Masquer les pouces Voir aussi pour SKEMA 6:
Table des Matières

Publicité

Les langues disponibles

Les langues disponibles

Liens rapides

97050180
r e v. 0 0 5
1 2 / 2 0 1 0
ITALIANO (Lingua originale) ..................................................................3
ENGLISH (translation from the original in Italian).............................77
FRANÇAIS (traduction de l'original en italien)................................151
DEUTSCH (Übersetzung aus dem Original in Italienisch)..............225
I
Gb
F
D

Publicité

Table des Matières
loading

Sommaire des Matières pour CASTELLINI SKEMA 6

  • Page 1 97050180 r e v. 0 0 5 1 2 / 2 0 1 0 ITALIANO (Lingua originale) ..............3 ENGLISH (translation from the original in Italian)......77 FRANÇAIS (traduction de l'original en italien)........151 DEUTSCH (Übersetzung aus dem Original in Italienisch)....225...
  • Page 3: Table Des Matières

    Comando a piede "a pressione" ........27 12. Dati tecnici ................72 5.2.3. Comando a piede "Power Pedal" ........28 12.1. Caratteristiche dimensionali SKEMA 6 RS ....73 5.3. Siringa ................30 12.2. Caratteristiche dimensionali SKEMA 6 CP ....74 5.4.
  • Page 4: Avvertenze Generali

    1.2. Uso previsto e modalità di impiego • Le unità operatorie della serie SKEMA linea 6, modello SKEMA 6 e SKEMA 6 CP sono apparecchiature ad uso medico destinate al trattamento odontoiatrico. • La tavoletta medico può essere equipaggiata con un massimo di 6 strumenti.
  • Page 5: Garanzia

    Il peso del complesso dentale compreso di paziente da 190Kg, è uguale c.a 350Kg/mq. • Il tecnico non autorizzato da CASTELLINI che procede a modifi care il prodotto sostituendo parti o componenti con altri diversi da quelli utilizzati dal costruttore, si assume una responsabilità analoga a quella del costruttore stesso.
  • Page 6: Pulizia E Disinfezione

    • Combinazione di etanolo e propanolo. Concentrazione: la combinazione dei due deve essere come massimo 40 g. per ogni 100 g. di disinfet- tante. CASTELLINI S.p.A. ha eseguito varie prove di compatibilità fra i principali disinfettanti sul mercato e i propri prodotti, i disinfettanti che sono risultati essere più idonei sono i seguenti: •...
  • Page 7: Descrizione Degli Apparecchi

    • Frequenza nominale. • Potenza massima assorbita. • Numero di serie. • Mese e anno di fabbricazione. 2.2. Riuniti I complessi odontoiatrici modello SKEMA 6 sono previsti nelle seguenti versioni: Versione RS. Tavoletta medico in versione RS (gli strumenti sono recuperati mediante un sistema di braccetti a molla) applicata su doppio braccio di cui uno articolato ed autobilanciato.
  • Page 8: Poltrona

    SKEMA 6 - ISTRUZIONI PER L'USO 2.3. Poltrona Descrizione delle varie parti. [ a ] Poggiatesta. [ b ] Schienale [ c ] Bracciolo sinistro mobile ( optional ). [ d ] Bracciolo destro mobile ( optional ). [ e ] Pedana di sicurezza.
  • Page 9: Dispositivi Di Sicurezza

    SKEMA 6 - ISTRUZIONI PER L'USO 4.1. Dispositivi di sicurezza L'apparecchiatura dispone dei seguenti dispositivi di sicurezza: • La pedana della poltrona è dotata di un dispositivo [ l ] che, in presenza di un ostacolo, blocca immediatamente il movimento di discesa della poltrona ed esegue un movimento automatico di risalita per liberare l'ostacolo.
  • Page 10: Funzionamento Tavoletta Medico

    SKEMA 6 - ISTRUZIONI PER L'USO 5. Funzionamento tavoletta medico Disposizione degli strumenti. La disposizione degli strumenti sulla tavoletta è defi nita dal cliente in fase di ordine. Attivazione degli strumenti. • La siringa è sempre attiva (vedi paragrafo 5.3.).
  • Page 11 SKEMA 6 - ISTRUZIONI PER L'USO Pulizia tavoletta medico. Per la pulizia della tavoletta medico utilizzare un prodotto idoneo, che sia stato provato effi cace contro batteri e funghi, ed ampiamente effi cace verso i virus (compresi HBV e HIV); vedere il paragrafo 1.4.
  • Page 12: Consolle Medico

    SKEMA 6 - ISTRUZIONI PER L'USO 5.1. Consolle medico Descrizione dei pulsanti: Pulsante richiamo/cambio menu. Pulsanti multifunzione. Pulsante di selezione rapida 100% dei valori impostabili. Pulsante di selezione rapida 50% dei valori impostabili. Pulsante di selezione rapida 1% dei valori impostabili.
  • Page 13: Interfaccia Utente

    SKEMA 6 - ISTRUZIONI PER L'USO Descrizione icone di segnalazione. Freno braccio a pantografo bloccato. Sistema S.S.S. attivo. Pompa peristaltica inserita. Serbatoio acqua distillata NON in pressione. Memorizzazione poltrona attivata. (Colore nero) Serbatoio acqua distillata in riserva ed attivo. Programma automatico 1 poltrona.
  • Page 14: Selezione Operatore

    SKEMA 6 - ISTRUZIONI PER L'USO 5.1.1.1. Selezione operatore La consolle dei complessi odontoiatrici modello SKEMA 6 consente di impostare 3 diversi operatori. I dati impostabili per ogni operatore sono i seguenti: • Nome dell’operatore. • Regolazione della potenza della turbina e del detartaratore.
  • Page 15: Regolazione Luminosità Display

    SKEMA 6 - ISTRUZIONI PER L'USO 5.1.1.2.1. Regolazione luminosità display Questa impostazione è unica per tutti gli operatori. Dal menu IMPOSTAZIONI GENERALI eseguire le seguenti operazioni: • Premere il pulsante MENU per scorrere le icone fi no a selezionare quella relativa a "Regolazione luminosità...
  • Page 16: Regolazione/Blocco Freno Braccio A Pantografo

    SKEMA 6 - ISTRUZIONI PER L'USO 5.1.1.2.3. Regolazione/blocco freno braccio a pantografo Questa impostazione è unica per tutti gli operatori. Dal menu IMPOSTAZIONI GENERALI eseguire le seguenti operazioni: • Premere il pulsante MENU per scorrere le icone fi no a selezionare quella relativa a "Regolazione freno braccio"...
  • Page 17: Inserimento Anagrafi Ca Operatore

    SKEMA 6 - ISTRUZIONI PER L'USO 5.1.1.2.4. Inserimento anagrafi ca operatore Dal menu IMPOSTAZIONI GENERALI eseguire le seguenti operazioni: • Premere il pulsante MENU per scorrere le icone fi no a selezionare quella relativa a "Inserimento anagrafi ca operatore" .
  • Page 18: Regolazione Ora E Data

    SKEMA 6 - ISTRUZIONI PER L'USO 5.1.1.2.6. Regolazione ora e data Questa impostazione è unica per tutti gli operatori. Dal menu IMPOSTAZIONI GENERALI eseguire le seguenti operazioni: • Premere il pulsante MENU per scorrere le icone fi no a selezionare quella relativa a "Regolazione ora e data".
  • Page 19: Impostazioni Sistemi Di Igiene

    SKEMA 6 - ISTRUZIONI PER L'USO 5.1.1.3. Impostazioni sistemi di igiene Dal menu principale eseguire le seguenti operazioni: • Premere il pulsante MENU per scorrere le icone fi no a selezionare quella relativa a "IMPOSTAZIONI SISTEMI DI IGIENE" . • Premere il pulsante muntifunzione OK per entrare nel sottomenu sele-...
  • Page 20: Impostazione Ciclo Time Flushing (Tf)

    SKEMA 6 - ISTRUZIONI PER L'USO 5.1.1.3.2. Impostazione ciclo Time Flushing (TF) NOTA: è possibile accedere a questo menu solo se presente il sistema Time Flushing. Questa impostazione è unica per tutti gli operatori. Dal menu IMPOSTAZIONI SISTEMI DI IGIENE eseguire le seguenti operazioni: •...
  • Page 21: Svuotamento Serbatoio Sistema M.w.b

    SKEMA 6 - ISTRUZIONI PER L'USO 5.1.1.3.3. Svuotamento serbatoio sistema M.W.B. NOTA: è possibile accedere a questo menu solo se presente il sistema M.W.B. Questa funzione permette di svuotare il circuito idrico del sistema M.W.B. (vedi paragrafo 7.3.) qualora il complesso odontoiatrico debba rimanere spento per molti giorni o qualora si desiderasse svuotare l’acqua presente...
  • Page 22: Impostazione Acqua Alla Bacinella

    SKEMA 6 - ISTRUZIONI PER L'USO 5.1.1.4.1. Impostazione acqua alla bacinella Questa impostazione è unica per tutti gli operatori. Dal menu IMPOSTAZIONI GRUPPO IDRICO eseguire le seguenti opera- zioni: • Premere il pulsante MENU per scorrere le icone fi no a selezionare quella relativa a "Impostazione acqua alla bacinella"...
  • Page 23: Impostazione Movimentazioni Automatiche Bacinella

    SKEMA 6 - ISTRUZIONI PER L'USO 5.1.1.4.3. Impostazione movimentazioni automatiche bacinella NOTA: è possibile accedere a questo menu solo con bacinella motorizzata. Questa impostazione è unica per tutti gli operatori. Dal menu IMPOSTAZIONI GRUPPO IDRICO eseguire le seguenti opera- zioni: •...
  • Page 24: Programmazione Delle Posizioni 1, 2, 3 E 4 Della Poltrona

    SKEMA 6 - ISTRUZIONI PER L'USO 5.1.3. Programmazione delle posizioni 1, 2, 3 e 4 della poltrona Questa impostazione è specifi ca per ogni operatore. Dalla videata principale eseguire le seguenti operazioni: • Regolare la poltrona nella posizione desiderata utilizzando i pulsanti di movimentazione manuale.
  • Page 25 2 = Inversione rotazione micromotore e modalità ENDO 3 = Modalità chirurgica Di seguito verrà schematizzato il funzionamento nelle varie confi gura- zioni. NOTA: la variazione di confi gurazione del comando a piede può essere eseguita solo da un Tecnico Autorizzato CASTELLINI.
  • Page 26 SKEMA 6 - ISTRUZIONI PER L'USO Movimenti poltrona ( strumenti riposti ) CONFIGURAZIONI AZIONAMENTO FUNZIONE Salita Discesa Salita schienale Discesa schienale Movimenti automatici poltrona ( strumenti riposti ) CONFIGURAZIONI AZIONAMENTO FUNZIONE G + A Richiamo posizione 1 G + B...
  • Page 27: Comando A Piede "A Pressione

    SKEMA 6 - ISTRUZIONI PER L'USO 5.2.2. Comando a piede "a pressione" Descrizione delle parti. 1 Maniglia. 2 Leva di comando. 3 Comando movimenti poltrona. 4 Comando Water Clean System /Ritorno automatico della poltrona. 5 Comando Chip-air/Richiamo posizione risciacquo paziente.
  • Page 28: Comando A Piede "Power Pedal

    SKEMA 6 - ISTRUZIONI PER L'USO Comando Chip-air ( 5 ). Funzionamento: Comando Chip-air: invia un getto di aria alla Turbina o al Micromotore. L'erogazione di aria avviene premendo il tasto; il getto di aria si interrompe quando il tasto viene rilasciato.
  • Page 29 SKEMA 6 - ISTRUZIONI PER L'USO Funzionamento comando movimenti poltrona ( 3 ). Controlla i seguenti movimenti: • salita sedile poltrona, • salita schienale poltrona, • discesa sedile poltrona, • discesa schienale poltrona. Per interrompere il movimento rilasciare il comando.
  • Page 30: Siringa

    SKEMA 6 - ISTRUZIONI PER L'USO 5.3. Siringa Descrizione dello strumento. [a] Beccuccio. [b] Impugnatura. [c] Pulsante smontaggio siringa. [d] Pulsante aria. [e] Pulsante acqua. [f] Selettore caldo/freddo. [g] LED segnalazione caldo freddo. ATTENZIONE! Lo strumento è fornito allo stato non sterile.
  • Page 31: Turbina

    SKEMA 6 - ISTRUZIONI PER L'USO 5.4. Turbina Collegamento manipolo e cambio della fresa. Fare riferimento alle specifi che istruzioni allegate al manipolo. Utilizzo. • Tempi di funzionamento: lavoro 5 min., riposo 5 min. • Portare lo strumento in posizione di lavoro.
  • Page 32: Micromotore Elettrico

    SKEMA 6 - ISTRUZIONI PER L'USO Pulizia e manutenzione. Fare riferimento alle specifi che istruzioni allegate al manipolo. Sterilizzazione. Autoclave a vapore d’acqua a 135°C (2 bar). Tempo minimo 15 min. ATTENZIONE! Prima di eseguire la fase di sterilizzazione consultare le specifi che istruzioni di uso allegate al manipolo.
  • Page 33 SKEMA 6 - ISTRUZIONI PER L'USO Accensione/spegnimento della fi bra ottica. • Portare lo strumento in posizione di lavoro. • Attivare la fi bra ottica premendo il pulsante NOTA: l’attivazione della fi bra ottica è segnalato sul display dall'icona ( A ).
  • Page 34: Modalità Di Funzionamento Conservative

    SKEMA 6 - ISTRUZIONI PER L'USO 5.5.1. Modalità di funzionamento CONSERVATIVE Menu con micromotore estratto ma non attivo. • Premendo il pulsante multifunzione di sinistra ( M1 ) si seleziona uno dei 4 programmi di lavoro disponibili. • Premendo il pulsante MENU è possibile modifi care la modalità di funziona- mento.
  • Page 35: Modalità Di Funzionamento Endo

    SKEMA 6 - ISTRUZIONI PER L'USO 5.5.2. Modalità di funzionamento ENDO Menu con micromotore estratto ma non attivo. • Premendo il pulsante multifunzione di sinistra ( M1 ) si seleziona uno dei 4 programmi di lavoro disponibili. • Premendo il pulsante MENU è possibile modifi care la modalità di funziona- mento.
  • Page 36: Modalità Di Funzionamento Surgery

    SKEMA 6 - ISTRUZIONI PER L'USO 5.5.3. Modalità di funzionamento SURGERY Menu con micromotore estratto ma non attivo. • Premendo il pulsante multifunzione di sinistra ( M1 ) si seleziona uno dei 4 programmi di lavoro disponibili. 20:1 • Premendo il pulsante MENU è possibile modifi care la modalità di funziona- mento.
  • Page 37: Menu Impostazione Rapporto Di Riduzione

    SKEMA 6 - ISTRUZIONI PER L'USO 5.5.4. Menu impostazione rapporto di riduzione Dal menu impostazioni di funzionamento, selezionando l'cona relativa a "Impostazione rapporto di riduzione" e premendo il pulsante multifunzione di destra ( ) è possibile entrare nel relativo sottomenu dove sono presenti...
  • Page 38: Detartaratore

    SKEMA 6 - ISTRUZIONI PER L'USO 5.6. Detartaratore Collegamento manipolo ed inserto. Fare riferimento alle specifi che istruzioni allegate al manipolo. ATTENZIONE! Prima di collegare il manipolo verifi care che i contatti siano perfettamente asciutti. Qualora fosse necessario, asciugarli con l'aria della siringa.
  • Page 39 SKEMA 6 - ISTRUZIONI PER L'USO Accensione/spegnimento della fi bra ottica. • Portare lo strumento in posizione di lavoro. • Attivare la fi bra ottica premendo il pulsante NOTA: l’attivazione della fi bra ottica è segnalato sul display dall'ico- na ( A ). Qualora il manipolo utilizzato non disponga della fi bra ottica, sul display verrà...
  • Page 40: Detartaratore Chirurgico Surgison 2

    • Il manipolo SURGISON 2 deve essere utilizzato esclusivamente con gli inserti forniti a corredo o altri inserti forniti dalla CASTELLINI S.p.A. o da essa, comunque, approvati. • Non modifi care la forma dell’inserto.
  • Page 41: Modalità Di Funzionamento Boost

    SKEMA 6 - ISTRUZIONI PER L'USO 5.6.1.2. Modalità di funzionamento BOOST Oltre alla vibrazione ultrasonica dell'l'inserto, viene eseguita una modulazione in ampiezza della potenza erogata (circa +40% della potenza impostata). Questa modulazione crea un effetto di percussione sull’osso favorendone l’incisione.
  • Page 42 SKEMA 6 - ISTRUZIONI PER L'USO Avvertenze generali di utilizzo. ATTENZIONE! • Il LED fonte di luce è una sorgente di classe 2 (Po < 1mW) secondo la norma IEC 60825-1. NON FISSARE IL FASCIO. La luce emessa può danneggiare gli occhi in caso di irradiazioni dirette senza protezione.
  • Page 43: Lampada Polimerizzante Leda

    SKEMA 6 - ISTRUZIONI PER L'USO 5.7. Lampada polimerizzante LEDA Caratteristiche tecniche. Tensione d’alimentazione : 24-36 Vdc Potenza max assorbita : 10,5 VA Sorgente luminosa : 1 Led da 5 W Lunghezza d’onda : 440÷480 nm Tempi impostabili : 20 – 40 – 60 sec.
  • Page 44: Telecamera Endorale C-U2 Pro

    SKEMA 6 - ISTRUZIONI PER L'USO 5.8. Telecamera endorale C-U2 PRO C-U2 è una telecamera intraorale progettata appositamente per un semplice utilizzo nell’esame dentale intraorale, con un manipolo estremamente leggero, controllo automatico dell’esposizione e fuoco variabile. E’ concepita per assistere il dentista nella comunicazione con il paziente, per spiegare e motivare il trattamento previsto e migliorare la consapevolezza del paziente.
  • Page 45 SKEMA 6 - ISTRUZIONI PER L'USO Funzione MIRROR. Premendo il pulsante è possibile passare dalla visione di immagini reali a quella di immagini speculari. Tale funzione è possibile solo in modalità LIVE. NOTA: l’attivazione di questa funzione è segnalata sul display da un’apposita icona ( B ).
  • Page 46 SKEMA 6 - ISTRUZIONI PER L'USO • In fase di visualizzazione (stato FREEZE): - Premendo il pulsante MENU ( ) si visualizzano in successione le 4 pagine disponibili. - Utilizzando i pulsanti AUMENTA e/o DIMINUISCI è possibile selezionare una delle 4 immagini presenti nella pagina visualizzata.
  • Page 47 SKEMA 6 - ISTRUZIONI PER L'USO Pannello di Controllo OSD. Questo menu permette di modifi care alcuni parametri di funzionamento della telecamera C-U2 PRO (vedi paragrafo 5.8.1) e viene visualizzato direttamente sullo schermo del monitor. Per accedere al Pannello di Controllo OSD è suffi ciente premere il pulsante di scelta rapida MIN.
  • Page 48: Pannello Di Controllo Osd (On Screen Display)

    SKEMA 6 - ISTRUZIONI PER L'USO 5.8.1. Pannello di Controllo OSD (On Screen Display). Questo menu a video permette di modifi care alcuni parametri di funzionamento del manipolo telecamera C-U2 PRO. Il menu a video scompare automaticamente se non si preme pedale o pulsante a sfi oramento per qualche secondo, o semplicemente riponendo nuovamente il manipolo.
  • Page 49: Laser Integrato L810

    SKEMA 6 - ISTRUZIONI PER L'USO 5.9. Laser integrato L810 Questo dispositivo è un laser a diodi per uso medicale. Utilizzo. • Tempi di funzionamento: 6 min. ON, 3 min. OFF. • Portare lo strumento in posizione di lavoro (sul display della tavoletta medico viene visualizzata la videata relativa all'estrazione del laser).
  • Page 50: Pompa Peristaltica

    Utilizzare guanti sterili monouso. ATTENZIONE! Verifi care l’integrità dell’imballaggio, nonché la scadenza della linea d’irrigazione. Solo i kit d’irrigazione CASTELLINI garantiscono un funzionamento privo di problemi. Queste linee sono sterili e mo- nouso, un eventuale riutilizzo può comportare la contaminazione microbiologica del paziente.
  • Page 51: Localizzatore Apicale Elettronico (Laec)

    SKEMA 6 - ISTRUZIONI PER L'USO Impostazione quantità di soluzione fi siologica erogata dalla pompa. • Per impostare quantità di soluzione fi siologica erogata dalla pompa occorre premere in maniera prolungata (almeno 2 secondi) il pulsante • Selezionare il valore relativo alla quantità desiderata utilizzando i pulsanti AUMENTA e/o DIMINUISCI.
  • Page 52 SKEMA 6 - ISTRUZIONI PER L'USO LAEC abbinato a micromotore elettrico. E' possibile usare il LAEC anche in abbinamento con il micromotore elettrico quando sui trova in modalità ENDO. Quando il LAEC è attivato, se si estrae il micromotore elettrico in modalità...
  • Page 53: Funzionamento Tavoletta Assistente

    SKEMA 6 - ISTRUZIONI PER L'USO Funzionamento tavoletta assistente Caratteristiche principali. • La tavoletta [ a ] è vincolata al gruppo idrico [ b ] per mezzo di due bracci snodati che ne consentono il posizionamento nella zona più consona all'operatore.
  • Page 54: Strumenti A Tavoletta Assistente

    L’aspiratore entra in funzione estraendo il tubo dal supporto. Per variare la potenza di aspirazione agire sulla leva [ a ] posta sull’impu- gnatura del terminale porta-cannula. Lo SKEMA 6 dispone del sistema V.D.S. che permette l'asciugatura della linea aspirazione utilizzando un ritardo automatico dell'arresto (2 secondi circa).
  • Page 55: Vassoio Portatray A Tavoletta Assistente

    SKEMA 6 - ISTRUZIONI PER L'USO 6.4. Vassoio portatray a tavoletta assistente Il vassoio portatray [ a ] è in acciaio inox e può essere agevolmente tolto dal relativo supporto. Il supporto vassoio può ruotare sia in senso orario che antiorario onde permettere il suo posizionamento nella zona più...
  • Page 56 SKEMA 6 - ISTRUZIONI PER L'USO Impostazione lavaggio bacinella. L’erogazione dell’acqua alla bacinella può avvenire in maniera temporizzata o manuale (erogazione ON/OFF tramite una breve pressione del relativo pulsante di comando). Per impostare il funzionamento desiderato ed il tempo di erogazione acqua vedere il paragrafo 5.1.1.4.1.
  • Page 57: Sistema S

    SKEMA 6 - ISTRUZIONI PER L'USO 7.2. Sistema S.S.S. Descrizione del sistema. Il sistema è dotato di un serbatoio [ a ] posto sotto all'idrico ed idoneo a contenere acqua distillata. Il serbatoio ha una capacità complessiva di 1,8 litri.
  • Page 58: Ciclo Di Disinfezione Manuale Con Acqua Ossigenata

    SKEMA 6 - ISTRUZIONI PER L'USO 7.2.1. Ciclo di disinfezione manuale con acqua ossigenata. Con il sistema S.S.S. è possibile eseguire un ciclo manuale di disinfezione con acqua ossigenata (perossido di idrogeno) delle condotte idriche di tutti gli strumenti posti sulla tavoletta medico e della siringa posta sulla tavoletta assistente.
  • Page 59: Sistema M.w.b

    SKEMA 6 - ISTRUZIONI PER L'USO 7.3. Sistema M.W.B. Il sistema M.W.B. garantisce una separazione sicura, in modo fi sico, del sistema idrico del complesso odontoiatrico dalla rete idrica pubblica, grazie ad un tratto a caduta libera dell'acqua. Inoltre il sistema realizza l'immissione in continuo nel circuito idrico di acqua ossigenata con una concentrazione fi...
  • Page 60: Sistema Automatico Di Disinfezione Autosteril

    SKEMA 6 - ISTRUZIONI PER L'USO 7.4. Sistema automatico di disinfezione AUTOSTERIL Descrizione del sistema. Questo sistema permette di eseguire un ciclo automatico di disinfezione dei circuiti idrici dei seguenti strumenti: • tutti gli strumenti posti sulla tavoletta medico, • la siringa e lo strumento posto sulla tavoletta assistente, •...
  • Page 61 SKEMA 6 - ISTRUZIONI PER L'USO Interruzione del ciclo di disinfezione. • Premendo il pulsante multifunzione STOP è possibile in ogni istante interrompere il ciclo di disinfezione. • Un messaggio di conferma compare sul display della consolle: - premendo il pulsante multifunzione ESC si rinuncia a bloccare la disin- fezione e si torna a visualizzare i menu del ciclo.
  • Page 62: Sistema S.h.d. Per Il Lavaggio Delle Cannule Di Aspirazione

    ATTENZIONE! Come liquido disinfettante utilizzare esclusivamente la soluzione diluita di STER 3 PLUS (Castellini). Per la quantità di disinfettante e la percentuale di soluzione si racco- manda di seguire le istruzioni allegate al prodotto. Come avviare il ciclo di lavaggio.
  • Page 63: Ciclo Automatico Time Flushing

    SKEMA 6 - ISTRUZIONI PER L'USO 7.6. Ciclo automatico TIME FLUSHING Descrizione del sistema. Il ciclo automatico TIME FLUSHING permette di eseguire un ciclo automa- tico di lavaggio per rinnovare l'acqua presente nelle condotte idriche degli strumenti posti sulla tavoletta medico e sulla tavoletta assistente.
  • Page 64: Apertura/Chiusura Carter Laterale Idrico

    SKEMA 6 - ISTRUZIONI PER L'USO 7.7. Apertura/chiusura carter laterale idrico Apertura carter: • sbloccare il carter laterale idrico [ a ] impugnando la maniglia [ h ] e sollevandola verso l'alto. • Aprire il carter ruotandolo verso l'esterno. Chusura carter: •...
  • Page 65: Negatoscopio Per Panoramiche

    SKEMA 6 - ISTRUZIONI PER L'USO 8.4. Negatoscopio per panoramiche Su tutte le tavolette medico versione CP può essere applicato un negato- scopio per radiografi e panoramiche. Le dimensioni dello schermo sono le seguenti: H=200mm, L=300mm. Per accendere il negatoscopio è suffi ciente agire sull'apposito interruttore [ a ]: = Negatoscopio acceso.
  • Page 66: Manutenzione

    CASTELLINI S.p.A., in qualità di costruttore di complessi odontoiatrici, suggerisce una verifi ca almeno ogni 24 mesi all’installazione e dopo ogni intervento di riparazione/aggiornamento a carico delle parti elettriche a cui è...
  • Page 67: Aspirazione Chirurgica

    ATTENZIONE! Come liquido disinfettante utilizzare esclusivamente la soluzione diluita di STER 3 PLUS (Castellini). Per la quantità di disinfettante e la percentuale di soluzione si racco- manda di seguire le istruzioni allegate al prodotto.
  • Page 68: Separatore Chirurgico Cattani

    SKEMA 6 - ISTRUZIONI PER L'USO 9.5. Separatore chirurgico CATTANI Al termine di ogni intervento di chirurgia. • Aspirare con ognuna delle cannule utilizzate circa mezzo litro di soluzione preparata con il disinfettante scelto. • Sterilizzare i terminali porta-cannula in autoclave a vapore d' acqua fi no a 135°...
  • Page 69: Pulizia Fi Ltro Aria Di Ritorno Turbina

    Per lo smaltimento dei contenitori a perdere pieni di amalgama atte- nersi alle Normative locali e nazionali. 9.9. Poltrona modello NEW SKEMA La poltrona NEW SKEMA non necessita di particolari operazioni di ma- nutenzione. Si consiglia tuttavia un controllo generale di funzionamento annuale da parte di un tecnico autorizzato CASTELLINI.
  • Page 70: Imballaggio

    SKEMA 6 - ISTRUZIONI PER L'USO 10. Imballaggio Dimensioni dell'imballaggio: Riunito: 1570 x 780 x 1230 (h). Peso massimo: 140 Kg. Poltrona: 1510 x 730 x 1000 (h). Peso massimo: 150 Kg. 10.1. Trasporto ed immagazzinamento Sull’ esterno dell’imballo in cartone sono riportate le indicazioni di imma- gazzinamento, di trasporto e quelle per il disimballo.
  • Page 71 SKEMA 6 - ISTRUZIONI PER L'USO Messaggi di avvertimento. M = Messaggio sul display consolle C = Causa R = Rimedio M: “Riserva H2O, riempire serbatoio” M: “Controllare cannule fi ltro, aspirazione” C: Malfunzionamento del ciclo di lavaggio cannule. C: Il livello del liquido presente nel serbatoio per l'alimentazione idrica indipendente è...
  • Page 72: Dati Tecnici

    SKEMA 6 - ISTRUZIONI PER L'USO 12. Dati tecnici Pianta di installazione: 97042072 Collegamento acqua: 1/2 Gas. Manuale tecnico: 97071123 Pressione alimentazione idrica: 3-5 bar. Catalogo ricambi unità operatoria: 97023067 Portata alimentazione idrica: 10 l/min Catalogo ricambi poltrona: 97023067 Consumo acqua: 2 l/min.
  • Page 73: Caratteristiche Dimensionali Skema 6 Rs

    SKEMA 6 - ISTRUZIONI PER L'USO 12.1. Caratteristiche dimensionali SKEMA 6 RS 1 9 10 2 4 5 0 4 0 0 1 7 0 53 0 8 0 0 3 1 0 18 0 1 8 9 0 1 7 0...
  • Page 74: Caratteristiche Dimensionali Skema 6 Cp

    SKEMA 6 - ISTRUZIONI PER L'USO 12.2. Caratteristiche dimensionali SKEMA 6 CP 191 0 24 50 1 70 5 30 8 00 3 10 1 80 18 90 17 0...
  • Page 75: Schema Generale Di Igiene E Manutenzione Del Complesso Odontoiatrico Skema 6

    SKEMA 6 - ISTRUZIONI PER L'USO 13. Schema generale di igiene e manutenzione del complesso odontoiatrico SKEMA 6 QUANDO CHE COSA COSA FARE PARAGRAFO DI RIFERIMENTO Eliminare la condensa dalle condotte Rubinetto scarico condensa. Vedi paragrafo 9.2. dell'aria. Disinfezione dei condotti idrici degli spray con Vedi paragrafo 7.2.1.
  • Page 76 SKEMA 6 - ISTRUZIONI PER L'USO Pulire con prodotto disinfettante idoneo atte- nendosi alle istruzioni del fabbricante. Cordoni strumento removibili. Spruzzare il prodotto su carta monouso Vedi paragrafo 5. morbida. Non impiegare prodotti abrasivi o acidi. Disinfezione dei condotti idrici degli spray con Vedi paragrafo 7.2.1.
  • Page 77 12.2. Overall dimensions: SKEMA 6 CP ....... 148 5.4. Turbine ................. 105 5.5. Micromotor ..............106 SKEMA 6 dental operatory disinfecting and maintenance plan 5.5.1 CONSERVATIVE operating mode ....... 108 5.5.2 ENDO operating mode ..........109 5.5.3 SURGERY operating mode ......... 110 5.5.4...
  • Page 78: Safety Guidelines

    19) DVGW mark (quality assurance kitemark regarding supply of drinking water). 1.2. Intended use • The SKEMA line 6, SKEMA 6 and SKEMA 6 CP model operatory units are medical devices intended for dental treatment. • The instrument board may hold up to 6 instruments.
  • Page 79: Warranty

    Depending on the type of chair the unit comes with, refer to the installation DATA given in paragraph "Specifi cations”. CASTELLINI S.p.A shall not be held liable for any personal injury or equipment damage resulting from failure to heed the precaution given above.
  • Page 80: Cleaning And Disinfecting

    • Combination of ethanole and propanole. Concentration: the combination of the two should be maximum 40 g per 100 g of disinfectant. CASTELLINI S.p.A. has conducted compatibility tests amongst the main disinfectants available on the market and its own products, the most suitable disinfectants are listed below: •...
  • Page 81: Description Of The Equipment

    • Serial number • Month and year of construction 2.2. Dental units Dental units SKEMA 6 are available in the following versions: RS version "RS” version instrument board (instruments will return to their original position through the pulling action of the spring-operated arms) attached to a double supporting arm, one of which is articulated while the other is autobalancing.
  • Page 82: Dental Chair

    The maximum chair capacity is 190 Kg. ATTENTION! Do not exceed this value. Note about biocompatibility. For skai upholstery, only CASTELLINI original spare parts must be used. 3. Turning on the dental operatory Use the main switch [ f ]: Equipment on:...
  • Page 83: Safety Devices

    SKEMA 6 - OPERATING INSTRUCTION 4.1. Safety devices The equipment is supplied with the following safety devices: • The fl oor box is equipped with a device [ l ] that immediately stops the dental chair from moving down in the presence of an obstacle and auto- matically lifts it up to free the obstacle.
  • Page 84: Instrument Board Operation

    SKEMA 6 - OPERATING INSTRUCTION 5. Instrument board operation Layout of instruments The positions the instruments are placed in on the board are determined by the customer at the time of order. Starting the instruments. • The syringe is always on (see paragraph 5.3.).
  • Page 85 SKEMA 6 - OPERATING INSTRUCTION Cleaning the instrument board Clean the instrument board; use a suitable product approved against bacteria and fungi and effective against viruses (including HBV and HIV); see paragraph 1.4. ATTENTION! Do not use acids or harsh cleaning products.
  • Page 86: Doctor's Control Console

    SKEMA 6 - OPERATING INSTRUCTION 5.1. Doctor’s control console Description of the buttons: Menu change/call up button. Multifunction button. Fast selection button, 100% of settable values Fast selection button, 50% of settable values Fast selection button, 1% of settable values...
  • Page 87: User Interface

    SKEMA 6 - OPERATING INSTRUCTION Description of the icons. Pantograph arm brake engaged S.S.S. system on. Peristaltic pump on Distilled water tank NOT pressurized. Dental chair storage activated. (Black) Distilled water tank in reserve and active Dental chair automatic program 1.
  • Page 88: Operator Selection

    SKEMA 6 - OPERATING INSTRUCTION 5.1.1.1. Operator selection The console of SKEMA 6 model dental units allows 3 different operators to be set. The information given below can be set for each user: • User name • Adjusting the power of the turbine and scaler.
  • Page 89: Adjusting The Display Brightness

    SKEMA 6 - OPERATING INSTRUCTION 5.1.1.2.1. Adjusting the display brightness This setting is used for all the operators. Perform the following steps from the GENERAL SETTINGS menu: • Press button MENU to scroll the icons and select the one for "Display brightness adjustment"...
  • Page 90: Adjusting/Engaging The Pantograph Arm's Brake

    SKEMA 6 - OPERATING INSTRUCTION 5.1.1.2.3. Adjusting/engaging the pantograph arm’s brake This setting is used for all the operators. Perform the following steps from the GENERAL SETTINGS menu: • Press button MENU to scroll the icons, selecting the one for "Adjusting the arm’s brake"...
  • Page 91: Entering The Operator's Personal Identifi Cation

    SKEMA 6 - OPERATING INSTRUCTION 5.1.1.2.4. Entering the operator’s personal identifi cation Perform the following steps from the GENERAL SETTINGS menu: • Press button MENU to scroll the icons, selecting the one for "Entering the operator’s personal identifi cation". • Press multifunction button OK to enter the selected submenu.
  • Page 92: Setting The Date And Time

    SKEMA 6 - OPERATING INSTRUCTION 5.1.1.2.6. Setting the date and time This setting is used for all the operators. Perform the following steps from the GENERAL SETTINGS menu: • Press button MENU to scroll the icons and select the one for "Date and time setting".
  • Page 93: Setting The Disinfecting Systems

    SKEMA 6 - OPERATING INSTRUCTION 5.1.1.3. Setting the disinfecting systems Perform the following operations from the main menu: • Press button MENU to scroll the icons, selecting the one for "DISINFEC- TING SYSTEM SETTINGS" . • Press multifunction button OK to enter the selected submenu that contains...
  • Page 94: Setting The Time Flushing Cycle (Tf)

    SKEMA 6 - OPERATING INSTRUCTION 5.1.1.3.2. Setting the Time Flushing cycle (TF) NOTE: this menu can be accessed only if the Time Flushing system is present. This setting is used for all the operators. Perform the following steps from the DISINFECTING SYSTEM SETTINGS menu: •...
  • Page 95: Emptying The M.w.b. System Tank

    SKEMA 6 - OPERATING INSTRUCTION 5.1.1.3.3. Emptying the M.W.B. system tank NOTE: this menu can be accessed only if the M.W.B. system is present. This function is used to empty the M.W.B. system’s water circuit (see pa- ragraph 7.3.) if the dental unit is not going to be used for several days or if you want to drain the water present in the system.
  • Page 96: Setting Water To Bowl

    SKEMA 6 - OPERATING INSTRUCTION 5.1.1.4.1. Setting water to bowl This setting is used for all the operators. Perform the following steps from the HYDROGROUP SETTINGS menu: • Press button MENU to scroll the icons, selecting the one for " Setting water to bowl"...
  • Page 97: Automatic Bowl Motion Settings

    SKEMA 6 - OPERATING INSTRUCTION 5.1.1.4.3. Automatic bowl motion settings NOTE: this menu can be accessed only if the powered bowl is present. This setting is used for all the operators. Perform the following steps from the HYDROGROUP SETTINGS menu: •...
  • Page 98: Setting Dental Chair Positions 1, 2, 3 And 4

    SKEMA 6 - OPERATING INSTRUCTION 5.1.3. Setting dental chair positions 1, 2, 3 and 4 This setting is specifi c for each operator. Perform the following operations from the main screen: • Bring the dental chair into the desired position with the manual movements buttons.
  • Page 99 [2] (bistable operation). Only a CASTELLINI authorized technician can set the foot control in this manner. NOTE: air is automatically blown at the end of work to eliminate any drops of liquid remaining in the spray ducts.
  • Page 100 SKEMA 6 - OPERATING INSTRUCTION Dental chair movements ( instruments in place ) CONFIGURATIONS ACTIVATION FUNCTION Down Back up Back down Automatic dental chair movements ( instruments in place ) CONFIGURATIONS ACTIVATION FUNCTION G + A Position 1 retrieval G + B...
  • Page 101: Push-Pedal" Foot Control

    SKEMA 6 - OPERATING INSTRUCTION 5.2.2. “Push-pedal” foot control Description of the parts. Handle. Control pedal. Dental chair movements. Water clean system/automatic dental chair return control. Chip-air/patient rinse position control. Operation with water spray LED. Control pedal (2). Operation: • Remove the instrument •...
  • Page 102: Power Pedal" Foot Control

    SKEMA 6 - OPERATING INSTRUCTION Chip-air control (5) Operation • Key held down (at least 2 seconds) with the instrument removed: Chip-air control. Delivers air to the turbine or micromotor. Air is delivered by pressing the button. Air is no longer blown when the button is released.
  • Page 103 SKEMA 6 - OPERATING INSTRUCTION Operation of command for dental chair movements ( 3 ). These buttons move the dental chair as follows: -Chair seat up -Chair back up -Chair seat down -Chair back down To stop movement, release the button.
  • Page 104: Syringe

    SKEMA 6 - OPERATING INSTRUCTION 5.3. Syringe Description of the instrument. [ a ] Nozzle. [ b ] Handpiece. [ c ] Syringe release button. [ d ] Air button. [ e ] Water button. [ f ] Hot/cold selector.
  • Page 105: Turbine

    SKEMA 6 - OPERATING INSTRUCTION 5.4. Turbine Connecting the handpiece and changing the chuck. Refer to the specifi c instructions furnished with the handpiece. Use. • Operating time: work 5 min., rest 5 min. • Place the instrument in its work position.
  • Page 106: Micromotor

    SKEMA 6 - OPERATING INSTRUCTION Removable cord The turbine has a removable cord to ease cleaning (see paragraph 5.). Cleaning and care. Refer to the specifi c instructions furnished with the handpiece. Disinfection. Autoclave with steam at 135°C (2 bar). Minimum time: 15 min.
  • Page 107 SKEMA 6 - OPERATING INSTRUCTION Turning the fi ber optic on/off. • Set the instrument to its work position. • Press the button to turn on the fi ber optic. NOTE: Icon ( A ) appears on the display to signal the fi ber optic has been turned on.
  • Page 108: Conservative Operating Mode

    SKEMA 6 - OPERATING INSTRUCTION 5.5.1 CONSERVATIVE operating mode Menu with micromotor withdrawn but not turned on. • Press the left multifunction button (M1) to select one of the 4 programs available. • Press the MENU button to change the operating mode: •...
  • Page 109: Endo Operating Mode

    SKEMA 6 - OPERATING INSTRUCTION 5.5.2 ENDO operating mode Menu with micromotor withdrawn but not turned on. • Press the left multifunction button (M1) to select one of the 4 programs available. • Press the MENU button to change the operating mode: •...
  • Page 110: Surgery Operating Mode

    SKEMA 6 - OPERATING INSTRUCTION 5.5.3 SURGERY operating mode Menu with micromotor withdrawn but not turned on. • Press the left multifunction button (M1) to select one of the 4 pro- grams available. 20:1 • Press the MENU button to change the operating mode: •...
  • Page 111: Reduction Ratio Setup Menu

    SKEMA 6 - OPERATING INSTRUCTION 5.5.4 Reduction ratio setup menu Select the icon for “Reduction ratio setting” on the menu used to set the operating data and press the right multifunction button ( ) to go to the submenu containing the following icons:...
  • Page 112: Scaler

    SKEMA 6 - OPERATING INSTRUCTION 5.6. Scaler Connecting the handpiece and inserts. Refer to the specifi c instructions furnished with the handpiece. ATTENTION! Before attempting to connect the handpiece, make certain the contacts are perfectly dry. Blow air from the syringe, if necessary, to dry.
  • Page 113 SKEMA 6 - OPERATING INSTRUCTION Turning the fi ber optic on/off. • Set the instrument to its work position. • Press the button to turn on the fi ber optic. NOTE: Icon ( A ) appears on the display to signal the fi ber optic has been turned on.
  • Page 114: Surgison 2 Surgical Detartarer Device

    • The SURGISON 2 handpiece must only be used with the bits supplied with the instrument or other bits supplied by CASTELLINI S.p.A. • Do not change the shape of the bit • The instrument is supplied in a non-sterile state.
  • Page 115: Boost Functioning Mode

    SKEMA 6 - OPERATING INSTRUCTION 5.6.1.2. BOOST functioning mode In addition to the ultrasonic vibration of the bit, a modulation with the amplitude of the generated power (approx. +40% of the set power) is performed. The modulation creates a percussion effect on the bone thereby making incision easier.
  • Page 116 SKEMA 6 - OPERATING INSTRUCTION Safety guidelines ATTENTION! • The LED is a class 2 source (Po < 1mW) in compliance with international standard IEC 60825-1. NEVER CONTINUOUSLY STARE INTO THE LASER SOURCE. The light emitted may cause eye damage in the event of direct radiation without eye protection.
  • Page 117: Leda Curing Light

    SKEMA 6 - OPERATING INSTRUCTION 5.7. LEDA curing light Technical specifi cations. Supply voltage: : 24-36 Vdc Max. power absorbed: : 10,5 VA Light source : 1 Led da 5 W Wave length : 440÷480 nm Settable times : 20 – 40 – 60 sec.
  • Page 118: C-U2 Pro Intraoral Camera System

    SKEMA 6 - OPERATING INSTRUCTION 5.8. C-U2 PRO intraoral camera system C-U2 PRO is an intraoral camera system specially designed for simple and well-conceived usability in examining the oral cavity complete with extremely lightweight handpiece, auto-exposure and variable focus features. This system is designed to facilitate dentist-patient communication, to show and explain to patients all oral conditions and reasons for planned treatment so that they more clearly understand it.
  • Page 119 SKEMA 6 - OPERATING INSTRUCTION “MIRROR” function. When real images are displayed, press the button to change over to mirror images. This function is possible only in LIVE mode. NOTE: The relevant icon (B) appears on the display to signal this function has been activated.
  • Page 120 SKEMA 6 - OPERATING INSTRUCTION • While displaying (FREEZE mode): - Press button MENU ( ) to view the 4 pages available one after the other. - Use buttons INCREASE and/or DECREASE to select one of the 4 images present on the page displayed.
  • Page 121 SKEMA 6 - OPERATING INSTRUCTION OSD control panel. This menu allows a number of handpiece C-U2 (see paragraph 5.8.1) operating parameters to be edited. It appears directly on the screen. Press fast selection button MIN to access the OSD control panel.
  • Page 122: Osd Control Panel (On Screen Display)

    SKEMA 6 - OPERATING INSTRUCTION 5.8.1. OSD control panel (On Screen Display) This menu allows the user to change some operating parameters of the C-U2 PRO handpiece. The menu displayed is automatically cleared if the foot control or touch key is not pressed for a few seconds or if the handpiece is put back in place.
  • Page 123: Integrated Laser L810

    SKEMA 6 - OPERATING INSTRUCTION 5.9. Integrated laser L810 This is a diode laser for medical use. Use. • Operating times: 6 min. ON, 3 min. OFF. • Place the instrument in its work position (the screen regarding laser ex- traction appears on the display of the instrument board).
  • Page 124: Peristaltic Pump

    WARNING! Check the condition of the packaging as well as the expiration date of the administration line. Only CASTELLINI administration kits guarantee proper trouble-free operation. These lines are sterile and disposable, reusing them may put patients at risk of microbiological contamination.
  • Page 125: Electronic Apex Locator (Laec)

    SKEMA 6 - OPERATING INSTRUCTION Setting the amount of saline solution delivered by the pump. • Hold down the button (at least 2 seconds) to set the amount of saline solution delivered by the pump. • Use the increase and/or decrease buttons to select the desired amount.
  • Page 126 SKEMA 6 - OPERATING INSTRUCTION LAEC combined with the electric micromotor. It is possible to use the LAEC together with the electric micromotor when operating in ENDO mode. When the LAEC is turned on, information about the micromotor and the LAEC (bar graph and APEX value) is displayed when the electric micromotor is withdrawn in ENDO mode.
  • Page 127: Assistant's Board Operation

    SKEMA 6 - OPERATING INSTRUCTION 6. Assistant’s board operation Main features: • Two articulated arms secure the board (a) to the hydrogroup (b) allowing it to be placed in the most convenient work position. The pantograph arm (e) allows the assistant’s board to be moved 335 mm vertically through 6 work positions.
  • Page 128: Instruments On Assistant's Board

    To adjust the suction power, use the slider [ a ] located on the tube han- dpiece. The SKEMA 6 comes with the V.D.S. system that allows the suction line to be dried using an automatic stop delay (about 2 seconds).
  • Page 129: Instrument Tray On Assistant's Board

    SKEMA 6 - OPERATING INSTRUCTION 6.4. Instrument tray on assistant’s board. The instrument tray [ e ] is constructed in stainless steel and can be conveniently taken off its support. The tray holder can be turned either clockwise or counter-clockwise, allowing it to be placed in the most con- venient position for the operator.
  • Page 130 SKEMA 6 - OPERATING INSTRUCTION Setting bowl fl ushing. Water can be delivered to the bowl either in manual (with the ON/OFF button) or timed. See paragraph 5.1.1.4.1 to set the desired mode of operation and water delivery time. Setting automatic bowl fl ushing.
  • Page 131: Distilled Water Tank System

    SKEMA 6 - OPERATING INSTRUCTION Distilled water tank system Description of the system The system is equipped with a tank ( a ), placed under the hydrogroup, that can contain distilled water. The tank can hold 1.8 liters. Distilled water is delivered to: •...
  • Page 132: Manual Disinfecting Cycle With Hydrogen Peroxide

    SKEMA 6 - OPERATING INSTRUCTION 7.2.1. Manual disinfecting cycle with hydrogen peroxide With the S.S.S. cycle it is possible to perform a manual disinfecting cycle with hydrogen peroxide for the water ducts of all the instruments found on the instrument board and the syringe on the assistant's board.
  • Page 133 SKEMA 6 - OPERATING INSTRUCTION 7.3. Continuous disinfecting system combined with the device for separation from potable water line to prevent backfl ow in com- pliance with European standard EN 1717 (M.W.B. system) The M.W.B. system assures secure physical separation of the dental unit hydrogroup from the municipal water line thanks to a section with free-fall water.
  • Page 134: Autosteril Automatic Disinfection System

    SKEMA 6 - OPERATING INSTRUCTION 7.4. AUTOSTERIL automatic disinfection system Description of the system. This system performs an automatic disinfection cycle for the water circuits of the following instruments: • all instruments found on the instrument board • the syringe and instrument placed on the assistant's board, •...
  • Page 135 SKEMA 6 - OPERATING INSTRUCTION Stopping the disinfection cycle. • Press multifunction button STOP to interrupt the disinfecting cycle at any time. • A confi rmation message will appear on the console display: - Press multifunction button ESC so that the disinfecting cycle is no longer stopped.
  • Page 136: System For Fl Ushing The Suction Tubes

    ATTENTION! Use only a diluted solution of STER 3 PLUS (Castellini) as the liquid disinfectant. As regards the amount of disinfectant and percentage of solution, follow the instructions enclosed with the product.
  • Page 137: Time Flushing Automatic Cycle

    SKEMA 6 - OPERATING INSTRUCTION 7.6. TIME FLUSHING automatic cycle Description of the system The automatic TIME FLUSHING cycle allows an automatic fl ushing cycle to be carried out to renew the water present in the water lines of the instruments found on the instrument board and assistant's board.
  • Page 138: Opening/Closing The Cover At The Side Of The Hydrogroup

    SKEMA 6 - OPERATING INSTRUCTION 7.7. Opening/closing the cover at the side of the hydrogroup Opening the cover: • Grasp the handle [ h ] and pull it up to unlock the cover [ a ] at the side of the hydrogroup.
  • Page 139: Viewer For Panoramic X-Rays

    SKEMA 6 - OPERATING INSTRUCTION 8.4. Viewer for panoramic x-rays A viewer for panoramic x-rays can be installed on all the CP version instru- ment boards. The dimensions of the screen are: H=200mm, L=300mm. Use the switch [ a ] to turn on the x-ray fi lm viewer: = X-ray fi...
  • Page 140: Maintenance

    In accordance with standard I.E.C. 62353, the safety checks specifi ed in the Technical care manual and Maintenance and warranty handbook sup- plied with the dental unit are to be carried out at the intervals required by current local regulations. If no precise indications are given, CASTELLINI S.p.A., the manufacturer of the dental units, recommends checking them at least every 24 months at the time of installation and whenever electrical...
  • Page 141: Surgical Suction

    Surgical suction must be cleaned and disinfected with a disinfectant formu- lated for this purpose. ATTENTION! Use only a diluted solution of STER 3 PLUS (Castellini) as a liquid disinfectant. As concerns the amount of disinfectant and percentage of solution follow the instructions provided with the product.
  • Page 142: Cattani Surgical Separator

    SKEMA 6 - OPERATING INSTRUCTION 9.5. CATTANI surgical separator At the end of each surgical procedure. • Suck in about half a liter of solution prepared with the selected disinfectant with each of the suction tubes used. • Sterilize the ends of the tube holder in autoclave with water steam at up to 135°C (2 bar), minimum time 15 min.
  • Page 143: Cleaning The Turbine Return Air Fi Lter

    When disposing one-time use containers full of amalgam, observe current local and national laws. 9.9. CASTELLINI dental chair model NEW SKEMA The dental chair NEW SKEMA does not need any special maintenance. In any case, operation should be checked by CASTELLINI authorized personnel once a year.
  • Page 144: Packing

    SKEMA 6 - OPERATING INSTRUCTION 10. Packing Packing dimensions. Dental unit: 1570 x 780 x 1230 h. Maximum weight: 140 kg. Dental chair: 1510 x 730 x 1000 h. Maximum weight: 150 kg. 10.1. Transport and storage Storage, transport and unpacking instructions are given on the outside of the carton.
  • Page 145 SKEMA 6 - OPERATING INSTRUCTION Fault messages M = Message shown on console display C = Cause R = Remedy M: “H2O level low, fi ll tank” R: Clear the obstacle and press the button for the desired program again.
  • Page 146: Specifi Cations

    SKEMA 6 - OPERATING INSTRUCTION 12. Specifi cations. Installation plan: 97042072 Water supply pressure: 3-5 bar Technical manual: 97071123 Water delivery rate: 10 l/min. Dental unit spare parts catalogue: 97023067 Water usage: 2 l/min. Dental chair spare parts catalogue: 97023067...
  • Page 147: Overall Dimensions: Skema 6 Rs

    SKEMA 6 - OPERATING INSTRUCTION 12.1. Overall dimensions: SKEMA 6 RS 1 9 10 2 4 5 0 4 0 0 1 7 0 53 0 8 0 0 3 1 0 18 0 1 8 9 0 1 7 0...
  • Page 148: Overall Dimensions: Skema 6 Cp

    SKEMA 6 - OPERATING INSTRUCTION 12.2. Overall dimensions: SKEMA 6 CP 191 0 24 50 1 70 5 30 8 00 3 10 1 80 18 90 17 0...
  • Page 149: Skema 6 Dental Operatory Disinfecting And Maintenance Plan

    SKEMA 6 - OPERATING INSTRUCTION 13. SKEMA 6 dental operatory disinfecting and maintenance plan WHEN PART WHAT TO DO SEE PARAGRAPH Condensate drain cock Drain condensate from air ducts See paragraph 9.2 Disinfect water ducts of sprays wih manual See paragraph 7.2.1 cycle (if the S.S.S.
  • Page 150 SKEMA 6 - OPERATING INSTRUCTION Clean with a suitable disinfectant carefully following the directions for use provided by Removable instrument cords. the manufacturer. Spray the product on soft See paragraph 5. disposable paper towels. Do not use acids or harsh products.
  • Page 151 Commande au pied ............172 12. Données techniques............220 5.2.1. Commande au pied "multifonctions " ......172 12.1. Caractéristiques de dimensions SKEMA 6 RS... 221 5.2.2. Commande au pied “à pression” ........175 12.2. Caractéristiques de dimensions SKEMA 6 CP.... 222 5.2.3.
  • Page 152: Remarques Générales

    1.2. Utilisation prévue et modalités d’utilisation • Les unités de soins de la série SKEMA ligne 6, modèles SKEMA 6 et SKEMA 6 CP sont des appareillages à usage médical et destinés au traitement dentaire. • La tablette praticien peut être équipée de 6 instruments au maximum.
  • Page 153: Garantie

    1,5 m. • Respect de la qualité de l’eau. Afi n de répondre aux pré-requis légaux médicaux et nationaux relatifs à l’eau provenant des units dentaires, CASTELLINI S.p.A conseille de doter l’ensemble dentaire d’une installation de désinfection.
  • Page 154: Nettoyage Et Désinfection

    • Combinaison de éthanol et propanol. Concentration: la combinaison des deux produits ne doit pas dépasser 40g pour 100g de désinfectant. CASTELLINI S.p.A. a réalisé ses propres tests de compatibilité entre les principaux désinfectants du marché avec les plastiques qu’elle utilise. Les produits qui se sont avérés les plus adaptés sont les suivants:...
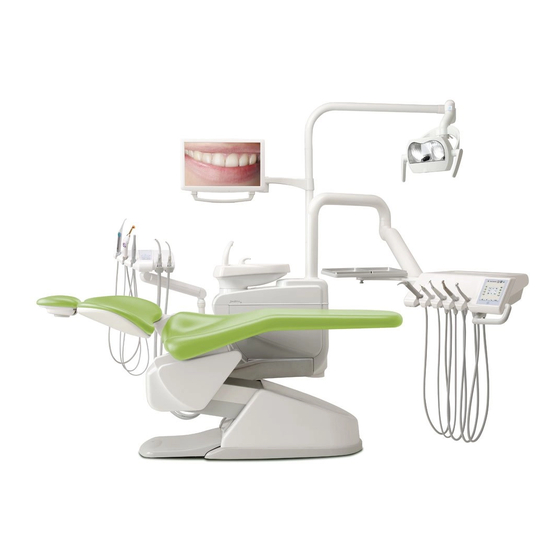
  • Page 155: Description Des Appareils

    • Numéro de série. • Mois et année de fabrication. 2.2. Units Les unités de travail SKEMA 6 sont prévues dans les versions suivantes: Version RS Tablette praticien en version "RS” (les instruments sont récupérés par l’intermédiaire d’un système de petits bras à ressort) installée sur double bras dont un est articulé...
  • Page 156: Fauteuil

    SKEMA 6 - INSTRUCTION DE SERVICE 2.3. Fauteuil Description fauteuil. [ a ] Têtière. [ b ] Dossier [ c ] Accoudoir gauche mobile (en option). [ d ] Accoudoir droit mobile (en option). [ e ] Embase de sécurité.
  • Page 157: Dispositifs De Sécurité

    SKEMA 6 - INSTRUCTION DE SERVICE 4.1. Dispositifs de sécurité L’appareillage dispose des dispositifs de sécurité suivants: • L’embase du fauteuil est dotée d’un dispositif [ l ] qui, en présence d’un obstacle, bloque immédiatement le mouvement de descente du fauteuil et effectue un mouvement automatique de remontée pour dégager l’ob-...
  • Page 158: Fonctionnement De La Tablette Praticien

    SKEMA 6 - INSTRUCTION DE SERVICE 5. Fonctionnement de la tablette praticien Disposition des instruments. La disposition des instruments sur la tablette est défi nie par le client lors de la commande. Activation des instruments. • La seringue est toujours active (voir paragraphe 5.3.).
  • Page 159 SKEMA 6 - INSTRUCTION DE SERVICE Nettoyage tablette praticien. En ce qui concerne le nettoyage de la tablette praticien utiliser un produit adapté, dont l'effi cacité contre les batteries et les champignons a été prou- vée et qui est largement effi cace contre les virus (HBV et HIV compris) ;...
  • Page 160: Instruction De Service

    SKEMA 6 - INSTRUCTION DE SERVICE 5.1. Console praticien Description des touches : Touche rappel/changement menu. Touches multifonctions. Touche de sélection rapide 100% des valeurs programmables. Touche de sélection rapide 50% des valeurs programmables. Touche de sélection rapide 1% des valeurs programmables.
  • Page 161: Interface Utilisateur

    SKEMA 6 - INSTRUCTION DE SERVICE Description icônes de signalisation. Frein bras à pantographe bloqué. Système S.S.S. activé. Pompe péristaltique insérée. Réservoir eau distillée PAS sous pression. Mémorisation fauteuil activée. (Couleur noir) Réservoir eau distillée en réserve et activé. Programme automatique 1 fauteuil.
  • Page 162: Sélection De L'opérateur

    SKEMA 6 - INSTRUCTION DE SERVICE 5.1.1.1. Sélection de l’opérateur La console des ensembles de soins dentaires modèle SKEMA 6 permet de programmer 3 opérateurs différents. Les données programmables pour chaque opérateur sont les suivantes : • Nom de l’opérateur.
  • Page 163: Réglage Luminosité Affi Cheur

    SKEMA 6 - INSTRUCTION DE SERVICE 5.1.1.2.1. Réglage luminosité affi cheur Ce paramétrage est unique pour tous les opérateurs. À partir du menu PARAMÉTRAGES GÉNÉRAUX, effectuer les opérations suivantes : • Frapper sur la touche MENU pour faire défi ler les icônes jusqu'à sélectionner celle relative à...
  • Page 164: Réglage/Blocage Frein Bras À Pantographe

    SKEMA 6 - INSTRUCTION DE SERVICE 5.1.1.2.3. Réglage/blocage frein bras à pantographe Ce paramétrage est unique pour tous les opérateurs. À partir du menu PARAMÉTRAGES GÉNÉRAUX effectuer les opérations suivantes : • Frapper sur la touche MENU pour faire défi ler les icônes jusqu'à sélectionner celle qui correspond au "Réglage frein bras".
  • Page 165: Introduction État Civil Opérateur

    SKEMA 6 - INSTRUCTION DE SERVICE 5.1.1.2.4. Introduction état civil opérateur À partir du menu PARAMÉTRAGES GÉNÉRAUX effectuer les opérations suivantes : • Frapper sur la touche MENU pour faire défi ler les icônes jusqu'à sélec- tionner celle qui correspond à "Introduction état civil opérateur" .
  • Page 166: Réglage Heure Et Date

    SKEMA 6 - INSTRUCTION DE SERVICE 5.1.1.2.6. Réglage heure et date Ce paramétrage est unique pour tous les opérateurs. À partir du menu PARAMÉTRAGES GÉNÉRAUX effectuer les opérations suivantes : • Frapper sur la touche MENU pour faire défi ler les icônes jusqu'à sélec- tionner celle relative à...
  • Page 167: Paramétrages Systèmes D'hygiène

    SKEMA 6 - INSTRUCTION DE SERVICE 5.1.1.3. Paramétrages systèmes d'hygiène À partir du menu principal effectuer les opérations suivantes : • Frapper sur la touche MENU pour faire défi ler les icônes jusqu'à sé- lectionner celle qui correspond au "PARAMÉTRAGES SYSTÈMES D'HYGIÈNE".
  • Page 168: Paramétrage Cycle Time Flushing (Tf)

    SKEMA 6 - INSTRUCTION DE SERVICE 5.1.1.3.2. Paramétrage cycle Time Flushing (TF) REMARQUE : il n'est possible d'accéder à ce sous-menu qu'en présence du système Time Flushing. Ce paramétrage est unique pour tous les opérateurs. À partir du menu PARAMÉTRAGES SYSTÈMES D'HYGIÈNE effectuer les opérations suivantes :...
  • Page 169: Vidage Réservoir Système M.w.b

    SKEMA 6 - INSTRUCTION DE SERVICE 5.1.1.3.3. Vidage réservoir système M.W.B. REMARQUE : il n'est possible d'accéder à ce sous-menu qu'en présence du système M.W.B. Cette fonction permet de vider le circuit hydrique du système M.W.B. (voir paragraphe 7.3.) dans le cas où l'ensemble de soins dentaires doit être éteint pendant plusieurs jours ou si l'on souhaite vider l’eau présente dans...
  • Page 170: Programmation Eau Au Crachoir

    SKEMA 6 - INSTRUCTION DE SERVICE 5.1.1.4.1. Programmation eau au crachoir Cette programmation est unique pour tous les opérateurs. À partir du menu PROGRAMMATIONS GROUPE HYDRIQUE, effectuer les opérations suivantes : • Frapper sur la touche MENU pour faire défi ler les icônes jusqu'à sélec- tionner cette qui est relative à...
  • Page 171: Paramétrages Actionnements Automatiques Du Crachoir

    SKEMA 6 - INSTRUCTION DE SERVICE 5.1.1.4.3. Paramétrages actionnements automatiques du crachoir REMARQUE : il n'est possible d'accéder à ce sous-menu qu'en présence du crachoir motorisé. Ce paramétrage est unique pour tous les opérateurs. À partir du menu PARAMÉTRAGES GROUPE HYDRIQUE effectuer les opérations suivantes :...
  • Page 172: Programmation Des Positions 1, 2, 3 Et 4 Du Fauteuil

    SKEMA 6 - INSTRUCTION DE SERVICE 5.1.3. Programmation des positions 1, 2, 3 et 4 du fauteuil Cette programmation est spécifi que à chaque opérateur. À partir de la page-écran principale, effectuer toutes les opérations sui- vantes : • Régler le fauteuil à la position souhaitée en utilisant les touches d’action- nement manuel.
  • Page 173 (fonctionnement bistable). Ce paramétrage de la pédale de commande peut exclusivement être réalisé par un Technicien Autorisé de la société CASTELLINI. REMARQUE : en fi n de travail, un souffl e d'air s'active automati- quement pour éliminer l'éventuelle goutte résiduelle de liquide présente dans les conduits des sprays.
  • Page 174: Instruction De Service

    SKEMA 6 - INSTRUCTION DE SERVICE Mouvements fauteuil (instruments reposés) CONFIGURATIONS ACTIONNEMENT FONCTION Montée Descente Montée dossier Descente dossier Mouvements automatiques fauteuil (instruments reposés) CONFIGURATIONS ACTIONNEMENT FONCTION G + A Rappel position 1 G + B Rappel position 3 G + C...
  • Page 175: Commande Au Pied "À Pression

    SKEMA 6 - INSTRUCTION DE SERVICE 5.2.2. Commande au pied “à pression” Description des parties. Poignée. Levier de commande. Commande mouvements fauteuil. Commande Water Clean System/Retour automatique du fauteuil. Commande Chip-air/Rappel position rinçage patient. LED signalisation fonctionnement avec eau spray.
  • Page 176: Commande Au Pied "Power Pedal

    SKEMA 6 - INSTRUCTION DE SERVICE Commande Chip-air ( 5 ). Fonctionnement: • Pression prolongée (au moins 2 secondes) de la touche avec instrument extrait : Commande Chip-air . Envoie un jet d’air à la Turbine ou au Micromoteur. L’envoi d’air se fait en frappant la touche ; lorsque la touche est relâchée, le jet d’air s’interrompt.
  • Page 177 SKEMA 6 - INSTRUCTION DE SERVICE Fonctionnement commande mouvement fauteuil ( 3 ). Contrôle les mouvements suivants: - Montée siège fauteuil. - Montée dossier fauteuil. - Descente siège fauteuil. - Descente dossier fauteuil. Pour interrompre le mouvement, relâcher la commande.
  • Page 178: Seringue

    SKEMA 6 - INSTRUCTION DE SERVICE 5.3. Seringue Description de l’instrument. [ a ] Bec. [ b ] Poignée. [ c ] Touche de démontage seringue. [ d ] touche de l’air. [ e ] Touche de l’eau. [ f ] Sélecteur chaud/froid.
  • Page 179: Turbine

    SKEMA 6 - INSTRUCTION DE SERVICE 5.4. Turbine Connexion pièce à la main et changement de la fraise. Se référer aux instructions spécifi ques fournies avec la pièce à la main. Utilisation. • Temps de fonctionnement : travail 5 min., repos 5 min.
  • Page 180: Micromoteur Électrique

    SKEMA 6 - INSTRUCTION DE SERVICE Cordon seringue extractible. La seringue est dotée d’un cordon extractible afi n de faciliter les opérations de nettoyage (voir paragraphe 5.). Nettoyage et entretien. Se référer aux instructions spécifi ques fournies avec la pièce à la main.
  • Page 181 SKEMA 6 - INSTRUCTION DE SERVICE Allumage/arrêt de la fi bre optique. • Mettre l’instrument en position de travail. • Activer la fi bre optique en frappant sur la touche. REMARQUE : l’activation de la fi bre optique est signalée sur l'affi cheur par l'icône ( A ).
  • Page 182: Modalité De Fonctionnement Conservative

    SKEMA 6 - INSTRUCTION DE SERVICE 5.5.1. Modalité de fonctionnement CONSERVATIVE Menu avec micromoteur extrait mais non activé. • En frappant sur la touche multifonctions de gauche ( M1 ) on sélectionne un des 4 pro- grammes de travail disponibles.
  • Page 183: Modalité De Fonctionnement Endo

    SKEMA 6 - INSTRUCTION DE SERVICE 5.5.2. Modalité de fonctionnement ENDO Menu avec micromoteur extrait mais non activé. • En frappant sur la touche multifonctions de gauche ( M1 ) on sélectionne un des 4 pro- grammes de travail disponibles.
  • Page 184: Modalité De Fonctionnement Surgery

    SKEMA 6 - INSTRUCTION DE SERVICE 5.5.3. Modalité de fonctionnement SURGERY Menu avec micromoteur extrait mais non activé. • En frappant sur la touche multifonctions de gauche ( M1 ) on sélectionne un des 4 programmes de travail disponibles. 20:1 •...
  • Page 185: Menu De Programmation Rapport De Réduction

    SKEMA 6 - INSTRUCTION DE SERVICE 5.5.4. Menu de programmation rapport de réduction À partir du menu Paramétrages de fonctionnement, en sélectionnant l'icône relative à "Programmation rapport de réduction" et en frappant sur la touche multifonctions de droite ( ) il est possible d'entrer dans le sous-menu cor- respondant dans lequel sont présentes les icônes suivantes :...
  • Page 186: Détartreur

    SKEMA 6 - INSTRUCTION DE SERVICE 5.6. Détartreur Raccordement pièce à la main et embout. Se référer aux instructions spécifi ques jointes à pièce à la main. ATTENTION! Avant de relier la pièce à la main, vérifi er que les contacts sont par- faitement secs.
  • Page 187 SKEMA 6 - INSTRUCTION DE SERVICE Allumage/arrêt de la fi bre optique. • Mettre l’instrument en position de travail. • Activer la fi bre optique en frappant sur la touche. REMARQUE : l’activation de la fi bre optique est signalée sur l'affi cheur par l'icône ( A ).
  • Page 188: Détartreur Chirurgical Surgison 2

    Contrôler que le liquide de refroidissement utilisé soit un modèle convenablement stérile. • La poignée SURGISON 2 doit être utilisée exclusivement avec les inserts fournis ou d'autres inserts CASTELLINI S.p.A. ou approuvés par celle-ci. • Ne pas modifi er la forme de l'insert.
  • Page 189: Instruction De Service

    SKEMA 6 - INSTRUCTION DE SERVICE 5.6.1.2. Modalité de fonctionnement BOOST En plus de la vibration ultrasonique de l'insert, une modulation de l'ampleur de la puissance distribuée est effectuée (environ 40% de la puissance pro- grammée). Cette modulation créée un effet de percussion sur l'os favorisant son incision.
  • Page 190 SKEMA 6 - INSTRUCTION DE SERVICE Avertissements généraux d’Utilisation. ATTENTION! • La DEL source de lumière est une source de classe 2 (Po < 1mW) d’après la norme IEC 60825-1. NE PAS FIXER LE FAISCEAU. La lumière émise peut blesser les yeux en cas d'irradiations directes sans protection.
  • Page 191: Lampe À Polymériser Leda

    SKEMA 6 - INSTRUCTION DE SERVICE 5.7. LAMPE À POLYMÉRISER LEDA Caractéristiques techniques. Tension d’alimentation : 24-36 Vdc Puissance max absorbée : 10,5 VA Source lumineuse : 1 Del de 5 W Longueur d’onde : 440 à 480 nm Temps programmables : 20 –...
  • Page 192: Caméra Intra-Orale C-U2 Pro

    SKEMA 6 - INSTRUCTION DE SERVICE 5.8. Caméra intra-orale C-U2 PRO C-U2 PRO est une caméra intra-orale conçue spécifi quement pour une utilisation simple lors de l’examen dentaire intra-oral, avec une pièce à main ex- trêmement légère, contrôle automatique de l’exposition et foyer variable. Elle a été conçue pour assister le dentiste au cours de la communication avec le patient, pour expliquer et justifi...
  • Page 193 SKEMA 6 - INSTRUCTION DE SERVICE Fonction “Mirror”. En frappant sur la touche il est possible de passer de l'affi chage d'images réelles à celui d'image spéculaires. Cette fonction n’est possible qu’en mode LIVE. REMARQUE : l’activation de cette fonction est signalée par l’apparition de l’icône correspondante ( B ) sur l’affi...
  • Page 194 SKEMA 6 - INSTRUCTION DE SERVICE • En phase de visualisation (état FREEZE) : - En frappant sur la touche MENU ( ) s'affi chent en succession les 4 pages disponibles. - En utilisant les touches AUGMENTE et/ou DIMINUE il est possible de sélectionner une des 4 images présentes dans la page visualisée.
  • Page 195 SKEMA 6 - INSTRUCTION DE SERVICE Panneau de Contrôle OSD. Ce menu permet de modifi er certains paramètres de fonctionnement de la la caméra C-U2 PRO (voir paragraphe 5.8.1) et est directement visualisé sur l’écran du moniteur. Pour accéder au tableau de contrôle OSD il suffi t de frapper sur la touche de sélection rapide MIN.
  • Page 196: Tableau De Contrôle Osd (On Screen Display)

    SKEMA 6 - INSTRUCTION DE SERVICE 5.8.1. Tableau de Contrôle OSD (On Screen Display) Ce menu à l’écran permet de modifi er certains paramètres de fonctionne- ment de la pièce à main C-U2 PRO. Le menu à l’écran disparaît automatiquement si l’on n’utilise pas la pédale de commande ou la touche à...
  • Page 197: Laser Intégré L810

    SKEMA 6 - INSTRUCTION DE SERVICE 5.9. Laser intégré L810 Ce dispositif laser est un laser à diodes pour usage médical. Utilisation. • Temps de fonctionnement : 6 min. ON, 3 min. OFF. • Mettre l'instrument en position de travail (sur l'affi cheur de la tablette pra- ticien, est visualisée la page-écran relative à...
  • Page 198: Pompe Péristaltique

    ATTENTION ! Vérifi er l'état de l’emballage ainsi que la date limite d'utilisation de la ligne d'irrigation. Seuls les kits d’irrigation CASTELLINI garantissent un fonctionnement exempt de problème. Ces lignes sont stériles et jetables, une éventuelle réutilisation peut entraîner la contamination microbiologique du patient.
  • Page 199: Localisateur D'apex Électronique (Laec)

    SKEMA 6 - INSTRUCTION DE SERVICE Programmation quantité de solution physiologique distribuée par la pompe. • Pour programmer la quantité de solution physiologique distribuée par la pompe il faut frapper de manière prolongée (au moins 2 secondes) sur la touche •...
  • Page 200 SKEMA 6 - INSTRUCTION DE SERVICE LAEC associé à micromoteur électrique. Il est possible d'utiliser le LAEC également en association avec le micro- moteur électrique quand il est en modalité ENDO. Quand le LAEC est activé, si l'on extrait le micromoteur électrique en mo- dalité...
  • Page 201: Fonctionnement Tablette Assistante

    SKEMA 6 - INSTRUCTION DE SERVICE 6. Fonctionnement tablette assistante Caractéristiques principales : • La tablette ( a ) est liée au groupe hydrique ( b ) au moyen de deux bras articulés qui en permettent le positionnement dans la zone la plus confortable pour l’opérateur.
  • Page 202: Instruments Sur Tablette Assistante

    Pour varier la puissance d'aspiration, agir sur le levier [ a ] placé sur la poignée du terminal porte-canule. Le SKEMA 6 dispose du système V.D.S. qui permet le séchage de la ligne d'aspiration en utilisant un retard automatique de l'arrêt (2 secondes environs).
  • Page 203: Plateau Porte-Tray Sur Tablette Assistante

    SKEMA 6 - INSTRUCTION DE SERVICE 6.4. Plateau porte-tray sur tablette assistante La tablette porte-plateau [ a ] est en acier inox et peut être facilement retiré de son support. Le support du plateau peut tourner aussi bien dans le sens des aiguilles de la montre que dans le sens contraire afi...
  • Page 204 SKEMA 6 - INSTRUCTION DE SERVICE Réglage lavage crachoir. L’envoi de l’eau au crachoir peut se faire de manière temporisée ou manuelle (envoi ON/OFF par la touche de commande correspondante). Pour programmer le fonctionnement souhaité et le temps d'envoi de l'eau, consulter le paragraphe 5.1.1.4.1.
  • Page 205: Système Avec Réservoir Eau Distillée

    SKEMA 6 - INSTRUCTION DE SERVICE 7.2. Système avec réservoir eau distillée Description du système. Le système SANASPRAY est doté d’un réservoir ( a ) placé sous le groupe hydrique et destiné à contenir de l’eau distillée. Le réservoir a une capacité totale de 1,8 litres.
  • Page 206: Cycle De Désinfection Manuel Avec Eau Oxygénée

    SKEMA 6 - INSTRUCTION DE SERVICE 7.2.1. Cycle de désinfection manuel avec eau oxygénée. Avec le système S.S.S. il est possible d'effectuer un cycle manuel de dé- sinfection avec de l'eau oxygénée (péroxyde d'hydrogène) des conduits hydriques de tous les instruments placés sur la tablette praticien et de la seringue placée sur la tablette assistante.
  • Page 207: Système M.w.b

    SKEMA 6 - INSTRUCTION DE SERVICE 7.3. Système d'hygiénisation en continu associé avec dispositif de sé- paration dans l'air du réseau hydrique conformément à la norme européenne EN 1717 (système M.W.B.). Le système M.W.B. garantit une séparation sûre, de manière physique, du sys- tème hydrique de l’ensemble odontologique du réseau hydrique public, grâce à...
  • Page 208: Système Automatique De Désinfection Autosteril

    SKEMA 6 - INSTRUCTION DE SERVICE 7.4. Système automatique de désinfection AUTOSTERIL Description du système. Ce système permet d’effectuer un cycle automatique de désinfection des conduits hydriques et des instruments suivants : • tous les instruments placés sur la tablette praticien, •...
  • Page 209 SKEMA 6 - INSTRUCTION DE SERVICE en position de travail. Interruption du cycle de désinfection. • En frappant sur la touche multifonctions STOP il est possible à tout moment, d'interrompre le cycle de désinfection. • Un message de confi rmation apparaît sur l'affi cheur de la console : - en frappant sur la touche multifonctions ESC on renonce à...
  • Page 210: Système S.h.d. Pour Le Lavage Des Canules D'aspiration

    ATTENTION ! Comme liquide désinfectant, utiliser exclusivement la solution diluée de STER 3 PLUS (Castellini). En ce qui concerne la quantité de désinfectant et le pourcentage de solution, il est recommandé de suivre les instructions jointes au produit.
  • Page 211: Cycle Automatique Time Flushing

    SKEMA 6 - INSTRUCTION DE SERVICE 7.6. Cycle automatique TIME FLUSHING Description du système. Le cycle automatique TIME FLUSHING permet d'effectuer un cycle automa- tique de lavage pour renouveler l'eau présente dans les conduits hydriques des instruments placés sur la tablette praticien et sur la tablette assistante.
  • Page 212: Instruction De Service

    SKEMA 6 - INSTRUCTION DE SERVICE 7.7. Ouverture/fermeture carter latéral hydrique Ouverture carter : • débloquer le carter latérale du groupe hydrique [ a ] en saisissant la poignée [ h ] et la soulever vers le haut. • Ouvrir le carter en le tournant vers l'extérieur.
  • Page 213: Négatoscope Pour Panoramiques

    SKEMA 6 - INSTRUCTION DE SERVICE 8.4. Négatoscope pour panoramiques Sur toutes les tablettes praticien version CP peut être installé un négatoscope pour radiographies panoramiques. Les dimensions de l'écran sont les suivantes : H=200mm, L=300mm. Pour allumer le négatoscope, il suffi t d'agir sur l'interrupteur correspondant [ a ] : = Négatoscope allumé.
  • Page 214: Entretien

    Entretien préventif. CASTELLINI S.p.A., en qualité de fabricant d’unités de soins dentaires, en accord aux réglementations du secteur I.E.C. 60601-1 Seconde Ed., I.E.C. 62353 et à la Directive MDD 93/42 et modifi cations ultérieures sur les dispositifs médicaux, préconise que les contrôles pour l’entretien préventif, spécifi és dans le Livret de Service Technique et dans le Livret de Garantie et d’Entretien joint à...
  • Page 215: Aspiration Chirurgicale

    ATTENTION ! Comme liquide désinfectant utiliser exclusivement la solution diluée de STER 3 PLUS (Castellini). En ce qui concerne la quantité de désinfectant et le pourcentage de solution, il est recommandé de respecter les instructions jointes avec le produit.
  • Page 216: Séparateur Chirurgical Cattani

    SKEMA 6 - INSTRUCTION DE SERVICE 9.5. Séparateur chirurgical CATTANI A la fi n de chaque intervention de chirurgie. • Aspirer avec chacune des canules utilisées environ un demi-litre de solution préparée avec le désinfectant choisi. • Stériliser les terminaux porte-canule en autoclave à la vapeur d’eau jusqu’à...
  • Page 217: Nettoyage Fi Ltre Air De Retour Turbine

    Normes locales et nationales. 9.9. Fauteuil modèle NEW SKEMA Le fauteuil NEW SKEMA ne nécessite aucune opération d’entretien par- ticulière. On conseille toutefois de procéder à un contrôle général de fonctionnement annuel qui sera effectué technicien autorisé CASTELLINI.
  • Page 218: Emballage

    SKEMA 6 - INSTRUCTION DE SERVICE 10. Emballage Dimensions de l’emballage. Unit: 1570 x 780 x 1230 [ h ]. Poids maximal: 140 Kg. Fauteuil: 1510 x 730 x 1000 [ h ]. Poids maximal: 150 Kg. 10.1. Transport et stockage Sur l’extérieur de l’emballage en carton sont reportées les indications de...
  • Page 219 SKEMA 6 - INSTRUCTION DE SERVICE Messages d'avertissement. M = Message sur l'affi cheur console C = Cause R = Solution M: “Réserve H2O, remplir réservoir” M: “Contrôler canules fi ltre, aspiration” C: Dysfonctionnement du cycle de lavage des canules.
  • Page 220: Données Techniques

    SKEMA 6 - INSTRUCTION DE SERVICE 12. Données techniques. Plan d’installation : 97042072 Pression alimentation hydrique : 3-5 bars Livret technique : 97071123 Débit alimentation hydrique : 10 l/min. Catalogue pièces de rechange unité 97023067 Consommation eau : 2 l/min.
  • Page 221: Caractéristiques De Dimensions Skema 6 Rs

    SKEMA 6 - INSTRUCTION DE SERVICE 12.1. Caractéristiques de dimensions SKEMA 6 RS. 1 9 10 2 4 5 0 4 0 0 1 7 0 53 0 8 0 0 3 1 0 18 0 1 8 9 0...
  • Page 222: Caractéristiques De Dimensions Skema 6 Cp

    SKEMA 6 - INSTRUCTION DE SERVICE 12.2. Caractéristiques de dimensions SKEMA 6 CP. 191 0 24 50 1 70 5 30 8 00 3 10 1 80 18 90 17 0...
  • Page 223: Schéma Général D'hygiène Et Entretien De L'ensemble De Soins Dentaires Skema 6

    SKEMA 6 - INSTRUCTION DE SERVICE 13. Schéma général d'hygiène et entretien de l'ensemble de soins dentaires SKEMA 6 QUAND QUOI FAIRE QUA FAIRE PARAGRAPHE DE REFERENCE Robinet vidage condensat. Éliminer le condensat des conduits de l'air. Voir paragraphe 9.2.
  • Page 224 SKEMA 6 - INSTRUCTION DE SERVICE Nettoyer avec du produit désinfectant adapté en respectant les instructions du fabriquant. Cordons de l’instrument ex- Pulvériser le produit sur un papier doux Voir paragraphe 5. tractibles. jetable. Ne pas utiliser de produits abrasifs ou acides.
  • Page 225 Notfalltaste ..............246 5.2. Fußpedalsteuerung ............246 12. Technische Daten..............294 5.2.1. „Multifunktions“-Fußpedalsteuerung ......246 12.1. Charakteristische Maße SKEMA 6 RS......295 5.2.2. „Druck“-Fußpedalsteuerung ......... 249 12.2. Charakteristische Maße SKEMA 6 CP....... 296 5.2.3. Fußpedalsteuerung "Power Pedal" ......250 5.3.
  • Page 226: Allgemeine Hinweise

    Trinkwassers bezieht). 1.2. Vorgesehener Gebrauch und Gebrauchshinweise • Bei den Behandlungseinheiten der Serie SKEMA Linie 6, Modell SKEMA 6 und SKEMA 6 CP, handelt es sich um Einrichtungen für den medizinischen Gebrauch, die für zahnärztliche Behandlungen bestimmt sind. • Die Arzteinheit kann mit maximal 6 Instrumenten ausgerüstet sein.
  • Page 227: Garantie

    Je nach dem Modell des Patientenstuhls, mit dem die Behandlungseinheit kombiniert ist, muss die diesbezüglich im Abschnitt "Technische Daten” ange- führte Installierungs-VORGABE herangezogen werden. CASTELLINI S.p.A lehnt jegliche Verantwortung für Sach- oder Personenschäden ab, wenn die hier angeführte Klausel nicht berücksichtigt wird. • Bedingungen des Fußbodens.
  • Page 228: Reinigung Und Desinfektion

    • Äthanol-/Propanol-Mischung. Konzentration: Die Kombination beider Stoffe darf maximal 40 g auf alle 100 g an Desinfektionsmittel aufweisen. CASTELLINI S.p.A. hat verschiedene Tests durchgeführt, die die Kompatibilität zwischen den wichtigsten auf dem Markt erhältlichen Desinfektionsmitteln und den eigenen Produkten betreffen. Die folgenden Desinfektionsmittel haben sich als am geeignetsten erwiesen: •...
  • Page 229: Beschreibung Der Geräte

    • Aufgenommene Höchstleistung • Seriennummer • Baumonat und Baujahr. 2.2. Behandlungseinheiten Für die Behandlungseinheiten SKEMA 6 liegen folgende Ausführungs- versionen vor: Version RS Arztplatte Version "RS” (die Instrumente werden durch ein Federarmsystem rückgeholt), an einem Doppelarm angebracht, von denen einer mit Gelenk versehen und selbstausgleichend ist.
  • Page 230: Patientenstuhl

    SKEMA 6 - GEBRAUCHSANWEISUNGEN 2.3. Patientenstuhl Beschreibung des Patientenstuhls. [ a ] Kopfstütze [ b ] Rückenlehne [ c ] Linke bewegliche Armlehne (optional). [ d ] Rechte bewegliche Armlehne (optional). [ e ] Sicherheitsplatte [ f ] Verstellbare Fußstütze.
  • Page 231: Sicherheitsvorrichtungen

    SKEMA 6 - GEBRAUCHSANWEISUNGEN 4.1. Sicherheitsvorrichtungen Die Einrichtung verfügt über die folgenden Sicherheitsvorrichtungen: • Das Trittbrett des Patientenstuhls ist mit einer Sicherheitsvorrichtung [ i ] ausgerüstet. Diese sorgt in Präsenz eines Hindernisses für die sofortige Blockierung der Abfahrtsbewegung des Patientenstuhls und für das au- tomatische Wiederauffahren, um das Hindernis freizugeben.
  • Page 232: Funktionsweise Arztplatte

    SKEMA 6 - GEBRAUCHSANWEISUNGEN 5. Funktionsweise Arztplatte Anordnung der Instrumente. Die Anordnung der Instrumente auf der Platte wird vom Kunden während der Bestellphase erteilt. Aktivierung der Instrumente. • Die Spritze ist stets aktiviert (siehe Abschnitt 5.3). • Die Polymerisationslampe schaltet sich ein, wenn die dafür vorgesehene Taste bei ausgezogenem Instrument gedrückt wird (siehe Abschnitt 5.7).
  • Page 233 SKEMA 6 - GEBRAUCHSANWEISUNGEN Reinigung Arztelement. Für die Reinigung des Arztelements muss ein geeignetes Produkt ver- wendet werden, dessen Wirksamkeit gegen Bakterie und Pilze erprobt wurde und das weitgehend wirksam gegen Viren ist (einschließlich HBV und HIV), siehe Abschnitt 1.4.
  • Page 234: Arztpult

    SKEMA 6 - GEBRAUCHSANWEISUNGEN 5.1. Arztpult Beschreibung der Tasten: Taste Menüaufruf/-wechsel. Multifunktionstaste. Schnellwahltaste 100% der eingebbaren Werte. Schnellwahltaste 50% der eingebbaren Werte. Schnellwahltaste 1% der eingebbaren Werte. Taste ERHÖHUNG: zum Erhöhen der eingegebenen Werte. Taste VERMINDERUNG: zum Vermindern der eingegebenen Werte.
  • Page 235: Benutzerschnittstelle

    SKEMA 6 - GEBRAUCHSANWEISUNGEN Beschreibung der Melde-Ikonen. S.S.S-System aktiviert. Bremse Pantographarm blockiert. Behälter destilliertes Wasser NICHT unter Druck. Schlauchpumpe eingeschaltet. (Schwarz) Behälter für destilliertes Wasser im Reservezustand Speicherung Patientenstuhl aktiviert und aktiviert. (Rot) Behälter für destilliertes Wasser im Reservezustand, aber Automatisches Programm 1 Patientenstuhl.
  • Page 236: Benutzerwahl

    SKEMA 6 - GEBRAUCHSANWEISUNGEN 5.1.1.1. Benutzerwahl Am Pult der zahnärztlichen Behandlungskomplexe Modell SKEMA 6 können 3 verschiedene Bediener eingegeben werden. Für jeden Benutzer lassen sich die folgenden Daten eingeben: • Name des Bedieners. • Leistungsregulierung der Turbine und des Zahnsteinentferners.
  • Page 237: Helligkeitseinstellung Display

    SKEMA 6 - GEBRAUCHSANWEISUNGEN 5.1.1.2.1. Helligkeitseinstellung Display Diese Einstellung ist für alle Bediener gleich. Über das Menü der GENERELLEN EINSTELLUNGEN lassen sich die folgenden Eingriffe vornehmen: • Die MENÜ-Taste drücken, um die Ikonen solange durchzugehen, bis die Ikone angewählt werden kann, die sich auf die "Helligkeitsregulierung des Displays"...
  • Page 238: Regulierung/Sperre Bremse Pantographarm

    SKEMA 6 - GEBRAUCHSANWEISUNGEN 5.1.1.2.3. Regulierung/Sperre Bremse Pantographarm Diese Einstellung ist für alle Bediener gleich. Über das Menü der GENERELLEN EINSTELLUNGEN lassen sich die folgenden Eingriffe vornehmen: • Die MENÜ-Taste drücken und die Ikonen solange durchgehen, bis man die Ikone, die sich auf die "Einstellung der Bremse des Arms" bezieht, anwählen kann.
  • Page 239: Eingabe Bediener-Stammdaten

    SKEMA 6 - GEBRAUCHSANWEISUNGEN 5.1.1.2.4. Eingabe Bediener-Stammdaten Über das Menü der GENERELLEN EINSTELLUNGEN lassen sich die folgen- den Eingriffe vornehmen: • Die MENÜ-Taste drücken und die Ikonen solange durchgehen, bis man die Ikone, die sich auf die "Eingabe der Bediener-Stammdaten" bezieht, anwählen kann.
  • Page 240: Einstellung Datum Und Uhrzeit

    SKEMA 6 - GEBRAUCHSANWEISUNGEN 5.1.1.2.6. Einstellung Datum und Uhrzeit Diese Einstellung ist für alle Bediener gleich. Über das Menü der GENERELLEN EINSTELLUNGEN lassen sich die folgenden Eingriffe vornehmen: • Die MENÜ-Taste drücken, um die Ikonen solange durchzugehen, bis die Ikone angewählt werden kann, die sich auf die "Einstellung von Datum und Uhrzeit"...
  • Page 241: Einstellungen Hygienesystem

    SKEMA 6 - GEBRAUCHSANWEISUNGEN 5.1.1.3. Einstellungen Hygienesystem Über das Hauptmenü lassen sich die folgenden Eingriffe vornehmen: • Die MENÜ-Taste drücken und die Ikonen solange durchgehen, bis man die Ikone, die sich auf die "EINSTELLUNGEN DES HYGIENESYSTEMS" bezieht, anwählen kann. • Die Multifunktionstest OK drücken, um Zugriff zum ausgewählten Untermenü...
  • Page 242 SKEMA 6 - GEBRAUCHSANWEISUNGEN 5.1.1.3.2. . Einstellung Time Flushing-Zyklus (TF) HINWEIS: Auf dieses Menü kann nur mit vorhandenem Time Flushing-System zugegriffen werden. Diese Einstellung ist für alle Bediener gleich. Über das Menü der EINSTELLUNGEN DES HYGIENESYSTEMS lassen sich die folgenden Eingriffe vornehmen: •...
  • Page 243: Entleerung Behälter M.w.b-System

    SKEMA 6 - GEBRAUCHSANWEISUNGEN 5.1.1.3.3. Entleerung Behälter M.W.B-System. HINWEIS: Auf dieses Menü kann nur mit vorhandenem M.W.B- System zugegriffen werden. Dieser Funktion kann der Wasserkreislauf des M.W.B-Systems entleert werden (siehe Abschnitt 7.3), wenn der zahnärztliche Behandlungskomplex über einige Tage hinweg nicht eingeschaltet wird oder wenn man das im System enthaltene Wasser ablassen möchte.
  • Page 244: Einstellung "Wasser Zum Mundspülbecken

    SKEMA 6 - GEBRAUCHSANWEISUNGEN 5.1.1.4.1. Einstellung "Wasser zum Mundspülbecken" Diese Einstellung ist für alle Bediener gleich. Über das Menü der EINSTELLUNGEN DER WASSEREINHEIT lassen sich die folgenden Eingriffe vornehmen: • Die MENÜ-Taste drücken und die Ikonen solange durchgehen, bis man die Ikone, die sich auf die "Einstellung Wasser zum Mundspülbecken"...
  • Page 245: Einstellungen Automatische Bewegungsabläufe Mundspülbecken

    SKEMA 6 - GEBRAUCHSANWEISUNGEN 5.1.1.4.3. Einstellungen automatische Bewegungsabläufe Mundspül- becken HINWEIS: Auf dieses Menü kann nur mit vorhandenem motorbe- triebenem Mundspülbecken zugegriffen werden. Diese Einstellung ist für alle Bediener gleich. Über das Menü der EINSTELLUNGEN DER WASSEREINHEIT lassen sich die folgenden Eingriffe vornehmen: •...
  • Page 246: Programmierung Der Positionen 1, 2, 3 Und 4 Des Patientenstuhls

    SKEMA 6 - GEBRAUCHSANWEISUNGEN 5.1.3. Programmierung der Positionen 1, 2, 3 und 4 des Patienten- stuhls Diese Eingabe ist spezifi sch auf den einzelnen Bediener bezogen. Von der Hauptanzeigeseite aus müssen folgende Schritte vorgenommen werden: • Den Patientenstuhl mit Hilfe der Tasten für die manuelle Bewegung in die gewünschte Stellung bringen.
  • Page 247 Spray-Wasser für das Instrument durch das Steuerelement [4] aktiviert bzw. deaktiviert wird, bevor man den Hebel [2] (bistabile Funktion) betätigt. Die Einstellung der Fußschaltung darf nur von einem autorisierten CASTELLINI- Techniker durchgeführt werden. HINWEIS: Nach Arbeitsende wird automatisch ein Luftstrahl aktiviert, um eventuell rückständige Flüssigkeitstropfen in den Sprayleitungen zu be-...
  • Page 248 SKEMA 6 - GEBRAUCHSANWEISUNGEN Patientenstuhlbewegungen (rückplatzierte Instrumente) KONFIGURATIONENI BETÄTIGUNG FUNKTION Aufwärtsbewegung Abwärtsbewegung Aufwärtsbewegung Rückenlehne Abwärtsbewegung Rückenlehne Automatische Bewegungen Patientenstuhl (rückplatzierte Instrumente) KONFIGURATIONENI BETÄTIGUNG FUNKTION G + A Aufruf Position 1 G + B Aufruf Position 3 G + C Aufruf Position 2...
  • Page 249: Druck"-Fußpedalsteuerung

    SKEMA 6 - GEBRAUCHSANWEISUNGEN 5.2.2. „Druck“-Fußpedalsteuerung Beschreibung der Teile. Griff. Steuerhebel. Steuerung Patientenstuhlbewegungen. Steuerung „Water Clean System“/automatische Patientenstuhlrück- stellung. Steuerung Chip-Air/Aufruf Spülposition Patient. LED Meldung Betrieb mit Spray-Wasser. Steuerhebel (2). Funktionsweise: • Das Instrument ausziehen. • Das Instrument durch Drücken des Pedals (a) einschalten.
  • Page 250: Fußpedalsteuerung "Power Pedal

    SKEMA 6 - GEBRAUCHSANWEISUNGEN „Chip-Air“-Steuerung (5). Funktionsweise: • Langanhaltendes Drücken (mindestens 2 Sekunden) der Taste mit au- sgezogenem Instrument „Chip-Air“-Steuerung. Schickt einen Luftstrahl zur Turbine oder zum Mikromotor. Die Luftabgabe fi ndet durch Drücken der Taste statt. Sobald die Taste wieder losgelassen wird, wird der Luftstrahl unterbrochen.
  • Page 251 SKEMA 6 - GEBRAUCHSANWEISUNGEN Funktionsweise Steuerung Patientenstuhlbewegungen ( 3 ). Folgende Bewegungen werden gesteuert: - Auffahrt Sitz Patientenstuhl - Auffahrt Rückenlehne Patientenstuhl - Abfahrt Sitz Patientenstuhl - Abfahrt Rückenlehne Patientenstuhl Zum Unterbrechen des Bewegungsablaufs, das Bedienelement loslassen. HINWEIS: Wenn ein Instrument aktiviert ist oder wenn das AUTOSTERIL -System in Funktion ist, sind alle Bewegungssteuerungen des Patientenstuhls blockiert.
  • Page 252: Spritze

    SKEMA 6 - GEBRAUCHSANWEISUNGEN 5.3. Spritze Beschreibung des Instruments. [ a ] Tülle. [ b ] Handgriff. [ c ] Taste Spritzenausbau. [ d ] Taste Luft. [ e ] Taste Wasser. [ f ] Wähler Kalt/Warm. [ g ] LED Kalt/Warm-Anzeige.
  • Page 253: Turbine

    SKEMA 6 - GEBRAUCHSANWEISUNGEN 5.4. Turbine Handstückanschluss und Fräsenwechsel. Siehe dazu die entsprechende Gebrauchsanleitung in Anlage an das Handstück. Gebrauch. • Funktionszeiten: 5 Minuten langer Betrieb; 5 Minuten Ruhezeit. • Das Instrument in Arbeitsstellung bringen. • Zum Starten des Instruments den Hebel der Fußpedalsteuerung betätigen (siehe Abschnitt 5.2).
  • Page 254: Elektrischer Mikromotor

    SKEMA 6 - GEBRAUCHSANWEISUNGEN Kabelstrang Spritze abnehmbar. Die Spritze ist mit einem abnehmnaren Kabelstrang ausgestattet, um die Reinigungsarbeiten zu erleichtern (siehe Abschnitt 5.). Reinigung und Wartung. Siehe dazu die entsprechende Gebrauchsanleitung in Anlage an das Handstück. Sterilisierung. Autoklav mit Wasserdampf bei 135°C (2 Bar). Mindestdauer: 15 Min.
  • Page 255 SKEMA 6 - GEBRAUCHSANWEISUNGEN Einschalten/Ausschalten der Optikfaser. • Das Instrument in Arbeitsstellung bringen. • • Die Optikfaser durch Drücken der Taste aktivieren. HINWEIS: Die Aktivierung der Optikfaser wird auf dem Display durch die Ikone ( A ) angezeigt. Regulierung der Lichtstärke der Optikfasern.
  • Page 256: Funktionsweise Conservative

    SKEMA 6 - GEBRAUCHSANWEISUNGEN 5.5.1 Funktionsweise CONSERVATIVE Menü mit ausgezogenem, aber nicht aktiviertem Mikromotor. • Durch Drücken der linken Multifunktionstaste (M1) kann eines der 4 zu Verfügung stehenden Arbeitsprogramme ausgewählt werden. • Durch Drücken der MENÜ-Taste kann die Funktionsweise geändert wer- den.
  • Page 257: Funktionsweise Endo

    SKEMA 6 - GEBRAUCHSANWEISUNGEN 5.5.2 Funktionsweise ENDO Menü mit ausgezogenem, aber nicht aktiviertem Mikromotor. • Durch Drücken der linken Multifunktionstaste (M1) kann eines der 4 zu Verfügung stehenden Arbeitsprogramme ausgewählt werden. • Durch Drücken der MENÜ-Taste kann die Funktionsweise geändert werden.
  • Page 258: Funktionsweise Surgery

    SKEMA 6 - GEBRAUCHSANWEISUNGEN 5.5.3 Funktionsweise SURGERY Menü mit ausgezogenem, aber nicht aktiviertem Mikromotor. • Durch Drücken der linken Multifunktionstaste (M1) kann eines der 4 zu Verfügung stehenden Arbeitsprogramme ausgewählt werden. 20:1 • Durch Drücken der MENÜ-Taste kann die Funktionsweise geändert werden.
  • Page 259: Eingabe-Menü Untersetzungsverhältnis

    SKEMA 6 - GEBRAUCHSANWEISUNGEN 5.5.4 Eingabe-Menü Untersetzungsverhältnis Wenn man im Menü der Funktionseinstellungen die Ikone auswählt, die sich auf die "Einstellung des Untersetzungsverhältnisses" bezieht, und die rechte Multifunktionstaste ( ) gedrückt wird, erhält man Zugriff auf das entsprechende Untermenü, das die folgenden Ikonen enthält: Angewandtes Untersetzungsverhältnis...
  • Page 260: Zahnsteinentferner

    SKEMA 6 - GEBRAUCHSANWEISUNGEN 5.6. Zahnsteinentferner Anschluss von Handstück und Einsatz. Siehe dazu die entsprechende Gebrauchsanleitung in Anlage an das Handstück. ACHTUNG! Vor dem Anschließen des Handstücks muss man sicherstellen, dass die Kontakte ganz trocken sind. Falls notwendig sind diese mit Luft der Spritze zu trocken.
  • Page 261 SKEMA 6 - GEBRAUCHSANWEISUNGEN Einschalten/Ausschalten der Optikfaser. • Das Instrument in Arbeitsstellung bringen. • • Die Optikfaser durch Drücken der Taste aktivieren. HINWEIS: Die Aktivierung der Optikfaser wird auf dem Display durch die Ikone ( A ) angezeigt. Wenn keine Optikfaser am verwendeten Handstück vorhanden ist, wird die Ikone (E) auf dem Display angezeigt.
  • Page 262: Chirurgisches Gerät Zur Entfernung Des Zahnsteins Surgison 2

    Sicherstellen, dass die eingesetzte Kühlfl üssigkeit steril und geeignet ist. • Das Handstück SURGISON 2 darf ausschließlich mit den mitgeliefer- ten Einsätzen oder mit anderen von CASTELLINI S.P.A zur Verfügung gestellten bzw. zugelassenen Einsätzen verwendet werden. • Die Form des Einsatzes nicht abändern.
  • Page 263: Boost Betrieb

    SKEMA 6 - GEBRAUCHSANWEISUNGEN 5.6.1.2. BOOST Betrieb Neben den Ultraschallschwingungen des Einsatzstückes wird eine Amplitudenmodulation der abgegebenen Leistung (ungefähr +40% der eingestellten Leistung) durchgeführt. Die Modulation erzeugt Schläge und so kann besser eingeschnitten werden. Es können 3 unterschiedliche Modulationen eingestellt werden, je nach Beschaffenheit des zu behandelnden Knochengewebes.
  • Page 264 SKEMA 6 - GEBRAUCHSANWEISUNGEN Allgemeine Gebrauchshinweise. ACHTUNG! • Bei der LED-Lichtquelle handelt es sich gemäß der IEC-Norm 60825-1 um eine Quelle der Klasse 2 (Po < 1mW). DAS LICHTBÜNDEL NICHTMIT DEN AUGEN FIXIEREN. Im Fall von direkten Bestrahlungen ohne Schutzmaßnahmen kann das ausgestrahlte Licht zu Schäden an den Augen führen.
  • Page 265: Polymerisationslampe Leda

    SKEMA 6 - GEBRAUCHSANWEISUNGEN 5.7. Polymerisationslampe LEDA Technische Eigenschaften. Speisespannung: 24-36 Vdc Max. Leistungsaufnahme: 10,5 VA Lichtquelle: 1 Led mit 5 W Wellenlänge: 440-480 nm Eingebbare Zeiten: 20 - 40 - 60 Sek. Akustische Signale:zu Beginn, alle 5 Sek. und am Ende des Arbeitsgangs.
  • Page 266: Endorale Kamera C-U2 Pro

    SKEMA 6 - GEBRAUCHSANWEISUNGEN 5.8. ENDORALE KAMERA C-U2 PRO Bei der C-U2 PRO handelt es sich um eine intraorale Kamera, die eigens für eine einfache Handhabung bei der zahnärztlichen intraoralen Untersuchung ent- worfen wurde und die mit einem extrem leichten Handstück sowie einer automatischen Kontrolle der Belichtung und einem variablen Brennpunkt ausgestattet ist.
  • Page 267 SKEMA 6 - GEBRAUCHSANWEISUNGEN “Mirror”-Funktion. Durch Drücken dieser Taste kann man von der richtigseitigen Ansicht der Bilder auf die spiegelbildliche Ansicht übergehen. Diese Funktionsweise ist nur in der “LIVE”-Modalität möglich. HINWEIS: Die Aktivierung dieser Funktion wird durch die dafür vorgesehene Ikone (B) auf dem Display angezeigt.
  • Page 268 SKEMA 6 - GEBRAUCHSANWEISUNGEN • Während der Anzeigephase (FREEZE-Zustand): - Durch Drücken der MENÜ-Taste ( ) werden die 4 verfügbaren Bilder nacheinander angezeigt. - Mit der Taste ZUNAHME und/oder ABNAHME kann eines der 4 auf der Seite angezeigten Bilder ausgewählt werden.
  • Page 269 SKEMA 6 - GEBRAUCHSANWEISUNGEN OSD-Steuertafel. Anhand dieses Menüs lassen sich einige Funktionsparameter die Kamera C-U2 (siehe Abschnitt 5.8.1) ändern. Das Menü wird direkt auf dem Bild- schirm des Monitors angezeigt. Um Zugriff auf die OSD-Bedientafel zu erhalten, muss einfach nur die Schnellwahltaste MIN gedrückt werden.
  • Page 270: Osd-Bedienpanel (On Screen Display)

    SKEMA 6 - GEBRAUCHSANWEISUNGEN 5.8.1. OSD-Bedienpanel (On Screen Display) Mit diesem auf dem Bildschirm angezeigten Menü lassen sich einige Funktionsparameter des Handstücks C-U2 PRO ändern. Wenn das Pedal oder die berührungssensitive Taste einige Sekunden lang nicht betätigt werden oder das Handstück wieder rückplatziert wird, verschwindet das Menü...
  • Page 271: Integrierter Laser L810

    SKEMA 6 - GEBRAUCHSANWEISUNGEN 5.9. Integrierter Laser L810 Bei diesem Gerät handelt es sich um einen Diodenlaser für medizinischen Gebrauch. Gebrauch. • Betriebszeiten: 6 Min. ON, 3 Min. OFF. • Das Instrument in Arbeitsposition bringen (auf dem Display der Arztplatte wird erscheint die Bildschirmanzeige, die sich auf das Ausziehen des Lasers bezieht).
  • Page 272: Schlauchpumpe

    ACHTUNG! Die einwandfreien und unbeschädigten Zustand sowie das Verfal- ldatum der Irrigationsleitung kontrollieren. Nur die Irrigationssets CASTELLINI gewährleisten eine einwandfreie und problemlose Funktionsweise. Diese sterilen Leitungen sind für einen Einwegge- brauch bestimmt. Eine eventuelle Wiederverwendung kann zu einer mikrobiologischen Kontamination des Patienten führen.
  • Page 273: Elektronischer Apex-Locator (Laec)

    SKEMA 6 - GEBRAUCHSANWEISUNGEN Eingabe der von der Pumpe abgegebenen Menge an physiologischer Kochsalzlösung. • Um die Menge der von der Pumpe abgegebenen Menge an physiologischer Kochsalzlösung einzugeben, muss lang anhaltend (mindestens 2 Sekunden lang) auf die Taste gedrückt werden.
  • Page 274 SKEMA 6 - GEBRAUCHSANWEISUNGEN LAEC in Kombination mit elektrischem Mikromotor. LAEC kann in der ENDO-Modalität auch in Kombination mit dem elektri- schen Mikromotor benutzt werden. Wenn man den elektrischen Mikromotor mit aktiviertem LAEC in der ENDO- Modalität herauszieht, erscheinen auf dem Display gleichzeitig sowohl die Informationen zum Mikromotor als auch die Informationen zum LAEC (Bargraph und APEX-Wert).
  • Page 275: Funktionsweise Helferinnenplatte

    SKEMA 6 - GEBRAUCHSANWEISUNGEN 6. Funktionsweise Helferinnenplatte. Haupteigenschaften: • Die Platte (a) ist über die beiden Gelenk-Ausleger, die ihre Positionierung in den jeweils günstigsten Arbeitsbereich ermöglichen, mit der Wassereinheit (b) verbunden. • Der Pantographarm (e) ermöglicht eine vertikal gerichtete Spannweite von 335 mm, die sich über 6 Arbeitspositionen erstreckt.
  • Page 276: Instrumente Am Helferinnenelement

    Zur Änderung der Saugleistung muss der Hebel [ a ] betätigt werden, der am Griff des Endstücks des Kanülenhalters angebracht ist. SKEMA 6 ist mit dem V.D.S-System zum Trocknen der Saugleitung ausgestattet, wobei das Anhalten automatisch verzögert wird (ca. 2 Se- kunden).
  • Page 277: Traytablett An Helferinnenelement

    SKEMA 6 - GEBRAUCHSANWEISUNGEN 6.4. Traytablett an Helferinnenelement Das Traytablett [ a ] besteht aus Edelstahl und lässt sich einfach und leicht aus der entsprechenden Halterung nehmen. Der Trayhalter kann sowohl im Uhrzeigersinn als auch gegen den Uhrzei- gersinn gedreht werden, damit sie vom Benutzer in dem Bereich positioniert werden kann, der sich am besten eignet.
  • Page 278 SKEMA 6 - GEBRAUCHSANWEISUNGEN Einstellung Beckenspülung. Die Wasserabgabe für das Becken kann auf zeitgesteuerte Weise oder auf manuelle Weise (Ausgabe ON/OFF anhand der entsprechenden Bedientaste) erfolgen. Zum Eingeben der gewünschten Funktionsweise und der Wasserabgabe- zeit, siehe Abschnitt 5.1.1.4.1. Einstellung der automatischen Beckenspülfunktion.
  • Page 279: System Mit Tank Von Distilliertem Wasser

    SKEMA 6 - GEBRAUCHSANWEISUNGEN System mit Tank von distilliertem Wasser Beschreibung des Systems. Das System ist mit einem Behälter ( a ) ausgestattet, der unter der Wasse- reinheit angebracht ist und sich für destilliertes Wasser eignet. Das Gesamtfassungsvermögen dieses Behälters beträgt 1,8 Liter.
  • Page 280: Manueller Desinfektionszyklus Mit Wasserstoffperoxyd

    SKEMA 6 - GEBRAUCHSANWEISUNGEN 7.2.1. Manueller Desinfektionszyklus mit Wasserstoffperoxyd Mit Hilfe des S.S.S-Systems kann ein manueller Desinfektionszyklus der Wasserleitungen aller am Arztelement angebrachten Instrumente und der am Helferinnenelement angebrachten Spritze mit Wasserstoffperoxyd vorgenommen werden. Zur Durchführung des Desinfektionszyklus ist wie folgt vorzuge- hen: A) Vorbereitung der desinfi...
  • Page 281: M.w.b-System

    SKEMA 6 - GEBRAUCHSANWEISUNGEN 7.3. System für kontinuierliche Hygienisierung in Kombination mit Luft- Trennung vom Wassernetz gemäß europäischer Vorschrift EN 1717 (M.W.B-System). Das M.W.B.-System gewährleistet dank eines Freifallbereichs des Wasser eine siche- re Trennung aus physikalischer Sicht zwischen dem Wasserversorgungssystem der zahnärztlichen Behandlungskomplexes und dem öffentlichen Leitungswassernetz.
  • Page 282: Automatisches Desinfektionssystem Autosteril

    SKEMA 6 - GEBRAUCHSANWEISUNGEN 7.4. Automatisches Desinfektionssystem AUTOSTERIL Beschreibung des Systems. Mit Hilfe dieses Systems kann ein automatischer Desinfektionszyklus an den Wasserkreisläufen der folgenden Instrumente ausgeführt werden. • alle an der Arztplatte angebrachten Instrumente, • der Spritze und des am Helferinnenelements platzierten Instruments, •...
  • Page 283 SKEMA 6 - GEBRAUCHSANWEISUNGEN - Einfüllen des Desinfektionsmittels und beginnende Zählung der zuvor als Verweildauer eingegebenen Zeit. - Nach Ablauf dieser Zeit wird eine neue Entleerungsphase der Leitungen mit Luft gestartet. - Reinigung der Leitungen mit Leitungswasser oder mit destilliertem Wasser (nur bei vorhandenem und aktiviertem unabhängigen S.S.S.
  • Page 284: S.h.d-System Für Die Saugkanülenreinigung

    SKEMA 6 - GEBRAUCHSANWEISUNGEN 7.5. S.H.D-System für die Saugkanülenreinigung. Beschreibung des Systems. Dieses System dient der Spülung, Reinigung und zur hygienischen Sau- berhaltung bzw. Desinfi zierung der Sauganlage. Es ist mit einem die Desinfektionsfl üssigkeit enthaltenden Behälter [ a ] und zwei Anschlüssen [ b ] ausgestattet, die für die Spülung der Absaugkanülen...
  • Page 285: Automatischer Time Flushing-Zyklus

    SKEMA 6 - GEBRAUCHSANWEISUNGEN 7.6. Automatischer TIME FLUSHING-Zyklus Beschreibung des Systems. Der automatische TIME FLUSHING-Zyklus ermöglicht die Durchführung eines automatischen Spülzyklus, um das Wasser zu erneuern, das in den Wasserleitungen der Instrumente an der Arztplatte und an der Helferinnen- platte enthalten ist.
  • Page 286: Öffnung/Schließung Seitliche Abdeckung Der Wassereinheit

    SKEMA 6 - GEBRAUCHSANWEISUNGEN 7.7. Öffnung/Schließung seitliche Abdeckung der Wassereinheit. Öffnen der Abdeckung: • Die seitliche Abdeckung der Wassereinheit [ a ] durch Ergreifen des Griffs [ h ] und Anheben nach oben ablösen. • Die Abdeckung durch Drehen nach oben öffnen.
  • Page 287: Negatoskop Für Panorama-Aufnahmen

    SKEMA 6 - GEBRAUCHSANWEISUNGEN 8.4. Negatoskop für Panorama-Aufnahmen Am Arztelement der Version CP kann ein Negatoskop für Panorama- Aufnahmen angebracht werden. Die Bildschirmmaße lauten wie folgt: H=200mm, L=300mm. Zum Einschalten des Negatoskops muss der dafür vorgesehene Schalter [ a ] betätigt werden: = Negatoskop eingeschaltet.
  • Page 288: Filter Chirurgisches Saugsystem

    Behandlungseinheit zu fi nden) beschriebenen Sicherheitskontrollen gemäß den durch die örtlich geltenden Vorschriften vorgegebenen Abstände durchgeführt werden. Sollten derartige Angaben bzw. Anweisungen nicht vorliegen, so rät Ihnen sie Firma CASTELLINI S.p.A. in ihrer Eigenschaft als Hersteller zahnärztlicher Behandlungseinheiten dazu, eine derartige Kontrolle zumindest alle 24 Monate durchzuführen zum Aufstellungszeitpunkt sowie nach jedem Instandsetzung- seingriff/jeder Abänderung zur Aktualisierung an den mit Netzstrom versorgten, elektrischen Teilen vorgenommen werden.
  • Page 289: Chirurgisches Saugsystem

    SKEMA 6 - GEBRAUCHSANWEISUNGEN 9.4. Chirurgisches Saugsystem Das chirurgische Absaugsystem muss mit einem Desinfektionsmittel gereinigt und desinfi ziert wird, dass für diesen Zweck geeignet ist. ACHTUNG! Als Desinfektionsmittel darf nur die verdünnte Lösung STER 3 PLUS (Castellini) verwendet werden. Angaben zur Menge an Desinfektionsmittel und zum Prozentanteil der Lösung müssen den Anleitungen entnommen werden, die dem...
  • Page 290: Chirurgischer Abscheider Cattani

    SKEMA 6 - GEBRAUCHSANWEISUNGEN 9.5. Chirurgischer Abscheider CATTANI Nach Abschluss eines jeden chirurgischen Eingriffs: • mit jeder verwendeten Kanüle ca. einen halben Liter der zuvor mit dem gewählten Desinfektionsmittel vorbereiteten Lösung ansaugen. • die Kanülenhalter-Endstücke im Autoklav mit Wasserdampf bei 135°C (2 Bar) sterilisieren, Mindestdauer 15 Min.
  • Page 291: Reinigung Filter Umluftsystem Turbine

    örtlichen und nationalen Vorschriften eingehalten werden. 9.9. Patientenstuhl Modell NEW SKEMA Für den Patientenstuhl NEW SKEMA sind keine besonderen Wartungs- maßnahmen erforderlich. Dennoch empfi ehlt es sich, einmal pro Jahr eine generelle Funktionskon- trolle von einem CASTELLINI-Fachtechniker ausführen zu lassen.
  • Page 292: Transport Und Einlagerung

    SKEMA 6 - GEBRAUCHSANWEISUNGEN 10. Verpackung Verpackungsmaße. Behandlungseinheit:1570 x 780 x 1230 [ h ]. Höchstgewicht: 140 Kg. Patientenstuhl:1510 x730 x 1000 [ h ]. Höchstgewicht: 150 kg. 10.1 Transport und Einlagerung Die Anweisungen für die Einlagerung, den Transport und für das Auspacken werden außen an der Pappverpackung dargestellt.
  • Page 293 SKEMA 6 - GEBRAUCHSANWEISUNGEN Hinweismeldungen. M = Meldung auf dem Pult-Display C = Ursache R = Abhilfe M: “Reservestand H2O, Behälter auffüllen” festgestellt, dass das Instrument ausgezogen ist. R: Sicherstellen, dass alle Instrumente korrekt in ihren Ablageplätzen C: Der Stand der im Behälter enthaltenen Flüssigkeit zur Versorgung der unabhängigen Wassereinheit ist unter den Mindeststand abge-...
  • Page 294 SKEMA 6 - GEBRAUCHSANWEISUNGEN 12. Technische Daten. Einbauplan 97042072 Wasseranschlussleitung. 1/2 Gas. Technisches Handbuch:: 97071123 Wasser-Förderdruck: 3-5 Bar Ersatzteilkatalog Behandlungseinheit: 97023067 Wasser-Förderleistung: 10 l/Min. Ersatzteilkatalog Patientenstuhl: 97023067 Wasserverbrauch: 2 l/Min. Höchstgewicht Behandlungseinheit: 90 kg Wasserhärte: 60 mg/l Behandlungseinheit zahnärztlicher 115 kg Ablass-Anschluss: ø40 mm...
  • Page 295 SKEMA 6 - GEBRAUCHSANWEISUNGEN 12.1. Charakteristische Maße SKEMA 6 RS. 1 9 10 2 4 5 0 4 0 0 1 7 0 53 0 8 0 0 3 1 0 18 0 1 8 9 0 1 7 0...
  • Page 296 SKEMA 6 - GEBRAUCHSANWEISUNGEN 12.2. Charakteristische Maße SKEMA 6 CP. 191 0 24 50 1 70 5 30 8 00 3 10 1 80 18 90 17 0...
  • Page 297 SKEMA 6 - GEBRAUCHSANWEISUNGEN 13. Hauptübersicht zu Hygiene und Wartung des zahnärztlichen Komplexes SKEMA 6 WANN WAS TUN? SIEHE ABSCHNITT Das Kondenswasser aus den Leitungen Hahn Kondenswasserablass. Siehe Abschnitt 9.2. entfernen. Desinfektion der Wasserleitungen der Sprays Spray-Leitungen. mit manuellem Zyklus (falls S.S.S-System Siehe Abschnitt 7.2.1.
  • Page 298 SKEMA 6 - GEBRAUCHSANWEISUNGEN Mit einem geeigneten Desinfektionsmittel reinigen und die Anleitungen des Herstellers einhalten. Ablösbare Instrumentensträn- Das Produkt auf weiches Einwegpapier auf- Siehe Abschnitt 5. sprühen. Keine abscheuernden oder säurehaltigen Produkte verwenden. Desinfektion der Wasserleitungen der Sprays mit manuellem Zyklus (falls S.S.S-System Siehe Abschnitt 7.2.1.

Table des Matières