Table des Matières

Publicité

Les langues disponibles
  • FR

Les langues disponibles

  • FRANÇAIS, page 58

Liens rapides

Fast Slow GO
the
BPR680/SPR680
EN
QUICK GUIDE
FR
GUIDE RAPIDE
IT
GUIDA RAPIDA
PT
MANUAL RÁPIDO
DE
KURZANLEITUNG
NL
SNELSTARTGIDS
ES
GUÍA RÁPIDA

Publicité

Table des Matières
loading

Sommaire des Matières pour Sage Fast Slow GO

  • Page 1 Fast Slow GO ™ BPR680/SPR680 QUICK GUIDE KURZANLEITUNG GUIDE RAPIDE SNELSTARTGIDS GUIDA RAPIDA GUÍA RÁPIDA MANUAL RÁPIDO...
  • Page 2: Table Des Matières

    IMPORTANT Contents SAFEGUARDS READ ALL INSTRUCTIONS Sage Recommends BEFORE USE AND SAVE Safety First FOR FUTURE REFERENCE Components • A downloadable version 10 Control Panel of this document 11 Food Presets is also available at 12 Cooking Presets sageappliances.com 13 Functions 23 Care &...
  • Page 3 result from inappropriate to more than half of its use of the pressure capacity. cooker. Make sure that the • The heating source cooker is properly closed necessary for cooking is before applying heat. included in the appliance. See “Pressure Cook” •...
  • Page 4 • Always insert the In particular, use a body connector end of the and a lid from Sage ® power cord into the indicated as being appliance inlet before compatible.
  • Page 5 • Do not place the • Do not operate the appliance near the appliance on a sink edge of a bench or table drain board. during operation. Ensure • Do not place the cooker that the surface is dry, on a stone bench top level, clean and free when it’s cooking.
  • Page 6 • Do not use a damaged IMPORTANT SAFEGUARDS removable cooking bowl. FOR ALL ELECTRICAL APPLIANCES Replace before using. • Do not use this appliance • Do not place food or if it is worn, has been liquid directly into the dropped or is damaged stainless-steel base.
  • Page 7 Sage sensory or mental Customer Service or go capabilities, or lack to sageappliances.com of experience and knowledge, if they have • The use of attachments been given supervision not sold or recommended or instruction concerning by Sage may cause fire, ®...
  • Page 8 SPECIFICATION current not exceeding 30mA be installed in the electrical circuit Model SPR680 Rated Volume 6 Litres supplying the appliance. Usable Volume 4 Litres See your electrician for Working Pressure 80kPa professional advice. Heating Source Electric Heating Element These specifications may change without prior To protect against notice.
  • Page 9: Components

    Components A. Pressure Release Valve F. Sealing Nut Automatically controls the rate at which G. 6L Removable Cooking Bowl steam is released from the cooker H. Lid Arm B. Pressure Safety Valve I. Easy Clean Moat C. Dishwasher Safe Removable Lid Catches condensation drips for D.
  • Page 10: Control Panel

    CONTROL PANEL SOUP STOCK MEAT STEW STEAM SAUTÉ | SEAR LEGUMES RICE | GRAINS RISOTTO YOGURT REDUCE SOUS VIDE DELAY START KEEP WARM PRESSURE SLOW NATURAL COOK COOK AUTO QUICK PULSE RELEASE A. Food Presets with light indicators J. Pressure release button with modes selection indicator B.
  • Page 11: Food Presets

    FOOD PRESETS SETTING: PRESSURE COOK FOOD MENU DEFAULT PRESET RANGE Soup 50 kPa - approx. 110°C 10 kPA – 80 kPa 30 MINS Up to 2:00 HRS AUTO QUICK Stock 80 kPa - approx. 116°C 10 kPA – 80 kPa 1 HOUR Up to 2:00 HRS AUTO QUICK...
  • Page 12: Cooking Presets

    YOGHURT Stage 1 Stage 2 Stage 3 Time: 8 – 16 HRS Scalding Cooling* Incubating Temp: n/a 10 MIN Up to 3 hours 8 hours Keep warm: n/a Temp: 83°C Temp: from 83°C to 43°C Temp: 43°C KEEP WARM OFF KEEP WARM OFF KEEP WARM OFF *Cool down time if the lid is open (for 2 litres of milk):...
  • Page 13: Functions

    Functions Pressure Release Valve Cover towards rear of cooker BEFORE FIRST USE 1. Remove and safely discard any packaging material, promotional labels and tape from the cooker. 2. Open the lid by turning the lid knob counter clockwise and lifting lid up and off the appliance until it is in the hinged open position.
  • Page 14 ✔ ✘ Yoghurt ✘ ✔ CONTROL PANEL SETTINGS The Fast Slow GO™ features 6 Cooking SIMPLE PRESET STEPS Preset Settings; Pressure Cook, Slow Cook, E.g. Reduce, Sauté/Sear, Steam and Sous Vide. It also features 8 Food Presets: Soup, Stock, SOUP Meat, Stew, Legumes, Rice/Grains, Risotto and Yoghurt.
  • Page 15 • Refer to ‘Food Presets’ and ‘Cooking 6. Close the lid and turn the lid knob Presets’ section for preset settings clockwise to lock into place. The cooker recommendations. alert will sound when the lid has been locked. • If there is no visible light on any of the food preset indicators, then the product is in 7.
  • Page 16 The steam release setting can be changed during RELEASE the steam release cycle by pressing The Fast Slow GO™ features 3 steam the STEAM RELEASE button. release methods: 14. At the end of the steam release cycle,...
  • Page 17 Any changes to the steam release mode may 8. Press the START button to commence lead to food spillage. cooking. The START/CANCEL button will illuminate orange. 9. The timer will be displayed and CAUTION automatically begin to count down. The time can be adjusted during the slow cook Always keep hands and face clear of the cycle by pressing the TIME (+/-) button.
  • Page 18 or SEAR setting and allow the water to come Stew to a simmer before pressure cooking. • The PRESSURE & SLOW COOK STEW setting is ideal for cooking ground meat, • Do not overfill the cooking bowl. The total meat sauces and hearty stews. volume of soup should not exceed the ‘MAX’...
  • Page 19 The SEAR setting is designed to enhance and to the cooking table for rice/grains and deepen the taste of meals by using the same legumes on the Sage webpage for more cooking bowl for caramelizing and browning information. foods before pressure or slow cooking.
  • Page 20 SOUS VIDE SOUS VIDE steps: 1. Fill cooking bowl with cool water until The SOUS VIDE setting is ideal for cooking it has reached the MAX line. food to a very precise temperature in To reduce preheat time, start with water a water bath.
  • Page 21 YOGHURT STEP 3 – Incubate the Yoghurt At the end of STEP 2, the word ‘ADD’ will How to use the yoghurt appear in the cooker screen. Place the shortcut auto program yoghurt starter in a bowl. Add ½ cup (125ml) of the cooled milk and whisk until smooth.
  • Page 22 DELAY START In order to maintain consistent cooking results The Fast Slow GO™ has a timer function to at various altitudes, the Fast Slow GO™ has delay the start of cooking for up to 24 hours.
  • Page 23: Care & Cleaning

    • Replace silicone rubber gasket every • Do not immerse metal base or power cord 1–2 years (see your nearest Sage Service in water or any other liquid as they may Centre). cause electrocution.
  • Page 24 WARNING If the silicone rubber gasket is not fitted correctly into the holder, the lid will not seal properly. This may cause the appliance to malfunction and leak steam or hot liquid which can cause burns or scalding. A mixture of ½ cup (125ml) lemon juice, 1 tablespoon lemon rind plus 500ml hot water cooked at HIGH pressure for 5 minutes can help eliminate food odours.
  • Page 25: Troubleshooting

    • The screen will display “Err” when there is a non-resettable issue with the appliance. Should this occur, immediately remove the power cord from the power outlet and contact Sage Consumer Support. Factory Reset • Press and hold 'soup' and 'sous vide' buttons for three seconds to...
  • Page 26: Guarantee

    2 years from the date of purchase against defects caused by faulty workmanship and materials. During this guarantee period Sage Appliances will repair, replace, or refund any defective product (at the sole discretion of Sage Appliances).
  • Page 27 Fast Slow GO ™ BPR680/SPR680 KURZANLEITUNG...
  • Page 28: Wichtige Sicherheitshinweise

    WICHTIGE Inhalt SICHERHEITS- HINWEISE Bei Sage steht Sicherheit an BITTE ALLE erster Stelle ANWEISUNGEN VOR 11 Komponenten GEBRAUCH LESEN 12 Bedienfeld UND ZUM SPÄTEREN 13 Voreinstellungen NACHSCHLAGEN 14 Kochfunktionen AUFBEWAHREN 15 Funktionen 27 Pflege und Reinigung • Dieses Dokument 29 Störungsbehebung ist unter sage­...
  • Page 29 • Der Behälter darf erst WARNUNG geöffnet werden, sobald Verwenden Sie den der Innendruck ausrei­ Schnellkochtopf aus­ chend gesunken ist. schließlich für seinen • Verwenden Sei den Bestimmungszweck. Schnellkochtopf niemals Dieses Gerät steht ohne Wasser, da dies während des Koch­ das Gerät ernsthaft vorgangs unter Druck.
  • Page 30 ® schleudert werden. Besonders das Gehäuse Lassen Sie erst den und der Deckel sollten stammen Dampf entweichen von Sage ® und schütteln Sie und kompatibel sein. danach den Kochtopf • Bitte vergewissern Sie sanft. Lassen Sie den sich vor dem ersten...
  • Page 31 Aufkleber vor der • Fassen Sie heiße Inbetriebnahme. Oberflächen nicht an. Die Oberflächen des • Entfernen und entsorgen Gerätes sind während Sie die am Netzstecker des und nach dem dieses Gerätes ange­ Betrieb heiß. Verwenden brachte Schutzhülle, da Sie zum Vermeiden von diese eine Erstickungs­...
  • Page 32 Oberfläche. Platzieren • Platzieren Sie keine Sie das Gerät nicht auf Gegenstände, außer einer mit Stoff bedeckten dem Deckel, auf dem Oberfläche und stets mit zusammengebauten einem Mindestabstand Kochtopf, während Sie von 20 cm zu Wänden, diesen nutzen oder Vorhängen, Stoffen und lagern.
  • Page 33 Kochschüssel ist dafür WICHTIGE SICHERHEITS­ HINWEISE FÜR ALLE konzipiert, Lebensmittel ELEKTRISCHEN GERÄTE und Flüssigkeiten zu halten. • Verwenden Sie dieses Gerät nicht, wenn es • Überprüfen Sie das abgenutzt, fallen Druckabgabeventil gelassen oder in und den Sicherheitsver­ irgendeiner Weise riegelungsstift auf beschädigt wurde.
  • Page 34 Geräts eingewiesen wurden und die damit • Die Verwendung von verbundenen Gefahren Zubehörteilen, die nicht verstehen. vertrieben von Sage ® oder empfohlen werden, • Das Gerät ist kein kann zu Bränden, Spielzeug für Kinder. Stromschlägen oder • Reinigung und Wartung Verletzungen führen.
  • Page 35 das Gerät nicht in sich Schützen Sie sich bewegenden Fahr­ vor Stromschlägen, zeugen oder Booten. indem Sie das Netzkabel, Verwenden Sie das den Netzstecker und das Gerät nicht im Freien. Gerät nicht in Wasser Fehlgebrauch kann zu oder andere Flüssigkeiten Verletzungen führen.
  • Page 36: Technische Daten

    TECHNISCHE DATEN Modell SPR680 Nennvolumen 6 Liter Nutzbares Volumen 4 Liter Arbeitsdruck 80 kPa Hitzequelle Elektrisches Heizelement Diese Angaben können sich ohne vorherige Ankündigung ändern. NUR FÜR DEN HAUSGEBRAUCH BESTIMMT. BEWAHREN SIE DIESE BEDIENUNGSANLEITUNG AUF...
  • Page 37: Komponenten

    Komponenten A. Druckabgabeventil F. Dichtungsmutter Regelt automatisch die Geschwindigkeit, G. Herausnehmbare 6­L­Kochschüssel mit der Dampf aus dem Kochtopf H. Deckelarm entlassen wird. I. Leicht zu reinigende Rinne B. Sicherheitsventil Fängt Kondenswasser auf und ermöglicht C. Spülmaschinenfester abnehmbarer eine mühelose Reinigung. Deckel J.
  • Page 38: Bedienfeld

    BEDIENFELD SOUP STOCK MEAT STEW STEAM SAUTÉ | SEAR LEGUMES RICE | GRAINS RISOTTO YOGURT REDUCE SOUS VIDE DELAY START KEEP WARM PRESSURE SLOW NATURAL COOK COOK AUTO QUICK PULSE RELEASE A. Voreinstellungen mit Anzeigelampen J. DAMPFABGABE­Taste mit Modusauswahl­ Anzeige B.
  • Page 39: Voreinstellungen

    VOREINSTELLUNGEN EINSTELLUNG: SCHNELLKOCHEN MENÜPUNKT STANDARDEINSTELLUNG BEREICH Suppe 50 kPa – ungefähr 110 °C 10 kPa – 80 kPa 30 Min. Bis zu 2 Std. AUTO QUICK Fond 80 kPa – ungefähr 116 °C 10 kPa – 80 kPa 1 Std. Bis zu 2 Std.
  • Page 40: Kochfunktionen

    JOGHURT Phase 1 Phase 2 Phase 3 Zeit: 8­16 Std. Erhitzen Kühlen* Gären Temp: n/a 10 Min. Bis zu 3 Stunden 8 Stunden Warmhalten: n/a Temp.: 83 °C Temp.: von 83 °C auf 43 °C Temp.: 43 °C WARMHALTEN AUS WARMHALTEN AUS WARMHALTEN AUS *Abkühldauer bei geöffnetem Deckel (für 2 Liter Milch):...
  • Page 41: Funktionen

    Sie den Deckel ein, bis das Ende der Schraube sichtbar ist. Befestigen Sie den Funktionen Deckel, indem Sie die Dichtungsmutter anschrauben, bis die rote Dichtung auf dem Deckel aufsitzt. VOR DEM ERSTEN GEBRAUCH Abdeckung des Druckabgabe­ 1. Entfernen und entsorgen Sie jegliches ventils zeigt Verpackungsmaterial, Aufkleber und in Richtung...
  • Page 42 ✔ ✔ behoben werden können. Reis/Getreide ✔ ✘ EINSTELLUNGEN AM BEDIENFELD Risotto ✔ ✘ Der Fast Slow GO™ verfügt über sechs Joghurt ✘ ✔ Kochfunktionen: Schnellkochen, Slow AUSWAHL DER EINFACHEN Cook, Reduzieren, Sautieren/Anbraten, VOREINSTELLUNG Dampfgaren und Sous­Vide. Außerdem z. B.
  • Page 43 Zeit als auch Geld. Für das Schnellkochen TIPP von Lebensmitteln ist weniger Flüssigkeit nötig. Vitamine sowie Mineral­ und andere Falls gewünscht können Sie Gemüse Nährstoffe bleiben dadurch erhalten und sautieren oder Fleisch anbraten, indem natürliche Aromen kommen stärker zum Sie die SAUTIEREN/ANBRATEN­ Tragen.
  • Page 44 beleuchtet und die VORHEIZEN­ 14. Am Ende des Dampfabgabe­Zyklus Anzeigelampe leuchtet auf. gibt der Kochtopf einen Signalton ab, das Display leuchtet auf und der HINWEIS Timer beginnt zu zählen, falls die WARMHALTEN­Funktion gewählt Es ist normal, wenn der Kochtopf kleine wurde.
  • Page 45 AUTOMATISCHE VARIABLE HINWEIS DAMPFABGABE Der Fast Slow GO™ verfügt über drei Die Schnellauswahlprogramme benutzen Dampfabgabemethoden: vorprogrammierte Dampfabgabefunktionen, um die besten Ergebnisse zu erzielen. Auto Quick Änderungen am Dampfabgabemodus Druck wird schnell freigesetzt, damit können zum Überkochen von Speisen Lebensmittel und Rezepte mit kurzen führen.
  • Page 46 6. Schließen und verriegeln Sie den Deckel. 11. Wurde Die WARMHALTEN­Funktion nicht ausgewählt, ertönt ein Signalton, 7. Drehen Sie das Druckabgabeventil in die und die orangefarbene Beleuchtung der offene Position. START/ABBRECHEN­Taste erlischt. 12. Nach 5 Minuten Inaktivität verfällt das Gerät in den Ruhezustand und die Anzeigen werden nicht länger beleuchtet.
  • Page 47 • Sie können, um die Dauer des Schnell­ • Wählen Sie die SAUTIEREN/ANBRATEN­ kochvorgangs zu verkürzen, während Einstellung, um Fleisch vor dem Kochen des SAUTIEREN/ANBRATEN­Schritts zu bräunen und Würzstoffe abzumildern. kaltes Wasser in die Kochschüssel gießen. • Anders als bei klassischen Kochmethoden Bringen Sie das Wasser zum Köcheln, auf der Herdplatte tritt beim Schnellkochen bevor Sie mit dem Schnellkochen...
  • Page 48 Sie in unserer Kochtabelle für Reis/ Sautieren bei niedriger Temperatur, Sautieren Getreide und Hülsenfrüchte. Diese ist auf bei mittelhoher Temperatur und Anbraten. der Sage­Website verfügbar. Die Temperatur­Anzeigelampe neben • Der gekochte Reis sollte etwa 5 Minuten der SLOW COOK­Taste zeigt die in der Schüssel ruhen, bevor Sie ihn...
  • Page 49 Muss ich den Beutel vakuumversiegeln? Die REDUZIEREN­Funktion eignet sich wunderbar, um Saucen, Sirupe sowie Fonds Zur Verwendung der SOUS­VIDE­Funktion einzudicken und Aromen zu verstärken. müssen Beutel nicht vakuumversiegelt werden, jedoch muss so viel Luft wie möglich DAMPFGAREN aus dem Beutel abgelassen werden und Die DAMPFGAREN­Einstellung eignet sich Wasser darf nicht in den Beutel eindringen, wunderbar, um Gemüse, Fischfilets und...
  • Page 50 4. Sobald das Wasser die gewünschte Setzen Sie die Kochschüssel in den Temperatur erreicht hat (das Gerät gibt Fast Slow GO™ ein, füllen Sie Milch ein, einen Signalton ab), platzieren Sie den schließen Sie den Deckel und öffnen Sie Beutel im Wasser.
  • Page 51 Wochen im Kühlschrank aufbewahrt werden. länger als 1­2 Stunden verwendet werden. TIPPS STARTVERZÖGERUNG Der Fast Slow GO™ verfügt über eine • Verwenden Sie homogenisierte Milch, Timer­Funktion, durch die der Beginn um einen glatteren Joghurt herzustellen. des Kochvorgangs um bis zu 24 Stunden Sollten sich Klumpen bilden und die verzögert werden kann.
  • Page 52 Auf dem Display wird nun ein Kochen mit einem Schnellkochtopf ganz C angezeigt. andere Bedingungen. Um unabhängig von Ihrer Höhenlage konstante Kochergebnisse zu erzielen, verfügt der Fast Slow GO™ über eine Höhenanpassungsfunktion, mit dem die Einstellungen basierend auf der Höhenlage Ihres gegenwärtigen Aufenthaltsortes angepasst werden.
  • Page 53: Pflege Und Reinigung

    Flüssigkeiten getaucht werden, da dies Stromschläge auslösen kann. • Ersetzen Sie die Silikon­Gummi­Dichtung • Die herausnehmbare Kochschüssel muss alle 1­2 Jahre (mehr erfahren Sie in einer korrekt in die Basis eingesetzt werden, Sage­Kundendienststelle in Ihrer Nähe). bevor Sie mit dem Kochvorgang beginnen.
  • Page 54 AUFBEWAHRUNG: • Waschen Sie die Dichtung in warmem Seifenwasser, spülen Sie sie mit klarem • Vergewissern Sie sich, dass der Kochtopf Wasser ab und trocknen Sie sie gründlich, ausgeschaltet ist. Der Kochtopf ist bevor Sie sie erneut einsetzen. ausgeschaltet, wenn alle Lichter der •...
  • Page 55: Störungsbehebung

    Oberfläche steht, und dass die Auffangtasse für Kondenswasser auf der Theke. korrekt in die Rückseite des Kochtopfs eingesetzt ist. Folgen Sie den Anweisungen auf Seite 15, um den Fast Slow GO™ für den Gebrauch vorzubereiten. • Leeren Sie Auffangtasse für Kondenswasser.
  • Page 56: Garantie

    Garantie 2 JAHRE BESCHRÄNKTE GARANTIE Sage Appliances gibt auf dieses Produkt für den häuslichen Gebrauch in bestimmten Gebieten eine Garantie über 2 Jahre ab Kaufdatum für Mängel, die durch fehlerhafte Verarbeitung und Materialien verursacht wurden. Während dieser Garantiezeit wird Sage Appliances jedes fehlerhafte Produkt reparieren, ersetzen oder das Geld zurückerstatten (nach eigenem Ermessen...
  • Page 57 Fast Slow GO ™ BPR680/SPR680 GUIDE RAPIDE...
  • Page 58 CONSIGNES Table des DE SÉCURITÉ matières IMPORTANTES Sage recommande la sécurité LISEZ TOUTES avant tout LES INSTRUCTIONS Composants AVANT UTILISATION 10 Panneau de commande ET CONSERVEZ-LES POUR 11 Préréglages culinaires RÉFÉRENCE ULTÉRIEURE 12 Préréglages de cuisson 13 Fonctions • Une version téléchargeable...
  • Page 59 brûlures peuvent résulter l'autocuiseur à plus de la moitié de sa capacité. d'une mauvaise utilisation de l'appareil. Assurez-vous que • La source de chauffe l'autocuiseur est bien fermé nécessaire à la cuisson est avant de l'utiliser. Veuillez comprise dans l'appareil. consulter les instructions •...
  • Page 60 Utilisez d'allumer l'appareil. Vérifiez notamment un récipient que l'entrée de l'appareil est et un couvercle de Sage ® entièrement sèche avant indiqués comme étant compatibles. d'insérer l'extrémité du cordon d'alimentation.
  • Page 61 • Ne placez pas l'appareil • Ne placez pas l'autocuiseur sur un plan de travail en au bord d'une table ou pierre pendant la cuisson. d'un comptoir pendant En effet, ces surfaces sont son utilisation. Assurez- vous que la surface est sensibles aux chaleurs sèche, plane, propre et variables et peuvent se...
  • Page 62: Dégagement Vapeur

    • Ne mettez pas de nourriture MESURES IMPORTANTES ou de liquide directement DE SÉCURITÉ POUR dans le fond en acier TOUS LES APPAREILS inoxydable. Seul le récipient ÉLECTRIQUES de cuisson amovible est • N'utilisez pas cet appareil si conçu pour contenir des celui-ci est usé, a été...
  • Page 63 Sage ou consulter le et de connaissances, site sageappliances.com. uniquement sous super- • L'utilisation d'accessoires vision ou après avoir reçu non fabriqués ou non...
  • Page 64: Spécifications

    • L'installation d'un commuta- Afin d'éviter tout risque teur de sécurité de courant de décharge électrique, résiduel est recommandée n'immergez pas le cordon pour fournir une sécurité électrique, la prise électrique supplémentaire lors de ou l'appareil dans l'eau l'utilisation d'appareils élec- ou dans tout autre liquide.
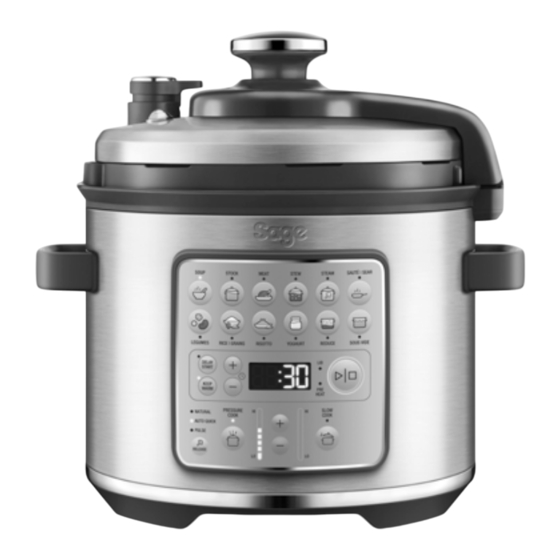
  • Page 65: Composants

    Composants A. Soupape de décompression F. Écrou d'étanchéité Contrôle automatiquement le débit G. Récipient de cuisson amovible de 6 L de vapeur sortant de l'autocuiseur H. Bras du couvercle B. Soupape de sécurité I. Gouttière facile à nettoyer C. Couvercle amovible lavable au lave- Récupère les gouttes de condensation vaisselle pour un nettoyage facilité.
  • Page 66: Panneau De Commande

    PANNEAU DE COMMANDE SOUP STOCK MEAT STEW STEAM SAUTÉ | SEAR LEGUMES RICE | GRAINS RISOTTO YOGURT REDUCE SOUS VIDE DELAY START KEEP WARM PRESSURE SLOW NATURAL COOK COOK AUTO QUICK PULSE RELEASE A. Préréglages culinaires avec voyants J. Bouton de dégagement vapeur avec lumineux voyants de sélection des modes B.
  • Page 67: Préréglages Culinaires

    PRÉRÉGLAGES CULINAIRES PARAMÈTRE : CUISSON SOUS PRESSION TYPES D'ALIMENT PARAMÈTRE PAR DÉFAUT INTERVALLE Soupe 50 kPa – environ 110 °C 10 kPa – 80 kPa 30 MIN Jusqu'à 2 h AUTO RAPIDE Bouillon 80 kPa – environ 116 °C 10 kPa – 80 kPa 1 HEURE Jusqu'à...
  • Page 68: Préréglages De Cuisson

    YAOURT Étape 1 Étape 2 Étape 3 Durée : 8 à 16 h Cuisson Refroidissement* Incubation Temp. : s/o 10 MIN Jusqu'à 3 heures 8 heures Maintien au chaud : s/o Temp. : 83 °C Temp. : de 83 °C à 43 °C Temp.
  • Page 69: Fonctions

    poussez pour faire apparaître le filetage de la vis. Fixez le couvercle en vissant Fonctions l'écrou d'étanchéité de sorte que le joint rouge touche la surface du couvercle. AVANT LA PREMIÈRE UTILISATION Couvercle de la soupape de 1. Retirez et jetez en lieu sûr tous les décompression emballages, adhésifs et étiquettes incliné...
  • Page 70: Paramètres Du Panneau De Commande

    ✔ PARAMÈTRES DU PANNEAU Légumineuses ✔ ✔ DE COMMANDE Riz/Céréales ✔ ✘ Le Fast Slow GO™ propose 6 paramètres Risotto ✔ ✘ de cuisson prédéfinis : Cuisson sous Yaourt ✘ ✔ pression, Cuisson lente, Réduire, Sauter/ Saisir, Vapeur et Sous vide. Il propose DES ÉTAPES PRÉDÉFINIES SIMPLES...
  • Page 71 • Le temps de cuisson peut être réglé MODE CUISSON SOUS PRESSION à la hausse ou à la baisse à l'aide MANUELLE des boutons + et -. La cuisson sous pression est une méthode • Une fois les ingrédients ajoutés, appuyez de préparation des aliments qui utilise sur DÉMARRER pour commencer un couvercle à...
  • Page 72 12. À la fin du cycle de cuisson sous pression, 7. Assurez-vous que la soupape de décompression soit placée sur l'appareil émettra un signal sonore et la vapeur sera automatiquement libérée le couvercle en position fermée. via la soupape de décompression. L'icône VAPEUR se mettra à...
  • Page 73: Dégagement Vapeur Variable Mains Libres

    DÉGAGEMENT VAPEUR VARIABLE soupape de décompression. MAINS LIBRES Le Fast Slow GO™ présente 3 méthodes REMARQUE de dégagement vapeur : Le mode de dégagement vapeur programmé Auto rapide pour les modes de cuisson prédéfinis est...
  • Page 74: Astuces Pour La Cuisson Sous Pression Et Lente

    sélectionné. Vous pouvez cependant REMARQUE régler la température à la hausse ou à la baisse à l'aide des boutons Pour libérer la vapeur en mode pause, PRESSION/TEMPÉRATURE (+/-). appuyez longuement sur le bouton Il y a deux préréglages de la température : dégagement vapeur.
  • Page 75 Bouillon • Ne remplissez pas trop le récipient de cuisson. Le volume total des ingrédients • Le réglage CUISSON SOUS PRESSION avant cuisson ne doit pas dépasser ET LENTE pour BOUILLON est idéal pour le niveau « MAX » indiqué à l'intérieur préparer toute sorte de bouillons, y compris du récipient de cuisson amovible.
  • Page 76 Cuisson lente. tableau de cuisson des riz/céréales et des (Voir page 10 et la lettre M. avec le schéma légumineuses sur le site web de Sage. du tableau de commandes) • Après la cuisson, laissez reposer le riz Le réglage SAUTER est idéal pour ramollir...
  • Page 77 RÉDUIRE De quoi ai-je besoin pour cuisiner des aliments avec la fonction Sous vide ? Ce réglage possède trois niveaux : faible, moyen et élevé. La cuisson sous vide requiert des sachets en plastique alimentaire thermorésistant et sans Le niveau de température sera indiqué sur BPA.
  • Page 78 YAOURT Étapes pour la cuisson SOUS VIDE : 1. Remplissez le récipient de cuisson avec Comment utiliser le raccourci auto- de l'eau froide jusqu'à atteindre la ligne MAX. matique de la fonction yaourtière ? Pour réduire le temps de préchauffage, Yaourt nature versez de l'eau à...
  • Page 79: Maintien Au Chaud

    1 ou 2 heures. le jusqu'à 2 semaines. DÉMARRAGE DIFFÉRÉ ASTUCES Le Fast Slow Go™ est doté d'un minuteur afin de différer le début de la cuisson jusqu'à • L'utilisation de lait homogénéisé permet d'obtenir un yaourt plus doux. Si votre plus de 24 heures.
  • Page 80: Réglage De L'unité De Mesure

    Celsius. L'affichage indiquera alors Afin d'obtenir une cuisson optimale quelle la lettre « C ». que soit l'altitude, le Fast Slow GO™ est doté d'une fonction « Ajustement à l'altitude » qui permet d'ajuster les réglages de l'appareil selon l'altitude de l'emplacement où...
  • Page 81: Entretien Et Nettoyage

    DÉMONTER LE COUVERCLE : Entretien • Retirez délicatement le joint en caoutchouc et nettoyage de silicone du porte-joint. Vérifiez périodiquement que celui-ci reste propre, flexible et n'est pas fissuré ni déchiré. Ne Avant de nettoyer l'autocuiseur, assurez-vous vous servez pas de l'appareil si le joint est que celui-ci est éteint.
  • Page 82: Joint En Caoutchouc De Silicone

    • Le joint en caoutchouc de silicone doit être correctement inséré dans l'autocuiseur. remplacé tous les 1 à 2 ans (renseignez- • Vérifiez que le couvercle est fermé et en vous auprès du service client Sage le plus position verrouillée. proche). • Rangez l'appareil en position verticale, •...
  • Page 83: Dépannage

    Il doit contenir au moins 1 litre de nourriture et liquide combinés. L'écran affiche « SEAL » • Si le problème persiste, veuillez contacter le service client Sage. L'autocuiseur passe • Rajoutez de l'eau dans le récipient de cuisson et redémarrez le cycle.
  • Page 84: Garantie

    Garantie GARANTIE LIMITÉE 2 ANS Sage Appliances garantit ce produit pour un usage domestique sur les territoires spécifiés pendant 2 ans à compter de la date d’achat, contre les défauts de fabrication et de matériaux. Au cours de cette période de garantie, Sage Appliances s’engage à...
  • Page 85: Déclaration À L'intention Du Consommateur

    Déclaration à l'intention du consommateur SAGE FRANCE - GARANTIE LIMITÉE Sage Appliances garantit ce produit pour un usage Article L. 217-4 du Code de la consommation : domestique sur les territoires spécifiés pendant 2 « Le vendeur livre un bien conforme au contrat et ans à...
  • Page 86: Remarques

    Remarques...
  • Page 87 Fast Slow GO ™ BPR680/SPR680 SNELSTARTGIDS...
  • Page 88: Sage Stelt Veiligheid Voorop

    BELANGRIJKE Inhoud VEILIGHEIDS- MAATREGELEN Sage stelt veiligheid voorop LEES ALLE INSTRUCTIES 10 Onderdelen VÓÓR GEBRUIK EN 11 Bedieningspaneel BEWAAR DEZE VOOR 12 Voorinstellingen TOEKOMSTIGE NASLAG 13 Kookstanden • U kunt dit document 14 Functies ook downloaden via 25 Onderhoud en reiniging sageappliances.com...
  • Page 89 rijst of gedroogde van de snelkookpan kan tot verbrandingen groenten, de kookpan leiden. Controleren of maximaal tot de helft de snelkookpan goed van zijn capaciteit vullen. is gesloten, voordat • De vereiste verwar- u deze verwarmt. mingsbron voor het Zie de instructies voor kookproces is in het 'Snelkoken' in dit boek.
  • Page 90 ® het relevante model instructies in deze gids. gebruiken. Gebruik • Verbind altijd eerst met name behuizingen het netsnoer met het en deksels van Sage ® apparaat, voordat die zijn aangeduid als u de stekker in het compatibel. stopcontact steekt.
  • Page 91 • Hete oppervlakken niet is bedekt en plaats het op aanraken. De oppervlak- ten minste 20 centimeter ken van het apparaat afstand van muren, zijn tijdens en na het gordijnen, stof en andere gebruik heet. Gebruik, hittegevoelige materialen. indien beschikbaar, altijd •...
  • Page 92 • Plaats geen andere • Controleer voor gebruik altijd het voorwerpen dan het deksel op de kookpan ontluchtingsventiel en wanneer deze in elkaar de veiligheidsborgpen op verstoppingen en gezet, in gebruik of opgeborgen is. maak deze, indien nodig, schoon. Controleer of •...
  • Page 93 • Het apparaat mag alleen Neem contact op met worden gebruikt door de klantenservice kinderen van 8 jaar of van Sage of ga naar ouder en personen sageappliances.com met beperkte fysieke, als er sprake is van zintuiglijke of mentale...
  • Page 94 • Het gebruik van van niet meer dan 30 mA te installeren in opzetstukken die niet door Sage worden het elektrische circuit ® verkocht of aanbevolen, dat het apparaat voedt. kan brand, elektrische Raadpleeg uw elektricien schokken of letsel voor professioneel veroorzaken.
  • Page 95 SPECIFICATIE Model SPR680 Nominaal volume 6 liter Bruikbaar volume 4 liter Werkdruk 80 kPa Verwarmingsbron Elektrisch verwarmingselement Deze specificaties kunnen zonder voorafgaande kennisgeving worden gewijzigd. ALLEEN VOOR HUISHOUDELIJK GEBRUIK BEWAAR DEZE INSTRUCTIES...
  • Page 96: Onderdelen

    Onderdelen A. Ontluchtingsventiel F. Afdichtingsmoer Regelt automatisch hoe snel stoom G. Uitneembare kookpan van 6 liter van de kookpan wordt vrijgegeven H. Hendel van deksel B. Drukventiel I. Eenvoudig te reinigen geultje C. Vaatwasserbestendig verwijderbaar deksel Vangt condensatiedruppels op voor snelle D.
  • Page 97: Bedieningspaneel

    BEDIENINGSPANEEL SOUP STOCK MEAT STEW STEAM SAUTÉ | SEAR LEGUMES RICE | GRAINS RISOTTO YOGURT REDUCE SOUS VIDE DELAY START KEEP WARM PRESSURE SLOW NATURAL COOK COOK AUTO QUICK PULSE RELEASE A. Voorinstellingen met controlelampjes J. Stoomvrijgaveknop met indicator voor modusselectie B.
  • Page 98: Voorinstellingen

    VOORINSTELLINGEN INSTELLING: SNELKOKEN VOEDSELMENU STANDAARD BEREIK VOORINSTELLING Soep 50 kPa - ca. 110 °C 10 kPa – 80 kPa 30 MIN Max. 2 UUR AUTO QUICK Bouillon 80 kPa - ca. 116 °C 10 kPa – 80 kPa 1 UUR Max.
  • Page 99: Kookstanden

    YOGHURT Fase 1 Fase 2 Fase 3 Tijd: 8-16 UUR Verwarmen Afkoelen* Incuberen Temp: n.v.t. 10 MIN. Tot 3 uur 8 uur Warmhouden: n.v.t. Temp: 83 °C Temp: van 83 °C tot 43 °C Temp: 43 °C WARMHOUDEN UIT WARMHOUDEN UIT WARMHOUDEN UIT *Afkoeltijd met het deksel open (voor 2 liter melk): Het kan 1 uur en 20 minuten duren om de temperatuur van 83 °C naar 43 °C te laten zakken...
  • Page 100: Functies

    Zet het deksel vast door de afdichtingsmoer op te schroeven tot Functies de rode afdichting het oppervlak van het deksel raakt. VOOR HET EERSTE GEBRUIK Afdekking van ontluchtingsventiel 1. Verwijder verpakkingsmaterialen, naar achterkant promotielabels en tape van de kookpan van kookpan en gooi ze op een veilige manier weg.
  • Page 101 ✔ verholpen door het apparaat te resetten. Stoven ✔ ✔ INSTELLINGEN BEDIENINGSPANEEL Peulvruchten ✔ ✔ Rijst/granen De Fast Slow GO™ heeft zes voorinstellingen ✔ ✘ voor koken; Pressure Cook (snelkoken), Risotto ✔ ✘ Slow Cook (slowcooking), Reduce (inkoken), Yoghurt ✘...
  • Page 102 kookvocht nodig is, blijven meer vitaminen, mineralen en andere voedingsstoffen behouden en worden de natuurlijke smaken Als u dat wilt, kun u groenten sauteren of versterkt. vlees dichtschroeien met de functie SAUTÉ/ 1. Houd de knop PRESSURE COOK SEAR voordat u het kookproces start. 2 seconden ingedrukt om de modus voor Wanneer u klaar bent, drukt u op STOP handmatig snelkoken te selecteren.
  • Page 103 Het stoompictogram knippert en de timer HANDSFREE VARIABELE telt op. STOOMVRIJGAVE 13. Als NATURAL is geselecteerd voor De Fast Slow GO™ biedt 3 methoden voor stoomvrijgave, neemt de druk in de pan stoomvrijgave: op natuurlijke wijze af. Stoom wordt niet Auto Quick door het ontluchtingsventiel geforceerd.
  • Page 104 geselecteerde levensmiddel ventiel. Dit om te voorkomen dat gevoelige ingrediënten, zoals bouillon en bonen, weergegeven. U kunt echter op de knoppen PRESSURE/ TEMPERATURE tijdens het aflaten van de druk door ruwe (+/-) drukken om de temperatuur te bewegingen in de pan worden opgebroken. verhogen of verlagen.
  • Page 105 Bouillon OPMERKING • De instelling PRESSURE & SLOW COOK STOCK is geschikt voor allerlei Houd de knop voor stoomvrijgave ingedrukt soort bouillon, zoals kip-, runder- en om tijdens de pauze stoom af te laten. groentebouillon. Tijdens slowcooking kan er druk worden •...
  • Page 106 • Voeg de overeenkomstige hoeveelheid REDUCE om gerechten die te vloeibaar water toe. Raadpleeg de kooktabel voor zijn, in te dikken. rijst/granen en peulvruchten op de Sage- • De kookpan niet overvullen. Het webpagina voor meer informatie. totale volume van de ongekookte •...
  • Page 107 • Rijst verdubbelt of verdriedubbelt in STEAM volume tijdens het koken. De kookpan De instelling STEAM is ideaal voor het niet overvullen. Het totale volume van stomen van etenswaren zoals groenten, ongekookte rijst en bouillon mag niet boven visfilets en dumplings. Wanneer u gerechten het ½-streepje aan de binnenkant van langer dan 30 minuten stoomt, is het de uitneembare kookpan uitkomen.
  • Page 108 MAX-streepje. STAP 1 – Verwarm de melk Begin met water dat bijna de Plats de kookpan in de Fast Slow GO™. doeltemperatuur heeft om de Voeg de melk toe. Sluit en vergrendel het voorverwarmingstijd te verkorten.
  • Page 109: Delay Start

    Is de yoghurt helemaal koud, doe DELAY START deze dan in een luchtdichte bak. U kunt de De Fast Slow GO™ heeft een timerfunctie yoghurt tot 2 weken in de koelkast bewaren. om de start van het kookproces tot 24 uur uit te stellen.
  • Page 110: Hoogte Aanpassen

    • Gebruik de knoppen TIJD (+/-) om de www.elevationmap.net of door contact op te tijdvertraging in stappen van 15 minuten tot nemen met de Sage-klantenondersteuning. een maximum van 24 uur in te stellen. MEETEENHEID INSTELLEN • Druk wanneer u maar wilt opnieuw op DELAY START om de instelling te verlaten Er wordt standaard gemeten in Celsius (C).
  • Page 111: Onderhoud En Reiniging

    DEKSEL DEMONTEREN: Onderhoud • Trek de siliconenrubber pakking voorzichtig en reiniging onder de pakkinghouder vandaan. Controleer regelmatig of de pakking schoon, flexibel en niet gebarsten of Zorg ervoor dat de kookpan is uitgeschakeld, gescheurd is. Het apparaat niet gebruiken voordat u deze gaat reinigen. Haal de stekker als de pakking is beschadigd.
  • Page 112 • Zorg ervoor dat de kookpan is uitgeschakeld. de 1 tot 2 jaar (raadpleeg uw dichtstbijzijnde De kookpan staat uit wanneer alle lampjes Sage-servicecentrum). op het display uit zijn. • Was de pakking in warm zeepsop. • Haal de stekker uit het stopcontact. Laat...
  • Page 113: Problemen Oplossen

    • Zorg ervoor dat de kookpan op een vlakke, horizontale ondergrond op het aanrecht staat en dat het opvangbakje voor condensatie aan de achterkant van de kookpan is geplaatst. Volg de instructies in 'De Fast Slow GO™ voorbereiden' op pagina 14. • Leeg het opvangbakje voor condensatie.
  • Page 114: Garantie

    Garantie BEPERKTE GARANTIE VAN 2 JAAR Sage Appliances biedt een garantie op dit product voor huishoudelijk gebruik in genoemde gebieden gedurende 2 jaar vanaf de datum van aankoop tegen defecten veroorzaakt door gebrekkige afwerking en materialen. Gedurende deze garantieperiode zal Sage Appliances defecte producten repareren, vervangen of terugbetalen (naar eigen goeddunken van Sage Appliances).
  • Page 115 Fast Slow GO ™ BPR680/SPR680 GUIDA RAPIDA...
  • Page 116 NORME DI Sommario SICUREZZA IMPORTANTI Sage consiglia: la sicurezza LEGGERE TUTTE prima di tutto LE ISTRUZIONI Componenti PRIMA DELL'USO E 10 Pannello di controllo CONSERVARLE PER 11 Preimpostazioni alimenti CONSULTARLE IN FUTURO 12 Preimpostazioni di cottura • Sul sito 13 Funzioni sageappliances.com...
  • Page 117 Questo apparecchio la cottura, come riso cuoce sotto pressione; o verdure essiccate, l'utilizzo inappropriato non riempire la pentola può causare ustioni. oltre la metà della sua Assicurarsi che la pentola capacità. sia chiusa correttamente • La fonte di calore prima di scaldarla. Vedere necessaria per la sezione "Cottura a cucinare è...
  • Page 118 Sage l'estremità del connettore ® al modello. In particolare, del cavo di alimentazione utilizzare un corpo e nell'ingresso un coperchio di Sage dell'apparecchio prima ® indicati come compatibili. di inserire la spina di • Prima di usare alimentazione nella...
  • Page 119 • Evitare di toccare le l'apparecchio a una superfici calde. Durante distanza minima di e dopo il funzionamento 20 cm da pareti, tende, le superfici dell'appa­ tessuti e altri materiali recchio sono calde. Per sensibili al calore. evitare ustioni o lesioni •...
  • Page 120 per trasportare • Utilizzare solo il l'apparecchio. pulsante STEAM • Prima di inserire la ciotola RELEASE (rilascio rimovibile nella base vapore) consigliato in acciaio inossidabile, per depressurizzare assicurarsi che la base la pentola dopo l'uso. della ciotola e la base •...
  • Page 121 Servizio ricevute in merito clienti Sage o visitare all'uso in sicurezza sageappliances.com. dell'elettrodomestico e • L'utilizzo di prolunghe che comprendano i rischi o accessori non venduti associati.
  • Page 122 usi diversi da quello Per proteggersi dalle previsto. Non utilizzare scariche elettriche, su veicoli in movimento non immergere la spina, o barche. Non utilizzare il cavo di alimentazione all'aperto. L'uso non o l'elettrodomestico in corretto potrebbe acqua o in qualsiasi altro provocare lesioni.
  • Page 123: Componenti

    Componenti F. Dado di tenuta A. Valvola di rilascio della pressione Controlla automaticamente la velocità G. Recipiente per cottura rimovibile da 6 l di fuoriuscita del vapore dalla pentola H. Braccio del coperchio B. Valvola di sicurezza della pressione I. Solco facile da pulire C.
  • Page 124: Pannello Di Controllo

    PANNELLO DI CONTROLLO SOUP STOCK MEAT STEW STEAM SAUTÉ | SEAR LEGUMES RICE | GRAINS RISOTTO YOGURT REDUCE SOUS VIDE DELAY START KEEP WARM PRESSURE SLOW NATURAL COOK COOK AUTO QUICK PULSE RELEASE A. Preimpostazioni alimenti con indicatori J. Pulsante di rilascio della pressione con luminosi indicatore di selezione delle modalità...
  • Page 125: Preimpostazioni Alimenti

    PREIMPOSTAZIONI ALIMENTI IMPOSTAZIONE: PRESSURE COOK MENU ALIMENTI IMPOSTAZIONE PREDEFINITA INTERVALLO Soup (zuppa) 50 kPa ­ circa 110°C 10 kPA – 80 kPa 30 MIN Fino a 2 ORE AUTO QUICK (veloce automatico) Stock (brodo) 80 kPa ­ circa 116°C 10 kPA – 80 kPa 1 ORA Fino a 2 ORE AUTO QUICK (veloce automatico)
  • Page 126: Preimpostazioni Di Cottura

    YOGURT Fase 1 Fase 2 Fase 3 Tempo: 8 ­ 16 Scaldare Raffreddare* Mettere in incubazione Temp.: n/a 10 min Fino a 3 ore 8 ore Keep warm: n/a Temp.: 83 °C Temp.: da 83°C a 43°C Temp.: 43°C KEEP WARM OFF KEEP WARM OFF KEEP WARM OFF *Tempo di raffreddamento con coperchio aperto (per 2 litri di latte):...
  • Page 127: Funzioni

    coperchio e spingere in posizione per esporre la filettatura della vite. Funzioni Fissare il coperchio avvitando il dado di tenuta in modo che la guarnizione rossa tocchi la superficie del coperchio. PREPARAZIONE AL PRIMO UTILIZZO 1. Rimuovere dalla pentola e smaltire in Coperchio della modo sicuro i materiali di imballaggio, le valvola di rilascio...
  • Page 128 9. La pentola emette un segnale acustico A seconda della modalità di cottura, e il display LED si illumina. premendo un pulsante di preimpostazione alimenti si regolano i livelli di PRESSIONE 10. Si consiglia di eseguire un ciclo o TEMPERATURA, il tempo di cottura e la di cottura di 15 minuti con acqua per modalità...
  • Page 129 • Dopo aver aggiunto gli ingredienti, premere di ebollizione e permette quindi di cuocere il START per avviare la cottura. cibo fino al 70% più velocemente. Questo si traduce in un minor consumo energetico e in un risparmio notevole sia in termini di tempo SUGGERIMENTO che di costi.
  • Page 130 8. Premere il pulsante START per avviare 14. Al termine del ciclo di rilascio del vapore, la cottura. Il pulsante START/CANCEL la pentola emette un segnale acustico, il si illumina di arancione e si accende display lampeggia e, se "KEEP WARM" "PREHEAT".
  • Page 131 Tenendo premuto il pulsante di rilascio del DEL VAPORE VARIABILE vapore durante o dopo un ciclo di cottura si aprirà la valvola di rilascio della pressione. The Fast Slow GO™ offre 3 metodi di rilascio del vapore: NOTA Auto Quick (veloce automatico) Le modalità...
  • Page 132 5. Mettere gli alimenti nel recipiente di 11. Se la funzione KEEP WARM non è cottura rimovibile. Assicurarsi che ci stata selezionata, la pentola emette un sia almeno 1 litro di alimenti e liquido segnale acustico e il pulsante START/ combinati nel recipiente.
  • Page 133 • Non riempire eccessivamente il recipiente Usare l'impostazione REDUCE dopo la di cottura. Il volume totale di acqua, carne cottura per addensare i cibi troppo acquosi. e/o erbe aromatiche non deve superare • Non riempire eccessivamente il recipiente il livello "MAX" segnato all'interno del di cottura.
  • Page 134 • Aggiungere la quantità di acqua corrispondente. Per ulteriori informazioni, fare riferimento alla tabella di cottura per SAUTÉ/SEAR riso/cereali e legumi sul sito di Sage. Questa preimpostazione ha tre livelli: sauté basso, sauté medio e sear. • Dopo la cottura, lasciare riposare il riso nel recipiente per 5 minuti prima di mescolare Il livello di temperatura sarà...
  • Page 135 si consiglia di girare la valvola di rilascio della pressione in posizione aperta per garantire pressione in posizione aperta. una temperatura di cottura costante. SOUS VIDE (sottovuoto) Quando va effettuata la rosolatura? L'impostazione SOUS VIDE è ideale per È possibile rosolare gli alimenti prima o dopo cuocere il cibo a una temperatura molto la cottura con la funzione SAUTÉ/SEAR.
  • Page 136 Tempo e temperatura: a 43°C. Questo processo assicura che l'apparecchio raggiunga la temperatura • FILETTO DI MANZO (spessore: 2,5 cm) – per la crescita ottimale delle colture iniziali. Cottura media – 54°C per 1 ora Se la temperatura è troppo alta le colture •...
  • Page 137 DELAY START • Per raffreddare più velocemente il latte scaldato, mettere il recipiente di cottura The Fast Slow GO™ ha una funzione timer in un contenitore più grande con acqua per ritardare l'inizio della cottura fino a 24 ore. ghiacciata, e controllare la temperatura con Questa funzione timer non si applica alle un termometro.
  • Page 138: Impostazione Dell'unità Di Misura

    (+/­) per 5 secondi per ritornare a Celsius; Per mantenere gli stessi risultati di cottura ad il display mostrerà una C. altitudini diverse, the Fast Slow GO™ ha una funzione di regolazione dell'altitudine che consente di modificare le impostazioni in base all'altitudine della posizione corrente.
  • Page 139: Manutenzione E Pulizia

    SMONTARE IL COPERCHIO: Manutenzione • Estrarre delicatamente la guarnizione in e pulizia gomma siliconica da sotto il suo supporto. Controllare regolarmente che sia pulita, flessibile e priva di rotture. Evitare di usare Prima di eseguire la pulizia, assicurarsi che la l'elettrodomestico se appare danneggiata.
  • Page 140 • Sostituire la guarnizione in gomma sul display sono spente. siliconica ogni 1­2 anni (consultare il centro assistenza Sage più vicino). • Scollegare il cavo di alimentazione dalla presa di corrente. Lasciare raffreddare • Lavare la guarnizione con acqua calda completamente la pentola e tutti gli e sapone.
  • Page 141: Risoluzione Dei Problemi

    1 litro, tra alimenti e liquidi. OPPURE Lo schermo mostra "SEAL" • Se il problema persiste, contattare il Servizio clienti Sage. La pentola si accende • Aggiungere più acqua nella ciotola e riavviare il ciclo. automaticamente per...
  • Page 142: Garanzia

    Garanzia GARANZIA LIMITATA DI 2 ANNI Sage Appliances offre una garanzia per l’utilizzo domestico di questo prodotto in specifiche aree geografiche, per 2 anni dalla data di acquisto. La garanzia copre eventuali malfunzionamenti causati da difetti di fabbricazione o dei materiali. Durante il periodo coperto dalla garanzia, Sage Appliances sarà...
  • Page 143 Fast Slow GO ™ BPR680/SPR680 GUÍA RÁPIDA...
  • Page 144: Medidas De Seguridad Importantes

    MEDIDAS Índice DE SEGURIDAD IMPORTANTES Sage recomienda seguridad LEE TODAS LAS INSTRUC­ ante todo CIONES ANTES DEL USO 10 Componentes Y GUÁRDALAS PARA 11 Panel de control PODER CONSULTARLAS 12 Programas de comidas EN EL FUTURO. 13 Programas de cocción 14 Funciones •...
  • Page 145 • Nunca uses la olla ADVERTENCIA a presión sin añadir No uses la olla a presión agua, esto podría dañar para un propósito diferente el aparato seriamente. al que está destinada. • No llenes la olla más Este electrodomésti­ allá de 2/3 de su co cocina bajo presión.
  • Page 146 • Cuando cocines En concreto, usa un alimentos con una textura cuerpo y una tapa de espesa o pastosa, Sage indicados como ® después de liberar vapor, compatibles. agita suavemente la olla. • Antes de usar el Luego libera nuevamente...
  • Page 147 instrucciones indicadas electrodoméstico si las en este manual. tiene. • Coloca siempre el • No coloques el extremo del conector del electrodoméstico cable de alimentación cerca del borde de una en la entrada del encimera o mesa durante dispositivo antes de el funcionamiento.
  • Page 148 • No coloques el ensamblada, cuando electrodoméstico sobre esté en uso y cuando o cerca de un quemador esté guardada. de gas caliente, • No uses el asa de la un elemento eléctrico tapa para transportar o un lugar donde pueda el electrodoméstico.
  • Page 149 de presión y el pasador • Desenrolla comple­ de bloqueo de seguridad tamente el cable de no estén obstruidos alimentación antes y limpia si es necesario. del uso. Asegúrate de que el • Evita que el cable de pasador de bloqueo alimentación sobresalga de seguridad se mueve del borde de una...
  • Page 150 Sage o visita sageappliances.com. • No permitas que los niños jueguen con • El uso de accesorios no el aparato.
  • Page 151 • Se recomienda instalar Este símbolo indica un interruptor diferencial que el aparato no de seguridad para ofrecer debe desecharse protección adicional al con la basura doméstica usar aparatos eléctricos. normal. Debe llevarse a Se recomienda instalar un centro de recogida de en el circuito eléctrico que residuos designado por alimenta el aparato un...
  • Page 152: Componentes

    Componentes A. Válvula de liberación de presión F. Tuerca de sellado Controla automáticamente la velocidad G. Recipiente de cocción extraíble de 6 l a la que la olla libera vapor. H. Brazo de la tapa B. Válvula de seguridad por sobrepresión I.
  • Page 153: Panel De Control

    PANEL DE CONTROL SOUP STOCK MEAT STEW STEAM SAUTÉ | SEAR LEGUMES RICE | GRAINS RISOTTO YOGURT REDUCE SOUS VIDE DELAY START KEEP WARM PRESSURE SLOW NATURAL COOK COOK AUTO QUICK PULSE RELEASE A. Programas de comidas con indicadores J. Botón de liberación de presión con luminosos indicador de modo seleccionado B.
  • Page 154: Programas De Comidas

    PROGRAMAS DE COMIDAS PROGRAMA: COCCIÓN A PRESIÓN MENÚ DE COMIDA AJUSTE PREDETERMINADO OPCIONES Sopa 50 kPa ­ aprox. 110 °C 10 kPA ­ 80 kPa 30 min Hasta 2 h RÁPIDO AUTOMÁTICO 80 kPa ­ aprox. 116 °C 10 kPA ­ 80 kPa Caldo Hasta 2 h RÁPIDO AUTOMÁTICO...
  • Page 155: Programas De Cocción

    YOGUR Fase 1 Fase 2 Fase 3 Tiempo: 8 ­ 16 h Escaldado Enfriado* Incubado Temp.: n/d 10 min Hasta 3 horas 8 horas Mantener temp.: no Temp.: 83 °C Temp.: de 83 °C a 43 °C Temp.: 43 °C NO MANTENER NO MANTENER NO MANTENER...
  • Page 156: Funciones

    para exponer la rosca del tornillo. Asegura la tapa atornillando la tuerca Funciones de sellado de manera que la junta roja toque la superficie de la tapa. ANTES DEL PRIMER USO 1. Retira y desecha de forma segura Tapa de la válvula de liberación de los materiales de embalaje, etiquetas presión hacia la...
  • Page 157 Arroz/Granos ✓ ✘ AJUSTES DEL PANEL DE CONTROL Risotto ✓ ✘ The Fast Slow GO™ incluye 6 programas Yogur de cocción: cocción a presión, cocción ✘ ✓ lenta, reducción, salteado/sellado, cocción PASOS SIMPLES PARA PROGRAMAS a vapor y cocción al vacío. Además dispone...
  • Page 158 hasta un 70 % más rápido. Dado que se CONSEJO consume menos energía, ahorrarás tiempo y dinero. Como la cocción a presión requiere Si lo deseas, puedes saltear las verduras muy poco líquido, se potencian los sabores o sellar la carne antes de cocinarlas con el naturales de los alimentos y se conservan programa SALTEADO/SELLADO.
  • Page 159 LIBERACIÓN DE VAPOR VARIABLE de liberación de vapor pulsando el botón VAPOR. The Fast Slow GO™ dispone de 3 métodos de liberación de vapor: 14. Al final del ciclo de liberación de vapor, sonará la alerta de la olla, la pantalla Rápido automático...
  • Page 160 Intermitente PRECAUCIÓN La presión se libera en ráfagas para reducir el efecto en los alimentos en el interior. Mantén siempre las manos y la cara alejadas Esto se recomienda para los tipos de de la válvula de liberación de presión alimentos que generan una pequeña cuando cocines a presión, ya que pueden cantidad de espuma o que no hacen...
  • Page 161 12. Después de 5 minutos de inactividad, 7. Gire la válvula de liberación de presión a se activará el modo de espera. La luz la posición abierta. se apagará. CONSEJOS PARA COCCIÓN A PRESIÓN Y COCCIÓN LENTA Sopa • El programa SOPA, con modos de cocción a presión o lenta, permite preparar una gran variedad de sopas, desde caldos ligeros 8.
  • Page 162 • No llenes en exceso el recipiente Sage para obtener más información. de cocción. El volumen total de los • Cuando termine la cocción, deja que el ingredientes crudos para el guiso no debe arroz repose en el recipiente 5 minutos exceder la marca de nivel máximo dentro...
  • Page 163 • El arroz duplicará o triplicará su tamaño o lenta. El programa SALTEADO se después de la cocción. No llenes en exceso corresponde con los niveles de temperatura el recipiente de cocción. El volumen total MEDIA y BAJA de tu aparato. del arroz crudo y el líquido no debe exceder El programa SELLADO está...
  • Page 164 AL VACÍO ¿Debo cerrar la tapa o dejarla abierta? El programa AL VACÍO es ideal para cocinar Recomendamos usar el programa AL VACÍO alimentos en un baño de agua a una con la tapadera cerrada y en la posición de temperatura exacta.
  • Page 165 5. Cierra y bloquea la tapa, pero asegúrate El proceso de pasteurización mata cualquier de que la válvula de liberación de presión bacteria mala que pueda estropear la leche. esté en posición abierta. También elimina a la posible competencia de los cultivos activos del yogur. 6.
  • Page 166: Retrasar El Inicio

    RETRASAR EL INICIO • Para enfriar más rápido la leche después de escaldarla, coloca el recipiente de The Fast Slow GO™ cuenta con una cocción en un recipiente más grande función de temporizador para retrasar el con agua y cubitos. Puedes controlar la inicio de un programa hasta 24 horas.
  • Page 167: Ajuste De Altitud

    Para restablecer los ajustes de altitud a los predeterminados, vuelve a cambiar la altitud a 0 metros. NOTA Puedes encontrar la altitud exacta en www.elevationmap.net o contactando con el centro de Servicio al cliente de Sage.
  • Page 168: Cuidado Y Limpieza

    CÓMO DESMONTAR LA TAPADERA: Cuidado • Retira con cuidado la junta de silicona del y limpieza soporte para juntas. Revisa periódicamente que la junta esté limpia, se mantenga flexible y que no esté agrietada o rota. Antes de limpiarla, asegúrate de que la No utilices el aparato si la junta está...
  • Page 169: Almacenamiento

    • Asegúrate de que la olla esté apagada. 1 o 2 años. Puedes consultar a tu centro La olla estará apagada cuando todas las de servicio de Sage más cercano. luces de la interfaz estén apagadas. • Lava la junta con agua tibia jabonosa.
  • Page 170: Resolución De Problemas

    Si esto ocurre, desenchufa el cable inmediatamente y ponte en contacto con el servicio de atención al cliente de Sage. Ajustes de fábrica • Mantén pulsados los botones “sopa” y “sous vide” durante tres...
  • Page 171: Garantía

    Garantía GARANTÍA LIMITADA DE 2 AÑOS La garantía de Sage Appliances cubre este producto para uso doméstico en territorios específicos durante 2 años a partir de la fecha de compra contra fallos causados por mano de obra y materiales defectuosos. Durante el plazo de la garantía, Sage Appliances...
  • Page 172 Nota...
  • Page 173 Fast Slow GO ™ BPR680/SPR680 MANUAL RÁPIDO...
  • Page 174: Cuidados Importantes

    CUIDADOS Índice IMPORTANTES LEIA TODAS AS A Sage recomenda INSTRUÇÕES ANTES a segurança como máxima DE UTILIZAR E GUARDE- prioridade AS PARA REFERÊNCIA Componentes FUTURA 10 Painel de controlo • Está disponível uma 11 Predefinições de alimentos versão deste documento 12 Definições de confeção para transferência em...
  • Page 175 de pressão. Certifique-se • A fonte de calor necessária para cozinhar encontra-se de que a panela de pressão incluída no aparelho. está corretamente fechada antes de aplicar calor. • Depois de cozinhar carne Consulte as instruções com pele (por ex., língua de na secção "Cozinhar Sob vaca), que pode inchar sob Pressão"...
  • Page 176 • Utilize apenas peças • Introduza sempre sobressalentes da Sage a extremidade do conector ® de acordo com o modelo do cabo de alimentação na relevante. Em particular, entrada do aparelho antes use um corpo e uma tampa...
  • Page 177 • Não coloque o aparelho • Não coloque a panela elétrica sobre uma perto da extremidade bancada de pedra de um banco ou mesa quando está a cozinhar. durante o funcionamento. Certifique-se de que As bancadas são sensíveis a superfície está nivelada, a calor desigual e podem limpa e livre de qualquer rachar se forem aquecidas...
  • Page 178 • Não coloque alimentos DIRETRIZES ou líquidos diretamente DE SEGURANÇA na base de aço inoxidável. IMPORTANTES PARA Apenas a panela interior TODOS OS APARELHOS amovível foi concebida ELÉTRICOS para conter alimentos • Não utilize este aparelho ou líquidos. se estiver gasto, tiver •...
  • Page 179 Contacte e pessoas com capacida- des físicas, sensoriais o serviço de atendimento ou mentais reduzidas ou ao cliente da Sage ou com falta de experiência aceda a sageappliances. e conhecimento, mas com se o aparelho apenas se tiverem estiver danificado ou for necessária qualquer tarefa...
  • Page 180 • Recomendamos Não coloque o cabo a instalação de um de alimentação, a ficha dispositivo de corrente ou o aparelho dentro de residual (comutador de água ou qualquer outro segurança) para fornecer líquido para proteger contra segurança adicional ao choques elétricos. utilizar todos os aparelhos O símbolo apresentado elétricos.
  • Page 181 Componentes A. Válvula de libertação de pressão F. Porca de vedação Controla automaticamente o nível G. Panela interior de 6 L removível de libertação do vapor da panela H. Braço da tampa B. Válvula de segurança da pressão I. Ranhura de resíduos de limpeza fácil C.
  • Page 182: Painel De Controlo

    PAINEL DE CONTROLO SOUP STOCK MEAT STEW STEAM SAUTÉ | SEAR LEGUMES RICE | GRAINS RISOTTO YOGURT REDUCE SOUS VIDE DELAY START KEEP WARM PRESSURE SLOW NATURAL COOK COOK AUTO QUICK PULSE RELEASE A. Predefinições de alimentos com J. Botão de libertação de pressão com indicadores luminosos indicador de seleção de modos B.
  • Page 183 PREDEFINIÇÕES DE ALIMENTOS DEFINIÇÃO: COZEDURA A PRESSÃO MENU DE ALIMENTOS PREDEFINIÇÃO INTERVALO Sopa 50 kPa - aprox. 110 °C 10 kPA - 80 kPa 30 MIN Até 2 h RÁPIDO AUTOMÁTICO Caldo 80 kPa - aprox. 116 °C 10 kPA - 80 kPa 1 HORA Até...
  • Page 184 IOGURTE Passo 1 Passo 2 Passo 3 Tempo: 8-16 horas Ferver Refrigerar* Incubar Temp: n/a 10 MIN. Até 3 horas 8 horas Manter quente: Temp.: 83 °C Temp: de 83 °C a 43 °C Temp.: 43 °C MANTER MANTER QUENTE MANTER QUENTE DESATIVADO...
  • Page 185: Antes Da Primeira Utilização

    na parte inferior do braço da tampa e empurre para a devida posição para Funções expor a rosca do parafuso. Fixe a tampa enroscando a porca de vedação de maneira que a vedação vermelha toque na superfície da tampa. ANTES DA PRIMEIRA UTILIZAÇÃO 1.
  • Page 186 DEFINIÇÕES DO PAINEL Arroz/Grãos DE CONTROLO ✔ ✘ Risotto ✔ ✘ A panela elétrica Fast Slow GO™ tem 6 Iogurte predefinições de cozedura; Cozedura sob ✘ ✔ Pressão, Cozedura Lenta, Reduzir, Saltear/ PASSOS SIMPLES DE PREDEFINIÇÕES Selar, Vapor e Sous Vide. Inclui também Por exemplo, 8 predefinições de alimentos: Sopa, Caldo,...
  • Page 187 Como os alimentos cozidos sob pressão SUGESTÃO requerem pouco líquido de cozedura, retêm mais vitaminas, minerais e outros nutrientes Se desejar, é possível saltear vegetais ou e os sabores naturais são realçados. selar carne com a função SALTEAR/SELAR 1. Para selecionar o modo manual de antes de cozinhar.
  • Page 188 estiver aceso, o temporizador inicia a NOTA contagem crescente. 15. Abra a tampa rodando o botão da tampa É normal que a panela elétrica liberte no sentido contrário ao dos ponteiros do pequenas rajadas de vapor à medida relógio e levante-a cuidadosamente para que estabiliza.
  • Page 189 LIBERTAÇÃO DE VAPOR VARIÁVEL cozedura para abrir a válvula de libertação MÃOS LIVRES da pressão. The Fast Slow GO™ inclui 3 métodos NOTA de libertação de vapor: O modo de libertação de vapor ou pressão Auto Quick (Libertação programado nos modos de cozedura Rápida Automática)
  • Page 190 5. Coloque os alimentos na panela interior 11. A panela emite um sinal sonoro, amovível. Certifique-se de que existe a retroiluminação laranja do botão pelo menos 1 L de alimentos e líquido INICIAR/CANCELAR apaga-se se combinados na panela. a função MANTER QUENTE não tiver sido selecionada.
  • Page 191 • Não encha excessivamente a panela • Não encha excessivamente a panela interior. O volume total de água, ossos interior. O volume total de ingredientes crus e/ou ervas aromáticas não deve exceder do guisado não deve exceder a marca a marca de nível "MAX" dentro da panela de nível "MAX"...
  • Page 192 • Adicione a quantidade de água correspondente. Consulte a tabela de SALTEAR/SELAR culinária para arroz/grãos e leguminosas na página Web da Sage para obter mais Esta predefinição tem três níveis: saltear informações. baixo, saltear médio e selado. • Após cozinhar, deixe o arroz em repouso O nível de temperatura será...
  • Page 193 de libertação da pressão para a posição pressão para a posição aberta para garantir aberta. uma temperatura de cozedura consistente. SOUS VIDE Quando devo selar? A definição SOUS VIDE é ideal para Pode selar os itens antes ou depois de cozinhar alimentos a uma temperatura muito cozinhar com a função SALTEAR/SELAR.
  • Page 194 PASSO 1 – Ferver o leite com o leite arrefecido na panela interior. Coloque a panela interior na Fast Slow GO™. Feche e bloqueie a tampa, prima INICIAR Adicione o leite. Feche e bloqueie a tampa, para incubar durante 5-8 horas. Quanto mais rode a válvula de libertação da pressão para...
  • Page 195: Manter Quente

    INÍCIO RETARDADO com um termómetro. Quando o leite atingir 43 °C, adicione ½ chávena (125 ml) de A Fast Slow GO™ possui uma função leite arrefecido ao fermento do iogurte, de temporizador para retardar o início bata até ficar homogéneo, em seguida, de cozedura em até 24 horas. Esta função junte à...
  • Page 196 5 segundos para reverter para Celsius de pressão. e o ecrã apresenta C para Celsius. Para manter resultados de cozedura consistentes às várias altitudes, a panela Fast Slow GO™ tem uma funcionalidade de Ajuste da Altitude que ajusta as definições com base na altitude da sua atual localização. 1. Para aceder à definição Altitude, mantenha premido os botões INÍCIO...
  • Page 197: Cuidados E Limpeza

    DESMONTAR A TAMPA: Cuidados • Puxe cuidadosamente a junta de silicone e limpeza para retirá-la do suporte da junta. Verifique periodicamente se está limpa, flexível e sem fendas ou cortes. Se estiver Antes de limpar, certifique-se de que a danificada, não utilize o aparelho. panela elétrica está desligada. Retire a ficha • Lave a parte interna da tampa com uma do cabo de alimentação da tomada elétrica esponja ou um pano húmido com sabão.
  • Page 198 • Certifique-se de que a tampa está fechada 1–2 anos (consulte o Centro de Assistência e trancada na sua devida posição. Sage mais próximo). • Armazene o aparelho na vertical com os • Lave a junta com água morna com sabão. seus pés de apoio nivelados. Não armazene Enxague com água limpa e deixe secar...
  • Page 199: Resolução De Problemas

    • Adicione mais líquidos/alimentos à panela. Deve haver uma "SEAL" (Selar) quantidade mínima de 1 litro de alimentos e líquido combinados. • Contacte o serviço de atendimento ao cliente da Sage se o problema persistir. A panela elétrica passa • Adicione mais água à panela interior e reinicie o ciclo.
  • Page 200 Durante este período da garantia, a Sage Appliances irá reparar, substituir ou reembolsar qualquer produto defeituoso (sob o critério exclusivo da Sage Appliances). Todos os direitos legais da garantia ao abrigo da legislação nacional aplicável serão...
  • Page 201 Notas...
  • Page 202 Notas...
  • Page 203 Notas...
  • Page 204 Netherlands Sweden Österreich: 0800 80 2551 0800 020 1741 0200 123 797 Luxembourg Denmark Sage Appliances France SAS 0800 880 72 080 820 827 Siège social: 66 avenue des Champs Elysées – 75008 Paris 879 449 866 RCS Paris Switzerland...

Ce manuel est également adapté pour:

Bpr680Spr680

Table des Matières