Table des Matières
Publicité
Les langues disponibles
Les langues disponibles
Liens rapides
Publicité
Chapitres
Table des Matières
Dépannage

Manuels Connexes pour Sensopart FT 50 C S1 Série


Sommaire des Matières pour Sensopart FT 50 C S1 Série
- Page 1 Montage- und Bedienungsanleitung Mounting and operating instructions Instructions de service et de montage FT 50 C...S1 Farbsensor mit serieller Schnittstelle Colour sensor with serial interface Capteur de couleur avec interface série...
- Page 2 écrite de SensoPart Industriesensorik GmbH. Nous déclinons toute responsabilité concernent les fautes éventuelles d’impression et autres erreurs qui auraient pu intervenir lors du montage de cette brochure.
- Page 3 Hinweise zur Bedienung: Drücken der Tasten nur mit Finger! Keine spitzen Gegenstände verwenden! Instructions for use: Push buttons only with finger! Do not use sharp objects! Indications pour l’utilisation : N’ appuyer sur les boutons qu’avec les doigts ! Ne pas utiliser d’objets pointus ! Taste drücken Taste loslassen Farbe einlernen...
- Page 4 Maßzeichnung / Dimensional drawing / Plan coté Abb. 1 / Illustr. 1 / Fig. 1 15300350 Anschluss / Wiring / Raccordement IN ES IN ET IN ES IN KL/TR IN ET RS485 Data+ (Y/A) IN KL/TR RS485 Data+ (Y/A) RS485 Data- (Z/B) RS485 Data- (Z/B) Abb.
-
Page 5: Table Des Matières
Montage- und Bedienungsanleitung Inhaltsverzeichnis Inhaltsverzeichnis ...............................5 Symbolerklärung ..............................6 Sicherheitshinweise ..............................6 Bestimmungsgemäße Verwendung ........................7 Leistungsmerkmale...............................7 Montage ................................8 5.1 Maßzeichnung .............................8 5.2 Sensormontage ............................8 Elektrische Installation ............................9 Bedienung und Einstellung ..........................10 7.1 Anzeigen und Einstellelemente ........................10 7.2 Mögliche Einstellungen und Betriebsarten....................11 7.3 Einstellungen über das Bedienfeld vornehmen ..................12 7.3.1 Kurzanleitung (068-13883) siehe Ausklappseite ................12 7.3.2 Einstellmodus (conf) aktivieren ......................12... -
Page 6: Symbolerklärung
Montage- und Bedienungsanleitung Symbolerklärung Warnhinweise und sonstige Hinweise sind in dieser Anleitung durch Symbole gekennzeichnet. Sie werden durch Signalworte eingeleitet. Die verwendeten Symbole sind: WARNUNG ... weist auf eine möglicherweise gefährliche Situation hin, die zum Tod oder zu schweren Verletzungen führen kann, wenn sie nicht gemieden wird. -
Page 7: Bestimmungsgemäße Verwendung
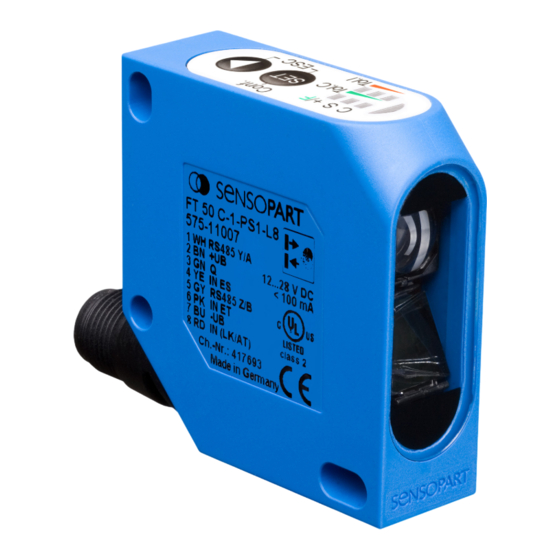
Montage- und Bedienungsanleitung Bestimmungsgemäße Verwendung Der FT 50 C...S1 ist ein Farbsensor zum Erkennen farblich unterschiedlicher Objekte im Tasterbetrieb (bei opaken Objekten) und Reflektorbetrieb (bei transparenten Objekten). WARNUNG Das Produkt ist für das Sichern von Personen nicht zugelassen (kein Sicherheitsbauteil gemäß Maschinenrichtlinie). -
Page 8: Montage
Montage- und Bedienungsanleitung Montage Maßzeichnung Abb. 5 15300065 Abb. 4 15300350 Sensormontage Sensor mit Befestigungsbohrungen an geeigneten Halter z.B. Typ MS F 50 oder MSP F 50* (nicht im Lieferumfang enthalten) schrauben. Sensor so positionieren, dass der Abstand vom Sensor zum Objekt möglichst konstant ist. HINWEIS Einsatzbedingungen beachten •... -
Page 9: Elektrische Installation
Montage- und Bedienungsanleitung Elektrische Installation Gerätestecker so verdrehen (Abb. 4), dass das Anschlusskabel frei und ohne abzuknicken angeschlossen werden kann. Buchse des Anschlusskabels aufstecken und verschrauben (zulässige Anzugsdrehmomente ca. 0,5 ...1 Nm). Anschlusskabel sichern (zum Beispiel mit Kabelbinder). Sensor gemäss Abb. 10 / Abb. 11 anschließen. IN ES IN ET IN ES... -
Page 10: Bedienung Und Einstellung
Montage- und Bedienungsanleitung Bedienung und Einstellung Der Sensor hat verschiedene Betriebsarten und Funktionen. Er verfügt über eine serielle RS485-Schnittstelle zur Übertragung von Farbwerten und zum Einstellen der Sensorfunktionen. Über das Bedienfeld wird der Sensor mit den Tasten eingestellt. VORSICHT Drücken der Tasten nur mit Finger! Keine spitzen Gegenstände verwenden! Anzeigen und Einstellelemente Die Tasten und ihre Funktion: Generelle Bedienfunktionen... -
Page 11: Mögliche Einstellungen Und Betriebsarten
Montage- und Bedienungsanleitung Anzeigefunktion Farbe Verwendung Im Betriebsmodus Im Einstellmodus Gelb S = Scan Keine Funktion BLINKT, Farbe scannen wenn Menü „S” (eine Farbe einscan- nen) gewählt, BLINKT mit „+/F”, wenn Menü „S+” gewählt. Gelb C+ = Teach+ Keine Funktion BLINKT mit „C”, S+ = Scan+ wenn Menü... -
Page 12: Einstellungen Über Das Bedienfeld Vornehmen
Montage- und Bedienungsanleitung Werkseinstellung Zusätzlich über die elektrische Schnittstelle: • Über die externe Eingabeleitung „IN ET” ist das Einlernen einer Refe- renzfarbe möglich. • Über die externe Eingabeleitung „IN ES” ist das Einscannen eines Farbbereichs möglich. • Über die RS485-Schnittstelle können alle Sensorfunktionen eingestellt und ausgelesen werden. - Page 13 Montage- und Bedienungsanleitung Ablauf: Schritt Menüpunkt Aktivität Es folgt Bild Bemerkung Betriebsmo- Objekt Betriebsparameter wie Tastweite, Bewegungsrichtung, dus (kein positionieren Neigungswinkel, etc. (siehe Kapitel 5 „Montage”) beachten. Menüpunkt) LED „C” (gelb) blinkt, wenn Zeitschloss geöffnet und Ein- stellmodus aktiviert ist. >...
-
Page 14: Menü „C+": Weitere Farben Einlernen, Hinzufügen, Verknüpfen
Montage- und Bedienungsanleitung Farbe einlernen über Eingang IN ET: Der Teach-in-Vorgang kann auch über die Eingabeleitung IN ET (PIN 6) ausgelöst werden. Hierzu muss die Eingabeleitung > 3 s auf High-Pegel gesetzt werden (Zeitschloss). Die Farbe wird mit dem Wechsel der Flanke (von High auf Low) eingelernt. -
Page 15: Menü „S": Scannen Eines Einzelnen Farbbereiches
Montage- und Bedienungsanleitung Schritt Menüpunkt Aktivität Es folgt Bild Bemerkung Farbtoleranz ist übernommen. Sensor ist bereit für die Einstellung der Intensitätstoleranz. bestätigen LED „C” (gelb) leuchtet, wenn Farbe erkannt wird,* LEDs „Tol.I” (rot) leuchten. mehrfach Intensitätstoleranz (Grauselektivität) auswählen drücken, bis gewünschte Toleranz gewählt ist... -
Page 16: Menü „S+": Weitere Farbbereiche Einscannen, Hinzufügen, Verknüpfen
Montage- und Bedienungsanleitung Schritt Menüpunkt Aktivität Es folgt Bild Bemerkung Farbbereich Solange gedrückt ist, wird der Farbbereich einge- einscannen scannt. drücken und gedrückt halten Farbbereich wird gespeichert. Sensor ist einsatzbereit. loslassen LED „C” (gelb) leuchtet, wenn Farbe erkannt / Schaltausgang „Q” aktiv ist (wenn Schaltart = N.O. -
Page 17: Menü „F": Sonderfunktionen Einstellen
Montage- und Bedienungsanleitung Schritt Menüpunkt Aktivität Es folgt Bild Bemerkung Zusätzlicher Farbbereich wird gespeichert. Sensor ist einsatzbereit loslassen LED „C” (gelb) leuchtet, wenn Farbe erkannt / Schaltausgang „Q” aktiv ist (wenn Schaltart = N.O. = Werkseinstellung eingestellt). Zum Einlernen (hinzufügen) weiterer Farbbereiche den Einstellablauf (Schritte 1-5) wiederholen. 7.3.7 Menü... -
Page 18: Kommunikation Über Die Serielle Schnittstelle
HINWEIS Zur komfortablen Parametrierung der Sensortypen S1 ist eine Bediensoftware „ProgSensor” verfügbar, die von unserer Homepage heruntergeladen werden kann (www.sensopart.de). Beim Anschluss mehrerer Sensoren über den RS485-Bus können sich Reflexionen bilden, welche die Übertragung beeinträchtigen. Daher muß am Ende des Busses das Kabel mit einem Widerstand abgeschlossen werden, der dem Wellenwiderstand der verwendeten Leitung (in der Regel 120 Ohm) entspricht. -
Page 19: Beschreibung Des Protokolls
Montage- und Bedienungsanleitung werksseitig fest veränderbar 4800 / 9600 / 19200 / 38400 Baud Datenübertragungsrate Werkseinstellung 9600 Baud Stoppbits Parity keine Bits / Byte Zugriffsverfahren Master / Slave (der Sensor verhält sich als Slave) Sensor-Adresse Beschreibung des Protokolls • Das Datenübertragungsprotokoll ist busfähig. •... -
Page 20: Übersicht Der Masterbefehle
Montage- und Bedienungsanleitung Mögliches Antworttelegramm des Sensors Dezimal Hex.: Bedeutung Befehl wurde ausgeführt Befehl konnte nicht ausgeführt werden; mögliche Ursachen: Prüfsumme oder Parameter / Befehl falsch In den Parameterbytes (4. Byte bis (n-1). Byte) werden 12 Bit-Daten und 7 Bit-Daten übertragen. Dabei werden folgende Formate benutzt: Mögliche Parameterformate: 7 Bit Datenbyte... -
Page 21: Beispiele Für Masterbefehle
Montage- und Bedienungsanleitung Befehlsbez. Dez. Hex.: ASCII Bemerkung Bsp. Alle Einstellungen Der Sensor überträgt alle Einstellungen 8.5.8 des Sensors lesen (Parameter und Farbkanäle). Farbvektor lesen Aktuell gemessenen Farbwert (Farbvektor) lesen 8.5.9 (Sensor sendet Farbvektor und im letzten 12 Bit-Datenwort den Zustand des Schaltausgangs). Farbmatrix über- Der Master programmiert die 5 Farbkanäle. -
Page 22: Softwareversion Lesen
Montage- und Bedienungsanleitung 8.5.2 Softwareversion lesen Befehl (Byte 3): dezimal 118; hexadezimal 0x76 Parameter: keine Antwort (Byte 3): dezimal 89; hexadezimal 0x59 Parameter: Hauptversion 7 Bit Datenbyte, Nebenversion 7 Bit Datenbyte Der Sensor sendet die Softwareversion. Beispieltelegramm (im Beispiel hat der Sensor die Adresse 1 und die SW-Version 3.5) Mastertelegramm Antworttelegramm des Sensors Bezeichnung... -
Page 23: Tastenfeld Verriegeln Und Entriegeln
Montage- und Bedienungsanleitung Der Sensor übernimmt die neue Sensoradresse. Beispieltelegramm (im Beispiel hat der Sensor die Adresse 1, der Master ändert die Adresse auf 122. Der Sensor antwortet noch mit der alten Adresse; danach ist er nur mit der neuen Adresse ansprechbar) Mastertelegramm Antworttelegramm des Sensors Bezeichnung... -
Page 24: Farbkanal Lesen
Montage- und Bedienungsanleitung Antwort (Byte 3): dezimal 89; hexadezimal 0x59 Parameter: keine Der Sensor aktiviert die Funktion in Abhängigkeit des Parameterwertes. Beispieltelegramm (im Beispiel hat der Sensor die Adresse 1 und der Sensor wird als Öffner mit Abfallverzögerung programmiert) Mastertelegramm Antworttelegramm des Sensors Bezeichnung Dezimal... - Page 25 Montage- und Bedienungsanleitung Antwort (Byte 3): dezimal 89; hexadezimal 0x59 Parameterformat Parameter: Zustand Öffner / Schließer und Abfallverzögerung 12 Bit Datenwort Rotanteil Kanal 1 12 Bit Datenwort Grünanteil Kanal 1 12 Bit Datenwort Intensität Kanal 1 12 Bit Datenwort Farbtoleranz Kanal 1 12 Bit Datenwort Intensitätstoleranz Kanal 1 12 Bit Datenwort...
-
Page 26: Farbvektor (Aktuell Gemessener Farbwert) Lesen
Montage- und Bedienungsanleitung 8.5.9 Farbvektor (aktuell gemessener Farbwert) lesen Befehl (Byte 3): dezimal 65; hexadezimal 0x41 Parameter: keine Antwort (Byte 3): dezimal 89; hexadezimal 0x59 Parameterformat Rotanteil 12 Bit Datenwort Grünanteil 12 Bit Datenwort Intensität 12 Bit Datenwort mit Schaltausgangskennung Zu den möglichen Zahlenwerten der Intensität siehe Kapitel 8.5.8 (Alle Einstellungen lesen). -
Page 27: Farbe Einlernen Und Farbbereich Einscannen
Montage- und Bedienungsanleitung Mastertelegramm Antworttelegramm des Sensors Bezeichnung Dezimal Hex.: Bezeichnung Dezimal Hex.: 1. Byte Adresse 1. Byte Adresse 2. Byte Länge 2. Byte Länge 3. Byte 3. Byte Befehl Antwort 4. Byte 4. Byte Prüfsumme Rotanteil Kanal 1 5. Byte 6. -
Page 28: Toleranz Einstellen
Montage- und Bedienungsanleitung Beispieltelegramm (im Beispiel hat der Sensor die Adresse 1, es wird ein Einlernvorgang ohne Änderung der Toleranz durchgeführt) Mastertelegramm „Farbe einlernen” starten Mastertelegramm Antworttelegramm des Sensors Bezeichnung Dezimal Hex.: Bezeichnung Dezimal Hex.: 1. Byte Adresse 1. Byte Adresse 2. -
Page 29: Datenübertragungsrate Einstellen
Montage- und Bedienungsanleitung 8.5.13 Datenübertragungsrate einstellen Befehl (Byte 3): dezimal 66; hexadezimal 0x42 Parameter: 0: 4800 Baud 1: 9600 Baud 2: 19200 Baud 3: 38400 Baud Parameterformat: 7 Bit Datenbyte Antwort (Byte 3): dezimal 89; hexadezimal 0x59 Parameter: keine Mit diesem Befehl wird die Datenübertragungsrate der Schnittstelle eingestellt. Beispieltelegramm (im Beispiel hat der Sensor die Adresse 1, es wird die Datenübertragungsrate 19200 Baud eingestellt) Mastertelegramm „Datenübertragungsrate einstellen“... -
Page 30: Pflege Und Wartung
Montage- und Bedienungsanleitung Pflege und Wartung Reinigung Bei Verschmutzung die Frontscheibe des Sensors mit einem weichen Tuch und ggf. etwas Kunststoffreiniger reinigen. VORSICHT Niemals aggressive Reinigungsmittel verwenden. Transport, Verpackung, Lagerung Die Lieferung bei Erhalt unverzüglich auf Vollständigkeit und Transportschäden prüfen. Bei Transportschäden den Transporteur benachrichtigen. -
Page 31: Technische Daten
Montage- und Bedienungsanleitung Technische Daten Optische Daten (typ.) FT 50 C-1-S1-L8 FT 50 C-2-S1-L8 FT 50 C-3-S1-L8 Tastweite (ab Referenzpunkt) 12 ... 32 mm 15 ... 30 mm 18 ... 22 mm Tastweitentoleranz ± 6 mm (bei Tol C 3 ±... -
Page 32: Bestellinformationen
Montage- und Bedienungsanleitung Elektrische Daten (typ.) Bereitschaftsverzug t ≤ 300 ms Mechanische Daten (typ.) Gehäusematerial ABS, schlagfest Material Frontscheibe PMMA Schutzart IP 67 * Umgebungstemperaturbereich -10 ... +55 °C Lagertemperaturbereich -20 ... +80 °C Schock und Schwingungsfestigkeit EN 60947-5-2 Anschluss M12 Stecker, drehbar, 8-polig Gewicht ca. - Page 33 Wenn Ihr PC über eine RS232-Schnittstelle verfügt, den RS232 Konverter K2-ADE-TB * Verfügt Ihr PC über eine USB Schnittstelle, benötigen Sie das CUSB-RS485-Set * Artikelnummer siehe Zubehörliste HINWEIS Datenblätter, Bedienungsanleitungen und die Bedienungssoftware (Progsensor) stehen unter www.sensopart.com zum Herunterladen bereit. FT 50 C...S1 Farbsensor - D - 068-13821 - 10.10.2011-04...
- Page 34 Mounting and operating instructions Contents Contents ...................................34 Guide to symbols ..............................35 Safety instructions ..............................35 Correct use .................................36 Performance ...............................36 Mounting ................................37 5.1 Dimensional drawing ..........................37 5.2 Mounting the sensor ..........................37 Electrical installation ............................38 Use and configuration ............................39 7.1 Displays and configuration elements ......................39 7.2 Possible configurations and operating modes ...................40 7.3 Configuration via the control panel ......................41 7.3.1 Quick user guide (068-13883) see fold-out page ................41...
-
Page 35: Guide To Symbols
Mounting and operating instructions Guide to symbols Warnings and other information are signalled by symbols in this manual. They are accompanied by hea- dings. The following symbols are used: WARNING ... indicates a possibly dangerous situation which can cause death or serious injury if not avoided. CAUTION ... -
Page 36: Correct Use
Mounting and operating instructions Correct use The FT 50 C...S1 is a colour sensor for the detection of objects in varying colours in proximity mode (for opaque objects) and reflector mode (for transparent objects). WARNING The product is not approved for the protection of personnel (no safety component according to Machinery Directive). -
Page 37: Mounting
Mounting and operating instructions Mounting Dimensional drawing Illustr. 5 15300065 Illustr. 4 15300350 Mounting the sensor Screw sensor to suitable holder e.g. type MS F 50 or MSP F 50* (not included in delivery) using the fixing holes. Fit the sensor in a place where the distance to the object is as constant as possible (little variation in scanning distance). -
Page 38: Electrical Installation
Mounting and operating instructions Electrical installation Rotate the connector plug (illustr. 4) so that the cable can be connected easily, without kinks. Fit socket of the connector cable and screw tight (authorised approx. tightening torque 0.5 to 1 Nm). Secure connection cable (for example with cable retainer). Connect sensor according to illustr. -
Page 39: Use And Configuration
Mounting and operating instructions Use and configuration The sensor has different operating modes and functions. It has a serial RS485 interface for the transfer of colour values and configuration of sensor functions. Sensor configuration can be carried out via the control panel using the keys. -
Page 40: Possible Configurations And Operating Modes
Mounting and operating instructions Display function Colour In operating mode In configuration mode Yellow S = Scan No function FLASHES, Scan colour if menu „S” (scan a colour) is selected, FLASHES with „+/F”, if menu „S+” is selected. Yellow C+ = Teach+ No function FLASHES with „C”,... -
Page 41: Configuration Via The Control Panel
Mounting and operating instructions Factory setting Also via the electrical interface: • It is possible to teach a reference colour via the external input cable „IN ET” • It is possible to scan a colour range via the external input cable „IN ES”... - Page 42 Mounting and operating instructions Procedure: Step Menu item Activity Picture follows Remark Operating Position object Observe operating parameters such as scanning distance, mode (no direction of movement, inclination etc. (see chapter 5 menu item) „Mounting”). Press LED „C” (yellow) flashes, when time lock is open and configuration mode is activated.
-
Page 43: Menu „C+": Teach, Add, Link Further Colours
Mounting and operating instructions Teach-in colours via input IN ET: The teach-in procedure can also be initiated by means of the input cable IN ET (PIN 6). For this purpose, the input cable must be set for > 3 s to High (time lock).The colour is taught by the variation of the edge (from High to Low). After the teach-in process, the colour is stored with the last manual tolerance settings. -
Page 44: Menu „S": Scanning A Single Colour Range
Mounting and operating instructions Step Menu item Activity Picture follows Remark Confirm with Colour tolerance is stored. Sensor is ready for the setting of intensity tolerance LED „C” (yellow) lights up when colour is detected,* LEDs „Tol.I” (red) light up. Press Select intensity tolerance (grey selectivity). -
Page 45: Menu „S+": Scan, Add, Link Further Colour Ranges
Mounting and operating instructions Step Menu item Activity Picture follows Remark Release Colour range is stored. Sensor is ready for use. LED „C” (yellow) lights up, when colour is detected / swit- ching output „Q” is active (when switching mode = N.O. = Factory setting is selected). -
Page 46: 7.3.7 Menu „F": Configurating Special Functions
Mounting and operating instructions 7.3.7 Menu „F”: Configurating special functions Individual functions are configurated or activated / deactivated in this menu. Step Menu item Activity Picture follows Remark Press LED „C” (yellow) flashes, when time lock is open and configuration mode is activated. >... -
Page 47: Communication Via The Serial Interface
INFORMATION For a convenient parameterization of the S1 sensor types, there is an operating software „ProgSensor” available for download on our website (www.sensopart.de). If several sensors are connected via the RS485 bus, reflections can occur which may impair transmission. At the end of the RS485 bus, the cable must therefore be fitted with a resistor corresponding to the characteristic impedance of the used cable (normally 120 Ohm). -
Page 48: Description Of Protocol
Mounting and operating instructions Description of protocol • The data transfer protocol is bus-compatible. • The sensor only sends data on request. The sensor has an address within the range 1 to 127 (factory setting = 1). • A data transfer cycle consists of a command telegram addressed to the sensor by the master and the sensor’s reply telegram. -
Page 49: Overview Of Master Commands
Mounting and operating instructions Possible parameter format: 7 bit data byte Data byte bit [6..0] 12 bit data item: Byte i Byte i + 1 Data item bit [11..6] Data item bit [5..0] 12 bit data item with switching output recognition (Q1 in bit D6, byte i + 1) and data valid (DV in bit D6 byte i) Byte i Byte i + 1 Data item bit [11..6]... -
Page 50: Examples For Master Commands
Mounting and operating instructions Command descrip- Dec. Hex.: ASCII Remark tion Tolerance settings Enter colour and grey selectivity (only constructive in con- 8.5.12 junction with „teach colour” command). Set data transfer rate Setting of data transfer rate. Possible Baud rates are 4800, 8.5.13 9600, 19200 and 38400 Baud. -
Page 51: Activate Factory Setting
Mounting and operating instructions Master telegram Sensor’s reply telegram Designation Decimal Hex.: Designation Decimal Hex.: 1st byte Address 1st byte Address 2nd byte Length 2nd byte Length 3rd byte 3rd byte Command Reply 4th byte Check sum 4th byte Main version 5th byte Secondary version 5 6th byte... -
Page 52: Lock And Unlock Keys
Mounting and operating instructions Master telegram Sensor’s reply telegram Designation Decimal Hex.: Designation Decimal Hex.: 1st byte Address 1st byte Address 2nd byte Length 2nd byte Length 3rd byte 3rd byte Command Reply 4th byte New address 4th byte Check sum 5th byte Check sum 8.5.5... -
Page 53: Read Colour Channel
Mounting and operating instructions Example telegram (In the example, the sensor has the address 1 and the sensor is programmed as N.C. with drop-out delay time) Master telegram Sensor’s reply telegram Designation Decimal Hex.: Designation Decimal Hex.: 1st byte Address 1st byte Address 2nd byte... -
Page 54: Read Colour Vector (Current Measured Colour Value)
Mounting and operating instructions Reply (byte 3): decimal 89; hexadecimal 0x59 Parameter format Intensity channel 1 12 bit data item Colour tolerance channel 1 12 bit data item Intensity tolerance channel 1 12 bit data item Channel 2 to channel 5 as with channel 1 The sensor transfers all configuration settings. -
Page 55: Transfer Colour Matrix
Mounting and operating instructions Reply (byte 3): decimal 89; hexadecimal 0x59 Parameter format Red portion 12 bit data item Green portion 12 bit data item Intensity 12 bit data item with switching output detection See chapter 8.5.8 (Read all configuration settings) for possible values for the intensity. The sensor sends the colour vector and the switching output status in the last 12 bit data item. -
Page 56: Teach Colour And Scan Colour Range
Mounting and operating instructions Master telegram Sensor’s reply telegram Designation Decimal Hex.: Designation Decimal Hex.: 1st byt Address 1st byt Address 2nd byte Length 2nd byte Length 3rd byte 3rd byte Command Reply 4th byte 4th byte Check sum Red portion channel 1 5th byte 6th byte... -
Page 57: Set Tolerance
Mounting and operating instructions Example telegram (In the example, the sensor has the address 1, a teach-in process is carried out without altering the tolerance) Master telegram „Start teach colour“ Master telegram Sensor’s reply telegram Designation Decimal Hex.: Designation Decimal Hex.: 1st byte Address 1st byte... -
Page 58: Set Data Transfer Rate
Mounting and operating instructions Example telegram (In the example, the sensor has the address 1, colour tolerance level 3 and intensity tolerance level 4 are set): Master telegram Sensor’s reply telegram Designation Decimal Hex.: Designation Decimal Hex.: 1st byte Address 1st byte Address 2nd byte... -
Page 59: Care And Maintenance
Mounting and operating instructions Care and maintenance Cleaning Should the front screen of the sensor become dirty, wipe it with a soft cloth and if necessary use a cleaning agent for plastic surfaces. CAUTION Never use aggressive detergents. Transport, packaging, storage Check the delivery upon receipt to ensure that it is complete and that no damage occurred during transport. -
Page 60: Technical Data
Mounting and operating instructions Technical data Optical data (typ.) FT 50 C-1-S1-L8 FT 50 C-2-S1-L8 FT 50 C-3-S1-L8 Scanning distance (from reference point) 12 ... 32 mm 15 ... 30 mm 18 ... 22 mm Scanning distance tolerance ± 6 mm (with Tol C ±... -
Page 61: Order Information
Mounting and operating instructions Electrical data (typ.) Power-on delay t ≤ 300 ms Mechanical data (typ.) Casing material ABS, shock-resistant Front screen material PMMA Protection standard IP 67 * Ambient temperature range -10 ... +55 °C Storage temperature range -20 ... +80 °C Resistance to thermal shocks and vibration EN 60947-5-2 Connection... - Page 62 If your PC has a USB interface, the additional CUSB-RS485-Set * is required. See accessory list for part numbers INFORMATION Data sheets, instruction manuals and operating software (Progsensor) are available for downloa- ding on www.sensopart.com. FT 50 C...S1 Colour sensor - GB - 068-13821 - 10.10.2011-04...
- Page 63 Instructions de service et de montage Table de matières Table de matières ..............................63 Explication des symboles ...........................64 Instructions de sécurité ............................64 Utilisation conforme à la destination de l'appareil ....................65 Caractéristiques de fonctionnement ........................65 Montage ................................66 5.1 Plan coté ..............................66 5.2 Montage du capteur ...........................66 Installation électrique ............................67 Commande et réglage ............................68 7.1 Témoins de fonctionnement et éléments de réglage .................68...
-
Page 64: Explication Des Symboles
Instructions de service et de montage Explication des symboles Les avertissements et autres messages contenus dans ce manuel sont repérés par des symboles. Ils sont également précédés de mots les signalant. Les symboles utilisés sont les suivants : AVERTISSEMENT ... indique une situation potentiellement dangereuse pouvant provoquer la mort ou des blessures graves si elle n'est pas évitée. -
Page 65: Utilisation Conforme À La Destination De L'appareil
Instructions de service et de montage Utilisation conforme à la destination de l'appareil Le FT 50 C...S1 est un capteur de couleur destiné à la reconnaissance d'objets de différentes couleurs en détection directe (pour les objets opaques) et sur réflecteur (pour les objets transparents). AVERTISSEMENT Le produit n'est pas compatible avec la sécurité... -
Page 66: Montage
Instructions de service et de montage Montage Plan coté Fig. 5 15300065 Fig. 4 15300350 Montage du capteur Visser le capteur avec les trous de fixation sur un support approprié, p. ex. du type MS F 50 et MSP F 50* (non inclu dans la livraison). -
Page 67: Installation Électrique
Instructions de service et de montage Installation électrique Tourner le boîtier (fig. 4) jusqu'à ce que le câble de raccordement ne soit pas comprimé ou plié. Brancher et visser la prise femelle du câble de raccordement (couples de serrage autorisés env. 0,5 ...1 Nm). Fixer le câble de raccordement (par exemple avec un serre-câble). -
Page 68: Commande Et Réglage
Instructions de service et de montage Commande et réglage Le capteur a différents modes de service et fonctions. Il dispose d'une interface série RS485 pour la transmission de valeurs chromatiques et le réglage des fonctions. Le champ d'utilisation permet de procéder au réglage du capteur avec les touches ATTENTION N'appuyer sur les boutons qu'avec les doigts! Ne pas utiliser d'objets pointus ! Témoins de fonctionnement et éléments de réglage... -
Page 69: Réglages Et Modes De Fonctionnement Possibles
Instructions de service et de montage Témoins de fonctionnement Couleur Utilisation En mode de travail En mode de réglage Jaune C = Colour ALLUME (en type de commutati- CLIGNOTE Enregistrer on N.O. = réglage usine) en cas de sélection du menu une couleur par lorsque la couleur de l‘objet „... -
Page 70: Procéder À Des Réglages Avec Le Champ D'utilisation
Instructions de service et de montage Réglage usine • Scanner et ajouter d'autres gammes de couleurs et combiner par OU Blanc neutre (Kodak 90 %) pour tous les canaux exclusif à 4 gammes de couleurs maximum déjà scannées. Menu principal „ F ” (Functions) •... -
Page 71: Menu „ C " : Enregistrer Par Apprentissage Une Seule Couleur
Instructions de service et de montage 7.3.3 Menu „ C ” : enregistrer par apprentissage une seule couleur REMARQUE • Lorsqu'une couleur est enregistrée par apprentissage, toutes les autres couleurs / gammes de couleurs enregistrées et scannées auparavant sont effacées. •... -
Page 72: Menu „ C+ " : Enregistrer, Ajouter Et Combiner D'autres Couleurs
Instructions de service et de montage Etape Option de Activité Image suit Remarque menu Appuyer Sélectionner la tolérance d'intensité (sélectivité des gris) plusieurs fois jusqu'à ce que la tolérance 1 = tolérance la plus réduite, 4 = tolérance la plus élevée souhaitée 2 = réglage usine s'affiche... - Page 73 Instructions de service et de montage Etape Option de Activité Image suit Remarque menu Appuyer sur Le menu „ scanner d'autres couleurs ” est sélectionné La LED „ C ” et „ + ” (jaune) clignotent. Enregistrer la Appuyer sur Appuyer brièvement sur la touche (au relâchement de la couleur par touche, la couleur est enregistrée).
-
Page 74: Menu „ S " : Scanner Une Seule Gamme De Couleurs
Instructions de service et de montage 7.3.5 Menu „ S ” : scanner une seule gamme de couleurs REMARQUE • Fonction pour le scannage d'une surface colorée hétérogène. • Lorsqu'une couleur est scannée, toutes les couleurs / gammes de couleurs enregistrées et scannées auparavant sont effacées. -
Page 75: Menu „ S+ " : Scanner, Ajouter, Combiner D'autres Gammes De Couleurs
Instructions de service et de montage 7.3.6 Menu „ S+ ” : scanner, ajouter, combiner d'autres gammes de couleurs REMARQUE • La fonction „ S+ ” („ Scan+ ”) permet de scanner 1 à 4 autres gammes de couleurs et d'étendre la gamme de couleurs en 4 étapes maximum •... -
Page 76: Menu „ F " : Régler Des Fonctions Supplémentaires
Instructions de service et de montage 7.3.7 Menu „ F ” : régler des fonctions supplémentaires Ce menu permet de régler ou d'activer / désactiver chacune des fonctions supplémentaires. Etape Option de Activité Image suit Remarque menu / fonction Appuyer La LED „... -
Page 77: Communication Via L'interface Série
Pour un paramétrage simple des capteurs de type S1, il y a la possibilité de télécharger de notre site internet (www.sensopart.fr) un logiciel d‘utilisation „ ProgSensor ”. Lors du branchement de plusieurs capteur sur le Bus RS485, il peut y avoir des réflexions qui perturbent une bonne transmission. -
Page 78: Propriétés Et Paramètres De Base De L'interface Série Du Capteur
Instructions de service et de montage Propriétés et paramètres de base de l'interface série du capteur L'interface série du capteur se caractérise par les propriétés suivantes : réglage usine fixe modifiable Matériel RS485, semi-duplex Broche 1 Data+ (Y/A), broche 5 Data- (Z/B) 4800 / 9500 / 19200 / 38400 Taux de transmission des données... -
Page 79: Aperçu Des Commandes Maître
Instructions de service et de montage Le dernier octet est la somme de contrôle formée à partir du OU exclusif par bits de tous les octets précédents. Lors du calcul de la somme de contrôle, il faut ôter de 1 bit (bit d'adresse ou de sélection) le 8 ième ième... -
Page 80: Exemples De Commandes Maître
Instructions de service et de montage Désignation de la Déc. Hex. : ASCII Remarque commande Verrouiller et déver- Cette commande permet de verrouiller ou déverrouiller 8.5.5 rouiller le clavier immédiatement les touches de commande. La connexion de la broche 8 n‘est pas nécessaire. Le déverrouillage des touches est uniquement possible par envoi du télégramme contenant la commande correspondante. -
Page 81: Lire La Version Logicielle
Instructions de service et de montage Exemple de télégramme (dans l'exemple, le capteur a l'adresse 1) Télégramme du maître Télégramme de réponse du capteur Désignation Décimal Hex. : Désignation Décimal Hex. : 1er octet Adresse 1er octet Adresse 2e octet Longueur 2e octet Longueur... -
Page 82: Modifier L'adresse Du Capteur
Instructions de service et de montage 8.5.4 Modifier l'adresse du capteur Commande (octet 3) : Décimal 76 ; hexadécimal 0x4C Parameter: Nouvelle adresse de capteur Format de paramètre : Octet de données à 7 bits Réponse (octet 3) : Décimal 89; hexadécimal 0x59 Paramètres : Le capteur applique sa nouvelle adresse. -
Page 83: Régler Les Fonctions Supplémentaires (Contact D'ouverture/Contact De Fermeture Et Retard Au Déclenchement)
Instructions de service et de montage 8.5.6 Régler les fonctions supplémentaires (contact d'ouverture/contact de fermeture et retard au déclenchement) Commande (octet 3) Décimal 98 ; hexadécimal 0x62 Paramètres : Bit 0 : 1 Contact d‘ouverture 0 Contact de fermeture Bit 2 : 1 Avec retard au déclenchement 0 Sans retard au déclenchement Format de paramètre : Mot de données de 12 bits Réponse (octet 3) :... -
Page 84: Lire Tous Les Réglages
Instructions de service et de montage Télégramme du maître Télégramme de réponse du capteur Désignation Décimal Hex. : Désignation Décimal Hex. : 3e octet Commande 3e octet Réponse 4e octet Somme de contrôle 102 4e octet Canal de couleur 5e octet Somme de contrôle 73 8.5.8 Lire tous les réglages... -
Page 85: Lire Un Vecteur De Couleur (Valeur De Couleur Actuellement Mesurée)
Instructions de service et de montage Télégramme du maître Télégramme de réponse du capteur Désignation Décimal Hex. : Désignation Décimal Hex. : 12e octet Tolérance de couleur canal 1 13e octet 14e octet Tolérance d'intensité canal 1 15e octet 16e-55e octet Canal 2 - 5 56e octet Somme de contrôle (1 - 55) -
Page 86: Enregistrer Une Couleur Par Apprentissage Et Scanner Une Gamme De Couleurs
Instructions de service et de montage Commande (octet 3) : Décimal 105 ; hexadécimal 0x69 Format de paramètre Intensité canal 1 Mot de données de 12 bits Tolérance de couleur canal 1 Mot de données de 12 bits Tolérance d'intensité canal 1 Mot de données de 12 bits Canal 2 ... -
Page 87: Régler La Tolérance
Instructions de service et de montage Cette commande permet d'exécuter un apprentissage (enregistrer une couleur) ou un scannage (scanner une gam- me de couleurs). REMARQUE L'apprentissage et le scannage consistent en une séquence de commandes devant impérative- ment être traitée afin que le capteur puisse à nouveau fonctionner. Apprentissage : Etape 1 : Bit 0 = 1 Démarrer l'apprentissage („... -
Page 88: Réglage De Taux De Transmission Des Données
Instructions de service et de montage Réponse (octet 3) : Décimal 89 ; hexadécimal 0x59 Paramètres : Le capteur applique les tolérances selon la valeur du paramètre. REMARQUE Cette commande doit uniquement être utilisée en combinaison avec un apprentissage ou un scannage (voir chapitre 8.5.11). -
Page 89: Entretien Et Maintenance
Instructions de service et de montage Entretien et maintenance Nettoyage En cas d'encrassement de la platine avant du capteur, nettoyer avec un chiffon doux et, si nécessaire, un peu de nettoyant pour matières plastiques. ATTENTION Ne jamais utiliser de nettoyant agressif. Transport, emballage, stockage Vérifier dès la réception qu'aucune pièce ne manque et s'assurer de l'absence d'avaries de transport. -
Page 90: Caractéristiques Techniques
Instructions de service et de montage Caractéristiques techniques Caractéristiques optiques (typ.) FT 50 C-1-S1-L8 FT 50 C-2-S1-L8 FT 50 C-3-S1-L8 Distance de détection 12 ... 32 mm 15 ... 30 mm 18 ... 22 mm (depuis le point de référence) Tolérance de distance de détection ±... -
Page 91: Références De Commande
Instructions de service et de montage Caractéristiques électriques (typ.) Temps de réponse mini 2 ms Interface de série RS485 (semi-duplex), 1 bit de stop, non parité, Taux Baud régla- ble par trame et logiciel Progsensor (Réglage usine 19200 Baud) Circuits protecteurs Protection contre les inversions de polarité, protection contre les courts-circuits (pas RS485) Protection électrique VDE... - Page 92 Pour la référence, voir la liste des accessoires REMARQUE Les fiches techniques, les instructions de service et le logiciel de commande (Progsensor) sont disponibles pour le téléchargement à l'adresse www.sensopart.com. FT 50 C...S1 Capteur de couleur - F - 068-13821 - 10.10.2011-04...
- Page 96 Kontaktadressen / Contact addresses / Contacts Deutschland France SensoPart Industriesensorik GmbH SensoPart France SARL Nägelseestraße 16 11, rue Albert Einstein D-79288 Gottenheim Espace Mercure Tel.: +49 (0) 7665 - 94769 - 0 F-77420 Champs sur Marne Fax: +49 (0) 7665 - 94769 - 765 Tél.: +33 (0) 1 64 73 00 61...