Télécharger Imprimer la page

Publicité

Les langues disponibles
  • FR

Les langues disponibles

  • FRANÇAIS, page 75

Liens rapides

Modelos
HORNO ARANDA
HORNO SANTACRUZ
HORNO ARANDA PARA ENCASTRAR
HORNO SANTACRUZ PARA ENCASTRAR
Fig.1
Fig.2
INSTRUCCIONES PARA LA INSTALACION, USO Y MANTENIMIENTO
INSTRUZIONI PER L'INSTALLAZIONE, L'USO E LA MANUNTENZIONE
INSTALLATION, USE AND MAINTENANCE INSTRUCTIONS
INSTRUCTIONS POUR L'INSTALLATION, L'UTILISATION ET L'ENTRETIEN
INSTRUÇÖES PARA INSTALAÇÄO, MANUTENÇÄO E UTILIZAÇÄO
Fecha de edición: 19 Oct. 2010
CODIGO: C03254
1

Publicité

loading

Sommaire des Matières pour hergom Aranda

  • Page 1 Modelos HORNO ARANDA HORNO SANTACRUZ HORNO ARANDA PARA ENCASTRAR HORNO SANTACRUZ PARA ENCASTRAR Fig.1 Fig.2 INSTRUCCIONES PARA LA INSTALACION, USO Y MANTENIMIENTO INSTRUZIONI PER L’INSTALLAZIONE, L’USO E LA MANUNTENZIONE INSTALLATION, USE AND MAINTENANCE INSTRUCTIONS INSTRUCTIONS POUR L’INSTALLATION, L’UTILISATION ET L’ENTRETIEN INSTRUÇÖES PARA INSTALAÇÄO, MANUTENÇÄO E UTILIZAÇÄO...
  • Page 3 Bienvenidos a la familia Hergóm. Agradecemos la distinción que nos ha dispensado con la elección de nuestros hornos mod. Santacruz y Aranda que representan en técnica y estilo un importante avance sobre los hornos de leña. Tenemos la seguridad de que su nuevo modelo de Hergóm habrá...
  • Page 4 I.- PRESENTACIÓN Este aparato posee como funciones principales:  Brasa y Calefactor en el Hogar inferior  Asador y Plancha, en el Horno superior. Las características principales de este Horno / Asador de leña son: Hogar (Cuerpo inferior)  De hierro fundido. ...
  • Page 5 De estilo minimal , de línea sencilla y limpia. Se suministra en dos versiones, revestimiento (Fig. 2, Portada), y para empotrar en obra (Fig. 3) Aranda De estilo clásico con remate superior en forma de arco con puertas de horno de doble hoja.
  • Page 6 II.- INSTALACIÓN La manera de instalar el horno influirá decisivamente en la seguridad y buen funcionamiento del mismo. Para asegurar una correcta instalación, es aconsejable que la realice un profesional. A.- CHIMENEAS. El funcionamiento del horno depende :  De la chimenea. ...
  • Page 7 - Vivacidad del fuego. Cuanto más caliente esté el fuego, más fuerte es el tiro. - Grietas en la chimenea, las puertas mal selladas o sucias, entradas de aire por la unión de los tubos, otro aparato conectado a la chimenea, etc. pueden producir tiros inadecuados.
  • Page 8 4.- Conexión a la chimenea Para la conexión del horno con la chimenea, acoplar los tubos por el interior del collarín del horno. recorrido vertical chimenea deben evitarse codos y tramos en horizontal, que dificulten el tiro y favorecen la formación de creosota y hollín.
  • Page 9 6.- Cambio de posición de la válvula de tiro En los modelos para empotrar en obra de los hornos Aranda y Santacruz, la válvula se suministra colocada en la parte derecha del horno. En el caso de necesidad de cambio de la situación de la válvula para una mejor adecuación de la obra, es posible ya que el cambio de...
  • Page 10 8.- Algunas normas A continuación indicamos otras normas que deben respetarse en la construcción de la chimenea: a) Emplear materiales resistentes e incombustibles. No montar tubos de fibrocemento en los 2-3 primeros metros. b) Escoger un trazado lo más vertical posible. No conectar varios aparatos a la misma chimenea.
  • Page 11 f) Es muy importante que las uniones de los tubos estén muy bien selladas para tapar las posibles fisuras que permitan la entrada de aire.. Fig.-13 Para comprobar la estanqueidad de la chimenea proceder de la siguiente forma: - Tapar la salida en el tejado. - Introducir papeles y paja húmeda por la parte inferior de la chimenea y encenderlos.
  • Page 12 Las chimeneas exteriores metálicas deberán construirse con tubos dobles calorifugados, especiales para combustibles sólidos. B.- ACCESORIOS OPCIONALES HERGOM dispone de los siguientes accesorios para este Hogar de Hierro Fundido. Tubos de acero en esmalte vitrificado. Tubos de acero inoxidable.
  • Page 13 El resto de elementos que compondrán la instalación eléctrica, deberá de adquirirlos Vd. (Interruptor, cables, conexiones, etc...) Fig. 19 Deje una longitud suficiente al cableado para permitir sacar, y meter de nuevo, el cable de la instalación ante una posible intervención sobre el mismo. Antes de situar el horno, compruebe que la instalación eléctrica funciona correctamente.
  • Page 14 Es importante realizar un buen nivelado del aparato. H.- ARANDA – DESMONTAR PARA PASO POR PUERTA 70 CM. Si es necesario pasar el horno a través de una puerta de 70 cm. deberá desmontar el techo, las puertas y el zócalo.
  • Page 15 Fig. 22 J.- SANTACRUZ – DESMONTAR PARA PASO POR PUERTA 70 CM. Si es necesario pasar el horno a través de una puerta de 70 cm. deberá desmontar el techo, las puertas, 1. Quitar el techo, viene simplemente posado sobre el horno 2.
  • Page 16 III.-INSTRUCCIONES DE MANEJO Una vez que su horno ha sido instalado, y conectado a la chimenea, está preparado para encender el fuego. Aunque el funcionamiento de su horno es fácil, el proceso de combustión de combustibles sólidos es complejo, ya que intervienen varios factores y se necesita tiempo y experiencia para comprender como se realiza.
  • Page 17 Guarda útiles: En las versiones del horno con revestimiento, se han aprovechado los huecos inferiores, con puerta en el mod. Santacruz y abierto en el mod. Aranda. No se recomienda guardar objetos que puedan deteriorarse por temperatura. Siempre que su horno esté en uso utilice un guante protector para sacar los utensilios.
  • Page 18 Precaución en calentar demasiado. Un sobrecalentamiento significa que Vd. ha hecho funcionar su horno a una temperatura demasiado elevada durante un largo período de tiempo. Esto puede dañar su aparato y por consiguiente deberá evitarlo. Un sobrecalentamiento es el resultado de un tiro excesivo, debido a alguna de estas razones: ...
  • Page 19 F.- Registro del HOLLIN Con cada horno se entrega un útil de limpieza del registro de hollín, el registro de hollín se encuentra situado en la parte superior del frente, está cubierto por una puerta con el anagrama de hergóm, esta puerta se encuentra sujeta por dos tornillos, los cuales habrá...
  • Page 20 VII.-ESPECIFICACIONES TECNICAS Modelo: Hogar Asador Aranda / Santacruz Datos Técnicos Masa de la carga recomendada 4 kg Intervalo de carga recomendada 1 Hora Temperatura de los gases medio 290 ºK Temperatura de los gases en el collarín 300 ºK Concentración de CO medio al 13% O2 0,45 % Caudal másico de los humos...
  • Page 21 DIMENSIONES GENERALES ARANDA Ø200 Ø200 SANTACRUZ...
  • Page 22 VISTAS EXPLOTADAS Nº CODIGO NOMBRE CDAD 1 HF00222 ADAPTADOR CHIMENEA DIA 200 Y 230 2 HF2360 VALVULA TIRO CHIMENEA 3 CL00920 CAMARA VALVULA TIRO 4 CL00922 REVESTIMIENTO TECHO 5 J00175 PLACA AISLANTE TECHO IZ 6 J00177 PLACA AISL.TECHO CENTRO 7 CL00928 SOP.AISLANTE TECHO IZDA 8 CL00927 SOP.AISLANTE TECHO CENT 9 J00173 PLACA AISLANTE LATERAL...
  • Page 23 Nº CODIGO NOMBRE CDAD 1 HF03074 FRENTE ARANDA 2 T1472623 BULON SUPERIOR GIRO PUERTA 3 CL00909 CHAPA CRISTAL PTA HORNO IZDA 4 CL00908 CHAPA CRISTAL PTA HORNO DCHA 5 Q00555 ARANDA-CRISTAL PUERTA IZDA 6 N0037 TERMOMETROS CROMADOS 7 Q00554 ARANDA-CRISTAL PUERTA DCHA...
  • Page 24 13 CL290 GRAPA CRISTAL 14 N0031 CIERRES GRAPA 15 HF03075 PUERTA HOGAR 16 HF03076 SANTACRUZ-FRENTE 17 CL00917 PLACA INOX REGISTRO 18 CL00916 LOGO HERGOM REGISTRO 19 K0156 EJE GIRO INFERIOR BISAGRA 20 N0032 FLEJES CIERRE 21 CL00906 TAPA SUJECCION CIERRE...
  • Page 25 CDAD Nº CODIGO CDAD NOMBRE 1 CL00836 ARANDA TECHO 1 CL00842 SANTACRUZ-TAPA SUPERIOR 2 CPX-00412 ARANDA-CONJ FRENTE REVESTIMIENTO 2 CL00848 SANTACRUZ-FRONTAL SUPERIOR 3 CPX-00411 ARANDA-CONJUNTO REVESTIMIENTO 3 CPX-00410 SANTACRUZ-CONJUNTO REVESTIMIENTO 4 CL00838 ARANDA REVEST FALDON 4 CL03032 SANTACRUZ-PUERTA LEÑERA 5 CL00839...
  • Page 27 Siamo certi che la Sua nuovo forno Le fornirà molteplici soddisfazioni, che sono il maggiore stimolo della nostra squadra. Possedere un forno Hergóm mod. ARANDA y SANTACRUZ è la manifestazione di un significato di qualità eccezionale. La invitiamo a leggere il manuale nella sua totalità. Il suo proposito è...
  • Page 28 I.- PRESENTAZIONE Questo prodotto presenta come funzioni principali:  Cottura alla brace e riscaldamento nella camera di combustione inferiore  Cottura arrosto e alla piastra nel forno superiore. Le caratteristiche principali di questo Forno/Griglia a legna sono: Camera di combustione (corpo inferiore) ...
  • Page 29 Stile minimalista, dalla linea semplice e pulita. Disponibile in due versioni, con rivestimento (Fig. 2, Copertina), e da incasso (Fig. 3) . Aranda Stile classico, con la cornice superiore a forma di arco e porte del forno a doppio battente.
  • Page 30 II.- INSTALLAZIONE L‟installazione dell forno influirà in modo decisivo sulla sicurezza e sul buon funzionamento della stessa. È molto importante realizzare una buona installazione. Per assicurare una corretta installazione, si consiglia di affidare l‟incarico ad un esperto. . A.- CANNA FUMARIA Il funzionamento della cucina dipende : a) Dalla canna fumaria.
  • Page 31 - Pressione barometrica. Durante i giorni di pioggia, umidi o burrascosi, il tiraggio è generalmente debole. - Vivacità del fuoco. Quanto più caldo è il fuoco, tanto più forte sarà il tiraggio. - Crepe nella canna fumaria, le porte mal sigillate o sporche, l‟entrata di aria attraverso l‟unione dei tubi, un altro apparecchio collegato al camino, ecc., possono produrre tiraggi inadeguati.
  • Page 32 4.- Collegamento alla canna fumaria Nella salita verticale della canna fumaria si devono evitare gomiti e parti in orizzontale che possano rendere difficile il tiraggio e favorire la formazione di creosoto e fuliggine. È molto importante sigillare l‟unione dei tubi che formano la canna fumaria con mastice refrattario, gesso o altro materiale appropriato, impedire...
  • Page 33 6.- Cambio di posizione della valvola di tiraggio. Nei modelli ad incasso in muratura dei forni Aranda e Santacruz, la valvola viene fornita collocata sulla parte destra del forno. In caso di necessità di cambiamento della posizione della valvola per un migliore adattamento dei lavori, tutto ciò...
  • Page 34 8.- Alcuni norme Di seguito indichiamo altre norme che devono essere rispettate durante la costruzione della canna fumaria: a) Impiegare materiali resistenti e non combustibili. Non montare tubi di fibrocemento per i primi 2-3 metri. b) Scegliere un tracciato che sia il più verticale possibile. Non collegare vari apparecchi alla stessa canna fumaria.
  • Page 35 f) È molto importante che le unioni dei tubi siano ben sigillate per tappare le possibili fessure che permettono l‟entrata dell‟aria. Fig.-13 Per verificare la stabilità della canna fumaria, procedere nel seguente modo: - Tappare l‟uscita sul tetto. - Introdurre fogli di carta e paglia umida attraverso la parte inferiore della canna fumaria e accenderli.
  • Page 36 h) Che i cappelletti non rendano difficile il tiraggio Fig.-16 k) Pulire la k) Canna fumaria almeno una volta all‟anno.La pulizia più efficace per i condotti della canna fumaria è mediante spazzole antifuliggine appropriate. Esistono prodotti chimici che aiutano a ritardare la pulizia classica con spazzole. Le spazzole devono essere il più...
  • Page 37 Il resto di elementi che comporranno l'installazione elettrica, acquisiràli Lei (Interruttore, cavi, connessioni,...) Fig.-19 Lasciare una lunghezza sufficiente al cablaggio per poter togliere e inserire nuovamente il cavo dall'impianto in caso di un possibile intervento sullo stesso. Prima di collocare il forno, verificare che l'impianto elettrico funzioni correttamente.
  • Page 38 Nella parte interna della legnaia (solo nei modelli con rivestimento), si trovano le quattro gambe di livellamento, che sarà necessario regolare in caso di superfici non lisce. H.- ARANDA – SMONTAGGIO PER IL PASSAGGIO ATTRAVERSO PORTE DA 70 CM. Se è necessario far passare il forno attraverso una porta da 70 cm si dovranno smontare il tetto, le porte e lo zoccolo.
  • Page 39 Fig. 22 J.- SANTACRUZ – SMONTAGGIO PER IL PASSAGGIO ATTRAVERSO PORTE DA 70 CM. Se è necessario far passare il forno attraverso una porta da 70 cm si dovranno smontare il tetto, le porte e lo zoccolo. 5. Togliere il tetto, che viene semplicemente appoggiato sul forno. 6.
  • Page 40 III.-ISTRUZIONI DI UTILIZZO Una volta che il suo forno è installato e collegato alla canna fumaria, è pronto per accendere il fuoco. Sebbene il funzionamento del duo forno sia semplice, il processo di combustione dei combustibili solidi è complesso, poiché intervengono vari fattori e servono tempo ed esperienza per comprendere come si realizza.
  • Page 41 Nelle versioni del forno con rivestimento, sono stati sfruttati i vani inferiori per utilizzarli come nicchia porta tutto, con porta nel modello Santacruz e aperta nel modello Aranda. Non è consigliabile riporvi oggetti che si possono rovinare con la temperatura. Quando il suo forno è...
  • Page 42 I detergenti per vetri delle stufe sono abbastanza efficaci. Non provare mai a pulire il vetro durante il funzionamento dell‟apparato. Si raccomanda di utilizzare il detergenti per cristalli Hergom per la sua efficacia, che si può reperire presso i nostri rivenditori.
  • Page 43 L‟ispezione si trova nella parte superiore del frontale, ed è coperta da una piastra con l‟anagramma Hergom. Questa piastra è agganciata con due viti che devono essere tolte per avere l‟accesso alla zona di pulizia dei residui di fuliggine.
  • Page 44 VII.-SPECIFICHE TECNICHE Modello: Focolare/Forno Aranda/Santacruz Dati tecnici Massa di carico raccomandata 4 kg Intervallo di carica raccomandato 1 Hora Temperatura media dei fumi 290 ºK Temperatura dei fumi nel collarino 300 ºK Concentrazione media di CO al 13% O2 0,45 % Caudale massico dei fumi 16 gr/sec.
  • Page 45 DIMENSIONI GENERALI ARANDA Ø200 Ø200 SANTACRUZ...
  • Page 46 N° CODICE NOME Q.TA' VISTAS EXPLOTADAS 1 HF00222 ADATTATORE CANNA FUMARIA DIAM. 200 E 230 2 HF2360 VALVOLA TIRAGGIO CANNA FUMARIA 3 CL00920 VANO DELLA VALVOLA DI TIRAGGIO 4 CL00922 RIVESTIMENTO TETTO 5 J00175 PLACCA ISOLANTE TETTO SINISTRO 6 J00177 PLACCA ISOLANTE TETTO DESTRO 7 CL00928 SUPPORTO ISOLANTE TETTO SINISTRO...
  • Page 47 VALVOLA FOCOLARE FISSA 13 Q00642 CRISTALLO PORTA FOCOLARE 14 CL03043 GUIDA VALVOLE FOCOLARE 15 N0031 FERMI DI CHIUSURA 16 Q00562 ARANDA MANIGLIA PORTA FOCOLARE 17 HF03075 PORTA FOCOLARE 18 CL00917 PLACCA INOX REGISTRO FUMI 19 CL00916 LOGO HERGOM REGISTRO FUMI 20 CL00914...
  • Page 48 FERMI DI CHIUSURA 15 HF03075 PORTA FOCOLARE 16 HF03076 SANTACRUZ-FRONTALE 17 CL00917 PLACCA INOX REGISTRO FUMI 18 CL00916 LOGO HERGOM REGISTRO FUMI 19 K0156 GANCIO DI ROTAZIONE INFERIORE DELLA CERNIERA 20 N0032 BANDE DI CHIUSURA 21 CL00906 TAPPO BLOCCAGGIO CHIUSURA...
  • Page 49 CODICE NOME Q.TA' Nº CODICE Q.TA' NOME CL00836 ARANDA TETTO 1 CL00842 SANTACRUZ-TETTO SUPERIORE CPX-00412 ARANDA-PARTE FRONTALE RIVESTIMENTO 2 CL00848 SANTACRUZ-FRONTALE SUPERIORE CPX-00411 ARANDA-CORPO RIVESTIMENTO 3 CPX- 00410 SANTACRUZ-CORPO RIVESTIMENTO CL00838 ARANDA FRONTONE RIVESTIMENTO 4 CL03032 SANTACRUZ-PORTA DEL VANO LEGNA...
  • Page 51 WELCOME to the Hergóm range. We would like to thank you for choosing our model ovens Samtacruz and Aranda, which represents, in technique and style, a significant improvement in classical coal and firewood oven. We are sure that your new model of Hergóm will prove fully satisfactory, which is the most outstanding feature of our equipment.
  • Page 52 I.- INTRODUCTION This unit features the following main functions:  Barbecue and Heater in the lower fire place  Spit and Grill in top oven. The main features of this log Oven / Grill are: Fireplace (Lower section)  Cast iron. ...
  • Page 53 Minimalist style, simple and clean line. Available in two versions, stand-alone (Fig. 2, Cover), and insert (Fig. 3) Aranda Classic style with top finish in the shape of an arch and with double doors. Available in two versions, stand-alone (Fig. 1, Cover), and insert (Fig. 4) From an operational point of view, they are the same, as they use the same fireplace and oven.
  • Page 54 II.- INSTALLATIÓN The form of installing the oven will decisively influence its safety and correct working order. It is very important for it to be well installed. To ensure a correct installation, we recommend it be done by a professional. A.- CHIMNEYS.
  • Page 55 2.- Creosote formation and cleaning When wood is burned slowly, tars and other organic vapours are produced that, when combined with atmospheric humidity, form creosote. The creosote vapours can be condensed if the chimney walls are cold. If the creosote catches alight, extremely hot fires may be caused.
  • Page 56 4.- Connecting the chimney The vertical run of the chimney must avoid elbow joints and long horizontal sections, as they make draught difficult and favour the formation of creosote and soot. It is extremely important to seal attachment ring – elbow joint – tube connections using refractory filler, plaster or any other suitable...
  • Page 57 M-5 nut and bolt. 6.-Draw valve position change In the case of Aranda and Santacruz on-site insert models, the valve comes on the right-hand side of the oven. It is very easy to change the position of the valve if required to adapt its position to the location where the oven is to be installed.
  • Page 58 8.- Some standards Below are other standards that must be respected when building the chimney: a) Use resistant and non-combustible materials. Do not use cement fibre tubes for the first 2-3 metres. b) Choose as vertical a run as possible. Do not connect various appliances to the same chimney.
  • Page 59 f) It is very important for the tube joints to be well sealed to cover possible cracks that allow air to enter.. Fig.-13 To check the chimney is airtight, proceed as follows: - Block the hole on the roof. - Introduce damp paper and straw into the chimney and light it. - Check for possible cracks where the smoke escapes and seal them.
  • Page 60 h) The cowls must not hinder the draught. Fig.-16 k) Clean the chimney at least once a year. The most effective way of cleaning chimney flues is by using suitable chimney brushes. There are chemical products that help delay the need for classic brush cleaning.
  • Page 61 The remaining parts comprising the electrical installation must be purchased by you (Switch, cables, connections, etc...) Fig.-19 Leave sufficient length of cable to be able to pull it out and replace in the event of any maintenance work. Before installing the oven, check that the electric installation is working correctly.
  • Page 62 H.- ARANDA - DISASSEMBLE TO PASS THROUGH 70 CM DOORWAY. If the oven has to be passed through a 70 cm doorway, the top section, doors and skirting board must be removed.
  • Page 63 Fig. 22 J.- SANTACRUZ – DISASSEMBLE TO PASS THROUGH 70 CM DOORWAY. If the oven has to be passed through a 70 cm doorway, the top section, doors must be removed. 1. Remove the top section; it is simply resting on the oven 2.
  • Page 64 III.- INSTRUCTIONS OF USE Once your oven has been installed and connected to the chimney, you are ready to light the fire. Although your oven is easy to use, the combustion process of solid fuels is complicated, as it involves several factors and it takes time and experience to understand the process. Before lighting your oven for the first time, please take time to become familiar with the different control systems and parts of the unit, how to choose the wood, how to light it and use it on a daily basis.
  • Page 65 In the case of stand-alone ovens, the lower gaps have been used to create a storage space. The said space has a door in the Santacruz model and is open in the Aranda model. The said storage area is not recommended for objects that may be damaged by high temperatures.
  • Page 66 Overheating. Overheating means that you have operated your oven a excessively high temperatures for a long period of time. This can damage your unit and, therefore, it is a situation that must be avoided. Overheating is the result of excessive draw, due to any of the following reasons: ...
  • Page 67 A soot cleaning tool is provided with every oven to clean the soot chamber located at the top of the front section. It features a cover with the Hergom anagram. The said cover is held in place by two screws, which will have to be removed to access the soot chamber.
  • Page 68 VII.-TECHNICAL SPECIFICATIONS Model: Aranda / Santacruz Fireplace Oven Technical Data Recommended load 4 kg Recommended load period 1 Hour Average gas temperature 290 ºK Gas temperature at the seal 300 ºK Average CO concentration at 13% O2 0.45 % Mass flow rate of smoke 16 gr/sec Maximum Power.
  • Page 69 GENERAL DIMENSIONS ARANDA Ø200 Ø200 SANTACRUZ...
  • Page 70 VISTAS EXPLOTADAS PCNO PARTNAME NAME 1 HF00222 CHIMNEY ADAPTER - 200 AND 230 DIAM. 2 HF2360 CHIMNEY DRAW VALVE 3 CL00920 DRAW VALVE CHAMBER 4 CL00922 TOP LINING 5 J00175 TOP SECTION - LEFT INSULATION PLATE 6 J00177 TOP SECTION -CENTRE INSUL. PLATE 7 CL00928 TOP SECTION - LEFT INSULATION SUPP.
  • Page 71 CHROMED THERMOMETERS 7 Q00554 ARANDA-RIGHT DOOR GLASS PANE 8 HF00829 LEFT RUSTIC DOOR 9 Q00568 ARANDA - OVEN DOOR LEVER 10 HF00830 RIGHT RUSTIC DOOR 11 CL03041 MOBILE FIREPLACE VALVE 12 CL03040 FIXED FIREPLACE VALVE 13 Q00642 FIREPLACE DOOR GLASS PANE...
  • Page 72 13 CL290 GLASS PANE CLAMP 14 N0031 CLIP CLOSING 15 HF03075 FIREPLACE DOOR 16 HF03076 SANTACRUZ-FRONT 17 CL00917 STAINLESS STEEL COVER PLATE 18 CL00916 HERGOM COVER LOGO 19 K0156 LOWER HINGE ROTATION AXIS 20 N0032 CLOSURE STRIP 21 CL00906 COVER FASTENING...
  • Page 73 NAME Num. CODE NAME 1 CL00836 ARANDA TOP SECTION 1 CL00842 SANTACRUZ-TOP COVER 2 CPX-00412 ARANDA-FRONT COVER ASSY 2 CL00848 SANTACRUZ-FRONT TOP 3 CPX-00411 ARANDA-SHELL ASSEMBLY 3 CPX-00 410 SANTACRUZ-SHELL ASSEMBLY 4 CL00838 ARANDA SKIRTING BOARD 4 CL03032 SANTACRUZ-LOG CHAMBER DOOR...
  • Page 75 équipe. Posséder une four Hergóm modèle SANTACRUZ y ARANDA est la manifestation d’un sens exceptionnel de la qualité. Lisez, s’il vous plaît, tout le manuel. Son but est de vous familiariser avec votre four et de vous indiquer les normes à...
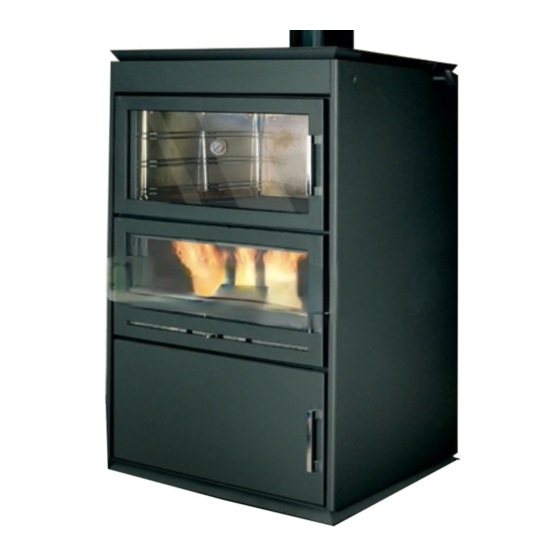
  • Page 76 I.- PRÉSENTATION Cet appareil a les fonctions principales suivantes :  Braise et Chauffage dans le Foyer inférieur  Grill et Plancha, dans le Four supérieur. Les principales caractéristiques de ce four/ rôtissoire à bois sont : Foyer (Corps inférieur) ...
  • Page 77 De style minimaliste, de ligne simple et épurée. Livrée en deux versions, avec revêtement (Fig. 2, Avant), et pour encastrer dans l‟ouvrage de maçonnerie (Fig. 3) Aranda De style classique avec finition supérieure en forme d‟arc avec portes de four à double battant.
  • Page 78 II.- INSTALLATIÓN La façon d‟installer la cuisinière aura une influence décisive sur la sécurité et son bon fonctionnement. Il est très important de réaliser une bonne installation. Pour assurer une installation correcte, il est conseillé de faire intervenir un professionnel. A.- CHEMINÉES Le fonctionnement de la cuisinière dépend : ...
  • Page 79 Des fissures dans la cheminée, des portes mal verrouillées ou sales, des entrées d‟air par les raccords des tubes, un autre appareil connecté à la cheminée, etc. peuvent produire des tirages inadéquats 2.- Formation de créosote et son nettoyage Lorsque le bois brûle lentement il y a production de goudrons et d‟autres vapeurs organiques qui, en se combinant avec l‟humidité...
  • Page 80 4.-Connexion à la cheminée Pour raccorder la fournaise à la cheminée, un quai, les tubes à l'intérieur de la collerette du four. Dans le parcours vertical de la cheminée il faut éviter les coudes et les tronçons à l‟horizontale parce qu‟ils rendent plus difficile tirage favorisent...
  • Page 81 à l‟aide de la vis et de l‟écrou M-5. 6.- Changement de position du regulateur de tirage. Pour les modèles de fours Aranda et Santacruz à encastrer dans un support en maçonnerie, le régulateur de tirage est dores et déjà...
  • Page 82 8.- Quelques normes. Nous indiquons ci-dessous d‟autres normes qu‟il faut respecter pour la construction de la cheminée : a) employer des matériaux résistants et incombustibles. Ne pas monter des tubes en fibrociment sur les 2-3 premiers mètres. b) Choisir un tracé le plus vertical possible. Ne pas connecter plusieurs appareils à la même cheminée Dévia tion correc t...
  • Page 83 f) Il est très important que les unions des tubes soient très bien scellées pour boucher les possibles fissures qui permettent l‟entrée d‟air. Fig.-13 Pour vérifier l‟étanchéité de la cheminée il faut procéder de la manière suivante : Couvrir la sortie sur le toit Introduire des papiers et de la paille humide dans la partie inférieure de la cheminée et les allumer Observer les possibles fissures par où...
  • Page 84 La fig. 12 présente le détail du schéma électrique et indique (encadré discontinu) le matériel fourni par Hergom. L‟ensemble électrique fourni par Hergom se compose des éléments suivants : Ampoule protégée par une tulipe, résistance thermique de 550 ºC. - Câble en silicone résistant à la chaleur, avec trois terminaux, pour raccordement à la lampe, et gaine enveloppante en polyuréthane.
  • Page 85 Les autres éléments propres à l‟installation électrique devront être acquis par vous (interrupteur, câbles, raccordements, etc.). Fig.19 Laissez une longueur de câble suffisante pour permettre de faire sortir et entrer de nouveau le câble de l‟installation en cas d‟intervention éventuelle sur ce dernier. Avant de situer la cuisinière, assurez-vous que l‟installation électrique fonctionne correctement.
  • Page 86 Un bon nivellement de l‟appareil est important. H.- ARANDA – DÉMONTER POUR PASSAGE PAR UNE PORTE DE 70 CM. S‟il faut passer le four à travers une porte de 70 cm. vous devrez démonter le toit, les portes et le socle.
  • Page 87 Fig. 22 J.- SANTACRUZ – DÉMONTER POUR PASSAGE PAR PORTE DE 70 CM. S‟il faut passer le four à travers une porte de 70 cm. vous devrez démonter le toit, les portes 9. Enlevez le toit qui est simplement posé sur le four 10.
  • Page 88 III.-INSTRUCTIONS DE MANIPULATION Une fois le four installé et la cheminée connectée, le four est préparé pour allumer le feu. Même si le fonctionnement de votre four est facile, le processus de combustion de combustibles solides est complexe parce que plusieurs facteurs interviennent et qu‟il faut du temps et de l‟expérience pour comprendre le processus.
  • Page 89 Pour les versions du four avec revêtement, les vides inférieurs ont été aménagés comme des niches, avec une porte pour le modèle Santacruz et ouvert pour le modèle Aranda. Il n‟est pas recommandé d‟y ranger des objets qui peuvent se détériorer à cause de la température élevée.
  • Page 90 Précaution pour éviter la surchauffe. Une surchauffe signifie que vous avez fait fonctionner votre four à une température trop élevée durant une longue période de temps. Cela peut endommager votre appareil et vous devrez l‟éviter. Une surchauffe est le résultat d‟un tirage excessif, pour les raisons suivantes : ...
  • Page 91 F.- Registre de la SUIE Chaque four est livré avec un outil de nettoyage du registre de suie qui se trouve sur la partie haute de l‟avant du poêle. Il est couvert d‟une porte qui est décorée de l‟anagramme de hergóm. Cette porte est fixée par deux vis qu‟il faudra desserrer pour nettoyer le registre de la suie.
  • Page 92 VII.-SPÉCIFICATIONS TECHNIQUES Modèle : Foyer rôtissoire Aranda / Santacruz Données techniques Masse du chargement recommandée 4 kg Intervale de chargement recommandée 1 Heure Température des gaz moyen 290 ºK Température des gaz sur le collier 300 ºK Concentration de CO moyen à 13% O2 0,45 % Débit massique des fumées...
  • Page 93 DIMENSIONS GÉNÉRALES ARANDA Ø200 Ø200 SANTACRUZ...
  • Page 94 VISTAS EXPLOTADAS PCNO PARTNAME NOM 1 HF00222 ADAPTATEUR CHEMINÉE JOUR 200 ET 230 2 HF2360 SOUPAPE TIRAGE CHEMINÉE 3 CL00920 CHAMBRE SOUPAPE TIRAGE 4 CL00922 REVÊTEMENT TOIT 5 J00175 PLAQUE ISOLANTE TOIT GAUCHE 6 J00177 PLAQUE ISOLANTE TOIT CENTRE 7 CL00928 SUP.ISOLANT TOIT GAUCHE 8 CL00927 SUP.ISOLANT TOIT CENTRE...
  • Page 95 Nº CODE QTÉ. 1 HF03074 AVANT ARANDA 2 T1472623 BOULON SUPÉRIEUR ROTATION PORTE 3 CL00909 TÔLE VITRE PORTE FOUR GAUCHE 4 CL00908 TÔLE VITRE PORTE FOUR DROITE 5 Q00555 ARANDA-VITRE PORTE GAUCHE 6 N0037 THERMOMÈTRES CHROMÉS 7 Q00554 ARANDA-VITRE PORTE DROITE...
  • Page 96 13 CL290 AGRAFE VITRE 14 N0031 FERMETURES AGRAFE 15 HF03075 PORTE FOYER 16 HF03076 SANTACRUZ-AVANT 17 CL00917 PLAQUE INOX REGISTRE 18 CL00916 LOGO HERGOM REGISTRE 19 K0156 AXE ROTATION INFÉRIEURE CHARNIÈRE 20 N0032 FEUILLARDS FERMETURE 21 CL00906 COUVERCLE FIXATION FERMETURE...
  • Page 97 NOMBRE QTÉ. Nº CODE QTÉ. 1 CL00836 ARANDA TOIT 1 CL00842 SANTACRUZ-COUVERCLE SUPÉRIEUR 2 CPX-00412 ARANDA-ENSEMBLE FACE REVÊTEMENT 2 CL00848 SANTACRUZ-AVANT SUPÉRIEUR 3 CPX-00411 ARANDA-ENSEMBLE REVÊTEMENT 3 CPX-00410 SANTACRUZ-ENSEMBLE REVÊTEMENT 4 CL00838 ARANDA REVÊT.TABLETTE SANTACRUZ-PORTE LOGEMENT BOIS 4 CL03032 5 CL00839...
  • Page 99 Bem-vindos à família Hergóm. Agradecemos a distinção que nos dispensou com a eleição dos nossos fornos mod. Santacruz e Aranda que representam em técnica e estilo, um importante avanço sobre os fornos de lenha. Temos a certeza de que o seu novo modelo de Hergóm, lhe proporcionará...
  • Page 100 I.- APRESENTAÇÃO Este aparelho possui como funções principais:  Brasa e Aquecedor na parte inferior  Assador e Placa na parte superior. As características principais deste Forno / Assador de lenha são: Fornalha (Corpo inferior)  De ferro fundido.  Porta de ferro fundido com cristal vitrocerâmico. ...
  • Page 101 De estilo minimalista, de linha simples e limpas. Fornece-se em duas versões, com revestimento (Fig. 2, Portada), e para encastrar em obra (Fig. 3) Aranda De estilo clássico com remate superior em forma de arco com portas de forno de dupla folha.
  • Page 102 II.- INSTALAÇÃO A maneira de instalar o forno influirá decisivamente na segurança e bom funcionamento do mesmo. Para assegurar uma correcta instalação do aparelho e da chaminé, é aconselhável que a realize um profissional. A.- CHAMINÉS. O funcionamento do forno depende : d) Da chaminé.
  • Page 103 2- Formação do creosoto e sua limpeza. Quando a madeira se queima lentamente produz alcatrões e outros vapores orgânicos, que ao se combinarem com a humidade ambiente, formam o creosoto. Os vapores de creosoto, podem-se condensar, se as paredes da chaminé estão frias. Se se inflama o creosoto podem-se produzir fogos extremamente fortes.
  • Page 104 4.- Ligação à chaminé Para a ligação do forno com a chaminé, acoplar os tubos pelo interior do colarim do forno. No recorrido vertical da chaminé devem evitar-se curvas e tramos na horizontal, dificultem tiragem favoreçam formação creosoto e fuligem. É...
  • Page 105 6. Mudanca de posicao da válvula de tiragen Nos modelos para encastrar em obra de fornos Aranda e Santacruz, a válvula é fornecida colocada na parte direita do forno. No caso de necessidade de mudança de posição da válvula para uma melhor aplicação em obra, tal é...
  • Page 106 8- Algumas normas Em continuação indicamos outras normas que devem ser respeitadas na construção da chaminé: a) Utilizar materiais resistentes e incombustíveis. Não montar tubos de fibrocimento. b) Escolher um traçado o mais vertical possível. Não ligar vários aparelhos à mesma chaminé.
  • Page 107 f) É muito importante que as uniões dos tubos estejam muito bem seladas para tapar as possíveis fissuras que permitam a entrada de ar. Fig.-13 Para comprovar a estanquicidade da chaminé proceder da seguinte forma: - Tapar a saída no telhado. - Introduzir papéis e palha húmida pela parte inferior da chaminé...
  • Page 108 h) Que os chapéus não dificultem a tiragem. Fig.-16 i) Limpar a chaminé pelo menos uma vez ao ano. Fig.-17 j) A união dos tubos que formam a chaminé, no caso de tubos metálicos simples, devem ser vedados com massa refractária. k) As chaminés exteriores metálicas deverão construir-se com tubos duplos calorifugados, especiais para combustíveis sólidos.
  • Page 109 O resto de elementos que completarão a instalação eléctrica, deverão ser adquiridos. (Interruptor, cabos, ligações, etc...) Fig.-19 Deixe um comprimento suficiente de cabo para permitir retirar, e colocar de novo, o cabo da instalação ante uma possível intervenção sobre o mesmo. Antes de colocar a cozinha, comprove que a instalação eléctrica funciona correctamente.
  • Page 110 É importante realizar um bom nivelamento do aparelho. H.- ARANDA – DESMONTAR PARA PASSAGEM POR PORTA 70 CM. Se for necessário passar o forno através de uma porta de 70 cm, deverá desmontar o tecto, as portas e o rodapé.
  • Page 111 Fig. 22 J.- SANTACRUZ – DESMONTAR PARA PASSAGEM POR PORTA 70 CM. Se for necessário passar o forno através de uma porta de 70 cm, deverá desmontar o tecto e as portas. 13. Retirar o tecto. Vem simplesmente pousado sobre o forno 14.
  • Page 112 III.- INSTRUÇÕES DE UTILIZAÇÃO Uma vez que o seu forno tenha sido instalado e ligado à chaminé, está preparado para o acendimento do fogo. Apesar do funcionamento do seu forno ser fácil, o processo de combustão de combustíveis sólidos é complexo, já que intervêm vários factores e necessita-se de tempo e experiência para compreender como se realiza.
  • Page 113 Arrumos Nas versões de forno com revestimento, aproveitaram-se os espaços inferiores para os habilitar como armário, com porta no mod. Santacruz e aberto no mod. Aranda. Não se recomenda guardar objectos que possam deteriorar-se por temperatura. Sempre que o seu forno esteja em uso, utilize uma luva protectora para retirar os utensílios destes arrumos.
  • Page 114 Precaução no aquecimento em demasia Um sobreaquecimento significa que fez funcionar o seu forno a uma temperatura demasiado elevada durante um longo período de tempo. Isto pode danificar o seu aparelho e por conseguinte deverá evitá-lo. Um sobreaquecimento é o resultado de uma tiragem excessiva, devido a alguma destas razões: ...
  • Page 115 F.- Registro de Fuligem Com cada forno entrega-se uma ferramenta de limpeza do registro de fuligem. O registro de fuligem encontra-se situado na parte superior da frente, está coberto por uma porta com o anagrama de Hergóm, esta porta encontra-se fixa por dois parafusos, os quais terá...
  • Page 116 VII.- ESPECIFICAÇÕES TÉCNICAS Modelo: Forno Aranda / Santacruz Dados Técnicos Massa de carga recomendada 4 kg Intervalo de carga recomendada 1 Hora Temperatura média dos gases 290 ºK Temperatura dos gases na gola 300 ºK Concentração de CO médio a 13% O 0,45 % Caudal mássico dos fumos...
  • Page 117 DIMENSÕES GERAIS ARANDA Ø200 Ø200 SANTACRUZ...
  • Page 118 VISTAS EXPLOTADAS Nº CÓDIGO NOME 1 HF00222 ADAPTADOR CHIMENEA DIA 200 Y 230 2 HF2360 VALVULA TIRO CHIMENEA 3 CL00920 CAMARA VALVULA TIRO 4 CL00922 REVESTIMIENTO TECHO 5 J00175 PLACA AISLANTE TECHO IZ 6 J00177 PLACA AISL.TECHO CENTRO 7 CL00928 SOP.AISLANTE TECHO IZDA 8 CL00927 SOP.AISLANTE TECHO CENT...
  • Page 119 Nº CÓDIGO NOME 1 HF03074 FRENTE ARANDA 2 T1472623 PARAFUSO SUPERIOR GIRO DA PORTA 3 CL00909 CHAPA VIDRO PORTA DIREITA FORNO 4 CL00908 CHAPA VIDRO PORTA ESQUERDA FORNO 5 Q00555 ARANDA-VIDRO PORTA ESQUERDA 6 N0037 TERMÓMETROS CROMADOS 7 Q00554 ARANDA-VIDRO PORTA DIREITA 8 HF00829 PORTA RÚSTICA ESQUERDA...
  • Page 120 Nº CÓDIGO NOME 1 T1472623 PARAFUSO SUPERIOR GIRO DA PORTA 2 CL00913 SANTACRUZ-DOBRADIÇA PORTA FORNO 3 CL00907 SANTACRUZ-CHAPA VIDRO PORTA FORNO 4 Q00553 VIDRO PORTA FORNO 5 HF00828 SANTACRUZ-PORTA FORNO 6 N0037 TERMÓMETROS CROMADOS 7 Q00561 SANTACRUZ-MANÍPULO PORTA FORNALHA/FORNO 8 CL03043 GUIA VÁLVULAS FORNALHA 9 CL03041 VÁLVULA FORNALHA MÓVEL...
  • Page 121 Nº CÓDIGO NOME Nº CÓDIGO NOME 1 CL00836 ARANDA TECTO 1 CL00842 SANTACRUZ-ABA SUPERIOR 2 CPX-00412 ARANDA-CONJUNTO FRENTE REVESTIMENTO 2 CL00848 SANTACRUZ-FRONTAL SUPERIOR 3 CPX-00411 ARANDA-CONJUNTO REVESTIMENTO 3 CPX- 00410 SANTACRUZ-CONJUNTO REVESTIMENTO 4 CL00838 ARANDA REVESTIMENTO PAINEL 4 CL03032 SANTACRUZ-PORTA CARREGAMENTO LENHA...
  • Page 123 / Leia e siga as instrucções de funcionamento-Utilize somente combustíveis recomendados-Encastrável preparado para funcionamento intermitente Industrias Hergom,S.A. 39110 (Soto de la Marina) Cantabria C03212 Tel. 942 58 70 00 / email: hergom@hergom.com...
  • Page 128 INDUSTRIAS HERGÓM S.A. Apartado de Correos, 208 de Santander SOTO DE LA MARINA - Cantabria Tel.: (942) 587000* Fax: (942) 587001 e-mail: hergom@hergom.com web: www.hergom.com Santander (España) © Copyright Hergóm – D. Legal: SA-329-199...

Ce manuel est également adapté pour:

Santacruz