Publicité

Les langues disponibles
  • FR

Les langues disponibles

  • FRANÇAIS, page 19

Liens rapides

I
PROGRAMMATORE UNIVERSALE
GB
UNIVERSAL PROGRAMMER
F
PROGRAMMATEUR UNIVERSEL
D
UNIVERSAL-PROGRAMMIERGERÄT
E
PROGRAMADOR UNIVERSAL
P
PROGRAMADOR UNIVERSAL
ISTRUZIONI D'USO E DI INSTALLAZIONE
INSTALLATION AND USER'S MANUAL
INSTRUCTIONS D'UTILISATION ET D'INSTALLATION
INSTALLATIONS-UND GEBRAUCHSANLEITUNG
INSTRUCCIONES DE USO Y DE INSTALACION
INSTRUÇÕES DE USO E DE INSTALAÇÃO
www.BFTGateOpeners.com | (800) 878-7829
D811426 ver.02 11-06-07
8
027908 2 3 5 1 2 1
PROXIMA

Publicité

Table des Matières
loading

Sommaire des Matières pour BFT PROXIMA

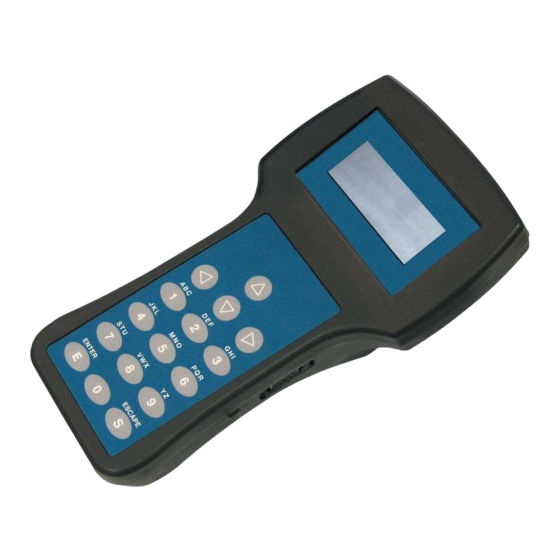
  • Page 1 UNIVERSAL PROGRAMMER PROGRAMMATEUR UNIVERSEL 027908 2 3 5 1 2 1 UNIVERSAL-PROGRAMMIERGERÄT PROGRAMADOR UNIVERSAL PROGRAMADOR UNIVERSAL PROXIMA ISTRUZIONI D’USO E DI INSTALLAZIONE INSTALLATION AND USER’S MANUAL INSTRUCTIONS D’UTILISATION ET D’INSTALLATION INSTALLATIONS-UND GEBRAUCHSANLEITUNG INSTRUCCIONES DE USO Y DE INSTALACION INSTRUÇÕES DE USO E DE INSTALAÇÃO...
  • Page 2 PROXIMA - Ver. 02 www.BFTGateOpeners.com | (800) 878-7829...
  • Page 3: Avvertenze

    Interfaccia “D” 6) ORGANIZZAZIONE DEI MENÙ Connettore per sistema seriale CAPRI (vedi Fig. 5). I menù che si susseguono sul display di PROXIMA sono organizzati in un albero a partire dalle schermate di benvenuto: PROXIMA - Ver. 02 - www.BFTGateOpeners.com | (800) 878-7829...
  • Page 4 <ESC> o <ENTER>” dove: Premendo <ESC> si esce stazione di un dip-switch. dalla programmazione e si può impostare in PROXIMA il numero di serie corretto: Premendo <ENTER> si forza il sistema ad accettare Dal menù M1 CENTRALI selezionare il menù logiche e premere “EN- un programmatore con numero di serie diverso.
  • Page 5 >autodiagnosi scrivi default: riporta la configurazione della centrale collegata alle im- PROXIMA invierà, tramite il protocollo EElink, un comando alla centrale postazioni di fabbrica. da verificare, essa effettuerà l’autodiagnosi e sul display apparirà un mes- saggio diagnostico che indicherà se tutti gli ingressi sono nella condizione 8) GESTIONE RADIOCOMANDI di riposo oppure indicherà...
  • Page 6 Se si desidera modificare questa impostazione, collegare A) Con codice il ricevitore al dispositivo PROXIMA, selezionare il menù configura uscite Se si dispone del codice del ricevitore, selezionare la voce “con codice”, e premere <ENTER>. Selezionare l’uscita che si desidera modificare ed usare la tastiera per inserire il codice ricevitore corretto e seguire le il tipo di attivazione.
  • Page 7 NIX/RTD) e la capacità di memoria (64-128-512-2048). Riferirsi al paragrafo 8.4 “liste ricevitori” per la gestione delle liste. si entra in questo sottomenù: Collegare il ricevitore al programmatore PROXIMA e seguire le indicazioni M23 DATABASE sul display, al termine dell’operazione la lista corrente del programmatore >scorri lista...
  • Page 8 ITALIANO MANUALE PER L’INSTALLAZIONE 2) collegare utilizzando gli accessori UNITRC/UNIMITTO ed il cavo M244 DEF.TIPO UNIDA il trasmettitore in sostituzione al dispositivo PROXIMA >clonix 3) inserire il nominativo del trasmettitore intric standard intric person. modifica nome: rtd 512 Consente la modifica di un nome associato ad un trasmettitore presente rtd 2048 nella lista corrente.
  • Page 9 10) INDICE DELLE FUNZIONI PROXIMA è dotato di una funzione di ricerca rapida dei menù. Tramite questa funzione è sufficiente indicare il numero del menù da visualizzare per raggiungerlo senza dover navigare utilizzando i tasti di selezione. La lista dei numeri relativi ai menù...
  • Page 10 CAMBIO N.DI SERIE (M52) USCITA 1 (M2281) DATA E ORA (M53) USCITA 2 (M2282) DISPLAY (M54) USCITA 3 (M2283) USCITA 4 (M2284) LUCE (M541) PIU’ CONTRASTO (M542) MENO CONTRASTO (M543) BUZZER 10 - PROXIMA - Ver. 02 www.BFTGateOpeners.com | (800) 878-7829...
  • Page 11: General Outline

    EELINK connection are able to supply the PROXIMA programmer with This product complies with recognised technical standards and safety power; in this case it will be possible to use PROXIMA even without a regulations. We declare that it is in conformity with the following European battery or external power supply unit.
  • Page 12 7) CONTROL uNIT MENu “Special switch”: their meanings depends on the control unit, therefore you Connect the control unit to the PROXIMA programmer using the UNIFLAT are advised to refer to the relevant manual for their use. cable and, if necessary, the UNIDA accessory. Make reference to the control unit instructions for further information.
  • Page 13 8) RADIO TRANSMITTER MANAGEMENT >self test The menu for radio transmitters of the PROXIMA device is used to manage all the functions of the INTRIC/CLONIX/RTD type receivers. By means of the EElink protocol, PROXIMA will send a command to the Here are some of the main functions: control unit to be checked;...
  • Page 14 Connect the receiver to the PROXIMA programmer and follow the instructions you enter this submenu: on the display; at the end of this operation, the current list of the PROXIMA programmer will be written in the receiver memory. cancel memory:...
  • Page 15 Once a first transmitter (master) has been entered in the individual PROXIMA device is carried out via radio, without needing a connec- receiver, it can be cloned to obtain transmitters characterised by these tion.
  • Page 16 Scroll lists: The relay of the associated output changes status when the key Displays in sequence all the lists memorised in the PROXIMA device. is kept pressed longer than 5 seconds. All the keys of all the tran- For each list, the description, type and maximum number of transmitters smitters entered in the receiver are automatically provided with that can be managed are displayed.
  • Page 17 10) FuNCTION INDEX PROXIMA is provided with a fast menu search function. With this func- tion, you just need to indicate the number of the menu to be displayed to reach it without having to browse using the selection keys. The list of the numbers referring to the menus which can be reached by means of this function is given in table 1.
  • Page 18 CHANGE SERIAL (M52) OUTPUT 1 (M2281) DATE AND TIME (M53) OUTPUT 2 (M2282) DISPLAY (M54) OUTPUT 3 (M2283) OUTPUT 4 (M2284) LIGHT (M541) MORE CONTRAST (M542) LESS CONTRAST (M543) BUZZER 18 - PROXIMA - Ver. 02 www.BFTGateOpeners.com | (800) 878-7829...
  • Page 19: Avertissements

    89/336/CEE. pour la connexion EELINK sont en mesure d’alimenter le programmeur PROXIMA ; dans ce cas, il sera possible d’utiliser PROXIMA, y compris en AVERTISSEMENTS l’absence de la batterie et de l’alimentateur externe. Dans les cas où, au Lors des opérations de câblage aux dispositifs à...
  • Page 20: Organisation Des Menus

    6) ORGANISATION DES MENuS Brancher la centrale au programmateur PROXIMA en utilisant le câble Les menus qui se suivent sur l’afficheur de PROXIMA sont organisés en UNIFLAT et si nécessaire l’accessoire UNIDA. Se référer aux instructions format arborescent à partir des pages-écrans de bienvenue: de la centrale pour les informations supplémentaires.
  • Page 21: Gestion Des Radiocommandes

    PROXIMA enverra par le biais du protocole EElink, une commande à la centrale à vérifier, il effectuera l’autodiagnostic et un message diagnostic liste courante. Si la liste courante contient déjà des données, elles seront apparaîtra sur l’afficheur qui indiquera si toutes les entrées sont dans la...
  • Page 22 EMARQuE MPORTANTE Les opérations réalisées dans ce menu ne comportent pas la modification M22 RECEPTEURS de la liste sélectionnée actuellement sur le dispositif PROXIMA. Utiliser >config. sorties le menu “Gestion base de données” et “Listes récepteurs” pour créer et personnaliser apporter des modifications aux listes.
  • Page 23 Se référer au paragraphe 8.4 “listes des récepteurs” pour la gestion des listes. ASE DE DONNÉES Brancher le récepteur au programmateur PROXIMA et suivre les indications Il est possible d’effectuer toutes les opérations d’insertion, remplacement, sur l’afficheur. Au terme de l’opération, la liste récepteur est chargée dans élimination et clonage des émetteurs à...
  • Page 24 1) spécifier l’émetteur à éliminer en insérant le numéro d’emplacement. définir la liste: 2) brancher, en utilisant les accessoires UNITRC/UNIMITTO et le câble UNIDA, l’émetteur en remplacement au dispositif PROXIMA. Permet de définir les caractéristiques de la liste courante. 3) insérer le nom de l’émetteur Si le type de liste n’a pas été...
  • Page 25: Mise À Jour Du Programmateur Proxima

    Le fabricant peut rendre disponibles les mises à jour du logiciel se trouvant dans le programmateur PROXIMA. Si la mise à jour du logiciel du dispositif PROXIMA est nécessaire, procéder comme indiqué ci-dessous: 1) Vérifier la version du logiciel PROXIMA installée actuellement sur le programmateur, en allumant le dispositif.
  • Page 26 CHANG. N. SERIE (M52) SORTIE 1 (M2281) DATE ET HEURE (M53) SORTIE 2 (M2282) DISPLAY (M54) SORTIE 3 (M2283) SORTIE 4 (M2284) LUMIERE (M541) PLUS CONTRASTE (M542) MOINS CONTRASTE (M543) VIBREUR 26 - PROXIMA - Ver. 02 www.BFTGateOpeners.com | (800) 878-7829...
  • Page 27: Technische Daten

    Die Vorrichtungen, die für die Verbindung EELINK nicht den Gebrauch europäischen Richtlinie entspricht: 89/336/EWG. des Adapters UNIDA erfordern, sind in der Lage, das Programmiergerät PROXIMA zu speisen. In diesem Fall kann PROXIMA auch ohne Batterie hINWEISE und externes Netzteil betrieben werden. Benötigt die Vorrichtung hingegen Bei der Herstellung von Kabelverbindungen mit zu programmierenden den Adapter UNIDA, kann sie über PROXIMA gespeist werden.
  • Page 28 · Kontrast: Der Displaykontrast kann hier erhöht oder verringert 6) MENÜAuFBAu werden. · Summer: Hier kann der interne Summer ein- oder ausgeschaltet Die Menüs, die auf dem Display des Gerätes PROXIMA einander folgen, sind - ausgehend von den Begrüßungsbildschirmen - in einer Baumstruktur werden. organisiert: 7) MENÜ...
  • Page 29 Zentrale schreiben: Schreibt die Daten der laufenden Liste in die an- geschlossene Zentrale; bereits vorhandene Daten werden dabei über- PROXIMA sendet über das Protokoll EElink einen Befehl zur Zentrale, die schrieben. geprüft werden soll. Diese führt eine Selbstdiagnose durch und gibt auf Default schreiben: Setzt die Konfiguration der angebundenen Zentrale dem Display eine Diagnosemeldung aus, die angibt, ob alle Eingänge in...
  • Page 30 Soll diese Einstellung geändert werden, muss der Empfänger ein und folgen den Anweisungen auf dem Display. Der Empfängerco- mit dem Gerät PROXIMA verbunden werden, dann das Menü “Ausgänge de, der aus 10 Ziffern im hexadezimalen Format besteht, wird auf der konfigurieren”...
  • Page 31 T3 aktiviert Ausgang 2 des Einzelsenders personalisiert sind. Den personalisierten Empfänger an das Programmiergerät Weitere Einzelempfänger haben einen Empfängercode, bei denen die PROXIMA anschließen und den Anweisungen auf dem Display folgen. letzten beiden Ziffern fortlaufend ansteigen, in unserem Beispiel 1A9C- Speicher lesen: 22FD-02, 1A9C-22FD-03 etc., die Verknüpfungen zwischen Taste und...
  • Page 32 2) die zuzuordnende Sendertaste drücken 3) den Sender benennen Angezeigt werden nacheinander alle Listen, die im Gerät PROXIMA über Funk: in diesem Modus sind der Sender und das Gerät PROXIMA gespeichert sind. über Funk verbunden. Eine Steckverbindung ist nicht erforderlich.
  • Page 33 Das Relais des zugeordneten Ausgangs wechselt den Zustand, dem PC verbinden. wenn die Sendertaste länger als 5 Sekunden gedrückt gehalten 4) Die vom Hersteller bereitgestellte Software für das Update “PROXIMA wird. Alle Tasten sämtlicher im Empfänger gespeicherter Sender Update.exe” starten und den Anweisungen folgen.
  • Page 34 SERIE NR.ÁNDR. (M52) AUSGANG 1 (M2281) DATUM - UHRZEIT (M53) AUSGANG 2 (M2282) DISPLAY (M54) AUSGANG 3 (M2283) AUSGANG 4 (M2284) BELEUCHTUNG (M541) + KONTRAST (M542) - KONTRAST (M543) SUMMER 34 - PROXIMA - Ver. 02 www.BFTGateOpeners.com | (800) 878-7829...
  • Page 35: Datos Generales

    Conector para sistema serial CAPRI (véase la Fig. 5). 6) ORGANIZACION DE LOS MENuS Alimentación Los menús que se subsiguen en el display de PROXIMA están organizados El dispositivo se enciende mediante el interruptor colocado en el lado en un árbol a partir de las pantallas de bienvenida: derecho del programador.
  • Page 36: Menu Centrales De Mando

    MANUAL DE INSTALACIÓN -------------------------------------------- 7) MENu CENTRALES DE MANDO Conecte la central de mando al programador PROXIMA utilizando el cable B.F.T. SPA PROXIMA V1.3 vers. del software instalada en el dispositivo UNIFLAT y, si es necesario, el accesorio UNIDA. Para más información, PROXIMA se remite a las instrucciones de la central de mando.
  • Page 37 >autodiagnostico Cambiar lista: En alternativa al menú anterior, es posible especificar PROXIMA enviará, mediante el protocolo EElink, un comando a la central directamente el número de ubicación en la que se desea operar. Leer central de mando: Lee todos los datos de una central de mando y de mando que se desea controlar, ésta efectuará...
  • Page 38 RANSMISORES MPORTANTE Las operaciones desarrolladas en este menú no comportan la modificación M22 RECEPTORES de la lista corrientemente seleccionada en el dispositivo PROXIMA. Utilice >config.salidas el menú “Gestión base de datos” y “Listas receptores” para crear y aportar personalizar modificaciones a las listas.
  • Page 39 Para la gestión de las listas, se remite al apartado 8.4 “Listas receptores”. ASE DE DATOS Conecte el receptor al programador PROXIMA y siga las indicaciones que Por medio del menú Base de datos, es posible efectuar todas las operacio- aparecen en el display;...
  • Page 40 1) Especifique el transmisor que desea eliminar insertando el número que presenta las posibles elecciones: de posición. 2) Conecte, utilizando los accesorios UNITRC/UNIMITTO y el cable M244 DEF. TIPO UNIDA, el transmisor de sustitución al dispositivo PROXIMA. >clonix 3) Inserte el nombre del transmisor. intric standard intric person.
  • Page 41 éxito. 10) ÍNDICE DE LAS FUNCIONES PROXIMA está dotado de una función de búsqueda rápida de los menús. Mediante esta función, es suficiente con indicar el número del menú que se desea visualizar para alcanzarlo sin tener que navegar utilizando las teclas de selección.
  • Page 42 CAMBIO N. SERIE (M52) SALIDA 1 (M2281) FECHA Y HORA (M53) SALIDA 2 (M2282) DISPLAY (M54) SALIDA 3 (M2283) SALIDA 4 (M2284) LUZ (M541) MÁS CONTRASTE (M542) MENOS CONTRASTE (M543) BUZZER 42 - PROXIMA - Ver. 02 www.BFTGateOpeners.com | (800) 878-7829...
  • Page 43 EELINK estão em condições de alimentar o programador PRO- técnica e pelas disposições relativas à segurança. Confirmamos que o XIMA; neste caso será possível utilizar PROXIMA ainda que na falta da mesmo está em conformidade com as seguintes directivas europeias: bateria e do alimentador exterior.
  • Page 44 6) ORGANIZAÇÃO DOS MENuS 7) MENu CENTRAIS Os menus que se apresentam em sucessão no display de PROXIMA estão Ligar a central ao programador PROXIMA utilizando o cabo UNIFLAT e se organizados numa árvore, a partir do ecrã de boas-vindas: necessário, o acessório UNIDA.
  • Page 45 INTERNA DAS CENTRAIS PROXIMA incorpora uma base de dados interna que pode conter a con- Externos ou de engate: os receptores externos devem ser ligados utili- figuração completa (parâmetros, lógicas e estatísticas) de 9 diferentes zando o cabo multipolar UNIFLAT e o acessório UNIDA.
  • Page 46 · o número de transmissores utilizáveis com o receptor é ilimitado inde- Ligar o receptor ao programador PROXIMA e seguir as indicações dadas pendentemente da capacidade de memória do receptor. no display, no fim da operação a lista receptor resulta carregada na lista ·...
  • Page 47 Ligar o receptor ao programador PROXIMA e seguir as indicações dadas modific. nombre no display; no fim da operação, a lista actual do programador PROXIMA borrar nombre está gravada na memória do receptor. modific. nombre cancelar a memória: deslocar lista: Ajusta a zero todas as informações relativas aos códigos de transmissores...
  • Page 48 >clonix posição. intric standard 2) ligar, com auxílio dos acessórios UNITRC/UNIMITTO e do cabo intric person. UNIDA, o transmissor em substituição ao dispositivo PROXIMA. rtd 512 3) inserir o nominativo do transmissor. rtd 2048 modificar nome: Permite a modificação de um nome associado a um transmissor presente clonix: no caso em que se deva realizar uma lista para um receptor da na lista actual.
  • Page 49 êxito positivo. 10) ÍNDICE DAS FUNÇÕES PROXIMA está dotado de uma função de busca rápida dos menus. Atra- vés desta função é suficiente indicar o número do menu a visualizar para chegar ao mesmo sem ter que navegar utilizando as teclas de selecção.
  • Page 50 CAMBIO N. SERIE (M52) SALIDA 1 (M2281) FECHA Y HORA (M53) SALIDA 2 (M2282) DISPLAY (M54) SALIDA 3 (M2283) SALIDA 4 (M2284) LUZ (M541) MÁS CONTRASTE (M542) MENOS CONTRASTE (M543) BUZZER 50 - PROXIMA - Ver. 02 www.BFTGateOpeners.com | (800) 878-7829...
  • Page 51 Fig. 1 Fig. 2 65.5 PROXIMA - Ver. 02 - www.BFTGateOpeners.com | (800) 878-7829...
  • Page 52 Contatti Contacts Contacts Kontakte Contactos Contatos MITTO 2-4 (12V) Fig. 5 4 32 1 Contatti Contacts Contacts Kontakte Contactos 6 7 8 6 7 8 Contatos CAPRI 1 CAPRI 2 52 - PROXIMA - Ver. 02 www.BFTGateOpeners.com | (800) 878-7829...

Table des Matières