Télécharger Imprimer la page
Integra CRW Manuel De L'utilisateur

Integra CRW Manuel De L'utilisateur

Ensemble d'anneau crânien compact universel (uchra)

Publicité

Les langues disponibles
  • FR

Les langues disponibles

  • FRANÇAIS, page 32

Liens rapides

Integra
EN – English
®
CRW
Universal Compact Head Ring Assembly (UCHRA)
®
Operator's Manual
EN – English ...........................................................................................................1
FR – Français ..........................................................................................................30
IT – Italiano............................................................................................................. 60
DE – Deutsch ..........................................................................................................90
ES – Español ........................................................................................................... 120
NL – Nederlands ....................................................................................................150
. . 1

Publicité

loading

Sommaire des Matières pour Integra CRW

  • Page 1 Integra EN – English ® Universal Compact Head Ring Assembly (UCHRA) ® Operator’s Manual EN – English ......................1 FR – Français ......................30 IT – Italiano......................60 DE – Deutsch ......................90 ES – Español ......................120 NL – Nederlands ....................150 . . 1...
  • Page 2 PATIENTS. No warranty or guarantee may be created by any act or statement nor may this Standard Warranty be modified in any way, except as a result of a writing signed by an officer of Integra. These limitations on the creation or modification of this warranty may not be waived or...
  • Page 3 EN – English Definitions of Alerts Used in this Manual Warning: An operation or maintenance procedure, practice, condition, statement, etc. which, if not strictly adhered to, could result in injury, long term health hazard, or death of a patient or personnel. Caution: An operation or maintenance procedure, practice, condition, statement, etc.
  • Page 4 ................................................................Using the CRW® System with Electrosurgical Devices ............................................Symbol Definitions .................................................................... Chapter 2: Using the CRW® System in a Magnetic Resonance Imaging Environment MRI Safety Information ................................................................MR Unsafe Components ................................................................. Chapter 3: Assembling the Universal Compact Head Ring Assembly List of UCHR Components and Accessories ..................................................
  • Page 5 About UCHRA System Compatibility The UCHR is designed to be used in conjunction with the Integra® CRW® Precision Stereotactic System, the CRWASL Stereotactic System, and the XKnife® Radiosurgery System. The UCHRA is configured to be CT and MRI compatible.
  • Page 6 To ensure proper accuracy and function of the CRW system, do not subject any of the CRW system’s parts or accessories to any forces that may affect its use or calibration. Always inspect the UCHR prior to use. If any of the parts or accessories are damaged in a way that may potentially affect the system’s accuracy or function,...
  • Page 7 EN – English Symbol Definition Lot number Use by date (YYYY-MM-DD) Manufacturer Authorized Representative in the European Community Date of manufacture Catalog number Product complies with the requirements of the directive 93/42/EEC Caution: Federal (US) law restricts this device to sale by or on the order of a physician or practitioner.
  • Page 8 EN – English This page is intentionally left blank. 7 . Chapter 1 . About the Universal Compact Head Ring...
  • Page 9 1mm from the assembled devices (DHRS, UCHRA, LL01) when imaged with either a spin-echo or a gradient echo pulse sequence and either a 1.5 T or a 3.0 T MRI system. Chapter 2 . Using the CRW® System in a Magnetic Resonance Imaging Environment . 8...
  • Page 10 EN – English MR Unsafe Components The following components of the UCHRA system are unsafe: Catalog Number Device Description UCHREBA (including all ear bar Ear Bar Assembly assembly components) MR Unsafe UCHREB UCHR EBA Rod UCHRAP Universal Compact HR Adaptor Plate Head Ring Wrench Cleaning Tap UCHRCASE...
  • Page 11 EN – English Chapter 3 Assembling the Universal Compact Head Ring Assembly List of UCHR Components and Accessories ..............................Assembling the Universal Compact Head Ring (UCHR) ........................ Attaching the Head Ring Screw Cross Bar (Optional) ........................Installing the Ear Bars (Optional) ......................................
  • Page 12 EN – English Head Rings and Accessories UCHRHK This kit includes: (4) Adapter plate attachment screws UCHRHK (UCHRA Hardware Kit) UCHRHK (2) Intubation hoop attachment screws (4) Head post attachment screws (2) Ear bar assembly attachment screws (2) Ear bar assembly nylon thumb screws UCHRP (Composite Post &...
  • Page 13 EN – English Head Rings and Accessories TAP (Cleaning Tap for HRP and UCHRP) HRKTP (Head Ring Positioner) HRKTP CSS (Conical T-Bolt Screws) Imaging Localizers BRWLF (CT Localizer Frame) BRWLF LL01 (Luminant® (MR/CT Localizer)) LL01 Chapter 3 . Assembling the Universal Compact Head Ring . 12...
  • Page 14 EN – English Sterile Devices (Single Use Only) ASD1 (sterile drape) Apuzzo Stereotactic Drape ASD1B (10 sterile drapes) DHRSL5 (48 mm / box of long screws / 5 packs, 2 screws per pack) Disposable Head Ring Screws DHRSS5 (34 mm / box of short screws /5 packs, 2 screws per pack)
  • Page 15 EN – English 2. See the picture to the right for a sample of a properly assembled head ring. Note The “lip” that goes around the head ring should be on the bottom. Note To prevent breaking the head post attachment screws, ensure that the post screws are tightened so that the post is flush with the head ring before tightening the disposable head ring screws.
  • Page 16 EN – English Installing the Ear Bars (Optional) Assembling the Ear Bar 1. Loosen the nylon thumb screw on the ear bar support Nylon Thumb Nylon Screw bracket to place the ear bar in the bracket. Thumb Screw Index Marks on Ear Bar Index Marks on Ear Bar Ear Bar Ear Bar...
  • Page 17 EN – English Placing the Head Ring Assembly on the Patient Note Placing the head ring assembly is easier if multiple people perform the procedure. 1. The first person should hold the head ring in the desired position over the patient’s head. 2.
  • Page 18 EN – English Place the HRKTP head ring positioner onto the head ring (Optional) Note Using the head ring positioner helps support the weight of the head ring assembly during placement on the patient. Note Photos represent the HRKTP head ring positioner being used with the HRAIM head ring and are for illustrative reference only.
  • Page 19 Caution: When installing the head ring screws: • Only use Integra disposable head ring screws. • Select the appropriate head ring screw length so that the screws protrude at least 13 mm from the outside surface of the head ring posts.
  • Page 20 Installing the Head Ring Screws Caution: When installing the head ring screws: • Only use Integra disposable head ring screws. • Select the appropriate head screw length so that the screws protrude at least 13 mm from the outside surface of the head ring posts.
  • Page 21 Note The arc adapter is used to attach the BRWLF to the head ring for CT scanning, and also attach the CRW system to the head ring. Chapter 3 . Assembling the Universal Compact Head Ring . 20...
  • Page 22 3. The UCHRA with the arc adapter plate in place. Assembling the Localizer Frames The CRW supports the BRWLF and Luminant localizer frames. Assembling the BRWLF on the UCHRA The BRW localizer frame is CT imaging-compatible only. The BRW localizer frame is not indicated for use with MR imaging.
  • Page 23 EN – English 1. Place the BRW localizer frame (BRWLF) onto the UCHRA (with the arc adapter installed): The BRWLF on the UCHRA is shown: • 2. Lock the cams to fasten the localizer frame to the Adapter Plate of the UCHRA. Chapter 3 .
  • Page 24 EN – English Assembling the Luminant Localizer on the UCHRA Note For MR setup, do not attach the arc adapter to the UCHRA. 1. Remove the Luminant localizer posterior panel and position the localizer so that the anterior panel is above the intubation hoop on the head ring assembly (without the arc adapter installed).
  • Page 25 EN – English 2. Secure the Luminant localizer by thumb-tightening the four attachment screws into the four threaded holes on the top of the head ring. Note The Luminant localizer and UCHRA fit together in one orientation only --all four screws will align properly.
  • Page 26 EN – English 2. Attach the UCHRA to the MAYFIELD Adapter using the short T-Bolts. Note Attach the CSS T-bolts to the arc adapter plate (which is already attached to the head ring). Then guide the patient and head ring onto the CRWMA MAYFIELD Adapter to prevent the binding of the MAYFIELD Adaptor to the MAYFIELD Swivel or Tri-Star Swivel Adapter.
  • Page 27 EN – English Chapter 4 Cleaning, Sterilizing and Maintaining the Universal Compact Head Ring Cleaning the Universal Compact Head Ring ..............................Packing the UCHR Components ......................................Sterilizing the UCHR Components ....................................Cleaning the Universal Compact Head Ring Note The use of Betadine® and other related fluids containing iodine may stain the surface of the stereotactic system.
  • Page 28 EN – English Parameters for Sterilizing the UCHR Components The following tables provide recommended sterilization parameters for the UCHR components. Due to variations in sterilization chambers and load configurations, it is the responsibility of the facility to determine a sterilization protocol that ensures sterility of the device.
  • Page 29 EN – English Summary of UCHR Sterilization Procedures Component Description Steam Autoclave Sterrad® UCHR Universal Compact Head Ring UCHRPA, UCHRPP Composite Head Ring Posts, Cross Bar & attached screws Head Ring Wrench UCHRAP UCHR Adapter Plate UCHREBA Ear Bar Assembly Kit UCHREB Ear Bar Chapter 4 .
  • Page 30 Additional information for EMEA Customers only: Products mentioned in this document are CE class I, IIa, IIb or III devices. Contact Integra should you need any additional information on devices classification. All the medical devices mentioned on this document are CE marked according to European council directive 93/42/EEC on medical devices and its relatives, unless specifically identified as “NOT CE MARKED”.
  • Page 31 FR – Français Integra ® Ensemble d’anneau crânien compact universel CRW® (UCHRA) Manuel de l’utilisateur...
  • Page 32 Integra ; ayant été modifié d’une manière qui, selon l’avis d’Integra, pourrait entraver sa stabilité ou sa fiabilité ; ayant été soumis à un usage abusif, négligent ou à un accident ; ou ayant été...
  • Page 33 FR – Français Définitions des alertes utilisées dans ce manuel Avertissement : Une procédure, pratique, condition, déclaration, etc. de fonctionnement ou d’entretien, etc. qui, si elle n’est pas strictement observée, risque d’entraîner des lésions, un danger pour la santé à long terme ou le décès d’un patient ou d’un membre du personnel.
  • Page 34 ............................................Utilisation du système CRW® avec des dispositifs électrochirurgicaux ................................. Définitions des symboles ..............................................................Chapitre 2 : Utilisation du système CRW® dans un environnement d’imagerie par résonance magnétique Informations relatives à la sécurité IRM ....................................................Composants incompatibles avec l’IRM .....................................................
  • Page 35 À propos de la compatibilité du système UCHRA L’UCHR est conçu pour être utilisé avec le système stéréotaxique CRW® Precision, le système stéréotaxique CRWASL et le système de radiochirurgie XKnife® d’Integra®.
  • Page 36 Contre-indications relatives à l’UCHRA L’anneau crânien est contre-indiqué chez les nourrissons dont la suture coronale n’es pas encore refermée. Le système CRW est contre-indiqué chez les patients atteints de la maladie de Creutzfeldt–Jakob. Précautions relatives aux dispositifs à usage unique Des dispositifs à...
  • Page 37 FR – Français Symbole Définition Numéro de lot À utiliser avant le (AAAA-MM-JJ) Fabricant Représentant autorisé dans la Communauté européenne Date de fabrication Référence catalogue Le produit est conforme aux exigences de la directive 93/42/CEE. Mise en garde : La loi fédérale (USA) réserve la vente de ce dispositif sur prescription d’un médecin.
  • Page 38 FR – Français Page laissée vierge intentionnellement. 37 . Chapitre 1 . À propos de l’anneau crânien compact universel...
  • Page 39 écho de spin ou en écho de gradient et un système IRM de 1,5 T ou 3,0 T. Chapitre 2 . Utilisation du système CRW® dans un environnement d’imagerie par résonance magnétique . 38...
  • Page 40 FR – Français Composants incompatibles avec l’IRM Les composants suivants du système UCHRA peuvent poser un danger : Numéro de référence Description du dispositif UCHREBA (y compris tous les Ensemble barres auriculaires (Ear Bar composants de l’ensemble de Incompatible Assembly, EBA) avec l’IRM barres auriculaires) UCHREB...
  • Page 41 FR – Français Chapitre 3 Montage de l’ensemble d’anneau crânien compact universel Liste des composants et des accessoires de l’UCHR ........................Montage de l’anneau crânien compact universel (UCHR) ....................Fixation de la barre transversale de vis d’anneau crânien (en option) .............
  • Page 42 FR – Français Anneaux crâniens et accessoires Ce kit comprend : (4) Vis de fixation de plaque adaptatrice (2) Vis de fixation d’anse d’intubation Kit de matériel de fixation de l’UCHRA (4) Vis de fixation de montant crânien UCHRHK (UCHRA Hardware Kit, UCHRHK) (2) Vis de fixation de l’ensemble de barres auriculaires (2) Vis moletées en nylon de l’ensemble de...
  • Page 43 FR – Français Anneaux crâniens et accessoires Taraud de nettoyage pour l’HRP et l’UCHRP (TAP) TAP Positionneur d’anneau crânien (Head Ring HRKTP Positioner, HRKTP) Vis en T coniques (Conical T-Bolt Screws, CSS) Localiseurs d’imagerie Cadre localiseur pour CT-scan (BRWLF) BRWLF Localiseur IRM/CT-scan Luminant®...
  • Page 44 FR – Français Dispositifs stériles (Exclusivement à usage unique) ASD1 (champ stérile) Champ pour stéréotaxie Apuzzo ASD1B (10 champs stériles) DHRSL5 (48 mm / boîte de vis longues / 5 packs, 2 vis par pack) Vis d’anneau crânien jetables DHRSS5 (34 mm / boîte de vis courtes /5 packs, 2 vis par...
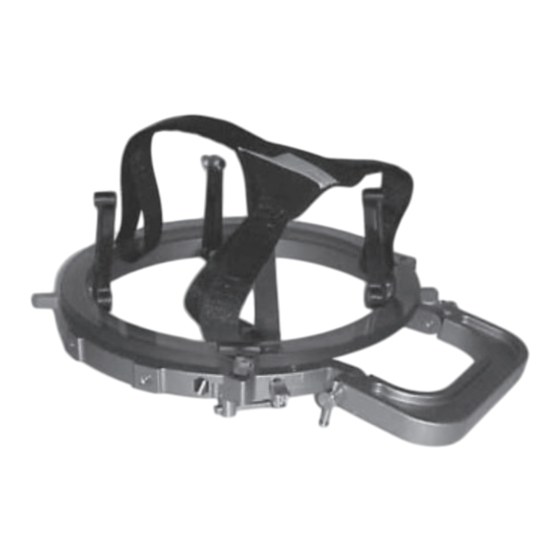
  • Page 45 FR – Français 2. Consulter l’image à droite, qui montre un anneau crânien correctement monté. Remarque Le rebord qui suit le pourtour de l’anneau crânien doit être en bas. Remarque Pour éviter de rompre les vis de fixation des montants crâniens, veiller à serrer les vis des montants de façon à...
  • Page 46 FR – Français Installation des barres auriculaires (en option) Montage de barre auriculaire 1. Desserrer la vis moletée en nylon sur le support de la barre Vis moletée Repères sur la barre Nylon en nylon auriculaire auriculaire pour placer la barre auriculaire dans le support. Thumb Screw Index Marks on Ear Bar Support...
  • Page 47 FR – Français Mise en place de l’ensemble d’anneau crânien sur le patient Remarque La mise en place de l’ensemble d’anneau crânien est plus facile si plusieurs intervenants effectuent la procédure. 1. Le premier intervenant doit tenir l’anneau crânien dans la position voulue sur la tête du patient. 2.
  • Page 48 FR – Français Mise en place du positionneur d’anneau crânien HRKTP sur l’anneau crânien (en option) Remarque L’utilisation du positionneur d’anneau crânien aide à soutenir le poids de l’ensemble d’anneau crânien lors de sa mise en place sur le patient. Remarque Les photos représentent le positionneur d’anneau crânien HRKTP utilisé...
  • Page 49 Mise en garde : Lors de l’installation des vis d’anneau crânien : • Utiliser uniquement des vis d’anneau crânien jetables Integra. • Choisir la longueur de vis d’anneau crânien appropriée de sorte que les vis dépassent d’au moins 13 mm de la surface extérieure des montants d’anneau crânien.
  • Page 50 Installation des vis d’anneau crânien Mise en garde : Lors de l’installation des vis d’anneau crânien : • Utiliser uniquement des vis d’anneau crânien jetables Integra. • Choisir la longueur de vis d’anneau crânien appropriée de sorte que les vis dépassent d’au moins 13 mm de la surface extérieure des montants d’anneau...
  • Page 51 à la partie antérieure de l’anneau crânien. Remarque La plaque adaptatrice d’arc sert à fixer le BRWLF sur l’anneau crânien pour les CT-scans, et pour fixer le système CRW à l’anneau crânien. Chapitre 3 . Montage de l’ensemble d’anneau crânien compact universel . 50...
  • Page 52 3. L’UCHRA avec la plaque adaptatrice d’arc en place. Montage des cadres localiseurs Le CRW soutient les cadres localiseurs BRWLF et Luminant. Montage du BRWLF sur l’UCHRA Le cadre localiseur BRW est uniquement compatible avec l’imagerie CT-scan.
  • Page 53 FR – Français 1. Placer le cadre localiseur BRW (BRWLF) sur l’UCHRA (avec la plaque adaptatrice d’arc installée) : BRWLF en place sur l’UCHRA : • 2. Verrouiller les cames pour fixer le cadre localiseur sur la plaque adaptatrice de l’UCHRA. Chapitre 3 .
  • Page 54 FR – Français Montage du localiseur Luminant sur l’UCHRA Remarque Pour la configuration IRM, ne pas fixer la plaque adaptatrice d’arc sur l’UCHRA. 1. Retirer le panneau postérieur du localiseur Luminant et positionner le localiseur de sorte que le panneau antérieur soit au-dessus de l’anse d’intubation sur l’ensemble d’anneau crânien (sans la plaque adaptatrice d’arc installée).
  • Page 55 FR – Français 2. Fixer le localiseur Luminant en serrant les quatre vis de fixation dans les quatre trous filetés sur le dessus de l’anneau crânien. Remarque Le localisateur Luminant et l’UCHRA s’adaptent dans une seule orientation ; les quatre vis s’alignent correctement. Ne pas tenter de monter ces pièces dans une autre orientation.
  • Page 56 FR – Français 2. Fixer l’UCHRA sur l’adaptateur MAYFIELD à l’aide des boulons en T courts. Remarque Fixer les boulons en T CSS sur la plaque adaptatrice d’arc (qui est déjà fixée sur l’an- neau crânien). Guider ensuite le patient sur l’adaptateur CRWMA MAYFIELD pour em- pêcher que l’adaptateur MAYFIELD ne se coince sur l’adaptateur pivotant ou pivo-...
  • Page 57 FR – Français Chapitre 4 Nettoyage, stérilisation et entretien de l’anneau crânien compact universel Nettoyage de l’anneau crânien compact universel ..........................Emballage des composants de l’UCHR ..................................Stérilisation des composants de l’UCHR ................................Nettoyage de l’anneau crânien compact universel Remarque L’utilisation de Betadine®...
  • Page 58 FR – Français Paramètres de stérilisation des composants de l’UCHR Les tableaux suivants indiquent les paramètres de stérilisation recommandés pour les composants de l’UCHR. En raison des variations des chambres de stérilisation et des configurations de charge, il revient à l’établissement de déterminer le protocole de stérilisation assurant la stérilité...
  • Page 59 FR – Français Résumé des procédures de stérilisation de l’UCHR Composant Description Autoclave vapeur Sterrad® UCHR Anneau crânien compact universel UCHRPA, UCHRPP Montants d’anneau crânien composites, barre transversale et vis rattachées Clé d’anneau crânien UCHRAP Plaque adaptatrice de l’UCHR UCHREBA Kit d’ensemble de barres auriculaires UCHREB...
  • Page 60 Informations supplémentaires pour les clients de la région EMEA seulement : Les produits mentionnés dans ce document sont des dispositifs de classe CE I, IIa, IIb ou III. Contacter Integra pour toute information supplémentaire sur la classification des dispositifs. Tous les dispositifs médicaux mentionnés dans ce document ont le marquage CE conformément à la directive européenne 93/42/CEE du Conseil relative aux dispositifs médicaux et aux directives apparentées, sauf s’ils sont spécifiquement identifiés comme «...
  • Page 61 IT – Italiano Integra ® Gruppo casco compatto universale (UCHRA) CRW® Manuale per l’uso...
  • Page 62 O USO DI UN PRODOTTO INTEGRA. In aggiunta, questa garanzia non sarà valida e Integra non sarà responsabile per perdite connesse all’acquisto o uso di un prodotto Integra che sia stato riparato da un ente che non sia un rappresentante di servizio autorizzato Integra, o alterato in qualsiasi modo che, a giudizio di Integra, comprometta la sua stabilità...
  • Page 63 IT – Italiano Definizioni degli avvisi usati in questo manuale Avvertenza: un intervento operativo o di manutenzione, una pratica, condizione, affermazione ecc. la cui inosservanza potrebbe dare luogo a infortuni, pericoli a lungo termine per la salute, o la morte di un paziente o operatore. Attenzione: un intervento operativo o di manutenzione, una pratica, condizione, affermazione ecc.
  • Page 64 ................................................................Uso del sistema CRW® con dispositivi elettrochirurgici ........................................... Definizioni dei simboli ................................................................Capitolo 2: Uso del Sistema CRW® in un ambiente a risonanza magnetica Informazioni sulla compatibilità RMN ...................................................... Componenti non compatibili con la RMN ..................................................Capitolo 3: Montaggio del gruppo del casco compatto universale Elenco dei componenti UCHR e degli accessori ..............................................
  • Page 65 L’UCHRA è configurato per essere compatibile con esami TAC e RMN. Indicazioni per l’uso dell’UCHRA Procedure stereotassiche standard Il Sistema CRW è un sistema stereotassico da usare per interventi neurochirurgici che richiedono la localizzazione precisa del target, come craniotomie, biopsie e stereotassia funzionale Nota: La localizzazione viene eseguita mediante imaging TAC o RMN.
  • Page 66 Per assicurare l’accuratezza e la funzione del sistema CRW, non sottoporre nessuna delle parti o degli accessori del sistema CRW a forze che potrebbero comprometterne l’uso o la taratura. Controllare sempre l’UzCHR prima dell’uso. Se una qualsiasi delle parti o accessori è...
  • Page 67 IT – Italiano Simbolo Definizione Numero di lotto Utilizzare entro (AAAA-MM-GG) Produttore Rappresentante autorizzato nella Comunità Europea Data di fabbricazione Numero di catalogo Il prodotto è conforme ai requisiti della Direttiva 93/42/CEE Attenzione: le leggi federali degli Stati Uniti limitano la vendita di questo dispositivo ai medici o su prescrizione medica.
  • Page 68 IT – Italiano Questa pagina è stata lasciata intenzionalmente vuota. 67 . Capitolo 1 . Casco compatto universale...
  • Page 69 (DHRS, UCHRA, LLO1) quando l’immagine viene acquisita con una sequenza di impulsi spin echo o gradient echo e un sistema RMN a 1,5T o 3,0T. Capitolo 2 . USO DEL SISTEMA CRW® IN UN AMBIENTE A RISONANZA MAGNETICA . 68...
  • Page 70 IT – Italiano Componenti non compatibili con la RMN I seguenti componenti del sistema UCHR non sono compatibili: Numero di catalogo Descrizione del dispositivo UCHREBA (inclusi tutti i componenti del gruppo barra Gruppo barra orecchio Non compatibile con RMN orecchio) UCHREB Asta UCHR EBA UCHRAP...
  • Page 71 IT – Italiano Capitolo 3 Montaggio Del Gruppo Del Casco Compatto Universale Elenco dei componenti UCHR e degli accessori ............................Montaggio del gruppo del casco compatto universale (UCHR) ..................Installazione della traversa delle viti del casco (Opzionale) ....................Installazione delle barre orecchie (Opzionale) ...............................
  • Page 72 IT – Italiano Casco e accessori UCHRHK Questo kit include: (4) Viti di fissaggio della piastra adattatore (2) Viti di fissaggio della piastra adattatore UCHRHK (Kit minuteria UCHRA) UCHRHK (4) Viti di fissaggio del supporto testa (2) Viti di fissaggio del gruppo della barra orecchio (2) Viti di fissaggio ad alette di nylon del gruppo della barra orecchio...
  • Page 73 IT – Italiano Casco e accessori TAP (maschio di pulizia HRP e UCHRP) HRKTP (Posizionatore casco) HRKTP CSS (Viti coniche con testa a T) Localizzatori per imaging BRWLF (Frame localizzatore TAC) BRWLF LL01 (Luminant® (Localizzatore RMN/TAC)) LL01 Capitolo 3 . Montaggio Del Gruppo Del Casco Compatto Universale . 72...
  • Page 74 IT – Italiano Dispositivo sterile (esclusivamente monouso) ASD1 (Telo sterile) Telo stereotassico Apuzzo ASD1B (10 teli sterili) DHRSL5 (48 mm / scatola di viti lunghe / 5 Confezioni, 2 viti per confezione) Viti monouso casco DHRSS5 (34 mm / scatola di viti corte / 5 confezioni, 2 viti per confezione)
  • Page 75 IT – Italiano 2. La figura qui a destra mostra un casco montato correttamente. Nota Il bordo attorno al casco deve essere in basso. Nota Per evitare di rompere le viti di fissaggio del supporto, assicurarsi che siano serrate in modo che il supporto sia a livello con il casco prima di serrare le viti monouso del casco.
  • Page 76 IT – Italiano Installazione delle barre orecchie (Opzionale) Montaggio della barra orecchio 1. Allentare la vite ad alette di nylon sulla staffa di supporto Vite ad alette di Segni di riferimento sulla Nylon nylon barra orecchio della barra orecchio per collocare la barra orecchio nella Thumb Screw Index Marks on Ear Bar staffa.
  • Page 77 IT – Italiano Posizionamento del gruppo del casco sul paziente Nota Il posizionamento del gruppo del casco è più facile se eseguito da diverse persone. 1. La prima persona dovrebbe mantenere il casco nella posizione desiderata sulla testa del paziente. 2.
  • Page 78 IT – Italiano Collocare il posizionatore del casco HRKTP sul casco (opzionale) Nota L’uso del posizionatore del casco aiuta a sostenere il peso del gruppo del casco durante il posizionamento sul paziente. Nota Le foto rappresentano il posizionatore del casco HRKTP usato con il casco HRAIM e sono esclusivamente a scopo di riferimento.
  • Page 79 Attenzione: quando si installano le viti del casco: • Usare esclusivamente le viti per casco monouso Integra. • Selezionare le viti per casco della lunghezza corretta in modo che protrudano di almeno 13 mm dalla superficie esterna dei supporti del casco.
  • Page 80 Installazione delle viti del casco Attenzione: quando si installano le viti del casco: • Usare esclusivamente le viti per casco monouso Integra. • Selezionare le viti per casco della lunghezza corretta in modo che protrudano di almeno 13 mm dalla superficie esterna dei supporti del casco.
  • Page 81 Nota L’adattatore arco viene usato per fissare il BRWLF al casco per l’esame TAC e fissa inoltre il sistema CRW al casco. Capitolo 3 . Montaggio Del Gruppo Del Casco Compatto Universale . 80...
  • Page 82 3. L’UCHRA con la piastra adattatore arco in posizione. Montaggio dei frame del localizzatore Il CRW sostiene il BRWLF e i frame del localizzatore Luminant. Montaggio del BRWLF sull’UCHRA Il frame del localizzatore BRW è solamente compatibile con gli esami TAC. Il frame del localizzatore BRW non è...
  • Page 83 IT – Italiano 1. Collocare il frame del localizzatore BRW (BRWLF) nell’UCHRA (con l’adattatore arco installato): In figura il BRWLF sull’UCHRA: • 2. Bloccare le camme per fissare il frame del localizzatore nella piastra adattatore dell’UCHRA. Capitolo 3 . Montaggio Del Gruppo Del Casco Compatto Universale . 82...
  • Page 84 IT – Italiano Montaggio del Localizzatore Luminant sull’UCHRA Nota Per la configurazione RMN, non fissare l’adattatore arco all’UCHRA. 1. Rimuovere il pannello posteriore del localizzatore Luminant e posizionare il localizzatore in modo che il pannello anteriore sia al di sopra dell’anello per intubazione sul gruppo del casco (senza l’adattatore arco installato).
  • Page 85 IT – Italiano 2. Fissare il localizzatore Luminant serrando con il pollice le quattro viti di fissaggio nei quattro fori filettati nella parte superiore del casco. Nota localizzatore Luminant l’UCHRA combaciano solamente in un orientamento -- tutt’e quattro le viti si allineeranno correttamente.
  • Page 86 IT – Italiano 2. Serrare l’UCHRA sull’Adattatore MAYFIELD usando le viti corte con testa a T. Nota Fissare le viti con testa a T CSS sulla piastra adattatore arco (che è già fissata al casco). Quindi guidare il paziente e il casco nell’Adattatore CRWMA MAYFIELD per prevenire che l’Adattatore MAYFIELD si blocchi sull’Adattatore snodo o snodo Tri-Star...
  • Page 87 IT – Italiano Capitolo 4 Pulizia, Sterilizzazione e Manutenzione Del Casco Compatto Universale Pulizia del casco compatto universale ..................................Imballaggio dei componenti UCHR ....................................Sterilizzazione dei componenti UCHR ..................................Pulizia del casco compatto universale Nota L’uso di Betadine® e altri fluidi connessi che contengono iodio potrebbe macchiare la superficie del sistema stereotassico.
  • Page 88 IT – Italiano Parametri per la sterilizzazione dei componenti UCHR Le seguenti tabelle includono parametri di sterilizzazione raccomandati per i componenti dell’UCHR. A causa delle variazioni nelle camere di sterilizzazione e configurazioni di carico, spetta all’ospedale determinare un protocollo di sterilizzazione che assicuri la sterilità...
  • Page 89 IT – Italiano Sommario delle procedure di sterilizzazione dell’UCHR Componente Descrizione Autoclave a vapore Sterrad® UCHR Casco compatto universale Sì Sì UCHRPA, UCHRPP Supporti compositi del casco, Sì Sì traversa e viti installate Chiave casco Sì Sì UCHRAP Piastra adattatore UCHR Sì...
  • Page 90 Informazioni addizionali esclusivamente per i clienti EMEA: I prodotti menzionati in questo documento sono omologati come dispositivi CE classe I, IIa, IIb o III. Rivolgersi a Integra per maggiori informazioni sulla classificazione dei dispositivi. Tutti i dispositivi medici menzionati in questo documento sono omologati CE secondo la direttiva del consiglio delle comunità europee 93/42CEE sui dispositivi medici e connessi, a meno che non siano specificamente identificati come “NON OMOLOGATI CE”.
  • Page 91 DE – Deutsch Integra ® CRW® Universelle kompakte Kopfringeinheit (UCHRA) Bedienungshandbuch...
  • Page 92 Wenn ein von der Garantie erfasster Defekt während der Garantielaufzeit oder der Laufzeit einer derartigen Platzierungsvereinbarung auftritt, sollte sich der Käufer direkt mit dem Hauptsitz von Integra in Verbindung setzen. Wenn der Käufer sich auf die Bedingungen dieser Garantie berufen möchte, muss das Produkt zum Hauptsitz von Integra zurückgeschickt werden. Fehlerhafte Produkte müssen unverzüglich, richtig verpackt und vorfrankiert zurückgesendet werden.
  • Page 93 DE – Deutsch Definitionen der in dieser Gebrauchsanweisung verwendete Warnhinweise Warnhinweis: Ein Betriebs- oder Wartungsverfahren, eine Praxis, eine Bedingung, eine Aussage usw., die, wenn sie nicht strikt eingehalten werden, zu Verletzungen, einer langfristigen Gesundheitsgefährdung oder zum Tod eines Patienten oder Personals führen können.. Vorsicht: Ein Betriebs- oder Wartungsverfahren, eine Praxis, eine Bedingung, eine Aussage usw., die, wenn sie nicht strikt eingehalten werden, zu einer Beschädigung oder Zerstörung eines Teils oder des gesamten...
  • Page 94 Vorsichtsmaßnahmen zur Einmalverwendung ................................................ Verwendung des CRW® Systems mit elektrochirurgischen Instrumenten ............................... Symboldefinitionen ..................................................................Kapitel 2: Einsatz des CRW® Systems in einer Magnetresonanztomographie-Umgebung MRT-Sicherheitsinformationen ..........................................................MRT-unsichere Komponenten ..........................................................Kapitel 3: Liste der UCHR-Komponenten und Zubehörteile Liste der UCHR-Komponenten und Zubehörteile ............................................
  • Page 95 Sie sich mit ihnen vertraut, bevor Sie das System in der Chirurgie verwenden. Über die UCHRA-System-Kompatibilität Der UCHR ist zur Verwendung mit dem Integra® CRW® Precision Stereotaxiesystem, dem CRWASL Stereotaxiesystem und dem XKnife® Radiochirurgiesystem konzipiert. Die UCHRA ist so konfiguriert, dass sie CT- und MRT-kompatibel ist..
  • Page 96 Teile oder des Zubehörs in einer Weise beschädigt wird, die möglicherweise die Genauigkeit oder Funktion des Systems beeinträchtigen kann, bitte das System an Integra für den Service zurücksenden (siehe Seite 108 für Verpackungsanweisungen). Verwendung des CRW® Systems mit elektrochirurgischen Instrumenten Wenn der UCHR mit einem massebezogenen elektrochirurgischen Gerät...
  • Page 97 DE – Deutsch Symbol Definition Chargenbezeichnung Verwendbarkeitsdatum (JJJJ-MM-TT) Hersteller Bevollmächtigter in der Europäischen Gemeinschaft Herstellungsdatum Bestellnummer Produkt erfüllt die Anforderungen der Richtlinie 93/42/EWG Vorsicht: In den USA darf dieses Produkt nach den gesetzlichen Vorschriften nur durch einen Arzt oder auf ärztliche Verschreibung abgegeben werden.
  • Page 98 DE – Deutsch Diese Seite wurde absichtlich frei gelassen. 97 . Kapitel 1 . Über den universellen kompakten Kopfring...
  • Page 99 In nichtklinischen Tests erstreckt sich das durch die Vorrichtung hervorgerufene Bildartefakt etwa 1 mm über die zusammengebauten Vorrichtungen (DHRS, UCHRA, LL01) hinaus, wenn es mit einer Gradientenechoimpulsfolge und entweder einem 1,5 T- oder 3,0 T-MRT-System abgebildet wird. Kapitel 2 . Einsatz des CRW® Systems in einer Magnetresonanztomographie-Umgebung . 98...
  • Page 100 DE – Deutsch MRT-unsichere Komponenten Die folgenden Komponenten des UCHRA-Systems sind MRT-unsicher: Katalognummer Produktbeschreibung UCHREBA (darunter alle Komponenten Ohrbügeleinheit MRT-unsicher der Ohrbügeleinheit) UCHREB UCHR EBA Stange UCHRAP Universeller kompakter HR Adapterplatte Kopfringschlüssel Gewindebohrer zur Reinigung UCHRA Aufbewahrungs- UCHRCASE und Sterilisationsbehälter UCHR EBA Befestigungsschraube(n) UCHRHK-Komponenten UCHR Adapterplatte Halteschraube(n)
  • Page 101 DE – Deutsch Kapitel 3 Zusammenbau der universellen kompakten Kopfringeinheit Liste der UCHR-Komponenten und Zubehörteile ..........................Zusammenbau des universellen kompakten Kopfrings ......................Anbringen der Kopfringschrauben-Kreuzschiene (optional) ..................Installieren der Ohrbügel (optional) .................................... Platzierung der Kopfringeinheit am Patienten ............................Installieren der Kopfringschrauben ....................................
  • Page 102 DE – Deutsch Kopfringe und Zubehör UCHRHK Zu diesem Kit gehören: (4) Adapterplatten-Befestigungsschrauben (2) Intubationsschlaufen- UCHRHK (UCHRA Hardware-Kit) UCHRHK Befestigungsschrauben (4) Kopfpfosten-Befestigungsschrauben (2) Ohrenbügeleinheit-Befestigungsschrauben (2) Ohrenbügeleinheit-Nylonrändelschrauben UCHRP (Kompositpfosten- und Kreuzschienenkit) UCHRP UCHREBA (Kopfring-Ohrbügelkit) UCHREBA UCHREB (Einzelohrbügel für UCHREBA) UCHREB HRW (Kopfringschlüssel) 101 .
  • Page 103 DE – Deutsch Kopfringe und Zubehör TAP (Gewindebohrer zur Reinigung von HRP und UCHRP) HRKTP (Kopfringpositionierer) HRKTP CSS (Konische T-Bolzenschrauben) Bildgebungs-Suchhilfen BRWLF (CT-Suchhilferahmen) BRWLF LL01 (Luminant® (MRT/CT-Suchhilfe)) LL01 Kapitel 3 . Zusammenbau der universellen kompakten Kopfringeinheit . 102...
  • Page 104 DE – Deutsch Sterile Medizinprodukte (nur zur Einmalverwendung) ASD1 (Steriles Abdecktuch) Apuzzo Stereotaxie-Abdecktuch ASD1B (10 sterile Abdecktücher) DHRSL5 (48 mm / Schachtel mit langen Schrauben / 5 Packungen, 2 Schrauben pro Packung) Einweg-Kopfringschrauben DHRSS5 (34 mm / Schachtel mit kurzen Schrauben / 5 Packungen, 2 Schrauben pro...
  • Page 105 DE – Deutsch 2. Das Bild rechts zeigt ein Beispiel eines ordnungsgemäß montierten Kopfrings. Hinweis: Die „Lippe“ um den Kopfring herum sollte auf der Unterseite sein. Hinweis: Um zu verhindern, dass die Kopfpfosten- Befestigungsschrauben brechen, sicherstellen, dass die Pfostenschrauben angezogen sind, so dass der Pfosten mit dem Kopfring bündig Lippe ist, bevor die Einweg-Kopfringschrauben...
  • Page 106 DE – Deutsch Installieren der Ohrbügel (optional) Montage des Ohrbügels 1. Die Nylonrändelschraube an der Ohrbügelhalterung lösen, Nylon- Markierungen an der Nylon rändelschraube Ohrenhalterung um den Ohrbügel in die Halterung zu legen. Thumb Screw Index Marks on Ear Bar Ear Bar Support Ohrbügelhalterung Ear Bar...
  • Page 107 DE – Deutsch Platzierung der Kopfringeinheit am Patienten Hinweis: Die Kopfringmontage ist einfacher, wenn mehrere Personen das Verfahren durchführen. 1. Die erste Person sollte den Kopfring in der gewünschten Position über dem Kopf des Patienten halten. 2. Die zweite Person kann die Ohrbügel so anordnen, dass das abgerundete Ende jedes Bügels bequem im Außenohr des Patienten liegt.
  • Page 108 DE – Deutsch Den HRKTP Kopfring-Positionierer auf Kopfring legen (optional) Hinweis: Der Kopfring-Positionierer stützt das Gewicht der Kopfringeinheit während der Platzierung am Patienten. Hinweis: Die Fotografien stellen den HRKTP- Kopfringpositionierer dar, der mit dem HRAIM-Kopfring verwendet wird, und dienen nur zu Anschauungszwecken. Die Schritte zur Verwendung des HRKTP mit der UCHRA sind ähnlich.
  • Page 109 Kopfringschrauben eindrehen und festz- iehen. Vorsicht: Bei der Installation der Kopfringschrauben: • Nur Integra Einweg-Kopfringschrauben verwenden. • Die passende Kopfringschraubenlänge wählen, so dass die Schrauben mindestens 13 mm über die Außenfläche der Kopfringpfosten hervorstehen. • Alle vier (4) Kopfringschrauben zur Befestigung des Kopfrings verwenden.
  • Page 110 Installieren der Kopfringschrauben Vorsicht: Bei der Installation der Kopfringschrauben: • Nur Integra Einweg-Kopfringschrauben verwenden. • Die passende Kopfringschraubenlänge wählen, so dass die Schrauben mindestens 13 mm von der Außenfläche der Kopfringpfosten vorstehen. • Alle vier (4) Kopfringschrauben zur Befestigung des Kopfrings verwenden.
  • Page 111 1. Die Arc-Adapterplatte so ausrichten, dass das offene Ende der Vorderseite der Kopfringeinheit zugewandt ist. Hinweis: Der Arc-Adapter dient zum Befestigen des BRWLF am Kopfring zur CT- Bildgebung und zum Befestigen des CRW-Systems am Kopfring. Kapitel 3 . Zusammenbau der universellen kompakten Kopfringeinheit . 110...
  • Page 112 2. Mit dem Kopfringschlüssel die Befestigungsschrauben festziehen und damit die Arc-Adapterplatte an der Kopfringeinheit befestigen. 3. Die UCHRA mit montierter Arc-Adapterplatte. Zusammenbau der Suchhilferahmen Der CRW stützt den BRWLF und die Luminant-Suchhilferahmen. BRWLF-Anbringung an der UCHRA BRW-Suchhilferahmen lediglich CT-kompatibel. BRW- Suchhilferahmen ist nicht zur Verwendung mit MRT-Bildgebung indiziert.
  • Page 113 DE – Deutsch 1. Den BRW-Suchhilferahmen (BRWLF) auf die UCHRA (mit dem montierten Arc-Adapter) platzieren.): Darstellung des BRWLF auf der UCHRA: • 2. Zur Befestigung des Suchhilferahmens an der Adapterplatte der UCHRA die Nocken verriegeln. Kapitel 3 . Zusammenbau der universellen kompakten Kopfringeinheit . 112...
  • Page 114 DE – Deutsch Anbringung der Luminant-Suchhilfe an der UCHRA Hinweis: Für MRT-Einrichtung den Adapter nicht an die UCHRA anschließen. 1. Das hintere Paneel Luminant-Suchhilfe abnehmen und die Suchhilfe so positionieren, dass sich das vordere Paneel über der Intubationsschlaufe auf der Kopfringeinheit befindet (ohne dass der Arc-Adapter installiert ist).
  • Page 115 DE – Deutsch 2. Die Luminant-Suchhilfe durch Festziehen der vier Befestigungsschrauben von Hand in den vier Gewindebohrungen Oberseite Kopfringes befestigen. Hinweis: Die Luminant-Suchhilfe und die UCHRA passen nur in einer Orientierung zusammen. Alle vier Schrauben sind bei korrekter Ausrichtung völlig eingepasst.
  • Page 116 DE – Deutsch 2. Die UCHRA mit den kurzen T-Bolzen am MAYFIELD Adapter befestigen. Hinweis: Die CSS T-Bolzen an die Arc- Adapterplatte (die bereits am Kopfring montiert ist) anbringen. Dann den Patienten und den Kopfring auf den CRWMA MAYFIELD Adapter hinleiten, damit sich der MAYFIELD Adapter nicht an den MAYFIELD Schwenk- oder TriStar-Schwenkadapter koppelt.
  • Page 117 DE – Deutsch Kapitel 4 Reinigung, Sterilisation und Wartung des universellen kompakten Kopfrings Reinigung des universellen kompakten Kopfrings ..........................Verpackung der UCHR-Komponenten ..................................Sterilisation der UCHR-Komponenten ..................................Reinigung des universellen kompakten Kopfrings Hinweis: Die Verwendung von Betadine® und anderen verwandten Jod enthaltenden Flüssigkeiten kann die Oberfläche des stereotaktischen Systems verfärben.
  • Page 118 DE – Deutsch Vorsicht: Den Suchhilferahmen nicht sterilisieren. Sterilisieren kann die Komponente beschädigen und außer Betrieb setzen. Sterilisationsparameter für die UCHR-Komponenten Die folgenden Tabellen stellen empfohlene Sterilisationsparameter für die UCHR-Komponenten dar. Aufgrund von Variationen in Sterilisationskammern und Beladungskonfigurationen ist das Krankenhaus dafür verantwortlich, ein Sterilisationsprotokoll festzulegen, das die Sterilität des Gerätes gewährleistet.
  • Page 119 DE – Deutsch Zusammenfassung der UCHR-Sterilisationsverfahren Komponente Beschreibung Dampf-Autoklav Sterrad® UCHR Universeller kompakter Nein Kopfring UCHRPA, UCHRPP Komposit-Kopfringpfosten, Nein Kreuzschiene und angebrachte Schrauben Kopfringschlüssel Nein UCHRAP UCHR Adapterplatte Nein UCHREBA Ohrbügeleinheitskit Nein UCHREB Ohrbügel Nein Kapitel 4 . Zusammenfassung der UCHR-Sterilisationsverfahren . 118...
  • Page 120 Zusätzliche Informationen nur für EMEA-Kunden: Bei den in diesem Dokument erwähnten Produkten handelt es sich um Geräte der CE-Klasse I, IIa, IIb oder III. Wenden Sie sich an Integra, wenn Sie zusätzliche Informationen über die Klassifizierung der Geräte benötigen. Alle Medizingeräte, die in diesem Dokument erwähnt werden, weisen eine CE-Markierung in Übereinstimmung mit der Richtlinie des Rates der Europäischen Union 93/42/EEG über Medizingeräte und damit verwandten Geräten auf, außer in Bezug auf Geräte, die spezifisch als „NICHT CE ZERTIFIZIERT“...
  • Page 121 ES – Español Integra ® Montaje universal compacto anular para la cabeza (UCHRA) CRW® Manual de operación...
  • Page 122 La pérdida o daño durante la devolución a Integra será al riesgo del cliente. La única responsabilidad de Integra bajo esta garantía será la reparación o el reemplazo, a la sola discreción y a costa exclusiva de Integra, sujeto a los términos de esta garantía y los acuerdos aplicables.
  • Page 123 ES – Español Definiciones de alertas usadas en este manual Advertencia: Una operación o procedimiento de mantenimiento, práctica, condición, afirmación, etc., que de no seguirse estrictamente podría causar heridas, representar un peligro a largo plazo para la salud, o causar la muerte del paciente o el personal médico.
  • Page 124 ....................................................Uso del Sistema CRW® con dispositivos electroquirúrgicos ......................................Definiciones de símbolos .............................................................. Capítulo 2: Uso del Sistema CRW® en un entorno de resonancia magnética Información de seguridad respecto a RMN .................................................. Componentes no seguros para RMN ....................................................... Capítulo 3: Cómo armar el Montaje universal compacto anular para la cabeza Lista de componentes y accesorios del UCHR ...............................................
  • Page 125 Acerca de la compatibilidad del sistema UCHRA El UCHR está diseñado para ser utilizado junto con el Sistema estereotáctico CRW® Precision, el Sistema estereotáctico CRWASL y el Sistema radioquirúrgico XKnife® de Integra®. El UCHRA está configurado para ser compatible con TC y RMN.
  • Page 126 Para asegurar la precisión y funcionalidad debidas del Sistema CRW, no someter a ninguno de los componentes o accesorios del Sistema CRW a cualquier fuerza que pueda afectar su uso o calibración.
  • Page 127 ES – Español Símbolo Definición Número de lote Fecha de caducidad (AAAA-MM-DD) Fabricante Representante autorizado en la Comunidad Europea Fecha de fabricación Número de catálogo El producto cumple con los requisitos de la directiva 93/42/CEE Precaución: Las leyes federales estadounidenses restringen la venta de este producto a médicos o profesionales médicos, o por prescripción facultativa.
  • Page 128 ES – Español Esta página se ha dejado en blanco a propósito. 127 . Capítulo 1 . Acerca del Aro universal compacto de cabeza...
  • Page 129 RMN con 1,5 T o 3,0 T. Capítulo 2 . Uso del Sistema CRW® en un entorno de resonancia magnética . 128...
  • Page 130 ES – Español Componentes no seguros para RMN Los siguientes componentes del Sistema UCHRA no son seguros: Número de catálogo Descripción del producto UCHREBA (incluyendo todos los componentes del montaje de Montaje de varilla para oído No seguro para RM varilla para oído) Varilla del montaje de varilla para oído del UCHREB...
  • Page 131 ES – Español Capítulo 3 Cómo armar el Montaje universal compacto anular para la cabeza Lista de componentes y accesorios del UCHR ............................Cómo armar el Aro universal compacto de cabeza (UCHR) ....................Acoplamiento de la Barra transversal para tornillo del aro de cabeza (Opcional) .......
  • Page 132 ES – Español Aros de cabeza y accesorios UCHRHK Este kit incluye: (4) Tornillos de fijación de la placa adaptadora (2) Tornillos de fijación del aro de intubación UCHRHK (kit de tornillería del UCHRA) UCHRHK (4) Tornillos de fijación del soporte para cabeza (2) Tornillos de fijación del montaje de varilla para oído (2) Tornillos manuales de nilón del montaje de...
  • Page 133 ES – Español Aros de cabeza y accesorios TAP (Vástago de limpieza para HRP y UCHRP) HRKTP (Posicionador del aro de cabeza) HRKTP CSS (Pernos cónicos en T) Localizadores para imagenología BRWLF (Marco localizador para TC) BRWLF LL01 (Luminant® (Localizador para RM/TC)) LL01 Capítulo 3 .
  • Page 134 ES – Español Productos estériles (monouso) ASD1 (paño estéril) Paño estereotáctico Apuzzo ASD1B (10 paños estériles) DHRSL5 (48 mm / caja de tornillos largos /5 paquetes, 2 tornillos por paquete) Tornillos desechables del aro de cabeza DHRSS5 (34 mm / caja de tornillos cortos /5 paquetes, 2 tornillos por...
  • Page 135 ES – Español 2. La figura de la derecha ilustra un ejemplo de un aro de cabeza armado correctamente. Nota El “reborde” que va alrededor del aro de cabeza debe estar en la parte inferior. Nota Para evitar que los tornillos de fijación del soporte del aro de cabeza se quiebren, verificar que los tornillos estén apretados de manera que el soporte esté...
  • Page 136 ES – Español Instalación de las Varillas para oído (Opcional) Montaje de la varilla para oído 1. 1. Aflojar el tornillo manual de nilón en la abrazadera Tornillo manual de Marcas indicadoras en la Nylon nilón varilla para oído de soporte de la varilla para oído para colocar la varilla para Thumb Screw Index Marks on Ear Bar oído en la abrazadera.
  • Page 137 ES – Español Colocación del Montaje anular para la cabeza en el paciente Nota Es más fácil colocar el Montaje anular para la cabeza si la colocación es hecha por varias personas. 1. La primera persona debe sujetar el aro de cabeza en la posición deseada sobre la cabeza del paciente.
  • Page 138 ES – Español Colocar el posicionador del aro de cabeza HRKTP en el aro de cabeza (Opcional) Nota Usar el posicionador del aro de cabeza ayuda a sostener el peso del montaje anular para la cabeza durante su colocación al paciente. Nota Las fotos representan el posicionador del aro de cabeza (HRKTP) en uso con el aro...
  • Page 139 Precaución: Al instalar los tornillos del aro de cabeza: • Usar sólo los Tornillos desechables del aro de cabeza Integra. • Seleccionar el tornillo del aro de cabeza de longitud apropiada de manera que los tornillos sobresalgan al menos 13 mm de la superficie externa de los soportes del aro de cabeza.
  • Page 140 Instalación de los Tornillos del aro de cabeza Precaución: Al instalar los tornillos del aro de cabeza: • Usar sólo los Tornillos desechables del aro de cabeza Integra. • Seleccionar el tornillo del aro de cabeza de longitud apropiada de manera que los tornillos sobresalgan al menos 13 mm de la superficie externa de los soportes para el aro de cabeza.
  • Page 141 El adaptador de arco se utiliza para acoplar el BRWLF al aro de cabeza para exploración por TC y también para acoplar el sistema CRW al aro de cabeza. Capítulo 3 . Cómo armar el Montaje universal compacto anular para la cabeza . 140...
  • Page 142 3. El UCHRA con la placa adaptadora de arco colocada. Montaje de los Marcos localizadores El CRW es compatible con los marcos localizadores BRWLF y Luminant. Montaje del BRWLF en el UCHRA El marco localizador BRW sólo es compatible con exploración por TC. El marco localizador BRW no está...
  • Page 143 ES – Español 1. Colocar el marco localizador BRW (BRWLF) en el UCHRA (con adaptador de arco instalado): Ilustración del BRWLF en el UCHRA: • 2. Cerrar las levas para sujetar el marco localizador en la Placa adaptadora del UCHRA. Capítulo 3 .
  • Page 144 ES – Español Montaje del Localizador Luminant en el UCHRA Nota Para configuración con fines de RM, no acoplar el adaptador de arco al UCHRA. 1. Quitar el panel posterior del localizador Luminant y posicionar el localizador de manera que el panel anterior esté...
  • Page 145 ES – Español 2. Sujetar el Localizador Luminant apretando con los dedos los cuatro tornillos de fijación en los cuatro orificios roscados en la parte superior del aro de cabeza. Nota El Localizador Luminant y el UCHRA encajan sólo en una orientación --los cuatro tornillos se alinearán correctamente.
  • Page 146 ES – Español 2. Acoplar el UCHRA al Adaptador MAYFIELD usando los pernos en T cortos. Nota Colocar los pernos cónicos en T (CSS) a la placa adaptadora de arco (que ya está acoplada al aro de cabeza). A continuación, guiar al paciente y al aro de cabeza sobre el Adaptador CRWMA MAYFIELD para impedir la unión del Adaptador MAYFIELD al Adaptador de rótula MAYFIELD o...
  • Page 147 ES – Español Capítulo 4 Limpieza, esterilización y mantenimiento del Aro universal compacto de cabeza Limpieza del Aro universal compacto de cabeza ..........................Empaquetado de los componentes del UCHR ............................Esterilización de los componentes del UCHR ............................Limpieza del Aro universal compacto de cabeza Nota El uso de povidona yodada (Betadine®) y otros líquidos relacionados que contienen yodo puede manchar la superficie del sistema estereotáctico.
  • Page 148 ES – Español Parámetros para esterilización de los componentes del UCHR Las siguientes tablas indican los parámetros de esterilización recomendados para los componentes del UCHR. Debido a las variaciones en las cámaras de esterilización y las configuraciones de carga, la institución tiene la responsabilidad de establecer un protocolo de esterilización que asegure la esterilidad del producto.
  • Page 149 ES – Español Resumen de los procedimientos de esterilización del UCHR Componente Descripción Autoclave de Sterrad® vapor UCHR Aro universal compacto de Sí Sí cabeza UCHRPA, UCHRPP Soportes compuestos para el Sí Sí aro de cabeza, barra transversal y tornillos de fijación Llave del aro de cabeza Sí...
  • Page 150 Información adicional sólo para clientes de EMEA: Los productos mencionados en este documento son productos sanitarios CE clase I, IIa, IIb o III. Contactar a Integra en caso de necesitar información adicional sobre la clasificación de productos sanitarios. Todos los productos sanitarios mencionados en este documento tienen el marcado CE según la directiva 93/42/CEE del Consejo Europeo para productos sanitarios y productos relacionados, salvo que sean identificados específicamente “SIN MARCADO CE”.
  • Page 151 NL – Nederlands Integra ® CRW® universele compacte hoofdringconstructie (UCHRA) Handleiding voor de gebruiker...
  • Page 152 Integra dat is gerepareerd door anderen dan een erkend servicemedewerker van Integra of dat zodanig is gewijzigd dat zulks naar de mening van Integra van invloed is op de stabiliteit of betrouwbaarheid van het product, of dat onderhevig is geweest aan onjuist gebruik, nalatigheid of ongelukken of dat op andere wijze is gebruikt dan volgens de door Integra verstrekte instructies.
  • Page 153 NL – Nederlands Betekenis van de in deze handleiding gebruikte symbolen Waarschuwing: Een handeling of onderhoudsprocedure, werkwijze, omstandigheid, uitspraak enz. die, indien niet strikt nageleefd, kan resulteren in letsel, langdurige gezondheidsschade of het overlijden van een patiënt of personeel. Let op: Een handeling of onderhoudsprocedure, werkwijze, omstandigheid, uitspraak enz.
  • Page 154 ................................................Gebruik van het CRW® systeem met diathermieapparatuur ......................................Definitie van symbolen ............................................................... Hoofdstuk 2: Gebruik van het CRW® systeem in een MRI-omgeving Informatie over veiligheid bij MRI ........................................................Componenten die niet veilig zijn bij MR ..................................................... Hoofdstuk 3: In elkaar zetten van de universele compacte hoofdring Lijst van UCHRA-onderdelen en -accessoires ................................................
  • Page 155 Compatibiliteit van het UCHRA-systeem De UCHR is bestemd voor gebruik in combinatie met het Integra® CRW® Precision stereotactische systeem, het CRWASL stereotactische systeem en het XKnife® radiochirurgiesysteem. De UCHRA is zo geconfigureerd dat hij bij CT en MRI kan worden gebruikt.
  • Page 156 Gebruikt afdekmateriaal moet volgens de richtlijnen van de instelling worden afgevoerd. Voor een nauwkeurige en goede werking van het CRW systeem mogen de onderdelen en accessoires van het CRW systeem niet worden blootgesteld aan krachten die van negatieve invloed zouden kunnen zijn op de werking of kalibratie ervan.
  • Page 157 NL – Nederlands Symbool Definitie Partijnummer Uiterste gebruiksdatum (JJJJ-MM-DD) Fabrikant Gemachtigde in de Europese Gemeenschap Fabricagedatum Catalogusnummer Het product voldoet aan de eisen van Richtlijn 93/42/EEG Let op: Volgens de federale wetgeving van de Verenigde Staten mag dit hulpmiddel uitsluitend door of in opdracht van een arts of zorgverlener worden aangekocht.
  • Page 158 NL – Nederlands Deze pagina is opzettelijk blanco gelaten. 157 . Hoofdstuk 1 . De universele compacte hoofdring...
  • Page 159 In niet-klinische proeven stak het door het instrument veroorzaakte artefact circa 1 mm uit voorbij de geassembleerde instrumenten (DHRS, UCHRA, LL01) bij beeldvorming met een spinecho- of gradiëntechopulssequentie in een MRI-systeem van 1,5 T of 3,0 T. Hoofdstuk 2 . Gebruik van het CRW® systeem in een MRI-omgeving . 158...
  • Page 160 NL – Nederlands Componenten die niet veilig zijn bij MR De volgende componenten van het UCHRA-systeem zijn niet veilig bij MR: Catalogusnummer Beschrijving hulpmiddel UCHREBA (inclusief onderdelen Oorstangconstructie oorstangconstructie) Onveilig bij MR UCHREB UCHR EBA stang UCHRAP Universele compacte HR adapterplaat Hoofdringsleutel Reinigingstap UCHRCASE de UCHRA...
  • Page 161 NL – Nederlands Hoofdstuk 3 In elkaar zetten van de universele compacte hoofdring Lijst van UCHRA-onderdelen en -accessoires ............................In elkaar zetten van de universele compacte hoofdring (UCHR) ................Bevestigen van de hoofdringschroefdwarsstang (optioneel) ..................Installeren van de oorstangen (optioneel) ................................
  • Page 162 NL – Nederlands Hoofdringen en accessoires UCHRHK Deze set bevat het volgende: (4) bevestigingsschroeven voor de adapterplaat (2) bevestigingsschroeven voor de intubatiering UCHRHK (UCHRA hardware-set) UCHRHK (4) bevestigingsschroeven voor de hoofdringstaanders (2) bevestigingsschroeven voor de oorstangconstructie (2) nylon duimschroeven voor de oorstangconstructie UCHRP (set met composietstaanders en UCHRP...
  • Page 163 NL – Nederlands Hoofdringen en accessoires TAP (reinigingstap voor HRP en UCHRP) HRKTP (hoofdringpositioneerder) HRKTP CSS (conische T-boutschroeven) Lokalisators voor beeldvorming BRWLF (CT-lokalisatieframe) BRWLF LL01 (Luminant® [MR/CT-lokalisator]) LL01 Hoofdstuk 3 . In elkaar zetten van de universele compacte hoofdring . 162...
  • Page 164 NL – Nederlands Steriele hulpmiddel (uitsluitend voor eenmalig gebruik) ASD1 (steriel afdekmateriaal) Apuzzo stereotactisch afdekmateriaal ASD1B (10 stuks steriel afdekmateriaal) DHRSL5 (48 mm/doos met lange schroeven/5 verpakkingen, 2 schroeven per verpakking) Disposable hoofdringschroeven DHRSS5 (34 mm/doos met korte schroeven/5 verpakkingen, 2 schroeven per verpakking) In elkaar zetten van de universele compacte hoofdring (UCHR)
  • Page 165 NL – Nederlands 2. Zie de afbeelding rechts voor een voorbeeld van een goed geassembleerde hoofdring. De “lip” rondom de hoofdring moet aan de onderkant komen te liggen. Zorg om te voorkomen dat de bevestigingsschroeven voor de hoofdstaanders breken dat de staander- schroeven zo worden aangedraaid dat de staander glad tegen de hoofdring aan ligt voordat u de disposable hoofdringschroeven aandraait.
  • Page 166 NL – Nederlands Installeren van de oorstangen (optioneel) In elkaar zetten van de oorstang 1. Draai de nylon duimschroef op de steunbeugel voor de Nylon Nylon duimschroef oorstang los om de oorstang in de steunbeugel te plaatsen. Thumb Screw Index Marks on Ear Bar Maatstrepen op oorstang Steunbeugel Ear Bar...
  • Page 167 NL – Nederlands Plaatsen van de hoofdringconstructie op de patiënt Het plaatsen van de hoofdringconstructie verloopt gemakkelijker als u hierbij assistentie hebt. 1. De eerste persoon houdt de hoofdring op de gewenste positie boven het hoofd van de patiënt. 2. De tweede persoon kan de oorstangen nu zo plaatsen dat het ronde uiteinde van elke oorstang comfortabel in het buitenoor van de patiënt komt te liggen.
  • Page 168 NL – Nederlands Bevestig de HRKTP hoofdringpositioneerder op de hoofdring (optioneel) Met behulp van de hoofdringpositioneerder helpt u het gewicht van de hoofdring- constructie tijdens plaatsing bij de patiënt ondersteunen. In de foto’s is de HRKTP hoofdring- positioneerder afgebeeld met de HRAIM hoofdring –...
  • Page 169 Let op: Let tijdens het installeren van de hoofdringschroeven op het volgende: • Gebruik uitsluitend disposable hoofdringschroeven van het merk Integra. • Selecteer een hoofdringschroef van de juiste lengte zodat de schroeven ten minste 13 mm voorbij het buitenoppervlak van de hoofdringstaanders uitsteken.
  • Page 170 Installeren van de hoofdringschroeven Let op: Let tijdens het installeren van de hoofdringschroeven op het volgende: • Gebruik uitsluitend disposable hoofdringschroeven van het merk Integra. • Selecteer een hoofdringschroef van de juiste lengte zodat de schroeven ten minste 13 mm voorbij het buitenoppervlak van de hoofdringstaanders uitsteken.
  • Page 171 De boogadapter wordt gebruikt om het BRWLF op de hoofdring te bevestigen voor CT-scans, en om het CRW systeem op de hoofdring te bevestigen. Hoofdstuk 3 . In elkaar zetten van de universele compacte hoofdring . 170...
  • Page 172 In elkaar zetten van de localisatorframes De CRW ondersteunt het BRWLF en het Luminant lokalisatorframe. Aanbrengen van het BRWLF op de UCHRA Het BRW-lokalisatorframe kan alleen voor CT-scans worden gebruikt. Het BRW-lokalisatorframe is niet geïndiceerd voor gebruik bij MR-beeldvorming.
  • Page 173 NL – Nederlands 1. Plaats het BRW-lokalisatorframe (BRWLF) op de UCHRA (waarop de boogadapter al is geïnstalleerd): BRWLF op UCHRA afgebeeld: • 2. Draai de nokhendels aan om het lokalisatorframe op de adapterplaat van de UCHRA te zetten. Hoofdstuk 3 . In elkaar zetten van de universele compacte hoofdring . 172...
  • Page 174 NL – Nederlands Aanbrengen van de Luminant lokalisator op de UCHRA Voor de MR-configuratie mag de boogadapter niet op de UCHRA bevestigd worden. 1. Verwijder het posterieure paneel van de Luminant lokalisator en plaats de lokalisator met het anterieure paneel boven de intubatiering op de hoofdringconstructie (zonder boogadapter).
  • Page 175 NL – Nederlands 2. Zet de Luminant lokalisator vast door de vier bevestigingsschroeven vingervast in de vier draadopeningen op de bovenkant van de hoofdring te schroeven. De Luminant lokalisator en UCHRA passen slechts op één manier in elkaar: de vier schroeven zijn dan goed uitgelijnd.
  • Page 176 NL – Nederlands 2. Bevestig de UCHRA met de korte T-bouten op de MAYFIELD adapter. Bevestig de CSST-bouten op de (reeds op de hoofdring bevestigde) boogadapterplaat. Plaats de patiënt en hoofdring vervolgens voorzichtig op de CRWMA MAYFIELD adapter om te voorkomen dat de MAYFIELD adapter tegen de MAYFIELD zwenkadapter of Tri-Star zwenkadapter aan loopt.
  • Page 177 NL – Nederlands Hoofdstuk 4 Reiniging, sterilisatie en onderhoud van de universele compacte hoofdring Reiniging van de universele compacte hoofdring ..........................Verpakken van de onderdelen van de UCHR ............................... Steriliseren van de onderdelen van de UCHR ............................... Reiniging van de universele compacte hoofdring Gebruik van Betadine®...
  • Page 178 NL – Nederlands Parameters voor sterilisatie van de UCHR-onderdelen De volgende tabellen bevatten de aanbevolen parameters voor sterilisatie van de UCHR-onderdelen. Vanwege verschillen in sterilisatiekamers en laadconfiguraties is het de verantwoordelijkheid van de instelling om een sterilisatieprotocol te ontwikkelen dat steriliteit van het hulpmiddel waarborgt. EtO (100% EtO) Parameters: Cyclus 1...
  • Page 179 NL – Nederlands Overzicht sterilisatieprocedures UCHR Onderdeel Beschrijving Stoomsterilisator/ Sterrad® autoclaaf UCHR Universele compacte hoofdring UCHRPA, UCHRPP Hoofdringstaanders van composiet, dwarsstang en daarop bevestigde schroeven Hoofdringsleutel UCHRAP UCHR-adapterplaat UCHREBA Oorstangset UCHREB Oorstang Hoofdstuk 4 . Overzicht sterilisatieprocedures UCHR . 178...
  • Page 180 Aanvullende informatie (uitsluitend voor klanten in EMEA) De in dit document vermelde producten zijn instrumenten van CE-klasse I, IIa, IIb of III. Neem voor vragen over de indeling van de instrumenten contact op met Integra. Alle in dit document vermelde medische hulpmiddelen zijn voorzien van een CE-markering conform richtlijn 93/42/EEG voor medische hulpmiddelen en aanverwante artikelen, tenzij specifiek voorzien van de aanduiding “NOT CE MARKED”.
  • Page 181 Deze pagina is bewust leeg gelaten.
  • Page 182 Deze pagina is bewust leeg gelaten.
  • Page 183 Deze pagina is bewust leeg gelaten.
  • Page 184 Additional information for EMEA Customers only: Products mentioned in this document are CE class I, IIa, IIb or III devices. Contact Integra should you need any additional information on devices classification. All the medical devices mentioned on this document are CE marked according to European council directive 93/42/EEC on medical devices and its relatives, unless specifically identified as “NOT CE MARKED”.