Beurer BC 54 Mode D'emploi
Masquer les pouces Voir aussi pour BC 54:
Table des Matières

Publicité

Les langues disponibles
  • FR

Les langues disponibles

  • FRANÇAIS, page 44

Liens rapides

DE Blutdruckmessgerät
Gebrauchsanweisung ......................................... 2
EN Blood pressure monitor
Instructions for use ........................................... 24
FR Tensiomètre
Mode d'emploi .................................................. 44
ES Tensiómetro
Instrucciones de uso  ........................................ 66
IT Misuratore di pressione
Istruzioni per l'uso ............................................ 87
TR Tansiyon ölçme cihazı
Kullanım kılavuzu ............................................ 109
RU Прибор для измерения кровяного давления
Инструкция по применению ......................... 129
PL Ciśnieniomierz
Instrukcja obsługi ............................................ 152
Notes on electromagnetic compatibility ............... 173
BC 54

Publicité

Table des Matières
loading

Sommaire des Matières pour Beurer BC 54

  • Page 1 BC 54 DE Blutdruckmessgerät Gebrauchsanweisung ......... 2 EN Blood pressure monitor Instructions for use ........... 24 FR Tensiomètre Mode d’emploi ..........44 ES Tensiómetro Instrucciones de uso  ........66 IT Misuratore di pressione Istruzioni per l’uso ..........87 TR Tansiyon ölçme cihazı...
  • Page 2: Table Des Matières

    Sie sich für ein Produkt unseres Sortimentes entschieden haben. Unser Name steht für hochwerti- ge und eingehend geprüfte Qualitätsprodukte aus den Bereichen Wärme, Gewicht, Blutdruck, Körpertemperatur, Puls, Sanfte Therapie, Massage, Beauty, Luft und Baby. Mit freundlicher Empfehlung Ihr Beurer-Team Inhaltsverzeichnis 1. Lieferumfang...............3 7. Anwendung ............11 2.
  • Page 3: Lieferumfang

    1. Lieferumfang Produktinformation Überprüfen Sie den Lieferumfang auf äußere Unversehrt- Hinweis auf wichtige Informationen heit der Kartonverpackung und auf die Vollständigkeit Anleitung beachten des Inhalts. Vor dem Gebrauch ist sicherzustellen, dass Vor Beginn der Arbeit und /oder dem das Gerät und Zubehör keine sichtbaren Schäden auf- Bedienen von Geräten oder Maschinen weisen und jegliches Verpackungsmaterial entfernt wird.
  • Page 4: Bestimmungsgemäßer Gebrauch

    3. Bestimmungsgemäßer Gebrauch Temperaturbegrenzung Bezeichnet werden die Temperaturgrenz- Zweckbestimmung werte, denen das Medizinprodukt sicher Das Blutdruckmessgerät ist für die vollautomatische, ausgesetzt werden kann nichtinvasive Messung arterieller Blutdruck- und Puls- Luftfeuchte, Begrenzung werte am Handgelenk bestimmt. Bezeichnet den Feuchtigkeitsbereich, Zielgruppe dem das Medizinprodukt sicher ausge- setzt werden kann Es ist für den Einsatz zur Selbstmessung im häuslichen Umfeld durch erwachsene Menschen konzipiert und für...
  • Page 5: Warn- Und Sicherheitshinweise

    4. Warn- und Sicherheitshinweise • Achten Sie darauf, dass die Manschette nicht an ei- nem Arm angelegt wird, dessen Arterien oder Venen Kontraindikationen in medizinischer Behandlung sind, z.B. intravaskulärer Zugang bzw. eine intravaskuläre Therapie oder ein ar- • Verwenden Sie das Blutdruckmessgerät nicht bei Neu- teriovenöser (A-V-) Nebenschluss.
  • Page 6 • Verwenden Sie das Gerät nicht gleichzeitig mit anderen Allgemeine Vorsichtsmaßnahmen medizinischen elektrischen Geräten (ME-Geräten). Dies könnte zu einer Fehlfunktion des Messgerätes führen • Das Blutdruckmessgerät besteht aus Präzisions- und und/oder eine ungenaue Messung verursachen. Elektronik-Bauteilen. Die Genauigkeit der Messwerte •...
  • Page 7 Maßnahmen zum Umgang mit Batterien Hinweise zu Elektromagnetischer Verträglichkeit • Wenn Flüssigkeit aus einer Batteriezelle mit Haut oder Augen in Kontakt kommt, die betroffene • Das Gerät ist für den Betrieb in allen Umgebungen ge- Stelle mit Wasser auswaschen und ärztliche Hilfe eignet, die in dieser Gebrauchsanweisung aufgeführt aufsuchen.
  • Page 8: Gerätebeschreibung

    5. Gerätebeschreibung Anzeigen auf dem Display: 1. Risiko-Indikator 1. Display 2. Symbol Bluetooth Übertragung ® 2. START/STOPP-Taste 3. Uhrzeit und Datum 3. Speichertaste M1 4. Systolischer Druck 4. Speichertaste M2 5. Diastolischer Druck 5. Handgelenksmanschette 6. Ermittelter Pulswert 6. Batteriefach abdeckung 7.
  • Page 9: Inbetriebnahme

    6. Inbetriebnahme Einstellungen vornehmen Sie sollten das Gerät vor der Nutzung unbedingt korrekt Batterien einlegen einstellen, um alle Funktionen vollumfänglich nutzen zu • Entfernen Sie den können. Nur so können Ihre Messwerte mit zugehörigem Deckel des Batterie- Datum und der Uhrzeit abgespeichert und von Ihnen spä- faches auf der linken ter abgerufen werden.
  • Page 10 Im Display blinkt das Stundenformat. Im Display blinkt die Stundenzahl. • Wählen Sie mit der Speichertaste • Wählen Sie mit der Speichertaste M1 oder M2 Ihr gewünschtes Stun- M1 oder M2 Ihre gewünschte Stun- denformat und bestätigen Sie mit denzahl und bestätigen Sie mit der START/STOPP-Taste der START/STOPP- Taste Im Display blinkt die Minutenzahl.
  • Page 11: Anwendung

    7. Anwendung Manschette anlegen • Grundsätzlich kann der Blutdruck an beiden Armen Allgemeine Regeln bei der Selbstmessung des gemessen werden. Gewisse Abweichungen zwischen Blutdrucks dem gemessenen Blutdruck am rechten und linken Arm • Um ein möglichst aussagekräftiges Profil über die Ent- sind dabei physiologisch bedingt und vollkommen nor- wicklung Ihres Blutdrucks zu generieren und dabei die mal.
  • Page 12 • Legen Sie die Manschette nun so am Handgelenk an, • Entspannen Sie Ihren Arm und die Handflächen. dass Ihre Handfläche und das Display des Gerätes • Um das Messergebnis nicht zu verfälschen, sollten Sie nach oben zeigen. sich während der Messung möglichst ruhig verhalten •...
  • Page 13 Sobald ein Puls zu erkennen ist, wird das Symbol Puls Sobald eine Verbindung besteht, hört das Bluetooth ® angezeigt. Symbol auf zu blinken. Alle Messdaten werden automa- tisch in die App übertragen. Nach erfolgreicher Daten- Sie können die Messung jederzeit durch das Drücken übertrageung schaltet sich das Gerät aus.
  • Page 14 • Blutdruckschwankungen sind normal. Selbst bei einer Bereich der gemesse- Farbe des Wiederholungsmessung können beachtliche Unter- nen Blutdruckwerte Klassifizierung Risiko- schiede zwischen den gemessenen Werten auftreten. Systole Diastole Indikators Einmalige oder unregelmäßige Messungen liefern da- (in mmHg) (in mmHg) her keine zuverlässige Aussage über den tatsächlichen 120 –...
  • Page 15 Blutdruck mitzuteilen – insbesondere dann, wenn Sie eine das Vorliegen einer Arrhythmie im Rahmen einer Untersu- medikamentöse Therapie erhalten. chung feststellen. Herzrhythmusstörungen Messwerte speichern, abrufen und löschen Dieses Gerät kann im Rahmen der Analyse Ihres aufge- Die Ergebnisse jeder erfolgreichen Messung werden zeichneten Pulssignals während der Blutdruckmessung zusammen mit Datum und Uhrzeit abgespeichert.
  • Page 16 Im Display wird A  A angezeigt. • Um das Gerät wieder auszuschalten, drücken Sie die START/STOPP-Taste Es wird der Durchschnittswert aller ge- speicherten Messwerte dieses Benutzer- Sie können das Menü jederzeit durch Drücken speichers angezeigt. der START/STOPP-Taste verlassen. • Drücken Sie die Speichertaste M1. Im Display wird AM AM angezeigt.
  • Page 17 Bluetooth zu übertragen. ® gen PIN-Code eingeben müssen. Nach erfolgreicher Dazu benötigen Sie die „ beurer Health Manager“ App. Eingabe ist das Gerät mit Ihrem Smartphone verbun- Diese ist im Apple App Store und bei Google Play kos- den.
  • Page 18: Reinigung Und Pflege

    ® Übertragung 9. Was tun bei Problemen? startet automatisch. Fehler- Mögliche Behebung Die „ beurer Health Manager“ App muss zur Übertra- meldung Ursache gung geöffnet sein. Es konnte kein Bitte wiederholen Sie Um eine störungsfreie Übertragung zu gewährleisten ent- Puls...
  • Page 19 Fehler- Mögliche Behebung Fehler- Mögliche Behebung meldung Ursache meldung Ursache Die Manschet- Bitte beachten Sie die Batterien Legen Sie neue Batte- te ist nicht kor- Hinweise im Kapitel sind fast ver- rien in das Gerät ein. rekt angelegt. „7. Anwendung“ unter braucht.
  • Page 20: Entsorgung

    10. Entsorgung • Diese Zeichen finden Sie auf schadstoff- haltigen Batterien: Reparatur und Entsorgung des Gerätes Pb = Batterie enthält Blei, • Das Gerät darf nicht selbst repariert oder justiert wer- Cd = Batterie enthält Cadmium, den. Eine einwandfreie Funktion ist in diesem Fall nicht Hg = Batterie enthält Quecksilber.
  • Page 21 IEC 61000-4-2, IEC 61000-4-3, IEC 61000-4-8) und Zul. Betriebs- +5 °C bis +40 °C, 15-90 % relative unterliegt besonderen Vorsichtsmaßnahmen hinsicht- bedingungen Luftfeuchte (nicht kondensierend), lich der elektromagnetischen Verträglichkeit. Bitte be- 700-1060 hPa Umgebungsluftdruck achten Sie dabei, dass tragbare und mobile HF-Kom- Zulässige Lager- und -20 °C bis +60 °C, munikationseinrichtungen dieses Gerät beeinflussen...
  • Page 22: Garantie / Service

    Es gilt deutsches Recht. 12. Garantie / Service Falls sich dieses Produkt während der Garantiezeit Die Beurer GmbH, Söflinger Straße 218, D-89077 Ulm als unvollständig oder in der Funktionstüchtigkeit als (nachfolgend „Beurer“ genannt) gewährt unter den mangelhaft gemäß der nachfolgenden Bestimmungen nachstehenden Voraussetzungen und in dem nachfol- erweist, wird Beurer gemäß...
  • Page 23 - Produkte, die unsachgemäß und/oder entgegen der Bestimmungen der Bedienungsanleitung verwen- det, gereinigt, gelagert oder gewartet wurden sowie Produkte, die vom Käufer oder einem nicht von Beurer autorisierten Servicecenter geöffnet, repariert oder umgebaut wurden; - Schäden, die auf dem Transportweg zwischen Herstel- ler und Kunde bzw.
  • Page 24 Our name stands for high-quality, thoroughly tested products for applications in the areas of heat, weight, blood pressure, body temperature, pulse, gentle therapy, massage, beauty and air. With kind regards, your Beurer team Table of contents 1. Included in delivery ..........25 7. Usage ..............32 2.
  • Page 25: Included In Delivery

    1. Included in delivery Product information Check that the exterior of the cardboard delivery Note on important information packaging is intact and make sure that all contents Observe the instructions are present. Before use, ensure that there is no visible Read the instructions before start- damage to the device or accessories and that all ing work and/or operating devices or...
  • Page 26: Proper Use

    3. Proper use Temperature limit The temperature limit values to which the Intended use medical device can safely be exposed The blood pressure monitor is intended for the fully auto- are indicated. matic, non-invasive measurement of arterial blood pres- Humidity, limit sure and pulse values on the wrist.
  • Page 27: Warnings And Safety Notes

    4. Warnings and safety notes General warnings Contraindications • The measurements taken by you are for your informa- tion only – they are no substitute for a medical examina- • Do not use the blood pressure monitor on newborns, tion! Discuss the measured values with your doctor and children or pets.
  • Page 28 • Only use the cuffs included in delivery or cuffs described • Do not drop the device. in these instructions for use for the device. Using another • Do not use the device in the vicinity of strong electro- cuff may lead to measurement inaccuracies. magnetic fields and keep it away from radio systems or •...
  • Page 29: Device Description

    5. Device description • Use identical or equivalent battery types only. • Always replace all batteries at the same time. 1. Display • Do not use rechargeable batteries. 2. START/STOP button 3. Memory button M1 Notes on electromagnetic compatibility 4. Memory button M2 •...
  • Page 30: Initial Use

    6. Initial use Information on the display: 1. Risk indicator Inserting the batteries 2. Symbol for Bluetooth transfer ® • Remove the battery 3. Time and date compartment lid on 4. Systolic pressure the left side of the 5. Diastolic pressure device.
  • Page 31 There are two different ways to access the menu The year flashes on the display. from which you can adjust the settings: • Select the desired year using the • Before initial use and after each time you replace memory button M1 or M2 and con- the battery: firm with the START/STOP button When inserting batteries into the device, you will...
  • Page 32: Usage

    7. Usage The hours flash on the display. • Select the desired hour using the General rules when measuring blood pressure memory button M1 or M2 and con- yourself firm with the START/STOP button • In order to generate as informative a profile of the progression of your blood pressure as possible and ensure that the measured values can be compared, The minutes flash on the display.
  • Page 33 Attaching the cuff • Position the cuff so that there is a distance of 1.0 – 1.5 cm between it and the heel of your hand. • Fundamentally, blood pressure can be measured on • Now fasten the cuff tightly around your wrist using the both arms.
  • Page 34 Selecting the user • The systolic pressure, diastolic pres- sure and pulse rate measurements You have 2 memories, each with 60 memory spaces, to are displayed. enable the separate storage of measurements for 2 dif- ferent people. To select the corresponding user memory, press the M1 memory button (for user ) or M2 (for user ) on the...
  • Page 35 blood pressure monitor switches off automatically after Risk indicator 5 seconds. The World Health Organization (WHO) has defined the in- • If you forget to turn off the device, it will switch off au- ternationally recognised classification for the evaluation of tomatically.
  • Page 36 Please be aware that these standard values can only serve sure, only use the results that have been recorded without as a general guideline, as the individual blood pressure corresponding irregularities in your pulse. If the sym- varies in different people and different age groups, etc. bol appears frequently, please consult your doctor.
  • Page 37 A A is displayed. • If you press the memory button M1 again, the last individual measurement The average value of all saved measured is displayed (in this example, measure- values in this user memory is displayed. ment 03). • Press the memory button M1. •...
  • Page 38 Bluetooth ® You will need the “ beurer Health Manager” app for this. Step 1: BC 54 This is available in the Apple App Store and from Google Activate Bluetooth ®...
  • Page 39: Cleaning And Maintenance

    The Bluetooth transfer Error Possible Solution starts automatically. message cause The “ beurer Health Manager” app must be active to Unable to re- Please wait one minute allow data transfer. cord a pulse. and repeat the measu- rement. You have mo-...
  • Page 40: Disposal

    Error Possible Solution Error Possible Solution message cause message cause The cuff was Please observe the notes The data could Proceed as described in not attached in chapter "7. Usage" not be sent via chapter „7. Usage“ under correctly. under the section "Atta- the section Bluetooth ®...
  • Page 41: Technical Specifications

    • For environmental reasons, do not dispose of the de- Display accuracy Systolic ± 3 mmHg, vice in the household waste at the end of its Diastolic ± 3 mmHg, useful life. Dispose of the unit at a suitable local Pulse ±...
  • Page 42: Warranty / Service

    Beurer GmbH,  Söflinger Straße 218, 89077 Ulm, Ger- • This device corresponds to the EU Medical Devices many (hereinafter referred to as “Beurer”) provides a war- Directive 93/42/EEC, the German Medical Devices Act ranty for this product, subject to the requirements below (Medizinproduktgesetz) and the standards EN 1060-1 and to the extent described as follows.
  • Page 43 – products that are used, cleaned, stored or maintained with the following provisions, Beurer shall carry out a re- improperly and/or contrary to the provisions of the in- pair or a replacement delivery free of charge, in accord- structions for use, as well as products that have been ance with these warranty conditions.
  • Page 44 Nos produits couvrent les domaines de la chaleur, du poids, de la pression sanguine, de la température corporelle, de la thérapie douce, des massages, de la beauté, des soins pour bébé et de l’amélioration de l’air. Sincères salutations, Votre équipe Beurer Table des matières 1. Contenu ..............45 7. Utilisation ..............53 2.
  • Page 45: Symboles Utilisés

    1. Contenu Information sur le produit Vérifiez si l’emballage carton extérieur du kit est intact et Indication d’informations importantes si tous les éléments sont inclus. Avant l’utilisation, assu- Suivre le mode d’emploi rez-vous que l’appareil et les accessoires ne présentent Lire le mode d’emploi avant de commen- aucun dommage visible et que la totalité...
  • Page 46: Utilisation Conforme Aux Recommandations

    3. Utilisation conforme aux Fabricant recommandations Utilisation Limites de température Indique les limites de température aux- Le tensiomètre est destiné à la mesure non invasive en- quelles le dispositif médical peut être tièrement automatique des valeurs de pression artérielle exposé en toute sécurité. et de pouls au niveau du poignet.
  • Page 47: Consignes D'avertissement Et De Mise En Garde

    4. Consignes d’avertissement et de mise • Veillez à ne pas placer la manchette sur un bras dont les artères ou les veines sont soumises à un traitement en garde médical, par exemple, en présence d’un dispositif d’ac- Contre-indications cès intravasculaire destiné à un traitement intravascu- laire ou en cas de shunt artério-veineux.
  • Page 48 • N’utilisez pas l’appareil simultanément avec d’autres Précautions générales appareils électriques médicaux (appareils EM). Cela pourrait causer un dysfonctionnement de l’appareil de • Le tensiomètre est constitué de composants de préci- mesure et/ou causer une mesure inexacte. sion et électroniques. La précision des valeurs mesu- •...
  • Page 49 Mesures relatives aux piles Informations sur la compatibilité électromagnétique • Si du liquide de la cellule de pile entre en contact avec la peau ou les yeux, rincer la zone touchée • L’appareil est prévu pour fonctionner dans tous les en- avec de l’eau et consulter un médecin.
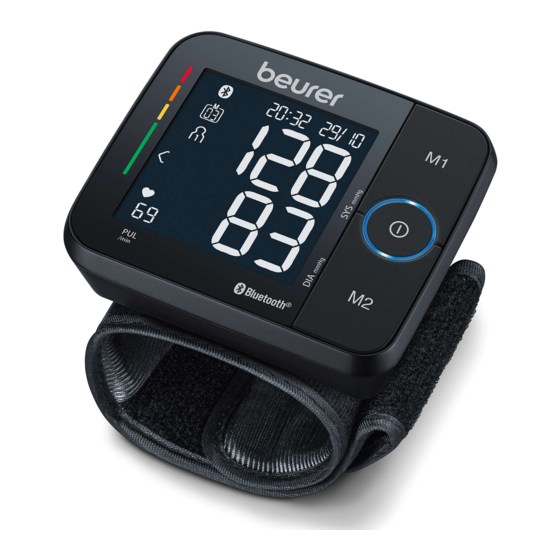
  • Page 50: Description De L'appareil

    5. Description de l’appareil Données affichées à l’écran : 1. Indicateur de risque 1. Écran 2. Symbole de transmission Bluetooth ® 2. Touche MARCHE/ARRÊT 3. Heure et date 3. Touche mémoire M1 4. Pression systolique 4. Touche mémoire M2 5. Pression diastolique 5.
  • Page 51: Mise En Service

    6. Mise en service Effectuer les réglages Il est essentiel de configurer correctement l’appareil avant Insérer les piles de l’utiliser afin de profiter pleinement de toutes ses fonc- • Retirez le couvercle tions. C’est la seule façon de sauvegarder vos valeurs compartiment mesurées avec la date et l’heure correspondantes et de à...
  • Page 52 Le format de l’heure clignote à L’heure clignote à l’écran. l’écran. • À l’aide de la touche mémoire M1 • À l’aide de la touche mémoire ou M2, sélectionnez l’heure que vous souhaitez et confirmez avec la M1 ou M2, sélectionnez le for- mat d’heure que vous souhai- touche MARCHE/ARRÊT tez et confirmez avec la touche...
  • Page 53: Utilisation

    7. Utilisation mesurée au bras gauche et droit a des causes phy- siologiques et est parfaitement normal. Vous devriez Règles générales pour la mesure autonome de la toujours effectuer la mesure au bras ayant la valeur pression artérielle de pression artérielle la plus élevée. Consultez votre •...
  • Page 54 • Placez la manchette de manière à laisser un écart de Sélectionnez un utilisateur 1,0 à 1,5 cm entre la manchette et la paume de votre Vous disposez de 2 mémoires utilisateur de 60 emplace- main. ments chacune afin d’enregistrer séparément les résul- •...
  • Page 55 • Les résultats de mesure de la pression s’éteint et le tensiomètre se met automatiquement hors systolique, de la pression diastolique tension après 5 minutes. et du pouls sont affichés. • Si vous oubliez d’éteindre l’appareil, il s’éteindra au- tomatiquement. Dans ce cas, la valeur est attribuée à l’utilisateur de la mémoire choisie ou à...
  • Page 56 sion artérielle réelle. Une évaluation fiable est possible la plage dans laquelle se trouve la tension mesurée. Si uniquement si vous mesurez régulièrement dans des les valeurs mesurées se trouvent dans deux classifica- conditions comparables. tions différentes (par exemple, systole en plage « normale haute »...
  • Page 57 trique. Les symptômes (battements cardiaques en retard • Si la fonction Bluetooth ® est activée (le symbole ou en avance, pouls plus rapide ou plus lent) peuvent être clignote à l’écran), le tensiomètre tente d’établir une induits notamment par une pathologie cardiaque, par connexion avec l’application.
  • Page 58 Vous avez également la possibilité de transférer en plus les mesures enregistrées sur l’appareil sur votre smart- phone via Bluetooth ® Pour cela, vous avez besoin de l’application «  beurer HealthManager  ». Elle est disponible gratuitement sur l’Apple App Store et sur Google Play.
  • Page 59  »). ® Liste des appareils compatibles : Étape 2 : Application « beurer HealthManager » Ajoutez le BC 54 dans l’application « beurer HealthManager » à la section Pour transférer les valeurs, veuillez suivre les points sui- « Réglages/Mes appareils ». vants : Si la fonction Bluetooth ® est activée dans les paramètres, Étape 3 : BC 54...
  • Page 60: Nettoyage Et Entretien

    été trouvé. une pause d’une minute. veuillez retirer la housse de votre smartphone. Lancez Veillez à ne pas parler ni Vous avez bou- le transfert de données depuis l’application «  beurer bouger pendant la me- gé parlé HealthManager ». sure.
  • Page 61: Élimination

    Message Cause pos- Solution Message Cause pos- Solution d’erreur sible d’erreur sible La manchette Respectez les consignes Les piles sont Insérez de nouvelles piles n’est pas posi- indiquées au chapitre presque vides. dans l’appareil. tionnée correc- «  7. Utilisation  » dans la I m p o s s i b l e Comme indiqué...
  • Page 62: Caractéristiques Techniques

    • Seul le service client ou un opérateur autorisé peut pro- céder à une réparation. Cependant, avant toute récla- N° du modèle BC 54 mation, veuillez contrôler au préalable l’état des piles et Méthode de mesure Mesure de la tension artérielle au les remplacer le cas échéant.
  • Page 63 pond aux exigences de sécurité spéciales relatives à la Conditions de -20 °C à +60 °C, compatibilité électromagnétique. Veuillez noter que les stockage et de ≤ 93 % d’humidité de l’air relative dispositifs de communication HF portables et mobiles transport admissibles sont susceptibles d’influer sur cet appareil.
  • Page 64: Garantie/Maintenance

    L’acheteur recevra ensuite des informations complé- mentaires concernant le déroulement de la demande de Beurer garantit le bon fonctionnement et l’intégrité de ce garantie, par exemple, l’adresse à laquelle envoyer le pro- produit. duit et les documents requis.
  • Page 65 Beurer ; - les dommages survenus lors du transport entre le fabri- cant et le client ou entre le service client et le client ;...
  • Page 66 Nos alegramos de que haya elegido un producto de nuestra gama. Nuestro nombre es sinónimo de productos de alta y comprobada calidad en el ámbito de aplicación de calor, peso, presión arterial, temperatura corporal, pulso, trata- miento suave, masaje, belleza, aire y bebés. Atentamente, El equipo de Beurer Índice 1. Artículos suministrados ..........67 7. Utilización ...............74 2.
  • Page 67: Artículos Suministrados

    1. Artículos suministrados Información sobre el producto Compruebe que el embalaje de los artículos suministra- Indicación de información importante dos esté intacto y que su contenido esté completo. Antes Seguir las instrucciones de utilizar el aparato deberá asegurarse de que ni este Leer las instrucciones antes de empezar ni los accesorios presentan daños visibles y de que se a trabajar o a manejar aparatos o...
  • Page 68: Uso Correcto

    3. Uso correcto Fabricante Finalidad El tensiómetro se ha diseñado para la medición automá- Rango de temperatura tica no invasiva de valores de presión arterial y pulso en Límites de temperatura a los que el la muñeca. dispositivo médico puede exponerse de forma segura.
  • Page 69: Indicaciones De Advertencia Y De Seguridad

    4. Indicaciones de advertencia y de • Asegúrese de no colocar el brazalete en un brazo cu- yas arterias o venas estén sometidas a algún tipo de seguridad tratamiento médico, p. ej., acceso por vía intravascular, Contraindicaciones administración de tratamiento por vía intravascular o un shunt arteriovenoso (A-V).
  • Page 70 • No utilice el aparato al mismo tiempo que otros apara- Medidas de precaución generales tos eléctricos médicos (aparatos ME). Esto podría ha- • El tensiómetro está compuesto por elementos elec- cer que el tensiómetro funcionara mal o provocar una trónicos y de precisión.
  • Page 71 Medidas para la manipulación de pilas Indicaciones relativas a la compatibilidad electromagnética • En caso de que el líquido de una pila entre en contacto con la piel o los ojos, lave la zona afecta- • El aparato está diseñado para usarse en todos los en- da con agua y busque asistencia médica.
  • Page 72: Descripción Del Aparato

    5. Descripción del aparato Indicaciones en la pantalla: 1. Indicador de riesgo 1. Pantalla 2. Símbolo de transmisión por Bluetooth ® 2. Tecla de INICIO/PARADA 3. Hora y fecha 3. Tecla de memorización M1 4. Presión sistólica 4. Tecla de memorización M2 5.
  • Page 73: Puesta En Funcionamiento

    6. Puesta en funcionamiento Se puede acceder de dos formas diferentes al menú para realizar los ajustes: Insertar las pilas • Antes del primer uso y cada vez que se cambian • Retire la tapa del las pilas: compartimento Una vez insertadas las pilas en el aparato, accede- las pilas, situado en rá...
  • Page 74: Utilización

    El año parpadea en la pantalla. Los minutos parpadean en la pantalla. • Seleccione con la tecla de memo- • Seleccione con la tecla de memo- rización M1 o M2 el año deseado rización M1 o M2 los minutos de- y confirme con la tecla de INICIO/ seados y confirme con la tecla de INICIO/PARADA...
  • Page 75 recomienda medir la presión arterial dos veces al día: tivo, el usuario debe comprobar el ajuste del brazalete y por la mañana después de levantarse y por la tarde. asegurarse de que su circunferencia de la muñeca está • La medición debe realizarse siempre en un estado de dentro del área impresa en el brazalete.
  • Page 76 superficie. No cruce las piernas; coloque los pies en el Medir la presión arterial suelo, uno junto a otro. Póngase el brazalete como se ha descrito anteriormente • En cualquier caso, asegúrese de que el aparato esté a y adopte la postura en la que desea realizar la medición. la altura del corazón durante la medición.
  • Page 77 problemas” de estas instrucciones de uso y repita la Evaluación de los resultados medición. Información general sobre la presión arterial • Apague el tensiómetro con la tecla de INICIO/ • La presión arterial es la fuerza con la que el torrente PARADA .
  • Page 78 Indicador de riesgo sístole en el rango de tensión normal alta y diástole en el rango normal), entonces el indicador de riesgo siempre La Organización Mundial de la Salud (OMS) ha estableci- muestra el rango más alto, en el ejemplo descrito “Alta do la clasificación internacionalmente reconocida para la Normal”.
  • Page 79 demasiado rápido) pueden estar provocados, entre otras • Si la función Bluetooth ® está activada (el símbolo cosas, por enfermedades cardiacas, la edad, la predis- parpadea en la pantalla), el tensiómetro intenta es- posición física, el exceso de estimulantes, el estrés o la tablecer una conexión con la app.
  • Page 80 Bluetooth ® • Para borrar la memoria de un usuario, seleccione Para ello necesitará la app “beurer Healthmanager”. primero el registro de usuario que desee borrar pul- Está disponible gratuitamente en Apple App Store y en sando con el aparato apagado la tecla de memori- Google Play.
  • Page 81 ® comenzará automática- mente. Paso 2: App “beurer HealthManager” Añada el BC 54 en la opción “Einstellun- La app “beurer HealthManager” debe estar abierta gen/Meine Geräte” (Ajustes/Mis disposi- para realizar la transmisión de datos. tivos) de la app “beurer HealthManager”.
  • Page 82: Limpieza Y Cuidado

    Señalamos expresamente que este software no es un Mensaje Posible causa Solución producto médico según la Directiva de la Unión Europea de error 93/42/EEC. No se ha colocado Siga las indicaciones Los valores mostrados sirven únicamente para su vi- correctamente del capítulo “7.
  • Page 83: Eliminación

    • Las reparaciones solo deben ser realizadas por el ser- Mensaje Posible causa Solución vicio de atención al cliente o distribuidores autorizados. de error Antes de realizar cualquier reclamación, compruebe el Los datos no se Acceda como se ha estado de las pilas y sustitúyalas si es necesario. han podido trans- descrito en el capítulo •...
  • Page 84: Datos Técnicos

    Condiciones de De -20 °C a +60 °C, almacenamiento y ≤ 93 % de humedad relativa del aire N.º de modelo BC 54 transporte admisibles Método de medición Oscilométrico, medición no invasiva Alimentación 2 pilas de 1,5 V de la presión arterial en la muñeca Vida útil de las pilas...
  • Page 85: Garantía/Asistencia

    12. Garantía/asistencia • Este aparato cumple la Directiva europea en lo refe- Beurer GmbH, Söflinger Straße 218, D-89077 Ulm (en lo rente a productos sanitarios 93/42/EEC, la ley alema- sucesivo, “Beurer”) concede una garantía para este pro- na sobre productos sanitarios y las normas europeas ducto.
  • Page 86 - el producto original ponsabilidad de productos o de otras disposiciones a Beurer o a un socio autorizado por Beurer. de responsabilidad legal preceptiva. Las reparaciones o la sustitución del producto no...
  • Page 87 Lei abbia scelto un prodotto del nostro assortimento. Il nostro marchio è garanzia di prodotti di elevata qualità, controllati nei dettagli, relativi ai settori calore, peso, pressione, temperatura corporea, pulsazioni, terapia dolce, massaggio, Beauty, aria e Baby. Cordiali saluti Il team Beurer Indice 1. Fornitura ..............88 7. Utilizzo ..............96 2.
  • Page 88: Fornitura

    1. Fornitura Informazioni sul prodotto Controllare l'integrità esterna della confezione e la com- Indicazione di informazioni importanti pletezza del contenuto. Prima dell'uso assicurarsi che Seguire le istruzioni l'apparecchio e gli accessori non presentino nessun Prima dell'inizio dei lavori e/o dell'utilizzo danno palese e che il materiale di imballaggio sia stato di apparecchi o macchine, leggere le rimosso.
  • Page 89: Uso Conforme

    3. Uso conforme Limitazione della temperatura Vengono indicati i valori limite di tem- Ambito di applicazione peratura a cui il dispositivo medico può Il misuratore di pressione è concepito per la misurazione essere esposto in modo sicuro. completamente automatica, non invasiva della pressione Umidità, limitazione arteriosa e del battito cardiaco al polso.
  • Page 90: Avvertenze E Indicazioni Di Sicurezza

    4. Avvertenze e indicazioni di sicurezza • Accertarsi che il manicotto non venga applicato su braccia con arterie o vene sottoposte a trattamenti me- Controindicazioni dici, ad esempio in presenza di un dispositivo di acces- so intravascolare, in caso di terapia intravascolare o di •...
  • Page 91 • Non utilizzare l'apparecchio contemporaneamente ad Misure precauzionali generali altri apparecchi elettromedicali (apparecchi EM). Que- sto potrebbe causare il malfunzionamento del misura- • Il misuratore di pressione è composto da moduli elet- tore e/o dare luogo a misurazioni imprecise. tronici di precisione. La precisione dei valori misurati •...
  • Page 92 Misure per l'uso delle batterie Indicazioni sulla compatibilità elettromagnetica • Se il liquido di una batteria viene a contatto con la • L'apparecchio è idoneo per l'utilizzo in qualsiasi am- pelle o con gli occhi, sciacquare le parti interessa- biente riportato nelle presenti istruzioni per l'uso, inclu- te con acqua e consultare un medico.
  • Page 93: Descrizione Dell'apparecchio

    5. Descrizione dell'apparecchio Indicatori sul display: 1. Indicatore di rischio 1. Display 2. Simbolo di trasmissione Bluetooth ® 2. Pulsante START/STOP 3. Ora e data 3. Pulsante di memorizzazione M1 4. Pressione sistolica 4. Pulsante di memorizzazione M2 5. Pressione diastolica 5.
  • Page 94: Messa In Funzione

    6. Messa in funzione Esecuzione delle impostazioni È importante impostare correttamente il dispositivo prima Inserimento delle batterie di utilizzarlo per poter utilizzare appieno tutte le funzioni. • Rimuovere il coper- Solo in questo modo è possibile memorizzare e successi- chio del vano bat- vamente richiamare i valori misurati con la rispettiva data terie sul lato sinistro e ora.
  • Page 95 Sul display lampeggia il numero Sul display lampeggia l'ora. dell'anno. • Con il pulsante di memorizzazione • Con il pulsante di memorizzazione M1 o M2 selezionare l’ora deside- M1 o M2 selezionare l’anno desi- rata e confermare con il pulsante START/STOP derato e confermare con il pulsante START/STOP...
  • Page 96: Utilizzo

    7. Utilizzo La misurazione andrebbe sempre effettuata sul braccio con i valori più alti. Stabilire una regola al riguardo con Regole generali per l'automisurazione della il proprio medico prima di iniziare le automisurazioni. pressione Da quel momento in poi misurare sempre la pressione •...
  • Page 97 • A questo punto stringere il manicotto saldamente intor- Per selezionare la memoria utente corrispondente, no al polso con l'aiuto della chiusura a strappo. Assi- sull'apparecchio spento premere il pulsante di memoriz- curarsi che aderisca bene, ma senza stringere il polso. zazione M1 (per l’utente ) o M2 (per la memoria utente ).
  • Page 98 • Vengono visualizzati i valori misurati il misuratore di pressione si spegne automaticamente per pressione sistolica e diastolica e dopo 5 secondi. battito cardiaco. • Se si dimentica di spegnere l'apparecchio, questo si spegne automaticamente. Anche in questo caso il valo- re viene memorizzato nella memoria utente selezionata o in quella utilizzata per ultima.
  • Page 99 affidabile è possibile solo se le misurazioni vengono ef- valori misurati rientrino in due classificazioni diverse (ad fettuate regolarmente e in condizioni paragonabili. es. la sistole nell'intervallo "Normale - alta" e la diasto- le nell'intervallo "Normale"), l'indicatore di rischio indica Indicatore di rischio sempre quella più...
  • Page 100 tati o anticipati, polso rallentato o troppo veloce) posso- • Se il Bluetooth ® è attivato (il simbolo lampeg- no essere determinati tra l'altro da patologie cardiache, gia sul display), il misuratore di pressione tenta di età, costituzione, sovralimentazione, stress o mancanza stabilire una connessione con l’app.
  • Page 101 Trasmissione via Bluetooth ® i valori misurati e memorizzati sull'apparecchio pos- sono inoltre essere trasmessi allo smartphone tramite Bluetooth ® A tale scopo è necessaria l'app "beurer HealthManager". È disponibile gratuitamente nell'Apple App Store e in Google Play.
  • Page 102 Requisiti di sistema per l'app "beurer HealthManager" Passo 1: BC 54 • iOS ≥ 10.0, Android ≥ 5.0 Attivare la funzione Bluetooth ® sull'ap- ® • Bluetooth ≥ 4.0 parecchio (vedere il capitolo "6. Messa in funzione", sezione "Bluetooth ").
  • Page 103: Pulizia E Cura

    Avviare la trasmissione dati nell'app "beurer Non muoversi o par- Durante la misu- HealthManager". lare durante la misu- razione la perso- Segnaliamo espressamente che il presente software non razione.
  • Page 104: Smaltimento

    Messaggio Possibile Soluzione Messaggio Possibile Soluzione di errore causa di errore causa Il manicotto non Attenersi alle indi- Le batterie sono Inserire nuove batterie è applicato cor- cazioni del capitolo quasi scariche. nell'apparecchio. rettamente. "7. Utilizzo" alla sezio- Non è possibile Procedere come de- ne "Applicazione del inviare i dati via...
  • Page 105: Dati Tecnici

    11. Dati tecnici • Non aprire l'apparecchio. In caso contrario la garanzia decade. Codice BC 54 • Le riparazioni possono essere effettuate solo dal Servi- Metodo di Misurazione oscillante e non invasi- zio clienti o da rivenditori autorizzati. Prima di inoltrare...
  • Page 106 • Questo apparecchio è conforme alla norma euro- Condizioni di da +5 °C a +40 °C, 15-90% di umi- pea EN 60601-1-2 (corrispondenza a CISPR 11, funzionamento dità relativa (senza condensa), 700- IEC 61000-4-2, IEC 61000-4-3, IEC 61000-4-8) e ne- ammesse 1060 hPa di pressione ambiente cessita di precauzioni d'impiego particolari per quanto...
  • Page 107: Garanzia / Assistenza

    Nel caso in cui il prodotto, durante il periodo di garanzia, cedeclarationofconformity.php si dimostrasse incompleto o presentasse difetti di fun- zionamento in linea con le seguenti disposizioni, Beurer 12. Garanzia / Assistenza provvederà a sostituire o riparare gratuitamente il prodot- Beurer GmbH, Söflinger Strasse 218, D-89077 Ulm (di...
  • Page 108 Beurer; - i danni occorsi nel trasporto dal produttore al cliente o tra il centro di assistenza e il cliente;...
  • Page 109 Ürünlerimizden birini seçtiğiniz için teşekkür ederiz. Isı, ağırlık, kan basıncı, vücut sıcaklığı, nabız, yumuşak terapi, ma- saj, güzellik, hava ve bebek alanlarına yönelik yüksek kaliteli ve titizlikle test edilmiş ürünlerimiz, dünyanın her tarafında tercih edilmektedir. Yeni cihazınızı iyi günlerde kullanmanızı dileriz Beurer Ekibiniz İçindekiler 1. Teslimat kapsamı ............110 7. Kullanım ..............117 2.
  • Page 110: Teslimat Kapsamı

    1. Teslimat kapsamı Ürün bilgileri Teslimat kapsamını kontrol ederek karton ambalajın dış- Önemli bilgilere yönelik not tan hasar görmemiş ve içeriğin eksiksiz olduğundan emin Kullanım kılavuzunu dikkate alın olun. Cihazı kullanmadan önce, cihazda ve aksesuarların- Çalışmaya ve/veya cihazı ya da makinele- da görünür hasarlar olmadığından ve tüm ambalaj malze- ri kullanmaya başlamadan önce kılavuzu melerinin çıkarıldığından emin olun.
  • Page 111: Amacına Uygun Kullanım

    Hedef grup Sıcaklık sınırlaması Yetişkin kişiler tarafından evde kendi kendine ölçüm yap- Tıbbi ürünün maruz kalabileceği sıcaklık mak için tasarlanmıştır ve bilek çevresi manşet üzerinde sınır değerlerini belirtir. yazılı aralıkta olan kullanıcılar için uygundur. Hava nemi, sınırlama Tıbbi ürünün maruz kalabileceği nem Endikasyon/klinik yarar aralığını...
  • Page 112 • Aşağıdaki durumlardan birinin söz konusu olması ha- • Cihaz sadece kullanım kılavuzunda açıklanan şekilde linde cihaz kullanılmadan önce mutlaka hekime danı- kullanılmak üzere tasarlanmıştır. Usulüne uygun olma- şılmalıdır: Kalp ritmi bozuklukları, kan dolaşımı bozuk- yan ve yanlış kullanım sonucu oluşan hasarlardan üreti- lukları, diyabet, gebelik, preeklampsi, hipotoni, sıtma ci firma sorumlu değildir.
  • Page 113 • Ölçümleri gerektiğinden daha sık yapmayın. Kan akı- Pillerin kullanımıyla ilgili önlemler şının kısıtlanması nedeniyle kan oturması meydana • Pilden sızan sıvı cilt veya gözlerle temas ettiğinde, gelebilir. ilgili yeri suyla yıkayın ve bir hekime başvurun. • Kan dolaşımı, tansiyon ölçümü nedeniyle gereğinden •...
  • Page 114: Cihaz Açıklaması

    5. Cihaz açıklaması Elektromanyetik uyumluluk ile ilgili bilgiler 1. Ekran • Cihaz, konutlar dahil olmak üzere bu kullanım kılavu- 2. BAŞLAT/DURDUR tuşu zunda belirtilen tüm ortamlarda çalıştırılabilir. 3. M1 bellek tuşu • Elektromanyetik parazit olan ortamlarda cihazın fonk- 4. M2 bellek tuşu siyonları...
  • Page 115: İlk Çalıştırma

    6. İlk çalıştırma Ekrandaki göstergeler: 1. Risk göstergesi Pillerin takılması 2. Bluetooth aktarım sembolü ® • Cihazın sol tarafın- 3. Saat ve tarih daki pil yuvasının 4. Sistolik tansiyon kapağını çıkarın. 5. Diyastolik tansiyon • İki adet 1,5 V AAA 6.
  • Page 116 Ayarları yapmak için kullanacağınız menüye iki farklı Ekranda ay göstergesi yanıp söner. şekilde erişebilirsiniz: • M1 veya M2 bellek tuşu ile istediği- • İlk kullanımdan önce ve her pil değişiminden sonra: niz ayı seçin ve BAŞLAT/DURDUR Pilleri cihaza taktığınızda ilgili menü otomatik ola- tuşu ile onaylayın.
  • Page 117: Kullanım

    • Ölçüme en az 30 dakika kala yememeli, içmemeli, si- Ekranda Bluetooth sembolü görüntülenir. ® gara kullanmamalı veya bedensel aktivite gerçekleştir- • M1 veya M2 bellek tuşu ile otomatik Bluetooth ® memelisiniz. veri aktarımının etkinleştirilip (Bluetooth sembolü ® • İlk tansiyon ölçümünden önce mutlaka 5 dakika dinle- gösterilir) etkinleştirilmeyeceğini (Bluetooth sem- ®...
  • Page 118 • Sol el bileğinizi açın. Koldaki kan dolaşımının çok dar • Ölçüm sırasında cihazın kalp yüksekliğinde olmasına giysiler veya benzeri eşyalar nedeniyle engellenmeme- her zaman dikkat edin. Aksi halde fizyolojik nedenlere sine dikkat edin. bağlı olarak ciddi sapmalar meyda- na gelebilir. Kolunuzu desteklemek için dirseğinizi bir masaya koyun.
  • Page 119 Tansiyonun ölçülmesi • Tansiyon ölçme cihazını BAŞLAT/DURDUR tuşu kapatın. Böylece ölçüm sonucu seçilen kullanıcı belle- Manşeti yukarıda açıklandığı gibi takın ve ölçümü gerçek- ğine kaydedilir. leştirmek istediğiniz duruşa geçin. ® • Bluetooth veri aktarımı etkinleştirilmişse, BAŞLAT/ • Tansiyon ölçme cihazını çalıştırmak DURDUR tuşuna basıldıktan sonra veriler aktarılır.
  • Page 120 – En düşük basınç diyastolik tansiyondur ve kalp kası Ölçülen tansiyon Risk tekrar tamamen genişlediğinde ve kalbi kanla doldur- değerleri aralığı Sınıflandırma göstergesi duğunda oluşur. Sistol Diyastol rengi • Tansiyon dalgalanmaları normaldir. Tekrarlanan bir (mmHg) (mmHg) ölçümde bile ölçülen değerler arasında büyük farklar 120 –...
  • Page 121 Kalp ritmi bozuklukları Ölçüm değerlerinin kaydedilmesi, görüntülenmesi ve silinmesi Bu cihaz, tansiyon ölçümü sırasında kaydedilen nabız sin- yalinizin analizi sırasında kalp ritmi ile ilgili olası bozukluk- Başarılı her ölçümün sonuçları, tarih ve saat ile birlikte ları belirleyebilir. Bu durumda cihaz, ölçümü gerçekleştir- kaydedilir.
  • Page 122 Ekranda A  A görüntülenir. • M1 hafıza düğmesine yeniden basar- sanız ekranda son münferit ölçüm gös- Bu kullanıcı belleğinde kayıtlı olan tüm terilir (Buradaki örnekte 03 ölçümü). ölçüm değerlerinin ortalaması görünür. • M1 hafıza düğmesine basın. • M1 hafıza düğmesine tekrar basarsanız ölçtüğünüz münferit ölçüm değerlerine bakabilirsiniz.
  • Page 123 • Bluetooth ® ≥ 4.0 Adım 2: “beurer HealthManager” uygulaması Uyumlu cihazların listesi: “beurer HealthManager” uygulamasında “Ayarlar / Cihazlarım” altında BC 54 cihazınızı ekleyin. Adım 3: BC 54 Değerleri aktarmak için aşağıdakileri yapın: Ölçüm yapın. Ayar menüsünde Bluetooth ® etkinleştirilmişse veriler öl- çümden sonra otomatik olarak aktarılır.
  • Page 124: Temizlik Ve Bakım

    Nabız kaydedi- Lütfen bir dakika bek- otomatik olarak başlar. lemedi. ledikten sonra ölçümü tekrarlayın. Ölçüm sıra- Aktarım için “beurer HealthManager” uygulaması açıl- Ölçüm sırasında sında hareket mış olmalıdır. konuşmamaya ve ettiniz veya Aktarma işleminin sorunsuzca gerçekleşmesini sağlamak hareket etmemeye konuştunuz.
  • Page 125: Bertaraf Etme

    Hata mesajı Olası neden Çözüm Hata mesajı Olası neden Çözüm Manşet doğru Lütfen “7. Kullanım”, Veriler “7. Kullanım”, takılmamıştır. “Manşetin takılması” “ üzerinden Bluetooth ® Bluetooth ® altındaki bilgileri gönderilemedi. aktarım” altında dikkate alın. açıklandığı gibi ma- Ölçümü tekrar eder- nuel bellek sorgulama ken manşetin doğru moduna geçin ve...
  • Page 126: Teknik Veriler

    • Kullanım ömrü sona eren cihazlar, çevrenin korunması Göstergenin Sistolik ± 3 mmHg, amacıyla evsel atıklar ile birlikte atılmamalıdır. Ci- doğruluğu diyastolik ±3 mmHg, haz, ülkenizdeki uygun atık toplama merkezleri nabız gösterilen değerin ±%5'i aracılığıyla bertaraf edilebilir. Cihazı elektrikli ve Ölçüm belirsizliği Klinik kontrole göre maks.
  • Page 127: Garanti/Servis

    ölçme cihazlarının temel özellikleri dahil olmak üzere güvenlik için özel koşullar). Beurer, bu ürünün kusursuz bir şekilde çalıştığını ve ek- • Bu tansiyon ölçme cihazının doğruluğu dikkatli bir şe- siksiz olduğunu garanti eder. kilde kontrol edilmiştir. Kalibrasyona gerek yoktur.
  • Page 128 Garanti talebi ancak müşterinin yasal zorunlu sorumluluk hükümleri uyarınca tüketi- - faturanın/satın alma belgesinin bir kopyasını ve ci hakları olabilir). - orijinal ürünü yetkili bir Beurer iş ortağına sunabilmesi halinde işleme Onarım veya komple değişim garanti süresini hiçbir konabilir. şekilde uzatmaz.
  • Page 129 Благодарим Вас за выбор продукции нашей компании. Мы производим современные, тщательно протестиро- ванные высококачественные изделия для обогрева тела, измерения массы, кровяного давления, температуры тела, пульса, легкой терапии, массажа, косметических процедур, ухода за детьми и очистки воздуха. С наилучшими пожеланиями, Ваша команда beurer Содержание 1. Комплект поставки ..........130 7. Применение ............138 2.
  • Page 130: Комплект Поставки

    1. Комплект поставки ВНИМАНИЕ Указывает на возможные повреждения Проверьте комплектность поставки и убедитесь в том, прибора или принадлежностей. что на картонной упаковке нет внешних повреждений. Перед использованием убедитесь, что прибор и  его Информация о продукте принадлежности не  имеют видимых повреждений, Содержит важную информацию и удалите все упаковочные материалы. При наличии Соблюдайте...
  • Page 131: Использование По Назначению

    Утилизация упаковки в соответствии Знак СЕ с предписаниями по охране окружаю- Это изделие соответствует требо- щей среды. ваниям действующих европейских и национальных директив. Изготовитель. 3. Использование по назначению Температурный диапазон Целевое назначение Указывает на значения температуры, при которых медицинское изделие Прибор для измерения кровяного давления (тоно- можно...
  • Page 132: Предупреждения И Указания По Технике Безопасности

    лученные результаты измерений, а  также может вы- • Не  используйте прибор для измерения кровяного водить средние показатели прошлых измерений. давления вместе с  высокочастотным хирургиче- Записанные данные могут помочь медицинским ра- ским прибором. ботникам в  диагностике проблем с  артериальным • Манжету нельзя использовать женщинам, перенес- давлением...
  • Page 133 • Допускается использование прибора только в  це- • Учтите, что во время накачивания манжеты может лях, описываемых в  данной инструкции по  приме- быть нарушена подвижность соответствующей ко- нению. Производитель не  несет ответственности нечности. за  ущерб, вызванный неквалифицированным или • Не  проводите измерения чаще, чем это необходи- ненадлежащим...
  • Page 134 • Для проведения измерений температура прибо- • Если батарейка потекла, очистите отсек для ра должна соответствовать комнатной. Если при- батареек сухой салфеткой, предварительно бор хранился при температуре, близкой к  макси- надев защитные перчатки. мальной или минимальной температуре хранения • Не разбирайте, не открывайте и не разбивай- и транспортировки, и был...
  • Page 135: Описание Прибора

    5. Описание прибора Указания по электромагнитной совместимости 1. Дисплей 2. Кнопка ВКЛ./ВЫКЛ. • Прибор предназначен для работы в  условиях, пе- 3. Кнопка сохранения M1 речисленных в настоящей инструкции по примене- 4. Кнопка сохранения M2 нию, в том числе в домашних условиях. • При наличии электромагнитных помех возможно- 5.
  • Page 136: Ввод В Эксплуатацию

    6. Ввод в эксплуатацию Индикация на дисплее 1. Индикатор риска Установка батареек 2. Символ передачи данных через Bluetooth ® • Снимите крышку 3. Время и дата отделения для ба- 4. Систолическое давление тареек с левой сто- 5. Диастолическое давление роны прибора. 6. Измеренное значение пульса •...
  • Page 137 Выполнение настроек На дисплее мигает формат времени. Чтобы в  полной мере пользоваться всеми функция- • С  помощью кнопки сохранения ми, перед использованием необходимо правильно M1 или M2 выберите желаемый настроить прибор. Только так Вы сможете сохра- часовой формат и  подтвердите нять измеренные значения с соответствующей датой выбор...
  • Page 138 На дисплее мигает индикация дня. На дисплее мигает символ Bluetooth ® • С  помощью кнопки сохранения • С  помощью кнопки сохранения M1 или M2 M1 или M2 выберите нужный можно включить (символ Bluetooth отобра- ® день и подтвердите выбор нажа- жается) или отключить (символ Bluetooth ®...
  • Page 139 • По крайней мере за 30 минут до измерения следует и  убедиться в  том, что объем запястья находится воздерживаться от приема пищи и жидкости, куре- в пределах напечатанного на ней диапазона. ния или физических нагрузок. • Освободите запястье. Следите за  тем, чтобы кро- • Перед первым измерением кровяного давления воснабжение...
  • Page 140 ногу на  ногу, поставьте ступни на  пол друг рядом Измерение кровяного давления с другом. Наложите манжету, как описано выше, и  займите • Во  время измерения прибор обязательно должен удобное для измерения положение. находиться на уровне сердца. В противном случае • Чтобы включить прибор для изме- из-за...
  • Page 141 Выполните указания согласно главе  9 «Что делать Оценка результатов при возникновении проблем?» настоящей инструк- Общая информация о кровяном давлении ции по применению и повторите измерение. • Кровяное давление представляет собой силу, с ко- • Выключите прибор для измерения кровяного дав- торой кровоток давит на  стенки артерии. Артери- ления, нажав...
  • Page 142 Индикатор риска ся измеренное давление. Если измеренные значения находятся в двух разных диапазонах (например, В  таблице ниже приведена определенная ВОЗ (Все- систолическое давление — высокое в допустимых мирной организацией здравоохранения) и  признан- пределах, а диастолическое — нормальное), то инди- ная во  всем мире классификация для  оценки изме- катор...
  • Page 143 ет на возможные нарушения пульса. Это может сви- Сохранение, просмотр и удаление результатов детельствовать об аритмии. Аритмия — это болезнь, измерения при которой возникает аномальный сердечный ритм, Результаты каждого успешного измерения сохра- вызванный сбоями в биоэлектрической системе, ре- няются с  указанием даты и  времени измерения. гулирующей...
  • Page 144 На дисплее отобразится A A . • При повторном нажатии кнопки со- хранения M1 на дисплее отобразит- Отобразится среднее значение всех ся результат последнего измерения сохраненных в  данной пользователь- (в  качестве примера используется ской памяти результатов измерений. измерение 03). • Нажмите кнопку сохранения M1. •...
  • Page 145 зан случайно сгенерированный шестизначный мощи Bluetooth ® ПИН-код на  двух строках, одновременно Для этого Вам требуется приложение «beurer на  смартфоне появится поле для ввода этого HealthManager». Оно доступно для бесплатного ска- ПИН-кода. После успешного ввода прибор сое- чивания в Apple App Store и Google Play. диняется со смартфоном.
  • Page 146 данных через (глава «7. Применение», HealthManager Bluetooth ® , то после раздел «Сохранение, подтверждения поль- просмотр и удаление Добавьте BC  54 в приложении beurer зовательской памяти результатов измере- HealthManager в разделе «Настройки/ нажатием кнопки ВКЛ./ ния»). Выберите нужную Мои устройства». ВЫКЛ. начнется пользовательскую па- передача...
  • Page 147: Очистка И Уход

    ся в  качестве основания для  терапевтических мер. Сообщение Возможные Меры Программное обеспечение не  является частью диа- об ошибке причины по устранению гностической медицинской системы. Неправильно Следуйте указаниям 8. Очистка и уход наложена в главе «7. Примене- манжета. ние», раздел «Накла- • Очищайте прибор и  манжету с  осторожностью. дывание...
  • Page 148: Утилизация

    10. Утилизация Сообщение Возможные Меры об ошибке причины по устранению Ремонт и утилизация прибора Батарейки поч- Вставьте в прибор • Ни в коем случае не ремонтируйте и не регулируйте ти разряжены. новые батарейки. прибор самостоятельно. В противном случае надеж- Невозможно Перейдите (см. главу ность работы прибора больше не гарантируется. передать «7. Применение», •...
  • Page 149: Технические Характеристики

    Точность индикации ±3 мм рт. ст. для систолического Утилизация батареек давления, • Батарейки нельзя выбрасывать вместе с бытовым ±3 мм рт. ст. для диастолического мусором. Они могут содержать тяжелые металлы, давления, пульс: ±5 % от указываемого поэтому их следует утилизировать отдельно. значения • Следующие знаки предупреждают Погрешность Максимально допустимое стан- о наличии...
  • Page 150 ности в отношении электромагнитной совместимо- Срок службы Примерно 150 измерений, в за- сти. Следует учесть, что переносное и  мобильное батареек висимости от высоты кровяного высокочастотное коммуникационное оборудование давления или давления накачи- вания может повлиять на работу данного прибора. • Прибор соответствует требованиям директивы Классификация Внутреннее питание, IP22, без ЕС 93/42/EEC о медицинском...
  • Page 151: Гарантия/Сервисное Обслуживание

    • Настоящим подтверждаем, что данное изделие со- ответствует требованиям европейской директивы RED  2014/53/EU. Декларацию CE  о  соответствии данного изделия основным требованиям директивы о медицинских изделиях можно найти по ссылке: www.beurer.com/web/we-landingpages/de/ cedeclarationofconformity.php 12. Гарантия/сервисное обслуживание Более подробная информация по  гарантии/сервису находится в гарантийном/сервисном талоне, который...
  • Page 152 Drodzy Klienci, cieszymy się, że zdecydowali się Państwo na zakup naszego produktu. Firma Beurer oferuje dokładnie przetestowane, wysokiej jakości produkty przeznaczone do pomiaru wagi, ciśnienia krwi, temperatury ciała i tętna, a także przyrządy do nawilżania powietrza, łagodnej terapii, masażu i ogrzewania oraz urządzenia służące do pielęgnacji urody i ułatwiające opiekę...
  • Page 153: Zawartość Opakowania

    1. Zawartość opakowania UWAGA Wskazówki bezpieczeństwa ostrzegające Zestaw należy sprawdzić pod kątem zewnętrznych przed możliwymi uszkodzeń kartonowego opakowania oraz kompletności uszkodzeniami urządzenia/akcesoriów zawartości. Przed użyciem upewnić się, że na urządze- niu ani na akcesoriach nie widać żadnych uszkodzeń, Informacje o produkcie a wszystkie części opakowania zostały usunięte.
  • Page 154: Użytkowanie Zgodne Z Przeznaczeniem

    3. Użytkowanie zgodne z przeznaczeniem Opakowanie zutylizować w sposób przyjazny dla środowiska Przeznaczenie Ciśnieniomierz służy do automatycznego nieinwazyjnego Producent pomiaru ciśnienia tętniczego i tętna na nadgarstku. Grupa docelowa Ograniczenie temperatury Produkt został opracowany z  myślą o  samodzielnym Określono wartości graniczne temperatu- wykonywaniu pomiarów w  domu przez dorosłe osoby. ry, w której można bezpiecznie stosować...
  • Page 155: Ostrzeżenia I Wskazówki Dotyczące Bezpieczeństwa

    4. Ostrzeżenia i wskazówki dotyczące • Mankietu nie należy zakładać na rękę, w której leczo- ne są tętnice i żyły, np. angioplastyka / terapia naczyń bezpieczeństwa krwionośnych czy przetoka tętniczo-żylna (AV). Przeciwwskazania Ogólne wskazówki ostrzegawcze • Nie wolno używać ciśnieniomierza do pomiaru ciśnie- •...
  • Page 156 • Urządzenia nie wolno używać, gdy nie są spełnione • Przed przystąpieniem do pomiaru urządzenie powinno warunki jego przechowywania lub eksploatacji. Może osiągnąć temperaturę pokojową. Jeśli urządzenie było to prowadzić do nieprawidłowych wyników pomiaru. przechowywane w  warunkach zbliżonych do maksy- •...
  • Page 157 • Nie wolno rozmontowywać, otwierać ani rozdrab- • Należy unikać stosowania tego urządzenia bezpośred- nio obok innych urządzeń lub wraz z innymi urządzenia- niać baterii. mi umieszczonymi jedno na drugim, ponieważ mogłoby • Przestrzegać znaków polaryzacji plus (+) i minus (-). to skutkować nieprawidłowym działaniem. Jeśli użytko- •...
  • Page 158: Opis Urządzenia

    5. Opis urządzenia Wskazania na wyświetlaczu: 1. Wskaźnik ryzyka 1. Wyświetlacz 2. Symbol Bluetooth – transmisja danych ® 2. Przycisk START/STOP 3. Godzina i data 3. Przycisk pamięci M1 4. Ciśnienie skurczowe 4. Przycisk pamięci M2 5. Ciśnienie rozkurczowe 5. Mankiet nadgarstkowy 6.
  • Page 159: Uruchomienie

    6. Uruchomienie Wybranie ustawień Przed użyciem należy koniecznie prawidłowo ustawić Wkładanie baterii urządzenie, aby móc w  pełni korzystać ze wszystkich • Zdjąć pokrywę ko- funkcji. Tylko w  ten sposób można zapisać i  następnie mory baterii znaj- wywołać wyniki pomiarów z prawidłową datą i godziną. dującą...
  • Page 160 Na wyświetlaczu zacznie migać Na wyświetlaczu zacznie migać wskazanie roku. wskazanie godziny. • Za pomocą przycisku pamięci M1 • Za pomocą przycisku pamięci M1 lub M2 ustawić odpowiednią lub M2 ustawić odpowiedni format godzinę, a  następnie potwierdzić godziny, a  następnie potwierdzić przyciskiem START/STOP przyciskiem START/STOP Na wyświetlaczu zacznie migać...
  • Page 161: Zastosowanie

    7. Zastosowanie runkowane fizjologicznie i całkowicie normalne. Pomiar należy zawsze wykonywać na tej ręce, w której ciśnie- Ogólne reguły obowiązujące podczas samodzielnego nie krwi jest większe. Przed rozpoczęciem samodziel- pomiaru ciśnienia krwi nych pomiarów należy to uzgodnić z swoim lekarzem. • Aby uzyskać maksymalnie bliski rzeczywistości profil Odtąd pomiar ciśnienia krwi należy wykonywać...
  • Page 162 • Zapiąć mankiet na nadgarstku za pomocą zapięcia na M1 (w przypadku użytkownika ) lub M2 (w przypadku rzep. Upewnić się, że ściśle przylega do nadgarstka, pamięci użytkownika ). Następnie potwierdzić wybór ale nie uciska go. poprzez naciśnięcie przycisku START/STOP Przyjmowanie prawidłowej pozycji ciała Pomiar ciśnienia tętniczego krwi •...
  • Page 163 Interpretacja wyników • pojawia się, jeśli pomiar nie został przeprowadzony prawidłowo. Ogólne informacje dotyczące ciśnienia krwi Przestrzegać wskazówek zawartych • Ciśnienie krwi opisuje siłę, z jaką przepływająca krew w rozdziale „9. Postępowanie w przypadku proble- naciska na ściany tętnic. Ciśnienie tętnicze stale zmie- mów”...
  • Page 164 klasyfikację do oceny zmierzonych wartości ciśnienia ryzyka pokazuje zawsze wyższy zakres – w opisywanym krwi: przykładzie będzie to ciśnienie „Normalne podwyższone”. Należy zwrócić uwagę, że podane wartości standardowe Zakres zmierzonych służą jedynie jako ogólne wytyczne, ponieważ indywidu- wartości ciśnienia Kolor alne wartości ciśnienia u różnych osób i w różnych gru- wskaź- Ciśnienie Ciśnienie...
  • Page 165 display il simbolo la misurazione deve essere ripetuta • Jeśli aktywowano Bluetooth ® (symbol miga na poiché potrebbe esserne pregiudicata la precisione. Per wyświetlaczu), ciśnieniomierz próbuje nawiązać valutare la pressione sanguigna, utilizzare esclusivamente połączenie z  aplikacją. Po nawiązaniu połącze- i risultati registrati riguardanti il battito senza irregolarità nia i ...
  • Page 166 (w przykła- Bluetooth ® dzie pomiar 03). W  tym celu konieczna jest aplikacja „beurer Health- • Jeśli ponownie naciśniesz przycisk pamięci M1, Manager”. Istnieje możliwość bezpłatnego pobrania za będzie możliwe wyświetlenie zmierzonych jednost- pośrednictwem Apple App Store i Google Play.
  • Page 167 W aplikacji „beurer HealthManager” za Bluetooth ® rozpocznie pomocą opcji „Ustawienia / Moje urzą- się automatycznie. dzenia” dodać urządzenie BC 54. Aplikacja „beurer HealthManager” musi być otwarta w celu transmisji. Krok 3: BC 54 W  celu zapewnienia sprawnego przenoszenia danych Wykonać pomiar.
  • Page 168: Czyszczenie I Konserwacja

    gramowanie nie jest częścią systemu diagnostyki me- Komunikat Możliwa Rozwiązanie dycznej. o błędzie przyczyna 8. Czyszczenie i konserwacja Mankiet został Proszę przestrzegać • Urządzenie i mankiet należy czyścić ostrożnie, wyłącz- nieprawidłowo wskazówek podanych nie za pomocą lekko zwilżonej szmatki. założony. w rozdziale „7. • Nie należy używać środków czyszczących ani rozpusz- Zastosowanie”...
  • Page 169: Utylizacja

    • Nie należy otwierać urządzenia. Nieprzestrzeganie po- Komunikat Możliwa Rozwiązanie wyższych zasad powoduje utratę gwarancji. o błędzie przyczyna • Naprawy mogą być wykonywane tylko przez serwis Baterie są pra- Włożyć nowe baterie producenta lub autoryzowanego dystrybutora. Przed wie zużyte. do urządzenia. złożeniem reklamacji należy zawsze sprawdzić...
  • Page 170: Dane Techniczne

    11. Dane techniczne Dopuszczalne Od -20°C do +60°C, warunki względna wilgotność powietrza Nr modelu BC 54 przechowywania ≤93% Metoda pomiaru Oscylometryczny, nieinwazyjny po- i transportu miar ciśnienia na nadgarstku Źródło zasilania 2 x bateria 1,5 V  Zakres pomiaru Ciśnienie w mankiecie 0–299 mmHg, Żywotność baterii Ok. 150 pomiarów, w zależności od ciśnienie skurczowe 60–230 mmHg, wysokości ciśnienia tętniczego lub ciśnienie rozkurczowe 40–130 mmHg,...
  • Page 171: Gwarancja/Serwis

    12. Gwarancja/serwis czącej wyrobów medycznych, ustawy o wyrobach me- dycznych oraz norm EN 1060-1 (Nieinwazyjne sfigmo- Firma Beurer GmbH, Söflinger Straße 218, D-89077 Ulm manometry – Część 1: Wymagania ogólne), EN 1060-3 (zwana dalej „Beurer”) udziela gwarancji na ten produkt (Nieinwazyjne sfigmomanometry – Część 3: Wymagania na następujących warunkach i ...
  • Page 172 (np. baterii, akumulatorów, mankietów, stanie uznany za niekompletny lub wadliwy w  działaniu uszczelek, elektrod, źródeł światła, nakładek i akceso- zgodnie z  poniższymi postanowieniami, firma Beurer riów inhalatora); bezpłatnie wymieni go lub naprawi zgodnie z niniejszymi - produktów, które były używane, czyszczone, przecho- warunkami gwarancji.
  • Page 173 30 cm (12 inches) to any part of the equipment (BC 54), including cables specified by the manufacturer. Otherwise, degradation of the performance of this equipment could result.
  • Page 174 Table 1 Table 2 Guidance manufacturer’s declaration – Guidance manufacturer’s declaration – electromagnetic emissions electromagnetic immunity Emissions test Compliance Immunity test IEC 60601-2 Compliance test level level RF emissions Group 1 CISPR 11 Electrostatic ±8 kV contact ±8 kV contact discharge (ESD) ±2 kV, ±4 kV, ±8 ±2 kV, ±4 kV, ±8...
  • Page 175 Voltage dips, ; 0.5 Radiated RF 10 V/m 10 V/m short interrup- cycle At 0°, IEC61000-4-3 80 MHz – 2,7 80 MHz – 2,7 tions and volta- 45°, 90°, 135°, ge variations on 180°,225°,270° 80 % AM at 80 % AM at power supply and 315°...
  • Page 176 Table 3 Guidance and manufacturer’s declaration - electromagnetic immunity Radiated RF Test Band Service Modulation M o d u l a t i o n Distance (m) IMMUNITY IEC61000-4- Frequency (MHz) TEST LEVEL 3 (Test (V/m) s p e c i f i c a - 380-390 TETRA Pulse...
  • Page 177 1720 1700-1990 GSM 1800; Pulse CDMA 1900; modulati- 1845 GSM 1900; on b) 1970 DECT; 217Hz LTE Band 1, 3, 4, 25; UMTS 2450 2400-2570 Bluetooth, Pulse WLAN, modulati- 802.11 on b) b/g/n, RFID 217Hz 2450, LTE Band 7 5240 5100-5800 WLAN Pulse...
  • Page 180 Bluetooth SIG, Inc. and any use of such marks by Beurer GmbH is under license. Other trademarks and trade names are those of their respective owners. Apple and the Apple logo are trademarks of Apple Inc., registered in the U.S. and other countries. App Store is a service mark of Apple Inc., registered in the U.S.

Table des Matières