Table des Matières

Publicité

Les langues disponibles
  • FR

Les langues disponibles

  • FRANÇAIS, page 31

Liens rapides

BC 85
D Blutdruckmessgerät
Gebrauchsanweisung .............................................. 2 – 16
G Blood pressure monitor
Instructions for use ................................................ 17 – 30
F Tensiomètre
Mode d'emploi ........................................................31 – 44
E Tensiómetro
Instrucciones de uso ..............................................45 – 58
I Misuratore di pressione
Istruzioni per l'uso .................................................. 59 – 72
T Tansiyon ölçme cihazı
Kullanım kılavuzu ....................................................73 – 86
r Прибор для измерения артериального
давления на запястье
Инструкция по применению .............................. 87 – 102
Q Ciśnieniomierz
Instrukcja obsługi ............................................... 103 – 116
Electromagnetic Compatibility Information
.......... 117 – 119

Publicité

Table des Matières
loading

Sommaire des Matières pour Beurer BC 85

  • Page 1 BC 85 D Blutdruckmessgerät Gebrauchsanweisung ..........2 – 16 G Blood pressure monitor Instructions for use ..........17 – 30 F Tensiomètre Mode d’emploi ............31 – 44 E Tensiómetro Instrucciones de uso ..........45 – 58 I Misuratore di pressione Istruzioni per l’uso ..........59 – 72 T Tansiyon ölçme cihazı...
  • Page 2: Table Des Matières

    6. Messwerte abrufen und löschen ........11 Lieferumfang 1. Kennenlernen • Blutdruckmessgerät mit Manschette Überprüfen Sie das Beurer BC 85 Blutdruckmessgerät auf • 2 x 1,5V AAA Batterien LR03 äußere Unversehrtheit der Verpackung und auf die Vollstän- • USB-Kabel digkeit des Inhalts.
  • Page 3 Vorsicht Die CE-Kennzeichnung bescheinigt die Konformität mit den grundlegenden An- forderungen der Richtlinie 93/42/EEC für Medizinprodukte. Hinweis Hinweis auf wichtige Informationen Zertifizierungszeichen für Produkte, die in die Russische Föderation und in die Länder Gebrauchsanweisung beachten der GUS exportiert werden. Hinweise zur Anwendung Anwendungsteil Typ BF •...
  • Page 4 • Bei Einschränkungen der Durchblutung an einem Arm auf • Verhindern Sie einen anhaltenden Druck in der Manschette Grund chronischer oder akuter Gefäßerkrankungen (unter sowie häufige Messungen. Eine dadurch resultierende Be- anderem Gefäßverengungen), ist die Genauigkeit der Hand- einträchtigung des Blutflusses kann zu Verletzungen führen. gelenksmessung eingeschränkt.
  • Page 5 – Schützen Sie das Gerät vor Stößen, Feuchtigkeit, • Immer alle Batterien gleichzeitig auswechseln. Schmutz, starken Temperaturschwankungen und direkter • Keine Akkus verwenden! Sonneneinstrahlung. • Keine Batterien zerlegen, öffnen oder zerkleinern. – Lassen Sie das Gerät nicht fallen. Hinweise zu Reparatur und Entsorgung –...
  • Page 6: Gerätebeschreibung

    3. Gerätebeschreibung Anzeigen auf dem Display: 1. Risiko-Indikator 1. Risiko-Indikator 2. Uhrzeit und Datum 2. USB-Schnittstelle 3. Systolischer Druck 3. Display 4. Diastolischer Druck 4. Positionierungsanzeige (Herzhöhe) 5. Symbol Herzrhythmusstörung 5. Speichertaste M1 Symbol Puls 6. Speichertaste M2 6. Ermittelter Pulswert 7.
  • Page 7: Messung Vorbereiten

    Systemvoraussetzungen für die PC-Software „ beurer Alle Displayelemente werden kurz angezeigt, blinkt im Health Manager“ Display. Stellen Sie nun wie im Folgenden beschrieben Datum und Uhrzeit ein. – ab Windows 7 SP1 – ab USB 2.0 (Type-A) Batterie Entsorgung Systemvoraussetzungen für die „beurer HealthManager“...
  • Page 8: Blutdruck Messen

    • Wählen Sie mit den Speichertasten M1/M2 Ihr gewünsch- Nachdem alle Daten eingestellt wurden, schaltet sich das Ge- tes Stundenformat und bestätigen Sie mit der START/ rät automatisch aus. STOPP- Taste ® Bluetooth Datum ® Im Display blinkt das Bluetooth Symbol.
  • Page 9 • Die Manschette muss eng um das Handgelenk anliegen, • Um das Blutdruckmessgerät zu starten, darf aber nicht einschnüren. drücken Sie die START/STOPP-Taste . Alle Displayanzeigen leuchten kurz Richtige Körperhaltung einnehmen auf. • Ruhen Sie sich vor jeder Messung ca. 5 Minuten aus! Nach 3 Sekunden beginnt das Bludruck- Ansonsten kann es zu Abweichungen kommen.
  • Page 10 • Schalten Sie das Blutdruckmessgerät mit der START/ Dies kann ein Indikator für eine Arrhythmie sein. Arrhythmie STOPP-Taste aus. Damit wird das Messergebnis im ist eine Krankheit, bei der der Herzrhythmus aufgrund von ausgewählten Benutzerspeicher abgespeichert. Fehlern im bioelektrischen System, das den Herzschlag steu- ert, anormal ist.
  • Page 11: Messwerte Abrufen Und Löschen

    unterschiedlichen Bereichen befinden (z.B. Systole im Be- – Wenn Sie die Messdaten für Benutzer- reich „Hoch Normal“ und Diastole im Bereich „Normal“) dann speicher einsehen möchten, drü- zeigt Ihnen die grafische Einteilung auf dem Gerät immer den cken Sie die Speichertaste M1. höheren Bereich an, im beschriebenen Beispiel „Hoch Normal“.
  • Page 12 Durchschnittswerte • Um das Gerät wieder auszuschalten, drücken Sie die START/STOPP-Taste Im Display blinkt A. Sie können das Menü jederzeit durch Drücken der Es wird der Durchschnittswert aller ge- START/STOPP-Taste verlassen. speicherten Messwerte dieses Benut- Messwerte löschen zerspeichers angezeigt. • Drücken Sie die jeweilige Speichertas- •...
  • Page 13: Übertragung Der Messwerte

    Sie haben die Möglichkeit die gemessenen und auf dem Gerät gespeicherten Werte zusätzlich auf Ihr Smartphone per Blue­ ® tooth zu übertragen. Dazu benötigen Sie die „beurer HealthManager“ App. Diese ist im Apple App Store und bei Google Play verfügbar.
  • Page 14: Fehlermeldung/Fehlerbehebung

    • Wenn Sie Gerät und Manschette aufbewahren, dürfen keine nen Sie hierzu bitte ggf. die Schutzhülle Ihres Smartphone. schweren Gegenstände auf dem Gerät und der Manschette Starten Sie die Datenübertragung in der „beurer HealthMa- stehen. Entnehmen Sie die Batterien. nager“ App.
  • Page 15 Genauigkeit der An- systolisch ± 3 mmHg, Datenübertragung Frequenzband 2402MHz – 2480MHz zeige diastolisch ± 3 mmHg, Sendeleistung max. 0 dBM Puls ± 5 % des angezeigten Wertes Blutdruckmessgerät verwendet ® Blue tooth low energy technology Messunsicherheit max. zulässige Standardabweichung Kompatibel mit Bluetooth 4.0 Smartpho- gemäß...
  • Page 16: Garantie

    Garantie unberührt. Für Geltendmachung eines Garantie- falles innerhalb der Garantiezeit ist durch den Kunden der Nachweis des Kaufes zu führen. Die Garantie ist innerhalb eines Zeitraumes von 3 Jahren ab Kaufdatum gegenüber der Beurer GmbH, Ulm (Germany) geltend zu machen.
  • Page 17: Included In Delivery

    1. Getting to know your device • Blood pressure monitor with cuff Check that the packaging of the Beurer BC 85 blood pressure • 2 x 1.5 V AAA batteries monitor has not been tampered with and make sure that all •...
  • Page 18: Important Notes

    2. Important notes Protect from moisture Signs and symbols The following symbols are used in these instructions for use, Serial number on the packaging and on the type plate for the device and the accessories: The CE labelling certifies that the product complies with the essential requirements of Attention Directive 93/42/EEC on medical products.
  • Page 19 a doctor before using the blood pressure monitor during • Do not allow sustained pressure in the cuff or frequent pregnancy. measurements. The resulting restriction of the blood flow • In the case of restricted circulation on the arm as a result of may cause injury.
  • Page 20 • We recommend that the batteries be removed if the device Instructions for repairs and disposal will not be used for a prolonged period of time. • Batteries do not belong in household waste. Please dispose Notes on handling batteries of empty batteries at the collection points intended for this purpose.
  • Page 21: Unit Description

    • For environmental reasons, do not dispose of the Information on the display: device in the household waste at the end of its use- 1. Risk indicator ful life. Dispose of the device at a suitable local col- 2. Time and date lection or recycling point.
  • Page 22: Preparing For The Measurement

    System requirements for the „ beurer Health Manager“ PC Battery disposal software. • The empty, completely flat batteries must be disposed of – from Windows 7 SP1 through specially designated collection boxes, recycling – from USB 2.0 (Type-A) points or electronics retailers. You are legally required to System requirements for the “beurer HealthManager”...
  • Page 23: Measuring Blood Pressure

    ® Date Bluetooth ® The year flashes on the display. The Bluetooth symbol flashes on the display. • Select the year using the M1/M2 memory • Use the M1/M2 memory buttons to choose whether au- ® ® buttons and confirm with the START/STOP tomatic Bluetooth data transfer is activated (Bluetooth ®...
  • Page 24 Adopt the correct posture You can cancel the measurement at any time by pressing the START/STOP button • Before every measurement, relax for about five minutes. Otherwise deviations can occur. As soon as a pulse is found, the pulse symbol is displayed.
  • Page 25 • If a connection to the app cannot be established after Risk indicator: ® 30 seconds, the Bluetooth symbol goes out and the blood The measurements can be classified and evaluated in accord- pressure monitor switches off automatically after 3 minutes. ance with the following table. However, these standard values serve only as a general If you forget to turn off the device, it will switch off automati- guideline, as the individual blood pressure varies in different...
  • Page 26: Displaying And Deleting Measurements

    If you press the M2 button, the transfer is cancelled and the Blood pressure Systole Diastole Action measurement data of user memory is displayed. The sym- value category (in mmHg) (in mmHg) bol is no longer shown. The buttons are deactivated as soon as regular monito- High normal 130 –...
  • Page 27: Transferring Measurements

    • To clear the memory of the relevant user memory, you PC is shown on the display. Begin the data must first select a user memory. transfer in the “beurer HealthManager” PC • Start the retrieval of the average values. software. During the data transfer, an anima- •...
  • Page 28: Error Messages/Troubleshooting

    Data transfer at a later point: ® the device to your smartphone using Bluetooth following measurements. • Go to memory mode You will need the “beurer HealthManager” app for this. This is ® • If Bluetooth data trans- (chapter 7). Select the available in the Apple App Store and from Google Play.
  • Page 29: Cleaning And Storing The Device And Cuff

    10. Technical specifications Accessories Instructions for use, 2 x 1.5V AAA bat- teries, storage box Model BC 85 Classification Internal supply, IPX0, no AP or APG, Type BC 80 continuous operation, application part Measurement method Oscillometric, non-invasive blood pres-...
  • Page 30 Customer Services address or found at the end of the in- structions for use. • This device corresponds to the EU Medical Devices Direc- tive 93/42/EEC, the German Medical Devices Act (Mediz- inproduktgesetz) and the standards EN  1060-1 (non-inva- sive sphygmomanometers, Part 1: General requirements), EN ...
  • Page 31: Présentation

    • Tensiomètre avec manchette • 2 piles 1,5 V AAA 1. Présentation • Câble USB Vérifiez que l’emballage du tensiomètre BC 85 de Beurer est • Guide de démarrage rapide intact et que tous les éléments sont inclus. • Boîte de rangement Le tensiomètre de poignet est conçu pour la mesure non in-...
  • Page 32: Conseils Importants

    2. Conseils importants Température et taux d’humidité admissibles Operating pour l’utilisation Symboles utilisés Les symboles suivants sont utilisés sur le mode d’emploi, sur Protéger contre l’humidité l’emballage et sur la plaque signalétique de l’appareil et des accessoires : Numéro de série Attention Le sigle CE atteste de la conformité...
  • Page 33 Communiquez vos résultats à votre médecin, vous ne devez • Utilisez uniquement l’appareil sur des personnes dont le prendre en aucun cas des décisions d’ordre médical sur la périmètre du poignet correspond à celui indiqué pour l’ap- base de ces seules mesures (par ex. le choix de médica- pareil.
  • Page 34 • En cas de non utilisation prolongée de l’appareil, sortez les Consignes de rangement et d’entretien piles du compartiment à piles. • Le tensiomètre est constitué de composants électroniques • Utilisez uniquement des piles identiques ou équivalentes. et de précision. La précision des valeurs mesurées et la du- •...
  • Page 35: Description De L'appareil

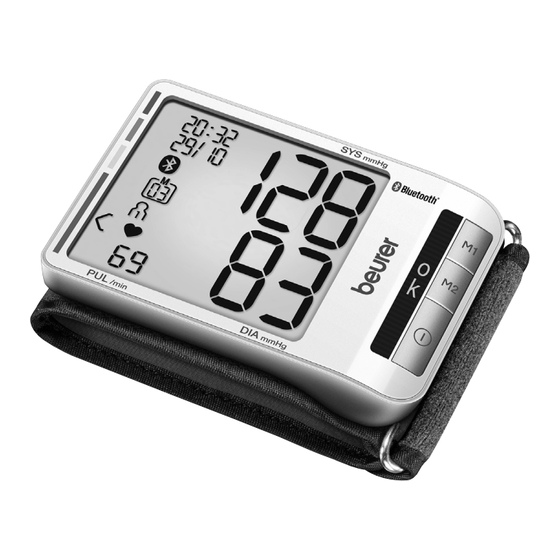
    3. Description de l’appareil Données affichées à l’écran : 1. Indicateur de risque 1. Indicateur de risque 2. Heure et date 2. Interface USB 3. Pression systolique 3. Écran 4. Pression diastolique 4. Indication de position (au niveau du coeur) 5. Symbole du trouble du rythme cardiaque 5.
  • Page 36: Préparation De La Mesure

    Configuration requise pour le logiciel PC « beurer Lorsque le symbole de remplacement des piles clignote HealthManager » et que E6 apparaît, vous ne pouvez plus effectuer de mesure – à partir d’Windows 7 SP1 et vous devez remplacer les piles. Tous les éléments de l’écran s’affichent brièvement et cli- –...
  • Page 37: Bluetooth

    Format de l’heure Heure • Maintenez la touche MARCHE/ARRÊT L’heure clignote à l’écran. enfoncée pendant 5 secondes. • À l’aide des touches mémoire M1/M2, sélec- tionnez l’heure que vous souhaitez et confirmez • À l’aide des touches mémoire M1/M2, sélec- avec la touche MARCHE/ARRÊT tionnez le format d’heure que vous souhaitez et confirmez avec la touche MARCHE/ARRÊT Les minutes clignotent à...
  • Page 38: Mesurer La Tension

    5. Mesurer la tension bien à plat sur le sol. Soutenez impérativement votre bras et pliez-le. Faites attention, dans tous les cas, à ce que la Positionnement de la manchette manchette se trouve au niveau du cœur. Sinon, cela pour- rait entraîner des erreurs considérables.
  • Page 39 Si vous oubliez d’éteindre l’appareil, il s’éteindra automatique- • E_ s’affiche lorsque la mesure n’a pas pu être effectuée cor- ment après environ 3 minutes. Dans ce cas, la valeur est attri- rectement. Lisez le chapitre Message d’erreur/ buée à l’utilisateur de la mémoire choisie ou utilisée en dernier. Résolution des erreurs de ce mode d’emploi et Attendez au moins 5 minutes avant d’effectuer recommencez la mesure.
  • Page 40: Récupérer Et Supprimer Les Valeurs De Mesure

    6. Récupérer et supprimer les valeurs de Ces valeurs ne doivent être utilisées qu’à titre indicatif car la tension artérielle varie selon les personnes, les âges, etc. mesure Il est important de consulter votre médecin de manière régu- Mémoire utilisateur lière.
  • Page 41 Si vous avez sélectionné la mémoire utilisateur 2, vous • Si vous appuyez de nouveau sur la touche mémoire (M1 devez actionner la touche mémoire M2. ou M2), vous pouvez consulter vos mesures individuelles. Valeurs moyennes • Pour éteindre l’appareil, appuyez sur la touche MARCHE/ A clignote à...
  • Page 42: Transfert Des Valeurs Mesurées

    • Si vous souhaitez supprimer d’autres valeurs, répétez la À cet effet, il vous faut l’application « beurer HealthManager ». procédure décrite ci-dessus. Elle est gratuite sur Apple l’App Store ou sur Google Play. Vous pouvez éteindre l’appareil à tout moment en appuyant Pour transférer les valeurs, veuillez suivre les points suivants :...
  • Page 43: Message D'erreur/Résolution Des Erreurs

    ARRÊT , les données • Ne posez pas d’objets lourds sur l’appareil ni sur la man- sont transférées. chette lorsqu’ils sont rangés. Retirez les piles. L’application « beurer HealthManager » doit être activée 10. Caractéristiques techniques pour le transfert. Modèle BC 85...
  • Page 44 • Cet appareil est en conformité avec la norme européenne Mémoire 2 x 60 emplacements de mémoire EN60601-1-2 et répond aux exigences de sécurité spé- Dimensions L 97 mm x l 68 mm x H 22 mm ciales relatives à la compatibilité électromagnétique. Veuil- Poids Environ 108 g (sans les piles) lez noter que les dispositifs de communication HF portables...
  • Page 45 6. Consultar y borrar los valores medidos ......54 Productos suministrados 1. Introducción • Tensiómetro con brazalete Compruebe que el embalaje del tensiómetro Beurer BC 85 • 2 pilas AAA de 1,5 V esté intacto y que su contenido esté completo. • Cable USB El tensiómetro para muñeca sirve para la medición y el control...
  • Page 46: Indicaciones Importantes

    2. Indicaciones importantes Proteger de la humedad Símbolos En las presentes instrucciones de uso, en el embalaje y en la Número de serie placa de características del aparato y de los accesorios se utilizan los siguientes símbolos: El sello CE certifica que este aparato cumple con los requisitos establecidos en la directiva Precaución 93/42/EEC relativa a los productos sanitarios.
  • Page 47 • No utilice el tensiómetro en recién nacidos o pacientes con que el aparato no funcione correctamente, retire el brazalete preeclampsia. Si va a utilizar el tensiómetro durante el em- del brazo. barazo, es recomendable que consulte previamente a su •...
  • Page 48 • Si no va a utilizar el aparato durante un periodo de tiempo Indicaciones de conservación y cuidado prolongado, retire las pilas del compartimento. • El tensiómetro está compuesto por elementos electrónicos • Utilice únicamente el mismo tipo de pila o un tipo equivalente. y de precisión.
  • Page 49: Descripción Del Aparato

    3. Descripción del aparato Indicaciones en la pantalla: 1. Indicador de riesgos 1. Indicador de riesgos 2. Hora y fecha 2. Interfaz USB 3. Presión sistólica 3. Pantalla 4. Presión diastólica 4. Indicador de posicionamiento (altura del corazón) 5. Símbolo de alteración del ritmo cardiaco 5.
  • Page 50: Preparación De La Medición

    Requisitos del sistema para el software para PC “ beurer Cuando el símbolo de cambio de pilas parpadea y apa- Health Manager” rece E6, no se pueden seguir realizando mediciones y se de- – a partir de Windows 7 SP1 ben cambiar todas las pilas.
  • Page 51: Medición De La Presión Arterial

    Formato de hora Los minutos parpadean en la pantalla. • Seleccione con las teclas de memorización M1/ • Mantenga pulsada la tecla de INICIO/PARA- M2 los minutos deseados y confirme con la tecla durante 5 segundos. de INICIO/PARADA • Seleccione con las teclas de memorización Una vez ajustados todos los datos, el aparato se apaga au- M1/M2 el formato de hora deseado y confir- tomáticamente.
  • Page 52 • Cierre el brazalete con el velcro, de forma que el borde su- Medición de la presión arterial perior del aparato quede aprox. 1 cm por debajo de la base Póngase el brazalete como se ha descrito anteriormente y de la mano. colóquese en la postura en la que desea realizar la medición.
  • Page 53 utilizado. En la pantalla aparece el símbolo correspondiente Evaluación de los resultados M1 o M2. Alteraciones del ritmo cardiaco: • Apague el tensiómetro con la tecla de INICIO/PARADA Este aparato es capaz de reconocer eventuales alteraciones De esa forma se memorizará el resultado de la medición en del ritmo cardiaco durante la medición, y en caso de que esto el registro de usuario seleccionado.
  • Page 54: Consultar Y Borrar Los Valores Medidos

    6. Consultar y borrar los valores medidos mal, así como del valor a partir del cual puede considerarse peligroso un incremento de la presión arterial. Registros de usuario La gradación de la pantalla y la escala en el aparato indican en Los resultados de todas las mediciones correctamente reali- qué...
  • Page 55 Si ha seleccionado el registro de usuario 2, deberá • Si vuelve a pulsar la tecla de memorización correspondiente utilizar la tecla de memorización M2. (M1 o M2), podrá consultar sus respectivos valores indivi- duales medidos. Valores medios En la pantalla parpadea A. •...
  • Page 56: Transmisión De Los Valores De Medición

    En la pantalla se visualiza PC. Inicie la Paso 2: Aplicación “beurer HealthManager” transferencia de datos en el software de PC Añada el dispositivo BC 85 en la opción "Einste- “beurer HealthManager”. Durante la transfe- llungen/Meine Geräte" (Ajustes/Mis dispositivos) rencia de datos se visualiza una animación de la aplicación “beurer HealthManager”.
  • Page 57: Mensajes De Error/Solución De Problemas

    • Cuando guarde la unidad y el brazalete, no se deben colo- CIO/PARADA car objetos pesados sobre ellos. Retire las pilas. 10. Características técnicas La aplicación “beurer HealthManager” debe estar Modelo BC 85 activada para realizar la transmisión de datos.
  • Page 58 • Este aparato cumple la norma europea EN60601-1-2 y está Peso Aprox. 108 g (sin pilas) sujeto a las medidas especiales de precaución relativas a Diámetro del brazalete De 135 a 230 mm la compatibilidad electromagnética. Tenga en cuenta que Condiciones de +5 °C hasta +40 °C, 15-93 % de hume- los dispositivos de comunicación de alta frecuencia portáti-...
  • Page 59 • Misuratore di pressione con manicotto Controllare l’integrità esterna della confezione e del contenuto • 2 batterie AAA da 1,5 V del misuratore di pressione BC 85 di Beurer. • Cavo USB Il misuratore di pressione da polso consente la misurazione •...
  • Page 60: Indicazioni Importanti

    2. Indicazioni importanti Proteggere dall’umidità. Spiegazione dei simboli I seguenti simboli sono utilizzati nelle istruzioni per l’uso, Numero di serie sull’imballo e sulla targhetta dell’apparecchio e degli acces- sori: Il marchio CE certifica la conformità ai re- quisiti di base della direttiva 93/42/EEC sui Attenzione dispositivi medici.
  • Page 61 • In caso di difficoltà di circolazione a un braccio a causa di bero una riduzione del flusso sanguigno con il conseguente patologie vascolari croniche o acute (tra cui vasocostrizio- rischio di lesioni. ni), la precisione della misurazione al polso è limitata. In tal •...
  • Page 62 – Non utilizzare l’apparecchio in prossimità di forti campi Indicazioni per la riparazione e lo smaltimento elettromagnetici, tenerlo lontano da impianti radio o tele- • Le batterie non sono rifiuti domestici. Smaltire le batterie foni cellulari. esauste negli appositi punti di raccolta. •...
  • Page 63: Descrizione Dell'apparecchio

    3. Descrizione dell’apparecchio Indicatori sul display: 1. Indicatore di rischio 1. Indicatore di rischio 2. Ora e data 2. Interfaccia USB 3. Pressione sistolica 3. Display 4. Pressione diastolica 4. Indicatore della posizione (altezza cuore) 5. Icona disturbo del ritmo cardiaco 5.
  • Page 64: Preparazione Della Misurazione

    Requisiti di sistema per il software per PC “ beurer Tutti gli elementi del display vengono brevemente visualizzati, Health Manager” sul display lampeggia . A questo punto impostare la data e l’ora come descritto di seguito. – da Windows 7 SP1 –...
  • Page 65: Bluetooth

    Formato ora Sul display lampeggia l’indicazione dei minuti. • Con i pulsanti per la memorizzazione M1/M2 • Tenere premuto il pulsante START/STOP selezionare i minuti desiderati e confermare con per 5 secondi. il pulsante START/STOP • Con i pulsanti per la memorizzazione M1/M2 Dopo avere impostato tutti i dati, l’apparecchio si spegne au- selezionare il formato dell’ora desiderato e tomaticamente.
  • Page 66 • Chiudere il manicotto con la chiusura a strappo in modo che • Per avviare il misuratore di pressione, il bordo superiore dell’apparecchio sia ca. 1 cm dal palmo premere il pulsante START/STOP della mano. Tutte le spie del display si accendono •...
  • Page 67 • Spegnere il misuratore di pressione con il pulsante START/ stema bioelettrico, che controlla il battito cardiaco. I sintomi STOP . In questo modo la misurazione viene memorizza- (battiti cardiaci accelerati o anticipati, polso rallentato o trop- ta nella memoria utente selezionata. po veloce) possono essere determinati tra l’altro da patolo- gie cardiache, età, costituzione, sovralimentazione, stress o ®...
  • Page 68: Ricerca E Cancellazione Dei Valori Misurati

    – Se si desidera visualizzare i dati misurati per la memoria Intervallo dei va- Sistole Diastole Misura da utente , premere il pulsante per la memorizzazione M2. lori di pressione (in mmHg) (in mmHg) adottare Sul display viene visualizzato il valore medio di tutte le misu- Livello 3: Rivolgersi a un ≥...
  • Page 69 Sul display lampeggia l’indicazione AM. Cancellazione dei valori di misurazione • Per cancellare una posizione di memoria di una determina- Viene visualizzato il valore medio degli ta memoria utente è necessario innanzitutto selezionare la ultimi 7 giorni di misurazioni mattutine memoria utente.
  • Page 70: Trasmissione Dei Valori Misurati

    Sul display viene visualizzato PC. Avviare la Fase 2: App „beurer HealthManager“ trasmissione dei dati nel software per PC Aggiungere il BC 85 nell’app „beurer Health- “beurer HealthManager”. Durante la trasmis- Manager“ in "Impostazioni/Miei dispositivi". sione dei dati sul display viene visualizzata un’animazione.
  • Page 71: Messaggi Di Errore/Soluzioni

    10. Dati tecnici L’app “beurer HealthManager” deve essere attivata per la trasmissione. Modello BC 85 Per garantire una trasmissione indisturbata, rimuovere even- Tipo BC 80 tualmente l’involucro protettivo dello smartphone. Avviare la Metodo di Misurazione oscillante e non invasiva trasmissione dati dall’app “beurer HealthManager”.
  • Page 72 sa) e IEC80601-2-30 (Apparecchi elettromedicali Parte 2-30: Accessori Istruzioni per l’uso, 2 batterie AAA Prescrizioni particolari relative alla sicurezza fondamentale da 1,5 V, custodia e alle prestazioni essenziali di sfigmomanometri automatici Classificazione Alimentazione interna, IPX0, non fa non invasivi). parte della categoria AP/APG, funzio- •...
  • Page 73: Teslimat Kapsamı

    6. Ölçüm değerlerini görüntüleme ve silme ......82 Teslimat kapsamı 1. Ürün özellikleri • Manşetli tansiyon ölçme cihazı Beurer BC 85 tansiyon ölçme cihazının ambalajının dıştan ha- • 2 adet 1,5V AAA pil sar görmemiş ve içeriğin eksiksiz olduğundan emin olun. • USB kablosu El bileğine takılan tansiyon ölçme cihazı, yetişkinlerin atarda-...
  • Page 74: Önemli Yönergeler

    2. Önemli yönergeler Nemden koruyunuz İşaretlerin açıklaması Cihazın ve aksesuarların kullanım kılavuzunda, ambalajında ve Seri numarası model etiketinde aşağıdaki semboller kullanılır: CE işareti, tıbbi ürünler için 93/42/EEC Dikkat yönetmeliğinin temel şartları ile uyumluluğu belgeler. Rusya ve Bağımsız Devletler Topluluğu ül- Açıklama kelerine ihraç...
  • Page 75 • Tansiyon ölçme cihazını yeni doğan bebeklerde ve preek- • Manşette sürekli basınç olmasını önleyin ve sık ölçümlerden lampsi hastalarında kullanmayın. Tansiyon ölçme cihazını kaçının. Kan akışının bunun sonucunda kısıtlanması halinde hamilelikte kullanmadan önce bir doktora danışmanızı tavsi- yaralanmalar meydana gelebilir. ye ederiz.
  • Page 76 – Cihazı güçlü elektromanyetik alanların yakınında kullan- • Cihazın içini açmayın. Bu husus dikkate alınmadığı takdirde mayın ve radyo sistemlerinden veya cep telefonlarından garanti geçerliliğini yitirir. uzak tutun. • Cihazı kendiniz onarmayın veya ayarlamayın. Aksi halde ci- • Cihaz uzun bir süre kullanılmayacaksa pilleri çıkarmanız hazın kusursuz çalışması...
  • Page 77: Cihaz Açıklaması

    3. Cihaz açıklaması Ekrandaki göstergeler: 1. Risk endikatörü 1. Risk endikatörü 2. Saat ve tarih 2. USB bağlantı noktası 3. Sistolik tansiyon 3. Ekran 4. Diyastolik tansiyon 4. Konumlandırma göstergesi (kalp yüksekliği) 5. Kalp ritmi bozukluğu sembolü 5. Hafıza tuşu M1 Nabız sembolü...
  • Page 78: Ölçüme Hazırlık

    Beurer bilgisayar yazılımı “ beurer Health Manager” için Tüm ekran öğeleri kısaca gösterilir, ekranda yanıp söner. sistem gereksinimleri Şimdi aşağıda belirtildiği şekilde tarihi ve saati ayarlayın. – Windows 7 SP1 ve üzeri Pillerin elden çıkarılması – USB 2.0 ve üzeri (Type-A) •...
  • Page 79: Bluetooth

    ® Tarih Bluetooth üzerinden aktarımda pil ile çalışma süresi aza- lır. Ekranda yıl göstergesi yanıp söner. • M1/M2 hafıza tuşu ile istediğiniz yılı seçin 5. Tansiyon ölçme ve START/STOP tuşu ile onaylayın Manşeti takma Ekranda ay göstergesi yanıp söner. • M1/M2 hafıza tuşu ile istediğiniz ayı seçin ve START/STOP tuşu ile onaylayın Ekranda gün göstergesi yanıp söner.
  • Page 80 mutlaka destekleyin ve bükün. Manşetin kalp yüksekliğine • Ölçüm, usulüne uygun şekilde gerçekleştirilemediğinde gö- rüntülenir E_. Bu kullanım kılavuzundaki Hata gelmesine mutlaka dikkat edin. Aksi takdirde ciddi sapma- lar meydana gelebilir. Kolunuzu ve el ayalarınızı gevşetin. iletisi/Arıza giderme bölümüne bakın ve ölçümü Daha fazla yardım için cihaza, tansiyon ölçme aletinin tekrarlayın.
  • Page 81 Sonuçları değerlendirme Ekrandaki sınıflandırma ve cihazdaki skala, tespit edilen tansi- yonun hangi aralıkta olduğunu gösterir. Sistol ve diyastol de- Kalp ritim bozuklukları: ğerleri iki farklı aralıkta ise (örn. sistol “Yüksek normal” aralığın- Bu cihaz ölçüm esnasında olası kalp ritim bozukluklarını tespit da ve diyastol “Normal”...
  • Page 82: Ölçüm Değerlerini Görüntüleme Ve Silme

    6. Ölçüm değerlerini görüntüleme ve silme Ortalama değerler Ekranda A sembolü yanıp söner. Kullanıcı hafızası Başarılı her ölçümün sonuçları, tarih ve saat ile birlikte kayde- Bu kullanıcı hafızasında kayıtlı olan tüm dilir. 60’tan fazla ölçüm verisi kaydedildiğinde en eski ölçümün ölçüm değerlerinin ortalaması...
  • Page 83: Ölçüm Değerlerinin Aktarılması

    Ölçülen ve cihazda kayıtlı olan değerleri Bluetooth üzerinden tekrarlayın. akıllı telefonunuza aktarabilirsiniz. BAŞLAT/DURDUR düğmesine basarak cihazı kapatabi- Bunun için “beurer HealthManager” uygulaması gereklidir. Bu lirsiniz. uygulama, Apple App Store’da ve Google Play’de bulunmak- tadır. Değerleri aktarmak için aşağıdaki adımları izleyin: ®...
  • Page 84: Hata Iletisi/Arıza Giderme

    Hata olduğunda ekranda E_ hata iletisi görüntülenir. “beurer HealthManager” uygulamasında Şu durumlarda hata iletileri görüntülenebilir: “Ayarlar / Cihazlarım” altından BC 85’yi ekle- • Nabız saptanamadığında: E 1; yin. • Ölçüm sırasında hareket ettiğinizde veya konuştuğunuzda: E2 ; • Manşet çok sıkı veya çok gevşek takıldığında: E3;...
  • Page 85: Teknik Veriler

    10. Teknik veriler Sınıflandırma Dahili besleme, IPX0, AP veya APG yok, devamlı kullanım, uygulama par- Model BC 85 çası tip BF BC 80 Veri aktarma Frekans bandı 2402MHz – 2480MHz Ölçüm yöntemi El bileğinden, titreşimli, invazif olmayan Verici gücü maks. 0 dBM tansiyon ölçümü...
  • Page 86 • Bu tansiyon ölçme cihazının doğruluğu dikkatli bir şekilde kontrol edilmiştir ve cihaz uzun bir kullanım ömrüne yönelik olarak geliştirilmiştir. Cihazın tedavi amacıyla kullanılması halinde, uygun araçlar- la ölçüm kontrolleri yapılmalıdır. Doğruluk kontrolü ile ayrın- tılı bilgileri servis adresinden talep edebilirsiniz. •...
  • Page 87: Комплект Поставки

    1. Для ознакомления • USB-кабель Проверьте комплектность поставки прибора для измере- • Краткое руководство пользователя ния кровяного давления Beurer BС 85 и убедитесь в том, • Коробка для хранения что на упаковке нет внешних повреждений. • Инструкция по применению Прибор для измерения кровяного давления на запястье...
  • Page 88: Важные Указания

    2. Важные указания Допустимая рабочая температура и Operating влажность воздуха Пояснения к символам В инструкции по применению, на упаковке и на типовой Хранить в сухом месте табличке прибора и принадлежностей используются сле- дующие символы: Серийный номер Осторожно! Символ CE подтверждает соответствие основным...
  • Page 89 • Результаты измерений, полученные Вами самостоя- также возможны при пониженном кровяном давлении, тельно, предназначены исключительно для Вас и не мо- диабете, нарушениях кровоснабжения и сердечного гут заменить медицинского обследования! ритма, при ознобе или треморе. Обсудите результаты Ваших измерений с врачом, ни в •...
  • Page 90 • В целях экономии энергии батареек прибор для изме- ими. Поэтому батарейки необходимо хранить в недо- рения кровяного давления отключается автоматически, ступном для детей месте! если в течение 2 минут не была нажата ни одна кнопка. • Обращайте внимание на обозначение полярности: плюс •...
  • Page 91: Описание Прибора

    3. Описание прибора ставителями. Перед предъявлением претензий про- верьте и при необходимости замените батарейки. 1. Индикатор риска • В интересах защиты окружающей среды 2. Интерфейс USB по  окончании срока службы следует утилизи- 3. Дисплей ровать прибор отдельно от  бытового мусора. 4. Индикация положения (на высоте сердца) Утилизация...
  • Page 92: Подготовка К Измерению

    2. Время и дата – начиная с Windows 7 SP1 3. Систолическое давление – начиная с USB 2.0 (Type-A) 4. Диастолическое давление Системные требования для приложения « beurer 5. Символ нарушения сердечного ритма Health Manager» Символ пульса – iOS ≥ 8.0, Android ≥...
  • Page 93 Формат времени Если мигает символ смены батарейки или на дис- плее появляется E6, то проведение измерений невозмож- • Удерживайте кнопку START/STOP нажа- но, следует полностью заменить батарейки. той в течение 5 секунд. Все элементы дисплея отобразятся на короткое время, на • С помощью кнопок сохранения M1/M2 вы- дисплее...
  • Page 94: Измерение Кровяного Давления

    На дисплее замигает число минут. • Зафиксируйте манжету с помощью застежки-липучки • С помощью кнопок сохранения M1/M2 выбе- таким образом, чтобы верхний край прибора находил- рите нужное число минут и подтвердите вы- ся ниже подушечки у основания большого пальца руки бор...
  • Page 95 Измерение кровяного давления дет сохранен в пользовательской памяти последнего пользователя. На дисплее появляется соответствующий Наложите манжету, как описано выше, и займите удоб- символ M1 или M2. ное для измерения положение. • Выключите прибор для измерения кровяного давления, • Для запуска прибора для измерения нажав...
  • Page 96 Оценка результатов давления у  разных людей варьируются в  зависимости от принадлежности к той или иной возрастной группе и т. п. Нарушения сердечного ритма Важно регулярно консультироваться с врачом. Врач опреде- Данный прибор во время измерения может идентифици- лит Ваши индивидуальные значения нормального кровяного ровать возможные нарушения сердечного ритма и при их давления, а также...
  • Page 97: Просмотр И Удаление Результатов Измерения

    На дисплее появится среднее значение всех измерений. Диапазон Систолическое Диастолическое Рекомендуе- ® Если Bluetooth активирован (на дисплее отображается значений давление давление мые меры кровяного (в мм рт. ст.) (в мм рт. ст.) мигающий символ ), прибор для измерения кровяного давления давления пытается установить соединение с приложе- Высокое 130–139 85–89 регулярное...
  • Page 98 На дисплее замигает AM. Удаление результатов измерения • Для удаления содержимого соответствующей пользова- Отобразится среднее значение тельской памяти выберите пользовательскую память. результатов утренних измерений за • Запустите запрос средних результатов измерений. последние 7 дней (утро: 5.00–9.00). • Нажмите обе кнопки сохранения M1 или M2 и удержи- •...
  • Page 99: Передача Результатов Измерения

    на рис. 1. Если во время передачи данных Шаг 2: Приложение «beurer произошла ошибка, на дисплее появится HealthManager» соответствующее сообщение, представ- Добавьте BC 85 в  приложении «beurer ленное на рис. 2. В этом случае прервите HealthManager» в разделе «Настройки/Мои соединение с компьютером и перезапу- рис. 2 устройства».
  • Page 100: Технические Данные

    • батарейки почти разряжены Шаг 4: BC 85 Шаг 4: BC 85 ® • не удалось передать данные по Bluetooth Передача данных сразу Передача данных в другое после измерения: время: В таких случаях выполните повторное измерение. Помни- • Если активирована • Перейдите в режим вы- те, что...
  • Page 101 Точность индикации ± 3 мм рт. ст. для систолического, Передача данных Частотный диапазон 2402 МГц – ± 3 мм рт. ст. для диастолического, 2480 МГц пульс ± 5 % от указываемого зна- Мощность передатчика макс. 0 дБМ чения Прибор для измерения кровяного ® давления работает с Bluetooth Погрешность Максимально допустимое стандарт- energy technology измерения...
  • Page 102: Гарантия

    11. Гарантия приборы, часть 2-30: особые предписания по обеспече- нию безопасности, включая основные характеристики Мы предоставляем гарантию на дефекты материалов и из- автоматизированных неинвазивных приборов для из- готовления этого прибора на срок 36 месяцев со дня про- мерения кровяного давления). дажи...
  • Page 103: Informacje O Urządzeniu

    6. Odczyt i usuwanie wyników pomiaru ......112 W komplecie 1. Informacje o urządzeniu • Ciśnieniomierz z mankietem Ciśnieniomierz Beurer BC 85 należy sprawdzić pod kątem ze- • 2 baterie AAA 1,5 V wnętrznych uszkodzeń opakowania oraz kompletnej zawartości. • Kabel USB Ciśnieniomierz nadgarstkowy służy do nieinwazyjnego pomia- •...
  • Page 104: Ważne Wskazówki

    2. Ważne wskazówki Chronić przed wilgocią Objaśnienie symboli W instrukcji obsługi, na opakowaniu i tabliczce znamionowej Numer seryjny urządzenia oraz akcesoriów znajdują się następujące symbole: Oznakowanie CE potwierdza zgodność z Uwaga zasadniczymi wymogami dyrektywy 93/42/ EEC w sprawie wyrobów medycznych. Oznakowanie certyfikacyjne dla produktów Wskazówka eksportowanych do Federacji Rosyjskiej...
  • Page 105 ciążowe. Przed zastosowaniem ciśnieniomierza w czasie • Mankietu nie należy zakładać na ramię, w którym leczone ciąży zaleca się konsultację z lekarzem. są tętnice i żyły, np. angioplastyka/terapia naczyń krwiono- • W przypadku problemów z ukrwieniem ręki w wyniku chro- śnych czy przetoka tętniczo-żylna (AV).
  • Page 106 • Jeśli urządzenie nie będzie używane przez dłuższy czas, • Nie otwierać urządzenia. Nieprzestrzeganie powyższych za- należy wyjąć baterie. sad powoduje utratę gwarancji. • Nie naprawiać ani nie regulować samodzielnie urządzenia. Wskazówki dotyczące postępowania z bateriami W przeciwnym razie nie można zagwarantować prawidło- wego działania.
  • Page 107: Opis Urządzenia

    3. Opis urządzenia Informacje na wyświetlaczu: 1. Wskaźnik ryzyka 1. Wskaźnik ryzyka 2. Godzina i data 2. Złącze USB 3. Ciśnienie skurczowe 3. Wyświetlacz 4. Ciśnienie rozkurczowe 4. Wskaźnik ustawienia (wysokość serca) 5. Symbol zaburzeń rytmu serca 5. Przycisk pamięci M1 Symbol tętna 6.
  • Page 108: Przygotowanie Do Pomiaru

    Program „ beurer Health Manager” — wymagania Na krótko wyświetlą się wszystkie elementy wyświetlacza, na systemowe wyświetlaczu miga wskazanie . Ustaw zgodnie z poniż- szym opisem datę i godzinę. – od Windows 7 SP1 – od USB 2.0 (Type-A) Utylizacja baterii Wymagania systemowe dla aplikacji „beurer Health-...
  • Page 109: Pomiar Ciśnienia Tętniczego

    • Za pomocą przycisków pamięci M1/M2 ustaw odpowiedni • Za pomocą przycisków pamięci M1/M2 ustaw odpo- format godziny, a następnie potwierdź przyciskiem START/ wiednią liczbę minut, a następnie potwierdź przyciskiem STOP START/STOP Po ustawieniu wszystkich danych urządzenie wyłączy się au- Data tomatycznie.
  • Page 110 • Mankiet musi ściśle przylegać do nadgarstka, lecz nie powi- Pomiar ciśnienia tętniczego krwi nien być zapięty zbyt mocno. Załóż mankiet zgodnie z powyższym opisem i przyjmij pozy- cję, w której ma być dokonany pomiar. Prawidłowa pozycja ciała • Aby włączyć ciśnieniomierz, naciśnij •...
  • Page 111 roby są przedwczesne uderzenia serca lub ich brak, a także • Wyłącz urządzenie za pomocą przycisku START/STOP zbyt wolne lub zbyt szybkie tętno. Przyczyny to m.in. choroby Spowoduje to zapisanie wyniku pomiaru w wybranej pamięci. serca, podeszły wiek, predyspozycje wynikające z budowy ®...
  • Page 112: Odczyt I Usuwanie Wyników Pomiaru

    zakres – w opisywanym przykładzie będzie to ciśnienie „Nor- – Jeśli chcesz wyświetlić dane pomiarów malne wysokie”. z danej pamięci użytkownika naci- śnij przycisk pamięci M1. Zakres wartości Ciśnienie Ciśnienie Rozwiązanie – Jeśli chcesz wyświetlić dane pomia- ciśnienia skur- rozkur- rów z  danej pamięci użytkownika czowe czowe naciśnij przycisk pamięci M2.
  • Page 113: Przenoszenie Danych Pomiarowych

    Na wyświetlaczu będzie migać symbol AM. • Uruchom odczyt wartości średnich. • Przytrzymaj wciśnięte przyciski pamięci M1 lub M2 przez Zostanie wyświetlona średnia wartość 5 sekund. z ostatnich 7 dni pomiarów porannych Na wyświetlaczu pojawią się symbole CL (rano: godz. 5.00–9.00). i 00.
  • Page 114 ® Krok 4: BC 85 Krok 4: BC 85 czenie Bluetooth W  tym celu wymagane jest zastosowanie aplikacji „beurer Transmisja danych bezpo- Transmisja danych w póź- Health Manager”. Istnieje możliwość pobrania za pośrednic- średnio po zakończeniu po- niejszym terminie: twem Apple App Store i Google Play.
  • Page 115: Komunikaty Błędów/Usuwanie Błędów

    Aplikacja „beurer HealthManager” musi być aktywna • Na urządzeniu i mankiecie nie wolno stawiać ciężkich w celu wykonania transmisji. przedmiotów. Wyjąć baterie. W celu zapewnienia sprawnego przenoszenia danych zdejmij 10. Dane techniczne etui ze smartfonu. Rozpocznij transmisję danych w  aplikacji Model BC 85 „beurer HealthManager”.
  • Page 116 sfigmomanometry – Część  3: Wymagania dodatkowe do- Trwałość baterii Ok. 300 pomiarów, w zależności od tyczące elektromechanicznych systemów do pomiaru ci- wysokości ciśnienia tętniczego lub ci- śnienia krwi) oraz IEC80601-2-30 (Medyczne urządzenia śnienia pompowania elektryczne, część 2–30: Szczególne ustalenia dotyczące Akcesoria Instrukcja obsługi, 2 baterie 1,5 V AAA, bezpieczeństwa wraz z istotnymi danymi z zakresu wydaj-...
  • Page 117: Electromagnetic Compatibility Information

    Electromagnetic Compatibility Information Guidance and manufacture’s declaration – electromagnetic emissions – for all EQUIPMENT and SYSTEMS Guidance and manufacture’s declaration – electromagnetic emission The BC85 blood pressure monitor is intended for use in the electromagnetic environment specified below. The customer of the user of the BC85 blood pressure monitor should assure that it is used in such and environment.
  • Page 118 Guidance and manufacture’s declaration – electromagnetic immunity – for EQUIPMENT and SYSTEMS that are not LIFE-SUPPORTING Guidance and manufacture’s declaration – electromagnetic immunity The BC85 blood pressure monitor is intended for use in the electromagnetic environment specified below. The customer or the user of the BC85 blood pressure monitor should assure that it is used in such an environment.
  • Page 119 Recommended separation distances between portable and mobile RF communications equipment and the EQUIPMENT or SYSTEM – for EQUIPMENT or SYSTEM that are not LIFE-SUPPORTING Recommended separation distances between portable and mobile RF communications equipment and the BC85 blood pressure monitor The BC85 blood pressure monitor is intended for use in an electromagnetic environment in which radiated RF disturbances are control- led.
  • Page 120 ® The Bluetooth word mark and logos are registered trademarks owned by Bluetooth SIG,Inc. and any use of such marks by Beurer GmbH is under license. Other trademarks and trade names are those of their respective owners. Apple and the Apple logo are trademarks of Apple Inc., registered in the U.S. and other countries. App Store is a service mark of Apple Inc., registered in the U.S.

Table des Matières