Panasonic AW-RP50E Mode D'emploi
Masquer les pouces
Voir aussi pour AW-RP50E:
- Mode d'emploi (100 pages) ,
- Mode d'emploi (84 pages) ,
- Mode d'emploi (228 pages)

Manuels Connexes pour Panasonic AW-RP50E


Sommaire des Matières pour Panasonic AW-RP50E
-
Page 94: Organisation Des Modes D'emploi De Ce Modèle
All manuals and user guides at all-guides.com VERSION FRANÇAISE (FRENCH VERSION) Table des matières Avant utilisation ............2 Retour des caméras distantes à leur position initiale ....20 Réglage de la vitesse de Pan, Tilt, zoom et mise au point ..20 Vue générale ................2 Rég lage de la plage de mouvement de la caméra distante Marques commerciales et marques commerciales déposées ..2... -
Page 95: Avant Utilisation
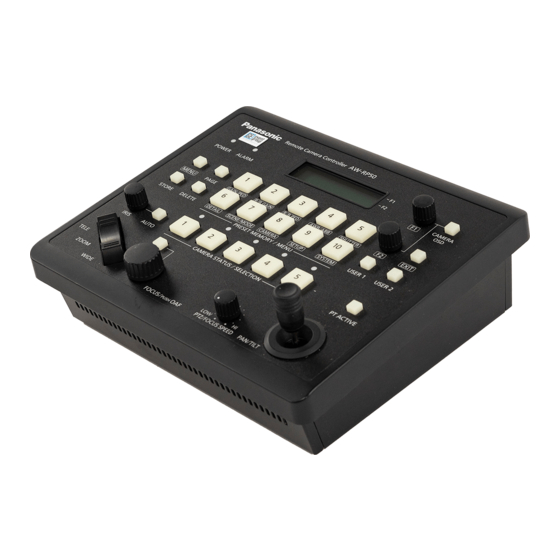
Vue générale Déni de la garantie EN AUCUN CAS Panasonic System Networks Co., Ltd. Cet appareil est une commande conçue pour la caméras NE SERA TENU POUR RESPONSABLE POUR TOUTE distantes (caméras avec tête de panoramique horizontal/ PARTIE OU TOUTE PERSONNE, À... -
Page 96: Comment Mettre Les Caméras Distantes Sous Et Hors Tension
All manuals and user guides at all-guides.com Comment mettre les caméras distantes sous et hors tension Comment mettre les caméras Mise sous tension de plusieurs caméras distantes sous tension Suivre l’une des procédures ci-dessous pour mettre les Régler le bouton MENU à ON. caméras distantes sous tension. - Page 97 All manuals and user guides at all-guides.com Comment mettre les caméras distantes sous et hors tension Comment mettre les caméras Mise hors tension de plusieurs caméras distantes hors tension Suivre l’une des procédures ci-dessous pour mettre les Régler le bouton MENU à ON. caméras distantes hors tension.
-
Page 98: Réglage Et Utilisation Des Mémoires Préréglées
All manuals and user guides at all-guides.com Réglage et utilisation des mémoires préréglées Cet appareil est pourvu d’une fonction permettant 4, 5 l’enregistrement des positions à filmer par les caméras distantes et des réglages des caméras distantes eux- mêmes. Jusqu’à 100 jeux de données (préréglages) peuvent être MENU PAGE GAIN/PED... -
Page 99: Exécution Des Données Préréglées
All manuals and user guides at all-guides.com Réglage et utilisation des mémoires préréglées Exécution des données Suppression des données de préréglées mémoires préréglées Remarque Appuyer sur un des boutons 1 à 5 CAMERA Cette fonction ne fonctionne pas avec le AW-PH400. STATUS/SELECTION pour sélectionner la caméra distante à... -
Page 100: Sélection Des Réglages Pour Une Caméra Distante Sélectionnée
All manuals and user guides at all-guides.com Sélection des réglages pour une caméra distante sélectionnée Réglage du niveau de noir Les réglages et ajustements suivants peuvent être exécutés pour une caméra distante sélectionnée directement à cet Effectuer l’ajustement du niveau de noir pour rendre les appareil. -
Page 101: Réglage De La Balance Des Blancs
All manuals and user guides at all-guides.com Sélection des réglages pour une caméra distante sélectionnée Réglage de la balance des blancs Les modes sélectionnables varient selon les caméras distantes connectées. Le rapport entre les RGB (les trois couleurs primaires) est ajusté... - Page 102 All manuals and user guides at all-guides.com Sélection des réglages pour une caméra distante sélectionnée A l’exécution de l’ajustement automatique, les détails Ajustement automatique de la balance des blancs suivants s’affichent au panneau LCD. Définir l’ajustement automatique si la coloration semble AWB ACTIVE: peu naturelle sous certaines sources lumineuses ou Apparaît pendant l’exécution de AWB.
- Page 103 All manuals and user guides at all-guides.com Sélection des réglages pour une caméra distante sélectionnée Ajustement manuel de la balance des blancs Ajustement des blancs en suivi automatique (ATW) (Réglage des valeurs de gain R et B) Cette fonction assure automatiquement la compensation de Comme pour l’ajustement automatique, remplir sorte que la balance des blancs est ajustée, même quand la source lumineuse ou la température de la couleur change...
-
Page 104: Réglage De La Balance Des Noirs
All manuals and user guides at all-guides.com Sélection des réglages pour une caméra distante sélectionnée Réglage de la balance des noirs Ajustement manuel de la balance des noirs (Réglage du niveau de noir R et B) La balance des noirs doit être ajustée au premier emploi d’une caméra distante ou quand la caméra distante est Connecter un moniteur de forme d’onde ou restée inutilisée pendant une période prolongée. -
Page 105: Réglage De La Vitesse D'obturation
All manuals and user guides at all-guides.com Sélection des réglages pour une caméra distante sélectionnée Réglage de la vitesse Réglage du détail d’obturation Le détail (netteté de l’image) est ajustable. Le mode d’obturation et la vitesse d’obturation de la caméra Régler le bouton MENU à... -
Page 106: Sélection Du Mode De Prise De Vues
All manuals and user guides at all-guides.com Sélection des réglages pour une caméra distante sélectionnée Sélection du mode de prise de Spécifications des barres de vues mire Sélectionner le mode de prise de vues correspondant aux Les images à... -
Page 107: Opération Des Items De Menu De La Caméra Distante Sélectionnée
All manuals and user guides at all-guides.com Opération des items de menu de la caméra distante sélectionnée Les opérations de menu des caméras distantes peuvent être exécutées à partir de l’appareil pour la caméra distante sélectionnée. Le bouton CAMERA OSD, et les cadrans F1 et F2 sont utilisés pour ces opérations. Quand le bouton CAMERA OSD est pressé, son indicateur s’allume, et le menu sur écran de la caméra distante sélectionnée s’affiche comme image de sortie de la caméra distante. -
Page 108: Réglage Des Boutons User
All manuals and user guides at all-guides.com Réglage des boutons USER Des items de menu peuvent être assignés aux deux Enregistrement des fonctions boutons USER (USER1, USER2). dans les boutons USER La fonction cible peut être activée simplement en appuyant sur le bouton USER (USER1 ou USER2). -
Page 109: Réglages De Signalisation (Tally)
All manuals and user guides at all-guides.com Réglages de signalisation (Tally) Régler Activé (On) ou Inactivé (Off) pour Tally ON qui fournit des instructions Tally à la caméra distante en réponse aux demandes Tally reçues via le GPI et le réseau. Régler le bouton MENU à... -
Page 110: Réglage Des Fonctions
All manuals and user guides at all-guides.com Réglage des fonctions Cette section décrit comment régler les fonctions de Tourner le cadran F1 pour sélectionner l’item l’appareil. Les fonctions suivantes sont réglables. de menu cible. Réglage des opérations des caméras distantes 1.PAN DIR ▼... -
Page 111: Réglage Des Opérations Des Caméras Distantes
All manuals and user guides at all-guides.com Réglage des fonctions Réglage des opérations des caméras distantes Régler ces opérations en sélectionnant le menu [SETUP], Réglage des directions de zooming puis le menu [OPERATE]. Au menu [SETUP], sélectionner [OPERATE] et afficher [4]OPERATE [ZOOM DIR]. - Page 112 All manuals and user guides at all-guides.com Réglage des fonctions Réglages quand la caméra Commutation du contrôle de la mise au distante bouge horizontalement ou point au contrôle de l’iris, et vice versa verticalement pendant la prise de vue Il est possible de commuter le contrôle, qui se fait par téléobjectif opérations de cadran et boutons, du contrôle de la mise au...
-
Page 113: Réglage De La Vitesse De Passage À La Position Réglée Par La Mémoire Préréglée
All manuals and user guides at all-guides.com Réglage des fonctions Réglage de la vitesse de Retour des caméras distantes à passage à la position réglée leur position initiale par la mémoire préréglée Les caméras distantes connectées peuvent être remises à leur position initiale. -
Page 114: Réglage De La Plage De Mouvement De La Caméra Distante (Fonction Limiteur)
All manuals and user guides at all-guides.com Réglage des fonctions Réglage de la plage de mouvement de la caméra distante (fonction limiteur) Cet appareil est pourvu d’une fonction limiteur qui limite la Affichage apparaissant avec une autre caméra distante plage de mouvement des caméras distantes. - Page 115 All manuals and user guides at all-guides.com Réglage des fonctions Réglage de la limite gauche Réglage de la limite droite Au menu [SETUP], sélectionner [PTZ ADJ] et afficher Au menu [SETUP], sélectionner [PTZ ADJ] et afficher [LIMIT LEFT].
-
Page 116: Contrôle Des Périphériques Connectés Aux Caméras Distantes
All manuals and user guides at all-guides.com Réglage des fonctions Contrôle des périphériques connectés aux caméras distantes Les dispositifs périphériques listés ci-dessous peuvent être Contrôle d’un balai contrôlés s’ils sont connectés aux caméras distantes. • Filtre ND • Balai Cet item set à... -
Page 117: Réglage De La Vitesse Minimale De Démarrage Du Zoom
All manuals and user guides at all-guides.com Réglage des fonctions Réglage de la vitesse minimale Exercice du contrôle extérieur de démarrage du zoom sur les données de mémoire préréglée Ce réglage assure que le zoom commencera à bouger régulièrement en fonction du degré... -
Page 118: Verrouillage Des Opérations Des Boutons
All manuals and user guides at all-guides.com Réglage des fonctions Verrouillage des opérations des Réglage du contre-jour du boutons panneau LCD Ceci invalide l’opération du bouton CAMERA OSD et des Le contre-jour du panneau LCD est ajustable. boutons PRESET MEMORY/MENU (1 à... -
Page 119: Réglage De La Liaison Avec Le Commutateur
All manuals and user guides at all-guides.com Réglage de la liaison avec le commutateur Ce réglage sert à connecter l’appareil à un commutateur Tourner le cadran F2, sélectionner l’adresse IP, optionnel (AW-HS50). puis appuyer dessus pour entrer la sélection. Pour relier l’appareil avec le commutateur, les réglages Régler l’adresse IP qui a été... -
Page 120: Réglage De La Liaison
All manuals and user guides at all-guides.com Réglage de la liaison avec le commutateur Réglage de la liaison Régler le bouton MENU à ON. Appuyer sur le bouton MENU pour allumer son indicateur. Régler le bouton 9 PRESET MEMORY/MENU (SETUP) à... -
Page 121: Réglage Des Fonctions Quand L'appareil Est Relié Au Commutateur
All manuals and user guides at all-guides.com Réglage des fonctions quand l’appareil est relié au commutateur Régler les différentes fonctions à utiliser quand l’appareil est Tourner le cadran F2, sélectionner la caméra relié au commutateur. distante, puis appuyer sur le cadran F2 pour entrer la sélection. -
Page 122: Réglages Du Commutateur
All manuals and user guides at all-guides.com Réglage des fonctions quand l’appareil est relié au commutateur Réglages du commutateur Tourner le cadran F2, sélectionner les réglages, puis appuyer dessus pour changer le Un réglage pour le contrôle du commutateur connecté à réglage. - Page 123 All manuals and user guides at all-guides.com Réglage des fonctions quand l’appareil est relié au commutateur Réglage de bus Réglage de l’information de caméra distante Au menu [SETUP], sélectionner [SW LINK] et afficher Au menu [SETUP], sélectionner [SW LINK] et afficher [BUS].
- Page 124 All manuals and user guides at all-guides.com Réglage des fonctions quand l’appareil est relié au commutateur Les réglages suivants liés à Tally peuvent être établis au Réglage OA Tally menu. Au menu [SETUP], sélectionner [SW LINK] et afficher Activation/désactivation des instructions [TALLY_IP].
-
Page 125: Réglage Pour L'information À Afficher À L'osd
All manuals and user guides at all-guides.com Réglage des fonctions quand l’appareil est relié au commutateur Réglage pour l’information à Tourner le cadran F2 pour sélectionner On ou Off, puis appuyer dessus pour entrer la afficher à l’OSD sélection. - Page 126 All manuals and user guides at all-guides.com Réglage des fonctions quand l’appareil est relié au commutateur Réglage de chaque item d’information à Valeur d’iris afficher Au menu [SETUP], sélectionner [SW DISP] et afficher [IRIS]. Puis régler à On ou Off. Format vidéo 7.IRIS Au menu [SETUP], sélectionner [SW DISP] et afficher...
-
Page 127: Contrôle De L'information D'alarme De L'équipement
All manuals and user guides at all-guides.com Contrôle de l’information d’alarme de l’équipement Il est possible de contrôler les états d’alarme de l’appareil [Sélectionner POWER] et des caméras distantes assignées aux boutons CAMERA L’état d’alarme de l’alimentation peut être contrôlé. STATUS/SELECTION. -
Page 128: Remise De L'appareil Aux Réglages Usine
All manuals and user guides at all-guides.com Remise de l’appareil aux réglages usine L’appareil peut être remis à ses réglages usine. Deux méthodes sont utilisables: l’une retourne tous les Tourner le cadran F2 pour sélectionner le réglages aux réglages usine, et l’autre retourne seulement mode d’initialisation. -
Page 129: Interface De Contrôle Pour Les Dispositifs Extérieurs
All manuals and user guides at all-guides.com Interface de contrôle pour les dispositifs extérieurs TALLY/GPI TALLY IN 1 à TALLY IN 5 sont des ports d’entrée de contact utilisés pour (D-sub 15 broches, femelle, filet en pouces) allumer les témoins Tally de l’appareil (au-dessus des boutons CAMERA STATUS/SELECTION). -
Page 130: Logiciel D'implantation
All manuals and user guides at all-guides.com Logiciel d’implantation Le “Setup Software” est une application qui permet d’exécuter les mêmes fonctions que les réglages IP automatiques de l’appareil à partir de l’ordinateur hôte. Il est utilisé pour régler l’environnement du réseau pour l’opération des caméras distantes à partir de l’ordinateur hôte. Il peut sauvegarder les fichiers de données de réglages dans l’ordinateur hôte, et charger les fichiers sauvegardés et les répercuter dans l’environnement du réseau. - Page 131 All manuals and user guides at all-guides.com Logiciel d’implantation Affichage de l’onglet “Setting” Case de liste SW Input L’adresse IP du AW-RP50 connecté au réseau est Les connecteurs d’entrée du commutateur sont affichés affichée ici. dans cette colonne. L’information de l’environnement de réseau établie par le Le connecteur d’entrée peut être changé...
- Page 132 All manuals and user guides at all-guides.com Logiciel d’implantation Réglage IP automatique Changement des numéros de caméra distante Quand les adresses IP doivent être changées Les numéros de caméra distante réglés pour les caméras distantes peuvent être changés. Cliquer sur [RENEW].
-
Page 133: Sauvegarde Et Chargement De Données
All manuals and user guides at all-guides.com Logiciel d’implantation Sauvegarde et chargement de données A l’écran de l’onglet “File Operate”, les fichiers à réglages d’environnement de réseau sont sauvegardés et chargés. Chargement des fichiers des réglages Charger les fichiers avec données de réglage d’environnement de réseau. -
Page 134: Référence À L'environnement De Réseau
All manuals and user guides at all-guides.com Logiciel d’implantation Référence à l’environnement de réseau A l’onglet “IP Address”, il est possible de sélectionner les adresses IP des autres télécommandes de caméras distantes AW-RP50 qui ont été connectées dans le réseau. Référence aux informations sur l’environnement du réseau créées par les unités AW-RP50 sélectionnés peut être faite à... -
Page 135: Tableau Des Items De Menus
All manuals and user guides at all-guides.com Tableau des items de menus Bouton Items de menu Dispositif contrôlé Valeur initiale Réglage 1 GAIN/PED GAIN AW-HE50 Auto, 0dB, 3dB, 6dB, 9dB, 12dB, 15dB, 18dB AW-HE100 AUTO, 0 à 12dB, 15dB, 18dB (0dB à... - Page 136 All manuals and user guides at all-guides.com Tableau des items de menus Bouton Items de menu Dispositif contrôlé Valeur initiale Réglage 5 SHUTTER SHUTTER AW-HE50 Off, Step, Synchro AW-HE100 Off, Step, Synchro AW-HE870 Off, Step, Synchro, ELC AW-E860, AW-E750, Off, Step, Synchro, ELC AW-E650, AW-E350 AK-HC1500, AK-HC1800 Off, Step, Synchro...
- Page 137 All manuals and user guides at all-guides.com Tableau des items de menus Bouton Items de menu Dispositif contrôlé Valeur initiale Réglage 9 SETUP [1]USER 1.USER1 SWLINK, BUSCONT, FASIST, CAMSEL, TALLY_IP, CAMINF, AWB, ABB, POWER OFF 2.USER2 SWLINK, BUSCONT, FASIST, CAMSEL, TALLY_IP, CAMINF, AWB, ABB, POWER OFF [2]SW LINK 1.SWLINK...
- Page 138 All manuals and user guides at all-guides.com Tableau des items de menus Bouton Items de menu Dispositif contrôlé Valeur initiale Réglage 9 SETUP [6]FUNCTION 1.ND FILTER AW-HE50 “–––” AW-HE100 “–––” AW-HE870 Off, On AW-E860, AW-E750, Off, On AW-E650, AW-E350 AK-HC1500, AK-HC1800 Clear, 1/4, 1/16, 1/64 2.OPTION AW-HE50...
- Page 139 All manuals and user guides at all-guides.com Tableau des items de menus Bouton Items de menu Dispositif contrôlé Valeur initiale Réglage 10 SYSTEM [1]CAMERA CTL 1.CAM1 NoAsign Serial, Network, NoAsign à 100.CAM100 [2]CAM ASSIGN 1.CAM1 192.168.000.010 à 100.CAM100 [3]SW CTL 1.SW NoAsign Network, NoAsign...