
Manuels Connexes pour Chopin ALVEOPC graph


Sommaire des Matières pour Chopin ALVEOPC graph
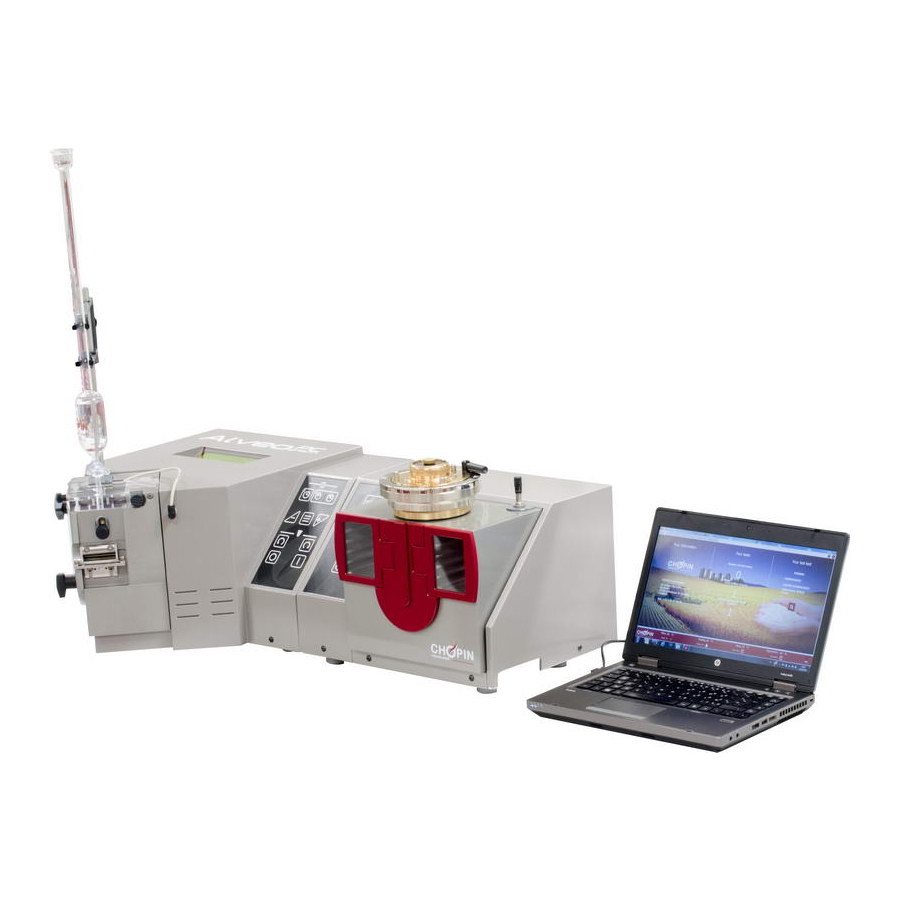
- Page 1 Quick installation and first test Installation rapide et premier test Instalación rápida y primera prueba Краткое руководство по установке и проведению первого испытания...
- Page 2 ** The laptop isn’t included B. Setting up It is recommended to have AlveoPC delivered and installed by a technician authorized by CHOPIN Technologies. Keep the packaging. You must use it when transporting the machine. Indoor conditions of use: 20°C (68°F) ± 2°C (35°F) and a relative humidity of 65% ± 15%.
-
Page 3: Electrical Connection
E. Cooling circuit installation The AlveoPC has to be connected to a tap or a cryostat (water cooler). Connect the hydraulic circuit tips to the Alveograph and the kneader by using the included tubing as shown in the adjacent diagram. Press the tips by pushing on the retaining ring. -
Page 4: User Interface
OPERATION A. User interface All the interactions are made through these control panels and digital screen of the kneader. The PC is here to display results. Kneader control panel Alveograph control panel 1 Reset chrono 1 1 Start 92/60-flow calibration 2 Start chrono 2 2 Increase airflow 3 Reset chrono 2... -
Page 5: Sample Preparation
B. Pneumatic setting Loosen the upper plate to reach the upper level of the guide bolts. Loosen the knurled lock nut and upper plate buffer. Set the nozzle body with its nozzle. The number engraved on the nozzle must be 12C. Tighten back the knurled lock nut to confine the nozzle body. -
Page 6: Material Preparation
F. Dough mixing Open the kneader (remove the safety throttle and lift the cover). Pour the flour into the kneader using a powder funnel. Fill the burette with a saltwater amount according to the flour humidity in %. Push the key to indicate the direction of rotation of the kneader. Push the key to start kneading. -
Page 7: Cleaning The Mixer
H. Cleaning the mixer While the batter is resting, the kneader has to be carefully cleaned before doing another test. Only use microfiber cloth and no metallic tools. Open kneader by removing the side. Clean it. Remove the batter left from the kneader. Remove the mixing arm and clean it. -
Page 8: Switching Off The Machine
J. Results At the end of these different measures, the software will create the average curve. 1. Test information 2. Custom settings 3. Aborting test 4. Exporting test 5. Printing test 6. Saving test 7. Results 8. Choosing tests to display 9. -
Page 9: Installer Votre Alveopc
**L’ordinateur portable n’est pas fourni. B. Mise en place Il est recommandé que l’AlveoPC soit livré et installé par un technicien agréé CHOPIN Technologies. Conserver l’emballage. Il est à utiliser impérativement pour tout transport de l’appareil. Conditions d’utilisation intérieure : 20°C ± 2°C pour une humidité relative de 65% ± 15% . -
Page 10: Installation Du Circuit De Refroidissement
E. Installation du circuit de refroidissement L’AlveoPC doit être connecté à un robinet ou à un cryostat. Brancher les embouts du circuit hydraulique à l’Alvéographe et au pétrin en utilisant Les tuyaux fournis et en respectant le schéma ci-contre Enfoncer les embouts en appuyant sur la bague de maintien. Assurer l’étanchéité... -
Page 11: Utilisation
UTILISATION A. Interface utilisateur L’intégralité des interactions se fait à partir des panneaux de commande et de l’écran digital du pétrin. Le PC sert à afficher les résultats. Panneau de commande pétrin Panneau de commande Alvéographe 1 Remet à zéro le chrono 1 1 Lance l’étalonnage de débit 2 Lance le chrono 2 92/60... -
Page 12: Réglage Pneumatique
B. Réglage pneumatique Desserrer la platine supérieure jusqu’au niveau supérieur des goujons de guidage. Dévisser la bague moletée et le tampon de la platine supérieure. Mettre en place le porte-buse muni de sa buse. Le numéro gravé sur la buse doit être 12C. Revisser la bague moletée pour emprisonner le porte-buse. -
Page 13: Pétrissage De La Pâte
F. Pétrissage de la pâte Ouvrir le pétrin (retirer la gâchette de sécurité et soulever le couvercle). Verser la farine dans le pétrin à l’aide d’un entonnoir à poudre. Remplir la burette avec le volume d’eau salée correspondant à l’humidité de la farine en %. -
Page 14: Nettoyage De La Cuve
H. Nettoyage de la cuve Pendant la phase de repos de la pâte, le pétrin doit être très soigneusement nettoyé avant de pouvoir réaliser un autre essai. N’utiliser que du chiffon microfibre et ne pas utiliser d’outil métallique. Ouvrir le pétrin en retirant le flanc. Nettoyer ce dernier. Retirer les restes de pâte du pétrin. -
Page 15: Résultats
J. Résultats A l’issue des différentes mesures, le logiciel trace la courbe moyenne. 1 Information de l’essai 2 Paramètres personnalisés 3 Abandon essai 4 Export de l’essai 5 Impression essai 6 Enregistrer essai 7 Résultats 8 Choix des essais à afficher 9 Compteur d’essais Rappel (mm) - Page 16 **El ordenador portátil no está incluido. B. Instalación Se recomienda que el AlveoPC sea entregado e instalado por un técnico autorizado de CHOPIN Technologies. Conservar el embalaje. Debe utilizarse para cualquier transporte del aparato. Condiciones de uso interior: 20°C ± 2°C con una humedad relativa de 65% ± 15%.
-
Page 17: Conexión Eléctrica
E. Instalación del circuito de refrigeración El AlveoPC debe estar conectado a un grifo o a un cryostat. Enchufar las boquillas del circuito hidráulico al Alveógrafo y la amasadora, utilizando los tubos que se incluyen y respetando el esquema indicado Empujar a fondo las boquillas apoyando sobre el anillo de retención. -
Page 18: Interfaz Usuario
UTILIZACIÓN A. Interfaz usuario Todas las interacciones se realizan a partir de los paneles de control y de la pantalla digital de la amasadora. El PC sirve para mostrar los resultados. Panel de control amasadora Panel de control Alveógrafo. 1 Reinicia el cronómetro 1 1 Inicia el calibrado 2 Inicia el cronómetro 2 de velocidad 92/60... - Page 19 B. Ajuste neumático Aflojar la platina superior hasta el nivel superior de los conectores de guía. Desenroscar la tuerca y el tapón de la platina superior. Colocar el soporte de la boquilla con su boquilla. El número grabado en la boquilla debe ser 12C. Enroscar la tuerca para sujetar el soporte de boquilla.
-
Page 20: Preparación Del Material
F. Amasado de la masa Abrir la amasadora (retirar el gatillo de seguridad y levantar la tapa). Añadir la harina en la amasadora con la ayuda de un embudo para polvo. Llenar la bureta con el volumen de agua salada correspondiente a la humedad de la harina en %. - Page 21 H. Limpieza de la amasadora Durante la fase de reposo de la masa, la amasadora debe ser limpiada cuidadosamente, antes de poder realizar otro ensayo. Utilizar sólo paños de microfibra y nunca herramientas metálicas. Abrir la amasadora y retirar el lateral. Limpiar este último. Retirar los restos de masa de la amasadora.
-
Page 22: Apagar El Aparato
J. Resultados Al término de las diferentes medidas, el software traza la curva media. 1 Información del ensayo 2 Parámetros personalizados 3 Abandono ensayo 4 Exportar el ensayo 5 Impresión del ensayo 6 Grabar ensayo 7 Resultados 8 Elección de los ensayos a mostrar 9 Contador de ensayos Recordatorio (mm) - Page 23 B. Установка В соответствии с рекомендациями производителя, доставка и установка AlveoPC должна по возможности осуществляться сертифицированным техником компании CHOPIN Technologies. Сохраняйте упаковку. Упаковка должна использоваться в обязательном порядке при транспортировке аппарата. Условия эксплуатации в помещении: 20 °C ± 2 °C при относительной влажности воздуха 65 % ± 15 % .
-
Page 24: Подключение К Электросети
E. Установка охлаждающего контура Аппарат AlveoPC необходимо подключить к крану водопровода или к криостату. Подключите патрубок гидравлического контура к альвеографу и к тестомесилке, используя шланги из комплекта поставки, согласно приведенной схеме. Установите патрубки, нажав на фиксирующее кольцо. Обеспечьте герметичность соединения патрубков и шлангов при помощи зажимных... - Page 25 ИСПОЛЬЗОВАНИЕ A. Интерфейс пользователя Все действия выполняются посредством панелей управления и цифрового экрана тестомесилки. Результаты отображаются на ПК. Панель управления тестомесилки Панель управления альвеографа 1 Сброс показания хронометра 1 1 Запуск калибровки воздушного насоса 92/60 2 Запуск хронометр 2 2 Увеличение количества 3 Сброс...
- Page 26 B. Регулировка подачи воздуха Открутите большую муфту до верхнего уровня направляющих штифтов. Отвинтите рифленое кольцо и заглушку большой муфты. Установите калибровочную насадку. Используется калибровочное сопло № 12C. Закрутите рифленое кольцо, чтобы оно зафиксировало блок крепления сопла. Зажмите большую муфту таким образом, чтобы обеспечить герметичность соединения...
- Page 27 F. Процедура замеса теста Откройте тестомесилку (откройте предохранительную защелку и поднимите крышку). Засыпьте муку в тестомесилку при помощи воронки для сыпучих материалов. Наполните бюретку соленой водой, объем которой соответствует влажности муки в %. Нажмите на кнопку, чтобы задать направление вращения тестомесилки. Нажмите...
- Page 28 H. Очистите тестомесилку Во время расстойки теста тестомесилку необходимо тщательно очистить для проведения другого испытания. Используйте только салфетки из микрофибры, не используйте металлические приспособления. Откройте тестомесилку, сняв боковую крышку. Очистить боковую крышку. Удалите из тестомесилки остатки теста. Снимите тестомесительный нож и очистите его. Будьте...
- Page 29 J. Результаты После завершения различных измерений программа строит кривую на основании средних значений. 1 Сведения об испытании 2 Персонализированные параметры 3 Остановка испытания 4 Экспорт результатов испытания 5 Распечатка результатов испытания 6 Сохранение результатов испытания 7 Результаты 8 Выбор испытаний для отображения 9 Счетчик...
- Page 30 Notes / Notas / Примe ания ч...
- Page 31 Notes / Notas / Примe ания ч...
- Page 32 Research, loans and training Tel. : +33 1 41 47 50 48 export@chopin.fr Tel. : +33 1 41 47 17 15 Tel. : +33 1 41 47 50 33 service@chopin.fr labo.application@chopin.fr Documentation produced by CHOPIN Technologies © 2017 – Pictures: CHOPIN Technologies...