Teac AG-L800 Manuel Du Propriétaire
Table des Matières
Liens rapides
9A09478201
AG-L800
AV Digital Home Theater Receiver
OWNER'S MANUAL
BEDIENUNGSANLEITUNG
MANUEL DU PROPRIETAIRE
Thank you for choosing a TEAC. Read this manual carefully to get the best performance from this unit.
Vielen Dank für den Kauf dieses TEAC-Geräts.
Bitte lesen Sie diese Anleitung sorgfältig durch,um die Leistungs-fähigkeit dieses Geräts optimal nutzen zu können.
Nous vous remercions pour l'achat d'un appareil TEAC.
Lire ce manuel avec attention pour obtenir les meilleures performances possibles de cet appareil.
Table des Matières

Manuels Connexes pour Teac AG-L800


Sommaire des Matières pour Teac AG-L800
- Page 1 BEDIENUNGSANLEITUNG MANUEL DU PROPRIETAIRE Thank you for choosing a TEAC. Read this manual carefully to get the best performance from this unit. Vielen Dank für den Kauf dieses TEAC-Geräts. Bitte lesen Sie diese Anleitung sorgfältig durch,um die Leistungs-fähigkeit dieses Geräts optimal nutzen zu können.
-
Page 2: Before Use
IMPORTANT (for U.K.Customers) Contents DO NOT cut off the mains plug from this equipment. If the plug fitted is not suitable for the power points in your home or the cable is too short to reach a power point, then obtain an appropriate safety approved extension lead or consult your Before Use .................. -
Page 3: Table Des Matières
Inhalt Sommaire Vor Inbetriebnahme ................3 Avant l'utilisation .................. 3 Aufstellungsort der Lautsprecherboxen .......... 5 Positionnement des enceintes ............5 Anschluß ....................5 Connexions .................... 5 Antennenanschluß ................15 Raccordements d'antenne ............... 15 Die einzelnen Bedienungselemente und ihre Funktion ....19 Désignation des commandes ............ -
Page 4: Positioning Of The Speakers
Positioning of the Speakers The positioning of speakers differs according to the size and acoustics of the listening room. While actually listening to a program source, try various speaker positions to determine which layout provides the best surround effect. Place the speakers connected to "L" to your left, and "R" to your right. -
Page 5: Aufstellungsort Der Lautsprecherboxen
ACHTUNG ATTENTION Mettre tous les éléments de votre chaîne hors tension avant de Schalten Sie Ihre gesamte Anlage aus, bevor Sie Ihren neuen AG-L800 anschließen und in Betrieb nehmen. procéder au raccordement de cet appareil. Lire attentivement le mode d'emploi de chacun des éléments que Lesen Sie (nochmals) die Bedienungsanleitungen aller Komponenten, die Sie zusammen mit dem AG-L800 betreiben möchten, aufmerksam... -
Page 6: Speaker Connections
SPEAKERS, PRE OUT Connection Speaker Connections How to connect Turn the terminal cap counterclockwise to loosen it. The Caution: speaker terminal caps cannot be fully removed from the base. To avoid damaging the speakers by inputting a sudden high-level Insert the wire into the terminal fully and turn the terminal cap signal, be sure to switch the power off before connecting the clockwise to securely connect it. -
Page 7: Branchement Des Haut-Parleurs
Anschluß Connexions Lautsprecheranschlüsse Branchement des haut-parleurs Vorsicht: Attention: Vor dem Anschluß der Lautsprecherkabel unbedingt das Gerät Pour éviter d'endommager les haut-parleurs en entrant ausschalten. Andernfalls können die Lautsprecher durch soudainement un signal de niveau élevé, bien couper l'alimentation Kontaktgeräusche etc. beschädigt werden. avant de raccorder les haut-parleurs. - Page 8 Note: Avoid a combined use of S-VIDEO and VIDEO connections. Use Connection between the AG-L800 and the DV-L800 is provided by one or the other throughout your system. the cables come with the DV-L800, except that, if you want, you have to get an S-VIDEO cable ready.
- Page 9 Connexions Die Anschlußverbindung zwischen AG-L800 und DV-L800 kann Le branchement entre le AG-L800 et le DV-L800 se fera au moyen mittels der zu DV-L800 mitgelieferten Kabel hergestellt werden. des câbles fournis avec le DV-L800, sauf pour la connexion en S- Falls der S-VIDEO-Anschluß...
- Page 10 HDR/VCR MONITOR Connection HDR/VCR, SAT, AUX DIGITAL IN jacks If your equipment is provided with a DIGITAL OUTPUT jack, Connect the component with RCA pin cords. Make sure to connect it to the DIGITAL IN jack. (Use the optional coaxial connect : cord or optical fiber cable.) white plug w white jack(L:left)
- Page 11 Anschluß Connexions HDR/VCR, SAT, AUX HDR/VCR, SAT, AUX Verbinden Sie die einzelnen Komponenten mittels Cinchkabel, und Raccorder l'appareil à l'aide de cordons munis d'une prise RCA. achten Sie dabei auf eine einheitliche Verbindung: Veiller à brancher: weißer Stecker w weiße Buchse (L:links) Fiche blanche w connecteur blanc(L : gauche) roter Stecker w rote Buchse (R:rechts) Fiche rouge w connecteur rouge (R :Droite)
-
Page 12: Ac Power Cord
MD/CD-R, AC POWER CORD Connection CD-R/MD, TAPE ZONE-2 OUT Connect the component with RCA pin cords. Make sure to connect : This additional set of video and audio jacks is primarily intended to relay pictures and sound to a TV set in the next room. white plug w white jack(L:left) red plug w red jack(R:right) Power cord (AC) -
Page 13: Cordon D'alimentation
Anschluß Connexions CD-R/MD, TAPE CD-R/MD, TAPE Verbinden Sie die einzelnen Komponenten mittels Cinchkabel, und Raccorder l'appareil à l'aide de cordons munis d'une prise RCA. achten Sie dabei auf eine einheitliche Verbindung: Veiller à brancher: weißer Stecker w weiße Buchse (L:links) Fiche blanche w connecteur blanc(L : gauche) roter Stecker w rote Buchse (R:rechts) Fiche rouge w connecteur rouge (R :Droite) -
Page 14: Connecting Antennas
ON/standby all the units connected by remote control cords. < When you press the PLAY button of a source, the AG-L800 is automatically switched to the source. < The source you select by turning the MULTI JOG knob on the AG-L800 will start playing automatically. -
Page 15: Antennenanschluß
< Mit dem POWER-Schalter von AG-L800 können Sie alle weiteren Komponenten, die über ein Fernsteuerkabel < l Il vous suffit d’appuyer sur la touche POWER du AG-L800 pour angeschlossen sind, auf Betrieb (ON) oder Bereitschaft mettre tous les appareils reliés par des cordons de schalten. - Page 16 Connecting Antennas (2) AM Indoor Loop Antenna A high-performance AM loop antenna provided with the receiver is sufficient for good reception in most areas. Connect the loop antenna's wires to the AM antenna terminals as shown. Place the antenna on a shelf, for example, or hang it on a window frame, etc., in the direction which gives the best reception, as far away as possible from the entire system, speaker cords and the power cord, to prevent unwanted noise.
- Page 17 Antennenanschluß (2) Raccordements d'antenne (2) AM Rahmen-Antenne Antenne-cadre intérieure AM > > Im Lieferumfang des Receivers befindet sich eine Hochleistungs- L'antenne cadre AM haute performance, fournie avec le récepteur Mittelwellen-Innenantenne, die in fast allen Empfangssituationen permet une très bonne réception dans la plupart des régions. ausreichend sein sollte.
-
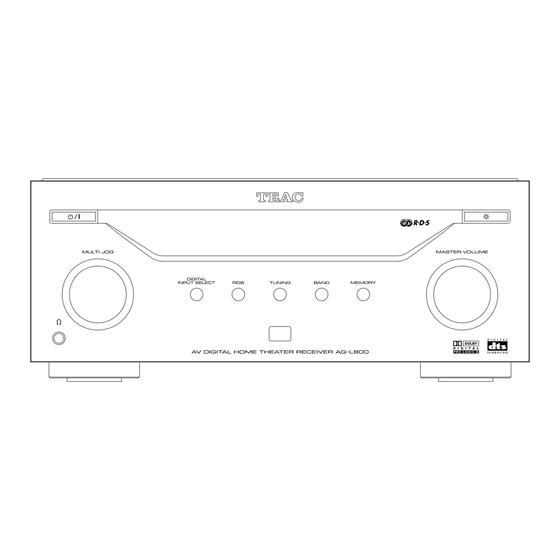
Page 18: Names Of Each Control
Names of Each Control (1) Front Panel Remote Sensor When operating the remote control unit, point it towards the POWER switch remote sensor. Press this switch to turn the unit on or off (standby). TUNING button The equipment draws nominal non-operating power from Use this to select tuning modes. -
Page 19: Die Einzelnen Bedienungselemente Und Ihre Funktion 1
Désignation des commandes 1 Die einzelnen Bedienungselemente und ihre Funktion 1 Vorderseite Face avant POWER-Schalter (Netzschalter) Interrupteur POWER Appuyez sur cet interrupteur pour mettre l'appareil sous Betätigen Sie diesen Schalter, um das Gerät ein- oder tension ou hors tension (veille). auszuschalten (Standy-Modus). -
Page 20: Remote Control Unit
Remote Control Unit INPUT SEL button This button provides the same function as the DIGITAL INPUT Function buttons SELECT button on the AG-L800 itself. Use these buttons to select function modes. Below the LCD display STEREO button (in TUNER page) Use this button to switch an FM broadcast between stereo and CH –... -
Page 21: Télécommande
Touche INPUT SEL INPUT SEL-Taste Cette touche a le même effet que la touche DIGITAL INPUT Diese Taste führt die gleiche Funktion wie die DIGITAL INPUT- SELECT sur le AG-L800 lui-même. Taste am AG-L800 aus. Au-dessous de l’afficheur LCD Unter dem LCD-Display Touches CH –... -
Page 22: Basic Operations
Basic Operations (1) Press the POWER button. Select a source by turning the MULTI JOG knob. HDR/VCR MD/CD-R (Digital input only) FM (or AM) (Analog input only) Alternatively, you can press the corresponding buttons on the AMP (or TUNER) BASIC page of the remote control unit. When DVD, MD/CD-R , SAT or AUX is selected, press the DIGITAL INPUT SELECT button to select “OPTICAL1”, “OPTICAL2”, “COAXIAL”... -
Page 23: Grundlegende Bedienung
Fonctionnement de base (1) Grundlegende Bedienung (1) Drücken Sie die POWER-Taste. Appuyer sur la touche POWER. Wählen Sie mit dem MULTI JOG-Regler eine Programmquelle Sélectionner une source en tournant le bouton MULTI JOG. aus. HDR/VCR HDR/VCR MD/CD (entrée numérique uniquement) MD/CD-R (Nur digitaler Eingang) FM (ou AM) (entrée analogique uniquement) FM (oder AM) (Nur analoger Eingang) - Page 24 Basic Operations (2) Power-on/Standby switch At the push of the power switch ( ), the unit powers on. A second press puts the unit into standby mode, a small indicator lighting to the right of the switch. Dimming the display screen Press the button and the display dims.
- Page 25 Fonctionnement de base (2) Grundlegende Bedienung (2) Betriebs-/Bereitschaftsschalter Commutateur mise sous tension/veille Mit diesem Schalter ( ) kann die Betriebsspannung des A la pression sur le commutateur ( ), l’appareil est mis Geräts eingeschaltet werden. bei eingeschaltetem Gerät kann sous tension. A la deuxième pression, l’appareil se met en mit diesem Schalter auf Bereitschaft geschaltet werden, mode veille, comme l’indique un petit témoin s’allumant du wobei die rechts neben dem Schalter befindliche LED leuchtet.
- Page 26 Basic Operations (3) PHONES jack For private listening, insert the headphones (1/4-inch plug) into the PHONES jack. The sound from speakers will be cut off. Note: < When plugging in the headphones, the STEREO mode is automatically switched on, overriding whatever surround mode is selected, and the SURROUND button (on the AMP ADVANCED page of the remote control) is disabled.
- Page 27 Fonctionnement de base (3) Grundlegende Bedienung (3) PHONES–Anschluß (Kopfhörer) Prise PHONES Durch den Anschluß eines Kopfhörers (1/4”-Stecker) an der Pour l'écoute privée, brancher le casque d'écoute (fiche de PHONES–Buchse. 6,35 mm) à la prise PHONES. Ceci a pour effet de couper le son Die Lautsprecher werden dabei ausgeschaltet.
-
Page 28: Radio Reception
Radio Reception Press the BAND button. Each time you press the BAND button, the unit alternates between AM and FM bands. Alternatively, you can use the FM/AM button on the TUNER BASIC (or ADVANCED) page of the remote control unit. Select the AUTO mode by pressing the TUNING button. -
Page 29: Hörfunk-Empfang
Hörfunk-Empfang (1) Réception de la radio (1) Betätigen Sie die BAND-Taste. Appuyer sur la touche BAND. Bei jedem Betätigen der BAND-Taste wechselt der A chaque pression de la touche, l’appareil bascule entre les Empfangsbereich zwischen AM und FM. bandes FM et AM. Wahlweise können Sie die FM/AM-Taste auf der TUNER Il vous est aussi loisible d’appuyer sur la touche FM/AM à... -
Page 30: Manual Memory Presetting
Presetting You can preset a maximum of 30 favorite channels on each of the FM and AM bands. Automatic Memory Presetting Press the BAND button. The unit should shift to the tuner mode. Each time you press the button, the unit alternates between AM and FM bands. -
Page 31: Preset-Abspeicherung
Preset-Abspeicherung Mise en mémoire des stations préférées Sie können für jeden Empfangsbereich (FM und AM) jeweils bis zu Il vous est loisible de configurer un maximum de 30 stations 30 bevorzugte Sender als Preset-Sender abspeichern. préférées sur chacune des bandes FM et AM. Automatische Preset-Abspeicherung Préréglage automatique de la mémoire Betätigen Sie die BAND-Taste. - Page 32 RDS (Radio Data System) (1) RDS is a broadcasting service which allows stations to send additional information along with the regular radio program signal RDS services can be received only in FM band. Switch the remote control unit to show the TUNER ADVANCED (or BASIC) page by pressing the TUNER and P buttons.
-
Page 33: Rds (Radio Data System) (1
RDS (Radio Data System) (1) RDS (Radio Data System) (1) RDS ist ein Sendeservice, mit dem Sender programmbegleitende Le RDS est un service de diffusion qui permet aux stations Signaldaten ausstrahlen. Das RDS-Signal ist nur im UKW- d'envoyer des informations complémentaires avec le signal du Empfangsbereich verfügbar. - Page 34 RDS (Radio Data System) (2) brief annoucements, events, public opinion, reports, NEWS actual situations. a kind of suggestion including practical AFFAIRS annoucements other than news, documents, discussion, analysis and so on. daily information or reference such as weather INFO forecast, consumer guide, medical assistance and so sports-related programs.
- Page 35 RDS (Radio Data System) (2) RDS (Radio Data System) (2) Kurze Ansagen, Ereignisse, öffentliche Meinungen, annonces brèves, événements, enquêtes publiques, NEWS NEWS reportages, comptes-rendus. Reportagen, aktuelle Situationen. conseils et suggestions telles que des annonces Stellungnahmen, Anregungen, Dokumentationen, AFFAIRS AFFAIRS pratiques autres que les nouvelles: documents, Analysen, etc.
-
Page 36: Pty Search
RDS (Radio Data System) (3) (3)RT mode < When you select RT with the RDS button, "RT" will blink for about 4 seconds. After 4 seconds, the data of received RT will be displayed. <If there is no RT data among received broadcastings, RDS mode will be automatically switched to PS mode. -
Page 37: Pty-Suchlauf
RDS (Radio Data System) (3) RDS (Radio Data System) (3) (3) RT Modus (3) Mode RT < Nachdem Sie mittels der RDS-MODE-Taste die Betriebsart RT < Lorsque vous sélectionnez l'option RT à l'aide de la touche angewählt haben, blinkt "RT" ca. 4 Sekunden im Display. Nach RDS, l'indication "RT"... -
Page 38: Video Operations
Video Operations Playing Video Sources Depending on the video source connection, select "DVD", "HDR/VCR", "SAT" or "AUX" by turning the MULTI JOG knob. When "DVD", "SAT" or "AUX" is selected, press the DIGITAL INPUT SELECT button to select the input in use. The picture from the video source can be seen on the TV and the sound from the video source will be heard from the speakers. -
Page 39: Video-Betriebsarten
Video-Betriebsarten Fonctionnement vidéo Wiedergabe von Videoaufzeichnungen Lecture de sources vidéo Wählen Sie mit dem MULTI JOG-Regler je nach verfügbarer Video- En fonction du branchement de la source vidéo, sélectionner Programmquelle "DVD", "HDR/VCR", "SAT" oder "AUX" aus. “DVD”, “HDR /VCR”, “SAT” ou “AUX” en tournant le bouton MULTI JOG. -
Page 40: Available Surround Modes
Available Surround Modes (1) The surround functions create a “live” atmosphere such as that experienced in movie theaters, discos, stadiums and concert halls. Select the appropriate surround mode according to the program source. < Note that surround speakers are needed for the DTS, Dolby Digital 5.1CH and the Dolby Pro Logic Surround modes to function, and a center speaker is needed for the 3 Stereo mode to function. -
Page 41: Verfügbare Surround-Modi
Verfügbare Surround-Modi (1) Modes Surround disponibles Die Surround-Funktionen vermitteln Klangeindrücke, wie Sie sie Lorsque vous utilisez la fonction surround, le son crée une atmosphère "vivante" comme celle obtenue dans les salles de aus Filmtheatern, Discos, Stadien und Konzertsälen kennen. cinéma ou les salles de concert. Den für die Programmquelle am besten geeigneten Surround Sound-Modus wählen. - Page 42 Available Surround Modes (2) DOLBY PRO LOGIC II gives you multichannel surround sound from any stereo source. < DOLBY PRO LOGIC II will not work on monaural source. DOLBY PRO LOGIC II MUSIC The Music mode creates a rich and enveloping surround ambience from stereo sources such as CDs.
- Page 43 Verfügbare Surround-Modi (2) Modes Surround disponibles DOLBY PRO LOGIC II gewährleistet Multikanal-Surround-Sound DOLBY PRO LOGIC II produit une correction de champ sonore multivoie à partir de toute source stéréophonique. von jeder Stereo-Programmquelle. < DOLBY PRO LOGIC II ne fonctionne pas avec une source <...
-
Page 44: Speaker Configuration
Speaker Configuration It is important to perform speaker configuration prior to using the decoder. At each press of the SETUP button on the AMP ADVANCED page of the remote control unit, the mode is changed as shown : (The indications differ from this diagram depending on the surround mode you select. -
Page 45: Lautsprecherkonfiguration
Lautsprecherkonfiguration Configuration de haut-parleurs Il est important d'effectuer la configuration de haut-parleurs avant Vor Gebrauch des Decoders muß die Lautsprecherkonfiguration vorgenommen werden. d'utiliser le décodeur. Bei jedem Betätigen der SETUP-Taste auf der AMP ADVANCED- A chaque pression sur la touche SETUP, le mode change comme Seite der Fernbedienungseinheit wechselt der Modus wie folgt: montré... -
Page 46: Delay Time
Delay Time Delay Time Press the SETUP button (on AMP ADVANCED page) as many times as necessary to display "DELAY". Press the arrowhead buttons (g/t) to enter a time. When you adjust the delay time in the Dolby Digital mode, an additional 10 mS is automatically added to the surround channels in the Dolby Pro Logic II Movie mode. -
Page 47: Verzögerungszeit
Verzögerungszeit Retard Verzögerungszeit Durée de retard Betätigen Sie die SETUP-Taste (auf der AMP ADVANCED- Appuyer sur la touche SETUP (à la page AMP ADVANCED de Seite) wie erforderlich, bis die Anzeige "DELAY" erscheint. la télécommande) autant de fois que nécessaire pour que le témoin “DELAY”... - Page 48 Test Tone Balancing relative volume between speakers The test tone function is useful to adjust the relative volume between speakers in DTS, DOLBY DIGITAL or DOLBY PRO LOGIC II mode. Once the balance set, you don't have to change the balance as long as the speakers aren't moved.
-
Page 49: Testtonfunktion
Son d'essai Testtonfunktion Réglage du volume entre les enceintes Einstellen des relativen Lautstärkeverhältnisses der Le son d’essai est pratique pour régler le niveau sonore relatif Lautsprecherboxen zueinander entre les enceintes opérant en mode DTS, DOLBY DIGITAL ou DOLBY PRO LOGIC II. Die Testtonfunktion kann genutzt werden, um die relative Une fois que vous avez réglé... - Page 50 If the batteries are exhausted, change the batteries. dealer or TEAC service center. e Use remote control unit within the range (5m/15ft) and point at the front panel.
-
Page 51: Amplifier Section
LCD Remote Control System (RC-L800) x 1 * LINE: 70 dB (IHF-A) Battery (AAA, R03, UM-4) x 4 Tone Control: Owner's Manual (AG-L800) x 1 BASS: ± 10 dB at 100 Hz TREBLE: ± 10 dB at 10 kHz * LINE means VCR, SAT, AUX. -
Page 52: Fehlerbeseitigung
Verwenden Sie die Fernbedienung in einem Abstand von ca. Kein Strom 5 m und richten Sie sie auf den Sensor am AG-L800. e Überprüfen Sie bitte die Verbindung zwischen Gerät und e Entfernen Sie Objekte, die sich zwischen der Fernbedienung Netzsteckdose. -
Page 53: Technische Daten
LCD Fernbedienungseinheit (RC-L800) x 1 Klangregelung : AAA (R03, UM-4) Batterie x 4 Tiefen : +/-10 dB bei 100 Hz Bedienungsanleitung (AG-L800) x 1 Höhen : +/-10 dB bei 10 Hz Digital-Audio-Teil * LINE bedeuted : VCR/TAPE IN, DVD IN, SAT/AUX IN, CD-R/MD Abtastfrequenz : PLAY und CD IN. -
Page 54: Dépannage
Actionnez la touche FM MODE. pour voir si on peut trouver soi-même la solution avant de contacter le revendeur ou le centre de service client TEAC. La télécommande ne fonctionne pas e Remplacer les piles, si celles-ci sont usées. -
Page 55: Section Amplificateur
* Ligne : 20 Hz à 20 kHz, +1/–3 dB Pile (AAA, R03 ou UM-4) x 4 Rapport signal sur bruit : Manuel du propriétaire (AG-L800) x 1 * Ligne : 70 dB (IHF-A) Commande de tonalité : * Les entrées Ligne sont VCR/TAPE IN, DVD IN, SAT/AUX IN, CD- Grave : +/–10 dB à... - Page 56 TEAC NEDERLAND BV Oeverkruid 15, NL-4941 VV Raamsdonksveer, Nederland Phone: 0162-510210 TEAC BELGIUM NV/SA c/o TEAC NEDERLAND BV, Oeverkruid 15, NL-4941 VV Raamsdonksveer, Nederland Phone: +31-162-510860 TEAC ITALIANA S.p.A. Via C. Cantù 11, 20092 Cinisello Balsamo, Milano, Italy Phone: 02-66010500 TEAC AUSTRALIA PTY., LTD.