Publicité

Les langues disponibles

Les langues disponibles

Liens rapides

DE | EN | FR
GeoDist® 50
BEDIENUNGSANLEITUNG
USER MANUAL
MODE D'EMPLOI
www.geo-fennel.de
www.geo-fennel.com
www.geo-fennel.fr

Publicité

Table des Matières
loading

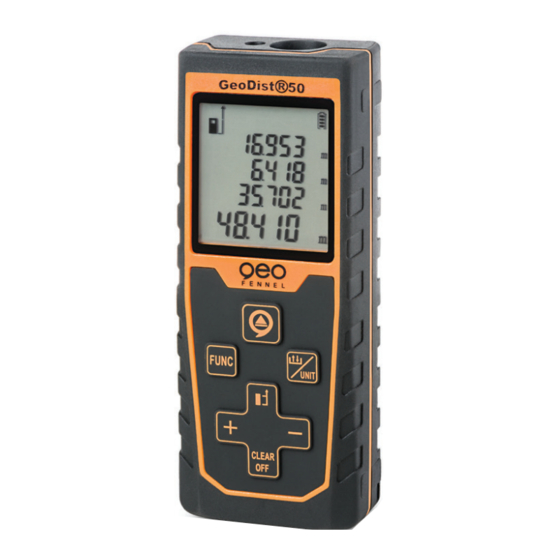
Sommaire des Matières pour geo-FENNEL GeoDist 50

  • Page 1 DE | EN | FR GeoDist® 50 BEDIENUNGSANLEITUNG USER MANUAL MODE D‘EMPLOI www.geo-fennel.de www.geo-fennel.com www.geo-fennel.fr...
  • Page 2: Table Des Matières

    Sehr geehrter Kunde, vielen Dank für das Vertrauen, welches Sie uns beim Erwerb Ihres neu- en geo-FENNEL-Gerätes entgegengebracht haben. Dieses hochwertige Qualitätsprodukt wurde mit größter Sorgfalt produziert und qualitätsge- prüft. Die beigefügte Anleitung wird Ihnen helfen, das Gerät sachgemäß zu bedienen.
  • Page 3: Lieferumfang

    LIEFERUMFANG · Laserentfernungsmesser GeoDist® 50 · Batterien · Holster · Bedienungsanleitung MERKMALE · Einzelmessung / Dauermessung · Messebene: vorn, hinten · Minimum / Maximum · Speicher (die letzten 10 Werte) · Fläche / Volumen · Einheiten: mm, ft, inch · Malerfunktion ·...
  • Page 4: Bedienelemente

    9 10 BEDIENELEMENTE 1. Anzeige Laser an / aus 2. Anzeige Maximumwert 3. Anzeige Fläche Wände m² 4. Anzeige Fläche Boden m² 5. Anzeige Umfang m 6. Anzeige Addition / Subtraktion 7 . Anzeige Messebene: vorn / hinten 8. Anzeige Speicher 9.
  • Page 5: Stromversorgung

    STROMVERSORGUNG BATTERIE EINLEGEN Gerät ausschalten und das Batteriefach auf der Rückseite öffnen. 2 x AAA Alkalinebatterien einlegen (korrekte Polarität beachten). Batteriefachdeckel wieder schließen. BEDIENUNG EIN- / AUSSCHALTEN Taste kurz drücken, um das Gerät ein- zuschalten. Standardeinstellung: Einzelmessung, Messebene hinten. Displayanzeige direkt nach dem Einschalten des Gerätes.
  • Page 6: Messungen Vornehmen

    MESSEBENE Taste (19) kurz drücken, um die Messebene einzustellen: Messung ab Vorderseite oder ab Rückseite des Gerätes. Displayanzeige Messebene hinten (Bild links), Messebene vorn (Bild rechts). MESSEINHEITEN Taste lang drücken, um die gewünschte Messeinheit auszuwählen: in, m, ft. MESSUNGEN VORNEHMEN Bei starker Sonneneinstrahlung oder reflektierenden Oberflächen sollte eine Zieltafel verwendet werden.
  • Page 7 FLÄCHENMESSUNG Im Modus Einzeldistanzmessung Taste (16) kurz drücken, um die Flächenmessfunktion zu starten. Laser auf den ersten Zielpunkt (z. B. Länge) richten und Messtaste (15) kurz drücken. Laser auf den zweiten Zielpunkt (z. B. Breite) richten und Messtaste (15) erneut kurz drücken.
  • Page 8 ADDIEREN / SUBTRAHIEREN Taste (+) kurz drücken: Das nachfolgende Messergebnis wird zum vorherigen addiert. Taste (-) kurz drücken: Das nachfolgende Messergebnis wird vom vorherigen subtrahiert. Mit dieser Methode können auch Flächen und Volumina addiert / subtrahiert werden. DAUERMESSUNG / MAXIMUM - MINIMUM Laser auf den gewünschten Messpunkt richten und Messtaste (15) ca.
  • Page 9 PYTHAGORASFUNKTION 1 (2 Punkte) Taste (16) kurz drücken, um die Pythagorasfunktion 1 zu starten. Laser auf den oberen Punkt richten und Messtaste (15) kurz drücken. Laser rechtwinklig auf den unteren Punkt richten und Messtaste (15) kurz drücken. Das Gerät errechnet nun automatisch die Höhe des Objekts. PYTHAGORASFUNKTION 2 Indirekte Höhenmessung (3 Punkte) Taste (16) zweimal kurz drücken, um die Pythagorasfunktion 2 zu...
  • Page 10 SPEICHERN Taste (18) kurz drücken, um den aktuellen Messwert zu speichern. Im Display wird der Speicherplatz angezeigt (z. B. „1“). Mit den Tasten (+) und (-) können im Display die 10 letzten gespeicherten Werte abgerufen werden. BELEUCHTUNG Mit dem Einschalten des Gerätes schaltet sich die Beleuchtung automatisch ein.
  • Page 11: Sicherheitshinweise

    SICHERHEITSHINWEISE BESTIMMUNGSGEMÄSSE VERWENDUNG Das Gerät sendet einen sichtbaren Laserstrahl aus, um z.B. folgende Messaufgaben durchzuführen: Ermittlung von Distanzen. UMGANG UND PFLEGE Messinstrumente generell sorgsam behandeln. Nach Benutzung mit weichem Tuch reinigen (ggfs. Tuch in etwas Wasser tränken). Wenn das Gerät feucht war, sorgsam trocknen. Erst in den Koffer oder die Tasche packen, wenn es absolut trocken ist.
  • Page 12: Ce-Konformität

    CE-KONFORMITÄT Das Gerät hat das CE-Zeichen gemäß den Normen EN 61010-1:2010. GARANTIE Die Garantiezeit beträgt zwei (2) Jahre, beginnend mit dem Verkaufsda- tum. Die Garantie erstreckt sich nur auf Mängel wie Material-oder Her- stellungsfehler, sowie die Nichterfüllung zugesicherter Eigenschaften. Ein Garantieanspruch besteht nur bei bestimmungsgemäßer Verwendung.
  • Page 13 EN 60825-1:2014. Das Gerät darf ohne weitere Sicherheitsmassnahmen eingesetzt werden. Das Auge ist bei zufälligem, kurzzeitigem Hineinse- hen in den Laserstrahl durch den Lidschlussreflex geschützt. Laserwarnschilder der Klasse 2 sind gut sichtbar am Gerät angebracht. www.geo-fennel.de G ERMA N Y Laser IEC 60825-1:2014...
  • Page 14 HAFTUNGSAUSSCHLUSS Der Benutzer dieses Produktes ist angehalten, sich exakt an die Anweisungen der Bedienungsanleitung zu halten. Alle Geräte sind vor der Auslieferung genauestens überprüft worden. Der Anwender sollte sich trotzdem vor jeder Anwendung von der Genauigkeit des Gerätes überzeugen. Der Hersteller und sein Vertreter haften nicht für fehlerhafte oder absichtlich falsche Verwendung sowie daraus eventuell resultieren- de Folgeschäden und entgangenen Gewinn.
  • Page 16 Dear Customer, Thank you for your confidence in us, having purchased a geo-Fennel instrument. For the optimum performance of the instrument, please read this ma- nual carefully and keep it in a convenient place for future reference. This manual contains important safety information that should be read and understood before use.
  • Page 17: Supplied With

    EN E N SUPPLIED WITH · Laser distance meter GeoDist® 50 · Batteries · Holster · User manual FEATURES · Single measurement / · Measurement reference: Permanent measurement front, rear · Minimum / Maximum · Memory function · Area / Volume ·...
  • Page 18: Features

    9 10 FEATURES 1. Laser ‚„on/off“ indication 2. Maximum value indication 3. Indication wall size m² 4. Indication floor size m² 5. Indication circumference in m 6. Addition / subtraction indication 7 . Measurement reference: front / rear 8. Memory indication 9.
  • Page 19: Power Supply

    POWER SUPPLY INSERTING AND REPLACING THE BATTERIES Power off the device, open the battery compartment cover and insert 2 x AAA Alkaline batteries (ensure correct polarity). Close the cover. OPERATION POWER ON / OFF Press the button to power on the device. The default settings are: Single measure- ment, measurement reference rear.
  • Page 20: Measurement Reference

    MEASUREMENT REFERENCE Press button (19) to change the measurement reference between front / rear. Display indication Reference rear: (left) Reference front: (right) SELECT UNITS Press and hold in succession to select the required measuring unit: m, ft, in. MEASURING When measuring in bright sunshine or to a reflective surface, it is recommended to use a target plate.
  • Page 21: Area Measurement

    AREA MEASUREMENT Press button (16) in single distance mode to access the area measure- ment function. Aim the laser at the first target (i. e. length) and press the measuring button (15). Aim the laser at the second target (i. e. width) and press the measuring button (15) once again.
  • Page 22 ADD / SUBTRACT Press button (+): To add the next measurement to the previous measurement. Press button (-): To subtract the next measurement from the previous measurement. Areas and volumes can also be added and subtracted using the same method. PERMANENT MEASUREMENT / MAXIMUM - MINIMUM Aim the laser at the required target and hold the mea- suring button (15).
  • Page 23 PYTHAGORAS FUNCTION 1 (2 points) Height measurement (2 points) Press button (16) to access the pythagoras function 1. Aim the laser at the upper target point and press the measuring button (15). Aim at the second target point with the laser horizontal and press the measuring button (15) once again.
  • Page 24 MEMORY Press button (18) and the memory icon and relevant memory location (i.e. “1“) are shown on the display . Using the buttons (+) and (-) the user can navigate through the last 10 measurements that are stored in the memory. ILLUMINATION When powering on the unit the display will automatically be illuminated.
  • Page 25: Safety Notes

    SAFETY NOTES INTENDED USE OF INSTRUMENT The instrument emits a visible laser beam in order to carry out the following measuring tasks: Measurement of distances. CARE AND CLEANING Handle measuring instruments with care. Clean with soft cloth only after any use. If necessary damp the cloth with some water. If the instrument is wet clean and dry it carefully.
  • Page 26: Safety Instructions

    CE-CONFORMITY This instrument has the CE mark according to EN 61010-1:2010. WARRANTY This product is warranted by the manufacturer to the original purchaser to be free from defects in material and workmanship under normal use for a period of two (2) years from the date of purchase. During the war- ranty period, and upon proof of purchase, the product will be repaired or replaced (with the same or similar model at manufacturers option), wit- hout charge for either parts or labour.
  • Page 27: Laser Classification

    It is allowed to use the unit without further safety precautions. The eye protection is normally secured by aversion responses and the blink reflex. The laser instrument is marked with class 2 warning labels. www.geo-fennel.de G ERMA N Y Laser IEC 60825-1:2014...
  • Page 28: Exceptions From Responsibility

    EXCEPTIONS FROM RESPONSIBILITY The user of this product is expected to follow the instructions given in the user manual. Although all instruments left our warehouse in perfect condition and adjustment the user is expected to carry out periodic checks of the product’s accuracy and general performance.
  • Page 30 Cher client, Nous tenons à vous remercier pour la confiance que vous avez témoig- née, par l‘acquisition de votre nouvel instrument geo-FENNEL. Les instructions de service vous aideront à vous servir de votre instru- ment de manière adéquate. Nous vous recommandons de lire avec soin tout particulièrement les consignes de sécurité...
  • Page 31: Livré Comme Suit

    LIVRÉ COMME SUIT · Télémètre laser GeoDist® 50 · Piles · Étui · Mode d‘emploi CARACTÉRISTIQUES · Mesure simple / continue · Visée de référence: · Mini / Maxi (et différence) devant / arrière · Surface / volume · Mémoire (10 mesures) ·...
  • Page 32: Description De L'apprareil

    9 10 DESCRIPTION DE L‘APPAREIL 1. Affichage laser marche / arrêt 2. Affichage valeur maximum 3. Affichage surface des murs en m² 4. Affichage surface du sol en m² 5. Affichage circonférence en m 6. Affichage addition / soustraction 7 . Affichage visée de référence devant / arrière 8.
  • Page 33: Alimentation En Courant

    ALIMENTATION EN COURANT MISE EN PLACE DES PILES Éteindre l‘instrument et ouvrir le compartiment de piles. Mettre 2 x AAA piles alcalines dans le compartiment de piles (attention à la polarité) et fermer le compartiment. OPÉRATION ALLUMER / ÉTEINDRE Appuyez brièvement sur le bouton pour allumer l‘instrument.
  • Page 34: Visée De Référence

    VISÉE DE RÉFÉRENCE Pressez brièvement le bouton (19) pour para- métrer la visée de référence: Mesure depuis le devant / l‘arrière de l‘appareil. Affichage: Visée de référence: arrière (à gauche) Visée de référence: devant (à droite) L ‘ UNITÉ DE MESURE Restez appuyé...
  • Page 35: Calcul De Surface

    CALCUL DE SURFACE En mode mesure simple appuyez brièvement sur le bouton (16) pour activer la fonction calcul de surface. Appuyez briévement sur le bouton (15) pour mesurer la première valeur (longueur). Appuyez briévement sur le bouton (15) pour mesurer la deuxième valeur (largeur). L ‘ instrument va calculer la suface automatiquement et l‘afficher à...
  • Page 36 ADDITION / SOUSTRACTION Appuyez brièvement sur le bouton (+): La prochaine valeur mesurée va automatiquement s‘additionner à la dernière valeur mesurée. Appuyez brièvement sur le bouton (-): La prochaine valeur mesurée va automatiquement se soustraire de la dernière valeur mesurée. Les fonctions addition et soustraction peuvent également être utilisées dans les fonctions surface et volume.
  • Page 37 CALCUL PYTHAGORE 1 (2 points) Appuyez brièvement sur le bouton (16) une fois pour entrer dans la fonction Pythagore 1. Visez avec le point laser sur le point supérieur et appuyez brièvement sur le bouton (15) pour mesurer la première valeur.
  • Page 38: Stockage De Mesures

    STOCKAGE DE MESURES Appuyez brièvement sur le bouton (18) pour mémoriser la valeur mesurée. L ‘écran va afficher la page de stockage. Appuyez sur les boutons (+) et (-), pour consultez les 10 dernières mesures. LE RÉTRO-ÉCLAIRAGE En mettant en marche l‘instrument le rétro-éclairage va s‘allumer automatiquement.
  • Page 39: Consignes De Sécurité

    CONSIGNES DE SÉCURITÉ UTILISATION CONFORME AUX PRESCRIPTIONS L ‘appareil projette un faisceau laser visible, pour effectuer p. ex. les travaux de mesures suivants: mesurer des distances. NETTOYAGE / REMISAGE (à l‘état humide) Essuyer l’instrument mouillé, humide ou sali en le frottant uniquement avec un tissu de nettoyage.
  • Page 40: Classification Des Lasers

    2, conformément à la norme DIN EN 60825-1:2014. De ce fait, l’instrument peut être utilisé sans avoir recours à d’autres mesures de sécurité. Au cas où l’utilisa- www.geo-fennel.de G E R M A N Y teur a regardé un court instant le faisceau Laser laser, les yeux sont tout de même protégés...
  • Page 41: Indications D' A Vertissement Et De Sécurité

    INDICATIONS D’ A VERTISSEMENT ET DE SÉCURITÉ · Prière de respecter les instructions fournies dans le mode d’emploi de l‘instrument. · Lire ces instructions avant d’utiliser l’instrument. · Ne jamais regarder le faisceau laser, même pas avec un appareil optique, à cause du risque de lésions oculaires pouvant en résulter. ·...
  • Page 42: Exclusion De La Responsabilité

    EXCLUSION DE LA RESPONSABILITÉ 1. L ‘utilisateur de ce produit est tenu de respecter ponctuellement les instructions du mode d‘emploi. Tous les instruments ont été très soi- gneusement vérifiés avant leur livraison. Toutefois, l‘utilisateur devra s‘assurer de la précision de ce niveau avant chaque emploi. 2.
  • Page 44 GmbH Technische Änderungen vorbehalten. Kupferstraße 6 All instruments subject to technical changes. D-34225 Baunatal Sous réserve de modifications techniques. Tel. +49 561 / 49 21 45 +49 561 / 49 72 34 info@geo-fennel.de www.geo-fennel.de 11/2017 Precision by tradition.

Table des Matières