Télécharger Imprimer la page

Publicité

Les langues disponibles

Les langues disponibles

Liens rapides

DE | EN | FR
FET 220K-L
BEDIENUNGSANLEITUNG
USER MANUAL
MODE D'EMPLOI
www.geo-fennel.de
www.geo-fennel.com
www.geo-fennel.fr

Publicité

loading

Sommaire des Matières pour geo-FENNEL FET 220K-L

  • Page 1 DE | EN | FR FET 220K-L BEDIENUNGSANLEITUNG USER MANUAL MODE D‘EMPLOI www.geo-fennel.de www.geo-fennel.com www.geo-fennel.fr...
  • Page 2 Sehr geehrter Kunde, vielen Dank für das Vertrauen, welches Sie uns beim Erwerb Ihres neuen geo-FENNEL-Gerätes ent- gegengebracht haben. Dieses hochwertige Qualitätsprodukt wurde mit größter Sorgfalt produziert und qualitätsgeprüft. Die beigefügte Anleitung wird Ihnen helfen, das Gerät sachgemäß zu bedienen. Bitte lesen Sie ins- besondere auch die Sicherheitshinweise vor der Inbetriebnahme aufmerksam durch.
  • Page 3 EIGENSCHAFTEN · Beidseitig großes, gut ablesbares Display · Laserlot zur einfachen Ausrichtung über dem Bodenpunkt · Beleuchtung von Fernrohrgesichtsfeld und Display · Horizontalkreis: Hold-Funktion, 0-Stellung an jeder beliebigen Position, Ablesung rechts- oder linksläufig · Vertikalkreis: Ablesung in gon / Grad / Prozent ·...
  • Page 4 STROMVERSORGUNG Gerät ausschalten und Batterie- / Akkufach abnehmen. Der Akku wird außerhalb des Gerätes mit dem Ladege- rät aufgeladen und anschließend wieder an das Gehäuse angeklickt. Batteriebetrieb: Batterien in das dafür vorgesehene Fach einlegen (Pola- rität beachten) und in das Gerät einsetzen. AKKU LADEN Batteriefach aus dem Gerät entnehmen und Ladegerät mit Batteriefach und Steckdose verbinden.
  • Page 5 BEDIENFELD UND DISPLAY 1. Handgriff 2. Schraube Handgriff 3. Grobvisier 4. Vertikalklemme und Vertikalfeintrieb 5. Bedientastatur 6. Objektiv 7 . Röhrenlibelle 8. Display 9. Fernrohrokular 10. Dreifuß 11. Fußschraube 12. Fokussierung 13. Batterie- / Akkufach 14. Horizontalklemme und Horizontalfeintrieb 15. Verriegelungshebel GRUNDEINSTELLUNGEN DES GERÄTES BEI AUSLIEFERUNG 1“...
  • Page 6 TASTENFUNKTIONEN TASTE FUNKTION Gerät ein- und ausschalten; dabei Taste gedrückt halten, bis der Piepton ertönt 0SET Nullsetzung Horizontalwinkel Auswahl der Zählrichtung des Horizontalwinkels (rechtsläufig / linksläufig) HOLD Feststellung der Hz-Kreisablesung Umschaltung von Höhenwinkel auf % Umschaltung auf zweite Tastenfunktion mit SFT: SFT + SFT Anzeige der elektronischen Libelle (schnell kurz drücken)
  • Page 7 BEDIENUNG VORBEREITUNG ZUR MESSUNG · Stativ Stativbeine auf gewünschte Höhe ausziehen und festklemmen. Stativ sicher aufstellen. · Instrument auf dem Stativ befestigen Instrument vorsichtig auf das Stativ setzen. Die Stativanzugsschraube (mit 5/8“-Gewinde) ein- schrauben, bis das Instrument sicher befestigt ist. ·...
  • Page 8 PARAMETER SETZEN 0SET gedrückt halten und Gerät einschalten - >Displayanzeige = Parameter 1 (mit bisher gewählter Einstellung) Parametereinstellung 1. mit R/L (OFF / 1-AX / 2-AX) Achskorrektur festlegen Mit 0SET Parameter 2 anwählen 2. mit R/L (OFF / ON) Winkelwert Zenit verändern (Koordinatensystem um 90° drehen) Mit 0SET Parameter 3 anwählen 3.
  • Page 9 UMSCHALTUNG ZÄHLRICHTUNG DES HORIZONTALKREISES (HR / LR) Im Standardmodus ist die Zählrichtung des Horizontalwinkels rechtsläufig (Displayanzeige HR). Durch Drücken der Taste R/L kann die Zählrichtung auf linksläufig umgestellt werden (Display- anzeige HL). Mit R/L kann nur der Horizontalkreis umgestellt werden. R/L erneut drücken, um wieder von HL auf HR umzustellen.
  • Page 10 Der Laserstrahl ist gepulst und kann mit jedem geo-FENNEL -Empfänger für Rotationslaser verwendet werden. Somit kann der FET 220K-L für alle Arbeiten, für die man einen Rotationslaser benötigen würde, eingesetzt werden. Der Laserpunkt hat im fokussierten Bereich (bei scharf gestelltem Bild) dem geringsten Durchmesser.
  • Page 12 SICHERHEITSHINWEISE BESTIMMUNGSGEMÄSSE VERWENDUNG Triangulierungen, Polygonierungen und Ingenieurvermessungen im Bauwesen sowie Katastervermes- sung. UMGANG UND PFLEGE Messinstrumente generell sorgsam behandeln. Nach Benutzung mit weichem Tuch reinigen (ggfs. Tuch in etwas Wasser tränken). Wenn das Gerät feucht war, sorgsam trocknen. Erst in den Koffer oder die Tasche packen, wenn es absolut trocken ist.
  • Page 13 Das Gerät darf ohne weitere Sicherheitsmaßnahmen eingesetzt werden. Das Auge ist bei zufälligem, kurzzeitigem Hineinsehen in den Laserstrahl durch den Lidschlussreflex geschützt. Laserwarnschilder der Klasse 2 sind gut sichtbar am Gerät angebracht. www.geo-fennel.de G ERMAN Y Laser IEC 60825-1:2014 P ≤ 1 mW @ 635 - 670 nm...
  • Page 14 Dear customer, Thank you for your confidence in us having purchased a geo-FENNEL instrument. This manual will help you to operate the instrument appropriately. Please read the manual carefully - particularly the safety instructions. A proper use only guarantees a longtime and reliable operation.
  • Page 15 FEATURES · 2 large easy-to-read LCDs · Laser plummet for easy set up over the ground point · Illumination of LCD and field of view · Horizontal circle: Hold-Function, 0-set at any desired position, clockwise/anti-clockwise reading · Vertical circle: reading in gon / degrees / percent ·...
  • Page 16 POWER SUPPY Power off the instrument and remove the Li-Ion battery case. Charge the Li-Ion battery outside of the instrument and insert it again when fully charged. Operation with batteries: Insert the batteries into the Alkaline battery case (take care of correct polarity) and fix the battery case in the battery compartment.
  • Page 17 KEYPAD AND FUNCTIONS 1. Carrying handle 2. Handle locking screw 3. Optical sight 4. Vertical tangent screw and clamp 5. Keypad 6. Objective lens 7 . Plate level 8. Display 9. Eyepiece 10. Tribrach 11. Footscrew 12. Focusing drive 13. Battery compartment 14.
  • Page 18 FUNCTIONS OF BUTTONS BUTTON FUNCTION Power ON/OFF the unit; keep the button pressed until a beep sounds 0SET 0SET of the horizontal angle Left/right horizontal angle measurement HOLD HOLD the horizontal angle Vertical angle / percent display Switch to the second button function with SFT: SFT + SFT Display of the electronic vial (press fast and short)
  • Page 19 OPERATION PREPARATION FOR MEASUREMENT Level and centre the instrument precisely to ensure an optimum performance. · Tripod Extend the tripod legs to a suitable height and tighten them. · Fix the instrument onto the tripod Attach the instrument onto the tripod carefully. Screw in the retaining bolt until the instrument is carfeully fixed.
  • Page 20 PARAMETER SETTING Keep 0SET pressed and power on the instrument - >Display indication = parameter 1 (with the current setting) Set parameter 1. with R/L (OFF / 1-AX / 2x-AX) set the tilt correction Select parameter 2 with 0SET 2. with R/L (OFF / ON) select the verticle angle indication OFF (zenith 0), ON (horizontal 0) Select parameter 3 with 0SET 3.
  • Page 21 MODE CONVERSION OF THE HORIZONTAL RIGHTWARD (HR) AND LEFTWARD (HL) TURNING INCREMENT Standardly the horizontal angle mode is clockwise (display indication HR). Press R/L to transform the horizontal angle mode to anti-clockwise (display indication HL). The key R/L is of no effect to the vertical angle. Press R/L again to transform the mode from HL to HR.
  • Page 22 The laser beam is pulsed and can therefore be used together with any geo-FENNEL receiver for rota- ting lasers. Thus, FET 220K-L can be applied for any task that would require the use of a rotating laser. The smallest diameter of the laser dot will be achieved if the laser beam is focussed.
  • Page 24 SAFETY NOTES INTENDED USE OF INSTRUMENT Triangle, polygon and engineer measurements in the field of civil engineering as well as cadastral survey. CARE AND CLEANING Handle measuring instruments with care. Clean with soft cloth only after any use. If necessary damp the cloth with some water.
  • Page 25 It is allowed to use the unit without further safety precautions. The eye protection is normally secured by the aversion responses and the blink reflex. The laser instrument is marked with class 2 warning labels. www.geo-fennel.de GER MANY Laser IEC 60825-1:2014 P ≤...
  • Page 26 CONTENU 1. Livré comme suit 2. Alimentation en courant 3. Clavier et écran 4. Opération 5. Consignes de sécurité LIVRÉ COMME SUIT · Théodolite électronique FET 220K-L · Embase · Batterie Li-Ion · Chargeur · Bloc de piles en secours ·...
  • Page 27 CARACTÉRISTIQUES · 2 grands écrans faciles à lire · Plomb laser pour une mise en place facile au-dessus du point sol · Éclairage du champ de visée de l'objectif à l'écran · Angle Hz: Position zéro, arrêt du cercle dans n'importe quelle position; cercle hz tournant à droite ou à...
  • Page 28 ALIMENTATION EN COURANT Mettez l‘instrument hors service et enlevez le comparti- ment de batterie rechargeable. Chargez la batterie hors de l‘instrument et remontez-la dans l‘instrument. Opération avec piles: Mettez en place les piles dans leur boîte (attention à la polarité) et montez la boîte dans l‘instrument. CHARGER LA BATTERIE RECHARGABLE Enlevez la batterie rechargeable de l‘instrument pour la charger hors de l‘instrument.
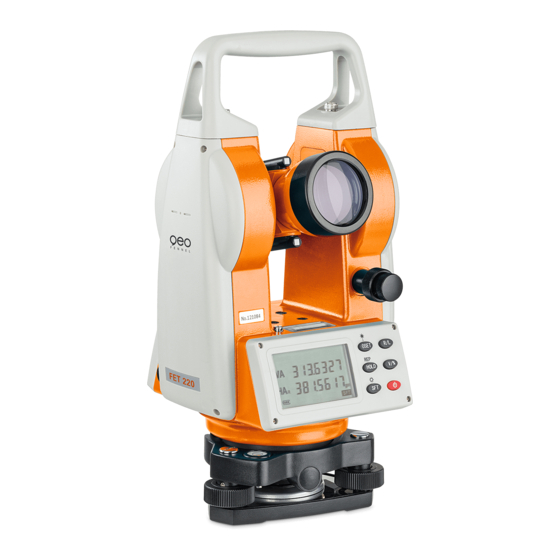
  • Page 29 CLAVIER ET ÉCRAN 1. Poignée 2. Vis de fixation de la poignée 3. Viseur optique 4. Vis de réglage micrométrique verticale et de blocage de mouvement 5. Clavier 6. Lentille de l‘objectif 7 . Nivelle d‘alidade 8. Écran 9. Oculaire 10.
  • Page 30 FONCTIONS DES TOUCHES TOUCHE FONCTION Mettre l‘instrument en marche/arrêt; tenez la touche appuyée jusqu‘au bip. 0SET Parametrage du 0 pour l‘angle horizontal R = lecture de l‘angle horizontal en sens horaire L = lecture de l‘angle hoirzontal en sens inverse de l‘horaire HOLD Mémorisation de l‘angle horizontal...
  • Page 31 OPÉRATION MISE EN STATION DU THÉODOLITE · Montez le trépied Placez les jambes du trépied à un endroit approprié et serrez le dispositif de verrouillage. · Montez l‘ instrument sur le trépied. Fixez l‘appareil sur le trépied avec soin, puis bougez l‘instrument en desserrant la vis de blocage centrale.
  • Page 32 CONFIGURATION Tenez appuyé sur 0SET et mettez l‘instrument en marche. - >Affichage de l‘écran = paramètre 1 (avec la configuration actuelle)) Configuration 1. Réglez la correction de l‘axe avec la touche R/L (OFF / 1-AX / 2x-AX) Sélectionez paramètre 2 avec 0SET 2.
  • Page 33 ANGLES HORIZONTAUX EN HR ET HL En mode standard la lecture de l‘angle horizontal est en sens horaire (affichage HR). En appuyant sur la touche R/L la lecture peut être passée en sens inverse de l‘horaire (affichage HL). R/L: La touche n’est pas utilisable en angle vertical. Appuyez sur la touche R/L pour retourner à...
  • Page 34 être ajusté. Ainsi, le marquage de la cible peut être accompli par une seule personne. Le faisceau laser est pulsé et peut donc être utilisé avec n'importe quel récepteur geo-FENNEL pour les lasers rotatifs. Ainsi, FET 220K-L peut être utilisé pour toute tâche qui exigerait l'utilisation d'un laser rotatif.
  • Page 36 CONSIGNES DE SÉCURITÉ UTILISATION CONFORME AUX PRESCRIPTIONS Trianguler, polygoner et mesurages d‘ingénieur dans le secteur de la construction et cadastre. NETTOYAGE / REMISAGE (à l‘état humide) Essuyer l’instrument mouillé, humide ou sali en le frottant uniquement avec un tissu de nettoyage. Quant à...
  • Page 37 EXCLUSION DE LA RESPONSABILITÉ 1. L ‘utilisateur de ce produit est tenu de respecter ponctuellement les instructions du mode d‘emploi. Tous les instruments ont été très soigneusement vérifiés avant leur livraison. Toutefois, l‘utilisateur devra s‘assurer de la précision de ce niveau avant chaque emploi. 2.
  • Page 38 Les pictogrammes de danger de la classe 2 sont bien visibles sur le niveau. www.geo-fennel.de Laser IEC 60825-1:2014...
  • Page 40 GmbH Technische Änderungen vorbehalten. Kupferstraße 6 All instruments subject to technical changes. D-34225 Baunatal Sous réserve de modifications techniques. Tel. +49 561 / 49 21 45 +49 561 / 49 72 34 info@geo-fennel.de 08/2021 www.geo-fennel.de Precision by tradition.