
Manuels Connexes pour geo-FENNEL GeoDist 30


Sommaire des Matières pour geo-FENNEL GeoDist 30
- Page 1 DE | EN | FR GeoDist® 30 BEDIENUNGSANLEITUNG USER MANUAL MODE D‘EMPLOI www.geo-fennel.de www.geo-fennel.com www.geo-fennel.fr...
-
Page 2: Table Des Matières
Sehr geehrter Kunde, vielen Dank für das Vertrauen, welches Sie uns beim Erwerb Ihres neu- en geo-FENNEL-Gerätes entgegengebracht haben. Dieses hochwertige Qualitätsprodukt wurde mit größter Sorgfalt produziert und qualitätsge- prüft. Die beigefügte Anleitung wird Ihnen helfen, das Gerät sachgemäß zu bedienen. -
Page 3: Lieferumfang
LIEFERUMFANG · Laserentfernungsmesser GeoDist® 30 · Batterien · Holster · Bedienungsanleitung MERKMALE · Fläche / Volumen · Messebene: vorn, hinten · Beleuchtetes Display · Automatische Abschaltung · Einheiten: mm, ft, inch · Signalton bestätigt Messung Technische Daten Genauigkeit (typisch)* ±2 mm Messdistanz* (innen) 0,05 - 30 m Laserklasse... -
Page 4: Bedienelemente
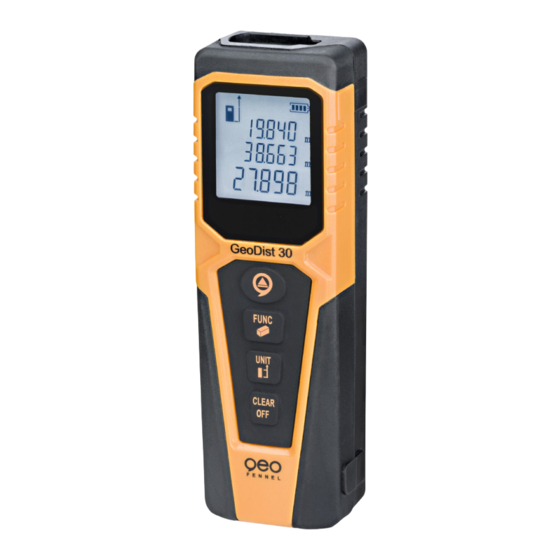
BEDIENELEMENTE 1. Laseranzeige 2. Anzeige Messebene 3. Symbol Fläche / Volumen 4. Empfangssignal zu stark / schwach 5. Batteriezustandsanzeige 6. Nebenanzeigen 7 . Hauptanzeige 8. Anzeige Einheiten 9. Gerät AN / Messtaste 10. Funktionstaste 11. Messebene / Einheit 12. Löschen / Gerät AUS... -
Page 5: Stromversorgung
STROMVERSORGUNG BATTERIE EINLEGEN Gerät ausschalten und das Batteriefach auf der Rückseite öffnen. 2 x AAA Alkalinebatterien einlegen (korrekte Polarität beachten). Batteriefachdeckel wieder schließen. BEDIENUNG EIN- / AUSSCHALTEN Taste kurz drücken, um das Gerät einzuschal- ten. Standardeinstellung: Einzelmessung, Mess- ebene hinten. Messeinheit: die zuletzt eingestellte Einheit. - Page 6 Taste lang drücken, um das Gerät auszuschal- ten. Nach 3 Minuten ohne Bedienung schaltet sich das Gerät automatisch aus. MESSEBENE Taste (11) kurz drücken, um die Messebene einzustellen: Messung ab Vorderseite oder ab Rückseite des Gerätes. Displayanzeige Messebene hinten (Bild links), Messebene vorn (Bild rechts).
-
Page 7: Messungen Vornehmen
MESSUNGEN VORNEHMEN Bei starker Sonneneinstrahlung oder reflektierenden Oberflächen sollte eine Zieltafel verwendet werden. EINZELDISTANZEN MESSEN Gerät mit Taste (9) einschalten, Laser auf den ge- wünschten Messpunkt richten und die Messtaste (9) drücken. Der Messwert wird unten im Display als Hauptanzeige angezeigt. Wird die nächste Messung vorgenommen, wandert der zuvor gemessene Wert in der Liste der Nebenanzeigen um eine Stelle nach oben. - Page 8 VOLUMENMESSUNG Taste FUNC (10) zweimal lang drücken, um die Volumenmessfunktion zu starten. Laser auf den ersten Zielpunkt (z. B. Länge) richten und Messtaste (9) kurz drücken. Laser auf den zweiten Zielpunkt (z. B. Breite) richten und Messtaste (9) erneut kurz drücken. Laser auf den dritten Zielpunkt (z.
-
Page 9: Fehlermeldungen
FEHLERMELDUNGEN ANZEIGE FEHLER PROBLEMLÖSUNG Empfangssignal zu stark / Andere Zieloberfläche zu schwach; verwenden Messzeit zu lang E-007 Zu viel Hintergrundlicht Zielbereich abdunkeln E-008 Temperatur zu hoch Gerät abkühlen lassen E-009 Temperatur zu niedrig Gerät wärmen E-006 Fehler in der Berechnung Messung wiederholen;... -
Page 10: Sicherheitshinweise
SICHERHEITSHINWEISE BESTIMMUNGSGEMÄSSE VERWENDUNG Das Gerät sendet einen sichtbaren Laserstrahl aus, um z.B. folgende Messaufgaben durchzuführen: Ermittlung von Distanzen. UMGANG UND PFLEGE Messinstrumente generell sorgsam behandeln. Nach Benutzung mit weichem Tuch reinigen (ggfs. Tuch in etwas Wasser tränken). Wenn das Gerät feucht war, sorgsam trocknen. Erst in den Koffer oder die Tasche packen, wenn es absolut trocken ist. -
Page 11: Ce-Konformität
CE-KONFORMITÄT Das Gerät hat das CE-Zeichen gemäß den Normen EN 61010-1:2010. GARANTIE Die Garantiezeit beträgt zwei (2) Jahre, beginnend mit dem Verkaufsda- tum. Die Garantie erstreckt sich nur auf Mängel wie Material-oder Her- stellungsfehler, sowie die Nichterfüllung zugesicherter Eigenschaften. Ein Garantieanspruch besteht nur bei bestimmungsgemäßer Verwendung. - Page 12 LASERKLASSIFIZIERUNG Das Gerät entspricht der Lasersicherheitsklasse 2 gemäss der Norm DIN EN 60825-1:2014. Das Gerät darf ohne weitere Sicherheitsmassnahmen eingesetzt werden. Das Auge ist bei zufälligem, kurzzeitigem Hineinse- hen in den Laserstrahl durch den Lidschlussreflex geschützt. Laserwarnschilder der Klasse 2 sind gut sichtbar am Gerät angebracht. Laser IEC 60825-1:2014 P ≤...
- Page 13 HAFTUNGSAUSSCHLUSS Der Benutzer dieses Produktes ist angehalten, sich exakt an die Anweisungen der Bedienungsanleitung zu halten. Alle Geräte sind vor der Auslieferung genauestens überprüft worden. Der Anwender sollte sich trotzdem vor jeder Anwendung von der Genauigkeit des Gerätes überzeugen. Der Hersteller und sein Vertreter haften nicht für fehlerhafte oder absichtlich falsche Verwendung sowie daraus eventuell resultieren- de Folgeschäden und entgangenen Gewinn.
- Page 14 Dear Customer, Thank you for your confidence in us, having purchased a geo-Fennel instrument. For the optimum performance of the instrument, please read this ma- nual carefully and keep it in a convenient place for future reference. This manual contains important safety information that should be read and understood before use.
-
Page 15: Supplied With
EN E N SUPPLIED WITH · Laser distance meter GeoDist® 30 · Batteries · Holster · User manual FEATURES · Area / volume · Point of reference: front, rear · Illuminated display · Automatic power-off · Units: mm, ft, inch ·... -
Page 16: Features
FEATURES 1. Laser „ON“ symbol 2. Measurement reference symbol 3. Area / volume symbol 4. Receiving signal indication 5. Battery status indication 6. Previous measurements 7 . Main measurement 8. Unit symbol 9. Power ON / measuring button 10. Function button 11. -
Page 17: Power Supply
POWER SUPPLY INSERTING AND REPLACING THE BATTERIES Power off the device, open the battery compartment cover and insert 2 x AAA Alkaline batteries (ensure correct polarity). Close the cover. OPERATION POWER ON / OFF Press (briefly) to power on the device and activate the laser. -
Page 18: Measurement Reference
Press and hold to power off the device. To maximise battery life the device will power off after 3 minutes inactivity. MEASUREMENT REFERENCE Press button (11) to change the measurement reference between front / rear. Display indication Reference rear: (left) Reference front: (right) SELECT UNITS Press and hold in succession to select the... -
Page 19: Area Measurement
MEASURING When measuring in bright sunshine or to a reflective surface, it is recommended to use a target plate. MEASURING A SINGLE DISTANCE Power on the device, aim the laser point at the target and press the measuring button (9). The measured distance is displayed in the main measurement line (7). -
Page 20: Volume Measurement
VOLUME MEASUREMENT Keep button (10) pressed twice to enter into the volume measurement function. Aim the laser at the first target (i. e. length) and press the measuring button (9) briefly. Aim the laser at the second target (i. e. width) and press the measuring button (9) once again briefly. -
Page 21: Message Codes
MESSAGE CODES INDICATION ERROR SOLUTION Received signal too Change the target surface weak / too strong; measuring time too long E-007 Too much background Shadow the target area light E-008 Temperature too high Cool the device down E-009 Temperature too low Warm the device up E-006 Calculation error... -
Page 22: Safety Notes
SAFETY NOTES INTENDED USE OF INSTRUMENT The instrument emits a visible laser beam in order to carry out the following measuring tasks: Measurement of distances. CARE AND CLEANING Handle measuring instruments with care. Clean with soft cloth only after any use. If necessary damp the cloth with some water. If the instrument is wet clean and dry it carefully. -
Page 23: Safety Instructions
CE-CONFORMITY This instrument has the CE mark according to EN 61010-1:2010. WARRANTY This product is warranted by the manufacturer to the original purchaser to be free from defects in material and workmanship under normal use for a period of two (2) years from the date of purchase. During the war- ranty period, and upon proof of purchase, the product will be repaired or replaced (with the same or similar model at manufacturers option), wit- hout charge for either parts or labour. -
Page 24: Laser Classification
LASER CLASSIFICATION The instrument is a laser class 2 laser product according to DIN IEC 60825-1:2014. It is allowed to use the unit without further safety precautions. The eye protection is normally secured by aversion responses and the blink reflex. The laser instrument is marked with class 2 warning labels. -
Page 25: Exceptions From Responsibility
EXCEPTIONS FROM RESPONSIBILITY The user of this product is expected to follow the instructions given in the user manual. Although all instruments left our warehouse in perfect condition and adjustment the user is expected to carry out periodic checks of the product’s accuracy and general performance. The manufacturer, or its representatives, assumes no responsibility of results of a faulty or intentional usage or misuse including any direct, indirect, consequential damage, and loss of profits. - Page 26 Cher client, Nous tenons à vous remercier pour la confiance que vous avez témoig- née, par l‘acquisition de votre nouvel instrument geo-FENNEL. Les instructions de service vous aideront à vous servir de votre instru- ment de manière adéquate. Nous vous recommandons de lire avec soin tout particulièrement les consignes de sécurité...
-
Page 27: Livré Comme Suit
LIVRÉ COMME SUIT · Télémètre laser GeoDist® 30 · Piles · Étui · Mode d‘emploi CARACTÉRISTIQUES · Surface / volume · Prise de mesure: devant / derrière · Écran rétro-éclairé · Déclencheur automatique, réglable · Unités: mm, ft, inch · Son confirmant la mesure Données techniques Précision (typique)*... -
Page 28: Description De L'apprareil
DESCRIPTION DE L‘APPAREIL 1. Indication laser 2. Indication référence de visée 3. Symbole surface / volume 4. Signal trop fort ou trop faible 5. Indication autonomie batterie 6. Liste d‘affichage auxiliaire 7 . Liste d’affichage principale 8. Symbole d‘unité 9. Bouton MARCHE / mesure 10. -
Page 29: Alimentation En Courant
ALIMENTATION EN COURANT MISE EN PLACE DES PILES Éteindre l‘instrument et ouvrir le compartiment de piles. Mettre 2 x AAA piles alcalines dans le compartiment de piles (attention à la polarité) et fermer le compartiment. OPÉRATION ALLUMER / ÉTEINDRE Appuyez brièvement sur le bouton pour allumer l‘instrument. -
Page 30: La Visée De Référence
Appuyez longuement sur le bouton pour éteindre l‘appareil. Après 3 minutes sans manipulation l‘appareil s‘éteint automatiquement. LA VISÉE DE RÉFÉRENCE Pressez brièvement le bouton (11) pour para- métrer la visée de référence: Mesure depuis le devant / l‘arrière de l‘appareil. Indication Visée de référence: arrière (à... -
Page 31: Mesure Simple
MESURE Sous les rayons du soleil ou sur un objet réfléchissant il faut utiliser une cible. MESURE SIMPLE Allumez l‘appareil et visez à l‘aide du point laser la cible que vous voulez mesurer; appuyez sur le bouton (9) et la mesure est effectuée. Le résultat de la mesure va apparaître sur l‘écran et la mesure précédante va être déplacée dans la liste auxiliaire de mesures. -
Page 32: Calcul De Volume
CALCUL DE VOLUME Appuyez deux fois longuement sur le bouton (10) pour activer la fonction calcul de volume. Appuyez brièvement sur le bouton (9) pour mesurer la première valeur (longueur). Appuyez brièvement sur le bouton (9) pour mesurer la deuxième valeur (largeur). Appuyez brièvement sur le bouton (9) pour mesurer la troisième valeur (hauteur). -
Page 33: Codes De Message
CODES DE MESSAGE INDICATION ERREUR CORRECTION Signal recu trop faible / Changer la surface cible trop fort; temps de mesure trop long E-007 Luminosité trop forte Mettre la zone cible à l‘ombre E-008 Température trop haute Laisser refroidir l‘appareil E-009 Température trop basse Réchauffer l‘appareil E-006... -
Page 34: Consignes De Sécurité
CONSIGNES DE SÉCURITÉ UTILISATION CONFORME AUX PRESCRIPTIONS L ‘appareil projette un faisceau laser visible, pour effectuer p. ex. les travaux de mesures suivants: mesurer des distances. NETTOYAGE / RANGEMENT (à l‘état humide) Essuyer l’instrument mouillé, humide ou sali en le frottant uniquement avec un tissu de nettoyage. -
Page 35: Classification Des Lasers
CONFORMITÉ CE Le niveau porte le label CE conformément aux normes NE 61010-1:2010. GARANTIE La durée de garantie est de deux (2) ans à partir de la date d‘achat. Cette garantie ne couvre que les défauts tels que le matériel défectueux ou les anomalies de fabrication, ainsi que le manque des propriétés prévues. -
Page 36: Indications D' A Vertissement Et De Sécurité
INDICATIONS D’ A VERTISSEMENT ET DE SÉCURITÉ · Prière de respecter les instructions fournies dans le mode d’emploi du niveau. · Lire ces instructions avant d’utiliser l’instrument. · Ne jamais regarder le faisceau laser, même pas avec un appareil optique, à cause du risque de lésions oculaires pouvant en résulter. - Page 37 EXCLUSION DE LA RESPONSABILITÉ · Le fabricant et son représentant déclinent toute responsabilité pour les dommages consécutifs et les bénéfices non réalisés par suite de catastrophes naturelles, comme p. ex. tremblement de terre, tempête, raz de marée etc. ainsi que d‘incendie, accident, interven- tion malintentionnée d‘une tierce personne, ou encore dus à...
- Page 40 GmbH Technische Änderungen vorbehalten. Kupferstraße 6 All instruments subject to technical changes. D-34225 Baunatal Sous réserve de modifications techniques. Tel. +49 561 / 49 21 45 +49 561 / 49 72 34 info@geo-fennel.de www.geo-fennel.de 06/2016 Precision by tradition.