Table des Matières

Publicité

Les langues disponibles
  • FR

Les langues disponibles

  • FRANÇAIS, page 14

Liens rapides

Art.-Nr.: 11437
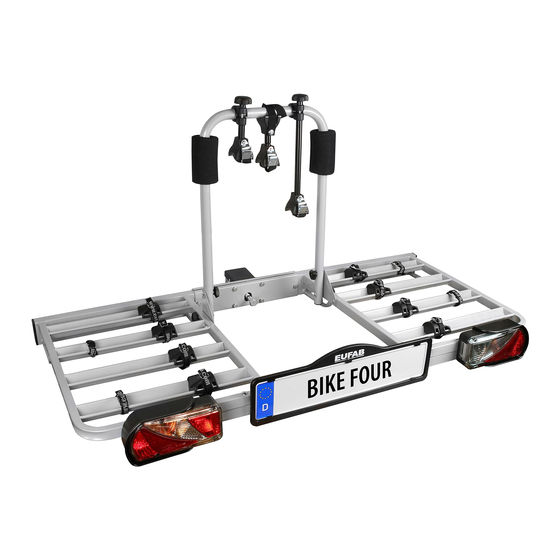
BIKE FOUR für Anhängerkupplungsträger
für bis zu vier Fahrräder
Bedienungsanleitung .............. 2
Article number 11437
BIKE FOUR for
trailer tow bar rack for up to four bicycles
Operating instructions ............. 8
Réf. 11437
BIKE FOUR pour attelage
de remorque pour jusqu'à quatre vélos
Manuel de l'opérateur ............. 14
Cod. art. 11437
BIKE FOUR per supporti per ganci
di traino per un massimo di quattro biciclette
Istruzioni per l'uso ................... 20
Art.nr. 11437
Fietsendrager „BIKE FOUR"
voor de trekhaak, voor maximaal vier fietsen
Gebruiksaanwijzing ................. 26
Obj.č. 11437
Zadní nosič „BIKE FOUR" na závěsné
zařízení, pro až čtyři jízdní kola
Návod k obsluze ...................... 32
N. º de art. 11437
Dispositivo portante trasero „BIKE FOUR" para el
enganche del remolque, para hasta cuatro bicicletas
Manual de instrucciones .......... 38
Nr art. 11437
Bagażnik na rowery „BIKE FOUR" na sprzęg
przyczepny, transport do czterech rowerów
Instrukcja obsługi .................... 44
Št. art. 11437
Nosilec za kolesa „BIKE FOUR" za
montažo na vlečno kljuko, za do štiri kolesa
Navodila za uporabo ................ 50
1

Publicité

Table des Matières
loading

Sommaire des Matières pour EUFAB BIKE FOUR

  • Page 1: X Podložka 15,8 X 8

    Návod k obsluze ...... 32 Article number 11437 N. º de art. 11437 BIKE FOUR for Dispositivo portante trasero „BIKE FOUR“ para el trailer tow bar rack for up to four bicycles enganche del remolque, para hasta cuatro bicicletas Operating instructions ..... 8 Manual de instrucciones ..
  • Page 2: Table Des Matières

    1. BESTIMMUNGSGEMÄSSER GEBRAUCH Der Fahrradträger BIKE FOUR wird an der Anhängerkupplung von Personenwagen befestigt und ist zum Transport von bis zu vier Fahrrädern vorgesehen. Dieses Gerät ist nicht dafür bestimmt, durch Kinder und Personen mit eingeschränkten geistigen Fähigkeiten oder ohne erforderliches Fachwissen benutzt zu werden.
  • Page 3: Sicherheitshinweise

    Beachten Sie die Hinweise des Kupplungsherstellers. Im Zweifel fragen Sie direkt beim Hersteller Ihrer Anhängerkupplung, ob diese geeignet ist. 4. SICHERHEITSHINWEISE • Das Warndreieck kennzeichnet alle für die Sicherheit wichtigen Anweisungen. Befolgen Sie diese immer, anderenfalls könnten Sie sich verletzen oder das Gerät könnte beschädigt werden. •...
  • Page 4: Montage Des Trägertisches

    5.1 MONTAGE DES TRÄGERTISCHES Trägertischtraverse Trägertischhälfte rechts Trägertischhälfte links Schlossschraube M6 x 70, Scheibe17,9 x 6,5 x 1,2, Mutter M6 Legen Sie die linke und rechte Hälfte des Trägertisches auf eine ebene Unterlage, wobei die Öffnung der Radschienen nach oben zeigt. Befestigen Sie die Trägertraverse am Trägertisch indem Sie die Schlossschrauben von oben durch den Trägertisch und die Trägertraverse stecken und von unten mit Scheiben und Muttern verschrauben, ziehen Sie die Muttern jetzt noch nicht fest an.
  • Page 5: Montage Der Rückleuchten

    Scheibe 17,9 x 6,5 x 1,2 Mutter M6 Schieben Sie die Schutzgummis auf den U-Bügel. Montieren Sie nun den U-Bügel, siehe Bilder 1 u. 2. M6 x 45 M6 x 45 mit Scheibe17,9 x 6,5 x 1,2 und Knaufmutter M6 M6 x 60 M6 x 60 mit Scheibe17,9 x 6,5 x 1,2 und Knaufmutter M6 M6 x 30...
  • Page 6: Montage Der Fahrräder Auf Dem Fahrradträger

    Werden der Träger und sein Verschluss nicht waagerecht aufgesetzt, kann es zu Druckspuren auf dem Kugelkopf der Anhän- gerkupplung kommen. Ziehen Sie die Schraube M16 leicht fest und richten Sie den Fahrradträger parallel zum Fahrzeugheck aus. Ziehen Sie nun die Schraube M16 so fest an, bis der Träger sicher befestigt ist und sich nicht mehr verdrehen lässt.
  • Page 7: Wartung Und Pflege

    Stellen Sie sicher, dass vorhandene Dachkantenspoiler nicht beschädigt werden und dass die Funktion des Zugentlastungs- gurts durch solche Spoiler nicht beeinträchtigt wird. Befestigen Sie nun den Teil des Gurtes mit dem Schloss am U-Bügel, wie auf den Bildern 1 bis 4 gezeigt. Bild 1 Bild 2 Bild 3...
  • Page 8 1. PROPER USE OF THE PRODUCT The BIKE FOUR bicycle rack is mounted to the trailer tow bar of a car and is designed for the transportation of up to four bicycles. Intended use also includes the observation of all information provided in these operating instructions, particularly the observance of safety instructions. Any other utilisation is considered to be contrary to the intended purpose and may lead to material damages or personal injuries.
  • Page 9: Westfalia

    Unsuitable ball rods made from GGG40 are produced by Westfalia for the following vehicles: Manufacturer Test symbol Suitable for F 4192 Audi A4 Westfalia F 3830 Audi A6 F 4112 Audi A8 Observe the instructions from the tow bar manufacturer. If in doubt, ask your manufacturer directly whether their trailer tow bar is suitable. 4.
  • Page 10: Mounting The Bicycle Rack

    Personal injury or property damages caused by increase wind loads. The bicycle rack and trailer tow bar may be damaged by too high a wind load. • Remove all bags from the bicycle before starting your journey. • Do not use protective covers for the bicycle during the journey. The general operating permit must be carried in the vehicle when the rack is mounted.
  • Page 11: Installation Of The Rear Lights

    Inserting the plugs Seal the ends of the tubes of the rack table using the rectangular plugs 80 x 30 [mm]. 5.2 MOUNTING THE U-SHAPED BAR Protective rubber U-shaped bar Knob nut M6 Lock screw M6 x 60 Lock screw M6 x 46 Lock screw M6 x 30 Stabilisation plate Washer 17.9 x 6.5 x 1.2...
  • Page 12: Mounting The Frame Holder

    5.6 MOUNTING THE FRAME HOLDER Undo the handle screw of the frame holder and rotate out fully. Open the cuff of the frame holder and place the inserts around the U-shaped bar at a position suitable for your bicycle. Place the cuff around the inserts and push firmly together. Close the frame holder using the handle screw (but do not tighten). 5.7 MOUNTING THE BICYCLE RACK ON THE TRAILER TOW BAR Make sure that the trailer tow bar is undamaged, clean and grease-free.
  • Page 13: Using The Tension-Relief Strap

    5.9 USING THE TENSION-RELIEF STRAP These instructions describe the use with estates and compact vehicles with a hatchback (rear door). With boots (saloons) proceed appropriately. Before mounting the tension-relief strap, remove dust and dirt from the upper region of the rear door in order to prevent scratching and abrasion when travelling with the tow-bar rack.
  • Page 14: Bike Four Pour Attelage De Remorque Pour Jusqu'à Quatre Vélos

    1. UTILISATION CONFORME The BIKE FOUR bicycle rack is mounted to the trailer tow bar of a car and is designed for the transportation of up to four bicycles. Intended use also includes the observation of all information provided in these operating instructions, particularly the observance of safety instructions. Any other utilisation is considered to be contrary to the intended purpose and may lead to material damages or personal injuries.
  • Page 15: Symbole De Contrôle

    Les boules d‘attelage non adaptées en GGG40 sont fabriquées par Westfalia pour les véhicules suivants : Fabricant Symbole de contrôle Adapté pour F 4192 Audi A4 Westfalia F 3830 Audi A6 F 4112 Audi A8 Respectez les consignes du fabricant de l‘attelage. En cas de doute, demandez au fabricant de votre attelage de remorque si elle est adaptée. 4.
  • Page 16: Montage Du Plateau Porteur

    Dommages matériels ou aux personnes en cas de forte charge de vent. Le porte-vélos et l‘attelage de remorque peuvent être endommagés en cas de charge du vent trop élevée. • Avant le déplacement, retirez toutes les sacoches du vélo. • N‘utilisez pas de housses pour vélo pendant le déplacement.
  • Page 17: Montage De L'étrier En U

    5.2 MONTAGE DE L‘ÉTRIER EN U Caoutchoucs de protection Étrier en U Écrous avec poignée M6 Vis à tête bombée M6 x 60 Vis à tête bombée M6 x 45 Vis à tête bombée M6 x 30 Tôles de stabilisation rondelles 17,9 x 6,5 x 1,2 Écrou M6 Glissez les caoutchouc de protection sur l‘étrier en U.
  • Page 18: Montage Du Support De Cadre

    5.6 MONTAGE DU SUPPORT DE CADRE Desserrez les écrous avec poignée du support de cadre et dévissez-les complètement. Ouvrez le collier du support de cadre et posez les inserts autour de l‘étrier en U à un endroit adapté à votre vélo. Replacez le collier autour des inserts et pressez fermement. Refermez le support de cadre à l‘aide de la vis avec poignée (ne serrez pas encore).
  • Page 19: Utilisation De La Sangle De Décharge De Traction

    5.9 UTILISATION DE LA SANGLE DE DÉCHARGE DE TRACTION Ce mode d‘emploi décrit l‘utilisation sur des breaks et des voitures compactes avec hayon (porte arrière). Procédez de la même façon pour les limousines. Avant de monter de la sangle de décharge de traction, retirez la poussière et la saleté de la zone supérieure du hayon afin d‘éviter des éraflures et des défauts causés par l‘abrasion durant un déplacement avec le porte-vélos arrière.
  • Page 20: Uso Conforme

    1. USO CONFORME Il portabiciclette BIKE FOUR va fissato al gancio di traino delle autovetture ed è previsto per il trasporto di max quattro biciclette. L‘uso conforme include anche il rispetto di tutte le informazioni fornite in queste istruzioni per l’uso, soprattutto delle avvertenze sulla sicurezza. Ogni altro utilizzo viene considerato improprio e può...
  • Page 21 Aste con sfera in GGG40 non adatte vengono prodotte da Westfalia per i seguenti veicoli: Produttore Simbolo di controllo Adatto per F 4192 Audi A4 Westfalia F 3830 Audi A6 F 4112 Audi A8 Rispettare le indicazioni del produttore del gancio di traino. Nel dubbio, verificare l‘idoneità del gancio di traino rivolgendosi direttamente al produttore. 4.
  • Page 22: Montaggio Del Portabiciclette

    5. ISTRUZIONI PER L‘USO Montaggio del portabiciclette Il portabiciclette deve essere ancora assemblato. Prelevare tutti i componenti dall‘imballo e disporli a terra. Controllare la fornitura. Ogni fase di lavoro è descritta e mostra chiaramente quali componenti occorrono per il montaggio del portabiciclette. 5.1 MONTAGGIO DEL PIANO DI SUPPORTO Traversa del piano di supporto Metà...
  • Page 23: Montaggio Della Staffa A U

    5.2 MONTAGGIO DELLA STAFFA A U Protezioni di gomma Staffa a U Dadi zigrinati M6 Vite a testa tonda con quadro Vite a testa tonda con quadro Vite a testa tonda con quadro Lamiera stabilizzante sottotesta M6 x 60 sottotesta M6 x 45 sottotesta M6 x 30 Rondella 17,9 x 6,5 x 1,2 Dadi M6...
  • Page 24: Montaggio Del Portabici Sul Gancio Di Traino

    5.6 MONTAGGIO DEI BRACCI DI SUPPORTO TELAIO Svitare la vite zigrinata del braccio di supporto telaio ed estrarla completamente. Aprire la fascetta del braccio di supporto telaio e far passare gli inserti intorno alla staffa a U, in un punto adeguato per la propria bicicletta. Rimettere la fascetta intorno agli inserti e premerli bene insieme. Chiudere il braccio di supporto telaio con la vite zigrinata (per ora non stringere a fondo).
  • Page 25: Utilizzo Della Cinghia Di Scarico Trazione

    5.9 UTILIZZO DELLA CINGHIA DI SCARICO TRAZIONE Nelle presenti istruzioni d‘uso è descritto l‘utilizzo del prodotto su station wagon e veicoli compatti con il portellone posteriore. Sui veicoli con coda a sbalzo (berline) procedere nel seguente modo. Prima di montare la cinghia di scarico trazione, rimuovere la polvere e lo sporco dalla parte superiore del portellone posteriore al fine di evitare graffi e sfregamenti durante la marcia con il supporto posteriore.
  • Page 26: Reglementair Gebruik

    1. REGLEMENTAIR GEBRUIK De fietsendrager BIKE FOUR wordt bevestigd aan de trekhaak van personenauto‘s en kan maximaal vier fietsen vervoeren. Dit product mag niet worden gebruikt door kinderen, mensen met een verstandelijke beperking of mensen die niet over de vereiste ervaring/kennis beschikken.
  • Page 27: Veiligheidsinstructies

    Neem de instructies van de fabrikant van de trekhaak in acht. Neem rechtsreeks contact op met de fabrikant van uw trekhaak als u niet zeker bent of deze geschikt is. 4. VEILIGHEIDSINSTRUCTIES • Deze waarschuwingsdriehoek markeert alle belangrijke veiligheidsaanwijzingen. Neem deze te allen tijde in acht, anders kunnen licha- melijk letsel of schade aan het apparaat het gevolg zijn.
  • Page 28 5.1 HET DRAAGFRAME MONTEREN Dwarsbalk Draagframehelft links Draagframehelft rechts Slotbout M6 x 70, ring 17,9 x 6,5 x 1,2, moer M6 Plaats de linker en rechter helften van het draagframe op een vlak oppervlak, met de opening van de wielrails naar boven gericht. Bevestig de dwarsbalk aan het draagframe door de slotbouten van bovenaf door draagframe en dwarsbalk te steken en deze van onderaf vast te schroeven met ringen en moeren, draai de moeren nog niet helemaal vast.
  • Page 29 Ring 17,9 x 6,5 x 1,2 Moer M6 Schuif de beschermrubbers op de U-beugel. Monteer nu de U-beugel, zie afb. 1 en 2. M6 x 45 M6 x 45 met ring 17,9 x 6,5 x 1,2 en knopmoer M6 M6 x 60 M6 x 60 met ring 17,9 x 6,5 x 1,2 en knopmoer M6 M6 x 30 M6 x 30 met ring 17,9 x 6,5 x 1,2 en moer M6...
  • Page 30: X Zaporni Vijak M6 X

    5.7 DE FIETSENDRAGER OP DE TREKHAAK MONTEREN Zorg ervoor dat de trekhaak onbeschadigd, schoon en vetvrij is. De fietsendrager wordt horizontaal van bovenaf op de trekhaak geplaatst. Als drager en grendel niet horizontaal worden geplaatst, kunnen er druksporen op de kogelkop van de trekhaak ontstaan. Draai de M16-bout iets aan en lijn de fietsendrager parallel aan de achterkant van het voertuig uit.
  • Page 31: Onderhoud En Verzorging

    Zorg ervoor dat eventueel aanwezige dakrandspoilers niet beschadigd raken en dat de werking van de trekontlastingsriem niet wordt beïnvloed door dergelijke spoilers. Bevestig nu het deel van de riem met het slot aan de U-beugel, zoals weergegeven in afb. 1 tot 4. Afb.
  • Page 32: Používání V Souladu S Určením

    1. POUŽÍVÁNÍ V SOULADU S URČENÍM Nosič jízdních kol BIKE FOUR se připevňuje na závěsné zařízení osobních vozidel a je určen k přepravě až čtyř jízdních kol. Toto zařízení není určeno k používání dětmi nebo osobami s omezenými duševními schopnostmi nebo bez potřebných odborných znalostí. Zamezte přístupu dětí...
  • Page 33: Bezpečnostní Upozornění

    Řiďte se pokyny výrobce závěsného zařízení. V případě pochybností se zeptejte přímo výrobce vašeho závěsného zařízení, zda je vhodné. 4. BEZPEČNOSTNÍ UPOZORNĚNÍ • Výstražný trojúhelník označuje všechny pokyny důležité pro bezpečnost. Tyto pokyny dodržujte vždy, v opačném případě si můžete způso- bit zranění...
  • Page 34 5.1 MONTÁŽ STOLU NOSIČE Traverza stolu nosiče Polovina stolu nosiče Polovina stolu nosiče levá pravá Šroub s plochou kulovou hlavou M6 x 70, Podložka17,9 x 6,5 x 1,2, Matice M6 Levou a pravou polovinu stolu nosiče položte na rovnou plochu tak, aby otvor lišt pro jízdní kola směřoval nahoru. Ke stolu nosiče připevněte traverzu prostrčením šroubů...
  • Page 35: Montáž Ramene Ve Tvaru U

    5.2 MONTÁŽ RAMENE VE TVARU U Ochranné U-rameno Matice M6 s Šroub s plochou kulovou Šroub s plochou Šroub s plochou Stabilizační plech hlavou M6 x 60 kulovou hlavou M6 kulovou hlavou M6 x 45 x 30 Podložka 17,9 x 6,5 x 1,2 Matice M6 Ochranné...
  • Page 36: Montáž Držáku Rámu

    5.6 MONTÁŽ DRŽÁKU RÁMU Povolte šroub s hlavicí držáku rámu a úplně jej vyšroubujte. Otevřete sponu držáku rámu a na místě vhodném pro vaše kolo vložte okolo U-ramene příslušné vložky. Sponu opět položte přes vložky a pevně stiskněte. Držák rámu zavřete šroubem s hlavicí (zatím nedotahujte). 5.7 MONTÁŽ...
  • Page 37: Použití Odlehčovacího Popruhu

    5.9 POUŽITÍ ODLEHČOVACÍHO POPRUHU Tento návod popisuje použití nosiče jízdních kol u vozidel typu kombi a kompaktů s víkem zavazadlového prostoru (zadními dveřmi). V případě vozidel se stupňovitou karoserií (limuzíny) postupujte příslušným způsobem. Před montáží odlehčovacího popruhu odstraňte prach a nečistoty z horní části víka zavazadlového prostoru, abyste zabránili poškrábání...
  • Page 38: Uso Conforme Al Previsto

    1. USO CONFORME AL PREVISTO El portabicicletas BIKE FOUR se fija en el enganche del remolque de turismos y está previsto para el transporte de hasta cuatro bicicletas. El aparato no está diseñado para utilizarse por niños o personas con su capacidad mental disminuida o sin los conocimientos necesarios. Mantenga el aparato lejos de los niños.
  • Page 39: Indicaciones De Seguridad

    Las barras de bola inadecuadas de GGG40 se fabrican por Westfalia para los siguientes vehículos: Fabricante Símbolo de verificación Apto para F 4192 Audi A4 Westfalia F 3830 Audi A6 F 4112 Audi A8 Observe las indicaciones del fabricante de enganches. En caso de duda, pregunte directamente al fabricante de su enganche del remolque para asegurarse de que es adecuado.
  • Page 40: Montaje Del Portabicicletas

    Daños personales o materiales debido a una carga excesiva del viento El portabicicletas y el enganche del remolque pueden resultar dañados por una carga excesiva del viento. • Antes de iniciar el viaje, retire todas las bolsas y alforjas de la bicicleta. •...
  • Page 41: Montaje De La Horquilla En U

    5.2 MONTAJE DE LA HORQUILLA EN U Gomas Horquilla en U Tuerca de Tornillo carrocero M6 x Tornillo carrocero M6 x Tornillo carrocero M6 x Chapa estabilizadora Arandela 17,9 x 6,5 x 1,2 Tuerca M6 Coloque las gomas protectoras sobre la horquilla en U. Monte ahora la horquilla en U, véanse las imágenes 1 y 2. M6 x 45 M6 x 45 con arandela 17,9 x 6,5 x 1,2 y tuerca de M6 x 60...
  • Page 42: Montaje Del Soporte De Cuadro

    5.6 MONTAJE DEL SOPORTE DE CUADRO Suelte el tornillo de empuñadura del soporte de cuadro y extráigalo por completo. Abra la abrazadera del soporte de cuadro y coloque los insertos alrededor de la horquilla en U en un lugar adecuado para su bicicleta. Vuelva a colocar la abrazadera alrededor de los insertos y apriétela. Cierre el soporte de cuadro con el tornillo de empuñadura (no lo apriete todavía).
  • Page 43: Mantenimiento Y Cuidados

    5.9 USO DE LA CORREA DE DESCARGA DE TRACCIÓN Estas instrucciones describen la utilización en furgonetas y compactos con portón trasero (puerta trasera). En el caso de vehículos con la parte trasera escalonada (berlinas), proceda correspondientemente. Antes del montaje de la correa de descarga de tracción, limpie el polvo y la suciedad de la parte superior del portón trasero para evitar arañazos durante el viaje con el dispositivo portante trasero.
  • Page 44 1. UŻYTKOWANIE ZGODNE Z PRZEZNACZENIEM Bagażnik na rowery BIKE FOUR jest mocowany do sprzęgu przyczepy samochodów osobowych i jest przewidziany do przewożenia do czterech rowerów. To urządzenie nie jest przeznaczone do obsługi przez dzieci lub osoby o ograniczonej sprawności umysłowej, lub nieposiadające wymaganej fachowej wiedzy.
  • Page 45: Wskazówki Bezpieczeństwa

    Nie nadające się kulowe haki holownicze z żeliwa GGG40 Westfalia produkuje dla następujących pojazdów: Producent Symbol kontroli Pasuje do F 4192 Audi A4 Westfalia F 3830 Audi A6 F 4112 Audi A8 Przestrzegać wskazówek producenta sprzęgu przyczepy. W razie wątpliwości należy skontaktować się z producentem i upewnić, czy posiadany sprzęg przyczepy nadaje się...
  • Page 46: Montaż Bagażnika Na Rowery

    Możliwość obrażeń ludzi lub strat materialnych z powodu obciążenia wiatrem Bagażnik na rowery i sprzęg przyczepy mogą zostać uszkodzone przez zbyt duże obciążenie wiatrem. • Przed wyruszenie w drogę zdjąć wszystkie torby z roweru • Podczas jazdy nie używać pokrowców na rowery. Jeżeli bagażnik jest zamontowany na pojeździe, to zawsze należy posiadać...
  • Page 47: Montaż Pałąka

    5.2 MONTAŻ PAŁĄKA gumowe pałąk nakrętka z pokrętłem M6 śruba zamkowa M6 x 60 śruba zamkowa M6 x 45 śruba zamkowa M6 x 30 blaszane usztywnienia podkładka 17,9 x 6,5 x 1,2 nakrętka M6 Wsunąć gumowe osłony na pałąk. Teraz zamontować pałąk, patrz fotografie 1 i 2. M6 x 45 M6 x 45 z podkładką...
  • Page 48: Montaż Bagażnika Na Rowery Na Sprzęgu Przyczepy

    5.6 MONTAŻ WSPORNIKÓW RAMY Poluzować śrubę z pokrętłem wspornika ramy i całkowicie ją wykręcić. Otworzyć opaskę wspornika ramy i przełożyć wkładki wokół pałąka w miejscu właściwym dla posiadanego roweru. Ponownie założyć opaskę wokół wkładki i mocno razem ścisnąć. Zamknąć wspornik ramy śruba z pokrętłem (jeszcze nie dokręcać). 5.7 MONTAŻ...
  • Page 49: Konserwacja I Pielęgnacja

    5.9 STOSOWANIE PASA ODCIĄŻAJĄCEGO Ta instrukcja opisuje stosowanie bagażnika w pojazdach kombi i pojazdach kompaktowych z tylną pokrywą (tylnymi drzwiami). W sedanach (limuzynach) należy postępować odpowiednio. Przed montażem pasa odciążającego usunąć pyły i zabrudzenia z górnego obszaru tylnej pokrywy, żeby uniknąć rys i obtarć...
  • Page 50: Predvidena Uporaba

    1. PREDVIDENA UPORABA Nosilec za kolesa BIKE FOUR se pritrdi na vlečno kljuko osebnega vozila in je predviden za transport do štirih koles. Naprava ni predvidena za uporabo s strani otrok ali oseb z omejenimi psihičnimi sposobnostmi ali brez potrebnega strokovnega znanja. Otrokom ne dovoliti v bližino naprave.
  • Page 51: Varnostni Napotki

    Neprimerne krogelne palice iz litine GGG40 proizvaja Westfalia za naslednja vozila: Proizvajalec Kontrolni simbol Primerno za F 4192 Audi A4 Westfalia F 3830 Audi A6 F 4112 Audi A8 Upoštevajte navodila proizvajalca vlečne kljuke. V dvomih se obrnite neposredno na prodajalca vaše vlečne kljuke in preverite, ali je ustrezna. 4.
  • Page 52: Navodila Za Uporabo

    Telesne poškodbe ali gmotna škoda zaradi večjega zračnega upora Večji zračni upor lahko poškoduje nosilec za kolesa in vlečno kljuko. • Pred začetkom vožnje s koles odstranite vse torbe. • Med vožnjo ne uporabljajte zaščitnih pregrinjal za kolesa. Splošno uporabno dovoljenje je treba imeti vedno v vozilu, kadar imate montiran nosilec za kolesa. Kadar koles ne prevažate, demontirajte nosilec.
  • Page 53: Montaža U-Stremena

    5.2 MONTAŽA U-STREMENA Zaščitne gume U-streme odebeljena zaporni vijak M6 x 60 zaporni vijak M6 x 45 zaporni vijak M6 x 30 stabilizacijska podložka 17,9 x 6,5 x 1,2 matica M6 Nataknite zaščitne gume na U-streme. Sedaj montirajte U-streme, glejte sliki 1 in 2. M6 x 45 M6 x 45 s podložko 17,9 x 6,5 x 1,2 in odebeljeno matico M6 M6 x 60...
  • Page 54: Montaža Držala Za Okvir

    5.6 MONTAŽA DRŽALA ZA OKVIR Popustite vijak z glavičem nosilca za okvir in ga povsem odvijte. Odprite objemko držala za okvir in položite vstavke okrog U-stremena in sicer na primerno mesto za vaše kolo. Nato objemko ponovno namestite okrog vstavkov in jo čvrsto stisnite skupaj. Držalo za okvir fiksirajte z vijakom z glavičem (ne ga še zategniti). 5.7 MONTAŽA NOSILCA ZA KOLESA NA VLEČNO KLJUKO Prepričajte se, da vlečna kljuka ni poškodovana, da je čista in brez masti.
  • Page 55: Uporaba Pasu Za Razbremenitev Vleka

    5.9 UPORABA PASU ZA RAZBREMENITEV VLEKA Navodila opisujejo uporabo pri kombijih in kompaktnih vozilih z zadnjo loputo (zadnja vrata). Pri vozilih s stopničastimi zadki (limuzine) postopajte ustrezno. Pred montažo pasu za razbremenitev vleka odstranite prah in umazanijo z zgornjega območja zadnjih vrat, da med vožnjo z nosilcem za kolesa preprečite nastanek prask in odrgnin.
  • Page 56 EAL GmbH info@eal-vertrieb.com Otto-Hausmann-Ring 107 +49 (0)202 42 92 83 0 www.eal-vertrieb.com 42115 Wuppertal +49 (0) 202 42 92 83 – 160 Deutschland © EAL GmbH, 11437, 03. 2019...

Ce manuel est également adapté pour:

11437

Table des Matières