Table des Matières

Publicité

Les langues disponibles
  • FR

Les langues disponibles

  • FRANÇAIS, page 54

Liens rapides

Bedienungsanleitung
Notice d'utilisation
Istruzioni per l'uso
Handleiding
Manual de instrucciones
User Manual
WLAN Radio mit Amazon Alexa
Radio Wi-Fi avec Amazon Alexa
Radio WLAN con Amazon Alexa
Wi-Fi-radio met Amazon Alexa
Radio por Wi-Fi con Amazon Alexa
Wi-Fi radio with Amazon Alexa
MEDION
LIFE
®
®
P66130 (MD 44130)

Publicité

Table des Matières
loading

Sommaire des Matières pour Medion LIFE P66130

  • Page 1 Manual de instrucciones User Manual WLAN Radio mit Amazon Alexa Radio Wi-Fi avec Amazon Alexa Radio WLAN con Amazon Alexa Wi-Fi-radio met Amazon Alexa Radio por Wi-Fi con Amazon Alexa Wi-Fi radio with Amazon Alexa MEDION LIFE ® ® P66130 (MD 44130)
  • Page 2: Table Des Matières

    Inhaltsverzeichnis Informationen zu dieser Bedienungsanleitung ... 3 1.1. Zeichenerklärung ............3 1.2. Bestimmungsgemäßer Gebrauch ......6 Sicherheitshinweise ........... 7 2.1. Gefahren für Kinder und Personen mit eingeschränkter Fähigkeit, Geräte zu bedienen .7 2.2. Betriebssicherheit ............8 2.3. Stromversorgung ............10 2.4. Aufstellungsort / Umgebung ......... 11 2.5.
  • Page 3 (FACTORY RESET) ............30 10.5. Anzeige der Systemversion (SW VERSION) ..31 10.6. Dimmer-Funktion (TIME OUT) ....... 31 10.7. Display-Beleuchtung (BRIGHTNESS) ....32 10.8. Equalizer (TREBLE / BASS) ........32 10.9. Synchronisation von Datum und Uhrzeit (TIME CHECK)..............33 10.10. Voreinstellung für die FM-Sendersuche (FM SCAN SET) ..............
  • Page 4: Informationen Zu Dieser Bedienungsanleitung

    Informationen zu dieser Bedienungsanleitung Vielen Dank, dass Sie sich für unser Produkt ent- schieden haben. Wir wünschen Ihnen viel Freu- de mit dem Gerät. Lesen Sie vor Inbetriebnahme die Sicherheits- hinweise aufmerksam durch. Beachten Sie die Warnungen auf dem Gerät und in der Bedie- nungsanleitung.
  • Page 5 VORSICHT! Warnung vor möglichen mittleren und oder leichten Verletzungen! HINWEIS! Hinweise beachten, um Sachschä- den zu vermeiden! Weiterführende Informationen für den Ge- brauch des Gerätes! Hinweise in der Bedienungsanleitung be- achten! WARNUNG! Warnung vor Gefahr durch elektri- schen Schlag! Aufzählungspunkt / Information über Er- •...
  • Page 6 Geprüfte Sicherheit Mit diesem Symbol gekennzeichnete Pro- dukte erfüllen die Anforderungen des Pro- duktsicherheitsgesetzes. Schutzklasse II Elektrogeräte der Schutzklasse II sind Elek- trogeräte die durchgehend doppelte und/ oder verstärkte Isolierung besitzen und keine Anschlussmöglichkeiten für einen Schutzleiter haben. Das Gehäuse eines iso- lierstoffumschlossenen Elektrogerätes der Schutzklasse II kann teilweise oder voll- ständig die zusätzliche oder verstärkte Iso-...
  • Page 7: Bestimmungsgemäßer Gebrauch

    1.2. Bestimmungsgemäßer Gebrauch Das Radio ist ein Gerät der Unterhaltungselektronik, mit dem man zu jeder Zeit über Alexa® kommunizieren kann. Das Gerät dient zur Wiedergabe von Radioausstrahlungen und über Bluetooth übertragene Audiosignale, zur Uhrzeit- anzeige und verfügt außerdem über eine Sleep-Timer- , Ti- mer- und Alarm-Funktion.
  • Page 8: Sicherheitshinweise

    nicht verwendet werden. • Setzen Sie das Gerät keinen extremen Bedingungen aus, es ist nur für den Gebrauch in Innenräumen. Zu vermeiden sind: – Hohe Luftfeuchtigkeit oder Nässe – Extrem hohe oder tiefe Temperaturen – Direkte Sonneneinstrahlung – Offenes Feuer Sicherheitshinweise 2.1.
  • Page 9: Betriebssicherheit

    • Bewahren Sie das Gerät und das Zubehör an einem für Kinder unerreichbaren Platz auf. GEFAHR! Erstickungsgefahr! Verpackungsmaterial ist kein Spiel- zeug! Durch Einatmen oder Verschlu- cken von Folien oder Kleinteilen be- steht Erstickungsgefahr.  Halten Sie Verpackungen von Kindern fern.
  • Page 10  Stellen Sie keine mit Flüssigkeit gefüll- ten Gefäße, wie z.B. Vasen, auf das Ge- rät oder in die nähere Umgebung und schützen Sie alle Teile vor Tropf- und Spritzwasser. Das Gefäß kann umkip- pen und die Flüssigkeit kann die elekt- rische Sicherheit beeinträchtigen.
  • Page 11: Stromversorgung

    2.3. Stromversorgung GEFAHR! Stromschlaggefahr! Verletzungsgefahr durch Stromschlag durch stromführende Teile.  Schließen Sie den Netzadapter nur an eine gut erreichbare, ordnungsgemäß installierte Schutzkontaktsteckdose (230 V ~ 50 Hz) an, die sich in der Nähe des Aufstellortes befindet. Lassen Sie die Steckdose unbedingt jederzeit frei zugänglich, damit ds Netzteil ungehin- dert abgezogen werden kann.
  • Page 12: Aufstellungsort / Umgebung

    • Beachten Sie, dass das Gerät auch im Standby- Betrieb weiterhin Strom verbraucht. 2.3.1. Netzadapter  Verwenden Sie nur den mitgelieferten Netz- adapter.  Wenn das Gehäuse des Netzadapters oder des Anschlusskabels beschädigt ist, muss der Netzadapter entsorgt und durch einen neuen Netzadapter des gleichen Typs ersetzt werden.
  • Page 13 GEFAHR! Stromschlaggefahr! Bei großen Temperatur- oder Feuch- tigkeitsschwankungen kann es durch Kondensation zur Feuchtigkeitsbil- dung innerhalb des Gerätes kommen, die einen elektrischen Kurzschluss ver- ursachen kann.  Warten Sie nach einem Transport des Gerätes solange mit der Inbetriebnah- me, bis es die Umgebungstemperatur angenommen hat.
  • Page 14  Achten Sie bei der Aufstellung darauf, dass – ausreichenden Abstand zu anderen Gegen- ständen besteht und die Lüftungsschlitze nicht verdeckt sind, damit immer eine aus- reichende Belüftung gewährleistet ist; – keine direkten Wärmequellen (z. B. Heizun- gen) auf das Gerät/auf den Netzadapter wirken;...
  • Page 15: Reparatur

    WARNUNG! Brandgefahr/Kurzschlussgefahr! Durch aufsteigenden Dampf oder Hit- ze kann ein Kurzschluss die Gefahr ei- nes elektrischen Schlages oder eines Brandes auslösen.  Montieren Sie das Gerät niemals ober- halb von Herdplatten oder anderen Hitze- oder Dampfquellen (wie etwa Wasserkocher etc.). ...
  • Page 16: Gerät Reinigen

     Gerät nicht in Betrieb nehmen, wenn das Gerät oder der Netzadapter sicht- bare Schäden aufweist.  Wenn Sie einen Schaden feststellen oder technische Probleme feststellen, überlassen Sie die Reparatur Ihres Ge- rätes ausschließlich qualifiziertem Fach- personal.  Im Falle einer notwendigen Reparatur wen- den Sie sich bitte ausschließlich an unsere autorisierten Servicepartner.
  • Page 17: Lieferumfang

     Vermeiden Sie chemische Lösungs- und Reinigungsmittel, weil diese die Oberfläche und/oder Beschriftungen des Gerätes beschädigen können. Lieferumfang Bitte überprüfen Sie die Vollständigkeit der Lieferung und benachrichtigen Sie uns innerhalb von 14 Tagen nach dem Kauf, falls die Lieferung nicht komplett ist. Wenden Sie sich bei defekter oder teilweise defekter Lieferung ebenfalls an uns.
  • Page 18: Konformitätsinformation

    Konformitätsinformation Hiermit erklärt die MEDION AG, dass sich dieses Gerät in Übereinstimmung mit den grundlegenden Anforderungen und den übrigen einschlägigen Bestimmungen befindet: • RE- Richtline 2014/53/EU • Öko-Design Richtlinie 2009/125/EG • RoHS-Richtlinie 2011/65/EU Die vollständige EU-Konformitätserklärung kann unter www. medion.com/conformity heruntergeladen werden.
  • Page 19: Informationen Zu Fm/Dab/Bluetooth

    4.2. Informationen zu FM/DAB/ Bluetooth Bluetooth Version Profile A2DP, AVRCP, HFP Klasse 2, bis zu 10 Meter Radius Frequenz 2,402 - 2,480 GHz Sendeleistung 1,3 dBm FM/DAB Frequenzbereich FM 87,5 - 108 MHz Frequenzbereich DAB 174 - 240 MHz...
  • Page 20: Geräteübersicht

    Geräteübersicht Func. LED-Anzeige für die WLAN Sprachsteuerung LC-Display F U N C . : Geräte- und Tastenfunktionen aktivie- ren/deaktivieren (Uhrzeitanzeige).  : Senderwahl / Menüeintrag wählen / im Blue- tooth-Modus Titel zurück  : Senderwahl / Menüeintrag wählen / im Blue- tooth-Modus Titel vor ( E N T E R ) : Menüeintrag bestätigen...
  • Page 21 DC IN Service port O N / O F F : Radio ein-/ausschalten. Im einge- schalteten Zustand ist die Sprachsteuerung aktiv, so- fern diese im Vorfeld eingerichtet wurde. Anschluss Netzadapter S E R V I C E P O R T : Software Upgrade USB-An- schluss Teleskopantenne...
  • Page 22 : Mikrofon-Stummschalttaste: Deaktivierung der Sprachsteuerungsfunktion : Nahfeld-Sprachsteuerungstaste M O D E : Funktionswahltaste (FM-Radio, DAB-Ra- dio, Bluetooth-Modus, WiFi-Modus) M E N U : Kurz drücken für Senderinformation / län- ger gedrückt halten, um Menüeinstellungen aufzu- rufen Mikrofon Mikrofon - V O L . + : Lautstärke einstellen / im Bluetooth- Modus Wiedergabe stummschalten Sendertasten zum Speichern/Aufrufen von Radio-...
  • Page 23: Inbetriebnahme Und Gebrauch

    Inbetriebnahme und Gebrauch 6.1. Netzanschluss Nehmen Sie den Anschluss des mitgelieferten Netzadap- ters vor.  Stecken Sie dazu den Stecker des Anschlusskabels in die Buchse D C I N 8 V und den Netzadapter in eine ordnungsgemäß installierte und jederzeit frei zugängli- che 230V ~ 50 Hz Schutzkontaktsteckdose.
  • Page 24: Radiobetrieb

    6.3.1. Lautstärke + V O L . -  Mit dem Drehregler am Gerät stellen Sie die Lautstärke ein. Im Display wird die Lautstärke für einige Sekunden als Bal- kenanzeige dargestellt. Radiobetrieb Mit diesem Radio können Sie FM-Sender und DAB+-Sender empfangen.
  • Page 25: Dab-Sendersuche

    8.3.1. DAB-Sendersuche Gehen Sie bitte wie folgt vor, um im DAB-Modus nach digita- len Radiosendern zu suchen: M E N U  Halten Sie im DAB-Betrieb die Taste gedrückt, bis das Systemeinstellungsmenü erscheint. Wählen Sie FULL mit den Tasten  oder  das erste Untermenü SCAN ( E N T E R ) ...
  • Page 26 9.3.1. FM-Sendersuche Gehen Sie bitte wie folgt vor, um im FM-Modus nach UKW- Radiosendern zu suchen: M E N U  Halten Sie im FM-Betrieb die Taste gedrückt, bis das Systemeinstellungsmenü erscheint. Wählen Sie mit den Tasten  oder  das erste Untermenü SCAN SET , um Voreinstellungen für die FM-Sendersu- che vorzunehmen.
  • Page 27: Systemeinstellungen Im Radiobetrieb (Dab/Fm)

    10. Systemeinstellungen im Radiobetrieb (DAB/FM) M E N U Wenn Sie das mit der Taste das das Systemeinstellungsmenü aufrufen, wird dieses automatisch nach einigen Sekunden wieder ge- schlossen, wenn keine Bedienung erfolgt. 10.1. Alarm einstellen/aktivieren (ALARM 1 / ALARM 2) Das Gerät bietet zwei Alarmzeiten, die jeweils mit Alarmton oder mit Radio wecken können.
  • Page 28 ALARM SOURCE ( E N T E R ) – Drücken Sie die Taste , um in die- ALARM ses Menü zu gelangen. Wählen Sie unter 1/2 SOURCE mit den Tasten  oder  die Art ALARM, DAB des Alarmtons ( oder ) und be- ( E N T E R )
  • Page 29: Sleeptimer Einstellen/Aktivieren (Sleep)

    10.2. Sleeptimer einstellen/aktivieren (SLEEP) Das Gerät bietet eine Sleeptimer-Funktion, wodurch das Ra- dio nach einer bestimmten Zeit abgeschaltet wird, wenn bis dahin keine Bedienung erfolgt ist. M E N U  Halten Sie im aktiven Betrieb die Taste drückt, bis das Systemeinstellungsmenü erscheint. Wählen Sie mit den Tasten ...
  • Page 30 ( E N T E R ) CLOCK  Drücken Sie die Taste , um ins Menü zu gelangen. SET YEAR ( E N T E R ) – Drücken Sie die Taste , um in die- ses Menü zu gelangen. Stellen Sie mit den Tasten  YEAR oder ...
  • Page 31: Werkseinstellung Wiederherstellen

    O N / O F F Wenn Sie das Gerät mit dem Schalter ausschalten (oder auch im Falle eines Stromausfalls) geht die manuell eingestellte Zeiteinstellung verloren. Nach erneutem Ein- schalten des Geräts synchronisiert sich die Zeit dann wieder automatisch. Sollten Sie nach der manuellen Zeiteinstellung den aktuellen Be- triebsmodus verlassen und diesen dann noch- mals aufrufen, synchronisiert sich die Zeitein-...
  • Page 32: Anzeige Der Systemversion (Sw Version)

    10.5. Anzeige der Systemversion (SW VERSION) Gehen Sie bitte wie folgt vor, um die aktuelle Software-Versi- on anzeigen zu lassen: M E N U  Halten Sie im aktiven Betrieb die Taste drückt, bis das Systemeinstellungsmenü erscheint. Wäh- len Sie mit den Tasten  oder  das Untermenü VERSION ( E N T E R ) ...
  • Page 33: Display-Beleuchtung (Brightness)

    10.7. Display-Beleuchtung (BRIGHTNESS) Sie haben die Möglichkeit, die Helligkeit der Display-Anzei- ge zu regeln. M E N U  Halten Sie im aktiven Betrieb die Taste drückt, bis das Systemeinstellungsmenü erscheint. Wählen Sie mit den Tasten  und  das Untermenü BRIGHTNESS ( E N T E R ) ...
  • Page 34: Synchronisation Von Datum Und Uhrzeit

    Die Equalizer-Funktion steht Ihnen auch im Bluetooth- und Sprachsteuerungsmo- dus zur Verfügung. 10.9. Synchronisation von Datum und Uhrzeit (TIME CHECK) Die automatische Synchronisation von Datum und Uhrzeit kann aktiviert und deaktiviert werden. M E N U  Halten Sie im aktiven Betrieb die Taste drückt, bis das Systemeinstellungsmenü...
  • Page 35: Favoriten Speichern

    ( E N T E R )  Drücken Sie die Taste , um ins SCAN SET Menü zu gelangen.  Wählen Sie nun mit den Tasten  oder , ob Sie nach STRONG ALL allen ( ) oder nur nach starken Sendern STRONG ONLY ) suchen wollen.
  • Page 36: Erweiterte Senderinformationen

    10.12. Erweiterte Senderinformationen Das Radio bietet Ihnen die Möglichkeit, sich erweiterte Sen- derinformationen anzeigen zu lassen. M E N U  Drücken Sie die Taste wiederholt, um folgen- de Informationen anzuzeigen: DAB: • Radiotext (Dynamic Label Segment) • Signalstärke • Signalfehler •...
  • Page 37: Bluetooth-Geräte Verbinden

    11.1. Bluetooth-Geräte verbinden  Schalten Sie wie oben beschrieben den Bluetooth-Mo- dus ein. Aktivieren Sie ebenso die Bluetooth-Funktion auf ihrem externen Gerät und führen Sie einen Kopp- lungsvorgang durch. Lesen Sie dazu die Anleitung ihres externen Gerätes. Der Name des Audio-Systems ist „ME- DION MD 44130“.
  • Page 38: Bluetooth-Verbindung Trennen

    12.1. Netzwerkverbindung herstellen und die Sprachsteuerung aktivieren Für die Einrichtung Amazon Alexa® be- nötigen Sie die MEDION SPEAKER App, die Sie problemlos über den App Store (Apple) bzw. Google Play Store (Andro- id) installieren können. Gehen Sie bitte für die Einrichtung der Sprachsteuerung wie folgt vor: ...
  • Page 39 MEDION MD 44130. Zur genauen Unterscheidung verschiedener Geräte werden hinter dem Modellnamen die letzten Stellen der MAC-Adresse angegeben.  Wählen Sie nun das Gerät MEDION MD 44130 und ver- binden Sie dieses. Eine Ansage weist Sie nun daraufhin, dass die Geräte erfog- reich verbunden wurden und Sie weiterhin den Instruktio- nen der App folgen sollen.
  • Page 40  Sobald die Verbindung hergestellt wurde, erscheint ein grünes Häkchen. Fahren Sie fort. Um Amazon Alexa® zu aktivieren, melden Sie das Gerät an Ihrem Amazon-Konto an. Dazu müssen Sie bereits bei Ama- zon registriert sein.  Melden Sie sich am Amazon Konto an. ...
  • Page 41: Netzwerkverbindung Trennen

    12.2. Netzwerkverbindung trennen Halten Sie die Nahfeld-Sprachsteuerungstaste gedrückt, wenn Sie die WLAN-Netzwerkverbindung Ihrer Geräte wie- der aufheben wollen. 12.3. Nahfeld-Sprachsteuerung Wenn Sie die Nahfeld-Sprachsteuerungstaste drücken, wechselt das Gerät in den Nahfeld-Spracherkennungsmo- dus. Sie können nun die Amazon Alexa®-Funktion nutzen, ohne das Gerät mit „Alexa“ zu wecken. Der Empfangsbe- reich verringert sich hierbei auf maximal 3 Meter.
  • Page 42: Wenn Störungen Auftreten

    13. Wenn Störungen auftreten Sollten Störungen auftreten, prüfen Sie bitte zunächst, ob Sie das Problem selbst beheben können. Die folgende Über- sicht kann Ihnen dabei helfen. VORSICHT! Verletzungsgefahr! Das Öffnen des Gerätes kann Verlet- zungen verursachen.  Versuchen Sie auf keinen Fall, das Ge- rät selbst zu reparieren.
  • Page 43: Reinigung

    Störung Mögliche Ursache / Maßnahme Kein Funksi- Wählen Sie ggf. einen anderen Stand- gnal für die ort, um das Funksignal für die Uhrzeit Uhrzeit / kein zu verbessern. Richten Sie die Wurfan- Radioemp- tenne aus, um den Radioempfang zu fang optimieren.
  • Page 44: Lagerung Bei Nichtbenutzung

    15. Lagerung bei Nichtbenutzung Wenn Sie dasGerät für einen längeren Zeitraum nicht benut- zen, lagern Sie es an einem trockenen, kühlen Ort und ach- ten Sie darauf, dass das Gerät vor Staub und extremen Tem- peraturschwankungen geschützt ist. Verpackung Ihr Gerät befindet sich zum Schutz vor Trans- portschäden in einer Verpackung.
  • Page 45: Technische Daten

    16. Technische Daten Netzadapter Hersteller WINNA DongGuan Yingna Electronic Technology Co., Ltd. Modell YN-15WA080100EU Eingangsspannung AC 100-240 V ~ 50/60 Hz 0,4 A Ausgangsspannung DC 8,0 V 1,0 A Gerät Spannungsversorgung DC 8,0 V 1,0 A Ausgangsleistung 4 W RMS Frequenzbereich DAB III 174 - 240 MHz Frequenzbereich FM...
  • Page 46 Amazon, Alexa und alle damit verbundenen Logos sind ein- getragene Warenzeichen von Amazon.com, Inc. oder der Tochtergesellschaften. Die Bluetooth® Wortmarke und die Logos sind eingetragene Marken von Bluetooth SIG, Inc. und werden von MEDION® unter Lizenz verwendet. Andere Markenzeichen und Markennamen sind Eigentum ihrer jeweiligen Inhaber.
  • Page 47: Serviceinformationen

    Erfahrungen austauschen und Ihr Wissen weitergeben. Sie finden unsere Service Community unter http://com- munity.medion.com. • Gerne können Sie auch unser Kontaktformular unter www.medion.com/contact nutzen. • Selbstverständlich steht Ihnen unser Serviceteam auch über unsere Hotline oder postalisch zur Verfügung. Deutschland Multimedia-Produkte (PC, Öffnungszeiten...
  • Page 48 Serviceadresse MEDION AG 45092 Essen Deutschland Österreich Öffnungszeiten Rufnummer Mo. - Fr.: 08:00 - 21:00  01 9287661 Sa. / So.: 10:00 - 18:00 Serviceadresse MEDION Service Center Franz-Fritsch-Str. 11 4600 Wels Österreich...
  • Page 49 Schweiz Öffnungszeiten Rufnummer  Mo. - Fr.: 09:00 - 19:00 0848 - 33 33 32 Serviceadresse MEDION/LENOVO Service Center Ifangstrasse 6 8952 Schlieren Schweiz Belgien Öffnungszeiten Rufnummer  Mo. - Fr.: 09:00 - 19:00 02 - 200 61 98 Serviceadresse MEDION B.V.
  • Page 50 Serviceadresse MEDION B.V. John F.Kennedylaan 16a 5981 XC Panningen Nederland Deutschland Diese und viele weitere Bedienungs- anleitungen stehen Ihnen über das Serviceportal www.medion.com/de/ service/start/ zum Download zur Ver- fügung. Dort finden Sie auch Treiber und andere Software zu diversen Geräten.
  • Page 51 Österreich Diese und viele weitere Bedienungs- anleitungen stehen Ihnen über das Serviceportal www.medion.com/at/ service/start/ zum Download zur Ver- fügung. Dort finden Sie auch Treiber und andere Software zu diversen Geräten. Sie können auch den nebenstehenden QR Code scannen und die Bedienungs- anleitung über das Serviceportal auf Ihr...
  • Page 52 Belgien Diese und viele weitere Bedienungsan- leitungen stehen Ihnen über das Ser- viceportal www.medion.com/be/nl/ service/start/ zum Download zur Ver- fügung. Dort finden Sie auch Treiber und andere Software zu diversen Geräten. Sie können auch den nebenstehenden QR Code scannen und die Bedienungs- anleitung über das Serviceportal auf Ihr...
  • Page 53: Impressum

    Vervielfältigung in mechanischer, elektronischer und jeder anderen Form ohne die schriftliche Genehmigung des Her- stellers ist verboten. Das Copyright liegt bei der Firma: MEDION AG Am Zehnthof 77 45307 Essen Deutschland Bitte beachten Sie, dass die oben stehende Anschrift keine Retourenanschrift ist.
  • Page 54 Sommaire Informations concernant la présente notice d’utilisation ..............55 1.1. Explication des symboles ......... 55 1.2. Utilisation conforme ..........58 Consignes de sécurité ..........60 2.1. Dangers en cas d’utilisation de l’appareil par des enfants et personnes aux capacités restreintes ..............60 2.2.
  • Page 55 8.3. Réglage de la date et de l’heure (CLOCK SET) .. 81 8.4. Restauration des réglages d’usine (FACTORY RESET) ................83 8.5. Affichage de la version système (SW VERSION) 83 8.6. Fonction de variation de la luminosité (TIME OUT) ................. 84 8.7.
  • Page 56: Informations Concernant La Présente Notice D'utilisation

    Informations concernant la présente notice d’utilisation Merci d’avoir choisi notre produit. Nous vous souhaitons une bonne utilisation. Lisez attentivement les consignes de sécuri- té avant de mettre l’appareil en service. Te- nez compte des avertissements figurant sur l’appareil et dans la notice d’utilisation. Conservez toujours la notice d’utilisation à...
  • Page 57 AVIS ! Respectez les consignes pour évi- ter tout dommage matériel ! Informations complémentaires concernant l’utilisation de l’appareil ! Respectez les consignes de la notice d’utilisation ! AVERTISSEMENT ! Risque d’électrocution ! Énumération/information sur des événe- • ments se produisant pendant l’utilisation  Action à exécuter Déclaration de conformité...
  • Page 58 Sécurité contrôlée Les produits portant ce symbole respec- tent les exigences de la loi sur la sécurité des produits. Classe de protection II Les appareils électriques de la classe de protection II sont des appareils électriques qui possèdent une isolation double conti- nue et/ou renforcée et qui ne présentent pas de possibilité...
  • Page 59: Utilisation Conforme

    Efficacité énergétique classe VI Le niveau d’efficacité énergétique est une classification standard du rendement des blocs d’alimentation internes et externes. L’efficacité énergétique indique le niveau de rendement. La classe VI représente le plus haut niveau d’efficacité. 1.2. Utilisation conforme Cette radio est un appareil lié au domaine de l’électronique de loisir qui permet à...
  • Page 60 • Tenez compte de toutes les informations contenues dans cette notice d’utilisation, en particulier des consi- gnes de sécurité. Toute autre utilisation est considérée comme non conforme et peut entraîner des dommages corporels ou matériels. • N’utilisez pas l’appareil dans des zones potentiellement explosives.
  • Page 61: Consignes De Sécurité

    Consignes de sécurité 2.1. Dangers en cas d’utilisation de l’appareil par des enfants et personnes aux capacités restreintes • L’appareil n’est pas destiné à être utilisé par des personnes (y compris des enfants) présen- tant des capacités physiques, sensorielles ou mentales restreintes ou ne disposant pas de l’expérience et/ou des connaissances requises à...
  • Page 62: Sécurité De Fonctionnement

    DANGER ! Risque de suffocation ! Les matériaux d’emballage ne sont pas des jouets ! Il existe un risque de suffo- cation si les films ou les petites pièces sont avalés ou inhalés.  Conservez les emballages hors de por- tée des enfants. 2.2.
  • Page 63: Alimentation Électrique

     N’ouvrez jamais le boîtier de l’appareil et le bloc d’alimentation et n’introduisez aucun objet à l’intérieur de l’appareil par les fentes et ouvertu- res.  Si l’adaptateur secteur, le cordon d’alimentation ou l’appareil est en- dommagé, débranchez immédiate- ment la fiche d’alimentation de la pri- ...
  • Page 64: Bloc D'alimentation

    facilement accessible située à proximi- té du lieu d’installation de l’appareil. Maintenez impérativement la prise de courant accessible à tout moment afin de pouvoir débrancher librement la fiche d’alimentation.  Pour couper votre appareil de l’alimentation en courant et le mettre totalement hors tension, débranchez l’adaptateur secteur de la prise de cou- rant.
  • Page 65: Lieu D'installation/Environnement

    cordon d’alimentation est endommagé, l’adaptateur secteur doit être éliminé et rem- placé par un adaptateur secteur neuf du même type.  Utilisez le bloc d’alimentation uniquement dans des pièces sèches, en intérieur. 2.4. Lieu d’installation/environnement Durant les premières heures d’utilisation, les ap- pareils neufs peuvent dégager une odeur ty- pique inévitable, mais totalement inoffensive qui s’estompe progressivement au fil du temps.
  • Page 66 AVIS ! Risque de dommage de l’appareil ! Des conditions ambiantes défavorab- les peuvent endommager l’appareil.  Utilisez l’appareil uniquement dans des pièces sèches.  Placez et utilisez tous les composants sur une surface stable, plane et exemp- te de vibrations afin d’éviter toute chu- te de l’appareil.
  • Page 67 médiate de champs magnétiques (par ex. téléviseur ou enceintes) ; – n’exposer l’appareil à aucune source de feu nu (par ex. bougies en combustion) ; – ne pas plier ni tendre trop fortement le cor- don d’alimentation. AVERTISSEMENT ! Risque d’incendie/de court-circuit ! La vapeur ou la chaleur s’échappant d’un appareil peut provoquer un court-circuit et donc entraî- ner un risque de choc électrique ou...
  • Page 68: Réparation

    2.5. Réparation DANGER ! Risque d’électrocution ! Les pièces sous tension présentent un risque de choc électrique.  Avant la première mise en service et après chaque utilisation, vérifiez si l’appareil et le cordon d’alimentation ne sont pas endommagés.  Si l’appareil ou l’adaptateur secteur présente des dommages visibles, ne les utilisez pas.
  • Page 69: Nettoyage De L'appareil

    2.6. Nettoyage de l’appareil DANGER ! Risque d’électrocution ! Risque de blessure par électrocution par des pièces conductrices de cou- rant.  Avant le nettoyage, débranchez l’adaptateur secteur de la prise de cou- rant. AVIS ! Dommages matériels possibles ! Le traitement inadéquat des surfaces sensibles peut endommager l’appareil.
  • Page 70: Contenu De La Livraison

    Contenu de la livraison Veuillez vérifier l’intégralité de la livraison et nous signaler dans les 14 jours suivant l’achat toute livraison incomplète. En cas de livraison en totalité ou partiellement défectueuse, veuillez également nous contacter. DANGER ! Risque de suffocation ! Il existe un risque de suffocation si les films ou les petites pièces sont avalés ou inhalés.
  • Page 71: Information Relative À La Conformité

    Information relative à la conformité Par la présente, MEDION AG déclare que cet appareil est con- forme aux exigences essentielles et autres dispositions per- tinentes : • Directive RE 2014/53/UE • Directive sur l’écoconception 2009/125/CE • Directive RoHS 2011/65/UE La déclaration de conformité UE intégrale peut être téléchar- gée à...
  • Page 72: Informations Concernant Fm/Dab/Bluetooth

    4.2. Informations concernant FM/DAB/ Bluetooth Bluetooth Version Profils A2DP, AVRCP, HFP Classe 2, rayon jusqu’à 10 mètres Fréquence 2,402 - 2,480 GHz Puissance d’émission max. 1,3 dBm FM/DAB Plage de fréquences FM 87,5 - 108 MHz Plage de fréquences DAB 174 - 240 MHz...
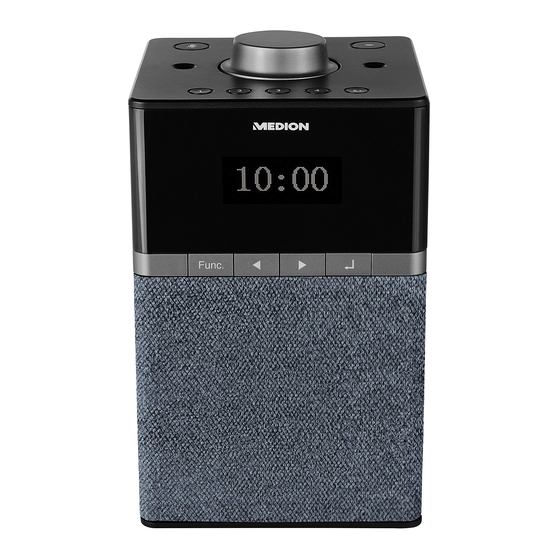
  • Page 73: Vue D'ensemble De L'appareil

    Vue d’ensemble de l’appareil Func. Voyant LED pour la commande vocale Wi-Fi Écran LC F U N C . : activer/désactiver les fonctions de l’appareil et des touches (affichage de l’heure)  : sélection de la station/sélection de l’option de menu/en mode Bluetooth titre précédent  : sélection de la station/sélection de l’option de menu/en mode Bluetooth titre suivant ( E N T E R )
  • Page 74 DC IN Service port O N / O F F  : allumer/éteindre la radio. Lorsque la radio est allumée, la commande vocale est active à condition qu’elle ait été configurée au préalable. Prise pour adaptateur secteur S E R V I C E P O R T  : mise à...
  • Page 75 : Touche de désactivation du son du microphone : désactivation de la fonction de commande vocale : Touche de commande vocale en champ proche M O D E  : touche de sélection de fonction (radio FM, radio DAB, mode Bluetooth, mode Wi-Fi) M E N U  : appuyer brièvement pour des informa- tions sur la station/appuyer plus longuement pour...
  • Page 76: Mise En Service Et Utilisation

    Mise en service et utilisation 6.1. Raccordement au réseau électrique Raccordez l’adaptateur secteur fourni.  Branchez pour cela la fiche du cordon sur la prise D C I N 8 V et l’adaptateur secteur sur une prise de terre réglementaire de 230 V ~ 50 Hz facile- ment accessible à...
  • Page 77: Niveau Sonore

    6.3.1. Niveau sonore + V O L . -  Le bouton rotatif de l’appareil vous per- met de régler le niveau sonore. Le niveau sonore est affiché sur l’écran pendant quelques se- condes, sous forme de barre. Fonctionnement de la radio Cette radio vous permet de capter des stations FM et DAB+.
  • Page 78: Recherche De Stations Dab

    7.1.1. Recherche de stations DAB Procédez comme suit pour rechercher des stations radio nu- mériques en mode DAB : M E N U  En mode DAB, maintenez la touche enfoncée jusqu’à ce que le menu des réglages système s’affiche à l’écran.
  • Page 79: Réglages Système En Mode Radio (Dab/Fm)

    M E N U  En mode FM, maintenez la touche enfoncée jusqu’à ce que le menu des réglages système s’affiche à l’écran. À l’aide des touches  ou , sélectionnez le pre- FM SCAN SET mier sous-menu afin de prérégler la recherche de stations FM.
  • Page 80 M E N U  L’appareil allumé, maintenez la touche foncée jusqu’à ce que le menu des réglages système s’affiche à l’écran. Avec les touches  ou , sélection- ALARM 1 ALARM 2 nez le sous-menu ( E N T E R ) ...
  • Page 81: Mode D'alarme

    MODE D’ALARME ( E N T E R ) – Appuyez sur la touche pour accé- ALARM 1/2 M O D E der à ce menu. Dans utilisez les touches  ou  pour régler le mode EACH DAY WEEKENDS (quotidien), (unique- WEEKDAYS...
  • Page 82: Réglage De La Date Et De L'heure (Clock Set)

     À l’aide des touches  ou , réglez la minuterie de veil- 5, 15, 30, 45, 60, 90, le sur la durée souhaitée ( ( E N T E R ) minutes) et confirmez avec . Con- figurez le réglage pour désactiver la minuterie de veille.
  • Page 83 SET MONTH ( E N T E R ) – Appuyez sur la touche pour accéder à ce menu. À l’aide des touches  ou , sélection- MONTH ( E N - nez le mois ( ) et confirmez avec T E R ) SET DAY ( E N T E R )
  • Page 84: Restauration Des Réglages D'usine (Factory Reset)

    8.4. Restauration des réglages d’usine (FACTORY RESET) Veuillez procéder comme suit pour rétablir les réglages d’usine de l’appareil : M E N U  L’appareil allumé, maintenez la touche foncée jusqu’à ce que le menu des réglages système s’affiche à l’écran. À l’aide des touches  ou , sélecti- FACTORY RESET onnez le sous-menu ( E N T E R )
  • Page 85: Fonction De Variation De La Luminosité (Time Out)

    Vous pouvez également effectuer une mise à jour logicielle via le port USB arrière. 8.6. Fonction de variation de la luminosité (TIME OUT) La fonction Time Out permet de diminuer progressivement la luminosité de l’écran après un certain temps de non-utili- sation.
  • Page 86: Égaliseur (Treble/Bass)

    À l’aide des touches  et , réglez la luminosité se- – LOW, MEDIUM, HIGH lon votre convenance ( ( E N T E R ) et confirmez avec 8.8. Égaliseur (TREBLE/BASS) La fonction d’égaliseur 2 bandes vous permet de régler indi- viduellement l’effet sonore du signal radio dans la plage des basses et des aigus.
  • Page 87: Time Check

    M E N U  L’appareil allumé, maintenez la touche foncée jusqu’à ce que le menu des réglages système s’affiche à l’écran. À l’aide des touches  ou , sélecti- TIME CHECK onnez le sous-menu ( E N T E R ) ...
  • Page 88: Enregistrement De Favoris

    8.11. Enregistrement de favoris Vous pouvez enregistrer vos stations préférées sur les tou- 1 - 5 + ches afin de pouvoir y accéder rapidement. Vous disposez de 10 emplacements favoris. Procédez comme suit :  Sélectionnez la station souhaitée.  Maintenez la touche enfoncée jusqu’à...
  • Page 89: Mode Bluetooth

     Activez le mode Bluetooth comme décrit ci-dessus. Ac- tivez également la fonction Bluetooth sur votre péri- phérique externe et procédez au couplage. Lisez à ce su- jet la notice d’utilisation de votre périphérique externe. Le nom du système audio est « MEDION MD 44130 ».
  • Page 90: Commande

     Le couplage est terminé et le périphérique externe peut maintenant être utilisé combiné à l’appareil radio.  Si vous voulez quitter la transmission via Bluetooth, dé- sactivez la fonction Bluetooth sur le périphérique exter- M O D E ne ou appuyez sur pour repasser en mode ra- dio.
  • Page 91: Mode Commande Vocale Wi-Fi

    10. Mode commande vocale Wi-Fi La commande vocale est toujours active, à condition qu’elle ait été configurée au préalable. Pour configurer la comman- M O D E de vocale, appuyez plusieurs fois sur la touche WIFI CONNECTING jusqu’à ce que s’affiche à...
  • Page 92 Wi-Fi de vot- re smartphone.  Dans vos paramètres Wi-Fi, recherchez des péri- phériques pouvant être mis en réseau. La radio MEDION MD 44130 apparaît dans la liste. Pour pouvoir différenci- er clairement les différents appareils, le nom de modèle est suivi des derniers chiffres de l’adresse MAC.
  • Page 93 Ama- ® zon Alexa . Vous pouvez maintenant fermer l’application MEDION SPEAKER. Vous pouvez maintenant utiliser la fonction Amazon Ale- ® . Lorsque vous vous adressez à votre appareil avec le mot « Alexa », il répondra à vos demandes. Si nécessaire, définis- sez la position actuelle de la radio dans l’application Alexa.
  • Page 94: Désactivation De La Connexion Réseau

    10.2. Désactivation de la connexion réseau Maintenez la touche de commande vocale en champ proche enfoncée si vous souhaitez couper la connexion de vos appareils au réseau Wi-Fi. 10.3. Commande vocale en champ proche Lorsque vous appuyez sur la touche de commande voca- le en champ proche , l’appareil passe en mode reconnais- sance vocale en champ proche.
  • Page 95: En Cas De Problèmes

    11. En cas de problèmes En cas de problèmes, veuillez tout d’abord vérifier si vous pouvez y remédier vous-même en vous aidant du tableau ci- dessous. ATTENTION ! Risque de blessure ! L’ouverture de l’appareil peut causer des blessures.  N’essayez en aucun cas de réparer vous-même l’appareil.
  • Page 96: Nettoyage

    Problème Cause possible/solution Pas de sig- Changez éventuellement l’appareil de nal radio pour place afin d’améliorer le signal radio l’heure/aucu- pour l’heure. Orientez l’antenne filaire ne réception de manière à optimiser la réception de radio la radio. La commande Vérifiez si le son du microphone est dé- vocale ne fon- sactivé.
  • Page 97: Stockage En Cas De Non-Utilisation

    13. Stockage en cas de non- utilisation Si vous n’utilisez pas l’appareil pendant une période prolon- gée, rangez-le dans un endroit frais et sec et veillez à ce qu’il soit protégé de la poussière et des variations de température. Emballage L’appareil est placé...
  • Page 98: Caractéristiques Techniques

    14. Caractéristiques techniques Bloc d’alimentation Fabricant WINNA DongGuan Yingna Electronic Technology Co., Ltd. Modèle YN-15WA080100EU Tension d’entrée CA 100-240 V ~ 50/60 Hz 0,4 A Tension de sortie CC 8,0 V 1,0 A Appareil Alimentation électrique CC 8,0 V 1,0 A Puissance de sortie 4 W RMS Plage de fréquence DAB III 174 - 240 MHz Plage de fréquences FM...
  • Page 99 Inc. ou de ses filiales. ® Le nom de marque et les logos Bluetooth sont des marques ® déposées de Bluetooth SIG, Inc. et sont utilisés par MEDION sous licence. Les autres marques déposées et noms de marque appar- tiennent à leurs propriétaires respectifs.
  • Page 100: Informations Relatives Au Service Après-Vente

    Au sein de notre Service Community, vous pouvez discu- ter avec d’autres utilisateurs ainsi qu’avec nos collabora- teurs pour partager vos expériences et vos connaissan- ces. Vous pouvez accéder à notre Service Community ici : http://community.medion.com. • Vous pouvez également utiliser notre formulaire de con- tact disponible ici : www.medion.com/contact.
  • Page 101 75 Rue de la Foucaudière 72100 LE MANS France Suisse Horaires d’ouverture Hotline SAV Lun - Ven : 7h00 à 23h00  0848 - 33 33 32 Sam/Dim : 10h00 à 18h00 Adresse du service après-vente MEDION/LENOVO Service Center Ifangstrasse 6 8952 Schlieren Suisse...
  • Page 102 Belgique Horaires d’ouverture Hotline SAV  Lun - Ven : 9h00 à 19h00 02 - 200 61 98 Adresse du service après-vente MEDION B.V. John F.Kennedylaan 16a 5981 XC Panningen Nederland Luxembourg Horaires d’ouverture Hotline SAV  Lun - Ven : 9h00 à 19h00 34 - 20 808 664 Adresse du service après-vente...
  • Page 103 La présente notice d’utilisation et bien d’autres sont disponibles au téléchar- gement sur le portail de service après- vente www.medion.com/fr/service/accueil/. Vous pourrez également y trouver des pilotes et d’autres logiciels pour diffé- rents appareils. Vous pouvez également scanner le code QR ci-contre pour charger la notice d’utilisation sur un appareil mobile via...
  • Page 104 Belgique La présente notice d’utilisation et bien d’autres sont disponibles au téléchar- gement sur le portail de service après- vente www.medion.com/be/fr/service/ac- cueil/. Vous pourrez également y trouver des pilotes et d’autres logiciels pour diffé- rents appareils. Vous pouvez également scanner le code QR ci-contre pour charger la notice d’utilisation sur un appareil mobile via...
  • Page 105: Mentions Légales

    Toute reproduction sous forme mécanique, électronique ou sous toute autre forme que ce soit est interdite sans l’autorisation préalable écrite du fabricant. L’entreprise suivante possède les droits d’auteur : MEDION AG Am Zehnthof 77 45307 Essen Allemagne Veuillez noter que l’adresse ci-dessus n’est pas celle du ser- vice des retours.
  • Page 106 Inhoudsopgave Informatie over deze gebruiksaanwijzing ....107 1.1. Betekenis van de symbolen ........107 1.2. Gebruiksdoel ..............110 Veiligheidsvoorschriften ........112 2.1. Gevaren voor kinderen en personen met een beperkt vermogen om apparaten te bedienen ..............112 2.2. Veilig gebruik ..............113 2.3. Stroomvoorziening ..........114 2.4.
  • Page 107 8.3. Tijd/datum instellen (CLOCK SET) .......133 8.4. Fabrieksinstellingen terugzetten (FACTORY RESET) ................135 8.5. Systeemversie weergeven (SW VERSION) ..135 8.6. Dimmerfunctie (TIME OUT)........136 8.7. Displayverlichting (BRIGHTNESS) ......136 8.8. Equalizer (TREBLE/BASS) ........137 8.9. Datum en tijd synchroniseren (TIME CHECK) .137 8.10. Standaardinstelling voor het zoeken naar FM-zenders (FM SCAN SET) ........138 8.11.
  • Page 108: Informatie Over Deze Gebruiksaanwijzing

    Informatie over deze gebruiksaanwijzing Hartelijk dank dat u voor ons product hebt ge- kozen. Wij wensen u veel plezier met het ap- paraat. Lees de veiligheidsvoorschriften aandachtig door voordat u het apparaat in gebruik neemt. Neem de waarschuwingen op het apparaat en in de gebruiksaanwijzing in acht.
  • Page 109 VOORZICHTIG! Waarschuwing voor mogelijk min- der ernstig en/of licht letsel. LET OP! Neem de aanwijzingen in acht om materiële schade te voorkomen. Meer informatie over het gebruik van het apparaat. Neem de aanwijzingen in de gebruiksaan- wijzing in acht. WAARSCHUWING! Waarschuwing voor gevaar door een elektrische schok.
  • Page 110 Verklaring van conformiteit (zie het hoof- dstuk 'Conformiteitsinformatie'): produc- ten die met dit symbool zijn gemarkeerd, voldoen aan de EU-richtlijnen. Beproefde veiligheid Producten die met dit symbool zijn gemar- keerd, voldoen aan de Duitse wet op de productveiligheid. Veiligheidsklasse II Elektrische apparaten van veiligheidsklasse II zijn elektrische apparaten die zijn voor- zien van dubbele en/of extra sterke iso-...
  • Page 111: Gebruiksdoel

    Energie-efficiëntieniveau VI Het energie-efficiëntieniveau is een stan- daardindeling van het rendement van ex- terne en interne voedingen. Met de ener- gie-efficiëntie wordt het rendement aangegeven en dit wordt onderverdeeld in verschillende niveaus, waarbij VI het hoogste (meest efficiënte niveau) is. 1.2.
  • Page 112 • Gebruik uitsluitend door ons geleverde of goedgekeurde reserveonderdelen en accessoires. • Neem alle informatie in deze gebruiksaanwijzing in acht en houd u in het bijzonder aan de veiligheidsvoorschrif- ten. Iedere andere vorm van gebruik geldt als niet con- form het gebruiksdoel en kan leiden tot letsel of mate- riële schade.
  • Page 113: Veiligheidsvoorschriften

    Veiligheidsvoorschriften 2.1. Gevaren voor kinderen en personen met een beperkt vermogen om apparaten te bedienen • Het apparaat is niet bedoeld om te worden gebruikt door personen (inclusief kinderen) met een lichamelijke, zintuiglijke of geestelijke beperking of met onvoldoende ervaring en/ of kennis, tenzij iemand die verantwoordelijk is voor hun veiligheid toezicht op hen houdt of hen instructie heeft gegeven hoe ze het ap-...
  • Page 114: Veilig Gebruik

    GEVAAR! Verstikkingsgevaar! Verpakkingsmateriaal is geen speel- goed. Er bestaat verstikkingsgevaar door het inademen of inslikken van fo- lie of kleine onderdelen.  Houd verpakkingen buiten het bereik van kinderen. 2.2. Veilig gebruik • Controleer het apparaat vóór het eerste ge- bruik op schade.
  • Page 115: Stroomvoorziening

     Open nooit de behuizing van het ap- paraat of de netadapter en steek geen voorwerpen door de sleuven en ope- ningen in het apparaat.  Trek bij beschadiging van de netadapter, het netsnoer of het apparaat onmiddelli- jk de netadapter uit het stopcontact. ...
  • Page 116  Onderbreek de stroomvoorziening van het apparaat of schakel alle spanning uit door de netadapter uit het stop- contact te trekken.  Trek het netsnoer altijd aan de netad- apter uit het stopcontact en trek nooit aan het snoer.  Trek de netadapter uit het stopcontact als er rook of ongebruikelijke geluiden uit het apparaat of de netadapter ko- men.
  • Page 117: Plaats Van Opstelling/Omgeving

    2.4. Plaats van opstelling/omgeving Nieuwe apparaten geven gedurende de eers- te uren van gebruik soms een typische, onvermi- jdelijke, maar volstrekt ongevaarlijke geur af die na verloop van tijd steeds minder wordt. Om ge- urvorming zoveel mogelijk te beperken advise- ren wij om de ruimte regelmatig te ventileren.
  • Page 118 LET OP! Gevaar voor schade aan het ap- paraat! Het apparaat kan door ongunstige om- gevingsfactoren beschadigd raken.  Gebruik het apparaat uitsluitend in droge ruimtes.  Plaats en gebruik alle onderdelen op een stabiele, vlakke en trillingsvrije on- dergrond om te voorkomen dat het apparaat valt.
  • Page 119 – stel het apparaat niet op in de buurt van magnetische velden (zoals een televisie of andere luidsprekers); – plaats geen bronnen van open vuur (bij- voorbeeld brandende kaarsen) in de buurt van het apparaat; – zorg dat de aansluitkabel niet onder trek- spanning staat en niet is geknikt.
  • Page 120: Reparatie

    2.5. Reparatie GEVAAR! Gevaar voor een elektrische schok! Er bestaat gevaar voor een elektri- sche schok door onderdelen die onder spanning staan.  Controleer het apparaat en het nets- noer vóór ingebruikname en na elk ge- bruik op beschadigingen.  Neem het apparaat niet in gebruik als het apparaat zelf of de netadapter zichtbaar beschadigd is.
  • Page 121: Apparaat Reinigen

    2.6. Apparaat reinigen GEVAAR! Gevaar voor een elektrische schok! Gevaar voor letsel als gevolg van een elektrische schok door onderdelen die onder spanning staan.  Trek vóór het reinigen de netadapter uit het stopcontact. LET OP! Mogelijke materiële schade! Door verkeerde behandeling van kwetsbare oppervlakken kan het ap- paraat beschadigd raken.
  • Page 122: Inhoud Van De Levering

    Inhoud van de levering Controleer de levering op volledigheid en informeer ons binnen 14 dagen na aankoop als de levering niet compleet is. Neem ook contact met ons op als het apparaat bij leve- ring geheel of gedeeltelijk defect is. GEVAAR! Verstikkingsgevaar! Er bestaat verstikkingsgevaar door het...
  • Page 123: Conformiteitsinformatie

    Conformiteitsinformatie Hierbij verklaart MEDION AG dat dit apparaat in overeenstemming is met de fundamentele eisen en de ove- rige toepasselijke voorschriften: • Radioapparatuurrichtlijn 2014/53/EU • Ecodesignrichtlijn 2009/125/EG • RoHS-richtlijn 2011/65/EU De volledige EU-verklaring van overeenstemming kan wor- den gedownload van www.medion.com/conformity.
  • Page 124: Informatie Over Fm/Dab/Bluetooth

    4.2. Informatie over FM/DAB/Bluetooth Bluetooth Versie Profielen A2DP, AVRCP, HFP Klasse 2, bereik tot 10 meter Frequentie 2,402-2,480 GHz Zendvermogen 1,3 dBm FM/DAB Frequentiebereik FM 87,5-108 MHz Frequentiebereik DAB 174-240 MHz...
  • Page 125: Overzicht Van Het Apparaat

    Overzicht van het apparaat Func. Led-lampje voor WiFi-spraakbesturing LC-display F U N C . : apparaat- en toetsfuncties activeren/ deactiveren (tijdsaanduiding) : zender kiezen / menuoptie kiezen / in Bluetooth- modus: naar vorige nummer : zender kiezen / menuoptie kiezen / in Bluetooth- modus: naar volgende nummer ( E N T E R ) : menuoptie bevestigen...
  • Page 126 DC IN Service port O N / O F F : radio in-/uitschakelen. Wanneer de ra- dio is ingeschakeld, is de spraakbesturing actief als dit vooraf is ingesteld. Aansluiting netadapter S E R V I C E P O R T : USB-aansluiting voor soft- ware-upgrade Telescoopantenne...
  • Page 127 : Toets voor dempen van microfoon: spraakbestu- ringsfunctie deactiveren : NFC-spraakbesturingstoets M O D E : functietoets (FM-radio, DAB-radio, Blue- tooth-modus, WiFi-modus) M E N U : kort indrukken voor zenderinformatie of langer ingedrukt houden om menu met systeemin- stellingen te openen Microfoon Microfoon - V O L .
  • Page 128: Ingebruikname En Gebruik

    Ingebruikname en gebruik 6.1. Netaansluiting Sluit de meegeleverde netadapter aan.  Steek daarvoor de stekker van de aansluitkabel in de bus D C I N 8 V en steek de netadapter in een volgens de voorschriften geïnstalleerd en goed bereik- baar stopcontact van 230 V ~ 50 Hz met randaarde.
  • Page 129: Radiomodus

    6.3.1. Volume + V O L . -  Met de draaiknop op het apparaat stelt u het volume in. In de display wordt het volume gedurende een paar secon- den in de vorm van een balk weergegeven. Radiomodus U kunt met deze radio FM- en DAB+-zenders ontvangen. U kunt maximaal 10 FM-zenders en 10 DAB+-zenders ops- laan.
  • Page 130: Dab-Zenders Zoeken

    7.1.1. DAB-zenders zoeken Ga als volgt te werk om in de DAB-modus naar digitale ra- diozenders te zoeken: M E N U  Houd in de DAB-modus de toets ingedrukt totdat het menu met systeeminstellingen verschijnt. Selecteer met de toetsen  of  het eerste submenu FULL SCAN ( E N T E R ) ...
  • Page 131: Fm-Zenders Zoeken

    7.2.1. FM-zenders zoeken Ga als volgt te werk om in de FM-modus naar VHF-radiozen- ders te zoeken: M E N U  Houd in de FM-modus de toets ingedrukt totdat het menu systeeminstellingen verschijnt. Selec- teer met de toetsen  of  het eerste submenu SCAN SET om standaardinstellingen voor het zoeken naar FM-zenders te definiëren.
  • Page 132: Alarm Instellen/Activeren (Alarm 1 / Alarm 2)

    8.1. Alarm instellen/activeren (ALARM 1 / ALARM 2) Het apparaat heeft twee wektijden. Voor beide kunt u instel- len dat u door een alarmsignaal of de radio wordt gewekt. M E N U  Houd in de actieve modus de toets ingedrukt totdat het menu met systeeminstellingen verschijnt.
  • Page 133: Alarm Volume

    ALARM VOLUME ( E N T E R ) – Druk op de toets om naar dit menu ALARM 1/2 VOLUME te gaan. Stel bij de toetsen  of  het volume van het alarmsignaal 00 - 15 ( E N T E R ) ) in en bevestig met ALARM MODE ( E N T E R )
  • Page 134: Tijd/Datum Instellen (Clock Set)

    ( E N T E R )  Druk op de toets om naar het menu SLEEP te gaan.  Selecteer met de toetsen  of  de gewenste tijd voor 5, 15, 30, 45, 60, 90, 120 de slaaptimer ( ( E N T E R ) nuten) en bevestig met .
  • Page 135 SET MONTH ( E N T E R ) – Druk op de toets om naar dit menu te gaan. Stel met de toetsen  of  de maand MONTH ( E N T E R ) ) in en bevestig met SET DAY ( E N T E R ) –...
  • Page 136: Fabrieksinstellingen Terugzetten (Factory Reset)

    8.4. Fabrieksinstellingen terugzetten (FACTORY RESET) Ga als volgt te werk om de fabrieksinstellingen van het ap- paraat terug te zetten: M E N U  Houd in de actieve modus de toets ingedrukt totdat het menu met systeeminstellingen verschijnt. Se- FACTO- lecteer met de toetsen ...
  • Page 137: Dimmerfunctie (Time Out)

    Via de USB-aansluiting aan de achterkant kunt u eventueel de software bijwerken. 8.6. Dimmerfunctie (TIME OUT) Met de timeoutfunctie kan de helderheid van de display worden gedimd als er bepaalde tijd niets wordt bediend. M E N U  Houd in de actieve modus de toets ingedrukt totdat het menu met systeeminstellingen verschijnt.
  • Page 138: Equalizer (Treble/Bass)

    8.8. Equalizer (TREBLE/BASS) Met de tweebands equalizerfunctie kunt u de hoogte en bas van het radiosignaal instellen. M E N U  Houd in de actieve modus de toets ingedrukt totdat het menu met systeeminstellingen verschijnt. Selecteer met de toetsen  en  het submenu TREBLE EQ BASS ( E N T E R )
  • Page 139: Standaardinstelling Voor Het Zoeken Naar

    ON/OFF Selecteer met de toetsen  en  de optie – (ge- activeerd) of (gedeactiveerd) en bevestig met ( E N T E R ) 8.10. Standaardinstelling voor het zoeken naar FM-zenders (FM SCAN SET) U kunt bij FM SCAN SET een standaardinstelling voor het zo- eken naar FM-zenders instellen.
  • Page 140: Favorieten Opslaan

    8.11. Favorieten opslaan U kunt uw favoriete zenders opslaan onder de toetsen om deze snel te beluisteren. U kunt maximaal 10 zen- ders als favoriet opslaan. Ga als volgt te werk:  Selecteer de gewenste zender.  Houd de toets ingedrukt tot in de display de lijst met favorieten verschijnt.
  • Page 141: Uitgebreide Zenderinformatie

    8.12. Uitgebreide zenderinformatie U kunt op de radio uitgebreide zenderinformatie weerge- ven. M E N U  Druk meerdere keren op de toets om de vol- gende informatie weer te geven: DAB: • Radiotekst (Dynamic Label Segment) • Signaalsterkte • Signaalfout •...
  • Page 142: Bluetooth-Apparaten Verbinden

    Lees hiervoor de handleiding van het externe apparaat. De naam van het audiosysteem is 'MEDION MD 44130' .  De verbinding is tot stand gebracht en het externe ap- paraat kan samen met de keukenradio worden gebruikt.
  • Page 143: Wifi-Spraakbesturingsmodus

     Schakel de radio in en druk op de toets om de WiFi-modus te activeren.  Installeer en open de MEDION SPEAKER-app op uw ex- terne apparaat (bijvoorbeeld een iPhone) en activeer WiFi. Daarna zoekt de app naar een draadloos HiFi-sys- teem.
  • Page 144 WiFi-instellingen van uw smartphone.  Zoek in de WiFi-instellingen naar netwerkcompatibele apparaten. In de lijst verschijnt nu de radio MEDION MD 44130. Om de verschillende apparaten beter uit elkaar te houden, worden achter de modelnaam de laatste te- kens van het MAC-adres weergegeven.
  • Page 145: Netwerkverbinding Verbreken

    Ga verder.  Daarna wordt uw radio weergegeven. Hier kunt u het globale volume veranderen en meer instellingen voor Amazon Alexa® definiëren. U kunt de MEDION SPEAKER- app nu afsluiten. Nu kunt u de Amazon Alexa®-functie gebruiken. Als u het apparaat met 'Alexa' aanspreekt, reageert het op wat u zegt.
  • Page 146: Nfc-Spraakbesturing

    10.3. NFC-spraakbesturing Als u op de NFC-spraakbesturingstoets drukt, wordt de NFC-spraakbesturingsmodus op het apparaat geactiveerd. U kunt nu de Amazon Alexa®-functie gebruiken zonder het apparaat met 'Alexa' aan te spreken. Het ontvangstbereik neemt hierbij af tot maximaal drie meter. Druk de NFC-spraakbesturingstoets niet te lang in, omdat daardoor de WiFi-net- werkverbinding wordt verbroken.
  • Page 147: Storingen

    11. Storingen Controleer bij storingen eerst of u het probleem zelf kunt oplossen. Het onderstaande overzicht kan u daarbij helpen. VOORZICHTIG! Gevaar voor letsel! Het openen van het apparaat kan let- sel veroorzaken.  Probeer in geen geval om het apparaat zelf te repareren.
  • Page 148: Reiniging

    Storing Mogelijke oorzaak/oplossing Geen radiosi- Zet het apparaat eventueel op een an- gnaal voor de dere plaats neer om het radiosign- tijd of geen aal voor de tijd te verbeteren. Richt de radio-ont- draadantenne om de radio-ontvangst vangst te optimaliseren. De spraak- Controleer of de microfoon is gedempt.
  • Page 149: Opslag Bij Niet-Gebruik

    13. Opslag bij niet-gebruik Berg het apparaat, als u het gedurende langere tijd niet ge- bruikt, op een droge, koele plaats op en zorg ervoor dat het apparaat is beschermd tegen stof en extreme temperatuur- schommelingen. Verpakking Het apparaat zit ter bescherming tegen trans- portschade in een verpakking.
  • Page 150: Technische Gegevens

    14. Technische gegevens Netadapter Fabrikant WINNA DongGuan Yingna Electronic Technology Co., Ltd. Model YN-15WA080100EU Ingangsspanning AC 100-240 V ~ 50/60 Hz 0,4 A Uitgangsspanning DC 8,0 V 1,0 A Apparaat Voeding DC 8,0 V 1,0 A Uitgangsvermogen 4 W RMS Frequentiebereik DAB III 174-240 MHz Frequentiebereik FM...
  • Page 151 Amazon.com, Inc. of zijn dochteron- dernemingen. Het woordmerk en de logo's van Bluetooth® zijn gedepo- neerde handelsmerken van Bluetooth SIG, Inc. en worden door MEDION® onder licentie gebruikt. Andere handelsmerken en merknamen zijn het eigendom van de betreffende eigenaar.
  • Page 152: Service-Informatie

    En bovendien staat ons serviceteam ook via de hotline of per post ter beschikking. Nederland Openingstijden Service Hotline Ma - vr: 07:00 - 23:00  0900 - 2352534 Za / zo: 10:00 - 18:00 Serviceadres MEDION B.V. John F.Kennedylaan 16a 5981 XC Panningen Nederland...
  • Page 153 België Openingstijden Service Hotline  Ma - vr: 09:00 - 19:00 02 - 200 61 98 Serviceadres MEDION B.V. John F.Kennedylaan 16a 5981 XC Panningen Nederland Luxemburg Openingstijden Service Hotline  Ma - vr: 09:00 - 19:00 34 - 20 808 664 Serviceadres MEDION B.V.
  • Page 154 Nederland Deze en vele andere gebruiksaanwijzin- gen staan ter beschikking om te down- loaden via het serviceportaal www.medion.com/nl/service/start/. Daar vindt u ook drivers en andere soft- ware voor verschillende apparaten. Ook kunt u de QR-code hiernaast scan- nen en de gebruiksaanwijzing via het serviceportaal downloaden op uw mo- biele eindapparaat.
  • Page 155: Colofon

    Verveelvoudiging in mechanische, elektronische of welke andere vorm dan ook zonder schriftelijke toestemming van de fabrikant is verboden. Het copyright berust bij de firma: MEDION AG Am Zehnthof 77 45307 Essen Duitsland Houd er rekening mee dat het bovenstaande adres geen re- touradres is.
  • Page 156 Indice Informazioni relative alle presenti istruzioni per l’uso ................157 1.1. Spiegazione dei simboli .........157 1.2. Utilizzo conforme ............160 Indicazioni di sicurezza ......... 161 2.1. Pericoli per bambini e persone con limitate capacità d’uso dei dispositivi ........161 2.2. Utilizzo sicuro .............162 2.3.
  • Page 157 8.3. Impostazione dell’ora/della data (CLOCK SET) 182 8.4. Ripristino delle impostazioni di fabbrica (FACTORY RESET) ............184 8.5. Visualizzazione della versione del sistema (SW VERSION) .............184 8.6. Funzione di riduzione della luminosità (TIME OUT) ................185 8.7. Illuminazione del display (BRIGHTNESS) ..185 8.8.
  • Page 158: Informazioni Relative Alle Presenti Istruzioni Per L'uso

    Informazioni relative alle presenti istruzioni per l’uso La ringraziamo per l’acquisto di questo prodot- to. Ci auguriamo che possa trarne profitto. Prima di mettere in funzione il dispositivo, leg- gere attentamente le indicazioni di sicurezza. Osservare le avvertenze riportate sul dispositi- vo e nelle istruzioni per l’uso.
  • Page 159 AVVISO! Seguire le indicazioni al fine di evi- tare danni materiali! Ulteriori informazioni sull’utilizzo del pro- dotto! Osservare le indicazioni contenute nelle istruzioni per l’uso! AVVERTENZA! Pericolo di scossa elettrica! Punto elenco/Informazione relativa a • eventi che si possono verificare durante l’utilizzo ...
  • Page 160 Sicurezza verificata I prodotti contrassegnati da questo simbo- lo soddisfano i requisiti della legge tedesca sulla sicurezza dei prodotti. Classe di protezione II I dispositivi elettrici di classe II possiedo- no un isolamento doppio e/o rinforzato permanente e non hanno possibilità di al- lacciamento per un conduttore di terra.
  • Page 161: Utilizzo Conforme

    1.2. Utilizzo conforme La radio è un dispositivo dell’elettronica di consumo con cui si può comunicare con Alexa® in qualsiasi momento. Il dispositivo è destinato alla diffusione di trasmissioni radio e di segnali audio trasmessi via Bluetooth, all’indicazione dell’orario e dispone anche di funzioni di spegnimento tem- porizzato, timer e sveglia.
  • Page 162: Indicazioni Di Sicurezza

    • Non esporre il dispositivo a condizioni estreme. Esso è destinato esclusivamente a essere utilizzato in ambien- ti chiusi. Occorre evitare: – elevata umidità dell’aria o umidità in generale – temperature estremamente alte o basse – esposizione diretta al sole –...
  • Page 163: Utilizzo Sicuro

    • Tenere il dispositivo e gli accessori fuori dalla portata dei bambini. PERICOLO! Pericolo di soffocamento! Il materiale d’imballaggio non è un giocattolo! Pericolo di soffocamento in seguito all’ingestione o all’inalazione di pellicole o componenti di piccole di- mensioni.  Tenere gli imballaggi fuori dalla porta- ta dei bambini.
  • Page 164  Non appoggiare sul dispositivo o nel- le sue immediate vicinanze contenito- ri pieni di liquidi, ad es. vasi, e proteg- gere tutte le parti del dispositivo da gocce e spruzzi d’acqua. Il contenito- re potrebbe infatti rovesciarsi e il liqui- do pregiudicare la sicurezza dei circui- ti elettrici.
  • Page 165: Alimentazione Elettrica

    2.3. Alimentazione elettrica PERICOLO! Pericolo di scossa elettrica! Pericolo di lesioni da scossa elettrica per la presenza di parti sotto tensione.  Collegare l’alimentatore solo a una presa con messa a terra (230 V ~ 50 Hz) facilmente raggiungibile, ins- tallata a regola d’arte e vicina al pun- to d’installazione.
  • Page 166: Luogo Di Installazione / Ambiente

    • Tenere presente che il dispositivo continua a consumare energia elettrica anche in stand- 2.3.1. Alimentatore  Utilizzare esclusivamente l’alimentatore in do- tazione.  Se l’involucro dell’alimentatore o il cavo di ali- mentazione sono danneggiati, l’alimentatore deve essere smaltito e sostituito mediante uno nuovo dello stesso tipo.
  • Page 167 PERICOLO! Pericolo di scossa elettrica! In caso di forte escursione termica o di notevoli variazioni dell’umidità dell’aria, la formazione di condensa all’interno del dispositivo può causare un cortocircuito.  Dopo avere trasportato il disposi- tivo, aspettare che abbia raggiunto la temperatura ambiente prima di met- terlo in funzione.
  • Page 168  Durante l’installazione assicurarsi che – la distanza dagli altri oggetti sia sufficien- te e che le fessure di ventilazione non siano coperte in modo tale da garantire una ven- tilazione sufficiente in ogni momento; – non siano presenti fonti di calore (es. calori- feri) che agiscono direttamente sul disposi- tivo/sull’alimentatore;...
  • Page 169: Riparazione

    AVVERTENZA! Pericolo d’incendio/di corto circuito! Salendo verso l’alto, il vapore o il calore può causare un cortocircuito con con- seguente pericolo di scossa elettrica o in- cendio.  Non montare il dispositivo sopra for- nelli o altre fonti di calore o vapore (come bollitori e simili).
  • Page 170: Pulizia Del Dispositivo

     Nel caso in cui si rilevino danni o prob- lemi tecnici, affidare la riparazione del proprio dispositivo esclusivamente a tecnici qualificati.  Nel caso sia necessaria una riparazione, ri- volgersi esclusivamente ai nostri partner di assistenza autorizzati. 2.6. Pulizia del dispositivo PERICOLO! Pericolo di scossa elettrica! Pericolo di lesioni da scossa elettrica...
  • Page 171: Contenuto Della Confezione

    Contenuto della confezione Verificare l’integrità della confezione e comunicare l’eventuale incompletezza della fornitura entro 14 giorni dall’acquisto. Mettersi in contatto con noi anche in caso di fornitura totalmente o parzialmente difettosa. PERICOLO! Pericolo di soffocamento! Pericolo di soffocamento in seguito all’ingestione o all’inalazione di pelli- cole o componenti di piccole dimen- sioni.
  • Page 172: Informazioni Sulla Conformità

    Informazioni sulla conformità MEDION AG dichiara che il dispositivo è conforme ai requisiti basilari e alle altre disposizioni in materia: • Direttiva RED 2014/53/UE • Direttiva Ecodesign 2009/125/CE • Direttiva RoHS 2011/65/UE La dichiarazione di conformità UE completa può essere scari- cata alla pagina www.medion.com/conformity.
  • Page 173: Informazioni Su Fm/Dab/Bluetooth

    4.2. Informazioni su FM/DAB/Bluetooth Bluetooth Versione Profili A2DP, AVRCP, HFP Classe 2, raggio fino a 10 metri Frequenza 2,402-2,480 GHz Potenza di trasmissione 1,3 dBm FM/DAB Gamma di frequenza FM 87,5-108 MHz Gamma di frequenza DAB 174-240 MHz...
  • Page 174: Panoramica Del Dispositivo

    Panoramica del dispositivo Func. Indicatore a LED per comando vocale WLAN F U N C . : attivazione/disattivazione delle funzioni del dispositivo e dei tasti (indicazione dell’orario). : selezione della stazione / selezione della voce di menu / in modalità Bluetooth traccia precedente : selezione della stazione / selezione della voce di menu / in modalità...
  • Page 175 DC IN Service port O N / O F F : accensione/spegnimento della radio. Quando il dispositivo è acceso, il comando vocale è attivo a condizione che sia stato precedentemente configurato. Collegamento dell’alimentatore S E R V I C E P O R T : porta USB per l’aggiornamento del software Antenna telescopica...
  • Page 176 : Tasto di disattivazione microfono: disattivazione della funzione di comando vocale : Tasto per il comando vocale nell’area circostante M O D E : tasto di selezione delle funzioni (radio FM, radio DAB, modalità Bluetooth, modalità Wi-Fi) M E N U : premere brevemente il tasto per ottene- re informazioni sulla stazione / premerlo più...
  • Page 177: Messa In Funzione E Utilizzo

    Messa in funzione e utilizzo 6.1. Collegamento alla rete elettrica Collegare l’alimentatore fornito.  Inserire la spina del cavo di alimentazione nella presa D C I N 8 V e l’alimentatore in una presa di corrente con messa a di terra da 230 V° ~ 50 Hz instal- lata a regola d’arte e sempre facilmente accessibile.
  • Page 178: Funzionamento Della Radio

    6.3.1. Volume  Regolare il volume mediante la manopola di regolazione + V O L . - sul dispositivo. Sul display il volume viene visualizzato per alcuni secondi sotto forma di grafico a barre. Funzionamento della radio Questa radio consente di ricevere le stazioni FM e DAB+. È...
  • Page 179: Ricerca Delle Stazioni Dab

    7.1.1. Ricerca delle stazioni DAB Per cercare stazioni radio digitali in modalità DAB procede- re come segue: M E N U  in modalità DAB tenere premuto il tasto fino a quando sul display non compare il menu delle impos- tazioni di sistema.
  • Page 180: Impostazioni Del Sistema In Modalità Radio (Dab/Fm)

    7.2.1. Ricerca delle stazioni FM Per cercare stazioni radio FM in modalità FM procedere come segue: M E N U  in modalità FM tenere premuto il tasto fino a quando sul display non compare il menu delle imposta- zioni di sistema. Con il tasto  o  selezionare il primo FM SCAN SET sottomenu per eseguire le preimpos-...
  • Page 181: Impostazione/Attivazione Della Sveglia (Sveglia 1 / Sveglia 2)

    8.1. Impostazione/attivazione della sveglia (SVEGLIA 1 / SVEGLIA 2) Il dispositivo offre la possibilità di impostare due orari al rag- giungimento dei quali viene azionata la sveglia con segnale acustico o con la radio.  Durante il funzionamento tenere premuto il tasto M E N U fino a quando sul display non compare il menu delle impostazioni di sistema.
  • Page 182: Alarm Volume

    ALARM VOLUME ( E N T E R ) – Premere il tasto per accedere a ALARM 1/2 VO- questo menu. All’interno di LUME utilizzare i tasti  e  per impostare il volu- 00-15 me della sveglia ( ), quindi confermare con il ( E N T E R ) tasto ALARM MODE...
  • Page 183: Impostazione Dell'ora/Della Data (Clock Set)

     Durante il funzionamento tenere premuto il tasto M E N U fino a quando sul display non compare il menu delle impostazioni di sistema. Con il tasto  o  SLEEP SET selezionare il sottomenu ( E N T E R ) ...
  • Page 184 SET YEAR ( E N T E R ) – Premere il tasto per accedere a questo menu. Con il tasto  o  impostare l’anno YEAR ( E N T E R ) ) e confermare con il tasto SET MONTH ( E N T E R ) –...
  • Page 185: Ripristino Delle Impostazioni Di Fabbrica (Factory Reset)

    8.4. Ripristino delle impostazioni di fabbrica (FACTORY RESET) Per ripristinare le impostazioni di fabbrica del dispositivo procedere come segue:  Durante il funzionamento tenere premuto il tasto M E N U fino a quando sul display non compare il menu delle impostazioni di sistema. Con il tasto  o  FACTORY RESET selezionare il sottomenu ( E N T E R )
  • Page 186: Funzione Di Riduzione Della Luminosità (Time Out)

    Tramite la porta USB posteriore è possibile eseguire un aggiornamento del software. 8.6. Funzione di riduzione della luminosità (TIME OUT) La funzione Time Out consente di ridurre la luminosità del display dopo un periodo di inutilizzo predefinito.  Durante il funzionamento tenere premuto il tasto M E N U fino a quando sul display non compare il menu delle impostazioni di sistema.
  • Page 187: Equalizer (Treble / Bass)

    Con i tasti  e  regolare la luminosità in base alle – LOW, MEDIUM, HIGH proprie preferenze ( ( E N T E R ) confermare con il tasto 8.8. Equalizer (TREBLE / BASS) La funzione di equalizzatore a doppia banda consente una regolazione individuale dell’audio del segnale radio nelle frequenze alte e basse.
  • Page 188: Sincronizzazione Di Data E Ora (Time Check)

    8.9. Sincronizzazione di data e ora (TIME CHECK) La sincronizzazione automatica di data e ora può essere atti- vata e disattivata.  Durante il funzionamento tenere premuto il tasto M E N U fino a quando sul display non compare il menu delle impostazioni di sistema.
  • Page 189: Memorizzazione Di Stazioni Preferite

    8.11. Memorizzazione di stazioni preferite È possibile memorizzare le stazioni preferite sui tasti per poterle richiamare rapidamente. Sono disponibili 10 posizioni per le stazioni preferite. Procedere come segue:  Selezionare la stazione desiderata.  Tenere premuto il tasto fino a quando sul display non compare l’elenco delle stazioni preferite.
  • Page 190: Informazioni Dettagliate Sulla Stazione

    8.12. Informazioni dettagliate sulla stazione La radio offre la possibilità di visualizzare informazioni detta- gliate sulla stazione. M E N U  Premere ripetutamente il tasto per visualizza- re le seguenti informazioni: DAB: • Testo radio (Dynamic Label Segment) • Potenza del segnale •...
  • Page 191: Collegamento Di Dispositivi Bluetooth

    Attivare la funzione Bluetooth anche sul dispo- sitivo esterno ed eseguire l’accoppiamento. A tale sco- po leggere le istruzioni del dispositivo esterno. Il nome dell’impianto audio è “MEDION MD 44130”.  L’accoppiamento è completato e il dispositivo esterno può essere abbinato alla radio da cucina.
  • Page 192: Interruzione Di Una Connessione Bluetooth

    10.1. Stabilire una connessione di rete e attivare il comando vocale Per la configurazione di Amazon Alexa® è necessaria l’app MEDION SPEAKER, che può essere installata facilmente dall’App Store (Apple) o dal Google Play Store (Android). Per configurare il comando vo- cale, procedere come segue: ...
  • Page 193  Installare l’app MEDION SPEAKER sul dispositivo esterno (ad es. iPhone) e aprirla, quindi attivare WLAN. L’app cer- ca un sistema HiFi wireless. L’indicatore a LED sopra il dis- play lampeggia con luce bianca. Se il dispositivo era già stato accoppiato in passato, dalla modalità Wi-Fi la radio può...
  • Page 194: Interruzione Della Connessione Di Rete

    Per attivare Amazon Alexa®, registrare il dispositivo sul prop- rio account Amazon. A tale fine è necessario essere già regis- trati sul sito di Amazon.  Accedere all’account Amazon.  Selezionare la lingua con cui si desidera comunicare con Amazon Alexa® e confermare. ...
  • Page 195: Comando Vocale Nell'area Circostante

    10.3. Comando vocale nell’area circostante Premendo il tasto per il comando vocale nell’area circostan- , il dispositivo passa alla modalità di riconoscimento vo- cale nell’area circostante. Ora è possibile utilizzare la funzi- onalità Amazon Alexa® senza dover risvegliare il dispositivo pronunciando il nome “Alexa”.
  • Page 196: In Caso Di Problemi

    11. In caso di problemi Se dovessero verificarsi problemi, innanzitutto verificare se sia possibile risolverli autonomamente. La seguente tabella può essere di aiuto. ATTENZIONE! Pericolo di lesioni! L’apertura del dispositivo può causa- re lesioni.  Non provare in nessun caso a ripara- re il dispositivo autonomamente.
  • Page 197: Pulizia

    Anomalia Cause / Rimedi possibili Nessun seg- Selezionare una posizione diversa per nale radio migliorare il segnale radio dell’ora. Ori- dell’ora / nes- entare l’antenna per ottimizzare la rice- suna ricezio- zione radio. ne radio Il comando Verificare se il microfono è spento. È vocale non possibile che sia attivato il comando vo- funziona...
  • Page 198: Come Conservare Il Dispositivo Quando Non Viene Utilizzato

    13. Come conservare il dispositivo quando non viene utilizzato Se si prevede di non utilizzare il dispositivo per lungo tem- po, riporlo in un luogo asciutto e fresco assicurandosi che sia protetto dalla polvere e da forti sbalzi di temperatura. Imballaggio L’imballaggio protegge il dispositivo da even- tuali danni durante il trasporto.
  • Page 199: Dati Tecnici

    14. Dati tecnici Alimentatore Produttore WINNA DongGuan Yingna Electronic Technology Co., Ltd. Modello YN-15WA080100EU Tensione in entrata AC 100-240 V ~ 50/60 Hz 0,4 A Tensione in uscita DC 8,0 V 1,0 A Dispositivo Alimentazione elettrica DC 8,0 V 1,0 A Potenza di uscita 4 W RMS Gamma di frequenza DAB III 174-240 MHz Gamma di frequenza FM 87,5-108 MHz...
  • Page 200 Amazon, Alexa e tutti i relativi loghi sono marchi registrati di Amazon.com, Inc. o di società controllate. Il marchio Bluetooth® e i relativi loghi sono marchi registra- ti di Bluetooth SIG, Inc. e vengono utilizzati da MEDION® su licenza. Gli altri loghi e nomi di marchi appartengono ai rispettivi...
  • Page 201: Informazioni Relative Al Servizio Di Assistenza

    Esistono diversi modi per mettersi in contatto con noi. • In alternativa è possibile compilare il modulo di contatto disponibile alla pagina www.medion.com/contact. • Il nostro team di assistenza è raggiungibile anche via te- lefonicamente. Italia...
  • Page 202 Italia Queste e altre istruzioni per l’uso pos- sono essere scaricate dal portale dell’assistenza www.medion.com/it/. Lì sono disponibili anche driver e altri software per diversi dispositivi. È inoltre possibile effettuare una scan- sione del codice QR riportato a fianco e scaricare le istruzioni per l’uso dal porta-...
  • Page 203: Note Legali

    È vietata la riproduzione in forma meccanica, elettronica e in qualsiasi altra forma senza l’autorizzazione scritta da par- te del produttore. Il copyright appartiene all’azienda: MEDION AG Am Zehnthof 77 45307 Essen Germania L’indirizzo riportato sopra non è quello a cui spedire la mer- ce resa.
  • Page 204 Índice Información acerca de este manual de instrucciones ............... 205 1.1. Explicación de los símbolos ........205 1.2. Uso conforme a lo previsto........208 Indicaciones de seguridad ........209 2.1. Peligros para niños y personas con capacidad limitada para manejar aparatos ..209 2.2.
  • Page 205 9.3. Ajuste de la hora/fecha (CLOCK SET) ....229 9.4. Restablecimiento a la configuración de fábrica (FACTORY RESET) ........231 9.5. Visualización de la versión del sistema (SW VERSION) ..............232 9.6. Función del regulador de atenuación (TIME OUT) ................232 9.7. Iluminación de la pantalla (BRIGHTNESS) ..233 9.8.
  • Page 206: Información Acerca De Este Manual De Instrucciones

    Información acerca de este manual de instrucciones Muchas gracias por haber elegido nuestro pro- ducto. Le deseamos que disfrute con este apa- rato. Antes de la puesta en marcha, lea atentamente las indicaciones de seguridad. Tenga en cuenta las advertencias que aparecen en el propio apa- rato y en el manual de instrucciones.
  • Page 207 ¡ATENCIÓN! ¡Advertencia de posibles lesiones de grado medio o leve! ¡AVISO! ¡Observe las indicaciones para evi- tar daños materiales! ¡Información más detallada para el uso del aparato! ¡Observe las indicaciones del manual de in- strucciones! ¡ADVERTENCIA! ¡Advertencia de peligro por descar- ga eléctrica! Signo de enumeración/información sobre •...
  • Page 208 Seguridad probada Los productos identificados con este sím- bolo cumplen los requisitos de la legislaci- ón sobre la seguridad de productos. Clase de protección II Los aparatos eléctricos de la clase de pro- tección II son aparatos que disponen de un aislamiento doble y/o reforzado continuo y que no tienen posibilidad de conexión de un conductor de puesta a tierra.
  • Page 209: Uso Conforme A Lo Previsto

    1.2. Uso conforme a lo previsto La radio es un aparato de la electrónica de entretenimien- to con la que en todo momento es posible comunicarse me- diante Alexa®. Este aparato sirve para reproducir emisiones de radio y señales de audio transferidas mediante Bluetooth, para visualizar la hora y también dispone de una función de despertador, temporizador y alarma.
  • Page 210: Indicaciones De Seguridad

    • Nunca utilice el aparato en zonas con peligro de explo- sión. Por ejemplo, en estaciones de servicio, zonas de al- macenamiento de combustibles o zonas en las que se procesan disolventes. El aparato tampoco se debe uti- lizar en entornos con aire contaminado de partículas (p. ej., polvo de harina o de serrín).
  • Page 211: Seguridad Operativa

    • La limpieza y el mantenimiento que debe re- alizar el usuario no deben ser ejecutados por niños sin supervisión. • Guarde el aparato y los accesorios fuera del al- cance de los niños. ¡PELIGRO! ¡Peligro de asfixia! ¡El material de embalaje no es un ju- guete! Peligro de asfixia por inhalaci- ón o ingesta de plásticos o pequeñas piezas.
  • Page 212  No coloque recipientes llenos de líqui- do, como jarrones, sobre el aparato o cerca del mismo y proteja todas las piezas frente a gotas de agua o agua pulverizada. El recipiente podría volcar y el líquido podría perjudicar la seguri- dad eléctrica.
  • Page 213: Alimentación Eléctrica

    2.3. Alimentación eléctrica ¡PELIGRO! ¡Peligro de descarga eléctrica! Peligro de sufrir lesiones por descarga eléctrica debido a piezas conductoras de corriente.  Conecte el adaptador de red solo a una toma de corriente con puesta a tierra (230 V ~ 50 Hz) fácilmente accesi- ble y debidamente instalada cerca del lugar de emplazamiento.
  • Page 214: Adaptador De Red

     Extraiga el adaptador de red de la toma de corriente en caso de que sal- ga humo o ruidos inusuales del apara- to o de la fuente de alimentación. • Tenga en cuenta que el aparato sigue consu- miendo corriente en el modo standby. 2.3.1.
  • Page 215 ¡PELIGRO! ¡Peligro de descarga eléctrica! En caso de grandes variaciones de temperatura o humedad, puede for- marse humedad dentro del aparato por condensación y esta puede provo- car un cortocircuito eléctrico.  Después de transportar el apara- to, espere hasta que este tenga la tem- peratura ambiente antes de ponerlo en funcionamiento.
  • Page 216  Al realizar la instalación, procure que – haya distancia suficiente a otros objetos y que las ranuras de ventilación no queden cubiertas para que siempre se garantice una ventilación suficiente; – no actúen fuentes de calor directas (p. ej., calefacciones) sobre el aparato/el adapta- dor de red;...
  • Page 217: Reparación

    ¡ADVERTENCIA! ¡Peligro de incendio/peligro de cor- tocircuito! Debido al vapor o el calor que sale, un cortocircuito puede generar el peligro de descarga eléctrica o incendio.  Nunca monte el aparato encima de placas de cocina u otras fuentes de ca- lor o vapor (como hervidores, etc.).
  • Page 218: Limpieza Del Aparato

     Si detecta algún daño o problemas té- cnicos, encargue la reparación de su aparato únicamente a personal técnico cualificado.  En caso de que sea necesario realizar una reparación, diríjase exclusivamente a nu- estros colaboradores de servicio técnico autorizados. 2.6.
  • Page 219: Volumen De Suministro

     No utilice disolventes ni productos de limpieza químicos, puesto que podrían dañar las superficies y/o las inscripcio- nes del aparato. Volumen de suministro Compruebe que el suministro esté completo, y, si no fuera este el caso, avísenos dentro de un plazo de 14 días después de su compra.
  • Page 220: Información Sobre La Conformidad

    Información sobre la conformidad Por la presente, MEDION AG declara que este aparato cump- le los requisitos básicos y el resto de disposiciones pertinen- tes: • Directiva 2014/53/UE sobre la comercialización de equi- pos radioeléctricos • Directiva 2009/125/CE sobre diseño ecológico •...
  • Page 221: Información Sobre Wifi

    4.1. Información sobre wifi Wifi Rango de frecuencia 2,4 GHz Wifi estándar 802.11 b/g/n Codificación WEP/WPA/WPA2 Alcance interiores aprox. 35-100 m/ exteriores aprox. 100-150 m Potencia de Rango de frecuencia/ Canal emisión máx./ 2412-2472 1-13 18,7 4.2. Información sobre FM/DAB/ Bluetooth Bluetooth Versión...
  • Page 222: Vista General Del Aparato

    Vista general del aparato Func. Indicador LED para el control por voz wifi Pantalla LC F U N C . : activar/desactivar funciones del aparato y teclas (visualización de la hora) : selección de la emisora/seleccionar la entrada de menú/en el modo Bluetooth una pista atrás : selección de la emisora/seleccionar la entrada de menú/en el modo Bluetooth una pista hacia delante ( E N T E R )
  • Page 223 DC IN Service port O N / O F F : encender/apagar la radio. En estado encendido el control por voz está activado siempre que se haya configurado previamente. Conexión para el adaptador de red S E R V I C E P O R T : conexión USB para actuali- zación de software Antena telescópica...
  • Page 224 : Tecla micrófono-modo silencioso: desactivación de la función de control por voz : Tecla de control por voz para corta distancia M O D E : tecla de selección de funciones (radio FM, radio DAB, modo Bluetooth, modo wifi) M E N U : pulsar brevemente para obtener informa- ción sobre emisoras/si se pulsa de forma prolongada pueden llamarse ajustes del menú...
  • Page 225: Puesta En Marcha Y Uso

    Puesta en marcha y uso 6.1. Conexión a la red eléctrica Realice la conexión del adaptador de red suministrado.  Para ello, inserte el conector del cable de conexión en el D C I N 8 V conector hembra y el adapta- dor de red en una toma de corriente con puesta a tierra bien instalada y fácilmente accesible en todo momento de 230 V ~ 50 Hz.
  • Page 226: Funcionamiento De Radio

    6.3.1. Volumen + V O L . -  Con el regulador giratorio ajuste el volu- men del aparato. En la pantalla se muestra el volumen durante unos segundos como indicación de barras. Funcionamiento de radio Con esta radio puede recibir emisoras FM y emisoras DAB+. Puede guardar hasta 10 emisoras FM y 10 emisoras DAB+.
  • Page 227: Consulta De Emisoras Dab De La Lista De Emisoras

    ( E N T E R )  Pulse para iniciar la búsqueda de emiso- ras digitales. Ahora el aparato buscará todas las emisoras DAB+ disponib- les. El progreso de búsqueda (en %) y el número de emisoras encontradas se muestran en la pantalla. En cuanto ha finaliz- ado el proceso, se cierra automáticamente el menú...
  • Page 228: Ajustes Del Sistema En El Modo De Radio (Dab/Fm)

    ( E N T E R )  Pulse y con las teclas  o  selecci- STRONG one si desea buscar todas las emisoras ( STRONG ) o solo las emisoras con señal intensa ( ONLY  En el modo de radio, con las teclas  o  ahora puede buscar manualmente emisoras pulsándolas varias veces.
  • Page 229: Alarm On/Off

    ALARM ON/OFF ( E N T E R ) – Pulse la tecla para acceder a este ALARM 1 / ALARM 2 menú. Active con las te- ( E N T E R ) clas  o  ( ) y confírmelo con ALARM TIME ( E N T E R ) –...
  • Page 230: Ajuste/Activación Del Sleeptimer (Sleep)

    E N T E R  Si mientras suena la alarma pulsa la tecla , acti- vará la función Snooze. La alarma se cancelará y volverá a sonar después de aprox. 10 minutos. M O D E  Mientras suena la alarma pulse la tecla para fi- nalizar la alarma.
  • Page 231 En algunos casos, es posible que no puedan sincronizar- se los datos si la señal de radio es demasiado débil. En este 00:00 caso, en la pantalla se mostrará y la hora tendrá que ajustarse manualmente. M E N U ...
  • Page 232: Restablecimiento A La Configuración De Fábrica (Factory Reset)

    O N / Si apaga el aparato con el interruptor O F F (o también en caso de fallo de corriente), se perderá el ajuste de la hora y la fecha confi- gurado manualmente. Cuando vuelva a encen- der el aparato, la hora y la fecha se sincroni- zarán de nuevo automáticamente.
  • Page 233: Visualización De La Versión Del Sistema (Sw Version)

    9.5. Visualización de la versión del sistema (SW VERSION) Proceda como se indica a continuación para visualizar la ver- sión de software actual: M E N U  Con el modo activo mantenga pulsada la tecla hasta que aparezca el menú de configuración del siste- ma.
  • Page 234: Iluminación De La Pantalla (Brightness)

    9.7. Iluminación de la pantalla (BRIGHTNESS) Si lo desea puede regular el brillo de la pantalla. M E N U  Con el modo activo mantenga pulsada la tecla hasta que aparezca el menú de configuración del sis- tema. Con las teclas  o  seleccione el submenú BRIGHTNESS ( E N T E R ) ...
  • Page 235: Sincronización De La Fecha Y La Hora (Time Check)

    La función de ecualizador también está a su disposición en el modo de Bluetooth y de control por voz. 9.9. Sincronización de la fecha y la hora (TIME CHECK) La sincronización automática de la fecha y la hora puede ac- tivarse y desactivarse.
  • Page 236: Guardado De Favoritas

     Con las teclas  o  seleccione si desea buscar todas STRONG ALL las emisoras ( ) o solo las emisoras con STRONG ONLY señal intensa ( Si a continuación busca emisoras FM en el modo de radio, la búsqueda se realiza según este preajuste.
  • Page 237: Información Complementaria De Emisoras

    9.12. Información complementaria de emisoras La radio le ofrece la posibilidad de visualizar información complementaria sobre emisoras. M E N U  Pulse la tecla varias veces para visualizar la si- guiente información: DAB: • texto de radio (Dynamic Label Segment) •...
  • Page 238: Conexión De Equipos Con Bluetooth

    Lea al res- pecto el manual de su dispositivo externo. El nombre del sistema de audio es «MEDION MD 44130».  El acoplamiento ha finalizado y el equipo externo puede utilizarse en combinación con la radio de cocina.
  • Page 239: Desconexión De La Conexión Bluetooth

    11.1. Establecimiento de la conexión de red y activación del control por voz Para la configuración de Amazon Alexa® necesita la MEDION SPEAKER App, que puede instalarse fácilmente a través la App Store (Apple) y/o Google Play Store (Android). Para la configuración del con- trol por voz proceda según se indica a...
  • Page 240  Instale y abra la MEDION SPEAKER App en su equipo ex- terno (p. ej. iPhone) y active WLAN. A continuación, la aplicación busca un sistema HiFi inalámbrico. El indica- dor LED encima de la pantalla parpadea alternativamen- te en color blanco. Si el aparato ya se acopló, la radio puede cambiarse al modo de conexión en el modo wifi...
  • Page 241: Desconexión De La Conexión De Red

     Después se muestra su radio. Aquí puede modificar el volumen global y llevar a cabo otros ajustes para Ama- zon Alexa®. Ahora puede cerrar la MEDION SPEAKER App. Y ya puede utilizar la función Amazon Alexa®. En cuanto se dirija a su aparato con «Alexa», este reaccionará...
  • Page 242: Control Por Voz A Poca Distancia

    11.3. Control por voz a poca distancia Si pulsa la tecla de control por voz a poca distancia , el aparato cambia al modo de identificación de voz a poca dis- tancia. Ahora puede utilizar la función Amazon Alexa® sin te- ner que despertar el aparato con «Alexa».
  • Page 243: En Caso De Fallos

    12. En caso de fallos En caso de que se produzcan fallos, compruebe primero si puede solucionar usted mismo el problema. El siguiente sinóptico puede resultarle de ayuda. ¡ATENCIÓN! ¡Peligro de sufrir lesiones! La apertura del aparato puede provo- car lesiones. ...
  • Page 244: Limpieza

    Fallo Posible causa/Medida No hay señal En caso necesario, seleccione otro em- inalámbrica plazamiento para mejorar la señal ina- para la hora/ lámbrica para la hora. Oriente la antena no hay recep- telescópica para optimizar la recepción ción de radio de radio.
  • Page 245: Almacenamiento En Caso De No Utilizarse

    14. Almacenamiento en caso de no utilizarse En caso de que no vaya a utilizar el aparato durante un tiem- po prolongado, almacénelo en un lugar seco y fresco y pro- cure que esté protegido contra el polvo y oscilaciones de temperatura extremas.
  • Page 246: Datos Técnicos

    15. Datos técnicos Adaptador de red Fabricante WINNA DongGuan Yingna Electronic Technology Co., Ltd. Modelo YN-15WA080100EU Tensión de entrada CA 100-240 V ~ 50/60 Hz 0,4 A Tensión de salida CC 8,0 V 1,0 A Aparato Alimentación de tensión CC 8,0 V 1,0 A Potencia de salida 4 W RMS...
  • Page 247 Amazon.com, Inc. o sus empresas filiales. La marca denominativa Bluetooth® y los logotipos son mar- cas registradas de Bluetooth SIG, Inc. utilizadas por MEDION® con la correspondiente licencia. Otras marcas registradas y nombres de marcas son propie-...
  • Page 248: Informaciones De Asistencia Técnica

    ón al cliente. Dispone de distintos medios para ponerse en contacto con nosotros: • Si lo desea, también puede utilizar nuestro formulario de contacto que encontrará en www.medion.com/contact. • Por supuesto, nuestro equipo de asistencia técnica tam- bién está a su disposición a través de nuestra línea direc- ta o por correo postal.
  • Page 249: Aviso Legal

    Queda prohibida la reproducción mecánica, electrónica o de cualquier otro tipo sin la autorización por escrito del fabricante. El copyright pertenece a la empresa: MEDION AG Am Zehnthof 77 45307 Essen Alemania Tenga en cuenta que la dirección indicada arriba no es una dirección para devoluciones.
  • Page 250 Contents Information about these operating instructions ..251 1.1. Key to symbols ............251 1.2. Proper use ..............254 Safety information ..........255 2.1. Dangers for children and people with reduced ability to operate devices .....255 2.2. Operating safety ............256 2.3. Power supply ..............257 2.4.
  • Page 251 8.5. Displaying the system version (SW VERSION) .277 8.6. Dimmer function (TIME OUT) .......277 8.7. Display illumination (BRIGHTNESS) ....278 8.8. Equaliser (TREBLE / BASS) ........278 8.9. Synchronisation of date and time (TIME CHECK) ................279 8.10. Presettings for the FM station search (FM SCAN SET) ..............279 8.11.
  • Page 252: Information About These Operating Instructions

    Information about these operating instructions Thank you for choosing our product. We hope you enjoy using this device. Read the safety instructions carefully before using the device for the first time. Note the war- nings on the device and in the operating inst- ructions.
  • Page 253 CAUTION! Warning: risk of minor and/or mo- derate injuries! NOTICE! Follow these instructions to pre- vent damage to the device! Additional information on using the de- vice! Comply with the notes in the operating in- structions. WARNING! Warning: risk of electric shock! Bullet point/information on steps during •...
  • Page 254 Tested safety Products that feature this symbol meet the requirements of the German Product Sa- fety Act. Protection class II Electrical devices in protection class II are devices that have double and/or reinforced insulation throughout, and do not have the option of connecting a protective earth.
  • Page 255: Proper Use

    1.2. Proper use The radio is an entertainment electronics device you can communicate with at any time via Alexa®. The device is used to play radio broadcasts and audio signals transmitted via Bluetooth or display the time and also has a sleep-timer, ti- mer and alarm function.
  • Page 256: Safety Information

    Avoid: – high humidity or wet conditions – extremely high or low temperatures – direct sunlight – naked flames Safety information 2.1. Dangers for children and people with reduced ability to operate devices • This device is not intended for use by peop- le (including children) with reduced physical, sensory or mental abilities or by those without experience and/or knowledge, unless they are...
  • Page 257: Operating Safety

    DANGER! Risk of choking and suffocation! The packaging material is not a toy! There is a risk of suffocation from brea- thing in or swallowing plastic film or small parts.  Keep packaging away from children. 2.2. Operating safety • Before using the device for the first time, check the device for damage.
  • Page 258: Power Supply

     Never open the product housing or po- wer supply housing and do not push objects inside the product through the slots and openings.  If the mains adapter, connection cable or device is damaged, immediately un- plug the mains adapter from the so- cket.
  • Page 259: Mains Adapter

     In order to disconnect the power to your device or to completely isolate the device from voltage sources, remo- ve the mains adapter from the socket.  When disconnecting the connection cable from the mains supply, always pull on the mains adapter rather than on the cable.
  • Page 260: Installation Location/Surroundings

    2.4. Installation location/surroundings In the first few hours of use, new products may give off a typical, unavoidable but totally harm- less smell which will wear off with time. We re- commend you ventilate the room regularly to help dissipate this odour. We have taken appro- priate measures during the development of this product to ensure that levels are well below legal limits.
  • Page 261  To prevent the device from falling, only install and operate it and its compo- nents on a sturdy, level and vibration- free surface.  When setting up the device, make sure that. – there is a sufficient gap in relation to other objects, and that the ventilation slots are not covered in order to ensure that there is always sufficient ventilation;...
  • Page 262: Repairs

    WARNING! Risk of fire/short circuit! Rising steam or heat can pose a risk of electric shock or fire if a short circuit occurs.  Never mount the device above a hob or any other heat or steam source (for example, electric kettles, etc.). ...
  • Page 263: Cleaning The Device

     If you discover any damage or experi- ence any technical problems, have the device repaired exclusively by a quali- fied technician.  If a repair must be carried out, please con- tact only our authorised service partners. 2.6. Cleaning the device DANGER! Risk of electric shock! Risk of injury from electric shock due...
  • Page 264: Package Contents

    Package contents Please check your purchase to ensure that all items are in- cluded. If anything is missing, contact us within 14 days of purchase. Also contact us in the event of defective or partly defective delivery. DANGER! Risk of choking and suffocation! There is a risk of suffocation from brea- thing in or swallowing plastic film or small parts.
  • Page 265: Declaration Of Conformity

    Declaration of Conformity MEDION AG hereby declares that this device complies with the fundamental requirements and the other relevant pro- visions of: • RE Directive 2014/53/EU • Ecodesign Directive 2009/125/EC • RoHS Directive 2011/65/EU You can download the complete EU Declaration of Confor- mity at www.medion.com/conformity.
  • Page 266: Information On Fm/Dab/Bluetooth

    4.2. Information on FM/DAB/Bluetooth Bluetooth Version Profile A2DP, AVRCP, HFP Class 2, up to 10 metre radius Frequency 2.402–2.480 GHz Transmission power 1.3 dBm FM/DAB Frequency range FM 87.5–108 MHz Frequency range DAB 174–240 MHz...
  • Page 267: Device Overview

    Device overview Func. LED display for WLAN voice control LCD screen F U N C . : Activate/deactivate device and button functions (time display)  : Station selection / Select menu entry / In Blue- tooth mode: Title backwards  : Station selection / Select menu entry / In Blue- tooth mode: Title forwards ( E N T E R ) : Confirm menu entry...
  • Page 268 DC IN Service port O N / O F F : Switch radio on/off. The voice control is active when the device is switched on, provided it has been set up beforehand. Mains adapter connection S E R V I C E P O R T : Software upgrade USB con- nection Telescopic aerial...
  • Page 269 : Microphone mute button: Deactivating the voice control function : Close-range voice control button M O D E : Function selection button (FM radio, DAB radio, Bluetooth mode, WiFi mode) M E N U : Press for station information / press and hold to call up the menu settings Microphone Microphone...
  • Page 270: Initial Operation And Use

    Initial operation and use 6.1. Mains connection Connect the mains adapter provided.  To do this, place the connection cable plug in the socket D C I N 8 V and the mains adapter into a properly installed 230V ~ 50 Hz earthed power socket which is accessible at all times.
  • Page 271: Radio Mode

    6.3.1. Volume + V O L . -  Use the control knob on the device to set the volume. The volume is shown on the display as a bar for a few se- conds. Radio mode You can use this radio to receive FM and DAB+ stations. You can save up to 10 FM stations and 10 DAB+ stations.
  • Page 272: Selecting Dab Stations From The Station List

    The device then searches for all available DAB+ stations. The search progress (in %) and the number of stations found are shown in the display. As soon as the process is finished the menu is closed automatically and the first station is played in the station list.
  • Page 273: System Settings In Radio Mode (Dab/Fm)

     You can now press the  or  buttons several times in radio mode to search for stations manually. Press and hold one of the buttons to start an automatic search. The search stops when a station is found. This station is then played.
  • Page 274 ALARM TIME ( E N T E R ) – Press the button to navigate to this menu. Use the  or  buttons to set the hour and ( E N T E R ) confirm with Use the  or  buttons to set the minute and con- –...
  • Page 275: Setting/Activating The Sleep Timer (Sleep)

    M O D E  Press the button during the alarm to stop the alarm. 8.2. Setting/activating the sleep timer (SLEEP) The device features a sleep timer function, which switches the radio off after a certain time if no actions have been per- formed up until then.
  • Page 276: Clock Set

    M E N U  Press and hold the button in active operation until the system settings menu appears. Use the  or  CLOCK SET buttons to select the submenu. ( E N T E R )  Press the button to navigate to the CLOCK SET menu.
  • Page 277: Restoring Factory Settings (Factory Reset)

    O N / If you switch off the device with the O F F switch (or also in the event of a power failure), the time set previously will be lost. Af- ter switching on the device again, the time is synchronised again automatically.
  • Page 278: Displaying The System Version (Sw Version)

    8.5. Displaying the system version (SW VERSION) Please proceed as follows to display the current software version: M E N U  Press and hold the button in active operation until the system settings menu appears. Use the  or  SW VERSION buttons to select the submenu.
  • Page 279: Display Illumination (Brightness)

    8.7. Display illumination (BRIGHTNESS) You have the option of adjusting the brightness of the dis- play. M E N U  Press and hold the button in active operation until the system settings menu appears. Use the  and BRIGHTNESS ...
  • Page 280: Synchronisation Of Date And Time (Time Check)

    8.9. Synchronisation of date and time (TIME CHECK) The automatic synchronisation of date and time can be acti- vated and deactivated. M E N U  Press and hold the button in active operation until the system settings menu appears. Use the  and TIME CHECK ...
  • Page 281: Saving Favourites

    8.11. Saving favourites You have the option of saving your preferred stations on the 1 - 5 + buttons so you can select these quickly. You can save up to 10 favourites. Proceed as follows:  Select the desired station. ...
  • Page 282: Advanced Station Information

    8.12. Advanced station information The radio offers you the option of displaying advanced stati- on information. M E N U  Press the button repeatedly to display the fol- lowing information: DAB: • Radio text (dynamic label segment) • Signal strength •...
  • Page 283: Connecting Bluetooth Devices

    Refer to the instructions for your external device for more information. The audio system's name is "MEDION MD 44130".  The pairing process is now complete and the external device can now be used together with the kitchen radio.
  • Page 284: Wlan Voice Control Mode

     Switch the radio on and activate WiFi mode with the M O D E button.  Install and open the MEDION SPEAKER app on your ex- ternal device (e.g. iPhone) and activate WLAN. The app now searches for a wireless HiFi system. The LED indica- tor above the display flashes white alternately.
  • Page 285 WLAN settings of your smartphone via the “Settings” op- tion.  Search for network-enabled devices in your WLAN set- tings. The MEDION MD 44130 radio now appears in the list. The last digits of the MAC address are shown to dis- tinguish precisely between different devices.
  • Page 286: Disconnecting The Network Connection

     Your radio is then displayed. Here you can change the global volume and make further settings for Amazon Alexa®. You can now close the MEDION SPEAKER app. You can now use the Amazon Alexa® function. As soon as you talk to the device with “Alexa” it will respond to your re- quests.
  • Page 287: Muting The Microphone

    10.4. Muting the microphone Press the microphone mute button if you wish to mute the microphone of your device. Amazon Alexa® no longer re- ceives signals in this case and is basically deactivated. The LED indicator below the display then lights up red. Press the button again to reactivate the microphone.
  • Page 288 Fault Possible cause/action No sound The volume may be set too low. In Bluetooth mode: Set the volume of the external device to the maximum and then control the volume using the kitchen radio. No radio si- If necessary, select another location to gnal for the improve the radio signal for the time.
  • Page 289: Cleaning

    12. Cleaning Always pull the mains adapter out from the socket before cleaning the device. Only use a dry, soft cloth to clean the device. Do not use che- mical solutions or cleaning products because these may da- mage the device’s surface and/or inscriptions. 13.
  • Page 290: Technical Specifications

    14. Technical specifi cations Mains adapter Manufacturer WINNA DongGuan Yingna Electronic Technology Co., Ltd. Model YN-15WA080100EU Input voltage AC 100–240 V ~ 50/60 Hz 0.4 A Output voltage DC 8.0 V 1.0 A Device Power supply DC 8.0 V 1.0 A Output power 4 W RMS Frequency range DAB III...
  • Page 291 Amazon, Alexa and all associated logos are registered trade- marks of Amazon.com, Inc. or its subsidiaries. The Bluetooth® word mark and logos are registered trade- marks of Bluetooth SIG, Inc. and are used by MEDION® un- der licence. Other trademarks and trade names are the property of their...
  • Page 292: Service Information

    You will find our Service Community at http://communi- ty.medion.com. • Alternatively, use our contact form at www.medion.com/ contact. • You can also contact our Service team via our hotline or by post.
  • Page 293: Legal Notice

    Mechanical, electronic and any other forms of reproduction are prohibited without the written permission of the manu- facturer. Copyright is owned by the company: MEDION AG Am Zehnthof 77 45307 Essen Germany Please note that you cannot use the address above for re-...

Ce manuel est également adapté pour:

Md 44130

Table des Matières