Medion LIFE P66220 Notice D'utilisation

Medion LIFE P66220 Notice D'utilisation

Radio de chantier dab+/bluetooth
Table des Matières

Publicité

Les langues disponibles
  • FR

Les langues disponibles

Liens rapides

DAB+/Bluetooth
DAB+/Bluetooth
Radio de chantier DAB+/Bluetooth
Radio da cantiere DAB+/Bluetooth
DAB+/Bluetooth
MEDION
®
®
®
®
LIFE
®
P66220 (MD 45220)
Bedienungsanleitung
Notice d'utilisation
Istruzioni per l'uso
Betjeningsvejledning
-Baustellenradio
job site radio
-werkplaatsradio
User Manual
®
®

Publicité

Table des Matières
loading

Sommaire des Matières pour Medion LIFE P66220

  • Page 1 Bedienungsanleitung User Manual Notice d‘utilisation Istruzioni per l‘uso Betjeningsvejledning DAB+/Bluetooth -Baustellenradio ® DAB+/Bluetooth job site radio ® Radio de chantier DAB+/Bluetooth ® Radio da cantiere DAB+/Bluetooth ® DAB+/Bluetooth -werkplaatsradio ® MEDION LIFE ® ® P66220 (MD 45220)
  • Page 2: Table Des Matières

    Inhalt Informationen zu dieser Bedienungsanleitung ........5 1.1. Zeichenerklärung ....................5 Bestimmungsgemäßer Gebrauch .............. 7 Sicherheitshinweise ..................8 3.1. Das Gerät sicher aufstellen ................9 3.2. Stromversorgung ....................9 3.3. Umgang mit Akkus .....................11 3.4. Reinigung und Aufbewahrung ..............11 3.5. Spritzwasserschutz .....................12 EU Konformitätsinformation ..............
  • Page 3 10.5. Senderinformationen anzeigen ..............26 10.6. Sender speichern ....................26 10.7. Gespeicherte Sender wiedergeben ..............26 Bluetooth Modus ..................26 11.1. Bluetooth-Geräte erstmalig koppeln ............27 11.2. Wiedergabe starten/anhalten ................27 11.3. Anrufe verwalten ....................28 AUX Modus ....................29 12.1. Externes Wiedergabegerät anschließen .............29 Komfortfunktionen ................... 30 13.1.
  • Page 4: Informationen Zu Dieser Bedienungsanleitung

    1. Informationen zu dieser Bedienungsanleitung Vielen Dank, dass Sie sich für unser Produkt entschieden haben. Wir wünschen Ihnen viel Freude mit dem Gerät. Lesen Sie vor Inbetriebnahme die Sicherheitshinweise und die gesamte Anleitung aufmerksam durch. Beachten Sie die Warnungen auf dem Ge- rät und in der Bedienungsanleitung.
  • Page 5 Hinweise in der Bedienungsanleitung beachten! Aufzählungspunkt / Information über Ereignisse während der Bedie- • nung  Auszuführende Handlungsanweisung Schutzklasse II Elektrogeräte der Schutzklasse II sind Elektrogeräte die durchge- hend doppelte und/oder verstärkte Isolierung besitzen und keine An- schlussmöglichkeiten für einen Schutzleiter haben. Das Gehäuse ei- nes isolierstoffumschlossenen Elektrogerätes der Schutzklasse II kann teilweise oder vollständig die zusätzliche oder verstärkte Isolierung bilden.
  • Page 6: Bestimmungsgemäßer Gebrauch

    2. Bestimmungsgemäßer Gebrauch Dies ist ein Gerät der Unterhaltungselektronik. Das Baustellenradio dient der Wiedergabe von Audiomaterial, welches via Bluetooth oder AUX zugespielt werden kann. Des Weiteren können Radiosendungen wiedergegeben werden. Der genannte Empfangsbereich stellt die technischen Möglich- keiten des Gerätes dar. Außerhalb dieses Bereiches empfange- ne Informationen dürfen nicht verwendet oder weiter verbreitet werden.
  • Page 7: Sicherheitshinweise

    3. Sicherheitshinweise WARNUNG! Verletzungsgefahr! Verletzungsgefahr für Kinder und Personen mit ver- ringerten physischen, sensorischen oder mentalen Fä- higkeiten (beispielsweise teilweise Behinderte, älte- re Personen mit Einschränkung ihrer physischen und mentalen Fähigkeiten) oder Mangel an Erfahrung und Wissen (beispielsweise ältere Kinder). ...
  • Page 8: Das Gerät Sicher Aufstellen

    3.1. Das Gerät sicher aufstellen  Warten Sie mit dem Anschluss des Geräts, wenn das Gerät von einem kalten in einen warmen Raum gebracht wird. Das dabei entstehende Kondenswasser kann unter Umständen das Gerät zerstören. Wenn das Gerät Zimmertemperatur er- reicht hat, kann das Gerät gefahrlos in Betrieb genommen werden.
  • Page 9  Betreiben Sie das Gerät nur an geerdeten, leicht zugängli- chen Steckdosen mit 100-240 V ~ 50/60 Hz. Wenn Sie sich der Stromversorgung am Auf stel lungsort nicht sicher sind, fragen Sie beim betreffenden Energieversorger nach.  Verwenden Sie das Netzanschlusskabel nicht mehr, wenn ei- ner der beiden Stecker oder das Kabel beschädigt sind.
  • Page 10: Umgang Mit Akkus

     Das Baustellenradio und die Zubehörteile nicht verwenden, wenn diese Beschädigungen, Rauchentwicklungen oder unge- wöhnliche Betriebsgeräusche aufweisen. Trennen Sie in diesem Fall unverzüglich die Stromversorgung.  Die Lichtquelle dieser Leuchte ist nicht ersetzbar. Wenn die Licht- quelle ihr Lebensdauerende erreicht hat, ist das gesamte Gerät zu ersetzen.
  • Page 11: Spritzwasserschutz

     Bitte beachten Sie, dass der Spritzwasserschutz nur in der aufrechten (normalen) Position des Baustellen- radios gewährleistet ist. 4. EU Konformitätsinformation Hiermit erklärt Medion AG, dass sich dieses Gerät in Übereinstimmung mit den grundlegenden Anforderungen und den übrigen einschlägigen Bestimmungen be- findet: •...
  • Page 12: Lieferumfang

    6. Lieferumfang GEFAHR! Erstickungsgefahr! Es besteht Erstickungsgefahr durch Verschlucken oder Einatmen von Kleinteilen oder Folien.  Halten Sie die Verpackungsfolie von Kindern fern.  Entnehmen Sie das Produkt aus der Verpackung und entfernen Sie sämtliches Verpackungsmaterial.  Bitte überprüfen Sie die Vollständigkeit der Lieferung und benachrichtigen Sie uns bitte innerhalb von 14 Tagen nach dem Kauf, falls die Lieferung nicht kom- plett ist.
  • Page 13: Geräteübersicht

    7. Geräteübersicht 7.1. Vorderseite Antenne Anzeige von Uhrzeit/Datum, Betriebsart, Radiosender, Display Systemeinstellungen, Lautstärke Lautstärke verringern/erhöhen Mikrofon • AMS (Automatische Sendersuche) • NAP (Countdown-Zeit) • EQ (Klangeffekte/Klangregelung)
  • Page 14 • Licht Ein-/Ausschalten • Dimmer für Displaybeleuchtung einstellen • Systemeinstellungen • Auswahl der übergeordneten Menüebene • Informationen zum aktuellen Sender • Sendersuchlauf • Navigation in den Menüs • Akku-Ladezustand • Sleep-Timer • Im Menü navigieren, nächster Titel/Sender • Wiedergabe starten/pausieren •...
  • Page 15: Rückseite

    7.2. Rückseite DC IN 9V Anschluss für Netzadapter Klemmscheibe der Staufachverriegelung Typenschild (Unterseite) Staufach für externe Geräte AUX IN Audio-Anschluss für externes Gerät (im Staufach) Rändelschraube der Staufachverriegelung LED-Arbeitslicht...
  • Page 16: Inbetriebnahme

    8. Inbetriebnahme 8.1. Netzbetrieb anschließen Verwenden Sie zum Anschluss des Radios ausschließlich den mitgelieferten Netzad- apter. Auf dem Netzadapter befindet sich ein Typenschild mit den entsprechenden Angaben.  Verbinden Sie den Stecker des Netzadapters mit dem Netzkabel-Anschluss D C I N 9 V des Gerätes. ...
  • Page 17: Gerät Einschalten/Ausschalten

    8.3. Gerät einschalten/ausschalten 8.3.1. Gerät einschalten  Drücken Sie die Taste , um das Gerät einzuschalten. Die Uhrzeit und das Datum ist im Display zu sehen. 8.3.2. Gerät ausschalten  Halten Sie die Taste gedrückt, um das Gerät in den Standby-Modus zu schalten.
  • Page 18: Uhrzeit/Datum Einstellen

    8.5. Uhrzeit/Datum einstellen 8.5.1. Uhrzeit/Datum manuell einstellen Das Gerät ist eingeschaltet oder befindet sich im Standby-Modus.  Halten Sie die Taste gedrückt. Das Menü Standby <System> wird angezeigt.  Drücken Sie die Taste Das Menü System <Sleep> wird angezeigt.  Drücken Sie die Taste oder mehrfach, um zu dem Menü...
  • Page 19 Das Menü Uhrzeit <Zeit/Datum einstellen> wird angezeigt.  Drücken Sie die Taste oder mehrfach, um zu dem Menü <Autom. Update> zu wechseln.  Drücken Sie die Taste  Wählen Sie <Update alle>, <Update von DAB> oder <Update von FM> aus, wenn die Uhrzeit und das Datum automatisch bezogen werden soll.
  • Page 20: Dab Sendersuchlauf Erstmalig Starten

    8.6. DAB Sendersuchlauf erstmalig starten Das Gerät ist eingeschaltet oder befindet sich im Standby Modus.  Drücken Sie die Taste Der DAB Sendersuchlauf startet. Nach Beendigung des Suchlaufs • wird die Anzahl der gespeicherten Sender angezeigt. • sind die Sender in der Senderliste alphabetisch sortiert •...
  • Page 21: Modus Wählen

    8.10. Modus wählen Die folgenden Betriebsarten können gewählt werden: Modus Beschreibung Wiedergabe eines digitalen Radiosenders Wiedergabe eines analogen Radiosenders Wiedergabe einer externen Audioquelle über den AUX-An- Hilfseingang schluss • Wiedergabe einer Audioquelle von einem externen Bluetooth bluetoothfähigem Gerät Paarung • Anrufsteuerung eines bluetoothfähigen Mobiltelefons ...
  • Page 22: Sender Speichern

    9.3. Sender speichern Sie können bis zu 30 DAB Sender speichern.  Wählen Sie den DAB Sender aus, den Sie speichern möchten.  Drücken Sie die Taste Das Menü Progr. aufrufen wird angezeigt.  Drücken Sie die Taste oder mehrmals, bis ein freier oder belegter und numerierte Speicherplatz angezeigt wird.
  • Page 23: Drc Funktion Einstellen

     Drücken Sie die Taste Das Menü Manuell einstellen und die aktuelle DAB Frequenz wird angezeigt.  Drücken Sie die Taste oder mehrmals, um die gewünschte DAB Fre- quenz einzustellen.  Drücken Sie die Taste Die neue DAB Frequenz ist eingestellt. 9.6.
  • Page 24: Fm Modus

     Drücken Sie die Taste Die TA Funktion ist eingestellt. 10. FM Modus 10.1. Signalqualität für Sendersuchlauf auswählen  Halten Sie die Taste gedrückt. Das Menü FM <Suchlauf-Einstellung> wird angezeigt.  Drücken Sie die Taste  Wählen Sie im Menü Suchlauf-Einstellung <Alle Sender> aus, um nach FM Sen- dern mit schwachem und starkem Signal zu suchen.
  • Page 25: Senderinformationen Anzeigen

    10.5. Senderinformationen anzeigen  Drücken Sie die Taste mehrmals um die folgenden Informationen anzuzei- gen: – Sendertyp/ Senderfrequenz/Aktueller Titel – Uhrzeit/Datum 10.6. Sender speichern Sie können bis zu 30 FM Sender speichern.  Wählen Sie den FM Sender aus, den Sie speichern möchten. ...
  • Page 26: Bluetooth-Geräte Erstmalig Koppeln

    11.1. Bluetooth-Geräte erstmalig koppeln Bekannte externe Geräte, die bereits einmal gekoppelt wurden, werden zukünftig direkt verbunden. Eine er- neute Kopplung ist nicht notwendig. Zur erneuten Ver- bindung aktivieren Sie lediglich den Bluetooth-Modus an beiden Geräten.  Wählen Sie die Betriebsart Bluetooth Paarung. ...
  • Page 27: Anrufe Verwalten

    11.3. Anrufe verwalten Eingehende Anrufe werden von dem Baustellenradio durch ein akustisches Signal angekündigt und unter- brechen die Audiowiedergabe. 11.3.1. Anruf annehmen  Drücken Sie die Taste Die Sprachübertragung erfolgt über das Mikrofon und den Lautsprecher. 11.3.2. Anruf beenden  Halten Sie die Taste gedrückt.
  • Page 28: Aux Modus

    12. AUX Modus Sie können den Anschluss AUX IN mit einer Kabelverbindung zu einem externen Wiedergabegerät (z. B. Smartphone oder MP3-Player) nutzen. 12.1. Externes Wiedergabegerät anschließen  Schalten Sie das Baustellenradio in den Standby Modus.  Schalten Sie Ihr externes Gerät aus. ...
  • Page 29: Komfortfunktionen

     Schalten Sie das externe Gerät ein.  Starten Sie die Wiedergabe an Ihrem externen Gerät.  Legen Sie das externe Gerät in die Innenseite der Staufachtür.  Schließen Sie die Staufachtür.  Verriegeln Sie die Staufachtür. Verdrehen Sie dazu die Klemmscheibe und ziehen Sie die Rändelschraube an. ...
  • Page 30: Nap Timer Verwenden

    13.3. NAP Timer verwenden Das Gerät bietet einen Countdown-Timer (z. B. als Hinweis zum Ende einer Pausen- zeit), den Sie in den jeweiligen Modi DAB, FM, Bluetooth und Hilfseingang (AUX) aktivieren können. Nach Ablauf der eingestellten Zeit (Aus, 10 Min., 15 Min., 30 Min., 45 Min., 60 Min., 90 Min.
  • Page 31: Displaybeleuchtung Dimmen

     Halten Sie die Taste gedrückt, bis das Arbeitslicht eingeschaltet ist. 13.4.2. Arbeitslicht ausschalten  Halten Sie die Taste gedrückt, bis das Arbeitslicht ausgeschaltet ist.  Drehen Sie das Arbeitslicht so, dass das Arbeitslicht zum Gerät zeigt. 13.5. Displaybeleuchtung dimmen Sie können die Displaybeleuchtung in den Stufen „hell“...
  • Page 32: Akku-Ladestatus

    13.6. Akku-Ladestatus Der Akku-Ladestatus kann ausschließlich im Akku-Be- trieb abgerufen werden.  Stellen Sie sicher, dass sich das Gerät im Akku-Betrieb befindet.  Modus DAB: Drücken Sie die Taste 7-mal hintereinander, um den Akku-La- destaus anzuzeigen.  Modus FM: Drücken Sie die Taste 3-mal hintereinander, um den Akku-La- destaus anzuzeigen.
  • Page 33: Servicefunktionen

    14. Servicefunktionen 14.1. Gerät auf Werkseinstellungen zurücksetzen Die aktuellen Einstellungen des Gerätes können auf die Einstellungen des Auslie- fungszustandes zurückgesetzt werden. Folgende Eisntellungen werden dabei zu- rückgesetzt: • Sprache • Uhrzeit und Datum • DAB/FM-Sender und Senderspeicher Das Zurücksetzen des Gerätes auf die Werkseinstellungen kann aus allen Modi aus- geführt werden.
  • Page 34: Reinigung

    15. Reinigung Vor der Reinigung ziehen Sie bitte den Netzstecker aus der Steckdose. Für die Rei- nigung verwenden Sie ein trockenes, weiches Tuch. Vermeiden Sie chemische Lö- sungs- und Reinigungsmittel, weil diese die Oberfläche und/oder Beschriftungen des Geräts beschädigen können. 16.
  • Page 35: Entsorgung

    17. Entsorgung VERPACKUNG Ihr Gerät befindet sich zum Schutz vor Transportschäden in einer Verpa- ckung. Verpackungen sind aus Materialien hergestellt, die umweltscho- nend entsorgt und einem fachgerechten Recycling zugeführt werden können. GERÄT Das Gerät ist mit einem integrierten Akku ausgestattet. Entsorgen Sie das Gerät am Ende seiner Lebenszeit keinesfalls über den normalen Hausmüll, sondern erkundigen Sie sich bei Ihrer örtlichen Verwaltung über Wege einer umweltgerechten Entsorgung an Sammelstellen für...
  • Page 36: Technische Daten

    18. Technische Daten Netzadapter BUREAU VERITAS Hersteller Hung Kay Modell HKP12-0901000dV Eingangsspannung AC 100-240V ~ 50/60Hz 0,3A MAX Ausgangsspannung DC 9V 1A, 9W Durchschnittliche Effizienz im Betrieb 84.67 % Leistungsaufnahme bei Nulllast 0,05 W Akku Hersteller Huizhou Huiyi New Energy Co., Ltd Modell CH 18650 2INR19/66 Ausgangsspannung...
  • Page 37 Radio Schutzart IP44 Abmessungen (BxHxT) ca. 282 x 235 x 180 mm Gewicht ca. 1,94 kg...
  • Page 38: Serviceinformationen

    Ihre Erfahrungen austauschen und Ihr Wissen weiter- geben. Sie finden unsere Service Community unter http://community.medion.com. • Gerne können Sie auch unser Kontaktformular unter www.medion.com/contact nutzen. • Selbstverständlich steht Ihnen unser Serviceteam auch über unsere Hotline oder postalisch zur Verfügung.
  • Page 39: Impressum

    Kontaktieren Sie zuerst immer unseren Kundenservice. 20. Datenschutzerklärung Sehr geehrter Kunde! Wir teilen Ihnen mit, dass wir, die MEDION AG, Am Zehnthof 77, 45307 Essen als Ver- antwortlicher Ihre personenbezogenen Daten verarbeiten. In datenschutzrechtlichen Angelegenheiten werden wir durch unseren betrieb- lichen Datenschutzbeauftragten, erreichbar unter MEDION AG, Datenschutz, Am Zehnthof 77, D –...
  • Page 40 Contents Information about this user manual ............43 1.1. Explanation of symbols ..................43 Proper use ....................45 Safety information ..................46 3.1. Setting up the device safely ................47 3.2. Power supply ......................47 3.3. Handling the rechargeable batteries ............49 3.4. Cleaning and storage ..................49 3.5.
  • Page 41 10.5. Displaying station information ..............64 10.6. Storing a radio station ..................64 10.7. Playing a stored station ..................64 Bluetooth mode ..................64 11.1. Connecting Bluetooth devices for the first time ........65 11.2. Start/pause playback ..................65 11.3. Managing calls .....................66 AUX mode ....................66 12.1.
  • Page 42: Information About This User Manual

    1. Information about this user manual Thank you for choosing our product. We hope you enjoy using this de- vice. Please read the safety instructions and the user manual carefully before using the device for the first time. Note the warnings on the device and in the user manual.
  • Page 43 • Bullet point/information on steps during operation  Instruction to be carried out Protection class II Electrical devices in protection class II are devices that have double and/or reinforced insulation throughout, and do not have an option for connecting a protective earth. The housing of an electrical device in protection class II, with surrounding insulating material, might ei- ther form all of the additional or reinforced insulation, or part of it.
  • Page 44: Proper Use

    2. Proper use This is an entertainment electronics device. The site radio is used to play audio material which can be played via Bluetooth or AUX. In addition, radio stations can be played. The specified reception frequency range represents the techni- cal possibilities of the device.
  • Page 45: Safety Information

    3. Safety information WARNING! Risk of injury! Risk of injury to children and persons with limited phys- ical, sensory or mental abilities (for example, partial- ly disabled people or older people with limited physi- cal and mental abilities) or to those without experience and knowledge (such as older children).
  • Page 46: Setting Up The Device Safely

    3.1. Setting up the device safely  If the device has been moved from a cold room to a warm room, wait before connecting it to the power supply. The re- sulting condensation may damage the device. The device can be operated safely as soon as it has reached room tempera- ture.
  • Page 47  Only operate the device from an earthed, easily accessible 100–240 V ~ 50/60 Hz mains socket. Contact the local energy supplier if you have any questions about the power supply at the installation location.  Do not use the power cable if either of the plugs or the cable is damaged.
  • Page 48: Handling The Rechargeable Batteries

     Do not use the site radio and accessories if they are damaged, generate smoke or emit unusual operating noises. In this case, disconnect the power supply immediately.  The light source for this light is not replaceable. When the light source has reached the end of its life, the entire device must be replaced.
  • Page 49: Water Spray Protection

    (normal) position. 4. EU Declaration of Conformity Medion AG hereby declares that this device complies with the fundamental require- ments and the other relevant provisions of the following: • RE Directive 2014/53/EU •...
  • Page 50: Package Contents

    6. Package contents DANGER! Risk of choking and suffocation! There is a risk of choking and suffocation due to swal- lowing or inhaling small parts or plastic wrap.  Keep the plastic packaging out of the reach of chil- dren. ...
  • Page 51: Device Overview

    7. Device overview 7.1. Front Aerial Display the time/date, operating mode, radio station, system Display settings, volume Reduce/increase volume Microphone • AMS (automatic station search) • NAP (countdown time) • EQ (sound effects/sound control)
  • Page 52 • Switch light on/off • Set dimmer for display lighting • System settings • Select higher-level menu • Information about the current station • Station search • Navigate in the menus • Battery charge level • Sleep timer • Navigate in the menu, next track/station •...
  • Page 53: Rear

    7.2. Rear DC IN 9V Connection for mains adapter Catch for storage compartment lock Type plate (underneath) Storage compartment for external devices Audio connection for external device (in storage compart- AUX IN ment) Knurled screw for storage compartment lock LED work light...
  • Page 54: Getting Started

    8. Getting started 8.1. Mains operation Only use the supplied mains adapter to connect the radio. The mains adapter has a type plate with the corresponding information on it.  Connect the mains adapter plug to the device's DC IN 9V power cable connection. ...
  • Page 55: Switching The Device On/Off

    8.3. Switching the device on/off 8.3.1. Switching the device on  Press the button to switch on the device. The time and date are visible on the display. 8.3.2. Switching the device off  Press and hold the button to switch the device to standby mode. When the device is in standby mode during battery op- eration, the device automatically switches to ener- gy-saving mode after 30 seconds.
  • Page 56: Setting The Time/Date

    8.5. Setting the time/date 8.5.1. Setting the time/date manually The device is switched on or in standby mode.  Press and hold the button. The Standby <System> menu is shown on the display.  Press the button. The System <Sleep> menu is shown on the display. ...
  • Page 57  Press the button several times to switch to the <Autom. update> menu.  Press the button.  Select <Update all>, <Update from DAB> or <Update from FM> if the time and date is to be set automatically.  Select <Do not update> if the time and date are not to be set automatically. The time and date are set automatically according to your selection.
  • Page 58: Starting The Dab Station Search For The First Time

    8.6. Starting the DAB station search for the fi rst time The device is switched on or in standby mode.  Press the button. The DAB station search starts. Once the search has ended • the number of stored stations is displayed; •...
  • Page 59: Dab Mode

    Mode Description Digital radio station playback Analogue radio station playback Auxiliary in- Playback of an external audio source via the AUX connection • Playback of an audio source from an external Bluetooth- Bluetooth enabled device pairing • Call control for a Bluetooth-enabled mobile phone ...
  • Page 60: Storing A Radio Station

    9.3. Storing a radio station You can store up to 30 DAB stations.  Select the DAB station you want to store.  Press the button. The Call up progr. menu is shown on the display.  Press the button several times until a free or occupied and numbered memory slot is shown on the display.
  • Page 61: Setting The Drc Function

     Press the button. The Manual setting menu and the current DAB frequency are shown on the dis- play.  Press the button several times to set the desired DAB frequency.  Press the button. The new DAB frequency is now set. 9.6.
  • Page 62: Fm Mode

     Select <On> to switch on the TA function.  Press the button. The TA function is now set. 10. FM mode 10.1. Selecting the signal quality for the station search  Press and hold the button. The FM <Search settings> menu is shown on the display. ...
  • Page 63: Displaying Station Information

    10.5. Displaying station information  Press the button several times to display the following information: – Station type/station frequency/current track – Time/date 10.6. Storing a radio station You can store up to 30 FM stations.  Select the FM station you want to store. ...
  • Page 64: Connecting Bluetooth Devices For The First Time

    11.1. Connecting Bluetooth devices for the fi rst time Known external devices, which have already been paired once, will be connected again automatically in the future. It is not necessary to pair the devices again. To reconnect, simply activate Bluetooth mode on both devices.
  • Page 65: Managing Calls

    11.3. Managing calls Incoming calls are announced by an acoustic signal from the site radio and interrupt audio playback. 11.3.1. Accepting a call  Press the button. Voice transmission takes place via the microphone and speaker. 11.3.2. Ending a call ...
  • Page 66  Insert a 3.5 mm jack cable into the AUX IN jack on the site radio.  Insert the other connector on the jack cable into the AUX output on your exter- nal device.  Switch on the external device. ...
  • Page 67: Convenience Functions

    13. Convenience functions 13.1. Equalizer  During operation, press the button. The current sound effect (e.g. FLAT) is shown on the display.  Press the button until the desired sound effect POP, JAZZ, CLAS- SIC, FLAT or ROCK is shown on the display. ...
  • Page 68: Using The Nap Timer

    13.3. Using the NAP timer The device features a countdown timer (e.g. as an indication of the end of a break) that you can enable in the respective modes DAB, FM, Bluetooth and Auxiliary in- put (AUX). An intermittent acoustic signal sounds once the set time has elapsed (off, 10 min., 15 min., 30 min., 45 min., 60 min., 90 min.
  • Page 69: Dimming The Display Lighting

     Press and hold the button until the work light is switched on. 13.4.2. Switching off the work light  Press and hold the button until the work light is switched off.  Turn the work light so that it is pointing towards the device. 13.5.
  • Page 70: Battery Charge Level

    13.6. Battery charge level The battery charge level can only be viewed during bat- tery operation.  Ensure that the device is powered by the battery.  DAB mode: Press the button 7 times in succession to display the battery charge level.
  • Page 71: Cleaning

     Press and hold the button.  Press the button several times until <System> is shown on the dis- play.  Press the button.  Press the button several times until <SW version> is shown on the display.  Press the button.
  • Page 72: Disposal

    17. Disposal PACKAGING Your device has been packaged to protect it from damage in transit. The packaging is made of materials that can be recycled in an environmen- tally friendly manner. DEVICE The device is fitted with an integrated rechargeable battery. At the end of its service life, do not dispose of the device in the normal household rubbish.
  • Page 73: Technical Specifications

    18. Technical specifi cations Mains adapter BUREAU VERITAS Manufacturer Hung Kay Model name HKP12-0901000dV Input voltage/current/input AC AC 100-240V ~ 50/60Hz 0,3A MAX frequency Output voltage/current DC 9V 1A, 9W Average efficiency during opera- 84.67 % tion Power consumption with zero 0,05 W load Rechargeable battery...
  • Page 74 Radio Protection class IP44 Dimensions (W x H x D) Approx. 282 x 235 x 180 mm Weight Approx. 1.94 kg...
  • Page 75: Service Information

    In our Service Community, you can meet other users as well as our staff, and you can also share your experiences and pass on your knowledge. You will find our Service Community at http://community.medion.com. • Alternatively, use our contact form at www.medion.com/contact.
  • Page 76: Legal Notice

    20. Privacy statement Dear customer, We wish to inform you that we, MEDION AG, Am Zehnthof 77, 45307 Essen, Germa- ny process your personal data as a data controller. For matters regarding data protection, we are supported by our company data pro- tection officer who can be contacted at MEDION AG, Datenschutz, Am Zehnthof 77, D –...
  • Page 78 Inhalt Informations concernant la présente notice d’utilisation ...... 81 1.1. Explication des symboles .................81 Utilisation conforme .................. 83 Consignes de sécurité................84 3.1. Installation de l’appareil en toute sécurité ..........85 3.2. Alimentation électrique ..................85 3.3. Manipulation des batteries ................87 3.4. Nettoyage et stockage ..................87 3.5.
  • Page 79 10.5. Affichage d’informations relatives à la station ........102 10.6. Mise en mémoire de stations ............... 102 10.7. Lecture de stations mises en mémoire ............. 102 Mode Bluetooth ..................103 11.1. Appairage de périphériques Bluetooth ........... 103 11.2. Démarrage/arrêt de la lecture ..............103 11.3.
  • Page 80: Informations Concernant La Présente Notice D'utilisation

    1. Informations concernant la présente notice d’utilisation Merci d’avoir choisi notre produit. Nous vous souhaitons une bonne uti- lisation. Veuillez lire attentivement les consignes de sécurité et la notice d’utili- sation dans son intégralité avant la mise en service de l’appareil. Tenez compte des avertissements figurant sur l’appareil et dans la notice d’utilisation.
  • Page 81 Tenez compte des remarques contenues dans la notice d’utilisation ! Énumération/Information sur des événements se produisant pendant • l’utilisation  Action à exécuter Classe de protection II Les appareils électriques de la classe de protection II sont des appa- reils électriques qui possèdent une isolation double continue et/ou renforcée et qui ne présentent pas de possibilité...
  • Page 82: Utilisation Conforme

    2. Utilisation conforme Ce produit est un appareil électronique grand public. La radio de chantier sert à lire du matériel audio qui peut être transmis via Bluetooth ou port AUX. Par ailleurs, elle permet de retransmettre des émissions de radio. La plage de réception mentionnée représente les possibilités techniques de l’appareil.
  • Page 83: Consignes De Sécurité

    3. Consignes de sécurité AVERTISSEMENT ! Risque de blessure ! Risque de blessure pour les enfants et les personnes présentant des capacités physiques, sensorielles ou mentales restreintes (par exemple personnes partielle- ment handicapées, personnes âgées avec diminution de leurs capacités physiques et mentales) ou manquant d’expérience et/ou de connaissances (par exemple en- fants plus âgés).
  • Page 84: Installation De L'appareil En Toute Sécurité

    3.1. Installation de l’appareil en toute sécurité  Si l’appareil est déplacé d’une pièce froide vers une pièce chaude, attendez avant de le brancher. L’eau de condensation due au changement de température pourrait détruire l’ap- pareil. Lorsque l’appareil a atteint la température ambiante, il peut être mis en marche en toute sécurité.
  • Page 85  Branchez l’appareil uniquement sur des prises mises à la terre de 100 - 240 V ~ 50/60 Hz facilement accessibles. Si vous n’êtes pas sûr de l’alimentation électrique utilisée sur le lieu d’installation, demandez au fournisseur d’énergie concerné.  N’utilisez plus le câble secteur si un des deux connecteurs ou le câble est détérioré.
  • Page 86: Manipulation Des Batteries

     N’utilisez pas la radio de chantier et les accessoires si vous constatez des détériorations, des dégagements de fumée ou des bruits anormaux lors du fonctionnement. Le cas échéant, coupez immédiatement l’alimentation électrique.  La source lumineuse de la lampe n’est pas remplaçable. Lorsque la source lumineuse est arrivée en fin de vie, il convient de remplacer l’ensemble de l’appareil.
  • Page 87: Protection Contre Les Projections D'eau

    à la verti- cale. 4. Information relative à la conformité UE Par la présente, Medion AG déclare que cet appareil est conforme aux exigences de base et autres réglementations en vigueur : • Directive CEM 2014/53/UE •...
  • Page 88: Contenu De L'emballage

    6. Contenu de l’emballage DANGER ! Risque de suffocation ! L’ingestion ou l’inhalation de petites pièces ou de films présente un risque de suffocation.  Conservez le film d’emballage hors de portée des en- fants.  Retirez le produit de l’emballage et enlevez tous les autres matériaux d’embal- lage.
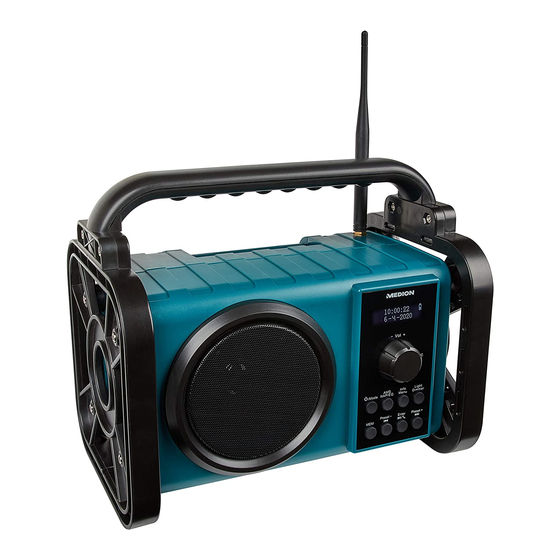
  • Page 89: Vue D'ensemble De L'appareil

    7. Vue d’ensemble de l’appareil 7.1. Face avant Antenne Affichage de l’heure et de la date, du mode de Écran fonctionnement, de la station de radio, des réglages système, du volume sonore Diminution/augmentation du volume Microphone...
  • Page 90 • AMS (recherche automatique de stations) • NAP (minuterie à rebours) • EQ (effets sonores/réglage de la sonorité) • Allumage/extinction de la lampe • Réglage du variateur de luminosité de l’écran • Paramètres système • Sélection du niveau supérieur dans le menu •...
  • Page 91: Face Arrière

    7.2. Face arrière DC IN 9 V Prise pour adaptateur secteur Rondelle de verrouillage du compartiment de rangement Plaque signalétique (partie inférieure) Compartiment de rangement pour appareils externes Port audio pour appareil externe (dans le compartiment de AUX IN rangement) Vis moletée de verrouillage du compartiment de rangement Lampe LED de travail...
  • Page 92: Mise En Service

    8. Mise en service 8.1. Raccordement à l’alimentation secteur Pour raccorder la radio au réseau électrique, utilisez exclusivement l’adaptateur sec- teur fourni. Une plaque signalétique comportant les informations correspondantes se trouve sur l’adaptateur secteur.  Reliez la fiche de l’adaptateur secteur à la prise de câble secteur DC IN 9V de l’appareil.
  • Page 93: Mise En Marche/Arrêt De L'appareil

    8.3. Mise en marche/arrêt de l’appareil 8.3.1. Mise en marche de l’appareil  Appuyez sur la touche pour allumer l’appareil. L’heure et la date sont affichées à l’écran. 8.3.2. Arrêt de l’appareil  Maintenez la touche enfoncée pour mettre l’appareil en mode Veille. En mode Veille, l’appareil passe automatiquement en mode économie d’énergie après 30 secondes lorsqu’il fonctionne sur batterie.
  • Page 94: Réglage De L'heure/De La Date

    8.5. Réglage de l’heure/de la date 8.5.1. Réglage manuel de l’heure/de la date L’appareil est allumé ou se trouve en mode Veille.  Maintenez la touche enfoncée. Le menu Veille <Système> s’affiche.  Appuyez sur la touche Le menu Système <Veille> s’affiche. ...
  • Page 95: Réglage Du Format De L'heure Et De La Date

    Le menu Heure <Réglage heure/date> s’affiche.  Appuyez plusieurs fois sur la touche pour accéder au menu <Mise à jour auto.>.  Appuyez sur la touche  Sélectionnez <Tout mettre à jour>, <Mise à jour DAB> ou <Mise à jour FM> si vous souhaitez que l’heure et la date soient automatiquement réglées.
  • Page 96: Première Recherche De Stations De Radio Dab

    8.6. Première recherche de stations de radio DAB L’appareil est allumé ou se trouve en mode Veille.  Appuyez sur la touche La recherche de stations DAB démarre. Lorsque la recherche est terminée • le nombre de stations mémorisées s’affiche ; •...
  • Page 97: Sélection Du Mode

    8.10. Sélection du mode Les modes de fonctionnement suivants peuvent être sélectionnés : Mode Description Lecture de station de radio numérique Lecture de station de radio analogique Entrée auxi- Lecture d’une source audio externe via le port AUX liaire • Lecture d’une source audio externe à...
  • Page 98: Mise En Mémoire De Stations

    9.3. Mise en mémoire de stations Vous pouvez mémoriser jusqu’à 30 stations DAB.  Sélectionnez la station DAB que vous souhaitez mettre en mémoire.  Appuyez sur la touche Le menu Programmation s’affiche.  Appuyez autant de fois que nécessaire sur la touche jusqu’à...
  • Page 99: Réglage De La Fonction Drc

    Recherche manuelle de stations  Maintenez la touche enfoncée. Le menu DAB <Recherche complète> s’affiche.  Appuyez autant de fois que nécessaire sur la touche jusqu’à ce que <Réglage manuel> s’affiche.  Appuyez sur la touche Le menu Réglage manuel et la fréquence DAB actuelle s’affichent. ...
  • Page 100: Réglage De La Fonction Ta

    9.8. Réglage de la fonction TA L’appareil dispose d’une fonction de réception automatique d’informations relatives au trafic routier.  Maintenez la touche enfoncée. Le menu DAB <Recherche complète> s’affiche.  Appuyez autant de fois que nécessaire sur la touche jusqu’à ce que l’écran affiche <TA>.
  • Page 101: Réglage Manuel Des Stations

    10.3. Réglage manuel des stations  Appuyez sur la touche pour modifier la fréquence par incréments de 0,5 MHz.  Appuyez sur la touche lorsque la qualité de réception d’une station vous convient. La station FM est mémorisée sous le numéro actuel de la mémoire de stations. 10.4.
  • Page 102: Mode Bluetooth

    11. Mode Bluetooth La fonction Bluetooth vous permet de lancer la lecture sans fil de titres à partir de périphériques externes (par ex. lecteur MP3 ou téléphone portable avec Bluetooth) sur cette radio de chantier. Lorsque la radio de chantier est connectée à un téléphone mobile via Bluetoo- th, vous pouvez recevoir des appels téléphoniques et utiliser la radio de chantier comme dispositif mains libres.
  • Page 103: Gestion Des Appels

    11.3. Gestion des appels Les appels entrants sont annoncés par un signal sonore sur la radio de chantier qui interrompt alors la lecture audio 11.3.1. Accepter un appel  Appuyez sur la touche La transmission vocale s’effectue par le biais du microphone et du haut-parleur. 11.3.2.
  • Page 104: Mode Aux

    12. Mode AUX Vous pouvez utiliser la prise AUX IN pour relier par câble un périphérique de lecture externe (par ex. smartphone ou lecteur MP3). 12.1. Branchement d’un périphérique de lecture externe  Mettez la radio de chantier en mode Veille. ...
  • Page 105: Fonctions De Confort

    chantier.  Branchez l’autre extrémité du câble jack dans la sortie AUX du périphérique ex- terne.  Allumez le périphérique externe.  Lancez la lecture sur votre périphérique externe.  Placez le périphérique externe à l’intérieur du compartiment de rangement. ...
  • Page 106: Utilisation De La Minuterie À Rebours (Nap)

    L’appareil passe en mode Veille une fois le temps réglé écoulé, indépendamment du mode réglé. 13.3. Utilisation de la minuterie à rebours (NAP) L’appareil dispose d’une fonction de minuterie à rebours (utile p. ex. pour signaler la fin d’un temps de pause), qui peut activée dans les différents modes DAB, FM, Bluetooth et Entrée auxiliaire (AUX).
  • Page 107: Extinction De La Lampe De Travail

    13.4.1. Allumage de la lampe de travail  Tournez la lampe de travail afin qu’elle ne soit pas orientée vers l’appareil.  Maintenez la touche enfoncée jusqu’à ce que la lampe s’allume. 13.4.2. Extinction de la lampe de travail  Maintenez la touche enfoncée jusqu’à...
  • Page 108: État De Charge De La Batterie

    13.6. État de charge de la batterie L’état de charge de la batterie ne peut être consulté qu’en mode de fonctionnement sur batterie.  Vérifiez que l’appareil se trouve en mode de fonctionnement sur batterie.  Mode DAB : appuyez sur la touche 7 fois de suite pour afficher l’état de charge de la batterie.
  • Page 109: Affichage De La Version Logicielle

    14.2. Affi chage de la version logicielle En cas de défaillance quelconque de l’appareil, il pourra être utile de fournir la ver- sion logicielle de l’appareil aux techniciens du SAV. L’affichage de la version logi- cielle est possible dans tous les modes. ...
  • Page 110: Nettoyage

    15. Nettoyage Avant le nettoyage, débranchez la fiche de la prise de courant. Utilisez pour le net- toyage un chiffon doux et sec. Évitez les solvants et produits d’entretien chimiques qui pourraient endommager la surface et/ou les inscriptions sur l’appareil. 16.
  • Page 111: Recyclage

    17. Recyclage EMBALLAGE Le produit est placé dans un emballage afin de le protéger contre tout dommage pendant le transport. Les emballages sont fabriqués à partir de matériaux qui peuvent être éliminés de manière écologique et remis à un service de recyclage approprié. PRODUIT L’appareil est équipé...
  • Page 112 Batterie Tension de sortie CC 7,4 V 2 000 mAh, 14,8 Wh Radio Alimentation électrique 9 V CC Puissance de sortie 1 x 5 W RMS Plage de fréquence DAB/DAB+ III 174 - 240 MHz Plage de fréquence FM 87,5 – 108 MHz Fréquence de fonctionnement Version 5.0 / 2402-2480 MHz Bluetooth...
  • Page 113: Informations Relatives Au Sav

    Au sein de notre Service Community, vous pouvez discuter avec d’autres utili- sateurs ainsi qu’avec nos collaborateurs pour partager vos expériences et vos connaissances. Vous pouvez accéder à notre Service Community ici : http://community.medion. com. • Vous pouvez également utiliser notre formulaire de contact disponible ici : www.
  • Page 114: Mentions Légales

    En matière de protection des données, nous sommes assistés par le délégué à la protection des données personnelles de notre entreprise, que vous pouvez contacter à l’adresse MEDION AG, Datenschutz, Am Zehnthof 77, D - 45307 Essen ; datenschutz@medion.com. Nous traitons vos données dans le cadre du déroule- ment de la garantie et des processus connexes (p.
  • Page 115 à la loi fédérale allemande sur la protection des données (BDSG)). En cas de recours auprès de MEDION AG, adres- sez-vous au responsable de la protection des données et de la liberté d’information de Rhénanie-du-Nord-Westphalie, Postfach 200444, 40212 Düsseldorf, www.ldi.nrw.
  • Page 116 Contenuto Informazioni relative alle presenti istruzioni per l’uso ......119 1.1. Spiegazione dei simboli ................. 119 Utilizzo conforme ..................121 Indicazioni di sicurezza ................122 3.1. Installazione sicura del dispositivo ............123 3.2. Alimentazione elettrica .................. 123 3.3. Utilizzo delle batterie ricaricabili ..............125 3.4.
  • Page 117 10.5. Visualizzazione delle informazioni sulla stazione radio ..... 140 10.6. Memorizzazione di una stazione ..............140 10.7. Riproduzione di una stazione radio memorizzata ....... 140 Modalità Bluetooth ................. 141 11.1. Prima associazione dei dispositivi via Bluetooth ........141 11.2. Avvio/arresto della riproduzione ..............141 11.3.
  • Page 118: Informazioni Relative Alle Presenti Istruzioni Per L'uso

    1. Informazioni relative alle presenti istruzioni per l’uso La ringraziamo per l’acquisto di questo prodotto. Ci auguriamo che sia soddisfatto del dispositivo. Prima di utilizzare il prodotto, leggere attentamente e interamente le in- dicazioni di sicurezza e le presenti istruzioni per l’uso. Osservare le av- vertenze riportate sul dispositivo e nelle istruzioni per l’uso.
  • Page 119 Osservare le indicazioni contenute nelle istruzioni per l’uso! Punto elenco/informazioni relative a eventi che si possono verificare • durante l’utilizzo  Istruzioni operative da seguire Classe di protezione II Gli apparecchi elettrici di classe II possiedono un isolamento doppio e/o rinforzato permanente e non hanno possibilità di allacciamento per un conduttore di terra.
  • Page 120: Utilizzo Conforme

    2. Utilizzo conforme Questo è un dispositivo dell’elettronica di consumo. La radio da cantiere è destinata alla riproduzione di materiale audio trasmesso via USB, Bluetooth o AUX. Possono essere inol- tre riprodotte trasmissioni radio. La gamma di ricezione indicata riflette le possibilità tecniche del dispositivo.
  • Page 121: Indicazioni Di Sicurezza

    3. Indicazioni di sicurezza AVVERTENZA! Pericolo di lesioni! Pericolo di lesioni per bambini e persone con ridot- te capacità fisiche, sensoriali o intellettive (ad esempio persone parzialmente disabili, anziani con capacità fisi- che o intellettive ridotte) o con carenza di esperienza e di conoscenze (ad esempio bambini grandi).
  • Page 122: Installazione Sicura Del Dispositivo

    3.1. Installazione sicura del dispositivo  Dopo aver trasportato il dispositivo da un ambiente freddo a uno caldo, attendere prima di collegarlo. In determinate circo- stanze la formazione di condensa potrebbe danneggiare il di- spositivo. Quando il dispositivo ha raggiunto la temperatura ambiente è...
  • Page 123  Collegare il dispositivo solo a prese con messa a terra facil- mente accessibili da 100-240 V ~ 50/60 Hz. In caso di dubbi sull’alimentazione elettrica nel luogo di posizionamento, ri- volgersi al fornitore di energia interessato.  Non utilizzare il cavo di alimentazione se la spina o il cavo sono danneggiati.
  • Page 124: Utilizzo Delle Batterie Ricaricabili

     Non utilizzare la radio da cantiere e gli accessori se presenta- no danni, producono fumo o emettono rumori insoliti. In que- sti casi staccare immediatamente la spina dalla presa elettrica.  La sorgente luminosa di questa lampada non può essere so- stituita.
  • Page 125: Protezione Dagli Spruzzi D'acqua

    è garantita solo se la radio da cantiere si tro- va in posizione eretta (normale). 4. Informazioni sulla conformità UE Medion AG dichiara che il dispositivo è conforme ai requisiti essenziali e alle altre di- sposizioni vigenti in materia: •...
  • Page 126: Contenuto Della Confezione

    6. Contenuto della confezione PERICOLO! Pericolo di soffocamento! Pericolo di soffocamento in caso di ingestione o inala- zione di componenti piccoli o pellicole dell’imballaggio.  Tenere la pellicola dell’imballaggio fuori dalla porta- ta dei bambini.  Estrarre il prodotto dalla confezione e rimuovere tutto il materiale d’imballaggio. ...
  • Page 127: Panoramica Del Dispositivo

    7. Panoramica del dispositivo 7.1. Lato anteriore Antenna Visualizzazione di ora/data, modalità di funzionamento, Display stazione radio, impostazioni di sistema, volume Riduzione/aumento del volume Microfono • AMS (ricerca automatica delle stazioni) • NAP (conto alla rovescia) • EQ (effetti sonori/regolazione del suono)
  • Page 128 • Accensione/spegnimento della luce • Regolazione dell’illuminazione del display • Impostazioni di sistema • Selezione del menu di livello superiore • Informazioni sulla stazione attuale • Ricerca delle stazioni radio • Navigazione all’interno dei menu • Stato di carica della batteria •...
  • Page 129: Lato Posteriore

    7.2. Lato posteriore DC IN 9 V Ingresso per alimentatore Piastra di bloccaggio del meccanismo di chiusura del vano posteriore Targhetta (lato inferiore) Vano per dispositivi esterni AUX IN Presa audio per dispositivi esterni (nel vano posteriore) Vite a testa zigrinata del meccanismo di chiusura del vano posteriore Luce di lavoro LED...
  • Page 130: Messa In Funzione

    8. Messa in funzione 8.1. Collegamento alla rete elettrica Per collegare la radio, utilizzare esclusivamente l’alimentatore fornito. Sull’alimentato- re si trova una targhetta con i rispettivi dati.  Collegare la spina dell’alimentatore alla presa per il cavo di alimentazione DC IN 9 V del dispositivo. ...
  • Page 131: Accensione/Spegnimento Del Dispositivo

    8.3. Accensione/spegnimento del dispositivo 8.3.1. Accensione del dispositivo  Premere il tasto per accendere il dispositivo. Sul display vengono visualizzate l’ora e la data. 8.3.2. Spegnimento del dispositivo  Mantenere premuto il tasto per portare il dispositivo in modalità Stan- dby.
  • Page 132: Impostazione Di Ora/Data

    8.5. Impostazione di ora/data 8.5.1. Impostazione manuale di data e ora Il dispositivo è acceso o si trova in modalità Standby.  Mantenere premuto il tasto Viene visualizzato il menu Standby <Sistema>.  Premere il tasto Viene visualizzato il menu Sistema <Spegnimento automatico>. ...
  • Page 133: Primo Avvio Della Ricerca Delle Stazioni Radio Dab

     Premere più volte il tasto per passare al menu <Aggiornamento autom.>.  Premere il tasto  Selezionare <Aggiorna tutto>, <Aggiorna da DAB> o <Aggiorna da FM> per fare in modo che l’ora e la data vengano acquisite automaticamente.  Selezionare <Nessun aggiornamento> per fare in modo che l’ora e la data non vengano acquisite automaticamente.
  • Page 134: Regolazione Del Volume

    • le stazioni radio vengono inserite in ordine alfabetico nell’elenco delle stazioni; • viene riprodotta la prima stazione radio DAB dell’elenco; • viene visualizzato il nome della stazione radio; • il titolo del brano trasmesso viene visualizzato come testo scorrevole. 8.7.
  • Page 135: Modalità Dab

    Modalità Descrizione Riproduzione di una stazione radio digitale Riproduzione di una stazione radio analogica Ingresso ausi- Riproduzione di una sorgente audio esterna tramite la porta liario • Riproduzione di una sorgente audio da un dispositivo esterno con tecnologia Bluetooth Associazione Bluetooth •...
  • Page 136: Memorizzazione Di Una Stazione

    9.3. Memorizzazione di una stazione Si possono memorizzare fino a 30 stazioni radio DAB.  Selezionare la stazione radio DAB che si desidera memorizzare.  Premere il tasto Viene visualizzato il menu Richiama progr..  Premere più volte il tasto fino a che non viene visualizzata una posizione di memoria libera oppure occupata e numerata.
  • Page 137: Impostazione Della Funzione Drc

    <Imposta manualmente>.  Premere il tasto Vengono visualizzati il menu Imposta manualmente e la frequenza DAB attuale.  Premere più volte il tasto oppure per impostare la frequenza DAB de- siderata.  Premere il tasto La nuova frequenza DAB è impostata. 9.6.
  • Page 138: Modalità Fm

     Premere più volte il tasto finché non viene visualizzata l’opzione <TA>.  Premere il tasto  Selezionare <Off> per disattivare la funzione TA.  Selezionare <On> per attivare la funzione TA.  Premere il tasto La funzione TA è impostata. 10.
  • Page 139: Selezione Di Una Stazione

    10.4. Selezione di una stazione  Selezionare la modalità di funzionamento FM. Viene riprodotta la stazione radio FM attuale.  Premere il tasto  Premere il tasto finché non viene visualizzata la stazione radio FM desiderata.  Premere il tasto Viene riprodotta la stazione radio FM desiderata.
  • Page 140: Modalità Bluetooth

    11. Modalità Bluetooth Tramite la tecnologia Bluetooth è possibile riprodurre senza fili tracce di dispositi- vi esterni (per esempio lettori MP3 o telefoni cellulari con tecnologia Bluetooth) su questa radio da cantiere. Se la radio da cantiere è connessa a un telefono cellulare via Bluetooth, è possibile ricevere le chiamate in arrivo e utilizzare la radio da cantiere come un sistema viva- voce.
  • Page 141: Gestione Delle Chiamate

    11.3. Gestione delle chiamate Le chiamate in arrivo vengono segnalate dalla radio da cantiere mediante un segnale acustico che interrompe la riproduzione audio. 11.3.1. Accettazione di una chiamata  Premere il tasto La trasmissione vocale ha luogo tramite il microfono e l’altoparlante. 11.3.2.
  • Page 142: Modalità Aux

    12. Modalità AUX La presa AUX IN può essere utilizzata per collegare via cavo un dispositivo di ripro- duzione esterno (per es. smartphone o lettore MP3). 12.1. Collegamento di un dispositivo di riproduzione esterno  Portare la radio da cantiere in modalità Standby. ...
  • Page 143: Funzioni Che Migliorano Il Comfort D'uso

     Inserire l’altra estremità del cavo con spinotto nell’uscita AUX del dispositivo esterno.  Accendere il dispositivo esterno.  Avviare la riproduzione sul dispositivo esterno.  Posizionare il dispositivo esterno all’interno del vano posteriore.  Chiudere lo sportello del vano posteriore. ...
  • Page 144: Utilizzo Della Funzione Di Conto Alla Rovescia

     Premere il tasto Trascorso il periodo di tempo impostato, il dispositivo passa in modalità Standby in- dipendentemente dalla modalità impostata. 13.3. Utilizzo della funzione di conto alla rovescia Il dispositivo offre la funzione di conto alla rovescia (ad es. per indicare la fine di una pausa) attivabile nelle diverse modalità...
  • Page 145: Regolazione Dell'illuminazione Del Display

    13.4.1. Accensione della luce da lavoro  Orientare la luce da lavoro in modo che sia rivolta lontano dal dispositivo.  Mantenere premuto il tasto finché la luce da lavoro non si accende. 13.4.2. Spegnimento della luce da lavoro  Mantenere premuto il tasto finché...
  • Page 146: Stato Di Carica Della Batteria

    13.6. Stato di carica della batteria Lo stato di carica della batteria può essere visualizzato esclusivamente quando il dispositivo è alimentato dalla batteria.  Assicurarsi che il dispositivo sia alimentato dalla batteria.  Modalità DAB: premere il tasto 7 volte in rapida successione per visualizzare lo stato di carica della batteria.
  • Page 147: Funzioni Di Assistenza

    14. Funzioni di assistenza 14.1. Ripristino delle impostazioni di fabbrica del dispositivo È possibile ripristinare le impostazioni di fabbrica del dispositivo. In seguito a tale operazione vengono resettate le impostazioni seguenti: • lingua • ora e data • stazioni radio DAB/FM e stazioni radio memorizzate Il ripristino delle impostazioni di fabbrica del dispositivo può...
  • Page 148: Pulizia

    15. Pulizia Prima della pulizia estrarre la spina dalla presa di corrente. Per la pulizia utilizzare un panno morbido e asciutto. Evitare solventi e detergenti chimici perché possono danneggiare la superficie e/o le scritte sul dispositivo. 16. In caso di problemi PROBLEMA POSSIBILE CAUSA SOLUZIONE...
  • Page 149: Smaltimento

    17. Smaltimento IMBALLAGGIO L’imballaggio protegge il dispositivo da eventuali danni durante il tra- sporto. Gli imballaggi sono prodotti con materiali che possono essere smaltiti nel rispetto dell’ambiente e destinati a un corretto riciclaggio. DISPOSITIVO Il dispositivo è dotato di una batteria integrata. Al termine del ciclo di vita del dispositivo non smaltirlo in nessun caso assieme ai normali rifiu- ti domestici, ma informarsi presso l’amministrazione locale sulle modali- tà...
  • Page 150: Dati Tecnici

    18. Dati tecnici Alimentatore BUREAU VERITAS Costruttore Hung Kay Nome del modello HKP12-0901000dV Tensione di ingresso / corrente / frequenza della corrente alternata AC 100-240V ~ 50/60Hz 0,3A MAX di ingresso Tensione di uscita / corrente DC 9V 1A, 9W Efficienza media durante il funzio- 84.67 % namento...
  • Page 151 Radio In funzione: 10 °C ~ +45 °C umidità < 90% Valori ambientali Non in funzione: -10 °C ~ +55 °C umidità < 90% Grado di protezione IP44 Dimensioni (LxAxP) ca. 282 x 235 x 180 mm Peso ca. 1,94 kg...
  • Page 152: Informazioni Sul Servizio Di Assistenza

    • La community di assistenza è un luogo di incontro dove gli utenti e i nostri colla- boratori possono condividere le reciproche esperienze e conoscenze. La community di assistenza è accessibile alla pagina http://community.medion. com. • In alternativa è possibile compilare il modulo di contatto disponibile alla pagina www.medion.com/contact.
  • Page 153: Informativa Sulla Protezione Dei Dati Personali

    GDPR in combinato disposto con l’articolo 19 secondo le speciali disposizioni lega- li tedesche in materia di protezione dei dati in conformità con la BDSG). Per MEDION AG, si tratta dell’incaricato regionale per la protezione dei dati e la libertà d’informa- zione della Renania Settentrionale-Vestfalia, casella postale 200444, 40212 Düsseld-...
  • Page 154 Inhoud Informatie over deze gebruiksaanwijzing ..........157 1.1. Betekenis van de symbolen ................157 Gebruiksdoel .................... 159 Veiligheidsvoorschriften ................ 160 3.1. Het apparaat veilig opstellen ............... 161 3.2. Stroomvoorziening ..................161 3.3. Omgaan met accu's ..................163 3.4. Reinigen en opbergen ..................163 3.5.
  • Page 155 10.5. Zenderinformatie weergeven ..............178 10.6. Zenders opslaan ....................178 10.7. Opgeslagen zenders afspelen ..............178 Bluetooth-modus ..................178 11.1. Bluetooth-apparaten voor het eerst koppelen ........179 11.2. Afspelen starten/onderbreken ..............179 11.3. Oproepen beheren ..................180 AUX-modus ....................181 12.1.
  • Page 156: Informatie Over Deze Gebruiksaanwijzing

    1. Informatie over deze gebruiksaanwijzing Hartelijk dank dat u voor ons product hebt gekozen. We wensen u veel plezier met het apparaat. Lees de veiligheidsvoorschriften en de volledige gebruiksaanwijzing aandachtig door voordat u het product in gebruik neemt. Neem de waarschuwingen op het product en in de gebruiksaanwijzing in acht.
  • Page 157 Neem de aanwijzingen in de gebruiksaanwijzing in acht! Opsommingsteken/informatie over gebeurtenissen die zich tijdens • de bediening kunnen voordoen  Instructie voor een uit te voeren handeling Veiligheidsklasse II Elektrische apparaten van veiligheidsklasse II zijn elektrische appara- ten die in hun geheel zijn voorzien van een dubbele en/of extra ster- ke isolatie en geen aansluitmogelijkheden hebben voor een aardlei- ding.
  • Page 158: Gebruiksdoel

    2. Gebruiksdoel Dit apparaat behoort tot de consumentenelektronica. De bouwradio dient voor het afspelen van audio via Bluetooth of AUX. Ook radioprogramma's kunnen worden beluisterd. Met het genoemde ontvangstbereik worden de technische ca- paciteiten van het apparaat aangegeven. Informatie die buiten dit bereik wordt ontvangen, mag niet worden gebruikt of verder worden verspreid.
  • Page 159: Veiligheidsvoorschriften

    – direct zonlicht – open vuur. 3. Veiligheidsvoorschriften WAARSCHUWING! Gevaar voor letsel! Gevaar voor letsel bij kinderen en bij personen met een lichamelijke, zintuiglijke of geestelijke beperking (zoals gedeeltelijk invaliden en ouderen met een lichamelijke en geestelijke beperking) of met gebrek aan kennis en ervaring (zoals oudere kinderen).
  • Page 160: Het Apparaat Veilig Opstellen

    3.1. Het apparaat veilig opstellen  Wacht even met het aansluiten van het apparaat nadat het van een koude in een warme ruimte is gebracht. Door de con- densvorming die hierbij optreedt, kan het apparaat bescha- digd raken. Zodra het apparaat op kamertemperatuur is ge- komen, kan het zonder risico worden ingeschakeld.
  • Page 161  Sluit dit apparaat alleen aan op een geaard, goed toeganke- lijk stopcontact van 100-240 V~ 50/60 Hz. Als u twijfelt over de stroomvoorziening op de plaats van installatie, neem dan contact op met het energiebedrijf.  Gebruik het netsnoer niet meer als een van beide stekkers of het snoer beschadigd is.
  • Page 162: Omgaan Met Accu's

     Gebruik de bouwradio en de accessoires niet als deze bescha- digingen vertonen, rook produceren of ongewone geluiden voortbrengen. Trek in dat geval de stekker onmiddellijk uit het stopcontact.  De lichtbron van deze lamp kan niet vervangen worden. Als de lichtbron aan het einde van zijn levensduur is, moet het hele apparaat vervangen worden.
  • Page 163: Spatwaterdichtheid

     Houd er rekening mee dat de spatwaterdichtheid al- leen gegarandeerd is, als de bouwradio rechtop (in de normale stand) staat. 4. EU-conformiteitsinformatie Hierbij verklaart Medion AG dat dit apparaat in overeenstemming is met de funda- mentele eisen en de overige toepasselijke voorschriften: • RE-richtlijn 2014/53/EU •...
  • Page 164: Inhoud Van De Levering

    6. Inhoud van de levering GEVAAR! Verstikkingsgevaar! Er bestaat verstikkingsgevaar door het inslikken of ina- demen van kleine onderdelen of folie.  Houd verpakkingsfolie buiten het bereik van kinde- ren.  Haal het product uit de verpakking en verwijder al het verpakkingsmateriaal. ...
  • Page 165: Overzicht Van Het Apparaat

    7. Overzicht van het apparaat 7.1. Voorkant Antenne Weergave van tijd/datum, modus, radiozender, Display systeeminstellingen, volume Volume verlagen/verhogen Microfoon • AMS (automatisch zenders zoeken) • NAP (countdown-tijd) • EQ (klankeffecten/klankregeling)
  • Page 166 • Lamp in-/uitschakelen • Dimmer voor displayverlichting instellen • Systeeminstellingen • Naar het erboven liggende menu • Informatie over de huidige zender • Zenders zoeken • Navigatie door de menu's • Laadniveau accu • Sleep-timer • Binnen het menu navigeren, volgende titel/zender •...
  • Page 167: Achterkant

    7.2. Achterkant DC IN 9V Aansluiting voor netadapter Klemschijf van vergrendeling opbergvak Typeplaatje (onderkant) Opbergvak voor externe apparaten AUX IN Audioaansluiting voor extern apparaat (in het opbergvak) Kartelschroef van de vergrendeling van het opbergvak LED-werklamp...
  • Page 168: Ingebruikname

    8. Ingebruikname 8.1. Aansluiten op de netvoeding Gebruik voor het aansluiten van de radio uitsluitend de meegeleverde netadapter. Op de netadapter bevindt zich een typeplaatje met de gegevens van de adapter.  Steek de stekker van de netadapter in de DC IN 9V-netsnoeraansluiting van het apparaat.
  • Page 169: Apparaat Inschakelen/Uitschakelen

    8.3. Apparaat inschakelen/uitschakelen 8.3.1. Apparaat inschakelen  Druk op de toets om het apparaat in te schakelen. De tijd en datum zijn op het display te zien. 8.3.2. Apparaat uitschakelen  Houd de toets ingedrukt om het apparaat in de stand-bymodus te zet- ten.
  • Page 170: Tijd/Datum Instellen

    8.5. Tijd/datum instellen 8.5.1. Tijd/datum handmatig instellen Het apparaat is ingeschakeld of bevindt zich in de stand-bymodus.  Houd de toets ingedrukt. Het menu Stand-by <Systeem> verschijnt.  Druk op de toets Het menu Systeem <Slaap> verschijnt.  Druk op de toets om naar het menu <Tijd>...
  • Page 171  Druk de toets meerdere keren in om naar het menu <Autom. update> te gaan.  Druk op de toets  Selecteer <Alles bijwerken>, <Bijwerken van DAB> of <Bijwerken van FM> als de tijd en datum automatisch ingesteld moeten worden. ...
  • Page 172: Dab-Zenders Zoeken Voor Het Eerst Starten

    8.6. DAB-zenders zoeken voor het eerst starten Het apparaat is ingeschakeld of bevindt zich in de stand-bymodus.  Druk op de toets Het zoeken van DAB-zenders wordt gestart. Na afloop van het zoeken van zenders • wordt het aantal opgeslagen zenders weergegeven. •...
  • Page 173: Modus Selecteren

    De tijd en datum worden weergegeven. 8.10. Modus selecteren De volgende modi kunnen geselecteerd worden: Modus Omschrijving Een digitale radiozender afspelen Een analoge radiozender afspelen Hulpingang Een externe audiobron via de AUX-aansluiting afspelen • Een audiobron van een extern, Bluetooth-compatibel apparaat afspelen Bluetooth koppelen...
  • Page 174: Zenders Opslaan

    9.3. Zenders opslaan U kunt maximaal 30 DAB-zenders opslaan.  Selecteer de DAB-zenders die u wilt opslaan.  Druk op de toets Het menu Progr. oproepen wordt weergegeven.  Druk meerdere keren op de toets tot er een vrije of al bezette en genummerde opslagplaats wordt weergegeven.
  • Page 175: Drc-Functie Instellen

     Druk op de toets Het menu Handmatig instellen en de huidige DAB-frequentie verschijnen.  Druk de toets meerdere keren in om de gewenste DAB-frequentie in te stellen.  Druk op de toets De nieuwe DAB-frequentie is ingesteld. 9.6. DRC-functie instellen DRC (Dynamic Range Compression) is een functie om het volume van hardere klan- ken te verlagen en het volume van zachtere klanken te verhogen.
  • Page 176: Fm-Modus

     Druk op de toets De TA-functie is ingesteld. 10. FM-modus 10.1. Signaalkwaliteit voor zenders zoeken selecteren  Houd de toets ingedrukt. Het menu FM <Zoekinstelling> verschijnt.  Druk op de toets  Selecteer in het menu Zoekinstelling <Alle zenders> om naar FM-zenders met een zwak en sterk signaal te zoeken.
  • Page 177: Zenderinformatie Weergeven

    10.5. Zenderinformatie weergeven  Druk de toets meerdere keren in om de volgende informatie te tonen: – Zendertype/zendfrequentie/huidige titel – Tijd/datum 10.6. Zenders opslaan U kunt maximaal 30 FM-zenders opslaan.  Selecteer de FM-zenders die u wilt opslaan.  Houd de toets ingedrukt.
  • Page 178: Bluetooth-Apparaten Voor Het Eerst Koppelen

    11.1. Bluetooth-apparaten voor het eerst koppelen Bekende externe apparaten die al een keer gekoppeld zijn, worden daarna altijd direct met elkaar verbonden. Opnieuw koppelen is niet nodig. Om opnieuw verbin- ding te maken, hoeft u alleen de Bluetooth-modus op beide apparaten te activeren. ...
  • Page 179: Oproepen Beheren

    11.3. Oproepen beheren Inkomende oproepen worden door de bouwradio met een geluidssignaal aangekondigd en het afspelen van audio wordt dan onderbroken. 11.3.1. Oproep aannemen  Druk op de toets De spraakoverdracht gebeurt via de microfoon en luidspreker. 11.3.2. Oproep beëindigen ...
  • Page 180: Aux-Modus

    12. AUX-modus Met de aansluiting AUX IN en een kabelverbinding kunt u een extern afspeelappa- raat (bijv. smartphone of mp3-speler) gebruiken. 12.1. Extern afspeelapparaat aansluiten  Zet de bouwradio in de stand-bymodus.  Schakel het externe apparaat uit.  Ontgrendel de klep van het opbergvak aan de achterzijde van de bouwradio. Draai daarvoor de kartelschroef los en draai de klemschijf.
  • Page 181: Comfortfuncties

     Schakel het externe apparaat in.  Start het afspelen op het externe apparaat.  Leg het externe apparaat in het opbergvak.  Sluit de klep van het opbergvak.  Vergrendel de klep van het opbergvak. Draai de klemschijf en draai de kartelschroef vast. ...
  • Page 182: Naptimer Gebruiken

    13.3. NAPtimer gebruiken Het apparaat beschikt over een countdown-timer (bijv. om het einde van een pau- ze aan te geven) die u in de modi DAB, FM, Bluetooth en Hulpingang (AUX) kunt activeren. Na afloop van de ingestelde tijd (uit, 10 min., 15 min., 30 min., 45 min., 60 min., 90 min.
  • Page 183: Displayverlichting Dimmen

     Houd de toets ingedrukt tot de werklamp ingeschakeld is. 13.4.2. Werklamp uitschakelen  Houd de toets ingedrukt tot de werklamp uitgeschakeld is.  Draai de werklamp zodanig dat deze naar het apparaat straalt. 13.5. Displayverlichting dimmen U kunt de displayverlichting op de niveaus “helder” en “donker” instellen en uitzet- ten.
  • Page 184: Laadniveau Accu

    13.6. Laadniveau accu Het laadniveau van de accu kan uitsluitend in de accu- modus worden opgeroepen.  Zorg ervoor dat het apparaat zich in de accumodus bevindt.  Modus DAB: Druk de toets 7 keer achter elkaar in om het laadniveau van de accu weer te geven.
  • Page 185: Servicefuncties

    14. Servicefuncties 14.1. Het apparaat terugzetten op de fabrieksinstellingen De huidige instellingen van het apparaat kunnen worden teruggezet op de fa- brieksinstellingen. De volgende instellingen worden daarbij gereset: • Taal • Tijd en datum • DAB-/FM-zender en zendergeheugen Het apparaat kan vanuit alle modi op de fabrieksinstellingen worden teruggezet. ...
  • Page 186: Reiniging

    15. Reiniging Trek voordat u het toestel gaat reinigen de stekker uit het stopcontact. Gebruik voor het reinigen een droge, zachte doek. Gebruik geen chemische oplos- en reinigings- middelen, omdat deze het oppervlak en/of de opschriften van het apparaat kunnen beschadigen.
  • Page 187: Afvalverwerking

    17. Afvalverwerking VERPAKKING Het apparaat zit ter bescherming tegen transportschade in een verpak- king. Verpakkingen zijn gemaakt van materialen die milieuvriendelijk kunnen worden afgevoerd en vakkundig kunnen worden gerecycled. APPARAAT Het apparaat heeft een geïntegreerde accu. Doe het apparaat aan het einde van de levensduur in geen geval bij het gewone huishoudelijke afval.
  • Page 188: Service-Informatie

    U vindt onze Service Community op http://community.medion.com. • Daarnaast kunt u gebruikmaken van ons contactformulier op www.medion. com/contact. • Vanzelfsprekend kunt u ons serviceteam ook bereiken via de hotline of per post.
  • Page 189 Duitsland Deze en veel andere gebruiksaanwijzingen kunt u downloaden via het serviceportaal op www.medion.com/de/service/start/. Daar vindt u ook stuurprogramma's en andere software voor ver- schillende apparaten. Ook kunt u de QR-code hiernaast scannen en de gebruiksaanwij- zing van het serviceportaal downloaden op uw mobiele eindap-...
  • Page 190: Privacy Statement

    Service Center. 20. Privacy statement Beste klant! Wij delen u mee dat wij, MEDION AG, Am Zehnthof 77, 45307 Essen, als verwer- kingsverantwoordelijke uw persoonsgegevens verwerken. In aangelegenheden die te maken hebben met het recht op gegevensbescherming, worden wij bijgestaan door de functionaris voor gegevensbescherming van onze onderneming, die bereikbaar is onder MEDION AG, Datenschutz, Am Zehnthof 77, D-45307 Essen;...
  • Page 191 Noordrijn-Westfalen (Landesbeauftragte für Datenschutz und Informationsfreiheit Nordrhein Westfalen), Postbus 200444, 40212 Düsseldorf. www.ldi.nrw.de. De verwerking van uw gegevens is noodzakelijk voor de garantieafwikkeling; zon- der dat de vereiste gegevens beschikbaar worden gesteld, is het niet mogelijk om de garantie af te wikkelen.
  • Page 192 MSN 5006 3860...

Ce manuel est également adapté pour:

Md 45220

Table des Matières