geo-FENNEL ELT 220 Mode D'emploi

geo-FENNEL ELT 220 Mode D'emploi

Electronic theodolite
Table des Matières

Publicité

Les langues disponibles

Les langues disponibles

Liens rapides

DE | EN | FR
ECOLINE ELT 220
elektronischer Theodolit ´ELT 220´
dsArtikel-Nr.: D 3500
GLN-Nummer: 4250170910364
BEDIENUNGSANLEITUNG
USER MANUAL
MODE D'EMPLOI
EXACTLY WHAT YOU NEED.
ECOLINE

Publicité

Table des Matières
loading

Sommaire des Matières pour geo-FENNEL ELT 220

  • Page 1 DE | EN | FR ECOLINE ELT 220 elektronischer Theodolit ´ELT 220´ dsArtikel-Nr.: D 3500 GLN-Nummer: 4250170910364 BEDIENUNGSANLEITUNG USER MANUAL MODE D‘EMPLOI ECOLINE EXACTLY WHAT YOU NEED.
  • Page 2: Table Des Matières

    INHALTSVERZEICHNIS ALLGEMEINE HINWEISE BEDIENELEMENTE Anzeigen im Display Bedienfeld BEDIENUNG Vorbereitung zur Messung Einschalten Zustandsanzeige Batterie / Akku Austausch Batterie / Akku Nullsetzung des Horizontalkreises (0-SET) Elektronische V-Kreis-Angleichung Umschaltung Zählrichtung des Horizontalkreises (HA Feststellung der Horizontalkreisablesung Umschaltung von Höhenwinkel auf Prozent (%) Wiederholung Winkelmessung (repetitionsweise Winkelmessung) Distanzmessung mit dem Fadenkreuz Automatische Abschaltung...
  • Page 3: Allgemeine Hinweise

    ALLGEMEINE HINWEISE ∙ Instrument vor Benutzung überprüfen. Stellen Sie sicher, dass die vom Benutzer benötig- ten Einstellungen und Parameter eingestellt sind. Überzeugen Sie sich vor der Messung davon, dass die Batteriespannung ausreichend ist. ∙ Setzen Sie das Instrument nicht länger als notwendig extremer Hitze aus. Dies kann u.a. die Genauigkeit negativ beeinflussen.
  • Page 5: Bedienelemente

    BEDIENELEMENTE Handgriff Schraube Handgriff Grobvisier Vertikalklemme und Vertikalfeintrieb Bedientastatur Objektiv Röhrenlibelle Display Fernrohrokular Dreifuß Fußschraube Fokussierung Batterie-/Akkufach Horizontalklemme und Horizontalfeintrieb Verriegelungshebel ECOLINE...
  • Page 6: Anzeigen Im Display

    ANZEIGE IM DISPLAY Vertikalwinkel Horizontalwinkel, Zählrichtung rechtsläufig Horizontalwinkel, Zählrichtung linksläufig Umschalttaste Repetitionsweise Winkelmessung Automatische Abschaltung HOLD Feststellung der Hz-Kreisablesung Prozent Entfernungseinheit Winkeleinheit Akku-/Batteriezustandsanzeige BEDIENFELD Taste Funktion 1 Funktion 2 0SET Nullsetzung Horizontalwinkel Laserlot HOLD Feststellung der Hz-Kreisablesung Wiederholung horizontale Winkelmes- sung Umschalttaste für 2.
  • Page 7: Bedienung

    BEDIENUNG VORBEREITUNG ZUR MESSUNG Stativ Stativbeine auf gewünschte Höhe ausziehen und festklemmen. Stativ sicher aufstellen. Instrument auf Stativ befestigen Instrument vorsichtig auf das Stativ setzen. Die Stativanzugsschraube (mit 5/8“-Gewinde) einschrauben, bis das Instrument sicher befestigt ist. Libellen einspielen Zunächst die Dosenlibelle und anschließend die Röhrenlibelle einspielen. Die Röhrenlibelle nachstellen, bis sie bei Drehung des Theodolit-Oberteils in allen Lagen den Umschlag hält.
  • Page 8: Austausch Batterie / Akku

    AUSTAUSCH BATTERIE / AKKU Gerät ausschalten und Batterie- / Akkufach abnehmen. Der Akku wird außerhalb des Gerätes mit dem Ladegerät aufgeladen und anschließend wieder an das Gehäuse angeklickt. Nur bei Batteriewechsel: Haken herunterdrücken und Deckel abnehmen. Neuen Satz Alkali- ne-Batterien einlegen. Deckel schließen und Batteriefach wieder an das Gehäuse anklicken. NULLSETZUNG DES HORIZONTALKREISES (0-SET) ∙...
  • Page 9: Umschaltung Zählrichtung Des Horizontalkreises

    UMSCHALTUNG ZÄHLRICHTUNG DES HORIZONTALKREISES (HA Im Standardmodus ist die Zählrichtung des Horizontalwinkels rechtsläufig (Displayanzeige ). Durch Drücken des Knopfes „R/L “ kann die Zählrichtung auf linksläufig umgestellt werden (Displayanzeige HA FESTHALTEN DER HORIZONTALKREISABLESUNG Durch Drücken des Knopfes „HOLD“ kann der aktuelle Wert des Horizontalkreises fest- gehalten werden.
  • Page 10: Distanzmessung Mit Dem Fadenkreuz

    DISTANZMESSUNG MIT DEM FADENKREUZ Mit dem ELT 220 können in Verbindung mit einer Teleskop-Nivellierlatte manuell Entfernun- gen gemessen werden. ∙ Nivellierlatte auf Zielpunkt stellen. ∙ Mit dem Fernrohr des Gerätes die Nivel- lierlatte anvisieren. ∙ Den Wert des Abschnitts „d“ zwischen den beiden kleinen horizontalen Distanz- fäden mit 100 multiplizieren.
  • Page 11: Einstellung Von Geräteparametern

    EINSTELLUNG VON GERÄTEPARAMETERN Ziffer Parameter Setzen Vertikale Winkelanzeige Umschaltung zwischen Setting ON Setting OFF Zenith und horizontal horizontal zenith Automatische Abschaltung Abschaltung Ein-/Ausschal- Setting ON Setting OFF Minimale Winkeleinheit Umschaltung zwischen 10“ Setting ON Setting OFF und 20“ 10“ 20“ Winkeleinheit Umschaltung zwischen DEG Setting ON...
  • Page 12: Technische Daten

    TECHNISCHE DATEN Fernrohr: Vergrößerung 30-fach Objektivdurchmesser 45 mm Kürzeste Zielweite 1,5 m Winkelmessung: Inkremental Genauigkeit 6 mgon (20“) Kleinster Messwert 3 mgon (10“) Messeinheiten 400 gon / 360° Display / Beleuchtung 1 x LCD / ja Libellen: Röhrenlibelle 30“ / 2 mm Dosenlibelle 8“...
  • Page 13: Sicherheitshinweise

    SICHERHEITSHINWEISE FEHLERMELDUNGEN Anzeige Bedeutung Vertikalwinkel 0-Position liegt außerhalb des Bereichs. Interner Speicherfehler. Reserviert für Einstellung des Herstellers. Fehler im Winkel-Messsystem. Gerät oder Fernrohr zu schnell gedreht. Es ist ein Fehler in Winkel-Messsystem erfasst. Das Instrument sollte wieder mit Strom versorgt werden, um diesen Fehler zu beseitigen Achtung: Bei auftretenden Fehlermeldungen die durchgeführte Messung anhand der Bedienungs- anleitung sorgsam wiederholen.
  • Page 14: Umgang Und Pflege

    UMGANG UND PFLEGE Messinstrumente generell sorgsam behandeln. Nach Benutzung mit weichem Tuch reinigen (ggfs. Tuch in etwas Wasser tränken). Wenn das Gerät feucht war, sorgsam trocknen. Erst in den Koffer oder die Tasche packen, wenn es absolut trocken ist. Transport nur in Originalbe- hälter oder -tasche.
  • Page 15: Haftungsausschluss

    HAFTUNGSAUSSCHLUSS ∙ Der Benutzer dieses Produktes ist angehalten, sich exakt an die Anweisungen der Bedie- nungsanleitung zu halten. Alle Geräte sind vor der Auslieferung genauestens überprüft worden. Der Anwender sollte sich trotzdem vor jeder Anwendung von der Genauigkeit des Gerätes überzeugen. ∙...
  • Page 16 CONTENTS IMPORTANT INFORMATION FEATURES Display Symbols Keyboard Function OPERATION Preparation for measurement Power on/off Alkaline / Rechargeable battery indication Alkaline / Rechargable battery replacement Horizontal angle 0SET (0-SET) Vertical angle 0 error correction Horizontal angle clockwise/anti-clockwise (HA Horizontal angle Hold Measuring a percent of grade (%) Horizontal angle repeat measurement Distance measurement using stadia lines...
  • Page 17: Important Information

    IMPORTANT INFORMATION BEFORE USING YOUR INSTRUMENT ∙ The ELT 220 Electronic Theodolite is a precision instrument and must be handled with care. ∙ For the optimum performance of the instrument we recommend that you read this manual carefully and keep it in a convenient place for future reference. Before you start...
  • Page 19: Features

    FEATURES Carrying handle Handle locking screw Optical sight Vertical tangent screw and clamp Keypad Objective lens Plate level Display Eyepiece Tribrach Footscrew Focusing drive Battery pack Horizontal tangent screw and clamp Tribrach clamp ECOLINE...
  • Page 20: Display Indication

    Horizontal angle right Horizontal angle left Select second function Repeat the horizontal angle Power on/off HOLD Hold horizontal angle Vertical grade percentage Not applicable to ELT 220 Angle unit Battery power status KEYBOARD FUNCTIONS Button Function 1 Function 2 0SET Horizontal angle “0 Set”...
  • Page 21: Operation

    OPERATION PREPARATION FOR MEASUREMENT Level and centrer the instrument precisely to ensure optimum performance. Setting up the instrument and tripod Extend the tripod legs to a suitable height and tighten the locking screw. Attach the instrument onto the tripod carefully. With the tripod centring screw slightly loose move the instrument across the tripod head until the laser plum- met is in coincidence with the ground point.
  • Page 22: Change The Batteries

    CHANGE THE BATTERIES Removing the alkaline / rechargeable battery When using alkaline batteries: Push down the press button and remove the battery compartment. Battery replacement: Push down the catch to remove the battery compartment cover. Replace the alkaline batteries / charge rechargeable battery. Ensure correct polarity when replacing the batteries.
  • Page 23: Horizontal Angle Clockwise/Anti-Clockwise

    HORIZONTAL ANGLE CLOCKWISE/ANTI-CLOCKWISE (HA Aim at target “A” using the crosshair of the telescope. Press “R/L “ key, to change transform horizontal angle mode HA into the mode HA Measuring by mode HA . “R/L “ key has no effect on the vertical angle. Press “R/L “...
  • Page 24: Distance Measurement Using Stadia Lines

    DISTANCE MEASUREMENT USING STADIA LINES The ELT 220 telescope graticule is provided with stadia lines which can be used to measure a distance. To perform this function you need a vertical staff or similar vertical scale located at the target/station point to be measured. By viewing the vertical staff through the tele- scope measure the difference between the upper and lower stadia lines.
  • Page 25: Function Setting

    FUNCTION SETTING ITEM INSTRUCTION PARAMETER SETTING Vertical angle display Switching between horizon- Setting ON Setting OFF tal and zenith horizontal zenith Automatic power off Auto power off (on and off) Setting ON Setting OFF Minimum angle display Switching between 10“ and Setting ON Setting OFF 20“...
  • Page 26: Technical Specifications

    TECHNICAL SPECIFICATIONS Telescope: Magnification Clear objective aperture 45 mm Shortest focussing distance 1,5 m Angle measurement: Incremental Accuracy 6 mgon (20“) Shortest focussing distance 3 mgon (10“) Measuring units 400 gon / 360° Display / Illumination 1 x LCD / yes Vials: Circular level 30“...
  • Page 27: Safety Information

    SAFETY INFORMATION ERROR DISPLAY Display Error Content Vertical angle “0” position is out of range or set with incorrect procedure. Internal memory system error. Reserved for factory adjustment. Failure in angle measuring system. Rotation speed of telescope was too fast (over 4 r/s). Angle measuring system error.
  • Page 28: Care And Cleaning

    ∙ Only use the instrument for its intended applications. ∙ Do not open instrument housing. Repairs should be carried out by authorized workshops only. Please contact your local geo-FENNEL dealer. ∙ Do not remove warning labels or safety instructions. ∙ Keep instrument away from children.
  • Page 29: Exceptions From Responsibility

    EXCEPTIONS FROM RESPONSIBILITY ∙ The user of this product is expected to follow the instructions given in the User Manu- al. Although all instruments leave our warehouse in perfect condition and adjustment the user is expected to carry out periodic checks of the product’s accuracy and general performance.
  • Page 30 TABLE DES MATIERES IMPORTANT CARACTÉRISTIQUES Indication de l‘écran Panneau de commande OPÉRATION Préparation pour la mesure Marche Témoin piles Alcalines / batterie rechargeable Remplacement piles alcalines / batterie rechargeable Paramètrage angle 0 horizontal (0SET) Correction d‘erreur sur l‘angle vertical 0 Mode conversion de l‘horizontal vers la droite et vers la gauche en tournant l‘incrément (HA Blocage et déblocage de l‘angle horizontal...
  • Page 31 IMPORTANT LIRE AVANT D‘UTILISER VOTRE INSTRUMENT ∙ Faire un contrôle complet de l‘appareil avant de l‘utiliser. Assurez-vous que les fonctions de l‘instrument, alimentation, les réglages d‘origine et des paramètres répondent à vos besoins avant de l‘utiliser. ∙ Pour éviter les rayons directs du soleil sur la lentille de l‘appareil, ne jamais laisser l‘appareil se trouvant sous une chaleur importante plus longtemps que nécessaire, ou cela pourrait affecter la précision de l‘...
  • Page 33: Caractéristiques

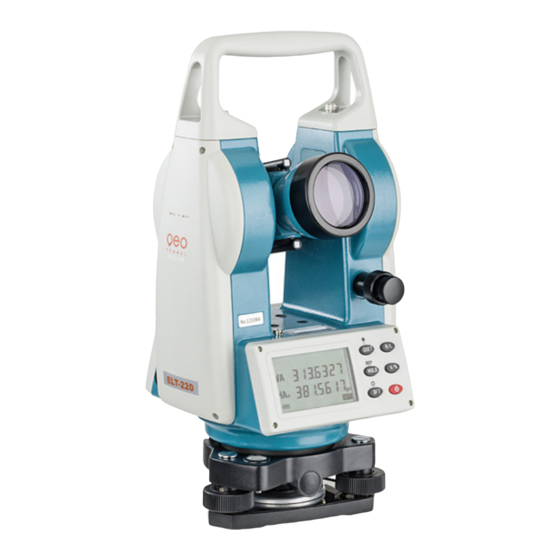
    CARACTÉRISTIQUES Poignée de transport Vis de la poignée Viseur optique Vis de réglage micrométrique verticale et de blocage de mouvement Bouton d‘exploitation Lentille de l‘objectif Nivelle principale Écran Oculaire Embase Vis de réglages Réglage du focus Batterie Vis de réglage micrométrique horizontale et de blocage de mouvement Le levier de verrouillage de l‘embase ECOLINE...
  • Page 34: Panneau De Commande

    DISPLAY INDICATION Angle vertical Angle horizontal droit Angle horizontal gauche La deuxième fonction Mode répétition Arrêt automatique HOLD Mémorisation de l‘angle horizontal Pourcentage de pente Unité de distance Unité d‘angle Niveau de la batterie PANNEAU DE COMMANDE Bouton Fonction 1 Fonction 2 0SET Réglez l‘angle horizontal 0...
  • Page 35: Opération

    OPÉRATION MISE EN STATION DU THÉODOLITE Centrer et mettre l‘instrument de niveau pour s‘assurer de ses bonnes performances. Montez le trépied Tout d‘abord placer les jambes du trépied à un endroit approprié et serrer le dispositif de verrouillage. Montez l‘ instrument sur le trépied. Fixez l‘appareil sur le trépied avec soin, puis bougez l‘instrument en desserrant la vis de blocage centra- le.
  • Page 36: Changement De La Batterie / Piles

    CHANGEMENT DE LA BATTERIE / PILES Appuyer de haut en bas sur le clip et enlevez les piles. En cas d‘utilisation de piles alcalines: Appuyez sur le bouton vers le bas pour retirer le compartiment des piles. Remplacement des piles: Poussez le crochet vers le bas pour retirer le capot du compartiment des piles.
  • Page 37: Mesure D'un Pourcentage De Déclivité

    PASSAGE DU MODE LECTURE HORIZONTAL DROIT EN MODE HORI- ZONTAL GAUCHE (HA Visez une cible „A“ en utilisant réticule du télescope. Appuyez sur la touche „R/L “ , modifiez l‘angle horizontal HA en mode HA Mesurez en mode HA La touche „R/L “ n’est pas utilisable en angle vertical. Appuyer sur la touche „R/L “...
  • Page 38: Mesure De La Distance

    MESURE DE DISTANCE Mesure de la distance avec la croix est une autre application du ELT-220. Pour exécuter cette fonction, une canne dont on connaît l‘échelle est nécessaire. En regardant à travers le télescope, la longueur entre les lignes stadia du haut et du bas doit être multipliée par 100 c‘est la distance entre le centre de l‘instrument et la canne.
  • Page 39: Configurations Des Fonctions

    CONFIGURATIONS DES FONCTIONS ARTICLE INSTRUCTION PARAMETRES DE CONFIGURATION Affichage angle vertical Changer le mode horizontal Sélect ON Sélect OFF et zénith horizontal sur le zénith Arrêt automatique Activer ou désactiver l‘arrêt Sélect ON Sélect OFF automatique l‘activer la désactiver Lecture angle minimale Paramétrer entre 10“...
  • Page 40 TECHNICAL SPECIFICATIONS Télescope: Grossissement Ouverture de l‘objectif 45 mm Visée minimale de focalisation 1,5 m Mesure d‘angle: Incrémental Précision 6 mgon (20“) Visée minimale de focalisation 3 mgon (10“) Unités de mesure 400 gon / 360° Écran / Rétro éclairage 1 x LCD / oui Nivelles: Nivelle circulaire...
  • Page 41: Consignes De Sécurité

    CONSIGNES DE SÉCURITÉ AFFICHAGE D ERREUR Affichage Contenu des erreurs Position 0 de l‘angle vertical est en dehors de la plage de compensation ou a été mal configuré. Il y a une anomalie dans le système de mémoire interne. Doit être réglé par le fabricant. Il y a une anomalie dans le système de mesure d‘angle.
  • Page 42: Entretien Et Nettoyage

    ENTRETIEN ET NETTOYAGE S‘il vous plaît manipuler cet instrument de mesure avec soin. Nettoyer avec un chiffon doux après chaque utilisation. Si nécessaire, utilisez un chiffon humide avec de l‘eau: si l‘instrument est humide, nettoyez le et séchez le soigneusement. Ne le ranger que si il est parfaitement sec.
  • Page 43: Exclusion De Responsabilité

    EXCLUSION DE RESPONSABILITE ∙ L ‘utilisateur de ce produit doit suivre les instructions indiquées dans le manuel d‘utilisation. Bien que tous les instruments ont quitté notre entrepôt en parfait état et réglage l‘utilisateur est censé effectuer des contrôles périodiques de la précision du produit et la performance générale . ∙...
  • Page 44 DS-Messwerkzeuge Goethestr. 5 D-65604 Elz TEL +49 (0) 64 31 - 97 79 - 0 FAX +49 (0) 64 31 - 97 79 - 29 E-Mail: vertrieb@ds-messwerkzeuge.de www.ds-messwerkzeuge.de Technische Änderungen vorbehalten. All instruments subject to technical changes. Sous réserve de modifications techniques. 11/2013...

Ce manuel est également adapté pour:

D 3500

Table des Matières