Télécharger Imprimer la page

Publicité

Les langues disponibles
  • FR

Les langues disponibles

  • FRANÇAIS, page 50

Liens rapides

Art.Nr.
5911410900
AusgabeNr.
5911410900_1002
Rev.Nr.
22/03/2023
MR760-E
DE
GB
FR
IT
HR
SI
Nachdrucke, auch auszugsweise, bedürfen der Genehmigung. Technische Änderungen vorbehalten. Abbildungen beispielhaft!
Akku-Aufsitzrasenmäher
Originalbedienungsanleitung
Battery-powered lawn tractor
Translation of original instruction manual
Tondeuse autoportée rider à batterie
Traduction des instructions d'origine
Trattorino tosaerba a batteria
La traduzione dal manuale di istruzioni originale
Akumulatorska traktorska kosilica
Prijevod originalnog priručnika za uporabu
Akumulatorska kosilnica na nitko
Prevod originalnih navodil za uporabo
11
31
50
70
90
108

Publicité

loading

Sommaire des Matières pour Scheppach MR760-E

  • Page 1 Art.Nr. 5911410900 AusgabeNr. 5911410900_1002 Rev.Nr. 22/03/2023 MR760-E Akku-Aufsitzrasenmäher Originalbedienungsanleitung Battery-powered lawn tractor Translation of original instruction manual Tondeuse autoportée rider à batterie Traduction des instructions d’origine Trattorino tosaerba a batteria La traduzione dal manuale di istruzioni originale Akumulatorska traktorska kosilica Prijevod originalnog priručnika za uporabu...
  • Page 2 www.scheppach.com...
  • Page 3 www.scheppach.com...
  • Page 4 www.scheppach.com...
  • Page 5 27+28 www.scheppach.com...
  • Page 6 www.scheppach.com...
  • Page 7 www.scheppach.com...
  • Page 8 www.scheppach.com...
  • Page 9 www.scheppach.com...
  • Page 10 www.scheppach.com...
  • Page 11 Halten Sie Hände und Füße von den rotie- renden Mähmessern fern. Gehör- und Augenschutz benutzen! Ladebuchse ! Laden Sie den Akku-Auf- sitzrasenmäher nur bei einer Umgebungs- temperatur zwischen 0 - 40°C Schnitthöhenverstellung min. max. Garantierter Schallleistungspegel DE | 11 www.scheppach.com...
  • Page 12 Vor Inbetriebnahme ..............21 Funktionen des Bedienpanels (Abb.12, Abb.1) ......22 Bedienung ................. 23 Laden und Lagerung ..............26 Transport ................... 26 Reinigung und Wartung ............. 27 Entsorgung und Wiederverwertung .......... 29 Störungsabhilfe ................. 30 Konformitätserklärung ............... 131 12 | DE www.scheppach.com...
  • Page 13 1. Einleitung Wir übernehmen keine Haftung für Unfälle oder Schäden, die durch Nichtbeachten dieser Anleitung und den Sicherheitshinweisen entstehen. HERSTELLER: Scheppach GmbH 2. Gerätebeschreibung Günzburger Straße 69 D-89335 Ichenhausen Lenkrad Fahrersitz VEREHRTER KUNDE, wir wünschen Ihnen viel Freude und Erfolg beim Ar- Getränkehalter...
  • Page 14 Erfahrung und Wissen oder flächen verwendet werden, nicht jedoch in öffent- Personen, welche mit den Anweisungen nicht ver- lichen Anlagen, Parks, Sportstätten sowie nicht in traut sind, darf die Verwendung des Gerätes nie der Land- und Forstwirtschaft. gestattet werden. 14 | DE www.scheppach.com...
  • Page 15 • Besondere Vorsicht ist an unübersichtlichen Stel- ßen und richtig zu verwenden. Verwendung einer len, Büschen, Bäumen und anderen Hindernissen Staubabsaugung kann Gefährdungen durch Staub geboten, hinter denen sich Personen, insbesonde- verringern. re Kinder, oder Tiere befinden können. DE | 15 www.scheppach.com...
  • Page 16 Gerät weglegen. Diese Augen in Kontakt kommt, konsultieren Sie auch einen Vorsichtsmaßnahme verhindert den unbeabsich- Arzt. Flüssigkeit, die aus der Batterie austritt, kann zu tigten Start des Elektrowerkzeugs. Hautreizungen oder Verbrennungen führen. 16 | DE www.scheppach.com...
  • Page 17 Das Kabel von Wärme, Öl, schar- bereichs kann den Akku zerstören und die Brand- fen Kanten oder beweglichen Teilen fern halten. gefahr erhöhen. Ein beschädigtes oder verheddertes Kabel erhöht die Gefahr eines Stromschlages. DE | 17 www.scheppach.com...
  • Page 18 überqueren, um das Aufwirbeln von Kies und Stei- mähers. Benutzen Sie nur geeignete und zugelas- nen zu vermeiden. Fahren Sie das Produkt lang- sene Ersatzteile. Die Benutzung von ungeeigne- sam und vorsichtig, um einen Kontrollverlust zu tem Zubehör kann zu Verletzungen führen. vermeiden. 18 | DE www.scheppach.com...
  • Page 19 • falls das Gerät anfängt, ungewöhnlich stark zu vib- Radgewichte oder Gegengewichte. rieren. Eine sofortige Überprüfung ist erforderlich. • Das Gesamtgewicht des Anhängers darf die maximale • beim Verlassen bzw. Transport des Gerätes. Anhängelast von 113 kg (250 lbs.) nicht überschreiten. DE | 19 www.scheppach.com...
  • Page 20 • lange Anwendungszeiten Arbeitsdrehzahl Messermotor ....3500 min Nennleistung Messermotor ....... 2* 1200 W Deshalb wird empfohlen warme Arbeitshandschuhe Schnitthöhe ..........38-114 mm zu tragen und regelmäßige Arbeitspausen einzule- Schnitthöhenverstellung ........7-fach gen. Schnittbreite ............. 76 cm 20 | DE www.scheppach.com...
  • Page 21 8.1 Sitz montieren (Abb. 5 u. 6) 1. Montieren Sie den Sitz (2), indem Sie die 2 • Leichtgängigkeit aller beweglichen Teile. Schrauben M8x16 (27) und die Muttern M8 (28) mit Hilfe des Maulschlüssels zunächst von Hand ansetzen. DE | 21 www.scheppach.com...
  • Page 22 Hinweis: Sollten Sie feststellen, dass die Reifen oder (17) nach unten gedrückt werden und kann im An- Räder beschädigt sind, kontaktieren Sie bitte den schluss durch nach oben ziehen wieder aktiviert Kundendienst bzw. eine Fachwerkstatt. werden. 22 | DE www.scheppach.com...
  • Page 23 ACHTUNG! Blicken Sie NICHT direkt in das Licht! • mangelnde Bodenhaftung der Räder, Richten Sie den Lichtstrahl niemals auf die Au- gen von Menschen oder Tieren! Verletzungsge- • zu schnelles Fahren, • unangemessenes Bremsen, fahr. DE | 23 www.scheppach.com...
  • Page 24 Sie unbedingt Grasablagerun- aktiviert. gen. Grasablagerungen erschweren den Startvor- 3. Drehen Sie den Zündschlüssel (30) im Zünd- gang, beeinträchtigen die Schnittqualität und den schloss (23) auf „ON“. Das Bedienpanel beginnt Grasauswurf. zu leuchten. 24 | DE www.scheppach.com...
  • Page 25 Anbaugerät auszukuppeln. Danach ist pedal (8). der Hang in langsamer Abwärtsfahrt und gerader Richtung zu verlassen. • Versuchen Sie niemals, den Akku-Aufsitzrasenmä- her durch Abstützen mit dem Fuß auf dem Erdbo- den zu stabilisieren. DE | 25 www.scheppach.com...
  • Page 26 Für den Transport auf öffentlichen Verkehrswe- und unbeschädigt ist. gen muss ein geeignetes Fahrzeug oder ein geeigneter Anhänger verwendet werden. Achten Sie beim Transport auf ausreichende Traglast des Transportmittels und eine geeignete Sicherung des Akku-Aufsitzrasenmähers. 26 | DE www.scheppach.com...
  • Page 27 Komponenten begonnen wird, muss das Bat- andere Flüssigkeiten und spritzen Sie es nicht mit terieanschlusskabel (24) von dem Motoranschlusska- einem Hochdruckreiniger ab. bel (24a) getrennt werden. - Halten Sie die Griffe ölfrei, damit Sie immer siche- ren Halt haben. DE | 27 www.scheppach.com...
  • Page 28 2. Schalten Sie den Akku-Aufsitzrasenmäher aus Achtung: Laut Produkthaftungsgesetz wird nicht für und ziehen Sie den Zündschlüssel (30) vom Schäden gehaftet, die durch unsachgemäße Repa- Zündschloss (23) ab. raturen oder durch Nichtverwendung von Originaler- satzteilen verursacht werden. 28 | DE www.scheppach.com...
  • Page 29 Schaden zufügen können. Eine Verwertung • Besitzer bzw. Nutzer von Elektro- und Elektronik- der Altbatterien und Nutzung der darin enthaltenen geräten sind nach deren Gebrauch gesetzlich zur Ressourcen trägt zum Schutz dieser beiden wich- Rückgabe verpflichtet. tigen Güter bei. DE | 29 www.scheppach.com...
  • Page 30 • Mähen Sie mit zugeschaltetem Tempomat • Fahrgeschwindigkeit im Verhältnis zur • Fahrgeschwindigkeit vermindern und Absinken der Leistung des Schnitthöhe zu hoch Schnitthöhe erhöhen Motors während des Mähens • Bremse nicht mehr korrekt eingestellt • Fachhändler/Kundendienst kontaktieren Bremsleistung ungenügend 30 | DE www.scheppach.com...
  • Page 31 Use hearing and eye protection! Charge socket! Only charge the battery- powered ride-on lawnmower at an ambient temperature of between 0 - 40°C. Min. - max. cutting height adjustment Guaranteed sound power level GB | 31 www.scheppach.com...
  • Page 32 Control panel functions (Fig. 12, Fig. 1)........41 Operation ................... 42 Charging and storage ..............44 Transport ................... 45 Cleaning and maintenance ............45 Disposal and recycling .............. 47 Troubleshooting ................. 49 Declaration of conformity ............131 32 | GB www.scheppach.com...
  • Page 33 1. Introduction 2. Device description Steering wheel MANUFACTURER: Scheppach GmbH Driver’s seat Günzburger Straße 69 Cup holder D-89335 Ichenhausen Cutting height setting Rear wheels Mowing unit DEAR CUSTOMER, We hope your new tool brings you much enjoyment Wheels, front and success.
  • Page 34 A moment of • for chipping and shredding tree and hedge cuttings, inattention while operating power tools may result in • for cleaning pavements (vacuuming, blowing away), serious personal injury. 34 | GB www.scheppach.com...
  • Page 35 Any power tool that cannot be the device. Obstacles (e.g. tree stumps, roots) can controlled with the switch is dangerous and must easily be overlooked in the tall grass. be repaired. GB | 35 www.scheppach.com...
  • Page 36 (RCD-Residual Current Device, or danger of injury. residual current circuit breaker). Using an RCD re- duces the danger of an electric shock. 36 | GB www.scheppach.com...
  • Page 37 • Wear protective or safety goggles with side protec- Please keep the instructions for future reference. tion. Use a face mask if the work is dusty. • Only permit responsible adults who are familiar with and understand the instructions to use the product. GB | 37 www.scheppach.com...
  • Page 38 • if the device starts to vibrate unusually strongly. Im- or adhesive tape. Damaged or leaking rechargea- mediate review is required. ble batteries must not be transported. More informa- • when leaving or transporting the device. tion can be obtained from your transport company. 38 | GB www.scheppach.com...
  • Page 39 1.9 bar in the rear wheels (5). Capacity.............50 Ah 6. Attention - Danger of cutting! Wear protective charging time ........Approx. 8 hours gloves! 7. Carefully remove the battery-powered ride-on Technical changes reserved! lawnmower from the pallet with 3 other people. GB | 39 www.scheppach.com...
  • Page 40 8.3 Fitting the steering wheel (Fig. 4) 1. Slide the steering rod cover (36) over the previ- ously mounted steering rod (37). 2. Place a plastic washer (34) on the steering rod. 3. Place the plastic sleeve (32) on the steering rod. 40 | GB www.scheppach.com...
  • Page 41 4. Adjust the seat position so that you sit safely and switched on comfortably and can easily reach the controls. 1. Switch the mowing unit on as described in point 11.6.2 and drive carefully as described there. 2. Press the “Cruise control on/off” switch (22). GB | 41 www.scheppach.com...
  • Page 42 5. Regularly check that the mowing blade (6a) is prop- erly fastened, in good condition and sharpened. 6. If this is not the case, have the mowing blade sharpened or replaced by a specialist workshop. 42 | GB www.scheppach.com...
  • Page 43 Grass deposits and attachment devices. Then slowly descend and make the starting process more difficult, impair cut- leave the slope in a straight direction! ting quality and grass discharge. GB | 43 www.scheppach.com...
  • Page 44 1. Press the brake pedal (8) down completely and er charges in dry conditions, otherwise the charging actuate the locking brake (14). unit or the battery-powered ride-on lawnmower could 2. Before leaving the driver’s seat, switch off the be damaged. mowing unit (6). 44 | GB www.scheppach.com...
  • Page 45 To avoid fire hazard, keep combustion engine, cool- ing fins, battery compartment, area around fuel tank and exhaust pipe free from grass, leaves or leaking oil (grease). Always clean the catch basket. GB | 45 www.scheppach.com...
  • Page 46 14.3.4 Checking the tyre pressure order. 1. Check the tyre pressure prior to starting. 2. Check the tyre pressure with a commercially avail- able foot pump (not included in the scope of deliv- ery) at regular intervals. 46 | GB www.scheppach.com...
  • Page 47 To do this, scan the QR code on and which are subject to the European Directive the cover page. 2012/19/EU. In countries outside the European Un- ion, different regulations may apply to the disposal of waste electrical and electronic equipment. GB | 47 www.scheppach.com...
  • Page 48 • Mask off the contacts and package the recharge- able battery such that it cannot move in the pack- aging. Please observe any additional national reg- ulations. 48 | GB www.scheppach.com...
  • Page 49 • The driving speed in relation to the • Reduce the driving speed and increase mowing cutting height is too high the cutting height • The brake is no longer set correctly • Contact the specialist merchant/ Braking power insufficient customer service GB | 49 www.scheppach.com...
  • Page 50 Prise de charge ! Ne chargez la tondeuse autoportée à batterie que si la température ambiante se situe entre 0 et 40 °C. Réglage de la hauteur de coupe min. max. Niveau de puissance sonore garanti 50 | FR www.scheppach.com...
  • Page 51 Fonctions du panneau de commande (fig. 12, fig. 1) ....61 Commande ................62 Charge et stockage ..............65 Transport ................... 65 Nettoyage et maintenance ............65 Élimination et recyclage ............68 Dépannage ................69 Déclaration de conformité ............131 FR | 51 www.scheppach.com...
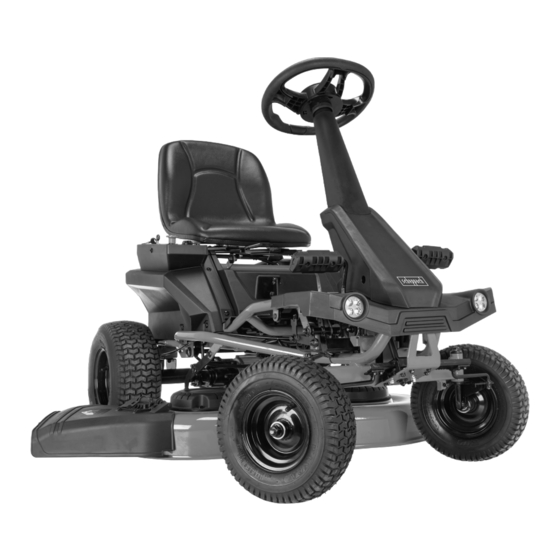
  • Page 52 1. Introduction Nous déclinons toute responsabilité concernant les ac- cidents ou dommages qui surviendraient en raison d’un non-respect de cette notice et des consignes de sécurité. FABRICANT : Scheppach GmbH 2. Description de l’appareil Günzburger Straße 69 D-89335 Ichenhausen Volant Siège du conducteur...
  • Page 53 à l’exclusion de l’entretien des lieux publics, pas les instructions d’utilisation de l’appareil ne des parcs, des terrains de sports ainsi que dans doivent pas utiliser l’appareil. lʼagriculture et les exploitations forestières. FR | 53 www.scheppach.com...
  • Page 54 • Gardez toujours un œil sur la zone située devant ment familiarisé avec l’utilisation de cet outil électrique. le véhicule. Soyez attentifs aux obstacles, afin de Toute manipulation négligente peut entraîner des bles- pouvoir les éviter à temps. sures graves en quelques fractions de seconde. 54 | FR www.scheppach.com...
  • Page 55 Les températures excessives. Le feu et les tempéra- outils électriques représentent un danger s’ils sont tures supérieures à 130 °C peuvent provoquer une utilisés par des personnes inexpérimentées. explosion. FR | 55 www.scheppach.com...
  • Page 56 à l’extérieur. L’uti- • N’entretenez jamais les batteries endommagées. lisation d’un câble de rallonge adapté à l’extérieur La maintenance des batteries est réservée au fa- réduit le risque d’électrocution. bricant ou à une agence de service client autorisée. 56 | FR www.scheppach.com...
  • Page 57 L’utilisateur doit avoir une vue dégagée sur la zone veillance. Avant de descendre, serrez le frein d’ar- de travail pour pouvoir détecter les dangers éven- rêt, désactivez les lames, arrêtez le moteur et dé- tuels. branchez la clé de démarrage. FR | 57 www.scheppach.com...
  • Page 58 - Porter les équipements de protection prescrits. Comportement humain, comportement incorrect - Toujours rester concentré lors de tous les travaux. m Un danger résiduel ne peut jamais être exclu. 58 | FR www.scheppach.com...
  • Page 59 ISO 5395-3 8. Saisissez l’appareil par le châssis, pas par le revê- Incertitude de mesure K = 1,08 dB tement en plastique ! 9. Conservez si possible l’emballage jusqu’à la fin de la période de garantie. FR | 59 www.scheppach.com...
  • Page 60 1. Poussez le revêtement de la barre de direction Si nécessaire, contactez un revendeur. (36) sur la barre de direction montée au préalable (37). 2. Placez une rondelle en plastique (34) sur la barre de direction. 60 | FR www.scheppach.com...
  • Page 61 1. Mettez-vous sur le siège du conducteur (2). vers le haut. 2. Tirez le levier de réglage du siège (12) vers le haut 3. Vous pouvez à présent également tondre en et maintenez-le dans cette position. marche arrière. FR | 61 www.scheppach.com...
  • Page 62 (23), vous pouvez mettre en marche l’appareil de tourner quelques secondes. Si vous touchez les en la tournant sur « ON « ou l’arrêter en la tournant pièces en rotation, vous risquez de vous blesser en sur « OFF «. vous coupant. 62 | FR www.scheppach.com...
  • Page 63 En outre, les petites pierres et d’autres objets peuvent - La marche arrière est réservée aux situations né- être projetés à au moins 15 mètres. Cela peut en- cessaires ! dommager les voitures, habitations et fenêtres. FR | 63 www.scheppach.com...
  • Page 64 Le risque de renverse- 1. Retirez toute trace d’herbes, de feuilles, de lubri- ment ou de glissement augmente lorsque le sol est fiant et d’huile avant l’entreposage. Ne posez pas meuble ou humide. d’autres objets sur la tondeuse. 64 | FR www.scheppach.com...
  • Page 65 100 heures chaque fonctionne- de fonction- débranchant le connecteur (voir point 9.4.) utilisation ment nement Lame de remplace- contrôle contrôle tondeuse ment Fau- contrôle contrôle contrôle cheuse Pneu contrôle contrôle contrôle Frein contrôle contrôle contrôle FR | 65 www.scheppach.com...
  • Page 66 Si vos connaissances sont insuffisantes ou que vous chaque saison. Vérifiez toujours que les vis (h) sont manquez d’outils, contactez toujours un revendeur. bien serrées. 66 | FR www.scheppach.com...
  • Page 67 à pied du commerce (non four- Les pièces de rechange et accessoires sont disponibles nie) à intervalles réguliers. auprès de notre centre de services. Pour ce faire, scan- nez le QR Code figurant sur la page d’accueil. FR | 67 www.scheppach.com...
  • Page 68 Veuillez également observer les éven- l’Union européenne et visés par la directive euro- tuelles prescriptions nationales en vigueur. péenne 2012/19/UE. D’autres dispositions d’élimi- nation des appareils électriques et électroniques usagés peuvent s’appliquent dans les pays hors de l’Union européenne. 68 | FR www.scheppach.com...
  • Page 69 Réduction de la puissance rapport à la hauteur de coupe augmenter la hauteur de coupe du moteur pendant la tonte Puissance de freinage • Le frein n’est plus réglé correctement • Contacter le commerçant spécialisé/le insuffisante service après-vente FR | 69 www.scheppach.com...
  • Page 70 Utilizzare una protezione per gli occhi e per l’udito! Presa di ricarica! Caricare il trattorino tosaerba a batteria solo ad una temperatura ambiente compresa tra 0 e 40°C. Regolazione dell‘altezza di taglio min. max. Livello di potenza sonora garantito. 70 | IT www.scheppach.com...
  • Page 71 Funzioni del pannello di comando (Fig. 12, Fig. 1) ....81 Funzionamento ................82 Ricarica e stoccaggio ..............84 Trasporto ................... 85 Pulizia e manutenzione ............. 85 Smaltimento e riciclaggio ............87 Risoluzione dei guasti ............... 89 Dichiarazione di conformità ............131 IT | 71 www.scheppach.com...
  • Page 72 1. Introduzione Si declina ogni responsabilità in caso di incidenti o danni dovuti al mancato rispetto delle presenti istru- zioni per l‘uso e delle indicazioni di sicurezza. FABBRICANTE: Scheppach GmbH 2. Descrizione dell’apparecchio Günzburger Straße 69 89335 Ichenhausen, Germania Volante...
  • Page 73 • Non permettere mai ai bambini o ai ragazzi di età comunque in strutture pubbliche, parchi, impianti inferiore ai 16 anni di utilizzare l‘apparecchio. Le sportivi, né in campo agricolo e forestale. norme locali possono stabilire l‘età minima dell‘u- tilizzatore. IT | 73 www.scheppach.com...
  • Page 74 • Quando si lavora in gruppo, bisogna sempre comu- scivolo durante il lavoro. Non lavorare mai ad esem- nicare per tempo agli altri ciò che si intende fare. pio a piedi nudi o con i sandali. Mantenere la distanza di sicurezza! 74 | IT www.scheppach.com...
  • Page 75 • Tenere il cavo di ricarica della batteria fuori dalla nutenzione accurata si bloccano con una frequenza portata dei bambini. minore e sono più agevoli da controllare. IT | 75 www.scheppach.com...
  • Page 76 L‘uso di altre batterie ricaricabili si utilizza il prodotto o si sostituiscono gli accessori. può causare lesioni e pericolo di incendio. L’osservanza di queste istruzioni per l’uso riduce il rischio di incendi, scosse elettriche e lesioni perso- nali. 76 | IT www.scheppach.com...
  • Page 77 Si prega di notare che fili e cavi duttivi o nastro adesivo. Le batterie danneggiate possono rimanere impigliati nelle lame. o che perdono non devono essere trasportate. Per ulteriori informazioni, contattare la propria società di trasporti. IT | 77 www.scheppach.com...
  • Page 78 • quando la lama falciatrice incontra un oggetto estra- Pressione aria ruote posteriori......1,9 bar neo. Verificare la presenza di danni alla macchina Peso totale............165 kg e all’attrezzo da taglio e far eseguire le riparazioni necessarie prima di ricominciare, 78 | IT www.scheppach.com...
  • Page 79 - In caso di inosservanza, le prestazioni del prodotto sona a persona. potrebbero subire una riduzione e le parti potreb- bero allentarsi. - La mancata osservanza di questa prescrizione in- valida la garanzia del produttore. IT | 79 www.scheppach.com...
  • Page 80 • stato impeccabile ed integrità dei dispositivi di pro- fiaggio degli pneumatici è pari a 2,7 bar per le ruo- tezione e del dispositivo di taglio, te anteriori (7) e a 1,9 bar per quelle posteriori (5). 80 | IT www.scheppach.com...
  • Page 81 Non puntate mai il fascio di luce verso gli 3. L’unità di taglio si spegne automaticamente in re- occhi di persone o animali! Pericolo di lesioni. tromarcia se non è attiva l’opzione taglio in retro- marcia (20). IT | 81 www.scheppach.com...
  • Page 82 • scarsa conoscenza degli effetti legati alle condizioni trattorino tosaerba a batteria avanza. del suolo, soprattutto in pendenza (vedere il punto 4. Per fermarsi, rilasciare il pedale Avanti (10) e pre- 11.6.3 “Lavoro su terreni in pendenza”), mere il pedale del freno (8). 82 | IT www.scheppach.com...
  • Page 83 IMPORTANTE: Per il trasporto, l’attrezzo da taglio lesioni gravi o addirittura mortali. deve essere sempre posizionato nella posizione più • Per motivi di sicurezza, l’apparecchio non deve es- alta (livello 7). sere utilizzato su pendenze superiori a 10° (17,6%). IT | 83 www.scheppach.com...
  • Page 84 (30) nel blocchetto di accensione (23) in 2. Assicurarsi di caricare la batteria dell’apparecchio posizione “OFF”. Quindi rimuovere la chiave di quando non viene utilizzata per un lungo periodo accensione (30) dal blocchetto di accensione (23). di tempo. 84 | IT www.scheppach.com...
  • Page 85 (grasso). ogni 100 dopo ogni dopo 25 ore Pulire sempre il cesto di raccolta. ore di utilizzo di esercizio esercizio Lame per verificare verificare sostituire falciatrice Barra verificare verificare verificare falciante IT | 85 www.scheppach.com...
  • Page 86 Mantenere sempre il trattorino tosaerba a batteria e rezza e per ottenere un risultato di taglio perfetto. gli attrezzi montati in buono stato di servizio; tutti i dispositivi di sicurezza devono essere presenti e in perfetto stato di servizio. 86 | IT www.scheppach.com...
  • Page 87 Contattare a tale proposito il servizio clienti del produttore. * non necessariamente compreso nell‘ambito della fornitura! IT | 87 www.scheppach.com...
  • Page 88 • Quanto esposto si applica solo a batterie e accu- mulatori distribuiti in un paese dell’Unione Europea e soggetti alla Direttiva europea 2006/66/CE. Nel paesi al di fuori dell’Unione Europea possono ap- plicarsi norme diverse per lo smaltimento di batte- rie e accumulatori. 88 | IT www.scheppach.com...
  • Page 89 • Ridurre la velocità di avanzamento e Calo di potenza del motore rispetto all‘altezza di taglio aumentare l‘altezza di taglio durante la falciatura • Freno non regolato più correttamente • Contattare un rivenditore specializzato/ Potenza del freno servizio clienti insufficiente IT | 89 www.scheppach.com...
  • Page 90 Držite šake i stopala dalje od rotirajućih noževa za košenje. Rabite štitnike sluha i štitnik za oči! Utičnica za punjenje! Akumulatorsku traktorsku kosilicu punite samo pri okolnoj temperaturi između 0 - 40 °C. Reguliranje visine rezanja min. maks. Zajamčena razina zvučne snage 90 | HR www.scheppach.com...
  • Page 91 Funkcije upravljačke ploče (sl. 12, sl. 1) ........100 Rukovanje .................. 101 Punjenje i skladištenje ............... 103 Transport ................... 104 Čišćenje i održavanje ..............104 Zbrinjavanje i recikliranje ............106 Otklanjanje neispravnosti ............107 Izjava o sukladnosti ..............131 HR | 91 www.scheppach.com...
  • Page 92 2. Opis uređaja 1. Uvod PROIZVOĐAČ: Upravljač Scheppach GmbH Vozačko sjedalo Günzburger Straße 69 Držač napitaka D-89335 Ichenhausen Regulator visine rezanja Stražnji kotači CIJENJENI KUPČE, Mehanizam za košenje želimo vam mnogo zadovoljstva i uspjeha pri radu s Prednji kotači novim uređajem.
  • Page 93 • za čišćenje nogostupa (usisavanje, ispuhivanje), droge, alkohola ili lijekova. Trenutak nepozornosti • za čišćenje snijega s pomoću mehanizma za ko- prilikom uporabe električnog alata može uzrokovati šenje, najteže ozljede. HR | 93 www.scheppach.com...
  • Page 94 U slučaju otklona nepozornosti može- • Ne radite s uređajem po kiši, nevremenu, a naroči- te izgubiti kontrolu nad uređajem. to ne u slučaju opasnosti od udara munje. 94 | HR www.scheppach.com...
  • Page 95 • Ako se električni alat rabi na otvorenom, uporabite žare. produžni kabel prikladan za vanjski prostor. Upora- ba produžnog kabela prikladnog za vanjski prostor smanjuje opasnost od električnog udara. HR | 95 www.scheppach.com...
  • Page 96 • Nosite zaštitne ili sigurnosne naočale s bočnim štit- pročitajte ove upute. Molimo sačuvajte upute za nikom. Rabite masku za lice prilikom rada u praš- kasniju uporabu. njavim uvjetima. 96 | HR www.scheppach.com...
  • Page 97 • ako nož za košenje udari u neko strano tijelo. Po- cama ili samoljepljivom trakom. Nije dopušteno tražite oštećenja na stroju i reznom alatu i zatražite transportirati oštećene ili zastarjele akumulatore. obavljanje potrebnih popravaka prije ponovnog po- Za dodatne informacije obratite se otpremniku. kretanja, HR | 97 www.scheppach.com...
  • Page 98 2. Provjerite je li opseg isporuke potpun. Visina rezanja ........... 38-114 mm 3. Provjerite postoje li na uređaju i priboru štete kod Reguliranje visine rezanja ......7-struko transporta. Širina rezanja ........... 76 cm 4. Skinite plastične osigurače. 98 | HR www.scheppach.com...
  • Page 99 2. Pritom se pobrinite za to da provrti budu jedan iznad drugoga. Po potrebi se obratite ovlaštenom distributeru. 3. Zatim provucite vijak M8x25 (29) kroz zakretnu motku i stavite maticu M8 (28). 4. Sada pritegnite vijak s pomoću čeljusnog ključa. HR | 99 www.scheppach.com...
  • Page 100 1. Sjednite na vozačko sjedalo (2). 3. Sada možete kositi i vozeći unatrag. 2. Povucite polugu regulatora sjedala (12) prema gore i držite je u tom položaju. 3. Sada sjedalo možete ispraviti prema naprijed ili prema natrag. 100 | HR www.scheppach.com...
  • Page 101 (23) možete uključiti “ON” ili isključiti “OFF” uređaj. - Pričekajte da se nož za košenje zaustavi. - Ne usporavajte rezni alat rukom. - Nosite zaštitne rukavice. - Držite rezni alat dalje od stopala. HR | 101 www.scheppach.com...
  • Page 102 • Provjerite kosilicu, nož za košenje i druge dijelove 1. Povucite gumb za uključivanje/isključivanje me- ako ste prešli preko stranog tijela ili ako uređaj vi- hanizma za košenje (17) prema gore. Mehanizam brira neuobičajeno jako. za košenje se uključuje. 102 | HR www.scheppach.com...
  • Page 103 • Prilikom rukovanja priključnim oruđima na padina- ma potreban je poseban oprez (promijenjena ras- Pobrinite se za to da je punjač potpun i neoštećen. podjela težine na uređaju). HR | 103 www.scheppach.com...
  • Page 104 Napomena: Najlakše ćete ukloniti prljavštinu i travu torske traktorske kosilice. odmah nakon košenja. Osušeni ostatci trave i prljav- štine mogu negativno utjecati na rad kosilice. Pro- vjerite jesu li iz kanala za izbacivanje trave očišćeni ostati trave i po potrebi ih uklonite. 104 | HR www.scheppach.com...
  • Page 105 9. Mehanizam za košenje sada možete iznijeti s de- uređaj bio siguran za rad. sne strane uređaja. 10. Radi ponovnog montiranja mehanizma za koše- Istrošene ili oštećene dijelove valja odmah zamijeniti nje obavite korake 1-9 obrnutim redoslijedom. zbog sigurnosnih razloga. HR | 105 www.scheppach.com...
  • Page 106 Europskoj direktivi 2012/19/EU. U državama izvan prirodnom trošenju, odnosno da su sljedeći dijelovi Europske unije mogu vrijediti drukčiji propisi za zbri- potrebni kao potrošni materijali. njavanje otpadnih električnih i elektroničkih uređaja. 106 | HR www.scheppach.com...
  • Page 107 • Brzina vožnje prevelika je u odnosu na • Smanjite brzinu vožnje i povećajte visinu tijekom košenja visinu rezanja rezanja • Kočnica nije više ispravno namještena • Obratite se ovlaštenom distributeru / Kočna snaga nije dovoljna servisnoj službi HR | 107 www.scheppach.com...
  • Page 108 Rok in nog ne približujte vrtečim se rezilom kosilnice. Uporabljajte zaščito za sluh in oči! Polnilna doza! Akumulatorsko traktorsko kosilnico polnite le, ko je temperatura okolice med 0 °C in 40 °C. Nastavitev višine reza min. maks. Zajamčeni nivo zvočne moči 108 | SI www.scheppach.com...
  • Page 109 Funkcije upravljalne plošče (sl. 12, sl. 1) ........118 Uporaba ..................119 Polnjenje in skladiščenje ............121 Prevoz ..................122 Čiščenje in vzdrževanje ............122 Odlaganje med odpadke in reciklaža ........124 Pomoč pri motnjah ..............125 Izjava o skladnosti ..............131 SI | 109 www.scheppach.com...
  • Page 110 1. Uvod 2. Opis naprave Volan PROIZVAJALEC: Scheppach GmbH Voznikov sedež Günzburger Straße 69 Držalo za pijačo D-89335 Ichenhausen Nastavitev višine reza Zadnja kolesa Kosilni mehanizem SPOŠTOVANI KUPEC, želimo vam veliko veselja in uspeha pri delu z vašo Sprednja kolesa novo napravo.
  • Page 111 če ste utrujeni ali pod • za drobljenje in sekljanje odrezkov dreves in žive vplivom drog, alkohola ali zdravil. Trenutek nepo- meje, zornosti pri uporabi električnega orodja lahko vodi • za čiščenje pločnikov (odsesavanje, odpihovanje), do resnih telesnih poškodb. SI | 111 www.scheppach.com...
  • Page 112 • Ne preobremenite naprave. Za svoje delo uporabi- • Z napravo ne delajte v dežju, nevihti in še posebej te temu namenjeno električno orodje. Z ustreznim ne, ko obstaja nevarnost udara strele. električnim orodjem lahko v podanem območju moči delate boljše in varneje. 112 | SI www.scheppach.com...
  • Page 113 Tekočina, ki izteka iz akumulatorja, lahko povzroči zaščitnim stikalom na okvarni tok (RCD-Residual draženje kože ali opekline. Current Device). Uporaba RCD zmanjša nevarnost električnega udara. SI | 113 www.scheppach.com...
  • Page 114 žico, kosti, igrače ali druge predmete. Ne pozabite, da se nit in žica lahko zatakneta za rezila. 114 | SI www.scheppach.com...
  • Page 115 • če naprava začne neobičajno vibrirati. Takoj pre- Varnostni napotki za vlečenje tovora verite. • Pri vlečenju ravnajte pametno. Pretežek tovor na • pri zapuščanju ali transportu naprave. klancu je nevaren. Pnevmatike lahko izgubijo opri- jem in povzročijo, da izgubite nadzor nad izdelkom. SI | 115 www.scheppach.com...
  • Page 116 1. Odprite embalažo in odstranite embalažni mate- Nastavitev višine reza ........7-kratno rial. Širina reza ............76 cm 2. Preverite, ali je obseg dostave celovit. 3. Preverite, če so se naprava in deli pribora poško- dovali med transportom. 4. Odstranite plastične varovalke. 116 | SI www.scheppach.com...
  • Page 117 3. Nato privijte vijak M8 x 25 (29) skozi krmilni drog napravi morate zamenjati. in namestite matico M8 (28). 4. Sedaj vijak privijte z viličastim ključem. Po potrebi se posvetujte s specializiranim trgovcem. SI | 117 www.scheppach.com...
  • Page 118 11.6.2, in previdno odpeljite, kot je tam opisano. trdno in udobno in boste zlahka dosegli upravljal- 2. Pritisnite stikalo za vklop/izklop tempomata (22). ne elemente. 3. Akumulatorska traktorska kosilnica se samodejno uravnava na vnaprej programirano hitrost, da do- sežete najboljše možne rezultate košnje. 118 | SI www.scheppach.com...
  • Page 119 Uporab- 1. Sedite na voznikov sedež (2). niku mora prodajalec ali druga pristojna oseba poučiti 2. Aktivirate jo tako, da do konca pritisnete zavorni o varni uporabi naprave. pedal (8) in pritisnete ročno zavoro (14). SI | 119 www.scheppach.com...
  • Page 120 Nato zapustite klanec v počasnem spu- stu in v poravnani smeri! • Na pobočjih naj bo linija košnje vedno prečno na pobočje. Drsenje kosilnice lahko preprečite tako, da jo postavite poševno navzgor. 120 | SI www.scheppach.com...
  • Page 121 4. Izklopite motor tako, da ključ za zagon (30) v klju- ne boste uporabljali, prekinite tokokrog tako, da čavnici za zagon (23) obrnete v položaj »OFF« izvlečete vtič (glejte točko 9.4). (IZKLOP). Nato izvlecite ključ za zagon (30) iz ključavnice za zagon (23). SI | 121 www.scheppach.com...
  • Page 122 • če ste z akumulatorsko traktorsko kosilnico zape- ki vključujejo telesne poškodbe ali poškodbe napra- ljali čez večji predmet, ki je lahko poškodoval na- ve. Če imate kakršna koli vprašanja, se obrnite na pravo, specializiranega trgovca. • če se motor nenadoma ustavi, 122 | SI www.scheppach.com...
  • Page 123 če je treba zamenjati enega od rezil kosilnice ali če je tre- Pooblastite servisno službo ali pooblaščenega stro- ba kosilni mehanizem prepeljati ali poslati na vzdrževanje! kovnjaka. Enako velja tudi za pribor. SI | 123 www.scheppach.com...
  • Page 124 • Akumulatorje in baterije lahko brezplačno oddate • Simbol prečrtanega smetnjaka pomeni, da električ- na naslednjih mestih: nih in elektronskih naprav ne smete odlagati med - Javno-pravna mesta za odstranjevanje odpad- gospodinjske odpadke. kov oz. zbirna mesta (npr. komunalna podjetja) 124 | SI www.scheppach.com...
  • Page 125 • Vozna hitrost je previsoka glede na • Zmanjšajte vozno hitrost in povečajte Padec moči motorja med višino reza višino reza košnjo • Zavora ni pravilno nastavljena • Obrnite se na specializiranega trgovca/ Nezadostna zavorna moč podporo za stranke SI | 125 www.scheppach.com...
  • Page 126 9. Andere Ansprüche, als die oben genannten, können nicht geltend gemacht werden. Die Garantiebedingungen gelten nur in der jeweils aktuellen Fassung zum Zeitpunkt der Reklamation und können ggf. unserer Homepage (www.scheppach.com) entnommen werden. Bei Übersetzungen ist stets die deutsche Fassung maßgeblich.
  • Page 127 www.scheppach.com...
  • Page 128 www.scheppach.com...
  • Page 129 www.scheppach.com...
  • Page 130 www.scheppach.com...
  • Page 131 EG - Konformitätserklärung Originalkonformitätserklärung EC Declaration of Conformity Déclaration de conformité EC Scheppach GmbH, Günzburger Str. 69, D-89335 Ichenhausen erklärt folgende Konformität gemäß EU-Richtlinie und Normen für deklaruje, ze produkt jest zgodny z nastepujacymi dyrektywami den Artikel UE i normami hereby declares the following conformity under the EU Directive pareiškia, taip atitiktis pagal ES direktyvos ir standartai šį...
  • Page 132 A költségek beillesztése az új részek a vevőnek. Átalakítása és hallgatólagos garancia a szállítás időpontját oly módon, hogy cserélje ki minden egyes része ezen csökkentése követelések és egyéb kártérítési igények ki vannak zárva. idő alatt észlelhető a sorban anyag-vagy gyártási legyen hiábavaló, ingyen. Az alkatrészeket, www.scheppach.com...

Ce manuel est également adapté pour:

5911410900