Publicité

Les langues disponibles
  • FR

Les langues disponibles

Liens rapides

MOTOCOLTIVATORE
MOTOR-CULTIVATOR
MOTOCULTEUR
MEHRZWECKGERÄT
MOTORNI KULTIVATOR
MLT03
Type:
Istruzioni d'uso
IT
Operating instructions
EN
FR
Mode d'emploi
DE
Bedienungsanleitung
Navodila za uporabo
SL

Publicité

Table des Matières
loading

Sommaire des Matières pour Eurosystems Evo MLT03

  • Page 1 MOTOCOLTIVATORE MOTOR-CULTIVATOR MOTOCULTEUR MEHRZWECKGERÄT MOTORNI KULTIVATOR Istruzioni d'uso Operating instructions Mode d’emploi MLT03 Bedienungsanleitung Type: Navodila za uporabo...
  • Page 2 Costruttore Numero di serie articolo – Progressivo Potenza in kW Manufacturer Serial number - Progressive Power in kW Manufacturer Constructeur Numéro de série article - Progressif Puissance en kW Hersteller Serienummer Fortlaufend Leistung in kW Model: xxxx-xxxxxxxxxxx Proizvajalec Serijska številka – progresivno Zmogljivost v kW Type: xxxxx xxxx | xxxxxxxxxxxx Nr.: xxxxxxxxx-xxxxxx...
  • Page 6 POSIZIONE 1 POSIZIONE 2 POSITION 1 POSITION 2 POLOŽAJ POLOŽAJ...
  • Page 7 FRESA - ROTAVATOR - FRAISE - FRÄSE - FREZA BARRA FALCIANTE e FALCIATUTTO - CUTTING BAR and GRASSLAND MOWER BARRE DE COUPE et DEBROUSSAILLEUSE - MESSERBALKEN und SICHEL-MÜLCHMÄHER REZILO in KOSILNICA ZA TRAVNATE POVRŠINE...
  • Page 10 90° 25°...
  • Page 12 Indice marce Speed index Innesto attrezzo Leggere il manuale prima di usare la macchina. Index marches Read the instructions manual before operating on the Cutter bar clutching Angabe machine. Embrayage barre Kazalo hitrosti Lire le mode d'emploi avant l'usage. Lesen Sie die Gebrauchsanweisung vor der Inbetriebnahme. Mähbalkenantrieb Pred uporabo naprave preberite navodila za uporabo.
  • Page 13 DATI TECNICI - TECHNICAL DETAILS - DONNEES TECHNIQUES - TECHNISCHE DATEN - TEHNIČNI PODATKI Per informazioni sul motore consultare lo specifico manuale, allegato alla documentazione del motocoltivatore. For further information about the engine, please check on the relevant instructions booklet you can find with the motor cultivator instructions. Pour plus amples informations sur le moteur consulter le manuel fourni en annexe de la documentation du motoculteur.
  • Page 14 Istruzioni d’uso originali INTRODUZIONE Indice Gentile Cliente, la ringraziamo per la fiducia accordata al nostro prodotto, le auguriamo un piacevole e sicuro utilizzo di questa macchina. Questo libretto contiene tutte le informazioni per un uso corretto e senza problemi, perciò si consiglia di leggere attentamente le NORME DI SICUREZZA e le ISTRUZIONI D’USO qui di seguito riportate, per avere un funzionamento senza inconvenienti e una durata sicura, della macchina, nel tempo.
  • Page 15: Dispositivo Di Sicurezza

    calzature antinfortunistiche e pantaloni lunghi. Fare attenzione, la fresa in movimento è potenzialmente pericolosa per mani e piedi. Importante inoltre camminare e non correre durante il lavoro. 6. Per trasportare la macchina spegnere il motore. 7. Tutte le operazioni di servizio devono essere effettuate con motore spento. Rimuovere la candela! 8.
  • Page 16 corrispondere i fori. Fissare i due elementi (6 e 1), inserendo la vite (8) ed il passacavo (9) nel foro superiore del manubrio attraverso il distanziale (7), già posizionato all’interno del supporto (1). Completare il fissaggio aggiungendo l’altro passacavo (9) e serrare con il dado (10). Procedere inserendo la vite (14) nel pomolo (13), la rondella (12) e la rondella a croce (11), nell’ordine come rappresentato in figura, in prossimità...
  • Page 17 REGOLAZIONE DEL MANUBRIO (Fig.10) Il manubrio del motocoltivatore è orientabile sia lateralmente che in altezza. E’ consigliabile, prima di iniziare qualsiasi tipo di lavoro, regolare il manubrio alle esigenze dell’operatore per rendere il motocoltivatore facilmente manovrabile. L’orientamento laterale del manubrio permette all’operatore di non calpestare il terreno già lavorato e di non danneggiare la vegetazione. Posizionare il manubrio sopra al motore per utilizzare la barra falciante od il falciatutto.
  • Page 18 Per innestare la marcia avanti o la retromarcia occorre sbloccare il fermo di sicurezza (3) premendo verso il basso e successivamente tirare la leva frizione (4). Per avanzare con l’attrezzo innestato occorre che le leve (2) e (4) siano azionate contemporaneamente. Dispositivo di sicurezza e disattivazione (Fig.11) Al rilascio di ciascuna leva (2) e (4) si interrompe immediatamente la funzione che era innestata in precedenza.
  • Page 19 IMPORTANTE! Per evitare l’inquinamento delle falde acquifere, l’olio esausto non deve essere gettato in scarichi fognari o canali idrici. Depositi per l’olio esausto sono ubicati presso tutti i distributori di benzina, oppure in discariche autorizzate secondo le normative comunali del Comune di residenza.
  • Page 20 Translation of original user instructions INTRODUCTION List of contents Dear Customer, thank you for your trust in purchasing our product .We hope you will spend many enjoyable hours using it. The present instructions are issued to ensure a right and correct use of the product : for this reason we beg you to carefully follow such working and safety instructions so that the machine could operate with your complete Introduction satisfaction and have a long service life.
  • Page 21: Safety Device

    Be very careful, when working, the blade is potentially hazardous for hands and feet. Always walk and never run while operating the machine. 6. To transport the machine on its set of wheels , switch the engine off and wait until the cultivator blades stop. 7.
  • Page 22 handlebar support (1) screw it turning it clockwise. HANDLEBAR ASSEMBLY (Fig. 3) Take the handlebar (6) out from the packaging and fix it to the upper end of the support (1) making the handlebar slots to match to the ones on the support. Tighten the two elements ( 6 and 1) inserting screw (8) and the cable-guide (9) into upper slot of the handlebar and through the spacer (7).
  • Page 23 BELT-STRETCHER CONTROL ADJUSTMENT (Fig. 9) Warning - wheels should start rotating only when control lever is beyond half travel. When lever is pulled to full extent (working position), the belt-stretcher load spring (2) should extend by 6 to 8 mm approx. For above described conditions to be reached, action is to be taken on adjuster (1) set close to the belt stretcher control assembly.
  • Page 24 - to engage the forward or reverse gear, release the safety device (3) by pressing downwards and then pull the clutch lever (4). How to operate the unit – unit + fitting (Fig.11) - switch the engine on. - to move the gearbox lever (A) to the direction of the desidered gear ( single/reverse gear) until the gear is inserted. - disconnect the safety lever (1) rotating it to the top then lower the fitting insertion lever (2).
  • Page 25 GARAGING AND SCHEDULED MAINTENANCE (Fig. 16) When the motor cultivator is stored without equipment ( like rotavator, grassland mower, cutting bar , etc..) it should be positioned as shown in the picture. Please put under the engine the polystyrene (1) you can find into the packaging or any other support showing a vertical side at least 14 cm.
  • Page 26 Traduction du mode d’emploi original INTRODUCTION Index Cher client, Nous vous remercions pour la confiance que vous nous avez accordée en acquérant un de nos produits, nous vous souhaitons une utilisation agréable et sûre de cette machine. Ce manuel contient toutes les informations nécessaires à...
  • Page 27: Dispositif De Securite

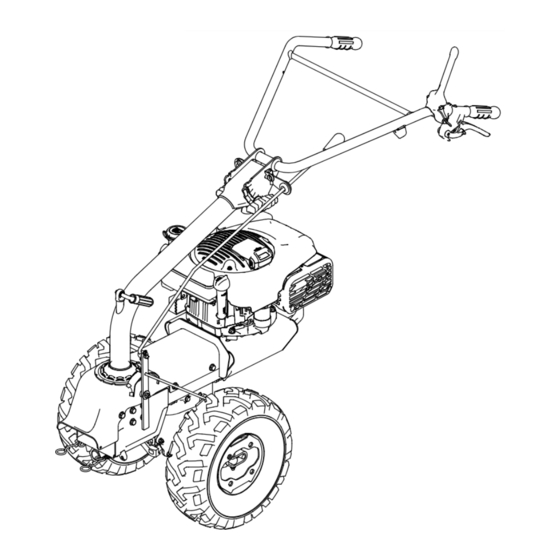
    3. Retirer les corps étrangers du terrain avant de commencer les opérations de fauchage ou de binage. Ne tondez qu’à la lumière du jour ou en présence d’un bon éclairage. 4. Ne pas mettre en marche la machine lorsque l’on se trouve devant les fraises ou la barre de coupe. En tirant la cordelette de démarrage du moteur les fraises ou la barre de coupe ne doivent pas se mettre en marche.
  • Page 28 palette. Le poids de la machine est indiqué sur l’étiquette de marquage et reporté dans les données techniques. MONTAGE DU MOTOCULTEUR Pour compléter le montage du motoculteur observer la procédure suivante. MONTAGE SUPPORT GUIDON (Fig. 3) Retirer de son emballage le support du guidon (1) et le positionner sur la machine en faisant attention à...
  • Page 29: Emplacement Attelage Outil (Fig.8 A) Reglage De La Commande Tendeur De Courroie (Fig.9)

    fonction de l’outil positionné. Toute la procédure est décrite dans les manuels d’utilisation et d’entretien des outils relatifs. EMPLACEMENT ATTELAGE OUTIL (Fig.8 A) après chaque utilisation nettoyer et graisser l’emplacement (2) avec un graisseur (1). REGLAGE DE LA COMMANDE TENDEUR DE COURROIE (Fig.9) Attention - Les roues doivent commencer à...
  • Page 30: Tension Automatique De La Courroie (Fig.12)

    MODE D’EMPLOI Une fois les opérations de montage et de réglage effectuées le motoculteur est prêt à travailler. ATTENTION: avant de démarrer le moteur toujours contrôler que la machine soit en parfaite condition de fonctionnement. Fonction de marche uniquement de la machine. (Fig.11) - Démarrer le moteur - Déplacer le levier de vitesse (A) dans la direction de marche désirée, tant que la vitesse n’a pas été...
  • Page 31: Niveau Sonore Et Vibration

    - Monter l’accessoire formé par le support de la masse (5) et la masse d’équilibrage (6). - Insérer l’accessoire dans le support du moteur (2) comme représenté dans la figure. A ce stade il est possible de travailler sur des terrains inclinés sans créer de dommage au moteur. REMISAGE ET ENTRETIEN PERIODOQUE (Fig.
  • Page 32: Sicherheitsbestimmungen

    Übersetzung der originalen Betriebsanleitung EINLEITUNG Index Sehr geehrter Kunde, wir danken Ihnen für das Vertrauen, das Sie unserem Produkt geschenkt haben, und wir wünschen Ihnen eine angenehme und sichere Benutzung dieses Gerätes. Dieses Handbuch enthält alle Informationen für einen korrekten und problemlosen Gebrauch; deshalb raten wir Ihnen die Einleitung SICHERHEITSHEITSBESTIMMUNGEN und BETRIEBSANLEITUNGEN aufmerksam zu lesen, damit die Funktionsweise des Gerätes auf lange Sicht störungsfrei und sicher gewährleistet ist.
  • Page 33 Verwenden Sie auch einen Ohrenschutz, um Ihr Gehör zu schützen. Achtung, die laufende Fräse kann für die Hände und Füße gefährlich sein. Wichtig: Bei der Arbeit gehen und nicht schnell laufen. 6. Schalten Sie den Motor beim Transport der Maschine aus. 7.
  • Page 34: Montage Des Starterkabels (Abb. 4)

    Bitte achten Sie darauf, dass die Aussparung (2) des Lenkholms mit dem Arretierbolzen an der Maschine (3) übereinstimmt. Führen Sie die Knebelschraube (5) durch die Hülse (5B) des Lenkholms (1) und drehen es im Uhrzeigersinn. MONTAGE DES LENKHOLMS (Abb.3) Den Lenkholm (6) aus der Verpackung nehmen und am oberen Ende der Lenkstange (1) so positionieren, dass die Bohrungen aufeinander passen.
  • Page 35 Der gesamte Vorgang wird in den entsprechenden Gebrauchs- und Wartungsanweisungen der Geräte beschrieben. SITZ GERÄTEHALTERUNG (Abb.8 A) Den Sitz (2) nach jeder Benutzung mit der Schmierbüchse (1) reinigen und einfetten. EINSTELLUNG DER SPANNVORRICHTUNG (Abb. 9) Achtung: Die Räder dürfen sich erst dann drehen, wenn der Steuerhebel die Hälfte seines Hubs überschritten hat.
  • Page 36 - Motor starten - Den Schalthebel (A) in die Richtung des gewünschten Gangs bewegen bis dieser Gang eingestellt ist. - Um den Vor- oder Rückwärtsgang zu betätigen, muss der Sicherheitsriegel (3) gelöst werden, in dem man diesen nach unten drückt. Anschließend den Kupplungshebel (4) ziehen.
  • Page 37 - Das Zubehör in das Motorlager (2) einfügen, wie in der Abbildung dargestellt. Jetzt ist es möglich, auf abfallendem Untergrund zu arbeiten ohne den Motor zu beschädigen. REGELMÄSSIGE INSTANDHALTUNG UND WARTUNG (Abb. 16) Wird die Grundmaschine ohne Anbaugerät z. B. Anbaufräse, Sichel-Mulchmäher, usw.
  • Page 38 Prevod izvirnih navodil za uporabo PREDSTAVITEV Kazalo vsebine Dragi uporabnik, zahvaljujemo se vam za vaše zaupanje, ki ste nam ga izkazali z nakupom našega izdelka. Upamo, da boste pri njegovi uporabi preživeli veliko prijetnih uric. Ta navodila za uporabo so izdana za zagotavljanje pravilne in Predstavitev ustrezne uporabe izdelka: iz tega razloga vas prosimo, da pazljivo sledite delovnim in varnostnim navodilom, za nemoteno delovanje in dolgo življenjsko dobo vaše naprave.
  • Page 39 5. Med delovanjem je potrebno uporabljati ščitnike za ušesa, ustrezno obutev in dolge hlače. Bodite zelo pazljivi pri delu, rezilo je lahko nevarno za roke in noge. Med upravljanjem z napravo ni dovoljeno teči, ampak zgolj hoditi. 6. Za premikanje naprave na priloženih kolescih, izključite motor in počakajte dokler se rezila povsem ne ustavijo. 7.
  • Page 40 se osrednja utora (2) nosilca krmila ujemata z zatičem (3). Namestite ročico na navojnem koncu (5) v režo (5B) nosilca nosilca krmila (1), obračajte v smeri urinega kazalca. MONTAŽA KRMILNE ROČICE (slika 3) Vzemite krmilno ročico (6) iz embalaže in jo pritrdite na zgornji konec nosilca (1) in uskladite odprtine na ročici s tistimi na nosilcu.
  • Page 41 (2) raztegniti za pribl. 6 do 8 mm. Za doseganje opisanih pogojev je potrebno namestiti regulator (1) v bližini napenjalca jermena. PRILAGODITEV KRMILNE ROČICE (slika 10) Krmilno ročico motornega kultivatorja je mogoče nastaviti glede na stran in višino. Pred pričetkom z delom je potrebno prilagoditi krmilno ročico glede na potrebe uporabnika, za lažje upravljanje z napravo. Bočni nagib krmilne ročice omogoča upravljalcu izogibanje obdelanim površinam ter preprečuje mečkanje rastja.
  • Page 42 - vključite motor. - premaknite vzvod menjalnika (A) v smeri želene prestave (naprej/vzvratno) dokler ni prestava nastavljena. - izključite varnostni vzvod (1) z vrtenjem navzgor, nato pa znižajte vzvod za vstavljanje priključkov (2). - za vklop prestave naprej ali nazaj, sprostite varnostno napravo (3) s pritiskom navzdol in nato povlecite ročico sklopke (4). Za premikanje ustreznih priključkov naprej in nazaj je potrebno uporabljati vzvoda (2) in (4) istočasno.
  • Page 43: Odpravljanje Napak

    pozorni tudi pri menjavi olja v motorju ter pri montaži in demontaži opreme. POZOR! Uporabljenega olja ni dovoljeno odlagati v odtok ali vodovodni sistem, zaradi preprečevanja onesnaženja pitne vode. Večina garaž uporablja zbiralnike uporabljenega olja, mogoče pa je uporabiti tudi pooblaščene krajevne zbiralnike. Preverite, da so vse matice, vijaki in vtiči ustrezno pritrjeni, zaradi zagotavljanja nemotenega in varnega delovanja naprave.
  • Page 44 03/2020 cod. 400065051...

Table des Matières