Publicité

Les langues disponibles
  • FR

Les langues disponibles

Liens rapides

MOTOZAPPA ELETTRICA
ELECTRIC MOTORHOE
ELEKTRISCHE MOTORHACKE
MOTOBINEUSE ELECTRIQUE
MOTOAZADA ELECTRICA
MZP02
Type:
IT
Istruzioni d'uso
EN
Operating instructions
DE
Bedienungsanweisung
FR
Mode d'emploi
ES
Instrucciones de uso

Publicité

Table des Matières
loading

Sommaire des Matières pour Eurosystems MZP02

  • Page 1 MOTOZAPPA ELETTRICA ELECTRIC MOTORHOE ELEKTRISCHE MOTORHACKE MOTOBINEUSE ELECTRIQUE MOTOAZADA ELECTRICA Istruzioni d'uso Operating instructions Bedienungsanweisung Mode d'emploi MZP02 Instrucciones de uso Type:...
  • Page 5 Numero di serie articolo – Progressivo Peso Manufacturer Serial number - Progressive Weight Serienummer Fortlaufend Gewicht Numéro de série article - Progressif Masse Model: xxxxxxxxx | xxxxxxxxxxxx Número de serie artículo – Progresivo Masa Nr.: xxxxxxxxx-xxxxxx Type: xxxxx xxxx Codice indentificativo prodotto Potenza Date: aaaa / E Product identification code...
  • Page 6 Leggere attentamente il libretto uso e istruzione prima di usare la macchina - Read the instructions manual before operating on the machine - Lesen Sie die Gebrauchsanweisung vor der Inbetriebnahme - Lire le mode d'emploi avant l'usage - Leer atentamente el manual de instrucciones antes de utilizar la máquina.
  • Page 7 Istruzioni d’uso originali INTRODUZIONE Indice Gentile cliente, vogliamo anzitutto ringraziarla per la preferenza accordata ai nostri prodotti e ci auguriamo che l’uso di questa macchina le riservi grandi soddisfazioni e risponda appieno alle sue aspettative. Questo manuale è stato redatto per consentirle di conoscere bene la sua macchina e di usarla in condizioni di Introduzione sicurezza ed efficienza.
  • Page 8 ATTENZIONE: prima del montaggio e la messa in funzione leggere attentamente il libretto istruzione. Le persone che non conoscono le norme di utilizzazione non possono usare la macchina. 1. L’ uso della macchine è vietato ai minori di 16 anni e alle persone che hanno assunto alcol, medicine o droghe. 2.
  • Page 9 presenti nella busta accessori all’interno della scatola imballo. Fig. 2/b) Inserire l’aggancio ferma filo (12) nel tubo stegola destro e successivamente fare passare il cavo di alimentazione come in figura. MONTAGGIO INTERRUTTORE (Fig. 3) Fissare l’interruttore inserendo i due perni in plastica nei fori della stegola come in figura. Richiudere l’interruttore e fissarlo con le due viti autofilettanti in dotazione nella busta accessori.
  • Page 10 MANUTENZIONE – PULIZIA (Fig. 8) ATTENZIONE: prima di eseguire operazioni di pulizia o rimozione di corpi estranei bisogna sempre staccare ogni collegamento alla rete elettrica. Montando le frese, la parte tagliente dei coltelli deve essere orientata nel senso di rotazione delle frese. Le 2 spine di fissaggio devono essere orientate come indicato nella figura.
  • Page 11 AVVERTENZE PER LA PROTEZIONE DELL’AMBIENTE Non smaltire insieme ai rifiuti solidi urbani, ma raccogliere separatamente. Le sostanze ed i componenti elettrici contenuti nel presente apparecchio ,se abbandonati o utilizzati in modo improprio, potrebbero rivelarsi dannosi per l’ambiente. Il simbolo del “ bidone della spazzatura su ruote barrato con una barra nera raffigurata sotto il bidone”...
  • Page 12 Translation of original user instructions INTRODUCTION List of contents Dear Customer, Firstly, we wish to thank you for having chosen our products and hope that the use of this machine will be extremely satisfying for you and fully meet your expectations. This manual has been drawn up to allow your to get to know your machine well and use it in safe and efficient conditions;...
  • Page 13 1. Persons who are not familiar with the operating manual, as well as children, adolescents under the age of 16 and persons under the influence of alcohol, drugs or medication must not operate the mower. 2. The unit was designed in order to be used by 1 trained operator only. The person using the mower is responsible for any accidents involving other persons or their property.
  • Page 14 c) link the two handles (1-2) to the tube (3): make such operation adding the parts (6), fixing with the screws (4), the washers (7) and the handles (5). Fig. 2/b) Insert the wire cable holder (12) into the right handlebar tube, then make the wire to pass-by as shown in the picture. All components are included in the packaging.
  • Page 15 MAINTENANCE – CLEANING ( Fig. 8) ATTENTION: before starting any work or maintenance on the machine, disconnect all electrical connections. When you assemble the rotavator, the knives cutting part should be oriented clockwise. The tightening pins must be fixed as shown in picture (8). In order to remove a stone or other object, embedded by chance into the tines, take the pins away (1).
  • Page 16: Safeguarding The Environment

    SAFEGUARDING THE ENVIRONMENT Do not dispose together with the solid urban waste, but collect and dispose separately. The components and the electrical wirings which are contained in the present unit can be dangerous to the environment if they are improperly discarded or misused . The symbol of a “wheeler- dustbin crossed and with a black bar shown under the dustbin”...
  • Page 17 Übersetzung der originalen Betriebsanleitung Einleitung Inhaltsverzeichnis Sehr geehrter Kunde, Wir danken Ihnen, dass Sie sich für einen unserer Artikel entschieden haben und hoffen, dass dieser voll und ganz Ihren Erwartungen entspricht. Die vorliegende Gebrauchsanleitung soll Ihnen dabei helfen, den Betrieb Ihres Geräts zu verstehen und dieses unter Berücksichtigung Ihrer persönlichen Sicherheit zu verwenden.
  • Page 18 SICHERHEITS- UND UNFALLVERHÜTUNGSBESTIMMUNGEN Auf der Maschine und in diesem Handbuch stehen einige Meldungen und Angaben, die von diesem Signal begleitet werden. Sie geben das Vorhandensein einer potentiellen Gefahr an, so dass es angemessen ist, der eigenen Sicherheit und der Sicherheit derer wegen, die sich in der Reichweite der Maschine befinden könnten, eine besondere Vorsicht walten zu lassen.
  • Page 19: Montage Des Schalters (Abb. 3)

    MONTAGE Mit Ausnahme anderweitiger Vereinbarungen wird die Motorhackmaschine abmontiert, in einer zweckdienlichen Verpackung geliefert. Die Motorhackmaschine wie folgt zusammenbauen. MONTAGE DER LENKHOLME (Abb. 2-2/b) Das Tragrohr der Lenkholme (3) in die beiden Löcher des Gestells (11) stecken und mit den beiden Schrauben (8), den vier Unterlegscheiben (9) und den zwei Muttern (10) befestigen.
  • Page 20 STARTEN DER MOTORHACKE - Stecker in Steckdose (230 Volt) stecken. - Das Kabel in den Drahthalter und dann (Abb.2/b Teil 12 ). - Den Knopf (1) drücken und den Hebel ziehen (2). (Abb. 4) - Nach dem Motoranlaß den Knopf (1) freigeben, indem man den Hebel (2) gedrückt hält. ANMERKUNG: Beim Starten hat der Elektromotor nicht das selbe Drehmoment eines Explosionsmotors;...
  • Page 21 Schallleistungspegel gemäß : L 85 dB (A) , Messunsicherheit K = ±1,1 dB (A). Garantierter Schallleistungspegel gemäß : L 93 dB (A) Vibration an den rechten Lenkholmen : a = 0,83 m/s² ; a = 2,47 m/s² ; a = 0,60 m/s² hw,x hw,y hw,z...
  • Page 22 Traduction du mode d’emploi original PRESENTATION Table des matières Cher Client, Nous désirons avant tout vous remercier de la préférence que vous avez accordée à nos produits et nous espérons que l’utilisation de cette machine vous réservera de grandes satisfactions et répondra pleinement à votre attente.
  • Page 23: Règles De Sécurité Et Contre Les Accidents Du Travail

    RÈGLES DE SÉCURITÉ ET CONTRE LES ACCIDENTS DU TRAVAIL Sur la machine et à l’intérieur de cette notice sont présentes des inscriptions et des indications suivies de ce signal dont le but est d’indiquer la présence d’un danger potentiel: il est par conséquent opportun d’agir avec prudence afin de garantir sa propre sécurité...
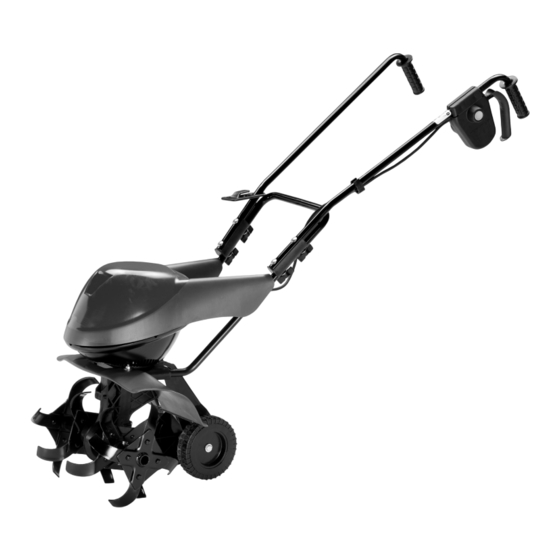
  • Page 24: Montage Des Mancherons : (Fig. 2-2/B)

    MONTAGE DES MANCHERONS : (fig. 2-2/b) introduire le tube du mancheron inférieur (3) dans les 2 trous du châssis (11) et le fixer avec deux vis (8) , quatre rondelles (9) et deux écrous (10) . Relier au tube (3) les deux mancherons (1-2) les 2 mancherons ne doivent pas se toucher;...
  • Page 25: Caracteristiques Techniques

    Pour éteindre la machine et pour arrêter les fraises, il faut relâcher le levier (fig.4 part. 2). ENTRETIEN HUILE (Fig.7) En général , l’huile doit être changée toutes les 60 heures de travail. Procéder comme suit : desserrer le bouchon à...
  • Page 26: Recommandation Pour La Protection De L'environnement

    RECOMMANDATION POUR LA PROTECTION DE L’ENVIRONNEMENT Ne pas traiter avec les ordures ménagères habituelles . Il faut les porter en déchetterie séparément. Les substances et les composants électriques abandonnés ou utilisés en usage impropre pourraient se révéler nocifs pour l’environnement. Le symbole de”...
  • Page 27 Traducción del manual de instrucciones original INTRODUCCIÓN Contenido Estimado Cliente, Ante todo queremos darle las gracias por la preferencia que nos ha acordado al elegir nuestros productos y deseamos que el uso de esta máquina le reserve grandes satisfacciones y corresponda plenamente con sus expectativas.
  • Page 28: Instrucciones De Seguridad

    INSTRUCCIONES DE SEGURIDAD Sobre la máquina y dentro de este manual, hay indicaciones señaladas por este símbolo que avisan la posibilidad de peligro. Por ello es necesario ser prudentes por la propria y la ajena seguridad (durante el trabajo, ter cuidado con los que pueden encontrarse en el radio de acción de la máquina).
  • Page 29: Puesta En Marcha De La Motoazada

    MONTAJE DEL MANILLAR (Fig.2-2/b) Insertar el tubo del manillar inferior (3) en los agujeros (11) sujetándolo con dos tornillos (8), cuatro arandelas (9) y dos tuercas (10). Adjuntar al tubo (3) los dos manillares (1-2) separados por las piezas (6) y sujetados por los tornillos (4), las arandelas (7) luego montar los puños (5).
  • Page 30 levantada respecto al suelo haciendo presión sobre el espolón (fig. 6). Un vez que las fresas han llegado a su máxima velocidad, será posible trabajar poniendolas a contacto con el suelo. Para parar la máquina y desactivar las fresas, dejar la palanca (fig. 4 part.2). CAMBIO DE ACEITE (Fig.
  • Page 31 ACCESÓRIOS OPCIONALES Aireador con muelles: se monta en lugar de las fresas para quitar el musgo del jardín. Lastre: se monta sobre la máquina para fresar más en profundidad. Aporcador con alas fijas: se utiliza para hacer surcos en el suelo antes de la siembra. Está...
  • Page 32 Cod. 39.0065.060 03/2020...

Table des Matières