Sharp MD-E9000H Mode D'emploi
Table des Matières
Les langues disponibles
Les langues disponibles
MD KOMPAKT KOMPONENTEN SYSTEM
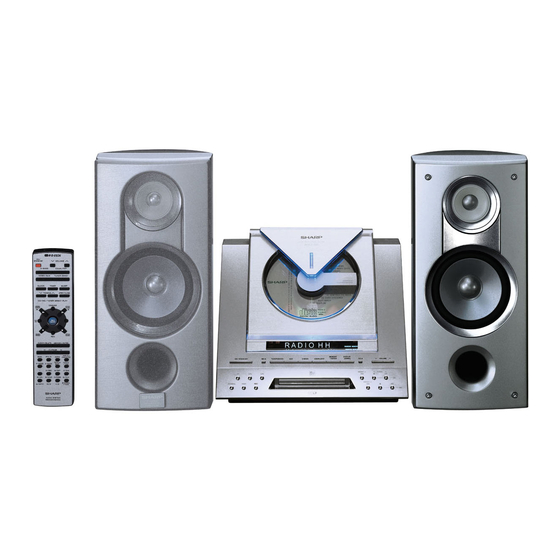
CHAÎNE COMPACTE MD
SISTEMA COMPACTO MD
MD KOMPAKT KOMPONENTSYSTEM
SISTEMA COMPACT MD
MD COMPACT COMPONENTENSYSTEEM
MD COMPACT COMPONENT SYSTEM
MODELL
MODELLO
MODÈLE
MODEL
MODELO
MODEL
MODELL
MD-E9000H
BEDIENUNGSANLEITUNG
MANUALE DI ISTRUZIONI
MODE D'EMPLOI
GEBRUIKSAANWIJZING
MANUAL DE MANEJO
OPERATION MANUAL
BRUKSANVISNING
*01-F-MD9000H(SEEG)
1
MD Kompakt Komponenten System MD-E9000H besteht aus MD-E9000H (Hauptgerät) und
CP-E9000H (Lautsprechersystem).
Chaîne compacte MD MD-E9000H composé de MD-E9000H (appareil principal) et de
CP-E9000H (enceintes acoustiques).
Sistema compacto MD MD-E9000H que consta de MD-E9000H (aparato principal) y
CP-E9000H (sistema de altavoces).
MD-E9000H MD Kompakt Kompontsystem av MD-E9000H (huvudenhet) och
CP-E9000H (högtalarsystem).
Sistema compact MD MD-E9000H consiste di MD-E9000H (apparecchio principale) e
CP-E9000H (diffusori).
MD-E9000H MD compact componentensysteem bestaande uit MD-E9000H (hoofdtoestel) en
CP- E9000H (luidsprekersysteem).
MD-E9000H MD Compact Component System consisting of MD-E9000H (main unit) and
CP-E9000H (speaker system).
DEUTSCH
······ Siehe Seiten i bis vi und D-1 bis D-46.
FRANÇAIS
······ Se reporter aux pages i à vi et F-1 à F-46.
ESPAÑOL
······ Consulte las páginas i a vi y S-1 a S-46.
SVENSKA
······ Hänvisa till sidorna i till vi och V-1 till V-46.
ITALIANO
······ Leggere le pagine i a vi e I-1 a I-46.
NEDERLANDS
······ Raadpleeg de bladzijden i t/m vi en N-1 t/m N-46.
ENGLISH
······ Please refer to pages i to vi and E-1 to E-46.
01.4.19, 3:01 PM
Chapitres
Table des Matières
Dépannage

Manuels Connexes pour Sharp MD-E9000H


Sommaire des Matières pour Sharp MD-E9000H
- Page 54 FRANÇAIS Table des matières I Informations générales I Radio Page Page Précautions ..................2-3 Écoute de la radio ................20 Accessoires ..................3 Écoute d’une station mise en mémoire ........... 21 Commandes et voyants ..............4-7 I Radio RDS I Avant l’utilisation Radio Data System (RDS) ............
-
Page 55: Précautions
G Ne rien placer sur l’appareil. tension plus élevée est dangereux et risque de provoquer un incendie ou tout autre type d’accident. SHARP ne sera pas tenu pour responsable G Mettre l’appareil à l’abri de l’humidité, de la chaleur excessive (supérieure des dommages causés par le non-respect de la tension spécifiée. -
Page 56: Précautions (Suite)
Accessoires Précautions (suite) Vérifier que les accessoires ci-dessous sont présents dans l’emballage. Entretien des compact discs Le compact disc résiste bien aux dommages, mais il peut se produire un mauvais alignement dû à l’encrassement de la surface du disque. Afin de profiter au maximum des disques et de ce lecteur, suivre les conseils ci- dessous. -
Page 57: Commandes Et Voyants
Commandes et voyants MD-E9000H I Façade Page de référence Compartiment CD ..............10, 13 Voyant de réglage de la minuterie ..........39 Capteur de télécommande ............... 9 Compartiment MD ................15 Touche marche/attente ..............10 Touche d’éjection MD ..............16 Touche de tuner (gamme d’ondes) .......... -
Page 58: Commandes Et Voyants (Suite)
Voyant de programme routier Voyant d’annonce routière Voyant EON Voyant d’informations routières Voyant de mode FM stéréo Voyant de réception en FM stéréo MODÈLE N° MD-E9000H Voyant TOC CHAÎNE COMPACTE MD Voyant de dépassement 230V ∼ 50Hz 50W Voyant de montage N°... - Page 59 Commandes et voyants (suite) MD-E9000H I Télécommande Page de référence Émetteur de télécommande ............9 Touche marche/attente Touche d’extra-graves Touche de vidéo/auxiliaire Touche de minuterie ............... 39 Touche d’horloge ................12 Touches d’accord haut et bas ............20 Touche d’annulation/effacement ........17, 21, 35 Touches de curseur ................
-
Page 60: I Raccordement Des Enceintes
1 0 cm TWEETER 5 cm IMPÉDANCE 4 OHMS PUISSANCE NOMINALE 2 0 W PUISSANCE MAXIMALE 4 0 W SHARP CORPORATION Rouge Noir Black I Enceinte acoustique Attention: G Raccorder les fils aux enceintes et puis sur l’appareil. Tweeter G Utiliser des enceintes ayant une impédance d’au moins 4 ohms. Des enceintes à... -
Page 61: Raccordement Du Système
Raccordement du système MD-E9000H Raccordement des antennes Antenne FM fournie: Raccorder l’antenne FM à la prise FM 75 OHMS et le diriger vers la direction qui assure la meilleure réception. Cadre-antenne PO fourni: Raccorder le cadre-antenne PO à la prise AM LOOP. Diriger le cadre-antenne PO... -
Page 62: Télécommande
Télécommande Mise en place des piles Essai de la télécommande Diriger la télécommande vers le capteur placé sur l’appareil. 1. Retirer le couvercle. La télécommande peut être utilisée dans le rayon illustré cidessous: 2. Installer les piles en respectant les polarités indiquées dans le Appuyer sur la touche ON/STAND- BY. -
Page 63: Commande Générale
Commande générale MD-E9000H Mode de démonstration La première fois qu’on branche l’appareil, ce dernier entre en mode de démonstration. Des mots se déplacent sur l’afficheur. Pour annuler le mode de démonstration: Lorsque l’appareil est en veille (mode de démonstration), appuyer sur la touche DISPLAY(DEMO). -
Page 64: Réglage Du Son
Réglage du son Réglage du volume Appuyer sur la touche VOLUME W pour augmenter le volume et la touche VOLUME X pour l’effet contraire. 39 MAXIMUM Commande de graves La première fois que l’appareil est allumé, l’appareil entre en mode d’extra-graves qui suramplifie les basses fréquences et affiche “BASS”. -
Page 65: Réglage De L'horloge
Réglage de l’horloge MD-E9000H Appuyer sur la touche 5/3 ou 2/4 pour régler les heures et puis appuyer sur la touche MEMORY/ENTER. S’il s’agit de l’affichage 12 heures, “AM” change automatiquement à “PM”. Appuyer sur la touche 5/3 5/3 ou 2/4 2/4 pour régler les minu-... -
Page 66: Écoute De Cd
Écoute de CD Appuyer sur la touche ON/STAND-BY pour allumer l’appareil. Appuyer sur la touche CD I. S’il n’y a pas de disque, l’appareil affiche “CD NO DISC”. Appuyer sur la touche CD 7 (OPEN/CLOSE) pour ouvrir le com- partiment CD. Mettre un CD en place en tournant la face d’étiquette vers le haut. -
Page 67: Pour Localiser Un Morceau
Listening to a CD (continued) MD-E9000H Pour retirer le CD: Pour localiser un morceau En mode d’arrêt, appuyer sur la touche CD 7 (OPEN/ CLOSE). Appuyer sur la touche d’éjection CD et retirer le CD. Pour passer au morceau suivant: Appuyer, en cours de lecture, sur la touche 4 (moins de 0,5 seconde). -
Page 68: Écoute D'un Minidisc
Écoute d’un minidisc Allumer l’appareil en pressant la touche ON/STAND-BY. Appuyer sur la touche MD I. Mettre un MD dans le compartiment MD, côté étiquette vers le haut. Titre de disque Nombre total de morceaux Temps de lecture total Le titre de disque s’affiche seulement lorsqu’il est enregistré. L’appareil affiche le nombre des morceaux et le temps de lecture total sur le minidisc. - Page 69 Listening to a MiniDisc (continued) MD-E9000H Interruption de la lecture: Pour localiser un morceau Appuyer sur la touche MD 06 . Pour relancer la lecture, réappuyer sur la touche MD 06 . Pour passer au morceau suivant: En cours de lecture, appuyer sur la touche 4 (moins de 0,5 seconde).
-
Page 70: Lecture Des Morceaux Programmés
Lecture des morceaux programmés On peut sélectionner 20 morceaux pour la lecture CD ou MD dans un ordre souhaité. Appuyer sur la touche CD H H H H H ou MD H H H H H pour déclencher la lecture. Nombre de morceaux total Temps de lecture total Appuyer sur la touche CD 06 06 ou MD 06... -
Page 71: Lecture Directe
Lecture directe Répétition et lecture au hasard MD-E9000H On peut sélectionner un mode de lecture pour le CD ou le MD: répétition, lecture au hasard, lecture normale. En mode CD ou MD, appuyer à plusieurs reprises sur la touche P-MODE pour sélectionner le mode de lecture. -
Page 72: Commutation De L'affichage
Commutation de l’affichage Commutation de l’affichage pendant la lec- ture MD L’affichage change comme suit chaque fois qu’on appuie en cours de lecture MD sur la touche DISPLAY (DEMO) de l’appareil principal ou la touche DISPLAY/CHARAC- TER de la télécommande. L’afficheur indique le temps écoulé... -
Page 73: Écoute De La Radio
Écoute de la radio MD-E9000H Appuyer sur la touche ON/STAND-BY pour allumer l’appareil. Agir sur la touche TUNER (BAND) pour afficher “FM” ou “AM”. Appuyer sur la touche TUNING (X X X X X ou W W W W W ) pour faire l’accord sur la station souhaitée. -
Page 74: Écoute D'une Station Mise En Mémoire
Écoute d’une station mise en mémoire Mise en mémoire d’une station Rappel d’une station mémorisée Il est possible de stocker 40 stations en PO et en FM et de les rappeler par une En mode de tuner, sélectionner une station souhaitée en appuyant simple pression d’une touche (accord de présélection). -
Page 75: Radio Data System (Rds)
Radio Data System (RDS) MD-E9000H RDS est un service de radiodiffusion qu’offrent de plus en plus de stations FM. Informations données par RDS Elles peuvent diffuser leurs programmes avec signaux supplémentaires tels que leur nom de station, informations sur les types de programmes (sports, Chaque fois que la touche DISPLAY/CHARACTER est pressée, l’afficha-... - Page 76 Radio Data System (RDS) (suite) Codes PTY (type de programme), TP (information routière) et TA (annonce TRAVEL Programmes sur tous les types de voyages: proximité, lointain, forfait, routière). astuce, etc. Non pour les informations routières (travaux, délai, etc.) On peut rechercher et recevoir les signaux PTY, TP et TA suivants. affectant un voyage immédiat qui utilise TP/TA.
-
Page 77: I Mémorisation Automatique De Stations (Aspm)
Radio RDS Radio Data System (RDS) (suite) MD-E9000H Pour interrompre l’opération ASPM en cours: Mémorisation automatique de stations Appuyer en cours du balayage sur la touche ASPM. (ASPM) Les stations préalablement mises en mémoire restent inchangées. En mode ASPM, le tuner recherche automatiquement de nouvelles stations RDS. -
Page 78: I Pour Rappeler Une Station En Mémoire
Radio Data System (RDS) (suite) Notes: Pour rappeler une station en mémoire G Si l’affichage arrête de clignoter, renouveler l’opération depuis l’étape 2. Lorsque Pour écouter une station souhaitée en spécifiant le type de programme l’appareil trouve le type souhaité, le numéro du canal correspondant clignote pour (recherche PTY): 2 secondes et le nom de la station clignote pour 7 secondes pour rester allumé... -
Page 79: I Pour Écouter Automatiquement Le Programme Souhaité (Eon-Pty)
Radio RDS Radio Data System (RDS) (suite) MD-E9000H Pour écouter automatiquement le program- Lorsque le programme spécifié démarre sur une station ON (au- me souhaité (EON-PTY) tre réseau), l’appareil y passe automatiquement et “PTY” se met à clignoter. Lorsqu’une émission du type souhaité commence, l’appareil y passe automatique- ment. -
Page 80: I Pour Écouter Automatiquement Les Informa
Radio Data System (RDS) (suite) I Pour écouter automatiquement les informa- Lorsqu’une station ON (autre réseau) diffuse une émission TA, tions routières (EON-TI) l’appareil passe automatiquement à cette station et “TI” clignote. Lorsque les informations routières commencent, le tuner y passe automatiquement. Faire l’accord sur une station RDS (lorsqu’un nom de station est affiché). -
Page 81: I Notes Pour Le Fonctionnement Rds
Radio RDS Radio Data System (RDS) (suite) MD-E9000H Notes: Notes pour le fonctionnement RDS Si la station est en train de diffuser le programme PTY spécifié (ou TA), l’appareil Il ne s’agit pas d’un mauvais fonctionnement même si l’un des cas suivants se ne passera pas à... -
Page 82: Avant D'enregistrer Sur Un Minidisc
Avant d’enregistrer sur un minidisc Différence par rapport à l'enregistrement sur Du numéro de plage cassette Enregistrement d'un CD Les nouveaux morceaux sont automatiquement numérotés suivant l'ordre d'origine Il n'est pas possible d'enregistrer de la musique sur le revers d'un minidisc. (numérotage synchronisé). -
Page 83: Enregistrement De Cd Vers Un Minidisc
Enregistrement de CD vers un minidisc MD-E9000H Enregistrement d'un CD sur MD (Montage Appuyer sur la touche ON/STAND-BY pour allumer l'appareil. simple) Appuyer sur la touche CD H H H H H . On peut facilement enregistrer un CD sur un minidisc, à partir du premier morceau. -
Page 84: Enregistrement De Cd Vers Un Minidisc (Suite)
Enregistrement de CD vers un minidisc (suite) Notes: Pour enregistrer sans utiliser le montage G Lorsque le temps de lecture CD est plus long que le temps restant disponible sur le MD, la touche HIGH ou NORMAL ne permet pas de déclencher l'enregistrement. simple Mettre un CD et un MD en place. -
Page 85: I Enregistrement Des Morceaux Cd En Les Programmant
Recording to a MiniDisc from a CD (continued) MD-E9000H Enregistrement de premiers morceaux de Enregistrement des morceaux CD en les programmant On peut créer une collection de chansons favorites en enregistrant, par exemple, les premiers morceaux du CD. Programmer des morceaux sur CD (voir page 17). -
Page 86: Enregistrement De La Radio Vers Un Minidisc
Enregistrement de la radio vers un minidisc Faire l'accord sur une station souhaitée (voir page 20). Mettre un MD enregistrable en place. Sélectionner un mode d’enregistrement en pressant sur l’une des touches REC MODE (SP, LP2, LP4). On peut alors vérifier le temps d’enregistrement restant sur le MD. Appuyer sur la touche REC. -
Page 87: Titrage D'un Minidisc
Titrage d’un minidisc MD-E9000H Appuyer sur la touche MD I et mettre un MD en place (voir page 15). Titre de disque Titre de morceau En mode d’arrêt pour MD, En lecture ou en pause pour MD, appuyer sur la touche NAME/ appuyer sur la touche NAME/ TOC et sélectionner “TRACK... -
Page 88: Titrage D'un Minidisc (Suite)
Titrage d’un minidisc (suite) Pour effacer des titres de disque ou de morceaux: Pour effacer un caractère: Suivre les étapes 1 - 3 dans le chapitre “Titrage de disques et de morceaux” à Exemple) Pour changer “LAVE SONG” pour “LOVE SONG” la page 34. -
Page 89: Montage D'un Minidisc Enregistré
Montage d’un minidisc enregistré MD-E9000H Pour diviser un morceau Pour fusionner des morceaux Appuyer sur la touche MD I et mettre un MD en place (voir page Appuyer sur la touche MD I et mettre un MD en place (voir page 15). -
Page 90: Montage D'un Minidisc Enregistré (Suite)
Montage d’un minidisc enregistré (suite) Pour déplacer un morceau Pour déplacer des morceaux programmés (déplacement programmé) Appuyer sur la touche MD I et mettre un MD en place (voir page 15). Programmer des morceaux dans un ordre voulu (étapes 1 - 5, page 17). -
Page 91: I Pour Effacer Un Morceau
Editing a Recorded MiniDisc (continued) MD-E9000H Pour effacer un morceau Pour effacer tous les morceaux à la fois Appuyer sur la touche MD I et mettre un MD en place (voir page Appuyer sur la touche MD I et mettre un MD en place (voir page 15). -
Page 92: Opérations Programmées Et Mise En Arrêt Différée
Opérations programmées et mise en arrêt différée I Opérations programmées (lecture/enregistrement) Appuyer sur la touche 5/3 5/3 ou 2/4 2/4 pour déclarer l’heure G Avant de régler la minuterie, appuyer sur la touche CLOCK pour vérifier que de départ et puis appuyer sur la touche MEMORY/ENTER. l’horloge est à... -
Page 93: I Mise En Arrêt Différée
Timer and Sleep Operation (continued) MD-E9000H Notes: I La minuterie ne peut pas commander un élément raccordé aux prises d’entrée auxiliaire. Appuyer sur la touche MEMORY/ENTER pour valider. I Lorsque le CD ou le MD est terminé, la lecture s’arrête même avant l’heure de fin programmée. -
Page 94: Enrichissement Du Système
Enrichissement du système Écoute du son en provenance d’un élément Le câble de raccordement n’est pas fourni. Se procurer un câble vendu dans le com- merce. raccordé Magnétoscope, . Utiliser un câble de raccordement pour relier un élément aux prises AUX INPUT. lecteur de DVD, etc. -
Page 95: Qu'est-Ce Qu'un Minidisc
Qu’est-ce qu’un minidisc? Limites du minidisc MD-E9000H Un disque est enfermé dans une cartouche qui permet une manipulation facile et qui L’appareil peut afficher “TOC Dans le système MD, le délimiteur de la zone le protège contre la poussière et l’encrassement. Toutefois, si un corps étranger y FULL”... -
Page 96: Messages Affichés
Messages affichés Si l’appareil affiche un message d’erreur, procéder comme suit: Messages Messages Signification Solution Signification Solution d’erreur d’erreur G Rien n’est enregistré G Remplacer le disque. G On utilise plus de 40 caractè- G Raccourcir le titre. BLANK MD NAME FULL res pour le titre de disque ou (ni musique ni titre). -
Page 97: Dépannage
Tuner Si le cas se présente, se reporter au tableau ci-dessous avant de prendre contact avec Problème Cause un revendeur ou un centre de réparation agréés par SHARP. L’émission radiodiffusée est pa- Général Le système est-il placé à proximité d’une rasitée consécutivement. -
Page 98: Dépannage (Suite)
Entretien Dépannage (suite) En cas de problème Nettoyage de la cellule porte-laser CD Si l’appareil a subi une force extérieure (chocs, électricité statique, surtension due à Ne pas toucher la cellule porte-laser. S’il y a une trace de doigt ou de la poussière un foudre, etc.) ou une mauvaise manipulation, il peut mal fonctionner. -
Page 99: Fiche Technique
Fiche technique MD-E9000H SHARP se réserve le droit d’apporter des modifications à la présentation et aux Minidisc caractéristiques des appareils à fin d’amélioration. Les valeurs indiquées dans ce Type Enregistreur MD document sont les valeurs nominales des appareils de série mais de légères différences peuvent être constatées d’un appareil à... - Page 146 MEMORANDUM/MÉMORANDUM/MEMORÁNDUM/ ANTECKNINGAR/ANNOTAZIONI/MEMORANDUM/MEMO *16-MEMO-MD9000H(SEEG) 01.9.13, 15:54...
- Page 147 MEMORANDUM/MÉMORANDUM/MEMORÁNDUM/ ANTECKNINGAR/ANNOTAZIONI/MEMORANDUM/MEMO *16-MEMO-MD9000H(SEEG) 01.9.13, 15:54...
- Page 148 SHARP CORPORATION TINSZ0693AWZZ A0104. YT *17-BACK-MD9000H(SEEG) 2001.4.20, 3:26 PM...