Beurer FT 95 Mode D'emploi
Masquer les pouces Voir aussi pour FT 95:
Table des Matières

Publicité

Les langues disponibles
  • FR

Les langues disponibles

  • FRANÇAIS, page 61

Liens rapides

DE Kontaktloses Thermometer
Gebrauchsanweisung .....................2
EN Non-contact thermometer
Instructions for use ........................32
FR Thermomètre sans contact
Mode d'emploi ..............................61
ES Termómetro sin contacto
Instrucciones de uso .....................90
IT Termometro senza contatto
Istruzioni per l'uso .......................120
TR Temassız Termometre
Kullanım Kılavuzu ........................151
RU Бесконтактный термометр
Инструкция по применению .....179
PL Termometr bezdotykowy
Instrukcja obsługi ........................209
FT 95

Publicité

Table des Matières
loading

Sommaire des Matières pour Beurer FT 95

  • Page 1 FT 95 DE Kontaktloses Thermometer Gebrauchsanweisung .....2 EN Non-contact thermometer Instructions for use ......32 FR Thermomètre sans contact Mode d’emploi ......61 ES Termómetro sin contacto Instrucciones de uso .....90 IT Termometro senza contatto Istruzioni per l’uso .......120 TR Temassız Termometre Kullanım Kılavuzu ......151 RU Бесконтактный...
  • Page 2: Table Des Matières

    DEUTSCH Inhalt 1. Zeichenerklärung ..........3 9. Messen der Objekttemperatur / 2. Bestimmungsgemäßer Gebrauch ..... 4 Raumtemperatur ........... 23 3. Warn- und Sicherheitshinweise ......5 10. Fehleranzeigen ..........24 3.1 Gefahren für den Anwender ......5 11. Batterien ............25 3.2 Gefahren für das Gerät .......
  • Page 3: Lieferumfang

    Bitte lesen Sie diese Gebrauchsanweisung aufmerksam durch, und beachten Sie die Hinweise. Mit freundlicher Empfehlung Ihr Beurer-Team Lieferumfang Überprüfen Sie den Lieferumfang auf äußere Unversehrtheit der Kartonverpackung und auf die Voll- ständigkeit des Inhalts. Vor dem Gebrauch ist sicherzustellen, dass das Gerät und Zubehör keine sichtbaren Schäden aufweisen und jegliches Verpackungsmaterial entfernt wird.
  • Page 4: Bestimmungsgemäßer Gebrauch

    Hinweis Gerät geschützt gegen Fremd- Hinweis auf wichtige Informa- körper ≥12,5 mm und gegen IP 22 tionen. schräges Tropfwasser Gebrauchsanweisung be- Seriennummer achten Anwendungsteil Typ BF Wichtige Information/Tipp Entsorgung gemäß Elekt- Die CE-Kennzeichnung be- ro- und Elektronik-Altgeräte scheinigt die Konformität mit EG-Richtlinie –...
  • Page 5: Warn- Und Sicherheitshinweise

    3. Warn- und Sicherheitshinweise Gefahren für den Anwender • Wenden Sie das Gerät nur an, nachdem Sie diese Gebrauchsanweisung gelesen und verstan- den haben. • Bewahren Sie diese Gebrauchsanweisung auf. Die Gebrauchsanweisung muss für alle Benutzer zugänglich sein. Alle Hinweise müssen befolgt werden. •...
  • Page 6: Gefahren Für Das Gerät

    • Berühren Sie die Linse nicht mit dem Finger. • Die von Ihnen ermittelten Messwerte dienen nur zu Ihrer Information, sie ersetzen keine ärztli- che Untersuchung! Bevor Sie medizinische Handlungen vornehmen, konsultieren Sie einen Arzt. • Reinigen Sie das Thermometer nach jeder Benutzung (w      12. Gerät reinigen). •...
  • Page 7: Hinweise Zum Umgang Mit Batterien

    • Setzen Sie das Gerät nicht direkter Sonneneinstrahlung, extremen Temperaturen oder hoher Luft- feuchtigkeit aus. • Setzen Sie das Gerät keinen Flüssigkeiten aus. Das Gerät ist nicht wasserdicht. Vermeiden Sie je- den direkten Kontakt mit Wasser oder anderen Flüssigkeiten. • Öffnen oder reparieren Sie das Gerät nicht selbst. Lassen Sie das Gerät nur von autorisierten Ser- vicestellen reparieren, sonst erlischt Ihr Garantieanspruch.
  • Page 8: Informationen Zu Diesem Thermometer

    Thermometer Rektaltemperatur 36,3 °C bis 37,8 °C (97,3 °F bis 100,0 °F) konventionelles Thermometer Beurer-Tipp • Vergleichen Sie nie mit verschiedenen Thermometern gemessene Tempera turen mit- einander. • Sagen Sie Ihrem Arzt, mit welchem Thermometer Sie die Körpertemperatur gemessen ha- ben und an welcher Körperstelle.
  • Page 9 Aktivitäten • Körperlichen Aktivitäten und, mit geringerem Einfluss, mentale Aktivitäten erhöhen die Körper- temperatur. Beurer-Tipp Die Körpertemperaturmessung liefert den aktuellen Messwert eines Menschen. Wenn Sie sich bei der Interpretation der Ergebnisse unsicher sind, oder wenn abnorme Werte (z.B. Fieber) auftreten, sollten Sie sich an Ihren Hausarzt wenden. Dies gilt auch bei geringen Tempera- turveränderungen, wenn weitere Krankheitssymptome hinzutreten, wie z.B.
  • Page 10: Gerätebeschreibung

    5. Gerätebeschreibung 1 Display 2 MODE/MEM-Taste -Taste 4 LIGHT/SET-Taste 5 SCAN-Taste 6 Fieberindikator 7 Messsensor 8 Batteriefachdeckel Tasten Funktionen MODE Einstellung des Messmodus. MODE/MEM Anzeige der gespeicherten Messwerte. LIGHT Manuelles Zuschalten der Display beleuchtung. LIGHT/SET Einstellung der Grundfunktionen. Gerät ein-/ausschalten. SCAN Temperaturmessung starten.
  • Page 11: Displaybeschreibung

    Displaybeschreibung 1 Bluetooth ® 2 Modus Objekt temperatur 3 Modus Raumtemperatur 4 Modus Stirntemperatur 5 Signalton-Symbol 6 Jahr 7 Speicherfunktion 8 Datum 9 Temperaturwert-/Speicher platz nummer-Anzeige 10 Batteriestandanzeige 11 Messergebnis ≥ 38,0°C (≥ 100,4°F) „Fieber“ 12 Messergebnis < 37,5°C (< 99,5°F) „kein Fieber“ 13 Displaybeleuchtungs-Symbol 14 Temperaturmesseinheit Fahrenheit 15 Temperaturmesseinheit Celsius...
  • Page 12: Inbetriebnahme

    6. Inbetriebnahme Batterie einlegen • Entfernen Sie den Batteriefachdeckel. • Legen Sie die beiden Batterien gemäß der angegebenen Po- lung in das Batteriefach ein. • Verwenden Sie ausschließlich Markenbatterien vom Typ: 2 x 1,5 V Micro (Alkaline Typ LR03). Achten Sie unbedingt darauf, dass die Batterien entsprechend der Kennzeichnung mit korrekter Polung eingelegt werden.
  • Page 13 Legen Sie die Batterien neu ein oder halten Sie die LIGHT/ SET-Taste beim eingeschalteten Thermometer 3 Sekun- den gedrückt. Im Display blinkt die Temperaturmessein- heit (Abb. 1). Sie können sich Ihre Messergebnisse in der Temperatur- messeinheit Grad Celsius (°C) oder Grad Fahrenheit (°F) anzeigen lassen.
  • Page 14 Im Display blinkt die Jahreszahl (Abb. 3). • Stellen Sie mit der MODE/MEM-Taste das Jahr ein und bestätigen Sie mit der LIGHT/SET-Taste. Im Display blinkt Tag/Monat (Abb. 4). • Stellen Sie mit der MODE/MEM-Taste den Tag und den Monat ein und bestätigen Sie m it der LIGHT/SET-Tas- te (Abb.
  • Page 15 Im Display blinkt (Abb. 8). Sie können die automatische Displaybeleuchtung (er- scheint nach Messung der Stirntemperatur) ein- oder ausschalten. • Um die automatische Displaybeleuchtung einzu- schalten, wählen Sie mit der MODE/MEM-Taste und bestätigen Sie mit der LIGHT/SET-Taste. Abb. 8 • Um die automatische Displaybeleuchtung auszu- schalten, wählen Sie mit der MODE/MEM-Taste und bestätigen Sie mit der LIGHT/SET-Taste.
  • Page 16 Im Display blinkt (Abb. 9). Sie können die Signaltöne (Einschalten des Geräts, wäh- rend der Messung, Abschluss der Messung) ein- oder aus- schalten. • Um die Signaltöne einzuschalten, wählen Sie mit der MODE/MEM-Taste und bestätigen Sie mit der LIGHT/SET-Taste. Abb. 9 •...
  • Page 17: Messen An Der Stirn

    8. Messen an der Stirn Beurer-Tipp Berücksichtigen Sie, dass • körperliche Betätigung, grundsätzlich erhöhte Schweißbildung auf der Stirn, Einnahme von gefäßverengenden Medikamenten und Hautirritationen das Mess ergebnis verfäl- schen können, • die Stirn, beziehungsweise Schläfe, frei von Schweiß und Kosmetika sein muss.
  • Page 18 • Halten Sie das Thermometer 2 bis 3 cm vor die Messstelle an der Stirn (Abb. 11). Drücken Sie die SCAN-Taste. Abb. 11 Wenn das Messergebnis unter 37,5°C (99,5°F) liegt, leuchtet der Fie- berindikator grün und im Display erscheint für kein Fieber, das signalisiert, dass die Körpertemperatur im normalen Bereich liegt.
  • Page 19 Wenn das Messergebnis über 38°C (100,4°F) liegt, leuchtet der Fie- berindikator rot und im Display erscheint , dass die Körpertem- peratur oberhalb des normalen Bereichs liegt. Abb. 14 Der Messwert wird automatisch mit Datum/Uhrzeit und Einstufung „Fieber“ / „kein Fie- ber“...
  • Page 20 Sie haben die Möglichkeit die gemessenen und auf dem Gerät gespeicherten Werte zusätzlich auf Ihr Smartphone per Bluetooth ® zu übertragen. Dazu benötigen Sie die „beurer HealthManager“ App oder die „beurer BabyCare“ App. Diese sind im Apple App Store und bei Google Play kostenlos verfügbar.
  • Page 21 Ihrem Gerät. (siehe Kapitel 7. „Grundfunktionen einstellen“).              Schritt 2: „beurer HealthManager“ oder „beurer BabyCare“ App* Fügen Sie in der „beurer HealthManager“ oder „beurer BabyCare“ App unter „Einstellungen / Meine Geräte“ das FT 95 hinzu.
  • Page 22 Die „beurer HealthManager“ oder „beurer BabyCare“ App muss zur Übertragung aktiviert sein. Um eine störungsfreie Übertragung zu gewährleisten entfernen Sie hierzu bitte ggf. die Schutzhülle Ihres Smartphone. Starten Sie die Datenübertragung in der „beurer HealthManager“ oder „ beurer BabyCare“ App.
  • Page 23: Messen Der Objekttemperatur / Raumtemperatur

    9. Messen der Objekttemperatur / Raumtemperatur Wenn Sie Objekttemperatur mit diesem Thermometer mes- sen wollen, müssen Sie in den Modus Objekttemperatur wechseln. • Dazu drücken Sie kurz beim eingeschalteten Thermo- meter die MODE/MEM-Taste. Das Gerät schaltet in den Modus Objekttemperatur (Abb.
  • Page 24: Fehleranzeigen

    10. Fehleranzeigen Fehler­ Problem Lösung meldung Messung während des Selbst test, Gerät noch Warten bis das Stirnsymbol nicht mehr nicht messbereit. blinkt. Raumtemperatur unter 15 °C oder über Raumtemperatur muss zwischen 15 °C 40 °C (<59 °F, >104 °F). und 40 °C liegen (59 °F - 104 °F). (1) Modus Stirntemperatur: Die ermittelte Betreiben Sie das Thermometer nur in- Temperatur ist höher als 42,2 °C (108 °F).
  • Page 25: Batterien

    11. Batterien Batterien wechseln Das Gerät benötigt zwei Batterien, Typ AAA, LR03. • Öffnen Sie das Batteriefach. Schieben Sie dazu das Batteriefach nach unten. • Nehmen Sie die verbrauchten Batterien aus dem Batterie- fach. • Setzen Sie neue Batterien ein. Achten Sie darauf, dass die Batterien entsprechend der Polung korrekt ausgerichtet sind.
  • Page 26: Gerät Lagern

    Reinigen Sie nach jedem Gebrauch den Messsensor. Verwenden Sie dazu ein weiches Tuch oder ein Wattestäbchen, welche mit Desinfektionsmittel oder 70 % Alkohol angefeuchtet werden können. Zur Reinigung des gesamten Gerätes verwenden Sie bitte ein weiches, leicht mit leichter Seifenlauge angefeuchtetes Tuch.
  • Page 27: Speicherfunktion

    Bei Verwendung des Gerätes in der Heilkunde sind Messtechnische Kontrollen mit geeigneten Mit- teln durchzuführen. Genaue Angaben zur Überprüfung der Genauigkeit können unter der Service-Ad- resse angefragt werden. Technische Änderungen zur Verbesserung und Weiterentwicklung des Produktes behalten wir uns vor. FT 95 Messmethode Kontaktlose Infrarot Messung...
  • Page 28: Richtlinien

    Signalton Beim Einschalten des Gerätes, während der Messung, beim Ab- schluss der Messung (einstellbar). Anzeige LCD-Display Energiesparfunktionen Gerät schaltet nach 1 Minute automatisch aus. Abmessungen 167,4 x 41,5 x 28 mm Breite x Tiefe x Höhe Gewicht 73 g (ohne Batterien) Batterie 2 x AAA, LR03 Betriebsdauer für ca.
  • Page 29: Garantie / Service

    Die CE-Konformitätserklärung zu diesem Produkt finden Sie unter: https://www.beurer.com/web/ we-landingpages/de/cedeclarationofconformity.php 17. Garantie / Service Die Beurer GmbH, Söflinger Straße 218, D-89077 Ulm (nachfolgend „Beurer“ genannt) gewährt un- ter den nachstehenden Voraussetzungen und in dem nachfolgend beschriebenen Umfang eine Ga- rantie für dieses Produkt.
  • Page 30 Wenn der Käufer einen Garantiefall melden möchte, wendet er sich zunächst an den Beurer Kundenservice: Beurer GmbH, Servicecenter Tel: +49 731 3989-144 Für eine zügige Bearbeitung nutzen Sie bitte unser Kontaktformular auf der Homepage www.beurer.com unter der Rubrik ‚Service‘. Der Käufer erhält dann nähere Informationen zur Abwicklung des Garantiefalls, z.B. wohin er das Produkt kostenfrei senden kann und welche Unterlagen erforderlich sind.
  • Page 31 - Folgeschäden, welche auf einem Mangel dieses Produktes beruhen (es können für diesen Fall je- doch Ansprüche aus Produkthaftung oder aus anderen zwingenden gesetzlichen Haftungsbestim- mungen bestehen). Reparaturen oder ein Komplettaustausch verlängern in keinem Fall die Garantiezeit.
  • Page 32 ENGLISH Contents 1. Signs and symbols .......... 33 9. Measuring object temperature/ 2. Intended use ........... 34 room temperature ......... 53 3. Warnings and safety notes ......35 10. Error messages ..........54 3.1 Risks to the user ........35 11.
  • Page 33: Signs And Symbols

    Please read these instructions for use carefully and observe the information they contain. With kind regards, Your Beurer team Included in delivery Check that the exterior of the delivery cardboard packaging is intact and make sure that all compo- nents are present. Before use, ensure that there is no visible damage to the device or accessories and that all packaging material has been removed.
  • Page 34: Intended Use

    Device protected against Note foreign objects ≥ 12.5 mm Note on important information. and against water dripping at IP 22 an angle Observe the instructions for Serial number Application part, type BF Important information/tip The CE labelling certifies that Disposal in accordance with the product complies with the Waste Electrical and the essential requirements...
  • Page 35: Warnings And Safety Notes

    • After physical activity, a bath or spending time outdoors, wait approx. 30 minutes before you take a measurement on your forehead. • The FT 95 thermometer is only designed for the measuring area on the human body stated in the instructions for use.
  • Page 36: Risks To The Device

    • Do not touch the lens with your fingers. • The measurements taken by you are for your information only – they are no substitute for a medi- cal examination. Consult a doctor before you undertake any medical treatment. • Clean the thermometer after each use (w      12. Cleaning the device). •...
  • Page 37: Notes On Handling Batteries

    Notes on handling batteries • If your skin or eyes come into contact with battery fluid, rinse the affected areas with water and seek medical assistance. • Choking hazard! Small children may swallow and choke on batteries. Store batteries out of the reach of small children.
  • Page 38: Information About This Thermometer

    Rectal temperature 36.3 °C to 37.8 °C (97.3 °F to 100.0 °F) Conventional thermometer Beurer tip • Temperatures measured with different thermometers should never be compared with one another. • Tell your doctor what type of thermometer you used to take your body temperature and on what part of the body.
  • Page 39 • Activities Physical and, to a lesser extent, mental activities increase body temperature. Beurer tip Taking the body temperature provides a current measurement of a person’s temperature. If you are uncertain about interpreting the results or if the values are abnormal (e.g. fever), please consult your doctor.
  • Page 40: Device Description

    5. Device description 1 Display 2 MODE/MEM button button 4 LIGHT/SET button 5 SCAN button 6 Fever indicator 7 Measuring sensor 8 Battery compartment lid Buttons Functions MODE Sets the measurement mode. MODE/MEM Displays the saved measurements. LIGHT Manual switch-on of the illuminated display. LIGHT/SET Sets the basic functions.
  • Page 41: Display Description

    Display description 1 Bluetooth ® 2 Object temperature mode 3 Room temperature mode 4 Forehead temperature mode 5 Acoustic signal symbol 6 Year 7 Memory function 8 Date 9 Temperature/memory space number display 10 Battery status indicator 11 Measurement ≥ 38.0 °C (≥ 100.4 °F) “fever” 12 Measurement <...
  • Page 42: Initial Use

    6. Initial use Inserting the battery • Remove the battery compartment lid. • Insert both batteries into the battery compartment according to the specified polarity. • Only use brand-name batteries of type: 2 x 1.5 V micro (alka- line type LR03). Make sure that the batteries are inserted the correct way round in accordance with the markings.
  • Page 43 Insert the batteries or press and hold the LIGHT/SET but- ton for 3 seconds when the thermometer is switched on. The temperature measurement unit flashes on the display (Fig. 1). You can set the device to display the measurements in de- grees Celsius (°C) or degrees Fahrenheit (°F).
  • Page 44 The year flashes on the display (Fig. 3). • Use the MODE/MEM button to set the year, and con- firm with the LIGHT/SET button. The day/month flashes on the display (Fig. 4). • Use the MODE/MEM button to set the day and month, and confirm with the LIGHT/SET button (Fig.
  • Page 45 flashes on the display (Fig. 8). You can activate or deactivate the automatic illuminated display (appears following forehead temperature meas- urement). • To activate the automatic illuminated display, use the MODE/MEM button to select , and confirm with the LIGHT/SET button. Fig.
  • Page 46 flashes on the display (Fig. 9). You can activate or deactivate the acoustic signals (de- vice activation, measurement in progress, measurement completion). • To activate the acoustic signals, use the MODE/MEM button to select , and confirm with the LIGHT/SET button.
  • Page 47: Forehead Measurement

    8. Forehead measurement Beurer tip Remember: • Physical activity, increased perspiration on the forehead, taking vasoconstrictive medi- cation and skin irritations can distort the measurement. • The forehead, or the temples, must be free from perspiration and cosmetics. • We recommend that you take three measurements on the forehead. If the three meas- urements are different, use the highest value.
  • Page 48 • Hold the thermometer 2 to 3 cm in front of the forehead measuring point (Fig. 11). Press the SCAN button. Fig. 11 If the measurement is less than 37.5 °C (99.5 °F), the fever indicator lights up green and if appears on the display to indicate no fe- ver, this indicates that the body temperature is in the normal range.
  • Page 49 If the measurement is over 38 °C (100.4 °F), the fever indicator lights up red and appears in the display. This indicates that the body temperature is above the normal range. Fig. 14 The measurement is automatically saved with the date/time and the “fever” /”no fever”...
  • Page 50: Displaying Stored Measurements

    • If a connection to the app cannot be established after 30 seconds, the Bluetooth ® symbol goes out and the device switches off automatically after 60 seconds. When connecting for the first time, a randomly-generated six-digit PIN code is displayed on device, and at the same time an input field appears on the smartphone in which you must enter this six-digit PIN code.
  • Page 51 It is also possible to transfer the measured values saved on the device to your smartphone using Bluetooth ® . To do this you will need the “beurer HealthManager” app or the “beurer BabyCare” app. They are available for free from the Apple App Store and from Google Play. System requirements iOS ≥...
  • Page 52 The “beurer HealthManager” or “beurer BabyCare” app must be activated to allow data transfer. If your smartphone has a protective cover, remove this to ensure that there is no interference dur- ing the transfer. Begin the data transfer in the “beurer HealthManager” or “beurer BabyCare” app.
  • Page 53: Measuring Object Temperature/Room Temperature

    9. Measuring object temperature/room temperature If you want to measure an object temperature with this ther- mometer, switch to object temperature mode. • With the thermometer switched on, briefly press the MODE/MEM button. The device switches to the object temperature mode (Fig.
  • Page 54: Error Messages

    10. Error messages Error Problem Solution message Measurement during self-test, device not yet Wait until the forehead symbol stops ready for measurement. flashing. Room temperature below 15 °C or above Room temperature must be between 40 °C (<59 °F, >104 °F). 15 °C and 40 °C (59 °F - 104 °F).
  • Page 55: Batteries

    11. Batteries Changing the batteries The device requires two AAA (LR03) batteries. • Open the battery compartment. To do this, push the battery compartment down. • Take the used batteries out of the battery compartment. • Insert new batteries. Make sure that the batteries are inserted the correct way round. •...
  • Page 56: Storing The Device

    To clean the entire device, please use a soft cloth slightly moistened with a mild soapy solution. Un- der no circumstances may liquid enter the device. Do not use the device again until it is completely dry. Storing the device The device must not be stored or used at an excessively high or low temperatures or humidities (w ...
  • Page 57 We reserve the right to make technical changes to improve and develop the product. Type FT 95 Measurement method Non-contact infrared measurement Basic functions Forehead temperature measurement Object temperature measurement Room temperature measurement Measurement units Celsius (°C) or Fahrenheit (°F) Operating conditions 15 °C to 40 °C (59 °F to 104 °F) at a relative humidity of <...
  • Page 58: Guidelines

    The device is suitable for use in all environments listed in these instructions for use, including domestic environments. We hereby confirm that this product complies with the European RED Directive 2014/53/EU. The CE Declaration of Conformity for this product can be found under: https://www.beurer.com/web/ we-landingpages/de/cedeclarationofconformity.php...
  • Page 59: Warranty/Service

    During the warranty period, should this product prove to be incomplete or defective in function- ality in accordance with the following provisions, Beurer shall carry out a repair or a replacement delivery free of charge, in accordance with these warranty conditions.
  • Page 60 A warranty claim shall only be considered if the buyer can provide Beurer, or an authorised Beurer partner, with - a copy of the invoice/purchase receipt, and - the original product. The following are explicitly excluded from this warranty: - deterioration due to normal use or consumption of the product;...
  • Page 61 FRANÇAIS Sommaire 1. Symboles utilisés ..........62 8. Mesure au niveau du front ......75 2. Utilisation conforme aux recommandations ... 63 9. Mesure de la température d’objet/ 3. Consignes d’avertissement et de mise température ambiante ........81 en garde ............64 10.
  • Page 62: Symboles Utilisés

    Lisez attentivement ce mode d´emploi et respectez les instructions d’utilisation. Sincères salutations, Votre équipe Beurer Contenu Vérifiez si l’emballage carton extérieur du kit est intact et si tous les éléments sont inclus. Avant l’uti- lisation, assurez-vous que l’appareil et les accessoires ne présentent aucun dommage visible et que la totalité...
  • Page 63: Utilisation Conforme Aux Recommandations

    Appareil protégé contre les Remarque corps solides ≥ 12,5 mm et Indication d’informations impor- IP22 contre les chutes de gouttes tantes. d’eau en biais Respecter les consignes du Numéro de série mode d’emploi Informations importantes/ Appareil de type BF conseils Élimination conformément à Le sigle CE atteste de la la directive européenne WEEE conformité...
  • Page 64: Consignes D'avertissement Et De Mise En Garde

    sures à domicile. Vous pouvez connaître rapidement et simplement votre température corporelle. Les valeurs s’enregistrent automatiquement. 3. Consignes d’avertissement et de mise en garde Risques pour l’utilisateur • N’utilisez pas l’appareil avant d’avoir lu et compris le présent mode d’emploi. •...
  • Page 65: Risques Pour L'appareil

    • Avant chaque utilisation, vérifiez que la lentille est intacte. Si elle est endommagée, veuillez vous adresser au vendeur ou au service après-vente. • Ne touchez pas à la lentille avec les doigts. • Les mesures que vous avez établies servent juste à vous tenir informé de votre état, elles ne rem- placent pas un examen médical.
  • Page 66: Remarques Relatives Aux Piles

    • N’exposez pas l’appareil à la lumière directe du soleil, à des températures extrêmes ou à une forte humidité. • Ne soumettez l’appareil à aucun liquide. L’appareil n’est pas étanche. Évitez tout contact direct avec l’eau ou d’autres liquides. • N’ouvrez ou ne réparez pas l’appareil vous-même. Ne faites réparer l’appareil que dans un centre de service autorisé, sous peine d’annulation de la garantie.
  • Page 67: Informations Concernant Ce Thermomètre

    Température rectale 36,3 °C à 37,8 °C (97,3 °F à 100,0 °F) Thermomètre ordinaire Conseil Beurer • Ne comparez jamais des températures prises avec des thermomètres différents. • Indiquez à votre médecin avec quel thermomètre vous avez mesuré la température cor- porelle et à quel endroit du corps. Tenez-en également compte lors d’un auto-diagnostic.
  • Page 68 Les activités physiques et, dans une moindre mesure, les activités cérébrales augmentent la tem- pérature corporelle. Conseil Beurer La mesure de la température corporelle donne une valeur de mesure actuelle pour une per- sonne. Si vous n’êtes pas certain de l’interprétation des résultats ou obtenez des valeurs anormales (par ex. : fièvre), consultez votre médecin traitant.
  • Page 69: Description De L'appareil

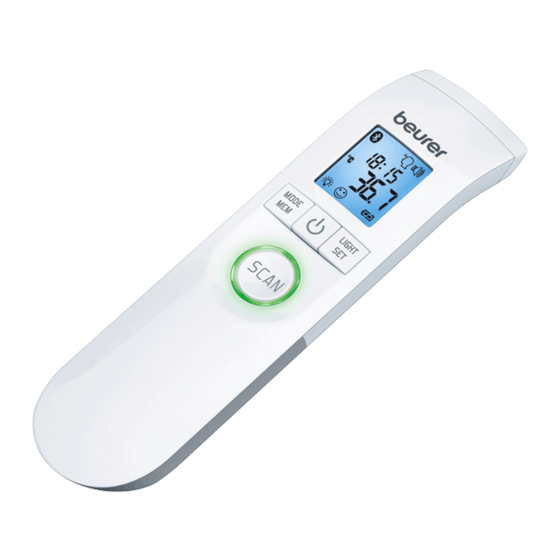
    5. Description de l’appareil 1 Écran 2 Touche MODE/MEM 3 Touche 4 Touche LIGHT/SET 5 Touche SCAN 6 Indicateur de fièvre 7 Capteur de mesure 8 Couvercle du compartiment à piles Touches Fonctions MODE Réglage du mode de mesure. MODE/MEM Affichage des mesures enregistrées.
  • Page 70: Bluetooth

    Description de l’affichage 1 Bluetooth ® 2 Mode température d’objet 3 Mode Température ambiante 4 Mode Température frontale 5 Symbole de signal sonore 6 Année 7 Fonction d’enregistrement 8 Date 9 Affichage de la valeur de la température/ du numéro de l’emplacement de sauvegarde 10 Affichage du niveau des piles 11 Résultat de la mesure ≥...
  • Page 71: Mise En Service

    6. Mise en service Insertion de la pile • Retirez le couvercle du compartiment à piles. • Insérez les deux piles dans le compartiment à piles en res- pectant la polarité. • Utilisez uniquement des piles de marque de type : 2 piles 1,5 V micro (alcaline LR03).
  • Page 72 Insérez à nouveau les piles ou maintenez la touche LIGHT/ SET enfoncée pendant 3 secondes lorsque le thermomètre est allumé. L’unité de mesure de la température clignote à l’écran (Fig. 1). Vous pouvez afficher vos résultats de mesure dans l’unité de mesure de la température degrés Celsius (°C) ou de- grés Fahrenheit (°F).
  • Page 73 L’année clignote à l’écran (Fig. 3). • Avec la touche MODE/MEM, réglez l’année et confir- mez avec la touche LIGHT/SET. Le jour/mois clignote à l’écran (Fig. 4). • Avec la touche MODE/MEM, réglez le jour et le mois et confirmez avec la touche LIGHT/SET (Fig. 5). Fig. 3 Fig. 4 Si le format de l’heure est réglé...
  • Page 74 clignote à l’écran (Fig. 8). Vous pouvez activer ou désactiver l’éclairage automa- tique de l’écran (s’affiche après la mesure de la tempé- rature frontale). • Pour activer l’éclairage automatique de l’écran, choisis- avec la touche MODE/MEM et confirmez avec la touche LIGHT/SET. Fig. 8 •...
  • Page 75: Mesure Au Niveau Du Front

    MODE/MEM et confirmez avec la touche LIGHT/SET. 8. Mesure au niveau du front Conseil Beurer Notez que • l’activité physique, une formation accrue de transpiration sur le front, la prise de médica- ments vasoconstricteurs et les irritations cutanées peuvent fausser le résultat de la mesure, •...
  • Page 76 • Pour allumer le thermomètre, appuyez brièvement sur la touche près un bref auto-test et deux bips courts, l’appareil est prêt à mesurer la température au niveau du front . L’appareil se trouve tou- jours en mode Température frontale. Celui-ci est représenté à l’écran par le symbole Fig. 10 •...
  • Page 77 Si le résultat de mesure est inférieur à 37,5 °C (99,5 °F), l’indicateur de fièvre s’allume en vert et s’affiche à l’écran pour indiquer que la température corporelle se trouve dans la plage normale. Fig. 12 Si le résultat de mesure se situe entre 37,5 °C et 37,9 °C, l’indica- teur de fièvre s’allume en jaune pour indiquer que la température corporelle est légèrement trop élevée.
  • Page 78 La valeur mesurée est automatiquement enregistrée avec la date et l’heure ainsi que la clas- sification « fièvre » / « pas de fièvre » L’appareil signale avec deux bips brefs et un symbole de front fixe qu’il est prêt pour une autre mesure. L’appareil s’éteint automatiquement après environ 60 secondes. Pour l’éteindre manuellement, appuyez sur la touche pendant 5 secondes.
  • Page 79 Vous avez également la possibilité de transférer en plus les mesures enregistrées sur l’appareil sur votre smartphone via Bluetooth ® . Il vous faut alors télécharger l’application « beurer HealthManager » ou « beurer BabyCare », disponible gratuitement sur l’App Store et sur Google Play. Configuration requise iOS ≥ 9.0, Android ≥ 5.0 Bluetooth ®...
  • Page 80 (cf. chapitre 7. « Régler les fonctions de base »).              Étape 2 : Application « beurer HealthManager » ou « beurer BabyCare »* Ajoutez le FT 95 dans l’application « beurer HealthManager » ou « beurer BabyCare », dans l’onglet « Réglages/Mes appareils ».             ...
  • Page 81: Mesure De La Température D'objet/Température Ambiante

    L’application « beurer HealthManager » ou « beurer BabyCare » doit être activée pour le transfert. Afin de garantir une transmission sans perturbations, veuillez retirer la housse de votre smartphone. Lancez le transfert de données depuis l’application « beurer HealthManager » ou « beurer BabyCare ».
  • Page 82: Affichage Des Erreurs

    Si vous voulez utiliser le thermomètre pour mesurer la température ambiante, vous devez passer au mode Température ambiante. • Pour cela, appuyez brièvement deux fois sur la touche MODE/MEM sur le thermomètre allumé. L’appareil passe en mode Température ambiante • La température ambiante s’affiche directement (Fig. 16). L’appareil s’éteint automatiquement après environ 60 ...
  • Page 83: Piles

    Message Problème Solution d’erreur (1) Mode Température frontale : la température Utilisez le thermomètre uniquement établie est supérieure à 42,2 °C (108 °F). dans les plages de température indi- (2) Mode Température d’objet : la tempéra- quées. En cas d’affichages d’erreur ture établie est supérieure à 80 °C (176 °F). répétés, consultez le revendeur ou le service client.
  • Page 84: Nettoyer L'appareil

    Éliminer les piles • Les piles usagées et complètement déchargées doivent être mises au rebut dans des conteneurs spéciaux ou aux points de collecte réservés à cet usage ou bien déposées chez un revendeur d’ap- pareils électriques. L’élimination des piles est une obligation légale qui vous incombe. •...
  • Page 85: Éliminer L'appareil

    14. Éliminer l’appareil Dans l’intérêt de la protection de l’environnement, l’appareil ne doit pas être jeté avec les ordures ménagères à la fin de sa durée de service. L’élimination doit se faire par le biais des points de collecte compétents dans votre pays. Éliminez l’appareil conformément à...
  • Page 86 Unités de mesure Celsius (°C) ou Fahrenheit (°F) Conditions d’utilisation 15 °C à 40 °C (59 °F à 104 °F) avec une humidité de l’air relative <95 % Conditions de conservation et de -20 °C à 50 °C (-4 °F à 122 °F) transport avec une humidité de l’air relative <85 % Distance de mesure 2 à...
  • Page 87: Directives

    Nous garantissons par la présente que ce produit est conforme à la directive européenne RED 2014/53/EU. La déclaration de conformité CE pour ce produit se trouve sous : https://www.beurer.com/web/we-landingpages/de/cedeclarationofconformity.php...
  • Page 88: Garantie/Maintenance

    17. Garantie/Maintenance La société Beurer GmbH, sise Söflinger Straße 218, 89077 Ulm, Allemagne, (ci-après désignée « Beurer ») propose une garantie pour ce produit dans les conditions suivantes et dans la mesure prévue ci-après. Les conditions de garantie suivantes n’affectent en rien les obligations de garantie du ven- deur découlant du contrat de vente conclu avec l’acheteur.
  • Page 89 - une copie de la facture/du reçu et - le produit d’origine à Beurer ou à un partenaire autorisé de Beurer. La présente Garantie exclut expressément - toute usure découlant de l’utilisation ou de la consommation normale du produit ;...
  • Page 90 ESPAÑOL Índice 1. Símbolos ............91 8. Medición en la frente ........105 2. Uso correcto ........... 92 9. Medición de la temperatura de objetos/ 3. Indicaciones de advertencia y de seguridad .. 93 temperatura ambiente ......... 111 3.1 Peligros para el usuario ......93 10.
  • Page 91: Artículos Suministrados

    Atentamente, El equipo de Beurer Artículos suministrados Compruebe que el envoltorio de los artículos suministrados esté intacto y que su contenido esté completo. Antes de utilizar el aparato, deberá asegurarse de que ni este ni los accesorios presen- ten daños visibles y de que se retire el material de embalaje correspondiente. En caso de duda, no lo use y póngase en contacto con su distribuidor o con la dirección de atención al cliente indicada.
  • Page 92: Uso Correcto

    Nota Aparato protegido contra Indicación de información cuerpos extraños ≥12,5 mm y IP 22 importante. contra goteo oblicuo de agua Respetar las instrucciones Número de serie de uso Información importante/ Pieza de aplicación tipo BF Sugerencia El sello CE certifica que este Eliminación según la Directiva aparato cumple los requisitos europea sobre residuos...
  • Page 93: Indicaciones De Advertencia Y De Seguridad

    3. Indicaciones de advertencia y de seguridad Peligros para el usuario • No utilice el aparato hasta que haya leído y comprendido estas instrucciones de uso. • Conserve estas instrucciones de uso. Las instrucciones de uso deben encontrarse a disposición de todos los usuarios.
  • Page 94: Peligros Para El Aparato

    • Limpie el termómetro cada vez que lo use (w      12. Limpieza del aparato). • Si todavía tiene dudas sobre cómo usar el aparato, póngase en contacto con su distribuidor o con el servicio de atención al cliente. Peligros para el aparato •...
  • Page 95: Indicaciones Para La Manipulación De Pilas

    • Los dispositivos de comunicación de alta frecuencia portátiles y móviles pueden interferir en el fun- cionamiento de este aparato. Indicaciones para la manipulación de pilas • En caso de que el líquido de una pila entre en contacto con la piel o los ojos, lave la zona afecta- da con agua y busque asistencia médica.
  • Page 96: Información Sobre Este Termómetro

    Temperatura rectal De 36,3 °C a 37,8 °C (de 97,3 °F a 100,0 °F) Termómetro convencional Sugerencia de Beurer • No compare nunca las temperaturas medidas con distintos termómetros. • Indique a su médico con qué termómetro ha medido la temperatura corporal y en qué...
  • Page 97 Las actividades corporales y, en menor medida, las actividades mentales aumentan la tempe- ratura corporal. Sugerencia de Beurer La medición de la temperatura corporal proporciona el valor de medición actual de una persona. Si no está seguro de cómo interpretar el resultado de la medición o si los valores mostrados son anómalos (por ejemplo, fiebre), consulte a su médico de familia.
  • Page 98: Descripción Del Aparato

    5. Descripción del aparato 1 Pantalla 2 Botón MODE/MEM 3 Botón 4 Botón LIGHT/SET 5 Botón SCAN 6 Indicador de fiebre 7 Sensor de medición 8 Tapa del compartimento de las pilas Botones Funciones MODE Ajuste del modo de medición. MODE/MEM Indicación de los valores de medición guardados.
  • Page 99: Bluetooth

    Descripción de la pantalla 1 Bluetooth ® 2 Modo temperatura de objeto 3 Modo temperatura ambiente 4 Modo temperatura de la frente 5 Símbolo de la señal acústica 6 Año 7 Función de almacenamiento 8 Fecha 9 Indicación del valor de la temperatura/número de posición de memoria 10 Indicación del estado de las pilas 11 Resultado de medición ≥...
  • Page 100: Puesta En Funcionamiento

    6. Puesta en funcionamiento Colocar las pilas • Retire la tapa del compartimento de las pilas. • Coloque las dos pilas conforme a la polaridad que se indica en el compartimento de las pilas. • Utilice exclusivamente pilas de marca del tipo: 2 x 1,5 V micro (alcalinas, tipo LR03).
  • Page 101 Vuelva a insertar las pilas o mantenga pulsado el botón LIGHT/SET con el termómetro encendido durante 3 se- gundos. En la pantalla parpadeará la unidad de medición de la temperatura (fig. 1). Puede elegir que los resultados de la medición se mues- tren en grados Celsius (ºC) o en grados Fahrenheit (ºF).
  • Page 102 En la pantalla parpadeará el año (fig. 3). • Ajuste con el botón MODE/MEM el año y confírmelo con el botón LIGHT/SET. En la pantalla parpadeará el día/mes (fig. 4). • Ajuste con el botón MODE/MEM el día y el mes y con- fírmelos con el botón LIGHT/SET (fig.
  • Page 103 En la pantalla parpadeará (fig. 8). Puede encender o apagar la iluminación automática de la pantalla que aparece después de medir la temperatu- ra en la frente. • Para encender la iluminación automática de la panta- lla, seleccione con el botón MODE/MEM y confirme con el botón LIGHT/SET.
  • Page 104 En la pantalla parpadeará (fig. 9). Puede encender o apagar las señales acústicas que sue- nan al encenderse el aparato, durante la medición y al fi- nalizar esta. • Para encender las señales acústicas, seleccione con el botón MODE/MEM y confirme con el botón LIGHT/SET.
  • Page 105: Medición En La Frente

    8. Medición en la frente Sugerencia de Beurer Tenga en cuenta lo siguiente: • La actividad física, una mayor sudoración en la frente, la ingesta de medicamentos va- soconstrictores y las irritaciones de la piel pueden alterar el resultado de las mediciones.
  • Page 106 • Mantenga el termómetro entre 2 y 3 cm por encima del punto de me- dición en la frente (fig. 11). Pulse el botón SCAN. Fig. 11 Si el resultado de la medición está por debajo de 37,5°C (99,5°F), el indicador de fiebre se ilumina en verde y en la pantalla aparece para indicar que no hay fiebre, lo que indica que la temperatura corporal se encuentra en un rango normal.
  • Page 107 Si el resultado de la medición está por encima de 38°C (100,4°F), el indicador de fiebre se ilumina en rojo y en la pantalla aparece , que indica que la temperatura corporal se encuentra por encima del rango normal. Fig. 14 El valor medido se almacena automáticamente con la fecha/hora y la clasificación “fiebre”...
  • Page 108: Mostrar Valores Guardados

    • Si después de 30 segundos no ha sido posible establecer una conexión con la aplica- ción, se apaga el símbolo de Bluetooth ® y el aparato se apaga automáticamente después de 60 segundos. En la primera conexión, en el aparato se muestra un código PIN de seis dígitos generado al azar, y al mismo tiempo se muestra en el smartphone un campo de entrada en el que deberá...
  • Page 109 También existe la posibilidad de transferir los valores medidos y guardados en el aparato a un smar- tphone por Bluetooth ® . Para ello necesitará la aplicación “beurer HealthManager” o la aplicación “beurer BabyCare”, disponibles gratuitamente en el App Store de Apple y en Google Play. Requisitos del sistema iOS ≥ 9.0, Android ≥ 5.0 Bluetooth ®...
  • Page 110              Paso 2: Aplicación “beurer HealthManager” o “beurer BabyCare”* Agregue el FT 95 en la aplicación “beurer HealthManager” o “beurer BabyCare” en “Ajustes/Mis dispositivos”.              Paso 3: FT 95 Realice una medición.
  • Page 111: Medición De La Temperatura De Objetos/Temperatura Ambiente

    9. Medición de la temperatura de objetos/temperatura ambiente Si desea medir la temperatura de un objeto con este ter- mómetro, debe cambiar al modo temperatura de objeto. • Para ello, pulse brevemente el botón MODE/MEM con el termómetro encendido. El aparato cambia al modo temperatura de objeto (fig.
  • Page 112: Visualización De Errores

    10. Visualización de errores Mensaje Problema Solución de error Medición durante la comprobación auto- Espere hasta que el símbolo de la frente mática, el aparato aún no está listo para deje de parpadear. medir. Temperatura ambiente inferior a 15 °C o La temperatura ambiente debe estar entre superior a 40 °C (<59 °F, >104 °F).
  • Page 113: Pilas

    11. Pilas Cambiar las pilas El aparato requiere dos pilas tipo AAA, LR03. • Abra el compartimento de las pilas. Desplace para ello hacia abajo el compartimento de las pilas. • Extraiga del compartimento las pilas gastadas. • Coloque pilas nuevas. Asegúrese de que las pilas están colocadas con la polaridad correcta.
  • Page 114: Almacenamiento Del Aparato

    Limpie el sensor de medición tras cada uso. Para ello, utilice un paño suave o un bastoncillo de al- godón mojados con desinfectante o alcohol de 70º. Para limpiar todo el aparato utilice un paño suave humedecido ligeramente con lejía jabonosa suave. Bajo ningún concepto debe entrar agua en el aparato.
  • Page 115 Si se utiliza el aparato en el ejercicio de la medicina, deberán realizarse controles metrológicos con los medios adecuados. Puede solicitar más información sobre la comprobación de la precisión del aparato al servicio de asistencia técnica en la dirección indicada. Nos reservamos el derecho de efectuar modificaciones técnicas para mejorar y perfeccionar el pro- ducto.
  • Page 116 Rangos de medición y Medición de la temperatura de objetos de 0 °C a 80 °C (de 32 °F precisión de la medición de la a 176 °F) temperatura de objetos Precisión de la medición ± 4 % o ± 2 °C (± 4 °F) Función de almacenamiento Guarda automáticamente los últimos 60 valores de medición.
  • Page 117: Directivas

    CE de este producto se encuentra en: https://www.beurer.com/web/we-landingpages/ de/cedeclarationofconformity.php 17. Garantía/asistencia Beurer GmbH, Söflinger Straße 218, D-89077 Ulm (en lo sucesivo, «Beurer») concede una garantía para este producto. La garantía está sujeta a las siguientes condiciones y el alcance de la misma se describe a continuación.
  • Page 118 - productos cuyo uso, limpieza, almacenamiento o mantenimiento sea indebido o vaya contra lo dispuesto en las instrucciones de uso, así como productos que hayan sido abiertos, reparados o modificados por el comprador o por un centro de servicio técnico no autorizado por Beurer;...
  • Page 119 - daños que se hayan producido durante el transporte entre las instalaciones del fabricante y las del cliente o bien entre el centro de servicio técnico y el cliente; - productos que se hayan adquirido como productos de calidad inferior o de segunda mano; - daños derivados que resulten de una falta del producto.
  • Page 120 ITALIANO Contenuto 1. Spiegazione dei simboli ........ 121 8. Misurazione sulla fronte ......135 2. Uso conforme ..........122 9. Misurazione della temperatura superficiale/ 3. Segnalazioni di rischi e indicazioni temperatura ambiente ......... 141 di sicurezza ........... 123 10. Messaggi di errore ........143 3.1 Pericoli per l’utilizzatore ......
  • Page 121: Spiegazione Dei Simboli

    Cordiali saluti Il team Beurer Fornitura Controllare l’integrità esterna della confezione e del contenuto. Prima dell’uso assicurarsi che l’ap- parecchio e gli accessori non presentino nessun danno palese e che il materiale di imballaggio sia stato rimosso. In caso di dubbio non utilizzare l’apparecchio e consultare il proprio rivenditore o con- tattare il Servizio clienti indicato.
  • Page 122: Uso Conforme

    Apparecchio protetto contro Nota la penetrazione di corpi solidi Nota che fornisce informazioni IP 22 ≥ 12,5 mm e contro la caduta importanti. inclinata di gocce d’acqua Seguire le istruzioni per l’uso. Numero di serie Informazione importante/ Parte applicativa tipo BF Suggerimento Smaltimento secondo le norme Il marchio CE certifica la...
  • Page 123: Segnalazioni Di Rischi E Indicazioni Di Sicurezza

    in casa. In questo modo è possibile conoscere in modo semplice e veloce la temperatura corporea. I valori vengono memorizzati automaticamente. 3. Segnalazioni di rischi e indicazioni di sicurezza Pericoli per l’utilizzatore • Utilizzare l’apparecchio solo dopo aver letto e compreso le presenti istruzioni per l’uso. •...
  • Page 124: Pericoli Per L'apparecchio

    • Prima di ogni utilizzo verificare che la lente sia intatta. Nel caso in cui la lente sia danneggiata ri- volgersi al proprio rivenditore o al Servizio clienti. • Non toccare la lente con il dito. • I valori misurati con l’apparecchio servono unicamente a scopo informativo, in nessun caso posso- no sostituire una visita medica! Prima di adottare trattamenti medici, consultare il proprio medico.
  • Page 125: Avvertenze Sull'uso Delle Batterie

    • Non esporre l’apparecchio alla luce diretta del sole, alle alte temperature o a elevata umidità. • Evitare che l’apparecchio entri in contatto con dei liquidi. Il termometro non è impermeabile. Evi- tare qualunque contatto diretto con acqua o altri liquidi. •...
  • Page 126: Informazioni Relative Al Termometro

    Temperatura rettale da 36,3 °C a 37,8 °C (da 97,3 °F a 100,0 °F) Termometro convenzionale Suggerimento Beurer • Non confrontare mai le temperature misurate con termometri diversi. • Informare il proprio medico sul tipo di termometro usato e sulla parte del corpo in cui si è...
  • Page 127 • Attività Le attività fisiche e, in modo più limitato, le attività mentali aumentano la temperatura corporea. Suggerimento Beurer La misurazione della temperatura corporea fornisce il valore attuale di una persona. Se non si è sicuri dell’interpretazione dei risultati o se risultano dei valori anomali (ad es. febbre), è...
  • Page 128: Descrizione Dell'apparecchio

    5. Descrizione dell’apparecchio 1 Display 2 Pulsante MODE/MEM 3 Pulsante 4 Pulsante LIGHT/SET 5 Pulsante SCAN 6 Indicazione della febbre 7 Sensore di misurazione 8 Coperchio vano batterie Pulsanti Funzioni MODE Impostazione della modalità di misurazione. MODE/MEM Visualizzazione dei valori misurati memorizzati. LIGHT Accensione manuale dell’illuminazione del display.
  • Page 129: Bluetooth

    Descrizione del display 1 Bluetooth ® 2 Modalità di misurazione superficiale 3 Modalità di misurazione della temperatura ambiente 4 Modalità di misurazione della temperatura della fronte 5 Simbolo del segnale acustico 6 Anno 7 Funzione di memoria 8 Data 9 Indicatore del valore misurato/numero di posizione 10 Indicatore di carica delle batterie 11 Risultato di misurazione ≥...
  • Page 130: Messa In Funzione

    6. Messa in funzione Inserimento della batteria • Rimuovere il coperchio del vano batterie. • Inserire le due batterie nel vano batterie rispettando la posi- zione dei poli. • Utilizzare esclusivamente batterie di marca del tipo: 2 batterie micro da 1,5 V (tipo alcalino LR03). Verificare che le batterie siano inserite correttamente, con i poli posizionati in base alle indicazioni.
  • Page 131 Reintrodurre le batterie oppure tenere premuto il pulsan- te LIGHT/SET con il termometro acceso per 3 secondi. Nel display lampeggiano l’unità della temperatura (fig. 1). I risultati della temperatura misurata possono essere visua- lizzati in gradi Celsius (°C) e Fahrenheit (°F). •...
  • Page 132 Nel display lampeggia l’indicatore del formato anno (fig. 3). • Impostare l’anno con il pulsante MODE/MEM e con- fermare con il pulsante LIGHT/SET. Nel display lampeggia il giorno/mese (fig. 4). • Impostare il giorno e il mese con il pulsante MODE/ MEM e confermare con il pulsante LIGHT/SET (fig.
  • Page 133 Nel display lampeggia (fig. 8). L’illuminazione automatica del display (che appare dopo aver misurato la temperatura della fronte) può essere at- tivata o disattivata. • Per attivare l’illuminazione del display utilizzare il pul- sante MODE/MEM per selezionare e confermare con il pulsante LIGHT/SET. Fig.
  • Page 134 Nel display lampeggia (fig. 9). I segnali acustici (all’accensione dell’apparecchio, durante la misurazione, alla fine della misurazione) possono essere attivati o disattivati. • Per attivare i segnali acustici usare il pulsante MODE/ MEM per selezionare e confermare con il pulsan- te LIGHT/SET.
  • Page 135: Misurazione Sulla Fronte

    8. Misurazione sulla fronte Suggerimento Beurer Tenere presente che • l’attività fisica, una sudorazione della fronte particolarmente elevata, l’assunzione di medi- cinali vasocostrittori e le irritazioni della pelle possono alterare i risultati della misurazione, • la fronte e in particolare le tempie devono essere libere da sudore e cosmetici.
  • Page 136 • Per accendere il termometro, premere brevemente il pulsante opo un breve autotest e un doppio segnale acustico l’appa- recchio è pronto per misurare la temperatura sulla fronte . L’ap- parecchio è sempre in modalità Temperatura frontale, che si può ri- conoscere dal simbolo sul display.
  • Page 137 Se il risultato di misurazione è compreso tra 37,5 °C e 37,9 °C, l’in- dicatore della febbre è giallo. Ciò segnala che la temperatura cor- porea è a un livello aumentato. Fig. 13 Se il risultato è superiore a 38 °C (100,4 °F), l’indicatore della febbre è...
  • Page 138 Se sull’apparecchio è attivato il Bluetooth ® , i dati vengono trasmessi all’app dopo la misurazione. • Sul display lampeggia l’icona Bluetooth ® (fig. 15). L’apparecchio cer- ca di stabilire una connessione con l’app solo per ca. 30 secondi. ® •...
  • Page 139 I valori misurati e memorizzati sull’apparecchio possono inoltre essere trasmessi allo smartphone tra- mite Bluetooth ® . A tale scopo è necessaria l’app "beurer HealthManager" o l’app "beurer BabyCare" disponibile nell’Apple App Store o in Google Play. Requisiti del sistema iOS ≥...
  • Page 140 (Vedere il capitolo 7. "Impostazione delle funzioni di base").              Fase 2: app "beurer HealthManager o "beurer BabyCare"* Aggiungere l’FT 95 all’app "beurer HealthManager" o all’app "beurer Baby- Care" in "Impostazioni/Miei dispositivi".             ...
  • Page 141: Misurazione Della Temperatura Superficiale/Temperatura Ambiente

    L’app "beurer HealthManager" o "beurer BabyCare" deve essere attivata per la trasmissione. Per garantire una trasmissione indisturbata, rimuovere eventualmente l’involucro protettivo dello smartphone. Avviare la trasmissione dati dall’app "beurer HealthManager" o "beurer BabyCare". 9. Misurazione della temperatura superficiale/temperatura ambiente Se si desidera misurare la temperatura superficiale con questo termometro, è...
  • Page 142 Se si desidera usare il termometro per misurare la temperatura dell’ambiente, è necessario passare alla modalità della Temperatura ambiente. • A termometro acceso premere due volte il pulsante MODE/MEM. L’apparecchio passa alla modalità di Temperatura ambiente • La temperatura ambiente viene mostrata direttamente (fig. 16). L’apparecchio si spegne automaticamente dopo circa 60 secondi oppure per spegnerlo premere il pulsante Fig.
  • Page 143: Messaggi Di Errore

    10. Messaggi di errore Messaggio Problema Soluzione di errore Misurazione durante l’autotest, apparec- Attendere finché il simbolo della fronte chio non ancora pronto. smette di lampeggiare. Temperatura ambiente inferiore a 15 °C o La temperatura ambiente deve essere superiore a 40 °C (<59 °F, >104 °F). compresa tra 15 °C e 40 °C (59 °F - 104 °F).
  • Page 144: Batterie

    11. Batterie Sostituzione delle batterie L’apparecchio necessita di due batterie, tipo AAA, LR03. • Aprire il vano batterie. Fare scorrere il vano batterie verso il basso. • Estrarre le batterie esauste dal vano batterie. • Inserire batterie nuove. Accertarsi che le batterie siano orientate correttamente in base alla polarità. •...
  • Page 145: Conservazione Dell'apparecchio

    Pulire il sensore di misurazione dopo ogni utilizzo. A tale scopo utilizzare un panno morbido o un cot- ton fioc imbevuto di disinfettante o di alcol al 70%. Per la pulizia dell’intero apparecchio utilizzare un panno morbido leggermente inumidito con acqua e sapone.
  • Page 146 Se l’apparecchio viene utilizzato a scopo professionale, è necessario effettuare controlli tecnici con gli strumenti adeguati. Richiedere informazioni dettagliate sulla verifica della precisione all’indirizzo indicato del servizio assistenza. Ci riserviamo il diritto di apportare modifiche tecniche al fine del miglioramento e del continuo svi- luppo del prodotto.
  • Page 147 Intervalli di misurazione e pre- da 0 °C a 80 °C (da 32 °F a 176 °F) cisione della misurazione della Precisione di misurazione ± 4% o ± 2 °C (± 4 °F) temperatura superficiale Funzione di memorizzazione Memorizza automaticamente gli ultimi 60 valori misurati. della misurazione della tempera- tura corporea Segnale acustico...
  • Page 148: Direttive

    CE per questo prodotto si trova su: https://www.beurer.com/web/ we- landingpages/de/cedeclarationofconformity.php 17. Garanzia/Assistenza Beurer GmbH, Söflinger Strasse 218, D-89077 Ulm (di seguito denominata "Beurer") offre una garanzia per questo prodotto, nel rispetto delle seguenti condizioni e nella misura descritta di seguito.
  • Page 149 Nel caso in cui il prodotto, durante il periodo di garanzia, si dimostrasse incompleto o presentas- se difetti di funzionamento in linea con le seguenti disposizioni, Beurer provvederà a sostituire o riparare gratuitamente il prodotto in base alle presenti condizioni di garanzia.
  • Page 150 Beurer; - i danni occorsi nel trasporto dal produttore al cliente o tra il centro di assistenza e il cliente;...
  • Page 151 TÜRKÇE İçindekiler 1. İşaretlerin açıklaması ........152 9. Nesne sıcaklığının/ 2. Amacına uygun kullanım ....... 154 oda sıcaklığının ölçülmesi ......171 3. Uyarılar ve güvenlik bilgileri ......154 10. Hataların gösterimi ........172 3.1 Kullanıcıya yönelik tehlikeler ....154 11. Piller ............172 3.2 Cihaza yönelik tehlikeler ......
  • Page 152: İşaretlerin Açıklaması

    Yeni cihazınızı iyi günlerde kullanmanızı dileriz. Beurer Ekibiniz Teslimat kapsamı Teslimat kapsamını kontrol ederek karton ambalajın dıştan hasar görmemiş ve içeriğin eksiksiz ol- duğundan emin olun. Cihazı kullanmadan önce, cihazda ve aksesuarlarında gözle görülür hasarlar olmadığından ve tüm ambalaj malzemelerinin çıkarıldığından emin olun. Şüpheli durumlarda kullan- mayın ve satıcınıza veya belirtilen müşteri hizmetleri adresine başvurun.
  • Page 153 Cihaz 12,5 mm ve daha büyük yabancı cisimlere ve eğimli bir Önemli bilgilere yönelik not. şekilde damlayan suya karşı IP 22 korumalıdır Kullanım kılavuzu dikkate alınmalıdır Seri numarası Uygulama parçası tip BF Önemli bilgi/öneri Elektrikli ve elektronik atık CE işareti, cihazın tıbbi cihazlarla ilgili AB direktifine ürünlerle ilgili 93/42/EEC (WEEE - Waste Electrical and...
  • Page 154: Amacına Uygun Kullanım

    2. Amacına uygun kullanım Bu termometre, alından temassız ateş ölçümü için tasarlanmıştır. Bu termometre ile ayrıca nesne ve oda sıcaklığı da ölçülebilir. Bu termometre evde ölçüm yapılması için uygundur. Bununla vücut sıcak- lığınızı hızlı ve basit biçimde ölçebilirsiniz. Değerler otomatik olarak kaydedilir. 3.
  • Page 155: Cihaza Yönelik Tehlikeler

    • Her kullanımdan önce lensin sağlam olup olmadığını kontrol edin. Hasarlı olması halinde satıcını- za veya servisinize başvurun. • Lense parmağınızla dokunmayın. • Ölçümler ile belirlediğiniz değerler sadece bilgilendirme amaçlıdır ve doktor muayenesi yerine geç- mez! Tıbbi önlemler almadan önce mutlaka doktorunuza danışın. •...
  • Page 156: Pillerin Kullanımıyla Ilgili Bilgiler

    • Cihazın içini açmayın veya cihazı kendiniz onarmaya çalışmayın. Cihazın yalnızca yetkili servisler tarafından onarılmasını sağlayın, aksi takdirde garanti hakkınız ortadan kalkar. • Taşınabilir veya mobil HF iletişim sistemleri bu cihazı etkileyebilir. Pillerin kullanımıyla ilgili bilgiler • Şarj edilebilir pil hücresindeki sıvı cilt veya gözlerle temas ettiğinde, ilgili yeri suyla yıkayın ve bir doktora başvurun.
  • Page 157: Bu Termometre Hakkında Bilgiler

    Rektal sıcaklık 36,3 °C - 37,8 °C (97,3 °F - 100,0 °F) Geleneksel termometre Beurer önerisi • Farklı termometrelerle ölçülmüş sıcaklıkları asla birbiriyle karşılaştırmayın. • Doktorunuza vücut sıcaklığınızı hangi termometre ile ve vücudunuzun hangi bölgesinde ölçtüğünüzü söyleyin. Bunu kendi kendinize yaptığınız teşhiste de göz önünde bulundurun.
  • Page 158 • Aktiviteler Vücut aktiviteleri ile etkisi daha düşük olan zihinsel aktiviteler vücut sıcaklığını arttırır. Beurer önerisi Vücut sıcaklığının ölçümü bir insanın güncel ölçüm değerini verir. Eğer sonuçları doğru yo- rumladığınızdan emin olamıyorsanız veya anormal değerler (örn. ateş) ortaya çıkarsa, dok- torunuza danışın.
  • Page 159: Cihaz Açıklaması

    5. Cihaz açıklaması 1 Ekran 2 MODE/MEM tuşu tuşu 4 LIGHT/SET tuşu 5 SCAN tuşu 6 Ateş göstergesi 7 Ölçüm sensörü 8 Pil bölmesi kapağı Tuşlar Fonksiyonlar MODE Ölçme modunun ayarlanması. MODE/MEM Kaydedilen ölçüm değerlerini gösterir. LIGHT Ekran ışığının manuel olarak açılması. LIGHT/SET Temel fonksiyonların ayarlanması.
  • Page 160 Ekran açıklaması 1 Bluetooth ® 2 Nesne sıcaklığı modu 3 Oda sıcaklığı modu 4 Alın sıcaklığı modu 5 Sinyal sesi simgesi 6 Yıl 7 Kayıt fonksiyonu 8 Tarih 9 Sıcaklık değeri ve kayıt yeri numarası göstergesi 10 Pil durumu göstergesi 11 Ölçüm sonucu ≥...
  • Page 161: İlk Çalıştırma

    6. İlk çalıştırma Pillerin takılması • Pil bölmesi kapağını çıkarın. • Her iki pili kutupları doğru yönde olacak şekilde pil bölmesi- ne yerleştirin. • Sadece kaliteli olduğu bilinen bir markaya sahip şu tip piller kullanın: 2 x 1,5 V mikro (alkalin tip LR03). Pillerin, işaretlere uygun olarak kutupları doğru yönde olacak şekilde yerleştirilmesine dikkat edin.
  • Page 162 Pilleri yeniden yerleştirin veya termometre açıkken LIGHT/ SET tuşunu 3 saniye basılı tutun. Sıcaklık ölçüm birimi ek- randa yanıp söner (Şek. 1). Sıcaklık sonucunuzu derece Santigrat (°C) ya da derece Fahrenheit (°F) sıcaklık birimi cinsinden görüntüleyebilir- siniz. • Ölçüm sonuçlarını Santigrat cinsinden görüntüle- Şek.
  • Page 163 Yıl ekranda yanıp söner (Şek. 3). • MODE/MEM tuşu ile yılı ayarlayın ve LIGHT/SET tuşu- na basarak onaylayın. Gün/ay ekranda yanıp söner (Şek. 4). • MODE/MEM tuşu ile günü ve ayı ayarlayın ve LIGHT/ SET tuşuna basarak onaylayın (Şek. 5). Şek.
  • Page 164 Ekranda yanıp söner (Şek. 8). Otomatik ekran ışığını (alın sıcaklığını ölçtükten sonra gö- rünür) açabilir veya kapatabilirsiniz. • Otomatik ekran ışığını açmak için MODE/MEM tuşu ile öğesini seçin ve LIGHT/SET tuşuna basarak onay- layın. • Otomatik ekran ışığını kapatmak için MODE/MEM tuşu Şek.
  • Page 165: Alından Ölçüm

    Şek. 10 öğesini seçin ve LIGHT/SET tuşuna basarak onaylayın. 8. Alından ölçüm Beurer önerisi Şunları göz önünde bulundurun: • Fiziksel aktivite, alın bölgesinde aşırı terleme, damar daraltıcı ilaçlar ve ciltteki tahrişler ölçüm sonucunu etkileyebilir. • Alın bölgesinin veya şakakların terden ve kozmetik ürünlerden temizlenmiş olması gerekir.
  • Page 166 ihaz kendi • Termometreyi açmak için tuşuna kısa süreyle basın. C kendine kısa bir test uygulayıp iki kısa bip sesi duyulduktan sonra alın bölgesinde sıcaklık ölçümü yapmaya hazırdır . Cihaz alın sı- caklığı modundadır. Bunu ekrandaki simgesinden anlayabilirsiniz. Şek. 10 •...
  • Page 167 Ölçüm sonucu 37,5°C ile 37,9°C arasındaysa, ateş göstergesi sarı renkte yanar ve bu da vücut sıcaklığının yüksek aralıkta olduğu- nu gösterir. Şek. 13 Ölçüm sonucu 38°C’nin (100,4°F) üzerindeyse, ateş göstergesi kır- mızı renkte yanar, ekranda görünür ve bu da vücut sıcaklığınızın normal aralığın üzerinde olduğu anlamına gelir.
  • Page 168: Kaydedilen Ölçüm Değerlerinin Görüntülenmesi

    Cihazda Bluetooth ® özelliği etkinse, ölçümden sonra ölçüm değerleri oto- matik olarak uygulamaya aktarılır. • Ekranda Bluetooth ® simgesi yanıp söner (Şek. 15). Cihaz yakl. 30 sa- niye boyunca uygulama ile bağlantı kurmaya çalışır. ® • Bağlantı kurulduğunda Bluetooth simgesinin yanıp sönmesi durur. Tüm ölçüm verileri otomatik olarak uygulamaya aktarılır.
  • Page 169 üzerinden aktarılması Ölçülen ve cihaza kaydedilen değerleri Bluetooth ® üzerinden akıllı telefonunuza aktarabilirsiniz. Bunun için “beurer HealthManager” veya “beurer BabyCare” uygulaması gereklidir. Bu uygulamaları Apple App Store ve Google Play’den ücretsiz olarak indirebilirsiniz. Sistem gereksinimleri iOS ≥ 9.0, Android ≥ 5.0 Bluetooth ®...
  • Page 170 • Bluetooth etkinleştirilmişse, ölçümden sonra veriler otomatik olarak aktarılır. Aktarım için “beurer HealthManager” veya “beurer BabyCare” uygulaması etkinleştirilmiş olmalıdır. Aktarma işleminin sorunsuzca gerçekleşmesini sağlamak için lütfen akıllı telefonunuzun koruyucu kılı- fını çıkarın. Veri aktarımını “beurer HealthManager” veya “beurer BabyCare” uygulamasında başlatın.
  • Page 171: Nesne Sıcaklığının/Oda Sıcaklığının Ölçülmesi

    9. Nesne sıcaklığının/oda sıcaklığının ölçülmesi Bu termometreyle nesne sıcaklığını ölçmek istiyorsanız, ter- mometreyi nesne sıcaklığı moduna almanız gerekir. • Bunun için termometre çalışır durumdayken MODE/ MEM tuşuna kısa süreyle basın. Cihaz nesne sıcaklığı moduna geçer (Şek. 16). • Termometreyi ölçüm yapmak istediğiniz yerin 2 - 3 cm önünde tutun.
  • Page 172: Hataların Gösterimi

    10. Hataların gösterimi Hata Sorun Çözüm mesajı Kendi kendine test sırasında ölçüm. Ci- Alın simgesinin yanıp sönmesi durana kadar haz ölçüm yapmaya hazır değil. bekleyin. Oda sıcaklığı 15 °C altında veya 40 °C Oda sıcaklığı 15 °C ve 40 °C (59 °F - 104 °F) üzerinde (<59 °F, >104 °F).
  • Page 173: Cihazın Temizlenmesi

    • Tükenmiş pilleri pil bölmesinden çıkarın. • Yeni pilleri yerleştirin. Pil kutuplarının doğru yönde olmasına dikkat edin. • Pil bölmesinin kapağını kapatın. Pillerin bertaraf edilmesi • Tükenmiş, tamamen boşalmış piller özel işaretli toplama kutularına atılarak, özel atık toplama yer- lerine veya elektrikli cihaz satıcılarına teslim edilerek bertaraf edilmelidir. Pillerin bertaraf edilmesi, yasal olarak sizin sorumluluğunuzdadır.
  • Page 174: Cihazın Saklanması

    Cihazın saklanması Cihaz, sıcaklığın ve hava neminin çok yüksek veya çok düşük olduğu yerlerde (w    15. Teknik veriler), güneş ışığında, elektrik akımına bağlı olarak veya tozlu yerlerde saklanmamalı ve kullanılmamalıdır. Aksi takdirde ölçümlerde yanlışlık olabilir. Uzun süreli saklama planlanıyorsa, piller çıkarılmalıdır. 14.
  • Page 175 Temel fonksiyonlar Alın sıcaklığı ölçümü Nesne sıcaklığı ölçümü Oda sıcaklığı ölçümü Ölçüm birimleri Santigrat (°C) veya Fahrenheit (°F) Çalışma koşulları 15 °C - 40 °C (59 °F - 104 °F) Bağıl hava nemi < %95 Saklama ve nakliye koşulları -20 °C - 50 °C (-4 °F - 122 °F) Bağıl hava nemi <...
  • Page 176: Direktifler

    özel önlemlere tabidir. Cihaz, konutlar dahil olmak üzere bu kullanım kılavuzunda belirtilen tüm ortamlarda çalıştırılabilir. Bu ürünün 2014/53/EU sayılı Avrupa RED Direktifine uygun olduğunu garanti ederiz. Bu ürünle ilgili CE uyumluluk beyanını şu konumda bulabilirsiniz: https://www.beurer.com/web/we-landingpages/ de/cedeclarationofconformity.php...
  • Page 177: Garanti / Servis

    17. Garanti / Servis Beurer GmbH, Söflinger Straße 218, D-89077 Ulm (aşağıda “Beurer” olarak anılacaktır) bu ürün için aşağıdaki koşullar çerçevesinde ve aşağıda açıklanan kapsamda bir garanti sunmaktadır. Aşağıdaki garanti koşulları, satıcının müşteri ile yaptığı satış sözleşmesinden doğan yasal garanti yükümlülüklerini etkilemez.
  • Page 178 - Kullanım kılavuzundaki bilgiler dikkate alınmadan ve/veya usulüne uygun olmayan bir şekilde kullanılan, temizlenen, depolanan veya bakımı yapılan ürünler ve Beurer tarafından yetkilendi- rilmemiş bir servis merkezi veya müşterinin kendisi tarafından açılan, onarılan veya üzerinde değişiklik yapılan ürünler;...
  • Page 179: Уважаемый Покупатель

    РУССКИЙ Оглавление 1. Пояснения к символам ....... 180 8. Измерение температуры на лбу ....195 2. Использование по назначению ....182 9. Измерение температуры объекта/ 3. Предостережения и указания по технике температуры в помещении ....... 201 безопасности ..........182 10. Индикация неисправностей ..... 203 3.1 Виды опасности для пользователя ..182 11.
  • Page 180: Пояснения К Символам

    С наилучшими пожеланиями, компания Beurer Комплект поставки Проверьте комплектность поставки и убедитесь в том, что на картонной упаковке нет внешних повреждений. Перед использованием убедитесь в том, что прибор и его принадлежности не име- ют видимых повреждений, и удалите все упаковочные материалы. При возникновении сомнений не используйте прибор и обратитесь к продавцу или в сервисную службу по указанному адресу.
  • Page 181 Прибор защищен от проникновения Указание твердых тел размером IP 22 Важная информация. ≥ 12,5 мм и капель воды, падающих под углом. Соблюдайте инструкцию Серийный номер. по применению. Рабочая часть термометра Важная информация/ типа BF. совет. Утилизация прибора в со- Знак CE подтверждает ответствии с директивой соответствие основным ЕС по отходам электрическо- требованиям директивы го...
  • Page 182: Использование По Назначению

    2. Использование по назначению Термометр предназначен для бесконтактного измерения температуры на лбу. С его помощью также можно измерить температуру объекта и помещения. Термометр подходит для измере- ния в домашних условиях. С его помощью Вы можете быстро и просто определить темпера- туру тела. Измеренные значения сохраняются автоматически. 3. Предостережения и указания по технике безопасности Виды...
  • Page 183 ности, не следует самовольно принимать новые лекарства или менять вид и (или) дозиров- ку назначенных лекарств. • Прибор разрешается использовать только в целях, описанных в данной инструкции по при- менению. • Изготовитель не несет ответственности за ущерб, вызванный неквалифицированным или ненадлежащим использованием прибора. • Использование прибора детьми запрещено. Не разрешайте детям играть с медицински- ми...
  • Page 184 • Не используйте прибор рядом с другими устройствами и не устанавливайте его на другие приборы, это может вызвать ошибки в работе. Однако если использование прибора все-та- ки необходимо в том виде, как описано выше, следует наблюдать за ним и другими устрой- ствами, чтобы убедиться, что они работают надлежащим образом. •...
  • Page 185: Информация О Термометре

    • Если батарейка потекла, очистите отделение для батареек сухой салфеткой, надев защит- ные перчатки. • Защищайте батарейки от чрезмерного воздействия тепла. • Опасность взрыва! Не бросайте батарейки в огонь. • Не заряжайте и не замыкайте батарейки накоротко. • Если прибор длительное время не используется, извлеките батарейки из отделения для батареек.
  • Page 186 Оральная температура от 36,0 до 37,4 °C (от 96,8 до 99,3 °F) Обычный термометр Ректальная температура от 36,3 до 37,8 °C (от 97,3 до 100,0 °F) Обычный термометр Совет компании Beurer • Никогда не сравнивайте между собой температуры, измеренные разными термо- метрами. • Сообщите врачу, каким термометром Вы мерили температуру и в каком месте тела. Учитывайте это и при самодиагностике.
  • Page 187 • Активность. Физическая активность, а также умственная деятельность (в меньшей степени) повышают температуру тела. Совет компании Beurer Измерение выдает значение температуры тела человека в данный момент. Если воз- никли сомнения в толковании результатов измерения или имеют место значения с от- клонением от нормы (например, жар), обратитесь к лечащему врачу. Это относится...
  • Page 188: Описание Прибора

    5. Описание прибора 1 Дисплей 2 Кнопка MODE/MEM 3 Кнопка 4 Кнопка LIGHT/SET 5 Кнопка SCAN 6 Индикатор повышенной темпера- туры 7 Измерительный датчик 8 Крышка отделения для батареек Кнопки Функции MODE Настройка режима измерения. MODE/MEM (режим/память) Индикация сохраненных измеренных значений. LIGHT Ручное...
  • Page 189: Описание Дисплея

    Описание дисплея 1 Bluetooth ® 2 Режим измерения температуры объекта 3 Режим измерения температуры в помещении 4 Режим измерения температуры на лбу 5 Символ звукового сигнала 6 Год 7 Функция памяти 8 Дата 9 Индикация значения температуры/номера ячей- ки памяти 10 Индикация состояния батареи 11 Результат...
  • Page 190: Включение И Настройка Термометра

    6. Подготовка к работе Установка батареек • Снимите крышку отсека для батареек. • Вставьте в отсек две батарейки, соблюдая полярность. • Используйте только качественные батарейки следующего типа: 2 алкалиновые (щелочные) батарейки по 1,5 В Micro (тип LR 03) Обязательно проследите за тем, чтобы батарейки были установлены с правиль- ной полярностью в соответствии с маркировкой. Нельзя использовать многократно заря- жаемые...
  • Page 191 Повторно вставьте батарейки или нажмите и удержи- вайте кнопку LIGHT/SET при включенном термометре в течение 3 секунд. На дисплее мигает индикация еди- ницы измерения температуры (рис. 1). Отображение результатов измерения возможно в гра- дусах Цельсия (°C) или градусах Фаренгейта (°F). • Для просмотра результатов измерения в  граду- Рис. 1 сах...
  • Page 192 На дисплее мигает индикация года (рис. 3). • С  помощью кнопки MODE/MEM установите год и подтвердите ввод нажатием кнопки LIGHT/SET. На дисплее мигает индикация дня/месяца (рис. 4). • С помощью кнопки MODE/MEM установите день и  месяц и  подтвердите ввод нажатием кнопки LIGHT/SET (рис. 5). Рис. 3 Рис. 4 Если выбирается 12-часовой формат, последо- вательность...
  • Page 193 На дисплее мигает (рис. 8). Вы можете включить или выключить автоматическую подсветку дисплея (включается после измерения тем- пературы на лбу). • Для включения автоматической подсветки дисплея с помощью кнопки MODE/MEM выберите и под- твердите выбор нажатием кнопки LIGHT/SET. Рис. 8 • Для выключения автоматической подсветки дис- плея с помощью кнопки MODE/MEM выберите и подтвердите...
  • Page 194 На дисплее мигает (рис. 9). Вы можете включать или выключать звуковые сигналы (при включении прибора, в процессе измерения, по за- вершении измерения). • Для включения звуковых сигналов с помощью кноп- ки MODE/MEM выберите и подтвердите выбор нажатием кнопки LIGHT/SET. Рис. 9 • Для выключения звуковых сигналов с помощью кнопки MODE/MEM выберите и подтвердите...
  • Page 195: Измерение Температуры На Лбу

    8. Измерение температуры на лбу Совет компании Beurer Учитывайте следующее: • Физическая активность, постоянное повышенное потоотделение на лбу, прием со- судосуживающих медикаментов и кожные раздражения могут привести к искаже- нию результатов измерения. • На лбу или висках не должно быть пота и косметики. • Мы рекомендуем выполнить три измерения на лбу. Если результаты трех измере- ний...
  • Page 196 осле • Для включения термометра коротко нажмите кнопку . П быстрой самопроверки и двух коротких звуковых сигналов прибор готов к измерению температуры на лбу . Прибор на- ходится в режиме измерения температуры на лбу. Об этом сви- детельствует символ на дисплее. Рис. 10 • Удерживайте термометр на расстоянии 2–3 см от точки измере- ния...
  • Page 197 Если результат измерения находится в  диапазоне от  37,5 до 37,9 °C, то индикатор повышенной температуры подсвечи- вается желтым светом, что говорит о повышенной темпера- туре тела. Рис. 13 Если результат измерения выше 38 °C (100,4 °F), то индикатор повышенной температуры подсвечивается красным светом, а на дисплее появляется символ , что означает высокую температуру...
  • Page 198 Если в приборе активирован Bluetooth ® , то после измерения резуль- таты автоматически передаются в приложение. • На дисплее мигает символ Bluetooth ® (рис. 15). В течение 30 се- кунд прибор устанавливает связь с приложением. ® • Как только соединение будет установлено, символ Bluetooth пе- рестанет мигать. Все результаты измерения автоматически пере- даются...
  • Page 199 ® У Вас есть возможность перенести измеренные и сохраненные на приборе значения на смарт- фон при помощи Bluetooth ® . Вам понадобятся приложения «beurer HealthManager» или «beurer BabyCare». Они доступны для бесплатной загрузки в Apple App Store и Google Play. Системные требования iOS ≥ 9.0, Android ≥...
  • Page 200 Проведите измерение.              Шаг 4. FT 95 Передача данных сразу после измерения ® • Если функция Bluetooth активирована, то передача данных выполня- ется автоматически после измерения. Для передачи данных необходимо запустить приложение «beurer HealthManager» или «beurer BabyCare».
  • Page 201 Чтобы обеспечить передачу данных без помех, снимите чехол со смартфона, если он есть. За- пустите передачу данных в приложении «beurer HealthManager» или «beurer BabyCare». 9. Измерение температуры объекта/температуры в помещении Для измерения температуры объекта с помощью этого термометра необходимо перейти в режим измерения температуры объекта. • Для этого коротко нажмите кнопку MODE/MEM при...
  • Page 202 Для использования термометра с целью измерения температуры в по- мещении необходимо перейти в режим измерения температуры в по- мещении. • Для этого дважды коротко нажмите кнопку MODE/MEM при вклю- ченном термометре. Прибор переключится в режим измерения температуры в помеще- нии • На дисплее отображается температура в помещении (рис. 16). Рис. 18 Прибор...
  • Page 203: Индикация Неисправностей

    10. Индикация неисправностей Сооб­ щение Проблема Решение об ошибке Измерение в процессе самопровер- Подождите, пока не перестанет мигать ки, прибор еще не готов к измерению. символ лба. Температура в помещении ниже Температура в помещении должна нахо- 15 °C или выше 40 °C (< 59 °F, диться в пределах от 15 до 40 °C (от 59 > 104 °F). до 104 °F). (1) Режим...
  • Page 204: Батарейки

    11. Батарейки Замена батареек В приборе используются две батарейки типа AAA, LR03. • Откройте отделение для батареек. Для этого сдвиньте крышку вниз. • Извлеките использованные батарейки из отделения. • Вставьте новые батарейки. Соблюдайте полярность. • Закройте отделение для батареек. Утилизация батареек • Утилизируйте использованные и полностью разряженные батарейки в контейнеры со специ- альной...
  • Page 205: Хранение Прибора

    Производите очистку измерительного датчика после каждого применения. Используйте для этого мягкую салфетку или ватную палочку, смоченную дезинфекционным средством или 70%-ным спиртом. Для очистки всего прибора используйте мягкую салфетку, слегка смоченную слабым мыльным раствором. Не допускайте попадания жидкости внутрь прибора. Используйте прибор снова лишь после того, как он полностью высохнет. Хранение...
  • Page 206: Технические Характеристики

    15. Технические характеристики Если способ и условия применения прибора не соответствуют спецификации, его безупреч- ная работа не гарантируется! Точность данного термометра была тщательно проверена; прибор был разработан с расчетом на длительный срок эксплуатации. При использовании прибора в медицинских учреждениях следует выполнять метрологический контроль с помощью соответствующих средств. Точные данные для проверки точности при- бора...
  • Page 207 Диапазоны измерения Измерение температуры на лбу и точность измерения От 34 до 42,2 °C (от 93,2 до 108 °F) температуры на лбу Точность измерения: ±0,2 °C (от 93,2 до 108 °F: ±0,4 °F) Клиническая точность Лоб: дети от 1 года до 5 лет ± 0,07 °C (0,13 °F) воспроизведения результатов взрослые ± 0,08 °C (0,14 °F) Диапазоны измерения Измерение температуры объекта от 0 до 80 °C (от 32 и точность измерения до 176 °F) температуры...
  • Page 208: Директивы

    по применению, в том числе в домашних условиях. Настоящим гарантируем, что данное изделие соответствует европейской директиве RED 2014/53/EU. С декларацией о соответствии данного продукта директивам ЕС можно ознакомиться, перейдя по ссылке https://www.beurer.com/web/we-landingpages/de/cedeclarationofconformity.php 17. Гарантия/сервисное обслуживание Более подробная информация по гарантии/сервису находится в гарантийном/сервисном талоне, который входит в комплект поставки.
  • Page 209 POLSKI Spis treści 1. Objaśnienie symboli ........210 8. Pomiar temperatury na czole ...... 224 2. Użytkowanie zgodne z przeznaczeniem ..212 9. Pomiar temperatury obiektu / 3. Ostrzeżenia i wskazówki dotyczące temperatury w pomieszczeniu ....230 bezpieczeństwa ..........212 10. Symbole błędów ......... 231 3.1 Zagrożenia dla użytkownika ....
  • Page 210: Zawartość Opakowania

    Z poważaniem Zespół Beurer Zawartość opakowania Zestaw należy sprawdzić pod kątem zewnętrznych uszkodzeń kartonowego opakowania oraz kom- pletności zawartości. Przed użyciem istotne jest upewnienie się, że na urządzeniu i akcesoriach nie widać żadnych uszkodzeń, a wszystkie części opakowania zostały usunięte. W razie wątpliwości należy zaprzestać używania urządzenia i zwrócić się do dystrybutora lub napisać na podany adres działu obsługi klienta.
  • Page 211 Ochrona urządzenia przed ciała- Wskazówka mi obcymi o wielkości ≥12,5 mm IP 22 Ważne informacje i kroplami wody spadającymi ukośnie Należy przestrzegać instrukcji Numer seryjny obsługi Część aplikacyjna typu BF Ważna informacja/wskazówka Utylizacja przebiega zgodnie z dyrektywą WE w sprawie zu- Oznakowanie CE potwierdza żytego sprzętu elektryczne- zgodność...
  • Page 212: Użytkowanie Zgodne Z Przeznaczeniem

    2. Użytkowanie zgodne z przeznaczeniem Niniejszy termometr służy do bezdotykowego pomiaru temperatury czoła. Ponadto za jego pomocą można też mierzyć temperaturę obiektów i pomieszczenia. Jest on dostosowany do przeprowadza- nia pomiarów w warunkach domowych. Umożliwia łatwy i szybki pomiar temperatury ciała. Wartości są zapisywane automatycznie. 3.
  • Page 213: Zagrożenia Dla Urządzenia

    • Producent nie ponosi odpowiedzialności za szkody wynikające z jego niewłaściwego użytkowania. • Z urządzenia nie mogą korzystać dzieci. Produkty medyczne nie służą do zabawy. • Przed każdym użyciem należy sprawdzić, czy soczewka nie jest uszkodzona. W przypadku jej uszkodzenia należy skontaktować się ze sprzedawcą lub z serwisem. •...
  • Page 214: Wskazówki Dotyczące Postępowania Z Bateriami

    • Chronić urządzenie przed bezpośrednim działaniem promieni słonecznych, wysoką temperaturą i wilgotnością powietrza. • Chronić urządzenie przed kontaktem z cieczami. Nie jest ono wodoszczelne. Unikać każdego bez- pośredniego kontaktu z wodą i innymi płynami. • Nie otwierać i nie naprawiać urządzenia samodzielnie. Może być ono naprawiane wyłącznie w au- toryzowanych punktach serwisowych.
  • Page 215: Informacje Na Temat Termometru

    Od 36,3°C do 37,8°C (od 97,3°F do 100,0°F) Termometr tradycyjny pomiarze rektalnym Wskazówka firmy Beurer • Nie należy porównywać ze sobą temperatur mierzonych za pomocą różnych termometrów. • Lekarzowi należy udzielić informacji, jakim termometrem i w jakim miejscu na ciele mierzo- na była temperatura. Należy to również uwzględnić w przypadku samodzielnej diagnozy.
  • Page 216 Temperatura ciała rano jest niższa i wzrasta w ciągu dnia. • Aktywność Aktywność fizyczna oraz w mniejszym stopniu aktywność umysłowa podwyższają temperaturę ciała. Wskazówka firmy Beurer Pomiar temperatury ciała wskazuje aktualną wartość temperatury ciała człowieka. W przy- padku niepewności podczas interpretacji wyniku lub nietypowej wartości (np. gorączka) należy skontaktować...
  • Page 217: Opis Urządzenia

    5. Opis urządzenia 1 Wyświetlacz 2 Przycisk MODE/MEM 3 Przycisk 4 Przycisk LIGHT/SET 5 Przycisk SCAN 6 Wskaźnik gorączki 7 Czujnik pomiarowy 8 Osłona komory na baterie Przyciski Funkcje MODE Ustawianie trybu pomiaru. MODE/MEM Wskazanie zapisanych wartości pomiaru. LIGHT Ręczne włączanie podświetlenia wyświetlacza. LIGHT/SET Ustawianie funkcji podstawowych.
  • Page 218 Opis wyświetlacza 1 Bluetooth ® 2 Tryb Temperatura obiektu 3 Tryb Temperatura w pomieszczeniu 4 Tryb Temperatura na czole 5 Symbol sygnału dźwiękowego 6 Rok 7 Funkcja zapisywania 8 Data 9 Wskaźnik wartości temperatury / numeru miejsca w pamięci 10 Wskaźnik stanu baterii 11 Wynik pomiaru ≥38,0°C (≥100,4°F) „gorączka”...
  • Page 219: Uruchomienie

    6. Uruchomienie Wkładanie baterii • Zdjąć klapkę komory baterii. • Obie baterie włożyć do komory na baterie zgodnie z ozna- czeniem polaryzacji. • Stosować wyłącznie baterie typu: 2 × 1,5  V AAA (alkaliczne, typ LR 03). Pamiętać o zachowaniu prawidłowej biegunowości zgodnie z oznakowaniem. Nie wol- no stosować...
  • Page 220 Włożyć ponownie baterie lub przy włączonym termome- trze przytrzymać przycisk LIGHT/SET przez 3 sekundy. Na wyświetlaczu zacznie migać jednostka pomiaru tem- peratury (rys. 1). Wyniki pomiaru można wyświetlać w stopniach Celsjusza (°C) lub Fahrenheita (°F). • Aby wyniki pomiaru były wyświetlane w stopniach Cel- Rys.
  • Page 221 Na wyświetlaczu zacznie migać wskazanie roku (rys. 3). • Za pomocą przycisku MODE/MEM ustawić rok i po- twierdzić przyciskiem LIGHT/SET. Na wyświetlaczu zacznie migać wskazanie dnia/miesią- ca (rys. 4). • Za pomocą przycisku MODE/MEM ustawić dzień i mie- siąc, a następnie potwierdzić przyciskiem LIGHT/SET Rys.
  • Page 222 Na wyświetlaczu zacznie migać (rys. 8). Automatyczne podświetlenie wyświetlacza (pojawia się po dokonaniu pomiaru temperatury na czole) można włą- czyć lub wyłączyć. • Aby włączyć automatyczne podświetlenie wyświetla- cza, należy użyć przycisku MODE/MEM i potwier- dzić za pomocą przycisku LIGHT/SET. Rys. 8 •...
  • Page 223 Na wyświetlaczu zacznie migać (rys. 9). Sygnały dźwiękowe (włączanie urządzenia, podczas po- miaru, zakończenie pomiaru) można włączać lub wyłączać. • Aby włączyć sygnały dźwiękowe, należy użyć przyci- sku MODE/MEM i  potwierdzić za pomocą przyci- sku LIGHT/SET. • Aby wyłączyć sygnały dźwiękowe, należy użyć przyci- Rys.
  • Page 224: Pomiar Temperatury Na Czole

    8. Pomiar temperatury na czole Wskazówka firmy Beurer Należy pamiętać, że: • aktywność fizyczna, nadmierna potliwość na czole, przyjmowanie leków zwężających naczynia i podrażnienie skóry może zafałszować wyniki pomiaru; • czoło lub skronie nie mogą być spocone i muszą być wolne od kosmetyków;...
  • Page 225 • Przytrzymać termometr 2–3 cm od miejsca pomiaru na czole (rys. 11). Nacisnąć przycisk SCAN. Rys. 11 Jeśli wynik pomiaru temperatury wynosi mniej niż 37,5°C (99,5°F), wskaźnik temperatury na wyświetlaczu świeci na zielono , sy- gnalizując brak gorączki, czyli temperaturę ciała w prawidłowym zakresie.
  • Page 226 Jeśli wynik pomiaru temperatury wynosi więcej niż 38°C (100,4°F), wskaźnik temperatury na wyświetlaczu świeci na czerwono sygnalizując, że pomiar wykracza poza zakres prawidłowej tem- peratury ciała. Rys. 14 Wartość pomiaru zapisywana jest automatycznie wraz z datą/godziną i klasyfikacją „gorącz- ka” / „brak gorączki” Urządzenie jest gotowe do kolejnego pomiaru, gdy wygeneruje dwa krótkie sygnały dźwię- kowe, a symbol czoła przestanie migać.
  • Page 227 • W górnym wierszu wyświetla się na zmianę godzina i data. Transmisja wyników pomiarów przez Bluetooth ® Użytkownik może również przesłać wartości pomiarów zapisane w urządzeniu do smartfona przez połączenie Bluetooth ® . W tym celu należy skorzystać z aplikacji „beurer HealthManager” lub „beurer BabyCare” dostępnej bezpłatnie w sklepie Apple App Store i Google Play.
  • Page 228 (patrz rozdział 7 „Ustawianie funkcji podstawowych”).              Krok 2: „beurer HealthManager” lub „beurer BabyCare” * W aplikacji „beurer HealthManager” lub „beurer BabyCare” za pomocą opcji „Ustawienia / Moje urządzenia” należy dodać urządzenie FT 95.
  • Page 229 ® jest włączony, dane zostaną przesłane po zakończeniu po- miaru. Aplikacja „beurer HealthManager” lub „beurer BabyCare” musi być aktywna, aby przeprowa- dzić transmisję. W celu zapewnienia sprawnego przenoszenia danych należy zdjąć etui ze smartfona. Rozpocznij transmisję danych w aplikacji „beurer HealthManager” lub „beurer BabyCare”.
  • Page 230: Pomiar Temperatury Obiektu / Temperatury W Pomieszczeniu

    9. Pomiar temperatury obiektu / temperatury w pomieszczeniu Aby za pomocą tego termometru zmierzyć temperaturę obiektu, należy przełączyć go na tryb Temperatura obiektu. • W tym celu należy przy włączonym termometrze naci- snąć krótko przycisk MODE/MEM. Urządzenie przełą- czy się na tryb Temperatura obiektu (rys.
  • Page 231: Symbole Błędów

    10. Symbole błędów Komunikat Problem Rozwiązanie o błędzie Pomiar podczas testu automatycznego, Należy poczekać, aż symbol czoła prze- urządzenie nie jest jeszcze gotowe do po- stanie migać. miaru. Temperatura w pomieszczeniu poniżej Temperatura pomieszczenia musi mie- 15°C lub powyżej 40°C (<59°F, >104°F). ścić się w zakresie od 15°C do 40°C (od 59°F do 104°F).
  • Page 232: Baterie

    11. Baterie Wymiana baterii Aby korzystać z urządzenia, należy zaopatrzyć się w dwie ba- terie typu AAA, LR03. • Otworzyć komorę na baterie. Wysunąć komorę na baterie. • Wyjąć zużyte baterie. • Włożyć nowe baterie. Należy uważać na zachowanie prawidłowej biegunowości podczas wkładania baterii. •...
  • Page 233: Przechowywanie Urządzenia

    Po każdym użyciu należy wyczyścić czujnik pomiarowy. W tym celu należy użyć szmatki lub wacika nasączonego środkiem do dezynfekcji lub alkoholem (70%). Do czyszczenia całego urządzenia należy używać miękkiej szmatki lekko zwilżonej wodą z mydłem. Do urządzenia nie może dostać się woda. Urządzenia można używać...
  • Page 234 W przypadku korzystania z urządzenia w praktyce lekarskiej należy przeprowadzać kontrole pomia- rowe za pomocą odpowiednich środków. Dokładne dane dotyczące sprawdzania dokładności moż- na uzyskać, kontaktując się z serwisem. Producent zastrzega sobie prawo do zmian technicznych mających na celu ulepszenie konstruk- cji urządzenia. FT 95 Metoda pomiaru Bezdotykowy pomiar z wykorzystaniem podczerwieni Funkcje podstawowe...
  • Page 235 Zakresy pomiaru i dokładność Pomiar temperatury obiektu od 0°C do 80°C (od 32°F do 176°F) pomiaru temperatury obiektu Dokładność pomiaru ±4% lub ±2°C (±4°F) Funkcja pamięci pomiaru tem- Automatyczny zapis ostatnich 60 wartości pomiaru. peratury ciała Sygnał dźwiękowy Podczas włączenia urządzenia, podczas pomiaru, po zakończe- niu pomiaru (z możliwością...
  • Page 236: Przepisy

    CE dot. tego produktu można znaleźć na stronie: https://www.beurer.com/web/ we-landingpages/de/cedeclarationofconformity.php 17. Gwarancja/serwis Firma Beurer GmbH, Söflinger Straße 218, D-89077 Ulm (zwana dalej „Beurer”) udziela gwarancji na ten produkt na następujących warunkach i w poniżej opisanym zakresie. Poniższe warunki gwarancji nie naruszają ustawowych zobowiązań gwarancyjnych sprzeda- jącego wynikających z umowy kupna zawartej z kupującym.
  • Page 237 Obowiązuje prawo niemieckie o ile jest to prawnie dopuszczalne. Jeśli w okresie obowiązywania gwarancji produkt zostanie uznany za niekompletny lub wadliwy w działaniu zgodnie z poniższymi postanowieniami, firma Beurer bezpłatnie wymieni go lub naprawi zgodnie z niniejszymi warunkami gwarancji. Jeśli kupujący chce zgłosić reklamację gwarancyjną, najpierw kontaktuje się z lokalnym dealerem: patrz załączona lista „Service International”...
  • Page 238 - uszkodzeń powstałych podczas transportu między producentem a klientem lub między centrum serwisowym a klientem; - produktów, które zostały zakupione jako artykuły grupy B („B-Ware”) lub jako artykuły używane; - szkód następczych, które wynikają z wady tego produktu (w tym przypadku mogą jednak istnieć roszczenia z tytułu odpowiedzialności za produkt lub wynikające z innych bezwzględnie obowią- zujących przepisów prawa dot.
  • Page 240 ® word mark and logos are registered trademarks owned by Bluetooth SIG,Inc. and any use of such marks by Beurer GmbH is under license. Other trademarks and trade names are those of their respective owners. Apple and the Apple logo are trademarks of Apple Inc., registered in the U.S. and other countries. App Store is a service mark of Apple Inc., registered in the U.S.

Ce manuel est également adapté pour:

795.11

Table des Matières