JVC FS-J60 Manuel D'instructions
Systeme de composants compact
Table des Matières
Les langues disponibles
Les langues disponibles
COMPACT COMPONENT SYSTEM
SYSTEME DE COMPOSANTS COMPACT
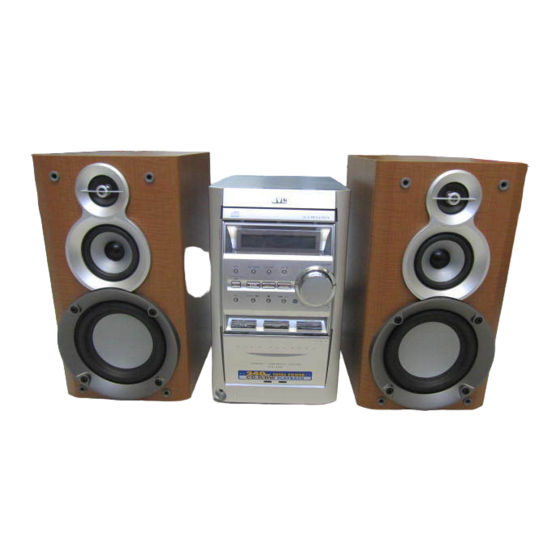
FS-J60
FS-J50
RM-SFSJ60U REMOTE CONTROL
SP-UXJ60
— Consists of CA-FSJ60 and SP-UXJ60
— Consists of CA-FSJ50 and SP-UXJ50
CA-FSJ60
SP-UXJ60
RM - SFSJ50U REMOTE CONTROL
INSTRUCTIONS
MANUEL D'INSTRUCTIONS
SP-UXJ50
CA-FSJ50
For Customer Use:
Enter below the Model No. and Serial No.
which are located either on the rear, bot-
tom or side of the cabinet. Retain this
information for future reference.
Model No.
Serial No.
SP-UXJ50
GVT0102-002B
[C]
Chapitres
Table des Matières
Dépannage

Manuels Connexes pour JVC FS-J60


Sommaire des Matières pour JVC FS-J60
- Page 28 Introduction Nous vous remercions pour avoir acheté un de nos produits JVC. Avant d’utiliser cet appareil, lisez attentivement ce mode d’emploi afin d’obtenir les meilleures performances de l’appareil, et conservez-le à titre d’information. À propos de ce mode d’emploi Sources d’alimentation •...
- Page 29 Utilisation des effets sonores .............. 10 Sélection de la luminosité de l’affichage ........... 11 Sélection de la couleur de l’affichage (POUR LE FS-J60 UNIQUEMENT) ........... 11 Écoute d’émissions FM et AM ..........12 Accord d’une station ................12 Préréglage des stations ............... 12 Accord d’une station préréglée ............
-
Page 30: Emplacement Des Touches Et Des Commandes
Emplacement des touches et des commandes Familiarisez-vous avec les touches et les commandes de votre appareil. Panneau avant Panneau avant POUR LE FS-J50: POUR LE FS-J50: COMPACT COMPONENT SYSTEM F S - J 6 0... - Page 31 3 Touche REV.MODE (mode autoreverse) (17 – 19) d’enregistrement) et SLEEP 4 Touche AUX (9) 2 Indicateur REC (enregistrement) 3 POUR LE FS-J60 UNIQUEMENT: Appuyez sur cette touche met aussi l’appareil sous tension. Indicateur SURROUND 4 POUR LE FS-J60 UNIQUEMENT: 5 Touche STANDBY/ON et témoin STANDBY/ON...
-
Page 32: Télécommande
Touche CANCEL (16) r Touche FM MODE (12) SOUND TURBO SURROUND t POUR LE FS-J60 UNIQUEMENT: Touche COLOR (11) y Touches de mode de lecture de disc (15, 16) • PRGM (programme), RANDOM et REPEAT DIMMER u POUR LE FS-J60 UNIQUEMENT:... -
Page 33: Pour Commencer
• Antenne FM (1) Antenne FM (fournie) • Télécommande (1) • Piles (2) • Cordons d’enceinte (POUR LE FS-J60 UNIQUEMENT) (4) Si quelque chose manquait, consultez immédiatement votre revendeur. Connectez l’antenne FM à la prise FM 75 Ω Mise en place des piles dans la télécommande COAXIAL. -
Page 34: Connexion Des Enceintes
Antenne AM Connexion des enceintes POUR LE FS-J60: Fil recouvert de vinyle (non fourni) Gris RIGHT LEFT RIGHT LEFT Rouge Cordons Cordons Antenne cadre AM d’enceinte MAIN SPEAKERS SUBWOOFERS d’enceinte (fournie) CAUTION: SPEAKER IMPEDANCE 6 -16 Noir Si les cordons sont recouverts par un Bleu isolant, retirez la petite partie de l’isolant à... -
Page 35: Connexion D'un Autre Appareil
Si les cordons sont recouverts par un Connexion d’un autre appareil isolant, retirez la petite partie de l’isolant à Pour connecter un appareil audio l’extrémité de chaque cordon en tordant et Vous pouvez connecter un appareil audio—utilisé en tirant l’isolant. uniquement comme appareil de lecture. -
Page 36: Fonctionnement Commun
Fonctionnement commun Réglage de l’horloge Pour ajuster de nouveau l’horloge 1 Assurez-vous que l’indicateur (minuterie) n’est pas Avant de continuer à utiliser l’appareil, réglez d’abord allumé sur l’affichage. l’horloge intégrée à cet appareil. Quand vous branchez le • S’il est allumé, maintenez pressée CLOCK/TIMER cordon d’alimentation secteur sur une prise murale, jusqu’à... -
Page 37: Ajustement Du Volume
à faible niveau de volume—Active Hyper Bass Pro. Pour une écoute privée Pour le FS-J60: Connectez le casque d’écoute à la prise PHONES. Aucun son ne sort Appuyez sur AHP PRO. des enceintes. Assurez-vous de diminuer le volume avant de connecter le casque d’écoute ou de le mettre sur vos oreilles. -
Page 38: Sélection De La Luminosité De L'affichage
Pour obtenir un son lourd (POUR LE FS-J60 UNIQUEMENT) Sélection de la couleur de l’affichage Vous pouvez obtenir un son lourd. La fonction accentue les (POUR LE FS-J60 UNIQUEMENT) sons basses et hautes fréquences—Sound Turbo. Vous pouvez choisir la couleur de l’affichage (Mode Appuyez sur SOUND TURBO. -
Page 39: Écoute D'émissions Fm Et Am
Écoute d’émissions FM et AM À suivre Accord d’une station Préréglage des stations Vous pouvez prérégler 30 stations FM et 15 stations AM. Appuyez sur FM/AM pour choisir FM/AM Dans certains cas, des tests de fréquences ont déjà été la gamme. mémorisés dans le tuner lors de la vérification de la fonction de préréglage avant l’expédition. -
Page 40: Accord D'une Station Préréglée
Accord d’une station préréglée Sur la télécommande UNIQUEMENT: Appuyez sur FM/AM pour choisir FM/AM la gamme. L’appareil se met automatiquement sous tension et accorde la dernière station —accordée FM ou AM. • Chaque fois que vous appuyez sur la touche, la bande alterne entre FM et AM. -
Page 41: Lecture De Disques
Lecture de Disques À suivre Lecture d’un Disque en entier—Lecture normale Cet appareil est conçu pour reproduire les disque suivants —CD, CD-R et CD-RW. Appuyez sur CD 0. Lors de la reproduction d’un CD-R ou d’un CD-RW Les CD-R (enregistrables) et les CD-RW (réinscriptibles) L’appareil se met automatiquement sous édités par l’utilisateur peuvent être reproduits uniquement tension et le plateau à... -
Page 42: Fonctionnement De Base De La Platine Disque
Fonctionnement de base de la platine disque PRGM Appuyez sur PRGM (programme). L’indicateur PRGM (programme) s’allume Pendant la lecture d’un disque, vous pouvez réaliser les sur l’affichage. choses suivantes. PRGM Pour arrêter la lecture momentanément Pendant la lecture, appuyez sur CD 3/8. •... -
Page 43: Lecture Dans Un Ordre Aléatoire-Lecture Aléatoire
Pour modifier le programme Répétition des plages—Lecture répétée Sur la télécommande UNIQUEMENT: Vous pouvez reproduire répétitivement toutes les plages, un CANCEL Avant ou après de commencer la lecture, vous programme ou la plage en cours de lecture autant de fois que pouvez effacer la dernière plage programmée vous le souhaitez. -
Page 44: Lecture De Cassettes
Lecture de cassettes Vous pouvez reproduire des cassettes de type I. Pour arrêter la lecture en cours, appuyez sur 7. Lecture d’une cassette Pour bobiner rapidement vers la gauche ou vers la droite, appuyez Appuyez sur PUSH OPEN 0 sur l’appareil. sur ¢... -
Page 45: Enregistrement
Enregistrement À suivre IMPORTANT: Enregistrement sur une cassette • Il peut être illégal d’enregistrer ou de reproduire des Sur l’appareil UNIQUEMENT: matériaux protégés par des droits d’auteur sans l’autorisation du propriétaire des droits. Insérez une cassette enregistrable, avec la • Le niveau d’enregistrement est réglé correctement partie exposée dirigée vers le bas. -
Page 46: Enregistrement Direct De Disque
Enregistrement direct de disque Enregistrement d’une plage Tout le contenu du disque est enregistré sur la cassette dans Cette méthode d’enregistrement est pratique pour l’ordre du disque, ou en fonction de l’ordre réglé pour la l’enregistrement des plages d’un disque pendant la lecture de lecture programmée. -
Page 47: Utilisation Des Minuteries
Utilisation des minuteries À suivre Il y a trois minuteries disponibles—la minuterie quotidienne, Réglez l’heure à laquelle vous souhaitez que la minuterie d’enregistrement et la minuterie d’arrêt. l’appareil se mette sous tension. Avant d’utiliser ces minuteries, vous devez régler l’horloge 1) Appuyez sur UP ou DOWN pour régler intégrée à... -
Page 48: Utilisation De La Minuterie D'arrêt
Utilisation de la minuterie d’arrêt Appuyer sur UP ou DOWN pour régler le niveau de volume puis appuyer sur Avec la minuterie d’arrêt, vous pouvez vous endormir en CLOCK/TIMER. musique. Vous pouvez régler la minuterie quand l’appareil est • Vous pouvez choisir le niveau de volume sous tension. -
Page 49: Entretien
Entretien Pour obtenir les meilleures performances de l’appareil, gardez vos disques, vos cassettes et le mécanisme propres. Nettoyage de l’appareil Manipulation des cassettes • Taches sur l’appareil • Si la bande est lâche dans la cassette, retirez Elles doivent être enlevées avec un chiffon doux. Si le mou en insérant un stylo dans l’une des l’appareil est très taché, essuyez-le avec un chiffon bobines et en tournant. -
Page 50: Guide De Dépannage
Guide de dépannage Si vous rencontrez des problèmes avec cet appareil, consultez cette liste avant d’appeler un réparateur. Si vous ne pouvez pas résoudre le problème avec les conseils donnés ci-dessous, ou si l’appareil a été endommagé physiquement, appelez une personne qualifiée, telle que votre revendeur, pour faire réparer l’appareil. Symptôme Cause Action... -
Page 51: Spécifications
Spécifications La conception et les spécifications sont sujettes à changement sans notification. FS-J60 (CA-FSJ60 et SP-UXJ60) FS-J50 (CA-FSJ50 et SP-UXJ50) Amplificateur Amplificateur Puissance de sortie: Puissance de sortie: SUBWOOFERS: 60 W par canal, min. efficace, les deux canaux entraînés sur 6 Ω à 1 kHz avec moins de 10% de 60 W par canal, min. - Page 52 VICTOR COMPANY OF JAPAN, LIMITED 0503MWMMDWJEM EN, FR © 2003 VICTOR COMPANY OF JAPAN, LIMITED...