JVC UX-H33 Manuel D'instructions
Table des Matières
Les langues disponibles
Les langues disponibles
Liens rapides
SERVICE MANUAL
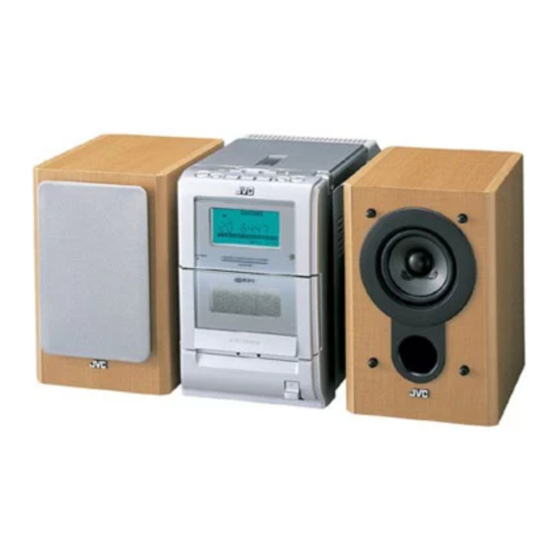
MICRO COMPONENT SYSTEM
03
2003
22044
1
Important Safety Precautions . . . . . . . . . . . . . . . . . . . . . . . . . . . . . . . . . . . . . . . . . . . . . . . . . . . . . . . . . . . 1-2
2
Disassembly method . . . . . . . . . . . . . . . . . . . . . . . . . . . . . . . . . . . . . . . . . . . . . . . . . . . . . . . . . . . . . . . . . . 1-6
3
Adjustment. . . . . . . . . . . . . . . . . . . . . . . . . . . . . . . . . . . . . . . . . . . . . . . . . . . . . . . . . . . . . . . . . . . . . . . . . . 1-18
4
Description of major ICs . . . . . . . . . . . . . . . . . . . . . . . . . . . . . . . . . . . . . . . . . . . . . . . . . . . . . . . . . . . . . . . 1-24
UX-H33
MICRO COMPONENT SYSTEM
TABLE OF CONTENTS
Area Suffix
B -------------------------- U.K.
E ------- Continental Europe
EN --------- Northern Europe
UX-H33
Chapitres
Table des Matières
Dépannage

Manuels Connexes pour JVC UX-H33


Sommaire des Matières pour JVC UX-H33
- Page 39 UX-H33 (No.22044)1-39...
- Page 40 UX-H33 VICTOR COMPANY OF JAPAN, LIMITED AV & MULTIMEDIA COMPANY AUDIO/VIDEO SYSTEMS CATEGORY 10-1,1chome,Ohwatari-machi,Maebashi-city,371-8543,Japan (No.22044) Printed in Japan 200303WPC...
- Page 53 UX-H33 < M E M O > 2-11...
- Page 54 UX-H33 VICTOR COMPANY OF JAPAN, LIMITED AV & MULTIMEDIA COMPANY AUDIO/VIDEO SYSYTEM CATEGORY 10-1,1chome,Ohwatari-machi,Maebashi-city,371-8543,Japan Printed in Japan (No.22044SCH) 200303...
- Page 56 UX-H33 < M E M O >...
- Page 73 Varningar, att observera och övrigt / Varoitukset, huomautukset, yms Advarsler, forsigtighedsregler og andet / Warnung, Achtung und sonstige Hinweise Mises en garde, précautions et indications diverses / Avisos, precauciones y otras notas Avvertenze e precauzioni da osservare VARNING— (standby/på) knapp ATTENTION—Touche (attente/sous tension) Koppla ur kontakten för att stänga av strömmen helt (alla...
- Page 74 Kerzen, auf das Gerät. Per l’Italia: • Wenn Sie Batterien entsorgen, denken Sie an den “Si dichiara che il questo prodotto di marca JVC è Umweltschutz. Batterien müssen entsprechend den conforme alle prescrizioni del Decreto Ministeriale geltenden örtlichen Vorschriften oder Gesetzen entsorgt n.548 del 28/08/95 pubblicato sulla Gazzetta Ufficiale...
- Page 75 VIKTIGT: Korrekt ventilering För att undvika risker för elektriska stötar, brand och skador bör utrustningen placeras på följande sätt: Framsida: Inga hinder och fritt utrymme. Sidor/Översida/Baksida: Inga hinder bör finnas i de områden som dimensionerna nedan anger. Undersida: Placera apparaten på en plan yta. Se till ett tillräcklig ventilering finns för ventilering genom ett placera apparaten på...
- Page 107 VICTOR COMPANY OF JAPAN, LIMITED SW, FI, DA, GE, FR, SP, IT 0103MWMMDWJEM © 2003 VICTOR COMPANY OF JAPAN, LIMITED...
- Page 139 VICTOR COMPANY OF JAPAN, LIMITED 0103MWMMDWJEM © 2003 VICTOR COMPANY OF JAPAN, LIMITED...
- Page 141 Warnung, Achtung und sonstige Hinweise Mises en garde, précautions et indications diverses Waarschuwingen, voorzorgen en andere mededelingen VORSICHT—Taste (Bereitschaft/ein) Ziehen Sie das Netzkabel ab, um die Stromversorgung vollständig zu unterbrechen (alle Leuchten und Anzeigen erlöschen). Die Taste (Bereitschaft/ein) trennt in keiner Position die Stromversorgung zum Netzanschluß.
- Page 142 ACHTUNG ACHTUNG Zur Verhinderung von elektrischen Schlägen, Brandgefahr, • Blockieren Sie keine Belüftungsschlitze oder - usw.: bohrungen. 1. Keine Schrauben lösen oder Abdeckungen entfernen (Wenn die Belüftungsöffnungen oder -löcher durch und das Gehäuse nicht öffnen. eine Zeitung oder ein Tuch etc. blockiert werden, 2.
- Page 143 Op vlakke ondergrond plaatsen. Voldoende ventilatieruimte voorzien door het toestel op een onderstel met een hoogte van 10 cm of meer te plaatsen. Vorderansicht Seitenansicht Face Côté Vooraanzicht Zijaanzicht 15 cm 15 cm 1 cm 1 cm 15 cm 15 cm UX-H35 UX-H33 UX-H30 15 cm 10 cm UX-H35/UX-H33/UX-H30...
- Page 144 WICHTIGER HINWEIS FÜR LASER-PRODUKTE IMPORTANT POUR LES PRODUITS LASER BELANGRIJKE INFORMATIE VOOR LASERPRODUKTEN ANBRINGUNGSORTE FÜR ETIKETTEN REPRODUCTION DES ÉTIQUETTES REPRODUCTIE VAN LABELS 1 KLASSIFIZIERUNGSHINWEIS BEFINDET SICH AUF 2 WARNETIKETT IM GERÄTEINNEREN DER AUSSENSEITE 1 ÉTIQUETTE DE CLASSIFICATION SUR LA SURFACE 2 ETIQUETTE D’AVERTISSEMENT À...
-
Page 145: Précautions
Introduction Nous vous remercions pour avoir acheté un de nos produits JVC. Avant d’utiliser cet appareil, lisez attentivement ce mode d’emploi afin d’obtenir les meilleures performances de l’appareil, et conservez-le à titre d’information. À propos de ce mode d’emploi Sources d’alimentation •... - Page 146 Table des matières Emplacement des touches ........... 3 Appareil ................3 Télécommande ..............5 Pour commencer ............6 Accessoires fournis ............6 Connexion des antennes ............ 6 Connexion des enceintes ........... 7 Connexion d’un autre appareil .......... 8 Mise en place des piles dans la télécommande ....9 Fonctionnement commun ..........
-
Page 147: Emplacement Des Touches
Emplacement des touches Familiarisez-vous avec les touches de votre appareil. Appareil Vue de dessus P HO NES COMPACT DIGITAL AUDIO TIMER/SNOOZE OPEN MULTI CONTROL ONE TOUCH AHB PRO ¢ VOLUME BAND TAPE TUNER Vue avant STANDBY MICRO COMPONENT SYSTEM... -
Page 148: Mono Stereo
À suivre Fenêtre d’affichage BASS SLEEP SNOOZE REC ON STEREO CLOCK MONO RDS TA NEWS INFO 1 2 3 4 5 6 7 8 9 10 11 12 13 14 15 PROGRAM RANDOM OVER Référez-vous aux pages entre parenthèses pour plus de détails. -
Page 149: Télécommande
Télécommande Référez-vous aux pages entre parenthèses pour plus de détails. 1 Touches numériques 2 Touche BASS (11) 3 Touches à commandes multiples STANDBY/ON UP, 4 (saut vers l’arrière), 7 (arrêt), ¢ • (saut vers l’avant) et DOWN 4 Touche SET (13) DISPLAY 5 Touches de source CLOCK... -
Page 150: Pour Commencer
Pour commencer À suivre Accessoires fournis Pour connecter une antenne FM extérieure Avant de la connecter, déconnectez l’antenne FM fournie. Vérifiez que vous avez bien tous les accessoires suivants. Le nombre entre parenthèses indique le nombre de Antenne FM extérieure pièces fournies. -
Page 151: Connexion Des Enceintes
Connexion des enceintes Antenne AM (PO) Fil recouvert de vinyle (non fourni) Cordons d’enceinte Cordons d’enceinte Antenne cadre AM (fournie) Enceinte droite Enceinte gauche Connectez l’antenne cadre AM aux Maintenez en position ouverte le serre- prises AM LOOP comme montré sur fil de la prise d’enceinte sur le panneau l’illustration. -
Page 152: Connexion D'un Autre Appareil
À suivre Retrait des grilles des enceintes MAINTENANT, vous pouvez Les grilles des enceintes peuvent être retirées. brancher cet appareil et les appareils connectés au secteur. Projections IMPORTANT: Assurez-vous de vérifier toutes les connexions avant de brancher le cordon Trous d’alimentation. -
Page 153: Mise En Place Des Piles Dans La Télécommande
12V 4A Adaptateur pour voiture DC IN R6(SUM-3)/AA(15F) (modèle JVC: CA-R120E) Connectez l’adaptateur pour voiture au connecteur DC IN (12 V, 4 A) et à la prise allume-cigares. • NE CONNECTEZ PAS l’adaptateur pour voiture à la prise allume-cigares avant de le connecter au connecteur DC IN. -
Page 154: Fonctionnement Commun
Fonctionnement commun À suivre Réglage de l’horloge Appuyez sur ¢ ou 4 pour ajuster les minutes, puis appuyez sur TIMER/ Avant d’utiliser l’appareil, réglez d’abord l’horloge. SNOOZE. Quand vous branchez le cordon d’alimentation, l’indicateur CLOCK et “0:00” clignotent sur l’affichage. Pour vérifier l’heure pendant la lecture Vous pouvez régler l’horloge quand l’appareil est allumé... -
Page 155: Mise Sous Tension
Mise sous tension Ajustement de la tonalité (grave/aigu) Pour mettre l’appareil sous tension, STANDBY/ON Il est possible d’ajuster le niveau des graves (plage des appuyez sur STANDBY/ON basses fréquences) et le niveau des aigus (plage des l’appareil). hautes fréquences) dans une plage de –5 à +5. Le témoin STANDBY s’éteint sur l’appareil. -
Page 156: Écoute D'émissions Fm Et Am (Po)
Écoute d’émissions FM et AM (PO) À suivre Accord d’une station Préréglage des stations Vous pouvez prérégler 30 FM et 15 stations Appuyez sur TUNER (ou TUNER AM (PO)—en utilisant soit de préréglage automatique BAND TUNER sur l’appareil) ou de préréglage manuel. Dans certains cas, des tests de fréquences ont déjà... -
Page 157: Pour Prérégler Les Stations Manuellement -Préréglage Manuel
Pour prérégler les stations manuellement Pour accorder directement une station préréglée —Préréglage manuel en utilisant les touches numériques Vous avez besoin de prérégler les stations séparément Sur la télécommande UNIQUEMENT: pour les bandes FM et AM (PO). Appuyer sur les touches •... -
Page 158: Changement De L'information Rds
À suivre Changement de l’information RDS Sur la télécommande UNIQUEMENT: Appuyez sur PTY SEARCH. SEARCH Vous pouvez voir l’information RDS sur l’affichage “PTY” et “SELECT” apparaissent pendant l’écoute d’une station FM. alternativement sur l’affichage. Sur la télécommande UNIQUEMENT: Appuyez sur PTY SELECT Appuyez sur DISPLAY SELECT + ou PTY... -
Page 159: Commutation Temporaire Sur Le Type De Programme De Votre Choix
Commutation temporaire sur le type de Fonctionnement de la fonction Enhanced programme de votre choix Other Networks: La fonction Enhanced Other Networks permet à CAS 1 l’appareil de commuter temporairement sur un S’il n’y a pas de station émettant le type de programme de son choix (TA, NEW et INFO) à... -
Page 160: Lecture Des Disques
Lecture des disques À suivre Cet appareil est conçu pour reproduire les disque Refermez le couvercle doucement. suivants—CD, CD-R et CD-RW. Appuyez sur 3/8 CD. Lors de la reproduction d’un CD-R ou d’un CD-RW L’appareil se met automatiquement Les CD-R (enregistrables) et les CD-RW sous tension et la première du disque (réinscriptibles) édités par l’utilisateur peuvent être est reproduite. -
Page 161: Fonctionnement De Base De La Platine Disque
Fonctionnement de base de la platine Programmation de l’ordre de lecture des plages—Lecture programmée disque Vous pouvez changer l’ordre dans lequel les plages Pendant la lecture d’un disque, vous pouvez réaliser les sont reproduites avant de commence la lecture. Vous choses suivantes. -
Page 162: Lecture Dans Un Ordre Aléatoire-Lecture Aléatoire
Pour vérifier le contenu du programme Pour sauter la plage actuelle, appuyez sur ¢. Il est possible de vérifier le contenu • Vous ne pouvez pas retourner aux plages du programme en appuyant sur précédentes en appuyant sur 4. ¢ ou 4 avant ou après de lecture. -
Page 163: Lecture De Cassettes
Lecture de cassettes Vous pouvez reproduire des cassettes de type I. Si aucune cassette ne se trouve dans l’appareil quand vous appuyez sur 2 3 TAPE Lecture d’une cassette “NO TAPE” apparaît sur l’affichage. Appuyez sur ) pour la platine cassette Pour arrêter la lecture, appuyez sur 7. -
Page 164: Enregistrement
Enregistrement À suivre IMPORTANT: Refermez le compartiment à cassette • Il peut être illégal d’enregistrer ou de reproduire doucement et vérifiez le sens des matériaux protégés par des droits d’auteur d’enregistrement pour la cassette. sans l’autorisation du propriétaire des droits. •... -
Page 165: Enregistrement Direct De Disque
Enregistrement direct de disque Pour enregistrer les deux faces—Mode autoreverse Tout le contenu du disque est enregistré sur la cassette Sur la télécommande UNIQUEMENT: dans l’ordre du disque, ou en fonction de l’ordre réglé REV.MODE Appuyez répétitivement sur REV.MODE pour la lecture programmée. (mode autoreverse) jusqu’à... -
Page 166: Utilisation Des Minuteries
Utilisation des minuteries À suivre Il y a quatre minuteries disponibles—Minuterie Réglez l’heure à laquelle vous quotidienne, minuterie d’enregistrement, minuterie de souhaitez que l’appareil se mette sous rappel et minuterie d’arrêt. tension. Avant d’utiliser ces minuteries, vous devez régler Sur la télécommande: l’horloge intégrée à... -
Page 167: Appuyez Sur Standby
Choisissez la minuterie Ajustez l’horloge si nécessaire. (minuterie quotidienne ou • Voir “Réglage de l’horloge” à la page 10. DOWN minuterie d’enregistrement) Appuyez sur STANDBY/ STANDBY/ON avec la source à reproduire. Sur la télécommande: CLOCK / TIMER Appuyez sur UP ou DOWN l’appareil) pour mettre pour choisir la minuterie, puis... -
Page 168: Utilisation De La Minuterie De Rappel
Utilisation de la minuterie de rappel Utilisation de la minuterie d’arrêt La minuterie de rappel met l’appareil hors tension (en Avec la minuterie d’arrêt, vous pouvez vous endormir mode d’attente) seulement pendant 5 minutes quand la en musique. Vous pouvez régler la minuterie quand minuterie quotidienne est en service. -
Page 169: Entretien
Entretien Pour obtenir les meilleures performances de l’appareil, gardez vos disques et le mécanisme propres. Nettoyage de l’appareil Manipulation des cassettes • Si la bande est lâche dans la • Taches sur l’appareil cassette, retirez le mou en insérant Elles doivent être enlevées avec un chiffon doux. Si un stylo dans l’une des bobines et l’appareil est très taché, essuyez-le avec un chiffon en tournant. -
Page 170: Guide De Dépannage
Guide de dépannage Si vous rencontrez des problèmes avec cet appareil, consultez cette liste avant d’appeler un réparateur. Si vous ne pouvez pas résoudre le problème avec les conseils donnés ci-dessous, ou si l’appareil a été endommagé physiquement, appelez une personne qualifiée, telle que votre revendeur, pour faire réparer l’appareil. Symptôme Cause Action... -
Page 171: Informations Complémentaires
Informations complémentaires Description des codes PTY: NEWS: Informations. NATION M: Musiques populaire actuelle d’un pays ou d’une région dans la langue nationale. AFFAIRS: Émissions d’actualité prolongeant les informations—débats ou analyses. OLDIES: Musiques de la période appelée “l’âge d’or” de la musique populaire. INFO: Émissions dont le but est de donner des conseils dans le sens le plus large. -
Page 172: Spécifications
Spécifications Amplificateur Général Puissance de sortie: Alimentation: 20 W (10 W + 10 W) à 4 Ω (10% THD) AC IN: 230 V , 50 Hz Sensibilité d’entrée audio/Impédance (à 1 kHz) DC IN: 12 V, 4 A AUX: 500 mV/48,75 kΩ Consommation: 35 W (pendant le fonctionnement) 4 Ω... - Page 173 VICTOR COMPANY OF JAPAN, LIMITED GE, FR, NL 0103MWMMDWJEM © 2003 VICTOR COMPANY OF JAPAN, LIMITED...
- Page 175 Varningar, att observera och övrigt / Varoitukset, huomautukset, yms Advarsler, forsigtighedsregler og andet / Warnung, Achtung und sonstige Hinweise Mises en garde, précautions et indications diverses / Avisos, precauciones y otras notas Avvertenze e precauzioni da osservare VARNING— (standby/på) knapp ATTENTION—Touche (attente/sous tension) Koppla ur kontakten för att stänga av strömmen helt (alla...
- Page 176 Kerzen, auf das Gerät. Per l’Italia: • Wenn Sie Batterien entsorgen, denken Sie an den “Si dichiara che il questo prodotto di marca JVC è Umweltschutz. Batterien müssen entsprechend den conforme alle prescrizioni del Decreto Ministeriale geltenden örtlichen Vorschriften oder Gesetzen entsorgt n.548 del 28/08/95 pubblicato sulla Gazzetta Ufficiale...
- Page 177 VIKTIGT: Korrekt ventilering För att undvika risker för elektriska stötar, brand och skador bör utrustningen placeras på följande sätt: Framsida: Inga hinder och fritt utrymme. Sidor/Översida/Baksida: Inga hinder bör finnas i de områden som dimensionerna nedan anger. Undersida: Placera apparaten på en plan yta. Se till ett tillräcklig ventilering finns för ventilering genom ett placera apparaten på...
- Page 180 KLASS 1 LASER APPARAT VARO: CD-soittimessa on laserdiodi jonka aallonpituus on VARNING: Om apparaten används på annat sätt än i denna 760-800nm ja jonka tyypillinen optinen antotehe on diodin bruksanvisning specificerats, kan användaren utsättas för dohdalla mitattuna 3mW. osynlig laserstrålning, som överskrider gränsen för laserklass 1.
- Page 181 Introduction Nous vous remercions pour avoir acheté un de nos produits JVC. Avant d’utiliser cet appareil, lisez attentivement ce mode d’emploi afin d’obtenir les meilleures performances de l’appareil, et conservez-le à titre d’information. À propos de ce mode d’emploi Sources d’alimentation •...
- Page 182 Table des matières Emplacement des touches ........... 3 Appareil ................3 Télécommande ..............5 Pour commencer ............6 Accessoires fournis ............6 Connexion des antennes ............ 6 Connexion des enceintes ........... 7 Connexion d’un autre appareil .......... 8 Mise en place des piles dans la télécommande ....9 Fonctionnement commun ..........
-
Page 183: Emplacement Des Touches
Emplacement des touches Familiarisez-vous avec les touches de votre appareil. Appareil Vue de dessus P HO NES COMPACT DIGITAL AUDIO TIMER/SNOOZE OPEN MULTI CONTROL ONE TOUCH AHB PRO ¢ VOLUME BAND TAPE TUNER Vue avant STANDBY MICRO COMPONENT SYSTEM... - Page 184 À suivre Fenêtre d’affichage BASS SLEEP SNOOZE REC ON STEREO CLOCK MONO RDS TA NEWS INFO 1 2 3 4 5 6 7 8 9 10 11 12 13 14 15 PROGRAM RANDOM OVER Référez-vous aux pages entre parenthèses pour plus de détails.
- Page 185 Télécommande Référez-vous aux pages entre parenthèses pour plus de détails. 1 Touches numériques 2 Touche BASS (11) 3 Touches à commandes multiples STANDBY/ON UP, 4 (saut vers l’arrière), 7 (arrêt), ¢ • (saut vers l’avant) et DOWN 4 Touche SET (13) DISPLAY 5 Touches de source CLOCK...
-
Page 186: Pour Commencer
Pour commencer À suivre Accessoires fournis Pour connecter une antenne FM extérieure Avant de la connecter, déconnectez l’antenne FM fournie. Vérifiez que vous avez bien tous les accessoires suivants. Le nombre entre parenthèses indique le nombre de Antenne FM extérieure pièces fournies. -
Page 187: Connexion Des Enceintes
Connexion des enceintes Antenne AM (PO) Fil recouvert de vinyle (non fourni) Cordons d’enceinte Cordons d’enceinte Antenne cadre AM (fournie) Enceinte droite Enceinte gauche Connectez l’antenne cadre AM aux Maintenez en position ouverte le serre- prises AM LOOP comme montré sur fil de la prise d’enceinte sur le panneau l’illustration. -
Page 188: Connexion D'un Autre Appareil
À suivre Retrait des grilles des enceintes MAINTENANT, vous pouvez Les grilles des enceintes peuvent être retirées. brancher cet appareil et les appareils connectés au secteur. Projections IMPORTANT: Assurez-vous de vérifier toutes les connexions avant de brancher le cordon Trous d’alimentation. -
Page 189: Mise En Place Des Piles Dans La Télécommande
12V 4A Adaptateur pour voiture DC IN R6(SUM-3)/AA(15F) (modèle JVC: CA-R120E) Connectez l’adaptateur pour voiture au connecteur DC IN (12 V, 4 A) et à la prise allume-cigares. • NE CONNECTEZ PAS l’adaptateur pour voiture à la prise allume-cigares avant de le connecter au connecteur DC IN. -
Page 190: Fonctionnement Commun
Fonctionnement commun À suivre Réglage de l’horloge Appuyez sur ¢ ou 4 pour ajuster les minutes, puis appuyez sur TIMER/ Avant d’utiliser l’appareil, réglez d’abord l’horloge. SNOOZE. Quand vous branchez le cordon d’alimentation, l’indicateur CLOCK et “0:00” clignotent sur l’affichage. Pour vérifier l’heure pendant la lecture Vous pouvez régler l’horloge quand l’appareil est allumé... -
Page 191: Mise Sous Tension
Mise sous tension Ajustement de la tonalité (grave/aigu) Pour mettre l’appareil sous tension, STANDBY/ON Il est possible d’ajuster le niveau des graves (plage des appuyez sur STANDBY/ON basses fréquences) et le niveau des aigus (plage des l’appareil). hautes fréquences) dans une plage de –5 à +5. Le témoin STANDBY s’éteint sur l’appareil. -
Page 192: Écoute D'émissions Fm Et Am (Po)
Écoute d’émissions FM et AM (PO) À suivre Accord d’une station Préréglage des stations Vous pouvez prérégler 30 FM et 15 stations Appuyez sur TUNER (ou TUNER AM (PO)—en utilisant soit de préréglage automatique BAND TUNER sur l’appareil) ou de préréglage manuel. Dans certains cas, des tests de fréquences ont déjà... -
Page 193: Accord D'une Station Préréglée
Pour prérégler les stations manuellement Pour accorder directement une station préréglée —Préréglage manuel en utilisant les touches numériques Vous avez besoin de prérégler les stations séparément Sur la télécommande UNIQUEMENT: pour les bandes FM et AM (PO). Appuyer sur les touches •... -
Page 194: Changement De L'information Rds
À suivre Changement de l’information RDS Sur la télécommande UNIQUEMENT: Appuyez sur PTY SEARCH. SEARCH Vous pouvez voir l’information RDS sur l’affichage “PTY” et “SELECT” apparaissent pendant l’écoute d’une station FM. alternativement sur l’affichage. Sur la télécommande UNIQUEMENT: Appuyez sur PTY SELECT Appuyez sur DISPLAY SELECT + ou PTY... -
Page 195: Commutation Temporaire Sur Le Type De Programme De Votre Choix
Commutation temporaire sur le type de Fonctionnement de la fonction Enhanced programme de votre choix Other Networks: La fonction Enhanced Other Networks permet à CAS 1 l’appareil de commuter temporairement sur un S’il n’y a pas de station émettant le type de programme de son choix (TA, NEW et INFO) à... -
Page 196: Lecture Des Disques
Lecture des disques À suivre Cet appareil est conçu pour reproduire les disque Refermez le couvercle doucement. suivants—CD, CD-R et CD-RW. Appuyez sur 3/8 CD. Lors de la reproduction d’un CD-R ou d’un CD-RW L’appareil se met automatiquement Les CD-R (enregistrables) et les CD-RW sous tension et la première du disque (réinscriptibles) édités par l’utilisateur peuvent être est reproduite. -
Page 197: Fonctionnement De Base De La Platine Disque
Fonctionnement de base de la platine Programmation de l’ordre de lecture des plages—Lecture programmée disque Vous pouvez changer l’ordre dans lequel les plages Pendant la lecture d’un disque, vous pouvez réaliser les sont reproduites avant de commence la lecture. Vous choses suivantes. -
Page 198: Lecture Dans Un Ordre Aléatoire-Lecture Aléatoire
Pour vérifier le contenu du programme Pour sauter la plage actuelle, appuyez sur ¢. Il est possible de vérifier le contenu • Vous ne pouvez pas retourner aux plages du programme en appuyant sur précédentes en appuyant sur 4. ¢ ou 4 avant ou après de lecture. -
Page 199: Lecture De Cassettes
Lecture de cassettes Vous pouvez reproduire des cassettes de type I. Si aucune cassette ne se trouve dans l’appareil quand vous appuyez sur 2 3 TAPE Lecture d’une cassette “NO TAPE” apparaît sur l’affichage. Appuyez sur ) pour la platine cassette Pour arrêter la lecture, appuyez sur 7. -
Page 200: Enregistrement
Enregistrement À suivre IMPORTANT: Refermez le compartiment à cassette • Il peut être illégal d’enregistrer ou de reproduire doucement et vérifiez le sens des matériaux protégés par des droits d’auteur d’enregistrement pour la cassette. sans l’autorisation du propriétaire des droits. •... -
Page 201: Enregistrement Direct De Disque
Enregistrement direct de disque Pour enregistrer les deux faces—Mode autoreverse Tout le contenu du disque est enregistré sur la cassette Sur la télécommande UNIQUEMENT: dans l’ordre du disque, ou en fonction de l’ordre réglé REV.MODE Appuyez répétitivement sur REV.MODE pour la lecture programmée. (mode autoreverse) jusqu’à... -
Page 202: Utilisation Des Minuteries
Utilisation des minuteries À suivre Il y a quatre minuteries disponibles—Minuterie Réglez l’heure à laquelle vous quotidienne, minuterie d’enregistrement, minuterie de souhaitez que l’appareil se mette sous rappel et minuterie d’arrêt. tension. Avant d’utiliser ces minuteries, vous devez régler Sur la télécommande: l’horloge intégrée à... - Page 203 Choisissez la minuterie Ajustez l’horloge si nécessaire. (minuterie quotidienne ou • Voir “Réglage de l’horloge” à la page 10. DOWN minuterie d’enregistrement) Appuyez sur STANDBY/ STANDBY/ON avec la source à reproduire. Sur la télécommande: CLOCK / TIMER Appuyez sur UP ou DOWN l’appareil) pour mettre pour choisir la minuterie, puis...
-
Page 204: Utilisation De La Minuterie De Rappel
Utilisation de la minuterie de rappel Utilisation de la minuterie d’arrêt La minuterie de rappel met l’appareil hors tension (en Avec la minuterie d’arrêt, vous pouvez vous endormir mode d’attente) seulement pendant 5 minutes quand la en musique. Vous pouvez régler la minuterie quand minuterie quotidienne est en service. -
Page 205: Entretien
Entretien Pour obtenir les meilleures performances de l’appareil, gardez vos disques et le mécanisme propres. Nettoyage de l’appareil Manipulation des cassettes • Si la bande est lâche dans la • Taches sur l’appareil cassette, retirez le mou en insérant Elles doivent être enlevées avec un chiffon doux. Si un stylo dans l’une des bobines et l’appareil est très taché, essuyez-le avec un chiffon en tournant. -
Page 206: Guide De Dépannage
Guide de dépannage Si vous rencontrez des problèmes avec cet appareil, consultez cette liste avant d’appeler un réparateur. Si vous ne pouvez pas résoudre le problème avec les conseils donnés ci-dessous, ou si l’appareil a été endommagé physiquement, appelez une personne qualifiée, telle que votre revendeur, pour faire réparer l’appareil. Symptôme Cause Action... -
Page 207: Informations Complémentaires
Informations complémentaires Description des codes PTY: NEWS: Informations. NATION M: Musiques populaire actuelle d’un pays ou d’une région dans la langue nationale. AFFAIRS: Émissions d’actualité prolongeant les informations—débats ou analyses. OLDIES: Musiques de la période appelée “l’âge d’or” de la musique populaire. INFO: Émissions dont le but est de donner des conseils dans le sens le plus large. -
Page 208: Spécifications
Spécifications Amplificateur Général Puissance de sortie: Alimentation: 20 W (10 W + 10 W) à 4 Ω (10% THD) AC IN: 230 V , 50 Hz Sensibilité d’entrée audio/Impédance (à 1 kHz) DC IN: 12 V, 4 A AUX: 500 mV/48,75 kΩ Consommation: 35 W (pendant le fonctionnement) 4 Ω... - Page 209 VICTOR COMPANY OF JAPAN, LIMITED SW, FI, DA, GE, FR, SP, IT 0103MWMMDWJEM © 2003 VICTOR COMPANY OF JAPAN, LIMITED...