Publicité

Les langues disponibles

Les langues disponibles

Liens rapides

MODEL
MODÈLE
MODELO
INSTRUCTION MANUAL AND SAFETY INSTRUCTIONS
Improper and unsafe use of this power tool can result in death or serious bodily injury!
This manual contains important information about product safety. Please read and
understand this manual before operating the power tool. Please keep this manual
available for others before they use the power tool.
MODE D'EMPLOI ET INSTRUCTIONS DE SECURITE
Une utilisation incorrecte et dangereuse de cet outil motorisé peut entraîner la mort
ou de sérieuses blessures corporelles!
Ce mode d'emploi contient d'importantes informations à propos de la sécurité de
ce produit. Prière de lire et de comprendre ce mode d'emploi avant d'utiliser l'outil
motorisé. Garder ce mode d'emploi à la disponibilité des autres utilisateurs avant
qu'ils utilisent l'outil motorisé.
MANUAL DE INSTRUCCIONES E INSTRUCCIONES DE SEGURIDAD
¡La utilización inapropiada e insegura de esta herramienta eléctrica puede resultar
en lesiones serias o en la muerte!
Este manual contiene información importante sobre la seguridad del producto. Lea y
comprenda este manual antes de utilizar la herramienta eléctrica. Guarde este manual
para que puedan leerlo otras personas antes de que utilicen la herramienta eléctrica.
DOUBLE INSULATION
DOUBLE ISOLATION
AISLAMIENTO DOBLE
CC 14SC
WARNING
AVERTISSEMENT
ADVERTENCIA
CUT-OFF MACHINE
TRONÇONNEUSE
TRONZADORA

Publicité

Table des Matières
loading

Sommaire des Matières pour Hitachi CC 14SC

  • Page 1 MODEL CUT-OFF MACHINE CC 14SC MODÈLE TRONÇONNEUSE MODELO TRONZADORA INSTRUCTION MANUAL AND SAFETY INSTRUCTIONS WARNING Improper and unsafe use of this power tool can result in death or serious bodily injury! This manual contains important information about product safety. Please read and understand this manual before operating the power tool.
  • Page 2: Table Des Matières

    English CONTENTS English Page Page IMPORTANT INFORMATION ........3 PREPARATION BEFORE OPERATION ......8 MEANINGS OF SIGNAL WORDS ........ 3 BEFORE USING ............10 SAFETY ................3 PRACTICAL APPLICATIONS ........11 FOREWORD ..............6 CUT-OFF WHEEL DISMOUNTING AND PART NAMES ..............7 MOUNTING ............
  • Page 3: Important Information

    Hazards that must be avoided to prevent bodily injury or machine damage are identified by WARNINGS on the tool and in this Manual. Never use this tool in a manner that has not been specifically recommended by HITACHI, unless you first confirm that the planned use will be safe for you and others.
  • Page 4 English 10. ALWAYS USE EYE PROTECTION WHEN WORKING WITH THE TOOL, TO PREVENT EYE INJURY. Ordinary eyeglasses only have impact resistant lenses, they are NOT safety glasses. Also, use a face mask for additional safety, and wear a dust mask if the cutting operation produces dust. 11.
  • Page 5 English Always clamp or otherwise secure the workpiece to the vise; otherwise the workpiece might be thrown from the base and cause bodily harm. Always confirm that the cut-off wheel is free from any cracks, before using the tool. Always confirm that the parts which fix the cut-off wheel are not damaged. Damaged parts cause the breakage of the cut-off wheel.
  • Page 6: Foreword

    English WARNING FOR YOUR OWN SAFETY READ THIS INSTRUCTION MANUAL BEFORE OPERATING THE CUT-OFF MACHINE. Always wear eye protection, when using the tool. Always keep hands out of the line of the cut-off wheel. Never operate the tool without the guards in place. Never perform any freehand operation with the tool.
  • Page 7: Part Names

    English PART NAMES Handle Wheel Cover Safety Cover Cut-off Wheel Quick Vise Spark Chute Fig. 1 Switch Lock-off Button Motor Stopper Pin Shaft Wheel Washer Base Screw Handle Chain Vise(B) Vise(A) Fig. 2...
  • Page 8: Specifications

    2 conductor type cabtire cable 8 ft (2.5 m) STANDARD ACCESSORIES 1 Cut-Off Wheel 14" × 7/64" × 1" (355 × 2.8 × 25.4 mm) Model CC 14SC (A36RBIG) 1pc. (Code No.964975Z) (Attached to the main body) 2 Wrench (Attached to the base) Fig.
  • Page 9 English Repair or replace damaged or worn cord immediately. This power tool is intended for use on a circuit with an receptacle similar to the one illustrated in sketch A, Fig. 4. A temporary adapter, similar to the one illustrated in sketches B and C, may be used to connect the power tool plug to a 2-pole receptacle as shown in sketch B in case a properly grounded receptacle is not available.
  • Page 10: Before Using

    English BEFORE USING 1. Make sure the power source is appropriate for the tool. WARNING: Never connect the power tool unless the available AC power source is of the same voltage as that specified on the nameplate of the tool. 2.
  • Page 11: Practical Applications

    English PRACTICAL APPLICATIONS WARNING: Never remove or install a workpiece while the cut-off wheel is rotating, to avoide personal injury. 1. Procedure for fixing the cutting material (Fig. 5 and 6). Quick Vise Place the workpiece material between Vise (A) and Vise (B), raise the clutch and push the Screw Handle to bring Vise (A) lightly into contact with the workpiece material, as shown in Fig.
  • Page 12 English 3. Cutting operation. (1) Rotate the cut-off wheel, gently press down the handle, and bring the cut-off wheel close to the material to be cut. (2) When the cut-off wheel contacts the material, gently press down the handle further and start cutting. (3) When cutting (or designated slotting) is completed, raise the handle and restore it to its original position.
  • Page 13 English 5. Moving the stationary vise-jaw (Fig. 12). The vise opening is set to the back in the vise slide ditch of the base The vise jaws open when shipped from the factory. to 8" (203 mm) In case the change of a vise opening is required, move the vise-jaw to forward or backward to desired location, after unscrewing the two bolts.
  • Page 14: Maintenance And Inspection

    English 2. Mounting the Cut-Off Wheel. Thoroughly remove dust from the wheel washer and bolt, then mount the cut-off wheel by following the dismounting procedures in reverse order. CAUTION: * Confirm that the stopper pin has returned to the retract position after installing or removing the cut-off wheel.
  • Page 15: Service And Repairs

    All quality power tools will eventually require servicing or replacement of parts because of wear from normal use. To assure that only authorized replacement parts will be used, and that the double insulation system will be protected, all service (other than routine maintenance) must be performed by an AUTHORIZED HITACHI POWER TOOL REPAIR CENTER, ONLY.
  • Page 16: Information Importante

    Les risques contre lesquels se prémunir pour éviter toute blessures physiques ou dommage matériel sont identifiés par des AVERTISSEMENTS sur l’outil et dans le présent manuel. Ne jamais utiliser l’outil d’une façon non spécifiquement recommandée par HITACHI, sans s’être au préalable assuré que l’utilisation prévue est sans danger pour soi et pour les autres.
  • Page 17 Français 9. PORTER DES VÊTEMENTS APPROPRIÉS PENDANT LE TRAVAIL. Ne jamais porter de vêtements lâches ni de gants, cravate, bagues, bracelets ni aucun autre bijou qui pourraient se coincer dans les pièces en rotation. Toujours porter des chaussures anti-dérapantes, de préférence avec des doigts de pied en acier.
  • Page 18 Français Toujours porter des vêtements bien ajustés et des chaussures anti-dérapantes (de préférence avec des doigts de pied en acier) et des lunettes de protection lorsqu’on utilise l’OUTIL ELECTRIQUE. Toujours manier l’OUTIL ELECTRIQUE avec soin. Si l’OUTIL ELECTRIQUE tombe ou qu’il heurte un objet dur, il risque de se déformer, de se fendiller ou autre dommage.
  • Page 19: Avant-Propos

    Français Quand l’OUTIL ELECTRIQUE est branché, ne jamais tenter de le déplacer avec le doigt sur l’interrupteur de marche. Ne jamais utiliser l’OUTIL ELECTRIQUE si l’interrupteur de marche ne fonctionne pas correctement. Ne jamais utiliser l’OUTIL ELECTRIQUE si le logement en plastique ou la poignée sont déformés ou fendillés.
  • Page 20: Nom Des Pièces

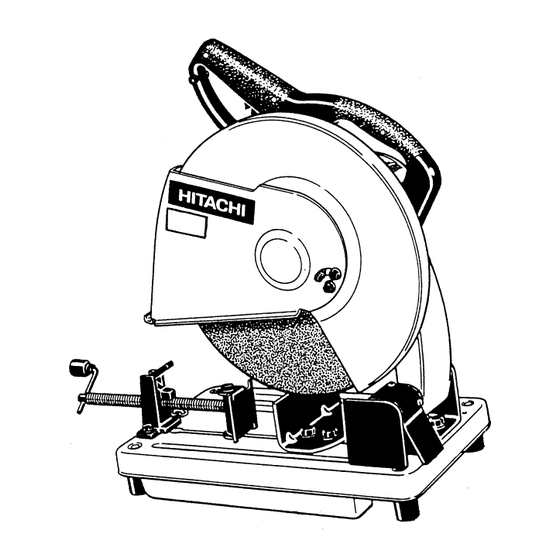
    Français NOM DES PIÈCES Poignée Carter de lame Carter de sécurité Disque à tronçonner Etau rapide Evacuateur d’étincelles Fig. 1 Gâchette Bouton de sécurité Moteur Butée goupille Arbre Rondelle de disque Socle Poignée à vis Chaîne Etau (B) Etau (A) Fig.
  • Page 21: Spécifications

    Câble sous gaine de caoutchouc à 2 conducteurs, 8 ft (2,5 m) ACCESSOIRES STANDARD 1 Disque à tronçonner 14" × 7/64" × 1" (355 × 2,8 × 25,4 mm) modèle CC 14SC (A36RBIG) × 1 (Code No. 964975Z) (Fixé au corps principal) 2 Clé (Fixé au socle) Fig.
  • Page 22 Français Utiliser uniquement des cordons de rallonge à 3 âmes dotés d’une fiche de mise à la terre à 3 broches et des prises à 3 pôles acceptant la fiche de l’outil. Réparer ou remplacer immédiatement tout cordon endommagé. Cet outil électrique est conçu pour fonctionner sur un circuit doté...
  • Page 23: Avant L'utilisation

    Français AVANT L’UTILISATION 1. S’assurer que la source d’alimentation convient pur l’outil. AVERTISSEMENT: Ne jamais raccorder l’outil électrique si la source d’alimentation secteur n’est pas de la tension spécifiée sur la plaque signalétique de l’outil. 2. S’assurer que la gâchette est coupée (OFF). AVERTISSEMENT: Si l’on raccorde le cordon d’alimentation à...
  • Page 24: Applications Pratiques

    Français 12. Inspecter la stabilité de rotation du disque à tronçonner. Pour obtenir des coupes précises, faire tourner le disque à tronçonner et voir s’il n’y a pas de flèche pour s’assurer que le disque ne présente pas d’instabilité notable ; sinon, il risque d’engendrer des vibrations et de provoquer un accident.
  • Page 25: Opération De Coupe

    Français 3. Opération de coupe (1) Faire tourner le disque à tronçonner, appuyer légèrement sur la poignée, et amener le disque près du matériau à couper. (2) Lorsque le disque est en contact avec le matériau, appuyer davantage sur la poignée et commencer à...
  • Page 26: Déplacement De La Mâchoire D'étau Fixe (Fig. 12)

    Français 5. Déplacement de la mâchoire d’étau fixe (Fig. 12) Lorsque l’outil quitte nos usines, l’ouverture de l’étau est réglée sur Les mâchoires l’arrière, sur l’encoche coulissante du socle de l’étau. d’étau s’ouvrent de 8" (203 mm) Si l’on souhaite modifier la position de l’ouverture de l’étau, déplacer la mâchoire d’étau vers l’avant ou vers l’arrière sur la position voulue, après avoir dévissé...
  • Page 27: Entretien Et Inspection

    Français 2. Installation du disque à tronçonner Enlever toute la poussière des rondelles de disque et du boulon, puis installer le disque à tronçonner en procédant dans l’ordre inverse du retrait. PRECAUTION: * Après l’installation ou le retrait du disque à tronçonner, vérifier que la butée goupille est revenue sur sa position rentrée.
  • Page 28: Graissage

    (autres que l’entretien de routine) exclusivement à un SERVICE APRES-VENTE D’OUTILS ELECTRIQUES HITACHI AGREE. REMARQUE: Les spécifications sont sujettes à modification sans obligations de la part d’HITACHI.
  • Page 29: Información Importante

    ADVERTENCIAS en la herramienta misma y en este manual. No utilice nunca esta herramienta de manera no específicamente recomendada por HITACHI, a menos que haya confirmado previamente que la utilización propuesta no entrañe ningún riesgo para usted o para terceros.
  • Page 30 Español 9. UTILICE SIEMPRE LAS VESTIMENTAS APROPIADAS CUANDO TRABAJE CON LA HERRAMIENTA. No utilice ropas o guantes flojos, collares, anillos, brazaletes u otras joyas pues podrían quedar atrapados en las piezas móviles. Utilice calzados no resbaladizos, preferentemente con puntera de acero. Si tiene cabellos largos, utilice un medio adecuado para recogerlos. 10.
  • Page 31 Español Cuando trabaje con la HERRAMIENTA MECÁNICA, utilice siempre vestimentas adecuadas, calzados no resbaladizos (preferentemente con puntera de acero) y gafas protectoras. Siempre maneje la HERRAMIENTA MECÁNICA con cuidado. No permita que la HERRAMIENTA MECÁNICA se caiga o golpee contra otro objeto duro, pues podría deformarse, agrietarse o sufrir otros daños.
  • Page 32: Prologo

    Español No bloquee la cubierta de seguridad (antes de usar la herramienta, siempre confirme que se desliza suavemente). No abuse del cable de alimentación de la herramienta. No intente mover la HERRAMIENTA MECÁNICA conectada a la red, con su dedo sobre el interruptor de arranque.
  • Page 33: Nomenclatura

    Español NOMENCLATURA Mango Cubierta de la rueda Cubierta de seguridad Rueda de recortar Tornillo de banco rápido Canaleta para chispas Fig. 1 Interruptor Botón de desbloqueo Motor Tope pasador Arandela de la rueda Base Mango de tornillo Cadena Tornillo de Tornillo de banco (B) banco (A)
  • Page 34: Especificaciones

    Cable armado flexible del tipo de 2 conductores, 8 pies (2,5 m) ACCESORIOS ESTÁNDAR 1 Rueda de recortar 14" × 7/64" × 1" (355 × 2,8 × 25,4 mm) Modelo CC 14SC (A36RBIG) 1 pza. (No. de código 964975Z) (Acoplada al cuerpo principal) 2 Llave fija (Acoplada al base) Fig.
  • Page 35 Español especializado o con el personal de servicio cuando tenga dudas sobre la conexión a tierra de la herramienta. Utilice únicamente cables prolongadores de 3 núcleos que tengan un enchufe de puesta a tierra de 3 espigas de contacto y tomacorrientes de 3 polos que coincidan con el enchufe. Repare o reemplace inmediatamente un cable dañado o gastado.
  • Page 36: Antes Del Uso

    Español ANTES DEL USO 1. Compruebe que la fuente de alimentación sea apropiada para la herramienta. ADVERTENCIA: No conecte nunca la herramienta mecánica a menos que la fuente de alimentación de CA disponible sea del mismo voltaje que el especificado en la placa de características de la herramienta.
  • Page 37: Funcionamiento De Prueba

    Español 11. Funcionamiento de prueba Después de confirmar que no hay ninguna persona situada delante de la herramienta, hágase a un lado y ponga en marcha la herramienta mecánica. Compruebe la inexistencia de condiciones anormales antes de intentar una operación de corte. Períodos de funcionamiento de prueba: Cuando se reemplaza la rueda de recortar ..
  • Page 38: Operación De Corte

    Español 3. Operación de corte (1) Gire la rueda de recortar, presione suavemente el mango hacia abajo, y ponga la rueda de recortar cerca del material que se va a cortar. (2) Cuando la rueda de recortar entre en contacto con el material, vuelva a presionar suavemente el mango hacia abajo y empiece a realizar el corte.
  • Page 39: Cómo Mover La Mordaza De Tornillo Fija (Fig. 12)

    Español 5. Cómo mover la mordaza de tornillo fija (Fig. 12) Cuando se expide de fábrica, la apertura del tornillo de banco está Las mordazas de ajustado hacia atrás en la canaleta deslizante del tornillo de banco tornillo se abren a 8"...
  • Page 40: Mantenimiento E Inspección

    Español 2. Montaje de la rueda de recortar Elimine completamente el polvo de las arandelas y perno de la rueda y luego instale la rueda de recortar invirtiendo el procedimiento de desmontaje. PRECAUCIÓN: * Después de montar o desmontar la rueda de recortar, compruebe que el tope pasador haya regresado a la posición de retracción.
  • Page 41: Servicio Y Reparaciones

    (que no sea mantenimiento de rutina) deben realizarse ÚNICAMENTE EN UN CENTRO DE SERVICIO DE HERRAMIENTAS MECÁNICAS AUTORIZADO POR HITACHI. NOTA: Las especificaciones se encuentran sujetas a cambios sin previo aviso, sin ninguna obligación por...
  • Page 42: Parts List

    Español PARTS LIST Model CC14SC...
  • Page 43 Español...
  • Page 44 Machine Screw Wheel Bolt External Tooth Lock Washer Nylon Washer Bolt Washer Safety Cover Lead Wire Ass’y Special Bolt (A) Carbon Brush HITACHI Label Brush Cap D4 × 30 Warning Label Roll Pin Spring Stopper Pin Hinge Shaft Gear Housing...
  • Page 45 Español...
  • Page 46 Español...
  • Page 47 Español...
  • Page 48 Issued by Sinagawa Intercity Tower A, 15-1, Konan 2-chome, Minato-ku, Tokyo 108-6020, Japan Distributed by 3950 Steve Reynolds Blvd. Norcross, GA 30093 Hitachi Koki Canada Co. A005 6395 Kestrel Road Code No. H993182-81 Mississauga ON L5T 1Z5 Printed in Taiwan...

Table des Matières