Becker Centronic TimeControl TC511 Notice De Montage Et D'utilisation

Masquer les pouces Voir aussi pour Centronic TimeControl TC511:
Table des Matières

Publicité

Les langues disponibles

Les langues disponibles

Liens rapides

Centronic
TimeControl TC511
Montage- und Betriebsanleitung
de
Zeitschaltuhr Funk für Lichtsensor
Wichtige Informationen für:
• den Monteur / • die Elektrofachkraft / • den Benutzer
Bitte entsprechend weiterleiten!
Diese Anleitung ist vom Benutzer aufzubewahren.
Assembly and Operating Instructions
en
Radio-operated Light Sensor Timer
Important information for:
• Fitters / • Electricians / • Users
Please forward accordingly!
These instructions must be kept for future reference.
Notice de montage et d'utilisation
fr
Horloge radio pour capteur de luminosité
Informations importantes pour:
• l'installateur / • l'électricien / • l'utilisateur
À transmettre à la personne concernée !
Cette notice doit être conservée par l'utilisateur.
Montage- en gebruiksaanwijzing
nl
Tijdschakelklok draadloos voor lichtsensor
Belangrijke informatie voor:
• de monteur / • de elektricien / • de gebruiker
Aan de betreffende personen doorgeven!
De gebruiker dient deze gebruiksaanwijzing te bewaren.
Becker-Antriebe GmbH
35764 Sinn/Germany
www.becker-antriebe.com

Publicité

Table des Matières
loading

Sommaire des Matières pour Becker Centronic TimeControl TC511

  • Page 1 Cette notice doit être conservée par l’utilisateur. Montage- en gebruiksaanwijzing Tijdschakelklok draadloos voor lichtsensor Belangrijke informatie voor: • de monteur / • de elektricien / • de gebruiker Aan de betreffende personen doorgeven! De gebruiker dient deze gebruiksaanwijzing te bewaren. Becker-Antriebe GmbH 35764 Sinn/Germany www.becker-antriebe.com...
  • Page 2: Table Des Matières

    Inhaltsverzeichnis Allgemeines ....................4 Gewährleistung ..................4 Sicherheitshinweise .................. 4 Anzeigen- und Tastenerklärung ..............5 Bestimmungsgemäße Verwendung ............6 Einlernen des Funks .................. 6 Montage Wandhalterung ................7 Lichtsensor ....................7 Erklärungen ....................8 Einstellungen ...................13 Inbetriebnahme ..................16 Werkseinstellung ..................16 Programmierung ..................17 Batteriewechsel ..................
  • Page 3 Sommaire Généralités ..................... 64 Garantie ....................64 Instructions de sécurité ................65 Explication des textes d’affichage et des touches ........66 Utilisation prévue ..................67 Programmation de la radio ................67 Montage du support mural ............... 68 Capteur de luminosité ................68 Explications ....................
  • Page 4: Allgemeines

    Endproduktes, Installation und Kundenberatung, erforderlichen gesetzlichen und behördlichen Vorschriften, insbesondere die einschlägigen aktuellen EMV-Vorschriften, beachtet und eingehalten werden. Sicherheitshinweise Vorsicht Bitte bewahren Sie die Anleitung auf! • Nur in trockenen Räumen verwenden. • Verwenden Sie nur unveränderte Becker Originalteile. • Halten Sie Personen aus dem Fahrbereich der Anlagen fern. • Halten Sie Kinder von Steuerungen fern. • Beachten Sie Ihre landesspezifischen Bestimmungen. • Verbrauchte Batterien fachgerecht entsorgen. Batterien nur durch identischen Typ (LR 03; AAA) ersetzen. • Wird die Anlage durch einen oder mehrere Sender gesteuert, muss der Fahrbereich der Anlage während des Betriebes einsehbar sein.
  • Page 5: Anzeigen- Und Tastenerklärung

    Anzeigen- und Tastenerklärung...
  • Page 6: Bestimmungsgemäße Verwendung

    Montage- und Betriebsanleitung Bestimmungsgemäße Verwendung Die TC511 darf nur für die Ansteuerung von Rollladen- und Jalousieanlagen verwendet werden. Der Anschluss von Fremdgeräten muss in Rücksprache mit dem Fachhandel durchgeführt werden. Hinweis Achten Sie darauf das die Steuerung nicht im Bereich metallischer Flä- chen oder magnetischer Felder installiert und betrieben wird. Funkanlagen, die auf der gleichen Frequenz senden, können zur Stö- rung des Empfangs führen. Es ist zu beachten, dass die Reichweite des Funksignals durch den Ge- setzgeber und den baulichen Maßnahmen begrenzt ist. Einlernen des Funks 1) Mastersender einlernen a) Empfänger in Lernbereitschaft bringen Hinweis Beachten Sie die Bedienungsanleitung des Empfängers.
  • Page 7: Weitere Sender Einlernen

    2) weitere Sender einlernen a) Drücken Sie die Einlerntaste des Mastersenders, bis der Empfänger quittiert. b) Drücken Sie nun die Einlerntaste des neuen Senders, bis der Empfänger quittiert. c) Jetzt drücken Sie die Einlerntaste des neu einzulernenden Senders noch ein- mal. Der Empfänger quittiert das erfolgreiche Einlernen. Die maximale Funkreichweite beträgt im Gebäude bis zu 25 m und im freien Feld bis zu 350 m.
  • Page 8: Erklärungen

    Montage- und Betriebsanleitung Erklärungen Rollladen-Auswahl Bei der Rollladen-Funktion fährt der Rollladen nach Betätigung einer Fahrtaste in Selbsthaltung. Jalousie-Auswahl Bei der Jalousie-Funktion fährt die Jalousie im Tippbetrieb, um eine genaue Positionierung der Lamellen zu ermöglichen. Drücken Sie eine Fahrtaste länger als 1 Sekunde, fährt die Jalousie in Selbsthaltung. Nach Anfahren der programmierten Zwischen- und Endlagenposition wird auto- matisch eine Wendung der Lamellen durchgeführt (wenn die Wendeposition programmiert wurde).
  • Page 9: Reset-Taste

    +/- Tasten Folgende Bedienungen sind über + und - möglich: • Menü -> Wert verändern • Auto-Betrieb -> Informationen abfragen • + Taste -> Nächste automatische Schaltzeit s • - Taste -> Nächste automatische Schaltzeit t • + Taste und OK Taste -> Astrozeit s •...
  • Page 10 Montage- und Betriebsanleitung ASTRO Die TC511 steuert automatisch den Rollladen oder die Jalousie zu den Sonnen- auf- und Sonnenuntergangszeiten. Diese Zeiten gelten als Richtwerte. ASTRO ABEND Steuert die Auffahrt nach der eingestellten Schaltzeit. Abfahrt nach Astrofunktion. INDIVIDUELL Steuert die Auf- und Abfahrt nach den von Ihnen eingestellten Schaltzeiten.
  • Page 11 WOCHE Mit dem Menü WOCHE legen Sie gleiche Fahrzeiten von Montag - Sonntag (1-7) fest. BLOCK Mit dem Menü BLOCK stellen Sie zwei Blöcke ein. Block 1: legt die Fahrzeiten für Montag - Freitag (1-5) fest. Block 2: legt die Fahrzeiten für Samstag und Sonntag (6,7) fest. EINZEL Mit dem Menü...
  • Page 12 Montage- und Betriebsanleitung SCHALTZEIT Automatische Auf- und Abfahrzeiten für Rollladen und Jalousie. Bei der Displayanzeige --:-- (zwischen der Uhrzeit 23:59 und 00:00) wird die Schaltzeit nicht ausgeführt. OFFSET Mit dem Menü OFFSET kann eine zusätzliche Schaltzeit t programmiert wer- den. Diese ist abhängig von der PROG1 Schaltzeit t (max. +/- 240 Min.). Beispiel: Astrozeit t: 20:00 Offset t: +60 Min.
  • Page 13: Einstellungen

    Einstellungen EINSTELLUNG Im Menü EINSTELLUNG haben Sie folgende Möglichkeiten: • URLAUB • SONNE (bei angeschlossenem Sensor) • DAEMMER (bei angeschlossenem Sensor) • ZWISCHENPOSITION • LUEFTUNG/WENDUNG • PROG1 (ENDLAGE, ZWISCHENPOSITION, LUEFTUNG/WENDUNG) • PROG2 (ENDLAGE, ZWISCHENPOSITION, LUEFTUNG/WENDUNG) • TEST MODUS (bei angeschlossenem Sensor) •...
  • Page 14 Montage- und Betriebsanleitung LUEFTUNG/WENDUNG Die Lüftungs-/Wendeposition ist eine frei wählbare Position des Rollladens/ Jalousie, zwischen der unteren und oberen Endlage. Mit dieser Funktion kön- nen Sie den Rollladen aus der unteren Endlage soweit wieder auffahren, bis die Lüftungsschlitze geöffnet sind. Bei der Jalousie erfolgt die Lamellenwendung. Dazu drücken Sie die AUF-Taste zweimal kurz nacheinander.
  • Page 15 LAENGE/BREITE/ZEITZONE (nur bei EXPERTEN MODUS ON) Ihre Koordinaten ermitteln Sie z.B. mit Hilfe eines Atlas. SO/WI SO/WI bezeichnet die automatische Sommer-/Winterzeitumschaltung. Werks- einstellung ist ON; die Zeitschaltuhr passt sich automatisch an. FUNKTION Dieser Modus ist nur für ausgebildetes Fachpersonal bestimmt! Im Menü FUNKTION haben Sie die Möglichkeit, folgende Funktionen einzustel- len: • ROLLLADEN/JALOUSIE (Auswahl des Behanges) •...
  • Page 16: Inbetriebnahme

    Montage- und Betriebsanleitung Inbetriebnahme Mit dem ersten Tastendruck „wecken“ Sie die Uhr auf. Sie können nun mit den +/- Tasten die Sprache wählen und diese mir der OK Taste übernehmen. Die Uhr befindet sich im Automatikmodus. Werkseinstellung UHR/DAT: aktuelle MEZ und aktuelles Datum PROGRAMM: ASTRO ->...
  • Page 17: Programmierung

    Programmierung Menüübersicht 1. Drücken Sie die MENUE-Taste, UHR/DAT erscheint. 2. Um weitere Menüs auszuwählen, drücken Sie die +/- Tasten. 3. Drücken Sie die MENUE-Taste, um in den Betriebsmodus zu gelangen. UHR/DAT (Uhrzeit und Datum einstellen) 1. Drücken Sie die MENUE-Taste, UHR/DAT erscheint. 2. Mit OK kommen Sie in den Menüpunkt Uhrzeit. 3.
  • Page 18 Montage- und Betriebsanleitung PROGRAMM PROG1/ ASTRO WOCHE (Astrofunktion für Woche + Sperrzeiten st) PROG1/ ASTRO BLOCK (Astrofunktion für Block1/2 + Sperrzeiten st) PROG1/ ASTRO EINZEL (Astrofunktion für Einzel + Sperrzeiten st) 1. Drücken Sie die MENUE-Taste. 2. Um das Menü PROGAMM auszuwählen, drücken Sie die + Taste bis PRO- GAMM erscheint.
  • Page 19 PROGRAMM PROG1/ ASTRO ABEND WOCHE (Astrofunktion Abend für Woche + Schaltzeit s + Sperrzeit t) PROG1/ ASTRO ABEND BLOCK (Astrofunktion Abend für Block1/2 + Schaltzeit s + Sperrzeit t) PROG1/ ASTRO ABEND EINZEL (Astrofunktion Abend für Einzel + Schaltzeit s + Sperrzeit t) Drücken Sie die MENUE-Taste. Um das Menü PROGAMM auszuwählen, drücken Sie die + Taste bis PRO- GAMM erscheint.
  • Page 20 Montage- und Betriebsanleitung PROGRAMM PROG1/ INDIVIDUELL WOCHE (Individuelle Schaltzeit st für Woche) PROG1/ INDIVIDUELL BLOCK (Individuelle Schaltzeit st für Block1/2) PROG1/ INDIVIDUELL EINZEL (Individuelle Schaltzeit st für Einzel) 1. Drücken Sie die MENUE-Taste. 2. Um das Menü PROGAMM auszuwählen, drücken Sie die + Taste bis PRO- GAMM erscheint.
  • Page 21 PROGRAMM PROG2/ INDIVIDUELL WOCHE (Individuelle Schaltzeit st für Woche) PROG2/ INDIVIDUELL BLOCK (Individuelle Schaltzeit st für Block1/2) PROG2/ INDIVIDUELL EINZEL (Individuelle Schaltzeit st für Einzel) Drücken Sie die MENUE-Taste. Um das Menü PROGAMM auszuwählen, drücken Sie die + Taste bis PRO- GAMM erscheint. Bestätigen Sie mit OK. Drücken Sie die + Taste PROG2 erscheint.
  • Page 22 Montage- und Betriebsanleitung PROGRAMM PROG2/OFFSET (z.B. Abfahrzeit Abend auf Lüftungsposition) 1. Drücken Sie die MENUE-Taste. 2. Um das Menü PROGAMM auszuwählen, drücken Sie die + Taste bis PRO- GAMM erscheint. 3. Bestätigen Sie mit OK. 4. Drücken Sie die + Taste PROG2 erscheint. 5.
  • Page 23 EINSTELLUNG URLAUB, LICHTSENSOR (Urlaub OFF/ON, Sonne/Dämmerung) Drücken Sie die MENUE-Taste. Um das Menü EINSTELLUNG auszuwählen, drücken Sie die + Taste bis EINSTELLUNG erscheint. Bestätigen Sie mit OK. URLAUB ON / OFF erscheint. Mit der +/- Taste können sie die Urlaubsfunktion auf ON oder OFF stellen. Bestätigen Sie Ihre Auswahl mit OK.
  • Page 24 Montage- und Betriebsanleitung EINSTELLUNG ZWISCHENPOSITION, LUEFTUNG/WENDUNG, Prog1 ENDLAGE (Zeit/Lageprogrammierung) 1. Sie haben die Menüpunkte URLAUB/LICHTSENSOR bestätigt. ZWISCHEN- POSITION erscheint. 2. Mit der +/- Taste können Sie die Fahrzeit zur ZWISCHENPOSITION einstel- len. Die Angabe der Fahrzeit erfolgt in Sekunden oder Sie fahren die ZWI- SCHENPOSITION mit der AB-/AUF-Taste aus der oberen Endlage an.
  • Page 25 EINSTELLUNG Prog2 ENDLAGE (Zeit/Lageprogrammierung) Hinweis Nur wenn in PROG2 eine Zeit eingestellt ist, wird Ihnen dieses Dialog- fenster angezeigt. 1. Sie haben den Menüpunkt PROG1 ENDLAGE bestätigt. PROG2 ENDLAGE erscheint. 2. Mit der +/- Taste können Sie zwischen PROG 2 ENDLAGE, PROG 2 ZWI- SCHENPOSITION und PROG 2 LUEFTUNG/WENDUNG auswählen. 3. Bestätigen Sie Ihre Auswahl mit OK. 4.
  • Page 26 Montage- und Betriebsanleitung EINSTELLUNG DEUTSCH/ ASTROVERSCHIEBUNG st (Sprachauswahl, Astroverschiebung) Hinweis Nur wenn ein Lichtsensor im Gerät eingesteckt ist, wird Ihnen der Me- nüpunkt TEST MODUS angezeigt. Sie haben den Menüpunkt PROG2 ENDLAGE bestätigt. TEST MODUS ON/ OFF erscheint. Mit der +/- Taste können Sie den TEST MODUS aktivieren oder deaktivie- ren (ON/OFF). Bestätigen Sie mit OK. DEUTSCH erscheint. Hinweis Der T EST M ODUS w ird b eendet, w enn S ie d ie O K-Taste i m B etriebsmodus drücken.
  • Page 27 EINSTELLUNG (Städteauswahl, EXPERTEN MODUS (LAENGE, BREITE, ZEITZONE) Sie haben die Funktion ASTROVERSCHIEBUNG t bestätigt. Stadtauswahl (KASSEL) erscheint. Mit der +/- Taste können Sie die nächstgelegene Stadt einstellen. Betätigen Sie mit OK. Hinweis Diese Dialogfenster werden nur angezeigt, wenn im Funktionsmenü der EXPERTEN MODUS auf ON steht.
  • Page 28 Montage- und Betriebsanleitung EINSTELLUNG SO/WI (Automatische Sommer-/Winterzeitumstellung) 1. Sie haben die Funktion ZEITZONE bestätigt. SO/WI erscheint. 2. Mit der +/- Taste können Sie SO/WI ein- oder ausschalten. 3. Bestätigen Sie Ihre Auswahl mit OK. 4. Drücken Sie die MENUE-Taste, um in den Betriebsmodus zu gelangen.
  • Page 29 FUNKTION ROLLLADEN/JALOUSIE, LAUFZEIT, ERSTINBETRIEBNAHME (Auswahl des Behanges, Laufzeit des Rollladens/Jalousie, Datum der Erstin- betriebnahme) Drücken Sie die MENUE-Taste. Um das Menü FUNKTION auszuwählen, drücken Sie die + Taste bis FUNK- TION erscheint. Bestätigen Sie mit OK. ROLLLADEN/JALOUSIE erscheint. Mit der +/- Taste können Sie zwischen Rollladen/Jalousie auswählen. Bestätigen Sie mit OK.
  • Page 30: Batteriewechsel

    Montage- und Betriebsanleitung Batteriewechsel Hinweis Wechseln sie die Batterien innerhalb einer Minute. Die eingestellten Werte bleiben erhalten. 1. Entnehmen Sie die Batterien. 2. Legen Sie die neuen Batterien lagerichtig ein. Reinigung Reinigen Sie das Gerät nur mit einem feuchten Tuch. Verwenden Sie kein Reini- gungsmittel, da dieses den Kunststoff angreifen kann. Technische Daten Nennspannung 3 V DC...
  • Page 31: Was Tun, Wenn

    Was tun, wenn...? Störung Ursache Abhilfe Antrieb läuft nicht, 1. Batterien sind leer. 1. Neue Batterien ein- Sendekontrollleuchte legen. bleibt aus. 2. Batterien sind falsch 2. Batterien richtig ein- eingelegt. legen. Antrieb läuft nicht, 1. Empfänger ausser- 1. Entfernung zum Sendekontrollleuchte halb der Funkreich- Empfänger verrin- leuchtet.
  • Page 32 Montage- und Betriebsanleitung Störung Ursache Abhilfe Die eingestellten Es ist kein Lichtsensor Prüfen Sie den Licht- Sonnen- und Dämme- eingesteckt oder der sensor, Anschlusskabel rungsparameter lassen Lichtsensor, bzw. das und Anschlussstecker. sich nicht ändern, bzw. Anschlusskabel ist werden nicht angezeigt. defekt.
  • Page 33: Allgemeine Konformitätserklärung

    Allgemeine Konformitätserklärung Hiermit erklärt die Firma Becker-Antriebe GmbH, dass sich das Gerät Centronic TimeControl TC511 in Übereinstimmung mit den grundlegenden Anforderungen und den anderen relevanten Vorschriften der Richtlinie R&TTE 1999/5/EG be- findet. Bestimmt für den Gebrauch in folgenden Ländern: EU, CH, NO, IS, LI...
  • Page 34: General

    EMC regulations are adhered to dur- ing utilisation of our products, especially with regard to end product assembly, installation and customer advice. Safety Information Caution Please keep the instructions in a safe place! • Use in dry rooms only. • Use unmodified Becker original parts only. • Keep persons away from the system guide track. • Keep children away from controls. • Please comply with national stipulations. • Dispose of used batteries properly. Replace batteries by an identical type (LR 03; AAA) only. • If the system is controlled using one or several transmitters, the sys- tem guide track must be visible during operation.
  • Page 35: Explanation Of Displays And Buttons

    Explanation of displays and buttons...
  • Page 36: Intended Use

    Assembly and Operating Instructions Intended use The TC511 may only be used for controlling roller shutter and venetian blind systems. Connection of other devices must be carried out in consultation with specialised dealers. Note Ensure that the control is not installed and operated near metal sur- faces or magnetic fields.
  • Page 37: Installing The Wall Mount

    2) Learning additional transmitters a) Press the learn button of the master transmitter until acknowledgement is given by the receiver. b) Now press the learn button of the new transmitter until acknowledgement is given by the receiver c) Then press the learn button of the new transmitter to be learnt once again. The receiver will indicate when the learn process has been successfully com- pleted.
  • Page 38: Explanations

    Assembly and Operating Instructions Explanations Selecting roller shutter When the roller shutter function is used, the roller shutter remains locked after a control button has been activated. Selecting venetian blind When the venetian blind function is being used, the venetian blind moves in non¬maintained command mode in order to allow the slats to be positioned more precisely.
  • Page 39: Menu Button

    +/- buttons The following operations are possible using the + and - buttons: • Menu -> change value • Auto mode -> request information • + button -> next automatic switching time s • - button -> next automatic switching time t • + button and OK Taste -> astro time s •...
  • Page 40 Assembly and Operating Instructions ASTRO The TC511 automatically controls the roller shutters or venetian blinds at sunrise and sunset. These times are used as guidelines. ASTRO EVENING Shutters are raised according to the set switching time. Shutters are lowered according to the astro function. INDIVIDUAL Triggers the UP and DOWN control commands according to the switching times you have set.
  • Page 41 WEEK Using the WEEK menu, you can set the same switching times from Monday - Sunday (1-7). BLOCK Using the BLOCK menu, you can set two blocks. Block 1: sets the switching times for Monday - Friday (1-5). Block 2: sets the switching times for Saturday and Sunday (6,7). INDIVIDUAL Using the INDIVIDUAL menu, you can set separate switching times for every day of the week.
  • Page 42 Assembly and Operating Instructions SWITCHING TIME Automatic switching times for roller shutters and venetian blinds to be raised and lowered. Programming will not take effect if the sign: --:-- is showing on your display. (--:-- is located between 23.59 and 00:00). OFFSET An additional switching time t can be programmed using the OFFSET menu.
  • Page 43: Settings

    Settings SETTING The SETTING menu gives you the following options: • HOLIDAY SETTING • SUN (when sensor is connected) • TWILIGHT SETTING (when sensor is connected) • INTERMEDIATE POSITION • VENTILATION/REVERSE • PROG 1 (END LIMIT, INTERMEDIATE POSITION, VENTILATION/REVERSE) • PROG 2 (END LIMIT, INTERMEDIATE POSITION, VENTILATION/REVERSE) •...
  • Page 44 Assembly and Operating Instructions VENTILATION/REVERSE The ventilation/reversing position is a position of the roller shutter/venetian blind between the upper and lower limits that can be freely selected. Using this function, you can raise the shutter from the lower end limit until the ventilation slits are open.
  • Page 45 LONGITUDE/LATITUDE/TIME ZONE (only when EXPERT MODE is ON) You can find out your coordinates, for example, with the aid of an atlas. SUMMER/WINTER SUMMER/WINTER describes the automatic clock adjustment for daylight sav- ing changes. If the default setting is ON, the time switch adjusts automatically. FUNCTION This mode is only intended for qualified electricians! The FUNCTION menu gives you the option of setting the following functions: •...
  • Page 46: Initial Operation

    Assembly and Operating Instructions Initial operation Press the button once to „wake up“ the timer. Now you can select the language with the +/- buttons and accept it with the OK button. The clock is in automatic mode. Default setting TIME/DATE: current GMT and current date PROGRAMME: ASTRO ->...
  • Page 47: Programming

    Programming Operating mode Overview of the menu 1. Press the MENU button until TIME/DATE appears. 2. To select further menus, press the +/- buttons. 3. Press the MENU button to switch to operating mode. TIME/DATE (to set the time and date) 1. Press the MENU button until TIME/DATE appears. 2. By pressing OK, you get to the time menu level. 3.
  • Page 48 Assembly and Operating Instructions PROGRAMME PROG1/ ASTRO WEEK (Astro function for week + idle period st) PROG1/ ASTRO BLOCK (Astro function for block1/2 + idle period st) PROG1/ ASTRO INDIVIDUAL (Astro function for individual + idle period st) 1. Press the MENU button. 2. To select the PROGAMME menu, press the + button until PROGAMME appears.
  • Page 49 PROGRAMME PROG1/ ASTRO EVENING WEEK (Astro function evening for week + switching time s + idle period t) PROG1/ ASTRO EVENING BLOCK (Astro function evening for block 1/2 + switching time s + idle period t) PROG1/ ASTRO EVENING INDIVIDUAL (Astro function evening for individual + switching time s+ idle period t) Press the MENU button.
  • Page 50 Assembly and Operating Instructions PROGRAMME PROG1/INDIVIDUAL WEEK (Individual switching time st for week) PROG1/INDIVIDUAL BLOCK (Individual switching time st for block1/2) PROG1/INDIVIDUAL INDIVIDUAL (Individual switching time st for individual day) 1. Press the MENU button. 2. To select the PROGAMME menu, press the + button until PROGAMME ap- pears.
  • Page 51 PROGRAMME PROG2/ INDIVIDUAL WEEK (Individual switching time st for week) PROG2/ INDIVIDUAL BLOCK (Individual switching time st for block1/2) PROG2/ INDIVIDUAL INDIVIDUAL (Individual switching time st for individual day) Press the MENU button. To select the PROGAMME menu, press the + button until PROGAMME ap- pears. Confirm by pressing OK. Press the + button until PROG2 appears.
  • Page 52 Assembly and Operating Instructions PROGRAMME PROG2/OFFSET (e.g. Time shutters are lowered to ventilation position in the evening) 1. Press the MENU button. 2. To select the PROGAMME menu, press the + button until PROGAMME ap- pears. 3. Confirm by pressing OK. 4.
  • Page 53 SETTING HOLIDAY, LIGHT SENSOR (Holiday OFF/ON, sun/twilight setting) Press the MENU button. To select the SETTING menu, press the + button until SETTING appears. Confirm by pressing OK. HOLIDAY ON / OFF will appear. You can set the holiday function to ON or OFF by pressing the +/- button. Confirm your selection by pressing OK.
  • Page 54 Assembly and Operating Instructions SETTING INTERMEDIATE POSITION, VENTILATION/REVERSE, Prog1 END LIMIT (Time/ position programming) 1. You have confirmed the HOLIDAY/LIGHT SENSOR menu levels. INTERMEDI- ATE POSITION will appear. 2. You can set the switching time to move to the INTERMEDIATE POSITION using the +/- button. The switching time is indicated in a few seconds or you can move to the INTERMEDIATE POSITION from the upper end limit using the DOWN/ UP button.
  • Page 55 SETTING Prog2 END LIMIT (Time/position programming) Note This dialog window will only be displayed if a time is set in PROG2. 1. You have confirmed the PROG1 END LIMIT menu level. PROG2 END LIMIT will appear. 2. You can select PROG 2 END LIMIT, PROG 2 INTERMEDIATE POSITION and PROG 2 VENTILATION/REVERSE using the +/- button. 3. Confirm your selection by pressing OK. 4.
  • Page 56 Assembly and Operating Instructions SETTING GB ENGL/ ASTRO SHIFT st (Language, astro shift) Note The TEST MODE menu level will only be displayed if a light sensor is connected to the device. You have confirmed the PROG2 END LIMIT menu level. TEST MODE ON/ OFF will appear. You can activate or deactivate the TEST MODE (ON/OFF) using the +/- but- ton.
  • Page 57 SETTING (City, EXPERT MODE (LONGITUDE, LATITUDE, TIME ZONE) You have confirmed the function ASTRO SHIFT t. The city selected (LON- DON) will appear. You can set the nearest town using the +/- button. Confirm by pressing OK. Note These dialog windows are only displayed when the EXPERT MODE in the function menu is ON.
  • Page 58 Assembly and Operating Instructions SETTING SUMMER/WINTER (Automatic clock adjustment for daylight saving changes) 1. You have confirmed the TIME ZONE function. SUMMER/WINTER will appear. 2. You can switch SUMMER/WINTER on or off using the +/- button. 3. Confirm your selection by pressing OK. 4.
  • Page 59 FUNCTION ROLLER SHUTTER/BLIND FUNCTION, RUNNING TIME, INITIAL OPERA- TION (Selection of shutter/blind, running time of the roller shutter/blind, date of initial operation) Press the MENU button. To select the FUNCTION menu, press the + button until FUNCTION ap- pears. Confirm by pressing OK. ROLLER SHUTTER/BLIND will appear. You can select either roller or blind using the +/- button.
  • Page 60: Changing The Batteries

    Assembly and Operating Instructions Changing the batteries Note Change the batteries within one minute. The values set are still saved. 1. Remove the battery. 2. Insert the new battery properly. Cleaning Clean the device with a damp cloth only. Do not use a cleansing agent since this could damage the plastic. Technical data Nominal voltage 3 V DC Battery type...
  • Page 61: What To Do If

    What to do if ...? Problem Cause Remedy Drive is not functioning, 1. Batteries are dead. 1. Insert new batteries. transmission control 2. Batteries are incor- 2. Insert batteries cor- light is not lit. rectly inserted. rectly. Drive is not functioning, 1. Receiver outside the 1.
  • Page 62 Assembly and Operating Instructions Problem Cause Remedy The sun and twilight No light sensor is Check the light sensor, parameters cannot be connected or the light connecting cable and changed, and/or are not sensor, and/or the con- connector plug. displayed. necting cable is faulty.
  • Page 63: General Declaration Of Conformity

    General declaration of conformity Becker-Antriebe GmbH hereby declares that the device Centronic TimeControl TC511 complies with the basic requirements and other relevant regulations of the EC Directive R&TTE 1999/5/EC. For use in the following countries: EU, CH, NO, IS, LI Subject to technical changes without notice.
  • Page 64: Généralités

    Notice de montage et d’utilisation Généralités La TC511, livrée par l’usine avec la date et l’heure actuelles (heure de l’Europe centrale), pilote le moteur automatiquement aux heures astro (heures de lever et de coucher du soleil). Une commande manuelle de la TC511 est toujours possible. Grâce au capteur de luminosité...
  • Page 65: Instructions De Sécurité

    Instructions de sécurité Prudence Prière de conserver cette notice d’utilisation! • A utiliser uniquement dans des locaux secs. • Utilisez uniquement des pièces originales de Becker qui n’ont subi aucune modification. • Veillez à ce que personne ne se tienne dans la zone de déploiement des installations. • Tenez les enfants à l’écart des commandes. • Observez les directives spécifiques des pays. • Eliminez les piles usagées conformément aux prescriptions en la matière. Remplacez toujours les piles usagées par des piles de type identique (LR 03; AAA). • Lorsque l’installation est pilotée par un ou plusieurs émetteurs, la zone de fonctionnement de l’installation doit être visible pendant...
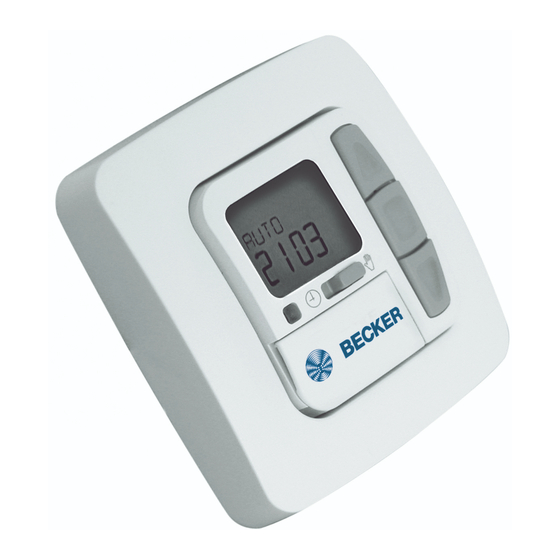
  • Page 66: Explication Des Textes D'affichage Et Des Touches

    Notice de montage et d’utilisation Explication des textes d’affichage et des touches...
  • Page 67: Utilisation Prévue

    Utilisation prévue La TC511 est conçue exclusivement pour la commande de volets roulants et de stores. La connexion d’appareils d’autres fabricants doit être mise au point avec le commerce spécialisé. Remarques Veillez à ce que la commande ne soit pas installée et utilisée dans une zone avec des surfaces métalliques ou de champs magnétiques. Les installations de radio qui émettent sur la même fréquence peuvent causer une perturbation de la réception. Sachez que la portée du signal radio est limitée par la législation et par les bâtiments. Programmation de la radio 1) Programmation de l’émetteur maître a) Préparer le récepteur en mode de programmation. Remarques Suivez la notice de service du récepteur.
  • Page 68: Programmation D'autres Émetteurs

    Notice de montage et d’utilisation 2) Programmation d’autres émetteurs a) Appuyez sur la touche de programmation de l’émetteur maître jusqu’à ce que le récepteur ait acquitté. b) Appuyez ensuite sur la touche de programmation du nouvel émetteur jusqu’à ce que le récepteur ait acquitté. c) Appuyez encore une fois sur la touche de programmation de l’émetteur à...
  • Page 69: Explications

    Explications Sélection volet roulant Pour la fonction volet roulant, le volet roulant se déplace en position de maintien après activation d’une touche de marche. Sélection store Lorsque la fonction store est active, le store se déplace par impulsion pour permettre un positionnement exact des lamelles. Appuyez sur une touche de marche pendant plus d’1 seconde pour amener le store en position de maintien.
  • Page 70: Touche Menu

    Notice de montage et d’utilisation Touches +/- Les touches + et - permettent les actions suivantes : • Menu -> Modification de la valeur • Service Auto -> Demande d’informations • Touche + -> horaire s automatique suivant • Touche - -> horaire t automatique suivant •...
  • Page 71 ASTRO La TC511 pilote automatiquement le volet roulant ou le store aux heures de lever et de coucher du soleil. Il s’agit de valeurs indicatives. ASTRO SOIR Pilote la montée selon l’horaire réglé. Descente selon fonction astro. INDIVIDUEL Pilote la montée et la descente selon les horaires que vous avez réglés.
  • Page 72: Horaire De Blocage

    Notice de montage et d’utilisation SEMAINE Le menu SEMAINE vous permet de régler les mêmes horaires de marche du lundi au dimanche (1-7). BLOC Le menu BLOC vous permet de régler deux blocs. Bloc 1 : définit les horaires de marche du lundi au vendredi (1-5). Bloc 2 : définit les horaires de marche du samedi et du dimanche (6,7).
  • Page 73 HORAIRES Horaires de montée et de descente automatiques pour VOLET ROULANT et STORE. Il n’y aucune programmation si vous avez sur l’écran --:-- (horaire situé entre 23:59 et 00:00). OFFSET Le menu OFFSET vous permet de régler un horaire t (OK) supplémentaire. Celui-ci dépend de l’horaire PROG1 t (maxi +/- 240 minutes).
  • Page 74: Réglages

    Notice de montage et d’utilisation Réglages REGLAGE Le menu REGLAGE vous offre les possibilités suivantes : • VACANCES • SOLEIL (avec capteur connecté) • CREPUSCULE (avec capteur connecté) • POS. INTERM • AERATION/INVERSION • PROG1 (POSITION FINALE, POS. INTERM, AERATION/INVERSION) •...
  • Page 75 AERATION/INVERSION La position aération/inversion est une position du volet roulant/store qui peut être librement sélectionnée entre la position finale supérieure et la position finale inférieure. Cette fonction vous permet de remonter le volet roulant à partir de la position finale inférieure jusqu’à ce que les fentes d’aération soient ouvertes. Lorsqu’il s’agit d’un store, les lamelles sont inversées.
  • Page 76 Notice de montage et d’utilisation LONGITUDE/LATITUDE/ZONE HORAIRE (seulement avec MODE EXPERT Vous pouvez déterminer vos coordonnées, p. ex., à l’aide d’un atlas. ETE/HIVER ETE/HIVER désigne la commutation automatique entre les heures d’été et d’hi- ver. Le réglage usine est ON ; l’horloge s’adapte automatiquement. FONCTION Ce mode est réservé exclusivement au personnel spécialisé ! Le menu FONCTION permet de régler les fonctions suivantes : •...
  • Page 77: Mise En Service

    Mise en service En appuyant une première fois sur la touche, vous « réveillez » l’horloge. Vous pouvez maintenant sélectionner la langue avec les touches +/- et la confirmer avec la touche OK. L’horloge est en mode Automatique. Paramétrage usine HEURE/DATE : heure de l’Europe centrale actuelle et date actuelle PROGRAMME : ASTRO ->...
  • Page 78: Programmation

    Notice de montage et d’utilisation Programmation Vue d’ensemble du menu 1. Appuyez sur la touche MENU, HEURE/DATE apparaît. 2. Pour sélectionner d’autres menus, appuyez sur les touches +/-. 3. Appuyez sur la touche MENU pour accéder au mode de service. HEURE/DATE (régler l’heure et la date) 1. Appuyez sur la touche MENU, HEURE/DATE apparaît. 2.
  • Page 79 PROGRAMME PROG1/ ASTRO SEMAINE (fonction astro pour semaine + horaire de blo- cage st) PROG1/ ASTRO BLOC (fonction astro pour BLOC1/2 + horaire de blocage st) PROG1/ ASTRO SEUL (fonction astro pour seul + horaire de blocage st) 1. Appuyez sur la touche MENU. 2. Pour sélectionner le menu PROGRAMME, appuyez sur la touche + jusqu’à ce que PROGRAMME apparaisse.
  • Page 80 Notice de montage et d’utilisation PROGRAMME PROG1/ ASTRO SOIR SEMAINE (fonction astro soir pour semaine + horaire s + horaire de blocage t) PROG1/ ASTRO SOIR BLOC (fonction astro soir pour bloc1/2 + horaire s + horaire de blocage t) PROG1/ ASTRO SOIR SEUL (fonction astro soir pour seul + horaire s + horaire de blocage t) Appuyez sur la touche MENU.
  • Page 81 PROGRAMME PROG1/ INDIVIDUEL SEMAINE (horaire individuel st pour semaine) PROG1/ INDIVIDUEL BLOC (horaire individuel st pour bloc 1/2) PROG1/ INDIVIDUEL SEUL (horaire individuel st pour seul) 1. Appuyez sur la touche MENU. 2. Pour sélectionner le menu PROGRAMME, appuyez sur la touche + jusqu’à ce que PROGRAMME apparaisse. 3.
  • Page 82 Notice de montage et d’utilisation PROGRAMME PROG2/ INDIVIDUEL SEMAINE (horaire individuel st pour semaine) PROG2/ INDIVIDUEL BLOC (horaire individuel st pour bloc 1/2) PROG2/ INDIVIDUEL SEUL (horaire individuel st pour seul) Appuyez sur la touche MENU. Pour sélectionner le menu PROGRAMME, appuyez sur la touche + jusqu’à ce que PROGRAMME apparaisse.
  • Page 83 PROGRAMME PROG2/OFFSET (p. ex. temps de descente soir sur position d’aération) 1. Appuyez sur la touche MENU. 2. Pour sélectionner le menu PROGRAMME, appuyez sur la touche + jusqu’à ce que PROGRAMME apparaisse. 3. Confirmez avec OK. 4. Appuyez sur la touche +. PROG2 apparaît. 5.
  • Page 84 Notice de montage et d’utilisation REGLAGE VACANCES, CAPTEUR DE LUMINOSITE (Vacances OFF/ON, Soleil/Crépus- cule) Appuyez sur la touche MENU. Pour sélectionner le menu REGLAGE, appuyez sur la touche + jusqu’à ce que REGLAGE apparaisse. Confirmez avec OK. VACANCES ON / OFF apparaît. Vous pouvez régler la fonction Vacancessur ON ou sur OFF au moyen des touches +/-.
  • Page 85 REGLAGE POS. INTERM, AERATION/INVERSION, Prog1 POSITION FINALE (programmation de l’horaire /de la position) 1. Vous avez confirmé les points de menu VACANCES/CAPTEUR DE LUMINO- SITE. POS. INTERM apparaît. 2. Vous pouvez régler le temps de marche pour POS. INTERM avec les touches +/-. Le temps de marche est donné en secondes. Vous pouvez également atteindre la POS.
  • Page 86 Notice de montage et d’utilisation REGLAGE Prog2 POSITION FINALE (programmation du temps/de la position) Remarque Cette fenêtre de dialogue s’affiche seulement lorsqu’un temps est réglé dans PROG2. 1. Vous avez confirmé le point de menu PROG1 POSITION FINALE. PROG2 POSITION FINALE apparaît. 2. Vous pouvez choisir entre PROG 2 POSITION FINALE, PROG 2 POS. INTERM et PROG 2 AERATION/INVERSION avec les touches +/-.
  • Page 87 REGLAGE FRANÇAIS/ DECALAGE ASTRO st (sélection de la langue, décalage astro) Remarque Le point de menu MODE TEST s’affiche seulement lorsqu’un capteur de luminosité est connecté à l’appareil. Vous avez confirmé le point de menu PROG2 POSITION FINALE. MODE TEST ON/OFF apparaît. Vous pouvez activer ou désactiver le MODE TEST (ON/OFF) avec les touches +/-. Confirmez avec OK. FRANÇAIS apparaît. Remarque Vous quittez le MODE TEST en appuyant sur la touche OK en mode de service.
  • Page 88 Notice de montage et d’utilisation REGLAGE (Sélection de la ville, MODE EXPERT (LONGITUDE, LATITUDE, ZONE HORAIRE) Vous avez confirmé la fonction DECALAGE ASTRO t. Sélection de la ville (PARIS) apparaît. Vous pouvez régler la ville la plus proche avec la touche +/-. Confirmez avec OK.
  • Page 89 REGLAGE ETE/HIVER (commutation automatique été/hiver) 1. Vous avez confirmé la fonction ZONE HORAIRE. ETE/HIVER apparaît. 2. Vous pouvez activer ou désactiver ETE/HIVER avec les touches +/-. 3. Confirmez votre sélection avec OK. 4. Appuyez sur la touche MENU pour accéder au mode de service.
  • Page 90: Volet Roulant/Store, Temps De Marche, 1E Mise En Service

    Notice de montage et d’utilisation FONCTION VOLET ROULANT/STORE, TEMPS DE MARCHE, 1e MISE EN SERVICE (sélection du tablier, temps de marche du volet roulant/store, date de la pre- mière mise en service) Appuyez sur la touche MENU. Pour sélectionner le menu FONCTION, appuyez sur la touche + jusqu’à ce que FONCTION apparaisse.
  • Page 91: Remplacement Des Piles

    Remplacement des piles Remarque Remplacez les piles dans l’espace d’une minute. Les valeurs réglées sont conservées. 1. Enlevez la pile. 2. Mettez la pile neuve en place dans la bonne position. Nettoyage Nettoyez l’appareil seulement avec un chiffon humide. N’utilisez pas de produit de nettoyage, celui-ci pouvant avoir un effet agressif sur la matière plastique. Caractéristiques techniques Tension nominale 3 V DC...
  • Page 92: Que Faire Quand

    Notice de montage et d’utilisation Que faire quand... ? Anomalie Cause Mesures à prendre Le moteur ne marche 1. Les piles dont 1. Mettre de nouvelles pas, le témoin de déchargées. piles. contrôle d’émission ne 2. Les piles ne sont 2. Placer les piles s’allume pas.
  • Page 93: Déclaration De Conformité Générale

    « PILE ». pile. Déclaration de conformité générale La société Becker-Antriebe GmbH déclare par la présente que l’appareil Cen- tronic TimeControl TC511 est en conformité avec les exigences fondamentales et les autres prescriptions pertinentes de la directive R&TTE 1999/5/CE. Est destiné à une utilisation dans les pays suivants: EU, CH, NO, IS, LI...
  • Page 94: Algemeen

    Montage- en gebruiksaanwijzing Algemeen De door de fabriek van actuele datum en tijd voorziene (MET) TC511 stuurt de aandrijving automatisch op de astrotijden (tijd van zonsopgang en zonsonder- gang). Handmatige bediening van de TC511 is altijd mogelijk. Door het eenvoudig aan brengen van een lichtsensor kan de TC511 uitgebreid worden met een comfortabele zonweringbesturing (schaduw geven aan plan- ten en meubels).
  • Page 95: Veiligheidsrichtlijnen

    Veiligheidsrichtlijnen Voorzichtig Bewaar deze gebruiksaanwijzing goed! • Uitsluitend in droge ruimtes gebruiken. • Maakt u uitsluitend gebruik van ongewijzigde Becker originele de- len. • Houd personen buiten het bereik van de installaties. • Laat kinderen niet met de installatie spelen. • Houdt u rekening met de landspecifieke bepalingen. • Verbruikte batterijen deskundig afvoeren. Batterijen uitsluitend door identieke type (LR 03; AAA) vervangen. • Wordt de installatie door één of meerdere zenders bestuurt, moet het bereik van de installatie gedurende het bedrijf kunnen worden overzien.
  • Page 96: Verklaring Van Displays En Toetsen

    Montage- en gebruiksaanwijzing Verklaring van displays en toetsen...
  • Page 97: Doelmatig Gebruik

    Doelmatig gebruik De TC511 mag uitsluitend gebruikt worden voor het bedienen van rolluiken en jaloezie-installaties. Het aansluiten van vreemde apparaten moet gebeuren na ruggespraak met de vakhandel. Aanwijzing Let u er alstublieft op dat de besturing niet in het bereik van metalen vlakken of magnetische velden wordt geïnstalleerd en geëxploiteerd. Radiozendinstallaties die op dezelfde frequentie zenden, kunnen tot storing bij het ontvangst leiden. Er dient rekening te worden gehouden met het feit, dat de reikwijdte van het radiosignaal door de wetgever en de bouwkundige maatrege- len is beperkt.
  • Page 98: Montage Van De Wandhouder

    Montage- en gebruiksaanwijzing 2) verdere zenders programmeren a) Drukt u de programmeertoets van de masterzender in tot de ontvanger be- vestigt. b) Drukt u nu de programmeertoets van de nieuwe zender tot de ontvanger be- vestigt. c) Nu drukt u de programmeertoets van de nieuw te programmeren zender op- nieuw in.
  • Page 99: Verklaringen

    Verklaringen Selectie rolluik Bij de rolluikfunctie loopt het rolluik na het activeren van een richtingstoets zelf- standig. Selectie jaloezie Bij de jaloeziefunctie gaat de jaloezie in de tipstand om een nauwkeurige positi- onering van de lamellen mogelijk te maken. Wanneer een richtingstoets langer dat 1 seconde wordt ingedrukt dan loopt de jaloezie zelfstandig.
  • Page 100 Montage- en gebruiksaanwijzing +/- toetsen De volgende bediening is met + en - mogelijk: • Menu -> Waarde veranderen • Auto-stand -> Informatie opvragen • +-toets -> Volgende automatische schakeltijds • - toets -> Volgende automatische schakeltijd t • + toets en OK toets -> Astrotijd s •...
  • Page 101 ASTRO De TC511 bestuurt automatisch de rolluiken of de jaloezie op de tijden van zons- opgang of zonsondergang. Deze tijden gelden als richtwaarden. ASTRO AVOND Stuurt het omhoog lopen na de ingestelde schakeltijd. Omlaag lopen volgens astrofunctie. INDIVIDUEEL Schakelt het Op en Neer sturen in met de door u ingestelde schakeltijden.
  • Page 102 Montage- en gebruiksaanwijzing WEEK Gebruik het menu WEEK om dezelfde schakeltijden voor maandag - zondag (1-7) vast te leggen. BLOK Gebruik het menu BLOK om de twee blokken in te stellen. BLOK 1: legt de schakeltijden voor maandag - vrijdag (1-5) vast. BLOK 2: legt de schakeltijden voor zaterdag en zondag (6,7) vast.
  • Page 103 SCHAKELTIJD Automatische op en neer schakeltijden voor rolluiken en jaloezie. De programmering wordt niet geactiveerd als het teken “--:--“ (tussen 23:59 en 00:00) op het display verschijnt. OFFSET Gebruik het menu OFFSET om een extra schakeltijd t te programmeren. Deze is afhankelijk van de PROG 1 schakeltijds (max.
  • Page 104: Instellingen

    Montage- en gebruiksaanwijzing Instellingen INSTELLING In het menu INSTELLING zijn de volgende mogelijkheden: • VAKANTIE • ZON (bij aangesloten sensor) • SCHEMER (bij aangesloten sensor) • TUSSENPOSITIE • VENTILATIE/KANTELEN • PROG 1 (EINDSTAND, TUSSENPOSITIE, VENTILATIE/KANTELEN) • PROG 2 (EINDSTAND, TUSSENPOSITIE, VENTILATIE/KANTELEN) •...
  • Page 105 VENTILATIE/KANTELEN De ventilatie-/kantelstand is een vrij te kiezen stand van het rolluik/de jaloezie tussen de bovenste en onderste eindstand. Gebruik deze functie om het rolluik uit de onderste stand zo ver omhoog te laten lopen dat de ventilatiespleet wordt geopend. Bij de jaloezie worden de lamellen gedraaid. Druk daartoe twee maal kort achter elkaar op de OP-toets.
  • Page 106 Montage- en gebruiksaanwijzing LENGTE/BREEDTE/TIJDZONE (alleen in EXPERT MODUS ON) De coördinaten zijn bijvoorbeeld in een atlas te vinden. ZO/WI ZO/WI geeft de automatische zomer-/wintertijdomschakeling aan. Fabrieksin- stelling is ON; de tijdschakelklok past zich automatisch aan. FUNCTIE Deze modus is uitsluitend bedoeld voor geschoold personeel! In het menu FUNCTIE bestaat de mogelijkheid de volgende functies in te stellen: •...
  • Page 107: Ingebruikname

    Ingebruikname Met de eerste druk op de toets wordt de klok „gewekt“. Kies met de+/- toetsen de taal en neem deze over met de OK toets. De klok bevindt zich in de automa- tische modus. Fabrieksinstelling TIJD/DAT: actuele MET en actuele datum PROGRAMMA: ASTRO ->...
  • Page 108: Programmering

    Montage- en gebruiksaanwijzing Programmering Menuoverzicht 1. Druk op de MENU-toets TIJD/DAT verschijnt. 2. Druk op de +/- toetsen om meer menu’s te selecteren. 3. Druk op de MENU-toets, om in de bedrijfsmodus terecht te komen. TIJD/DAT (tijd en datum instellen) 1. Druk op de MENU-toets en TIJD/DAT verschijnt. 2.
  • Page 109 PROGRAMMA PROG 1/ ASTRO WEEK (astrofunctie voor Week + Spertijdenst) PROG 1/ ASTRO BLOK (astrofunctie voor BLOK1/2 + Spertijden st) PROG 1/ ASTRO AFZONDERLIJK (astrofunctie voor Afzonderlijk + Spertijden 1. Druk op de MENU-toets. 2. Om het nieuwe PROGAMMA te selecteren, op de + toets drukken tot PRO- GRAMMA verschijnt. 3.
  • Page 110 Montage- en gebruiksaanwijzing PROGRAMMA PROG 1/ ASTRO AVOND WEEK (astrofunctie Avond voor Week + Schakeltijd s + Spertijd t) PROG 1/ ASTRO AVOND BLOK (astrofunctie Avond voor BLOK1/2 + Schakeltijd s + Spertijd t) PROG 1/ ASTRO AVOND AFZONDERLIJK (astrofunctie Avond voor Afzonderlijk + Schakeltijd s + SPERTIJD t) Druk op de MENU-toets. Om het nieuwe PROGAMMA te selecteren, op de + -toets drukken tot PRO- GRAMMA verschijnt.
  • Page 111 PROGRAMMA PROG 1/ INDIVIDUEEL WEEK (individuele schakeltijd st voor week) PROG 1/ INDIVIDUEEL BLOK (individuele schakeltijd st voor BLOK1/2) PROG 1/ INDIVIDUEEL AFZONDERLIJK (individuele schakeltijd st voor Af- zonderlijk) 1. Druk op de MENU-toets. 2. Om het nieuwe PROGAMMA te selecteren, op de +-toets drukken tot PRO- GRAMMA verschijnt. 3. Bevestig met OK. PROG 1 verschijnt. 4.
  • Page 112 Montage- en gebruiksaanwijzing PROGRAMMA PROG 2/ INDIVIDUEEL WEEK (individuele schakeltijd st voor week) PROG 2/ INDIVIDUEEL BLOK (individuele schakeltijd st voor BLOK 1/2) PROG 2/ INDIVIDUEEL AFZONDERLIJK (individuele schakeltijd st voor Af- zonderlijk) Druk op de MENU-toets. Om het nieuwe PROGAMMA te selecteren, op de +-toets drukken tot PRO- GRAMMA verschijnt. Bevestig met OK. Druk op de + toets.PROG 2 verschijnt.
  • Page 113 PROGRAMMA PROG 2/OFFSET (bijv. vertrektijd avond naar ventilatiestand) 1. Druk op de MENU-toets. 2. Om het nieuwe PROGAMMA te selecteren, op de +-toets drukken tot PRO- GRAMMA verschijnt. 3. Bevestig met OK. 4. Druk op de + toets PROG 2 verschijnt. 5.
  • Page 114 Montage- en gebruiksaanwijzing INSTELLING VAKANTIE, LICHTSENSOR (Vakantie OFF/ON, Zon/Schemering) Druk op de MENU-toets. Om het menu INSTELLING te selecteren, op de + toets drukken tot INSTEL- LING verschijnt. Bevestig met OK VAKANTIE ON / OFF verschijnt. Met de +/- toets kan de vakantiefunctie op ON of OFF worden gezet. Bevestig de keuze met OK.
  • Page 115 INSTELLING TUSSENPOSITIE, VENTILATIE/KANTELEN, Prog1 EINDSTAND (Tijd/ Standprogrammering) 1. De menu-items VAKANTIE/LICHTSENSOR zijn bevestigd. TUSSENPOSITIE verschijnt. 2. Met de +/- toets kan de looptijd naar de TUSSENPOSITIE worden ingesteld. De opgave van de looptijd vindt plaats in seconden of u loopt naar de TUS- SENPOSITIE met de NEER-/OP-toets vanuit de bovenste eindstand.
  • Page 116 Montage- en gebruiksaanwijzing INSTELLING PROG 2 EINDSTAND (Tijd/ Standprogrammering) Aanwijzing Alleen wanneer in PROG 2 een tijd is ingesteld, wordt het dialoogven- ster weergegeven. 1. Het menu-item VENTILATIE/KANTELEN is bevestigd. PROG 2 EINDSTAND verschijnt. 2. Gebruik de +/- -toets om te kiezen tussen PROG 2 EINDSTAND, PROG 2 TUSSENPOSITIE en PROG 2 VENTILATIE/KANTELEN . 3.
  • Page 117 INSTELLING NEDERL/ ASTROVERSCHUIVING st (Taalkeuze, Astroverschuiving) Aanwijzing Het MENU-item TEST MODUS verschijnt alleen wanneer er een licht- sensor in het apparaat gestoken is. Het menu-item VENTILATIE/KANTELEN is bevestigd. TEST MODUS ON/ OFF verschijnt. Gebruik de +/- toets om de TEST MODUS te activeren of te deactiveren (ON/OFF). Bevestig met OK. NEDERL verschijnt. Aanwijzing Gebruik de OK-toets in de bedrijfsmodus om de TEST MODUS te be- eindigen.
  • Page 118 Montage- en gebruiksaanwijzing INSTELLING (Stadkeuze, EXPERT MODUS (LENGTE, BREEDTE, TIJDZONE)) De functie ASTROVERSCHUIVING t is bevestigd. Stadkeuze (AMSTER- DAM) verschijnt. Gebruik de +/- toets om de dichtst bij gelegen stad in te stellen. Bevestig met OK. Aanwijzing Deze dialoogvensters worden alleen getoond, wanneer in het functie- menu de EXPERT MODUS op ON staat. LENGTE verschijnt. (Voor het nauwkeurige bepalen van uw vestigings- plaats, kan deze via de lengte-/breedtegraad worden ingesteld.) Gebruik de +/- toets om de gewenste LENGTEgraad in te stellen.
  • Page 119 INSTELLING ZO/WI (Automatische zomer-/wintertijd omschakeling) De functie TIJDZONE is bevestigd. ZO/WI verschijnt. Gebruik de +/- toets om ZO/WI in- of uit te schakelen. Bevestig de keuze met OK. Druk op de MENU-toets, om in de bedrijfsmodus terecht te komen.
  • Page 120 Montage- en gebruiksaanwijzing FUNCTIE ROLLUIKEN/JALOEZIE, LOOPTIJD, EERSTE INGEBRUIKNAME (selectie type raamdecoratie, looptijd van het rolluik/de jaloezie, datum van eer- ste ingebruikname) Druk op de MENU-toets. Om het menu FUNCTIE te selecteren, op de + toets drukken tot FUNCTIE verschijnt. Bevestig met OK. ROLLUIKEN/JALOEZIE verschijnt. Gebruik de +/- toets om tussen rolluiken/ jaloezie te kiezen.
  • Page 121: Batterijen Vervangen

    Batterijen vervangen Aanwijzing Vervang de batterijen binnen een minuut. De ingestelde waarden blijven behouden. 1. Haal de batterij er uit. 2. Plaats de nieuwe batterij in de juiste positie. Reiniging Reinig het apparaat uitsluitend met een vochtige doek. Gebruik geen reinigings- middelen aangezien deze kunststof kunnen aantasten. Technische gegevens Nominale spanning 3 V DC Batterijtype LR 03 (AAA)
  • Page 122: Wat Te Doen Als

    Montage- en gebruiksaanwijzing Wat te doen als ...? Storing Oorzaak Verhelpen Motor draait niet, zend- 1. Batterijen leeg. 1. Nieuwe batterijen controlelampje blijft uit. 2. Batterijen werden plaatsen. niet correct ge- 2. Batterijen correct plaatst. plaatsen. Motor draait niet, zend- 1. Ontvanger buiten de 1.
  • Page 123: Algemene Conformiteitsverklaring

    “BATTERIJ”. sen. Algemene conformiteitsverklaring Hierbij verklaart de firma Becker-Antriebe GmbH, dat het apparaat Centronic TimeControl TC511 in overeenstemming is met de basisvereisten en andere re- levante voorschriften van de richtlijn R&TTE 1999/5/EG. Bepaalt voor het gebruik in de volgende landen: EU, CH, NO, IS, LI...

Table des Matières