Table des Matières

Publicité

Les langues disponibles
  • FR

Les langues disponibles

  • FRANÇAIS, page 74

Liens rapides

Bedienungsanleitung
User Manual
Notice d'utilisation
Manual de instrucciones
Istruzioni per l'uso
Handleiding
Mikro-Audio-System mit Amazon Alexa
Micro Audio System with Amazon Alexa
Micro chaîne audio avec Amazon Alexa
Microsistema de sonido con Amazon Alexa
Sistema micro audio con Amazon Alexa
Micro-audiosysteem met Amazon Alexa
MEDION
LIFE
®
®
P64430 (MD 44300)

Publicité

Table des Matières
loading

Sommaire des Matières pour Medion LIFE P64430

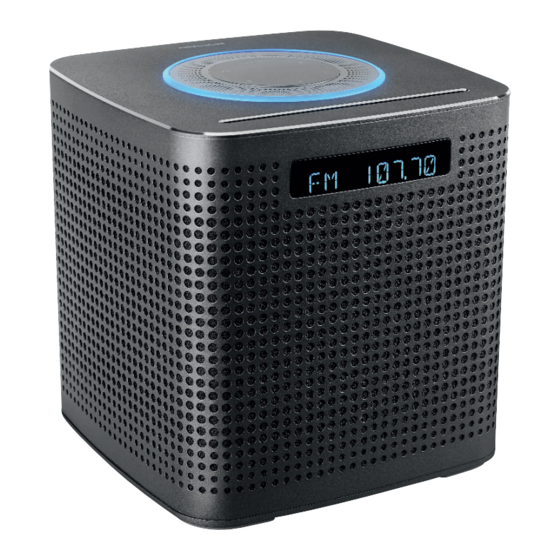
  • Page 1 Handleiding Mikro-Audio-System mit Amazon Alexa Micro Audio System with Amazon Alexa Micro chaîne audio avec Amazon Alexa Microsistema de sonido con Amazon Alexa Sistema micro audio con Amazon Alexa Micro-audiosysteem met Amazon Alexa MEDION LIFE ® ® P64430 (MD 44300)
  • Page 2: Table Des Matières

    Inhaltsverzeichnis Informationen zu dieser Bedienungsanleitung ........5 1.1. Zeichenerklärung ....................5 Bestimmungsgemäßer Gebrauch .............. 6 EU - Konformitätsinformation ..............7 3.1. Informationen zum WLAN ................. 7 3.2. Informationen zu Markenzeichen ..............7 Sicherheitshinweise ..................8 4.1. Eingeschränkter Personenkreis ................ 8 4.2.
  • Page 3 9.13. Titelwahl, schneller Rück-/Vorlauf ..............26 9.14. Ordneranwahl.......................26 9.15. Abspielreihenfolge programmieren ............27 9.16. Wiederholung .......................27 9.17. Zufallswiedergabe / Intro / A-B ..............27 9.18. Titelinformationen (ID3) ...................28 9.19. Bluetooth-Modus ....................28 9.20. Externes Wiedergabegerät anschließen .............29 9.21. Amazon Alexa®-Sprachsteuerung ..............30 Auf Werkseinstellungen zurücksetzen ............ 31 Reinigung ....................
  • Page 4: Informationen Zu Dieser Bedienungsanleitung

    1. Informationen zu dieser Bedienungsanleitung Vielen Dank, dass Sie sich für unser Produkt entschieden haben. Wir wünschen Ihnen viel Freude mit dem Gerät. Lesen Sie vor Inbetriebnahme die Sicherheitshinweise und die gesamte Anleitung aufmerksam durch. Beachten Sie die Warnungen auf dem Ge- rät und in der Bedienungsanleitung.
  • Page 5: Bestimmungsgemäßer Gebrauch

    WARNUNG! Warnung vor Gefahr durch elektrischen Schlag! Aufzählungspunkt / Information über Ereignisse während der Bedie- • nung  Auszuführende Handlungsanweisung 2. Bestimmungsgemäßer Gebrauch Ihr Gerät bietet Ihnen vielfältige Möglichkeiten der Nutzung: Das Gerät dient zum Abspielen von Tonmedien (CDs, MP3-Da- tenträger, USB-Geräte, über Bluetooth), zum analogen Radio- empfang und bietet die Sprachsteuerung mit Amazon Alexa®.
  • Page 6: Eu - Konformitätsinformation

    – extrem hohe oder tiefe Temperaturen, – direkte Sonneneinstrahlung, – offenes Feuer. 3. EU - Konformitätsinformation Hiermit erklärt die MEDION AG, dass sich dieses Gerät in Übereinstimmung mit den grundlegenden Anforderungen und den übrigen einschlägigen Bestimmungen be- findet: • RE- Richtline 2014/53/EU •...
  • Page 7: Sicherheitshinweise

    4. Sicherheitshinweise 4.1. Eingeschränkter Personenkreis • Das Gerät ist nicht dafür bestimmt, durch Personen (ein- schließlich Kinder) mit eingeschränkten physischen, senso- rischen oder geistigen Fähigkeiten oder mangels Erfahrung und/oder mangels Wissen benutzt zu werden, es sei denn, sie werden durch eine für ihre Sicherheit zuständige Person be- aufsichtigt oder erhielten von ihr Anweisungen, wie das Gerät zu benutzen ist.
  • Page 8: Betriebssicherheit

    4.2. Betriebssicherheit  Überprüfen Sie das Gerät vor der Benutzung auf Beschädi- gungen. Ein defektes oder beschädigtes Gerät darf nicht ver- wendet werden. GEFAHR! Stromschlaggefahr! Verletzungsgefahr durch Stromschlag durch stromfüh- rende Teile. Bei diesen besteht durch unabsichtlichen Kurzschluss die Gefahr eines elektrischen Schlages oder eines Brandes.
  • Page 9: Stromversorgung

    4.3. Stromversorgung GEFAHR! Stromschlaggefahr! Verletzungsgefahr durch Stromschlag durch stromfüh- rende Teile.  Schließen Sie das Gerät nur an eine gut erreichbare, ordnungsgemäß installierte Schutzkontaktsteckdose (230 V ~ 50 Hz) an, die sich in der Nähe des Aufstell- ortes befindet. Lassen Sie die Steckdose unbedingt jederzeit frei zugänglich, damit der Stecker ungehin- dert abgezogen werden kann.
  • Page 10: Aufstellungsort / Umgebung

    4.4. Aufstellungsort / Umgebung GEFAHR! Stromschlaggefahr! Bei großen Temperatur- oder Feuchtigkeitsschwankun- gen kann es durch Kondensation zur Feuchtigkeitsbil- dung inner halb des Gerätes kommen, die einen elektri- schen Kurzschluss verursachen kann.  Warten Sie nach einem Transport des Gerätes solan- ge mit der Inbetriebnahme, bis es die Umgebungs- temperatur angenommen hat.
  • Page 11: Reparatur

    – keine offenen Brandquellen (z. B. brennende Kerzen) in der Nähe des Geräts stehen; – das Anschlusskabel nicht unter Zugspannung steht und nicht geknickt wird. 4.5. Reparatur GEFAHR! Stromschlaggefahr! Es besteht die Gefahr eines elektrischen Schlags durch stromführende Teile.  Vor dem ersten Gebrauch und nach jeder Benutzung das Gerät sowie das Anschlusskabel auf Beschädi- gungen überprüfen.
  • Page 12: Laufwerke Und Anschlüsse

    4.7. Laufwerke und Anschlüsse • Führen Sie keinerlei Fremdkörper in die Öffnungen des CD- Players ein. Das Gerät kann dadurch beschädigt werden. • Legen Sie CDs immer mit der beschrifteten Seite nach vorn in das Diskfach. Wenden Sie niemals große Kraft an, wenn Sie eine Disk einlegen, oder ein externes Gerät anschließen.
  • Page 13 • Legen Sie grundsätzlich nur neue Batterien gleichen Typs ein. Benutzen Sie nie alte und neue Batterien zusammen. • Achten Sie beim Einlegen der Batterien auf die Polarität (+/–). • Bei unsachgemäßem Auswechseln der Batterien besteht Ex- plosionsgefahr! Ersetzen Sie die Batterien nur durch densel- ben oder einen gleichwertigen Typ.
  • Page 14: Gerät Reinigen

    4.9. Gerät reinigen GEFAHR! Stromschlaggefahr! Verletzungsgefahr durch Stromschlag durch stromfüh- rende Teile.  Vor der Reinigung ziehen Sie den Netzstecker aus der Steckdose. HINWEIS! Mögliche Sachschäden Falsche Behandlung der empfindlichen Oberflächen kann das Gerät beschädigen.  Für die Reinigung verwenden Sie ein trockenes, wei- ches Tuch.
  • Page 15: Geräteübersicht

    6. Geräteübersicht 6.1. Oberseite ON/OFF Lautstärkeregler O N / O F F – Gerät einschalten; gedrückt halten: Gerät ausschalten (im aus- geschalteten Zustand wird die Uhrzeit angezeigt, die Alexa-Funktion is deak- tiviert) – Betriebsart wählen – CD auswerfen – Gedrückt halten: Uhrzeit anzeigen (nur die Alexa-Funktion bleibt aktiv); Gerät aus dem Uhrzeit-Modus einschalten –...
  • Page 16: Rückseite

    6.2. Rückseite A N T. – Anschluss für FM-Antenne A U X I N – Anschlussbuchse für externes Gerät U S B – Anschlussbuchse für USB-Speichermedium A C ~ – Anschlussbuchse für Netzkabel Position des Typenschildes (auf der Unterseite)
  • Page 17: Fernbedienung

    6.3. Fernbedienung – CD auswerfen – Uhrzeit anzeigen (gedrückt halten, nur die Alexa-Funktion bleibt aktiv); Ge- rät aus dem Uhrzeit-Modus einschalten Betriebsart wählen CD – CD-Modus USB – USB-Modus AUX – AUX-Modus BT – Bluetooth-Modus FM – Radio-Modus WIFI – WLAN-Modus RESET –...
  • Page 18: Batterie In Die Fernbedienung Einlegen/Wechseln

    O N / O F F – Gerät einschalten; gedrückt halten: Gerät ausschalten (im aus- geschalteten Zustand wird die Uhrzeit angezeigt, die Alexa-Funktion is deak- tiviert) 7. Batterie in die Fernbedienung einlegen/ wechseln Legen Sie zwei 1,5 V-Batterien R03/LR03/AAA/Micro in die Fernbedienung ein. WARNUNG! Explosionsgefahr! Explosionsgefahr bei unsachgemäßem Auswechseln...
  • Page 19: Netzanschluss

    8.1. Netzanschluss Nehmen Sie den Anschluss des Netzkabels vor.  Stecken Sie dazu das flache Ende in den Anschluss A C ~ und das andere Ende des Kabels in eine ordnungsgemäß instal- lierte und jederzeit frei zugängliche 220- 240 V ~ 50/60 Hz Schutzkontaktsteckdose. 8.2.
  • Page 20: Externes Gerät Am Anschluss Aux In Anschließen

    8.3. Externes Gerät am Anschluss AUX IN anschließen Auf der Vorderseite des Gerätes befindet sich ein 3,5 mm Anschluss mit der Beschriftung A U X I N .  Stecken Sie das Anschlusskabel mit einem 3,5 mm Klinkenstecker in den Anschluss. 8.4.
  • Page 21: Betriebsart Wählen

    9.2. Betriebsart wählen  Drücken Sie die Taste am Gerät ein- oder mehrmals hintereinander, um die Betriebsarten durchzuschalten.  Auf der Fernbedienung wählen Sie die jeweiligen Tasten C D , U S B , A U X , B T , F M und W I F I entsprechend den Betriebsarten. Die gewählte Betriebsart wird im Display angezeigt: –...
  • Page 22: Uhr

    9.4. Uhr Die Uhrzeit wird regelmäßig durch das Signal der Radiosender automatisch einge- stellt. Eine manuelle Einstellung ist jedoch möglich. 9.4.1. Uhrzeit anzeigen  Drücken Sie im eingeschalteten Zustand die Taste C L O C K . Im ausgeschalteten Zustand wird die Uhrzeit permanent im Display angezeigt. 9.4.2.
  • Page 23: Sleeptimer

     Wählen Sie die Lautstärke des Alarms mit /. Je höher der Zahlenwert, desto lauter ist der Alarm.  Drücken Sie abschließend die Taste O K erneut, um die Einstellung zu beenden. Der aktivierte Alarm wird durch das Weckersymbol im Display angezeigt. 9.5.2.
  • Page 24: Radio

    9.8. Radio 9.8.1. Sender einstellen  Drücken Sie die Tasten  oder  kurz, um eine bestimmte Frequenz einzustel- len.  Halten Sie eine der Tasten oder  gedrückt, bis der Suchlauf beginnt, um au- tomatisch den nächsten Sender zu suchen. 9.8.2.
  • Page 25: Disk Einlegen/Auswerfen

    9.10. Disk einlegen/auswerfen Achten Sie darauf, dass über dem Gerät ca. 15 cm Platz ist, so dass die beim Einle- gen oder Auswerfen nicht behindert wird.  Schieben Sie vorsichtig eine CD mit der beschrifteten Seite nach vorn in den CD- Schacht.
  • Page 26: Abspielreihenfolge Programmieren

    9.15. Abspielreihenfolge programmieren Mit der Programmfunktion können Sie Ihr eigenes Musikprogramm zusammenstel- len, indem Sie nur bestimmte Titel zur Wiedergabe auswählen. Die Reihenfolge, in der die Kapitel wiedergegeben werden, können Sie dabei selbst bestimmen. Gehen Sie wie folgt vor:  Stoppen Sie die Wiedergabe mit . ...
  • Page 27: Titelinformationen (Id3)

    9.17.3. A-B (Loopfunktion)  Drücken Sie die Taste A - B , um bei laufender Wiedergabe den Startpunkt eines Teilstückes zu bestimmen. Im Display erscheint RPT A-.  Drücken Sie die Taste erneut, um den Endpunkt zu bestimmen. Im Display er- scheint R P T A - B .
  • Page 28: Externes Wiedergabegerät Anschließen

    9.19.2. Steuerung Die Wiedergabe der Titel sowie die Lautstärke und Sonderfunktionen können so- wohl an ihrem externen Gerät als auch am Mikro-Audio-System gesteuert werden. Welche Funktionen verfügbar sind, hängt von Ihrem externen Gerät und der Soft- ware, die Sie verwenden, ab. Grundsätzlich sind diese Tasten am Gerät für die Steue- rung per Bluetooth vorgesehen: - / + Lautstärke verringern/erhöhen...
  • Page 29: Amazon Alexa®-Sprachsteuerung

    Folgen Sie auch hier den Anweisungen auf dem Bildschirm. Um Amazon Alexa® zu aktivieren, melden Sie das Mikro Audio System an Ihrem Amazon-Konto an. Dazu müssen Sie bereits bei Amazon registriert sein.  Nach Abschluss der Einstellungen können Sie die Medion Speaker App schlie- ßen.
  • Page 30: Auf Werkseinstellungen Zurücksetzen

    9.21.2. Steuerung Die Sprachsteuerung reagiert auf Ihre Stimme. Sobald Sie das Gerät mit “Alexa“ an- sprechen, wird das es auf Ihre Anfragen reagieren.  Sie können die Amazon Alexa®-Funktion auch durch Druck auf die Taste akti- vieren. 9.21.3. Mikrofon-Stummschaltung Drücken Sie die Mikrofon-Stummschalttaste , wenn Sie das Mikrofon Ihres Ge- räts vorübergehend stummschalten wollen.
  • Page 31: Wenn Störungen Auftreten

    12. Wenn Störungen auftreten Sollten Störungen auftreten, prüfen Sie bitte zunächst, ob Sie das Problem selbst beheben können. Die folgende Übersicht kann Ihnen dabei helfen. Störung Mögliche Ursache Maßnahme Das Gerät ist durch ein Gewit-  Ziehen Sie den Netzadap- ter, eine statische Aufladung ter aus der Steckdose und oder einen anderen externen...
  • Page 32: Außerbetriebnahme

    GEFAHR! Stromschlaggefahr! Verletzungsgefahr durch Stromschlag durch stromfüh- rende Teile.  Versuchen Sie auf keinen Fall, das Gerät selbst zu re- parieren. Wenn eine Reparatur notwendig ist, wen- den Sie sich bitte an unser Service-Center oder eine andere geeignete Fachwerkstatt. 13. Außerbetriebnahme Wenn Sie das Gerät längere Zeit nicht benötigen, nehmen Sie es bitte außer Betrieb.
  • Page 33: Entsorgung

    14. Entsorgung VERPACKUNG Ihr Gerät befindet sich zum Schutz vor Transportschäden in einer Verpa- ckung. Verpackungen sind aus Materialien hergestellt, die umweltscho- nend entsorgt und einem fachgerechten Recycling zugeführt werden können. GERÄT Altgeräte dürfen nicht im normalen Hausmüll entsorgt werden. Entsprechend Richtlinie 2012/19/EU ist das Gerät am Ende seiner Le- bensdauer einer geordneten Entsorgung zuzuführen.
  • Page 34: Technische Daten

    15. Technische Daten Gerät Eingangsspannung 220-240 V ~ 50/60 Hz Leistungsaufnahme Betrieb ca. 15 Watt Leistungsaufnahme Aus-Zustand ca. 0,7 Watt Ausgangsleistung 2 x 15 Watt RMS Schutzklasse Schutzklasse II Laserleistung Laser Klasse 1 Unterstützte Formate CD-R, CD-RW, Audio-CD Anzahl Speicherplätze der pro- 20 Titel (CD) grammierbaren Wiedergabe Radio...
  • Page 35: Symbole Auf Dem Typenschild Und Dem Netzteil

    Fernbedienung Batterie 2x 1,5 V-Batterien R03/LR03/AAA/Micro ® Bluetooth Frequenz 2402-2480 MHz Maximale Sendeleistung -3,8 dBm Version Profile A2DP 1.3, AVRCP 1.5 Reichweite bis zu 8 Meter (ohne Hindernisse) Betriebsfrequenz 2.4 GHz. 15.1. Symbole auf dem Typenschild und dem Netzteil Schutzklasse II Elektrogeräte der Schutzklasse II sind Elektrogeräte die durchge- hend doppelte und/oder verstärkte Isolierung besitzen und keine Anschlussmöglichkeiten für einen Schutzleiter haben.
  • Page 36: Serviceinformationen

    Ihre Erfahrungen austauschen und Ihr Wissen weiter- geben. Sie finden unsere Service Community unter http://community.medion.com. • Gerne können Sie auch unser Kontaktformular unter www.medion.com/contact nutzen. • Selbstverständlich steht Ihnen unser Serviceteam auch über unsere Hotline oder postalisch zur Verfügung.
  • Page 37: Impressum

    Diese Bedienungsanleitung ist urheberrechtlich geschützt. Vervielfältigung in mechanischer, elektronischer und jeder anderen Form ohne die schriftliche Genehmigung des Herstellers ist verboten. Das Copyright liegt beim Inverkehrbringer: MEDION AG Am Zehnthof 77 45307 Essen Deutschland Bitte beachten Sie, dass die oben stehende Anschrift keine Retourenanschrift ist. Kon-...
  • Page 38 Table of Contents Information about these operating instructions ........41 1.1. Key to symbols .....................41 Proper use ....................42 EU – Declaration of Conformity ..............43 3.1. Information on WLAN ..................43 3.2. Trademark information ..................43 Safety information ..................44 4.1. Restricted group of people ................44 4.2.
  • Page 39 9.13. Track selection, rewind/fast forward ............62 9.14. Folder selection ....................62 9.15. Programming the track playing order ............63 9.16. Repeat ........................63 9.17. Random playback/Intro/A-B ................63 9.18. Track information (ID3) ..................64 9.19. Bluetooth mode ....................64 9.20. Connecting an external playback device ...........65 9.21.
  • Page 40: Information About These Operating Instructions

    1. Information about these operating instructions Thank you for choosing our product. We hope you enjoy using this de- vice. Read the safety instructions and all other instructions carefully before using the device for the first time. Note the warnings on the device and in the operating instructions.
  • Page 41: Proper Use

    WARNING! Warning: risk of electric shock! • Bullet point/information on steps during operation  Instruction to be carried out 2. Proper use Your device can be used in a range of ways: The device is intended for playing sound media (CDs, MP3 data media, USB devices, via Bluetooth) for analogue radio reception and features voice control using Amazon Alexa®.
  • Page 42: Eu - Declaration Of Conformity

    3. EU – Declaration of Conformity MEDION AG hereby declares that this device complies with the fundamental re- quirements and the other relevant provisions of: • RE Directive 2014/53/EU • Ecodesign Directive 2009/125/EC • RoHS Directive 2011/65/EU You can download the complete EU Declaration of Conformity at www.medion.
  • Page 43: Safety Information

    4. Safety information 4.1. Restricted group of people • This device is not intended for use by people (including chil- dren) with reduced physical, sensory or mental abilities or by those without experience and/or knowledge, unless they are supervised by a person responsible for their safety or they have been instructed in its use by that person.
  • Page 44: Operating Safety

    4.2. Operating safety  Before using the device for the first time, check the device for damage. A defective or damaged device may not be used. DANGER! Risk of electric shock! Risk of injury from electric shock due to live parts. They pose a risk of electric shock or fire if an unintentional short circuit occurs.
  • Page 45: Power Supply

    4.3. Power supply DANGER! Risk of electric shock! Risk of injury from electric shock due to live parts.  Only connect the device to a properly installed earthed mains socket (230 V ~ 50 Hz) that is easy to reach and close to the place where you have set up the device.
  • Page 46: Installation Location/Surroundings

    4.4. Installation location/surroundings DANGER! Risk of electric shock! Major changes in temperature or fluctuations in hu- midity can cause moisture to build up within the device due to condensation – this can cause an electrical short circuit.  After transporting the device, wait until it has reached ambient temperature before switching it on.
  • Page 47: Repairs

    4.5. Repairs DANGER! Risk of electric shock! There is a risk of electric shock due to live parts.  Check the device and the connection cable for dam- age before using the device for the first time, and af- ter each use. ...
  • Page 48: Handling Batteries

    4.8. Handling batteries The remote control for this device is operated with two batter- ies. Please note the following: • Keep new and used batteries out of the reach of children. Do not swallow batteries as they can cause chemical burns. WARNING! Risk of chemical burns! The remote control supplied with the device contains...
  • Page 49: Cleaning The Device

    • Store batteries in a cool, dry place. Strong direct heat can damage batteries. Do not expose the device to sources of in- tense heat. • Never short circuit or dismantle batteries. • Never throw batteries into a fire. Risk of explosion! •...
  • Page 50: Package Contents

    5. Package contents DANGER! Risk of choking and suffocation! Risk of choking and suffocation through swallowing or inhaling small parts or plastic wrap.  Keep the plastic packaging out of the reach of chil- dren.  Remove the product from the packaging and remove all packaging material. ...
  • Page 51: Device Overview

    6. Device overview 6.1. Top ON/OFF Volume control ON/OFF – Switch device on; press and hold: switch device off (when switched off the time is displayed, Alexa is deactivated) – Select operating mode – Eject CD – Press and hold: display the time (only Alexa remains active); switch de- vice out of time mode –...
  • Page 52: Rear

    6.2. Rear ANT. – Connection for FM antenna AUX IN – Jack for external device USB – Port for USB storage medium AC~ – Connection for mains cable Type plate (on the underside)
  • Page 53: Remote Control

    6.3. Remote control – Eject CD – Display time (only Alexa remains ac- tive); switch device out of time mode Select the operating mode CD – CD mode USB – USB mode AUX – AUX mode BT – Bluetooth mode FM –...
  • Page 54: Inserting/Replacing Batteries In The Remote Control

    ON/OFF – Switch device on; press and hold: switch device off (when switched off the time is displayed, Alexa is deactivated) 7. Inserting/replacing batteries in the remote control Insert two 1.5 V R03/LR03/AAA/micro batteries in the remote control. WARNING! Risk of explosion! Risk of explosion if battery is replaced incorrectly.
  • Page 55: Mains Connection

    8.1. Mains connection Connect the mains cable.  To do this, place the flat end in the AC ~ connection and the other end of the ca- ble into a properly installed 220–240 V ~ 50/60 Hz earthed power socket which is accessible at all times.
  • Page 56: Connecting An External Device To The Aux In Connection

    8.3. Connecting an external device to the AUX IN connection There is a 3.5 mm jack labelled AUX IN on the front of the device.  Plug the connection cable with a 3.5 mm jack plug into the jack connection. 8.4. Connecting USB devices USB memory sticks can be connected to the USB port.
  • Page 57: Selecting The Operating Mode

    9.2. Selecting the operating mode  Press the button on the device once or several times to run through the re- peat modes.  On the remote control, select the respective CD, USB, AUX, BT, FM and WIFI button according to the operating modes. The selected operating mode appears in the display: –...
  • Page 58: Clock

    9.4. Clock The time is set regularly using the radio reception signal. Manual setting is, howev- er, possible. 9.4.1. Displaying the time  When the device is switched on, press the CLOCK button. When the device is switched off, the time is permanently shown on the display. 9.4.2.
  • Page 59: Sleep Timer

     Use the / buttons to set the alarm volume. The higher the numerical value, the louder the alarm.  Then press the OK button again to complete the setting. The activated alarm is indicated by the alarm symbol in the display. 9.5.2.
  • Page 60: Radio

    9.8. Radio 9.8.1. Tuning the stations  Press the  or  button briefly to set a particular frequency.  Press and hold either or  on the remote control or on the device to auto- matically search for the next station. 9.8.2.
  • Page 61: Inserting/Removing A Disc

    9.10. Inserting/removing a disc Ensure there is approximately 15 cm space above the device, so that it is not hin- dered when inserting or ejecting.  Carefully insert a CD with the labelled side facing to the front into the CD slot. The CD is automatically pulled in and LOADING appears on the display.
  • Page 62: Programming The Track Playing Order

    9.15. Programming the track playing order Use the programme function to create your own music playlist by selecting which specific tracks you want to play. You can specify the order in which the list is played yourself. Proceed as follows: ...
  • Page 63: Track Information (Id3)

    9.17.3. A-B (loop function)  Press the A-B button during playback to set the starting point of a section. RPT A appears in the display.  Press the button again to set the end point. RPT A-B appears in the display. Playback now repeats within this section.
  • Page 64: Connecting An External Playback Device

    9.19.2. Control You can control how tracks are played, the volume and a range of special functions on your external device and on the micro audio system. What functions are availa- ble is dependent on your external device and the software that you use. In principle, these buttons on the device are intended for control via Bluetooth: Reduce/increase volume ...
  • Page 65: Amazon Alexa® Voice Control

    To activate Amazon Alexa®, register the Micro Audio System in your Amazon ac- count. You need to be registered on Amazon for this:  Once the settings are completed, you can close the Medion Speaker app.
  • Page 66: Reset To Factory Settings

    9.21.2. Control The voice control reacts to your voice. As soon as you talk to the device with “Alexa” it will respond to your requests.  You can also activate the Amazon Alexa® feature by pressing the button. 9.21.3. Muting the microphone Press the microphone mute button if you wish to mute the microphone of your device.
  • Page 67: Troubleshooting

    12. Troubleshooting If a fault occurs, first see whether you can resolve the problem yourself. You might find this overview useful. Fault Possible cause Corrective action  Pull the mains adapter The device is disrupted by a thunderstorm, static charge out of the socket and then or another external factor.
  • Page 68: End Of Operation

    DANGER! Risk of electric shock! Risk of injury from electric shock due to live parts.  Never attempt to repair the device yourself. If a re- pair is necessary, please contact our Service Center or a suitable authorised repair workshop. 13.
  • Page 69: Disposal

    14. Disposal PACKAGING Your device has been packaged to protect it from damage in transit. The packaging is made of materials that can be recycled in an environmen- tally friendly manner. DEVICE Do not dispose of old devices in normal household waste. In accordance with Directive 2012/19/EU, the devices must be properly disposed of at the end of its service life.
  • Page 70: Technical Specifications

    15. Technical specifi cations Device Input voltage 220–240 V ~ 50/60 Hz Power consumption, operation Approx. 15 W Power consumption when Approx. 0.7 W switched off Output power 2 x 15 watt RMS Protection class Protection class II Laser output Class 1 laser product Supported formats CD-R, CD-RW, audio CD...
  • Page 71: Symbols On The Type Plate And Power Pack

    Remote control Battery 2 x 1.5 V R03/LR03/AAA/micro batteries ® Bluetooth Frequency 2402 to 2480 MHz Maximum transmission power -3.8 dBm Version Profile A2DP 1.3, AVRCP 1.5 Range Up to 8 metres (without obstacles) Operating frequency 2.4 GHz 15.1. Symbols on the type plate and power pack Protection class II Electrical devices in protection class II are devices that have dou- ble and/or reinforced insulation throughout, and do not have the...
  • Page 72: Service Information

    In our Service Community, you can meet other users, as well as our staff, and you can exchange your experiences and pass on your knowledge there. You will find our Service Community at http://community.medion.com. • Alternatively, use our contact form at www.medion.com/contact.
  • Page 73: Legal Notice

    These operating instructions are protected by copyright. Mechanical, electronic and any other forms of reproduction are prohibited without the written permission of the manufacturer. Copyright is owned by the company: MEDION AG Am Zehnthof 77 45307 Essen Germany Please note that you cannot use the address above for returns. Please always con-...
  • Page 74 Sommaire Informations concernant la présente notice d’utilisation ...... 77 1.1. Explication des symboles .................77 Utilisation conforme .................. 78 Information relative à la conformité UE ..........79 3.1. Informations relatives au Wi-Fi ...............79 3.2. Informations sur les marques déposées .............79 Consignes de sécurité................80 4.1.
  • Page 75 9.13. Sélection de titres, avance/retour rapides ..........98 9.14. Sélection d’un dossier ..................98 9.15. Programmation de l’ordre de lecture ............99 9.16. Répétition ......................99 9.17. Lecture aléatoire / Intro / A-B ................99 9.18. Informations relatives aux titres (ID3) ............100 9.19. Mode Bluetooth ....................100 9.20.
  • Page 76: Informations Concernant La Présente Notice D'utilisation

    1. Informations concernant la présente notice d’utilisation Merci d’avoir choisi notre produit. Nous vous souhaitons une bonne uti- lisation. Veuillez lire attentivement les consignes de sécurité et la notice d’utili- sation dans son intégralité avant de mettre l’appareil en service. Tenez compte des avertissements apposés sur l’appareil et de la notice d’utili- sation.
  • Page 77: Utilisation Conforme

    AVERTISSEMENT ! Risque d’électrocution ! Énumération/information sur des événements se produisant pen- • dant l’utilisation  Action à exécuter 2. Utilisation conforme Cet appareil vous offre des possibilités d’utilisation variées : il permet la lecture de musique à partir de différents supports (CD, support de données MP3, périphériques USB, via Bluetooth) ainsi que la réception radio et la commande vocale avec Ama- zon Alexa®.
  • Page 78: Information Relative À La Conformité Ue

    – températures extrêmement hautes ou basses, – rayonnement direct du soleil, – flamme nue. 3. Information relative à la conformité UE Par la présente, MEDION AG déclare que cet appareil est conforme aux exigences essentielles et autres dispositions pertinentes : • Directive RE 2014/53/UE •...
  • Page 79: Consignes De Sécurité

    4. Consignes de sécurité 4.1. Catégorie de personnes restreinte • L’appareil n’est pas destiné à être utilisé par des personnes (y compris des enfants) présentant des capacités physiques, sen- sorielles ou mentales restreintes ou ne disposant pas de l’ex- périence et/ou des connaissances requises à moins d’être sur- veillées par une personne responsable de leur sécurité...
  • Page 80: Sécurité De Fonctionnement

    4.2. Sécurité de fonctionnement  Avant chaque utilisation, vérifiez que l’appareil n’est pas en- dommagé. N’utilisez pas un appareil défectueux ou endom- magé. DANGER ! Risque d’électrocution ! Risque de blessure par électrocution par des pièces conductrices de courant. En cas de court-circuit intem- pestif, celles-ci présentent un risque d’électrocution ou d’incendie.
  • Page 81: Alimentation Électrique

    4.3. Alimentation électrique DANGER ! Risque d’électrocution ! Risque de blessure par électrocution par des pièces conductrices de courant.  Branchez l’appareil uniquement sur une prise de terre réglementaire (230 V ~ 50 Hz) facilement acces- sible située à proximité du lieu d’installation de l’ap- pareil.
  • Page 82: Lieu D'installation/Environnement

    4.4. Lieu d’installation/environnement DANGER ! Risque d’électrocution ! En cas de fortes variations de température ou d’humi- dité, il est possible que de l’humidité par condensa- tion se forme dans l’appareil, ce qui peut provoquer un court-circuit.  Après le transport de l’appareil, attendez que celui-ci soit à...
  • Page 83: Réparation

    – n’exposer l’appareil à aucune source de feu nu (par ex. bou- gies en combustion) ; – ne pas plier ni tendre trop fortement le cordon d’alimenta- tion. 4.5. Réparation DANGER ! Risque d’électrocution ! Les pièces sous tension présentent un risque de choc électrique.
  • Page 84: Lecteurs Et Ports

    4.7. Lecteurs et ports • N’introduisez aucun corps étranger dans la fente du lecteur de CD. L’appareil risque d’être endommagé. • Insérez toujours les CD, face imprimée face à vous, dans la fente. Ne faites jamais usage de la force lorsque vous mettez en place un disque, ou que vous connectez un appareil ex- terne.
  • Page 85 • Utilisez exclusivement des piles neuves du même type. N’uti- lisez jamais des piles usagées et des piles neuves en même temps. • Veillez à bien respecter la polarité (+/–) lorsque vous insérez les piles. • En cas de remplacement incorrect des piles, il y a risque d’ex- plosion ! Remplacez les piles par des piles de même type ou de type similaire uniquement.
  • Page 86: Nettoyage De L'appareil

    4.9. Nettoyage de l’appareil DANGER ! Risque d’électrocution ! Risque de blessure par électrocution par des pièces conductrices de courant.  Avant le nettoyage, débranchez la fiche d’alimenta- tion de la prise de courant. AVIS ! Dommages matériels possibles Le traitement inadéquat des surfaces sensibles peut en- dommager l’appareil.
  • Page 87: Vue D'ensemble De L'appareil

    6. Vue d’ensemble de l’appareil 6.1. Face supérieure ON/OFF Bouton rotatif de réglage du volume ON/OFF – Mise en marche de l’appareil ; appui prolongé : arrêt de l’appa- reil (éteint, l’appareil affiche l’heure et la fonction Alexa est désactivée) – Sélectionner le mode de fonctionnement –...
  • Page 88: Face Arrière

    6.2. Face arrière ANT. – Connecteur de l’antenne FM AUX IN – Port pour périphérique externe USB – Port pour support de stockage USB AC~ – Port de connexion du câble d’alimentation Position de la plaque signalétique (sur le dessous)
  • Page 89: Télécommande

    6.3. Télécommande – Éjection du CD – Affichage de l’heure (appui prolon- gé, seule la fonction Alexa reste activée) ; désactivation de l’affichage de l’heure Sélection du mode de fonctionnement CD – Mode CD USB – Mode USB AUX – Mode AUX BT – Mode Bluetooth FM –...
  • Page 90: Insertion/Remplacement De La Pile De La Télécommande

    SHUFFLE – Lecture aléatoire A-B – Répétition d’un passage au sein d’un titre ON/OFF – Mise en marche de l’appareil ; appui prolongé : arrêt de l’appa- reil (éteint, l’appareil affiche l’heure et la fonction Alexa est désactivée) 7. Insertion/remplacement de la pile de la télécommande Insérez deux piles R03/LR03/AAA/Micro 1,5 V dans la télécommande.
  • Page 91: Raccordement Au Réseau Électrique

    8.1. Raccordement au réseau électrique Branchez le câble d’alimentation.  Enfichez pour cela l’extrémité plate dans le port AC ~ et l’autre extrémité du câble dans une prise à contact de protection conforme, facilement accessible et pré- sentant les caractéristiques suivantes : 220 V-240 V ~ 50/60 Hz.
  • Page 92: Raccordement D'un Périphérique Externe À La Prise Aux In

    8.3. Raccordement d’un périphérique externe à la prise AUX IN Sur la face avant de l’appareil se trouve un port de 3,5 mm portant l’inscription AUX IN.  Enfichez-y le câble de raccordement à fiche jack de 3,5 mm. 8.4. Raccordement d’un périphérique USB Vous pouvez raccorder des clés USB au port USB.
  • Page 93: Sélectionner Le Mode De Fonctionnement

    9.2. Sélectionner le mode de fonctionnement  Appuyez une ou plusieurs fois sur la touche de l’appareil pour passer d’un mode de lecture à l’autre.  Sur la télécommande, appuyez directement sur la touche CD, USB, AUX, BT, FM ou WIFI pour sélectionner le mode de fonctionnement adéquat. Le mode de fonctionnement sélectionné...
  • Page 94: Alarme

    9.4.2. Réglage manuel de l’heure / Synchronisation temporelle  Appuyez longuement sur la touche ON/OFF pour éteindre l’appareil.  L’appareil éteint, maintenez la touche CLOCK enfoncée jusqu’à ce que CLOCK SET apparaisse à l’écran.  L’heure se met alors à clignoter. Réglez les heures à l’aide des touches /. ...
  • Page 95: Minuterie De Sommeil

    9.5.2. Arrêt de l’alarme  Lorsque l’alarme retentit, appuyez sur la touche ON/OFF de l’appareil ou de la télécommande pour l’arrêter. 9.5.3. Activation/désactivation de l’alarme  Appuyez longuement sur la touche ON/OFF pour éteindre l’appareil.  Appuyez sur la touche TIMER pour afficher le réglage de l’alarme ...
  • Page 96: Radio

    9.8. Radio 9.8.1. Réglage des stations  Appuyez brièvement sur les touches  ou  pour régler une certaine fré- quence.  Maintenez la touche  ou  appuyée jusqu’à ce que la recherche débute pour rechercher automatiquement la prochaine station. 9.8.2.
  • Page 97: Insertion/Éjection D'un Disque

    9.10. Insertion/éjection d’un disque Veillez à conserver environ 15 cm d’espace au-dessus de l’appareil afin de ne pas gê- ner la mise en place et l’éjection des disques.  Insérez avec précaution un CD face imprimée face à vous dans la fente à CD. Le CD est automatiquement inséré...
  • Page 98: Programmation De L'ordre De Lecture

    9.15. Programmation de l’ordre de lecture Avec la fonction de programmation, vous pouvez compiler votre propre liste de lec- ture en ne sélectionnant que certains titres. Vous pouvez déterminer vous-même l’ordre de lecture des titres. Procédez comme suit :  Arrêtez la lecture en appuyant sur . ...
  • Page 99: Informations Relatives Aux Titres (Id3)

    9.17.3. A-B (boucle)  Appuyez sur la touche A-B pendant la lecture d’un titre pour définir le début d’un passage. RPT A- s’affiche à l’écran.  Appuyez de nouveau sur la touche pour déterminer la fin du passage. RPT A-B s’affiche à...
  • Page 100: Branchement D'un Périphérique De Lecture Externe

    9.19.2. Commande La lecture des titres, le réglage du volume et les fonctions spéciales peuvent alors être commandés à partir de votre périphérique externe ou de votre système au- dio. Les fonctions disponibles dépendent de votre périphérique externe et du logi- ciel que vous utilisez.
  • Page 101: Commande Vocale Amazon Alexa

    à l’écran. ® Pour activer Amazon Alexa , connectez la micro chaîne audio à votre compte Ama- zon. Pour cela, vous devez déjà disposer d’un compte Amazon.  Lorsque la configuration est terminée, vous pouvez fermer l’application Medion Speaker.
  • Page 102: Réinitialisation À La Configuration Usine Par Défaut

    9.21.2. Commande La commande vocale réagit à votre voix. Lorsque vous vous adressez à votre appa- reil avec le mot « Alexa », il répondra à vos demandes.  Vous pouvez également appeler la fonction Alexa® en appuyant sur la touche 9.21.3. Désactivation du son du microphone Appuyez sur la touche de désactivation du son du microphone si vous souhai- tez désactiver temporairement le microphone de votre appareil.
  • Page 103: En Cas De Dysfonctionnement

    12. En cas de dysfonctionnement En cas de dysfonctionnement, veuillez d’abord vérifier si vous pouvez résoudre le problème vous-même. En vous servant du tableau ci-dessous. Problème Cause possible Mesure  Débranchez l’adaptateur L’appareil est perturbé par un orage, une charge statique ou secteur de la prise de cou- un autre facteur externe.
  • Page 104: Mise Hors Tension

    Problème Cause possible Mesure  Vérifiez si la bonne heure La minute- d’alarme est réglée. La minuterie n’est pas correc- rie ne s’allume  Vérifiez si l’alarme est ac- tement réglée. tivée. DANGER ! Risque d’électrocution ! Risque de blessure par électrocution par des pièces conductrices de courant.
  • Page 105: Recyclage

    14. Recyclage EMBALLAGE L’appareil est placé dans un emballage de manière à le protéger contre tout dommage pendant le transport. Les emballages sont fabriqués à partir de matériaux qui peuvent être éliminés de manière écologique et remis à un service de recyclage approprié. APPAREIL Il est interdit d’éliminer des appareils usagés avec les déchets ménagers.
  • Page 106: Caractéristiques Techniques

    15. Caractéristiques techniques Appareil Tension d’entrée 220-240 V ~ 50/60 Hz Consommation en fonctionne- Env. 15 watts ment Consommation à l’arrêt Env. 0,7 watts Puissance de sortie 2 x 15 watts RMS Classe de protection Classe de protection II Puissance du laser Laser de classe 1 Formats pris en charge CD-R, CD-RW, CD audio Nombre d’emplacements mé- moire de la lecture program-...
  • Page 107: Symboles Inscrits Sur La Plaque Signalétique Et Le Bloc D'alimentation

    Dimensions/poids Dimensions (l x H x P) Env. 175 x 182 x 175 mm Poids Env. 2,5 kg Télécommande Piles 2 piles de 1,5 V R03/LR03/AAA/Micro ® Bluetooth Fréquence 2 402 – 2 480 MHz Puissance d’émission maximale -3,8 dBm Version Profils A2DP 1.3, AVRCP 1.5 Portée jusqu’à 8 mètres (sans obstacles) Fréquence de fonctionnement 2,4 GHz. 15.1. Symboles inscrits sur la plaque signalétique et le bloc d’alimentation Classe de protection II Les appareils électriques de la classe de protection II sont des appa-...
  • Page 108: Informations Relatives Au Service Après-Vente

    75 Rue de la Foucaudière 72100 LE MANS France Suisse Horaires d’ouverture Hotline SAV Lun - Ven : 7h00 à 23h00  0848 - 33 33 32 Sam/Dim : 10h00 à 18h00 Adresse du service après-vente MEDION/LENOVO Service Center Ifangstrasse 6 8952 Schlieren Suisse...
  • Page 109 Belgique Horaires d’ouverture Hotline SAV  Lun - Ven : 9h00 à 19h00 02 - 200 61 98 Adresse du service après-vente MEDION B.V. John F.Kennedylaan 16a 5981 XC Panningen Nederland Luxembourg Horaires d’ouverture Hotline SAV  Lun - Ven : 9h00 à 19h00 34 - 20 808 664 Adresse du service après-vente...
  • Page 110: Mentions Légales

    La présente notice d’utilisation est protégé par les droits d’auteur. Toute reproduction sous forme mécanique, électronique ou sous toute autre forme que ce soit est interdite sans l’autorisation préalable écrite du fabricant. L’entreprise suivante possède les droits d’auteur : MEDION AG Am Zehnthof 77 45307 Essen Allemagne Veuillez noter que l’adresse ci-dessus n’est pas celle du service des retours.
  • Page 112 Índice Información acerca de este manual de instrucciones ......115 1.1. Explicación de los símbolos ................115 Uso conforme a lo previsto ..............116 Información sobre la conformidad UE ........... 117 3.1. Información sobre wifi ................... 117 3.2. Información sobre marcas registradas ............. 117 Indicaciones de seguridad ..............
  • Page 113 9.13. Selección de pistas, avance/retroceso rápidos ........136 9.14. Selección de carpetas ..................136 9.15. Programación de la secuencia de reproducción ........137 9.16. Repetición ......................137 9.17. Reproducción aleatoria/Intro/A-B .............. 137 9.18. Informaciones sobre pistas (ID3) ..............138 9.19. Modo Bluetooth ....................
  • Page 114: Información Acerca De Este Manual De Instrucciones

    1. Información acerca de este manual de instrucciones Muchas gracias por haber elegido nuestro producto. Le deseamos que disfrute con este aparato. Antes de la puesta en marcha, lea atentamente las indicaciones de segu- ridad y todo el manual. Tenga en cuenta las advertencias que aparecen en el propio aparato y en el manual de instrucciones.
  • Page 115: Uso Conforme A Lo Previsto

    ¡ADVERTENCIA! ¡Advertencia de peligro por descarga eléctrica! Signo de enumeración/información sobre eventos durante el mane- •  Instrucción operativa que debe ejecutarse 2. Uso conforme a lo previsto Su aparato le ofrece diversas posibilidades de uso: el aparato sirve para reproducir medios de audio (CD, reproduc- tores MP3, dispositivos USB, a través de Bluetooth), para la re- cepción analógica de radio y para el control por voz con Amazon Alexa®.
  • Page 116: Información Sobre La Conformidad Ue

    – la radiación solar directa, – fuego abierto. 3. Información sobre la conformidad UE Por la presente, MEDION AG declara que este aparato cumple los requisitos básicos y el resto de disposiciones pertinentes: • Directiva 2014/53/UE sobre la comercialización de equipos radioeléctricos •...
  • Page 117: Indicaciones De Seguridad

    4. Indicaciones de seguridad 4.1. Grupo de personas limitado • El aparato no está concebido para ser usado por personas (in- cluidos niños) con capacidades físicas, sensoriales o menta- les limitadas o que carezcan de experiencia y/o conocimien- tos, a menos que les supervise una persona responsable de su seguridad o reciban indicaciones sobre cómo usar el aparato.
  • Page 118: Seguridad Operativa

    4.2. Seguridad operativa  Antes de utilizarlo, inspeccione el aparato para asegurarse de que no presenta daños. Un aparato defectuoso o dañado no debe utilizarse. ¡PELIGRO! ¡Peligro de descarga eléctrica! Peligro de sufrir lesiones por descarga eléctrica debi- do a piezas conductoras de corriente. Existe el peligro de que, en caso de un cortocircuito involuntario, estos componentes causen una descarga eléctrica o un in- cendio.
  • Page 119: Alimentación Eléctrica

    4.3. Alimentación eléctrica ¡PELIGRO! ¡Peligro de descarga eléctrica! Peligro de sufrir lesiones por descarga eléctrica debido a piezas conductoras de corriente.  Conecte el aparato exclusivamente a una toma de corriente con puesta a tierra (230 V ~ 50 Hz) fácil- mente accesible y debidamente instalada cerca del lugar de emplazamiento.
  • Page 120: Lugar De Instalación/Entorno

    4.4. Lugar de instalación/entorno ¡PELIGRO! ¡Peligro de descarga eléctrica! En caso de grandes variaciones de temperatura o hu- medad, puede formarse humedad dentro del aparato por condensación y esta puede provocar un cortocir- cuito eléctrico.  Después de transportar el aparato, espere hasta que este tenga la temperatura ambiente antes de poner- lo en funcionamiento.
  • Page 121: Reparación

    – no haya llamas abiertas (p. ej., velas encendidas) cerca del aparato; – el cable de conexión no se halle bajo tensión de tracción y no se doble. 4.5. Reparación ¡PELIGRO! ¡Peligro de descarga eléctrica! Existe peligro de descarga eléctrica a causa de las pie- zas conductoras de electricidad.
  • Page 122: Unidades De Disco Y Conexiones

    4.7. Unidades de disco y conexiones • No introduzca ningún cuerpo extraño en las ranuras del re- productor de CD. El aparato puede resultar dañado. • Coloque siempre los CD con el lado rotulado hacia arriba en la bandeja de disco. Nunca ejerza fuerza al colocar un disco o al conectar un aparato externo.
  • Page 123 • Introduzca como norma general solo pilas nuevas del mismo tipo. Nunca mezcle pilas nuevas y usadas. • Al insertar las pilas preste atención a la polaridad (+/−). • ¡En caso de un cambio inadecuado de las pilas existe peligro de explosión! Sustituya las pilas solo con pilas del mismo tipo o un tipo similar.
  • Page 124: Limpieza Del Aparato

    4.9. Limpieza del aparato ¡PELIGRO! ¡Peligro de descarga eléctrica! Peligro de sufrir lesiones por descarga eléctrica debido a piezas conductoras de corriente.  Antes de la limpieza, extraiga la clavija de enchufe de la toma de corriente. ¡AVISO! Posibles daños materiales Un tratamiento inadecuado de las superficies sensibles puede dañar el aparato.
  • Page 125: Vista General Del Aparato

    6. Vista general del aparato 6.1. Parte superior ON/OFF Regulador de volumen ON/OFF: encender el aparato; manteniendo pulsada: apagar el aparato (cuando está apagado se muestra la hora, la función Alexa está desactivada) : seleccionar modo operativo : expulsar CD : manteniéndola pulsada: mostrar la hora (solo permanece activa la fun- ción Alexa);...
  • Page 126: Parte Trasera

    6.2. Parte trasera ANT. : conexión para antena FM AUX IN: jack para dispositivo externo USB: jack para medio de almacenamiento USB AC~: jack para cable de red Ubicación de la placa de características (en la parte inferior)
  • Page 127: Mando A Distancia

    6.3. Mando a distancia : expulsar CD : mostrar la hora (mantener pulsada, solo permanece activa la función Alexa); encender el aparato desde el modo de visualización de hora Seleccionar el modo operativo CD: modo CD USB: modo USB AUX: modo AUX BT: modo Bluetooth FM: modo radio WIFI: modo wifi...
  • Page 128: Colocación/Cambio De Las Pilas En El Mando A Distancia

    INTRO: reproducir pista REPEAT: seleccionar modo de repetición SHUFFLE: reproducción aleatoria A-B: reproducción de un pasaje de una pista ON/OFF: encender el aparato; manteniendo pulsada: apagar el aparato (cuando está apagado se muestra la hora, la función Alexa está desactivada) 7.
  • Page 129: Conexión A La Red Eléctrica

    8.1. Conexión a la red eléctrica Realice la conexión del cable de red.  Para ello, inserte el extremo plano en la co- nexión AC ~ y el otro extremo del cable en una toma de corriente con puesta a tie- rra instalada correctamente y accesible en todo momento de 220-240 V ~ 50/60 Hz.
  • Page 130: Conexión De Un Aparato Externo A La Toma Aux In

    8.3. Conexión de un aparato externo a la toma AUX IN En la parte delantera del aparato hay una cone- xión de 3,5 mm con la rotulación AUX IN.  Enchufe el cable de conexión con un conector jack de 3,5 mm en la conexión. 8.4.
  • Page 131: Selección Del Modo Operativo

    9.2. Selección del modo operativo  Pulse la tecla en el aparato una o varias veces para ir cambiando de modo operativo.  En el mando a distancia, seleccione la tecla correspondiente al modo operativo: CD, USB, AUX, BT, FM o WIFI. El modo operativo seleccionado se muestra en la pantalla: –...
  • Page 132: Hora

    9.4. Hora La hora se ajusta automáticamente de manera periódica a través de la señal de la emisora de radio. Sin embargo, también se puede ajustar manualmente. 9.4.1. Visualización de la hora  Con el aparato encendido, pulse la tecla CLOCK. Con el aparato apagado, la hora se muestra permanentemente en la pantalla.
  • Page 133: Sleeptimer

     Seleccione el volumen de la alarma con /. Cuanto mayor sea el número, más alto será el volumen de la alarma.  Pulse a continuación la tecla OK para finalizar el ajuste. La alarma activada se muestra en pantalla a través del símbolo de despertador 9.5.2.
  • Page 134: Radio

    9.8. Radio 9.8.1. Ajuste de emisoras  Pulse las teclas  o  brevemente para ajustar una frecuencia concreta.  Mantenga pulsada una de las teclas o  hasta que comience la búsqueda para buscar automáticamente la siguiente emisora. 9.8.2. Radio Data System Con el Radio Data System puede visualizarse más información, como el nombre de la emisora, el texto de radio o el tipo actual de emisión para una emisora de radio.
  • Page 135: Inserción/Expulsión Del Disco

    9.10. Inserción/expulsión del disco Procure que encima del aparato haya unos 15 cm de espacio para que el disco pue- da insertarse o expulsarse sin obstáculos.  Coloque con cuidado un CD en la ranura de CD con la cara rotulada hacia delan- El CD se introduce automáticamente y en la pantalla aparece LOADING.
  • Page 136: Programación De La Secuencia De Reproducción

    9.15. Programación de la secuencia de reproducción Con la función de programa puede componer su propio programa de música selec- cionando solo pistas concretas para la reproducción. La secuencia en la que se re- producen los capítulos puede determinarla en este caso usted mismo. Proceda del siguiente modo: ...
  • Page 137: Informaciones Sobre Pistas (Id3)

    9.17.3. A-B (función de bucle)  Pulse la tecla A-B para determinar durante la reproducción el punto de inicio de un pasaje. En la pantalla aparece RPT A-.  Pulse de nuevo la tecla para determinar el punto final. En la pantalla aparece RPT A-B.
  • Page 138: Conexión De Un Dispositivo De Reproducción Externo

    9.19.2. Control La reproducción de las pistas, así como el volumen y las funciones especiales, pue- den controlarse tanto en su equipo externo como en el sistema de audio micro. Las funciones que están disponibles dependen de su dispositivo externo y del software que utiliza.
  • Page 139: Control Por Voz Amazon Alexa

    Con ella puede llevar a cabo los ajustes ne- cesarios para activar el control por voz.  Instale en primer lugar la app Medion Speaker en su smartpho- ne. Dicha app está disponible gratuitamente en la App Store (Apple) o Google Play Store (Android).
  • Page 140: Restablecimiento De La Configuración De Fábrica

    9.21.2. Control El control por voz reacciona a su voz. En cuanto se dirija a su aparato con «Alexa», este reaccionará a sus solicitudes.  También puede activar la función Amazon Alexa® pulsando la tecla 9.21.3. Modo silencioso del micrófono Pulse la tecla de modo silencioso del micrófono si desea silenciar temporalmen- te el micrófono de su aparato.
  • Page 141: En Caso De Fallos

    12. En caso de fallos En caso de que se produzcan fallos, compruebe primero si puede solucionar usted mismo el problema. El siguiente sinóptico puede resultarle de ayuda. Fallo Posible causa Medida  Extraiga el adaptador de Aparato averiado a causa de tormenta, una descarga está- red de la toma de corrien- tica u otro factor externo.
  • Page 142: Puesta Fuera De Servicio

    ¡PELIGRO! ¡Peligro de descarga eléctrica! Peligro de sufrir lesiones por descarga eléctrica debido a piezas conductoras de corriente.  En ningún caso trate de reparar usted mismo el apa- rato. Si fuera necesario reparar el aparato, diríjase a nuestro Centro de servicio o a cualquier otro taller especializado autorizado.
  • Page 143: Eliminación

    14. Eliminación EMBALAJE El aparato se envía embalado para protegerlo de posibles daños duran- te el transporte. Los embalajes están hechos con materiales que pueden desecharse de forma respetuosa con el medio ambiente y llevarse a un punto de reciclaje. APARATO Los aparatos usados no deben desecharse con la basura doméstica nor- mal.
  • Page 144: Datos Técnicos

    15. Datos técnicos Aparato Tensión de entrada 220–240 V ~ 50/60 Hz Consumo de potencia en funcio- aprox. 15 vatios namiento Consumo de potencia apagado aprox. 0,7 vatios Potencia de salida 2 x 15 vatios RMS Clase de protección Clase de protección II Potencia láser Láser clase 1 Formatos soportados...
  • Page 145: Símbolos Que Aparecen En La Placa De Características Y En La Fuente De Alimentación

    Dimensiones/Peso Dimensiones (An x Al x P) aprox. 175 x 182 x 175 mm Peso aprox. 2,5 kg Mando a distancia Pilas 2x pilas de 1,5 V R03/LR03/AAA/Micro ® Bluetooth Frecuencia 2402-2480 MHz Potencia de emisión máx. -3,8 dBm Versión Perfil A2DP 1.3, AVRCP 1.5 Alcance Hasta 8 metros (sin obstáculos) Frecuencia de servicio...
  • Page 146: Informaciones De Asistencia Técnica

    • Si lo desea, también puede utilizar nuestro formulario de contacto que encon- trará en www.medion.com/contact. • Por supuesto, nuestro equipo de asistencia técnica también está a su disposición a través de nuestra línea directa o por correo postal.
  • Page 147: Aviso Legal

    Este manual de instrucciones está protegido por derechos de autor. Queda prohibida la reproducción mecánica, electrónica o de cualquier otro tipo sin la autorización por escrito del fabricante. El copyright pertenece a la empresa: MEDION AG Am Zehnthof 77 45307 Essen Alemania Tenga en cuenta que la dirección indicada arriba no es una dirección para devolu-...
  • Page 148 Indice Informazioni relative alle presenti istruzioni per l’uso ......151 1.1. Spiegazione dei simboli ................. 151 Utilizzo conforme ..................152 Informazioni sulla conformità UE ............153 3.1. Informazioni sulla WLAN ................153 3.2. Informazioni sui marchi ................. 153 Indicazioni di sicurezza ................154 4.1.
  • Page 149 9.13. Selezione della traccia, scorrimento veloce avanti/indietro ..... 172 9.14. Selezione di una cartella ................172 9.15. Programmazione di una sequenza di riproduzione ......173 9.16. Ripetizione ......................173 9.17. Riproduzione casuale / Intro / A-B ............. 173 9.18. Informazioni sulla traccia (ID3) ..............174 9.19.
  • Page 150: Informazioni Relative Alle Presenti Istruzioni Per L'uso

    1. Informazioni relative alle presenti istruzioni per l’uso La ringraziamo per l’acquisto di questo prodotto. Ci auguriamo che pos- sa trarne profitto. Prima di mettere in funzione il dispositivo, leggere attentamente e inte- ramente le indicazioni di sicurezza e le presenti istruzioni per l’uso. Os- servare le avvertenze riportate sul dispositivo e nelle istruzioni per l’uso.
  • Page 151: Utilizzo Conforme

    AVVERTENZA! Pericolo di scossa elettrica! Punto elenco/Informazione relativa a eventi che si possono verifica- • re durante l’utilizzo  Istruzioni da seguire 2. Utilizzo conforme Il dispositivo può essere utilizzato in diversi modi: per riprodurre supporti audio (CD, supporti dati MP3, dispositivi USB, con tecnologia Bluetooth), per ricevere stazioni radio ana- logiche e per interagire con l’assistente vocale Amazon Alexa®.
  • Page 152: Informazioni Sulla Conformità Ue

    3. Informazioni sulla conformità UE MEDION AG dichiara che il dispositivo è conforme ai requisiti basilari e alle altre di- sposizioni in materia: • Direttiva RED 2014/53/UE • Direttiva Ecodesign 2009/125/CE • Direttiva RoHS 2011/65/UE La dichiarazione di conformità UE completa può essere scaricata alla pagina www.
  • Page 153: Indicazioni Di Sicurezza

    4. Indicazioni di sicurezza 4.1. Limitazione d’uso • Questo dispositivo non è destinato a essere utilizzato da per- sone (inclusi i bambini) con capacità fisiche, sensoriali o co- gnitive limitate o con mancanza di esperienza e/o cono- scenze, a meno che non siano controllate da una persona responsabile della loro sicurezza o ricevano da questa ade- guate istruzioni sull’uso del dispositivo.
  • Page 154: Utilizzo Sicuro

    4.2. Utilizzo sicuro  Prima di utilizzare il dispositivo controllare che non sia dan- neggiato. Un dispositivo difettoso o danneggiato non deve essere utilizzato. PERICOLO! Pericolo di scossa elettrica! Pericolo di lesioni da scossa elettrica per la presenza di parti sotto tensione. Un cortocircuito accidentale delle parti sotto tensione può...
  • Page 155: Alimentazione Elettrica

    4.3. Alimentazione elettrica PERICOLO! Pericolo di scossa elettrica! Pericolo di lesioni da scossa elettrica per la presenza di parti sotto tensione.  Collegare il dispositivo solo a una presa con messa a terra (230 V ~ 50 Hz) facilmente raggiungibile, instal- lata a regola d’arte e vicina al punto d’installazione. La presa deve essere sempre facilmente accessibile, cosicché...
  • Page 156: Luogo Di Installazione / Ambiente

    4.4. Luogo di installazione / ambiente PERICOLO! Pericolo di scossa elettrica! In caso di forte escursione termica o di notevoli varia- zioni dell’umidità dell’aria, la formazione di condensa all’interno del dispositivo può causare un cortocircuito.  Dopo avere trasportato il dispositivo, aspettare che abbia raggiunto la temperatura ambiente prima di metterlo in funzione.
  • Page 157: Riparazione

    4.5. Riparazione PERICOLO! Pericolo di scossa elettrica! Pericolo di scossa elettrica dovuto alla presenza di com- ponenti sotto tensione.  Prima e dopo ogni utilizzo verificare che il dispositivo e il cavo di alimentazione non siano danneggiati.  Non usare il dispositivo se presenta danni visibili. ...
  • Page 158: Utilizzo Delle Batterie

    4.8. Utilizzo delle batterie Il telecomando del dispositivo funziona a batterie. Osservare le indicazioni seguenti: • Tenere le batterie nuove e usate lontano dalla portata dei bambini. Non ingerire le batterie. Pericolo di ustione chimica. AVVERTENZA! Pericolo di ustione chimica! Il telecomando fornito in dotazione contiene due batte- rie.
  • Page 159: Pulizia Del Dispositivo

    • Conservare le batterie in un luogo fresco e asciutto. L’esposi- zione a calore diretto può danneggiare le batterie. Non espor- re il dispositivo a fonti di calore eccessive. • Non cortocircuitare o scomporre le batterie. • Non gettare le batterie nel fuoco. Pericolo di esplosione! •...
  • Page 160: Contenuto Della Confezione

    5. Contenuto della confezione PERICOLO! Pericolo di soffocamento! Pericolo di soffocamento in caso di ingestione o inala- zione di componenti piccoli o pellicole dell’imballaggio.  Tenere la pellicola dell’imballaggio fuori dalla porta- ta dei bambini.  Estrarre il prodotto dall’imballaggio e rimuovere tutto il materiale d’imballaggio. ...
  • Page 161: Panoramica Del Dispositivo

    6. Panoramica del dispositivo 6.1. Lato superiore ON/OFF Tasti per la regolazione del volume ON/OFF – Accensione del dispositivo; pressione prolungata: spegnimento del dispositivo (quando il dispositivo è spento viene visualizzata l’ora, la fun- zione Alexa è disattivata) – Selezione della modalità di funzionamento –...
  • Page 162: Lato Posteriore

    6.2. Lato posteriore ANT. – Presa per l’antenna FM AUX IN – Presa di collegamento per dispositivo esterno USB – Presa di collegamento per supporto di memorizzazione USB AC~ – Presa di collegamento per cavo di alimentazione Posizione della targhetta del tipo (nella parte inferiore)
  • Page 163 6.3. Telecomando – Espulsione CD – Visualizzazione dell’ora (pressio- ne prolungata, solo la funzione Alexa ri- mane attiva); accensione del dispositivo dalla modalità di visualizzazione dell’ora Selezione della modalità di funziona- mento CD – Modalità CD USB – Modalità USB AUX –...
  • Page 164: Inserimento/Sostituzione Della Batteria Del Telecomando

    INFO – Visualizzazione delle informazioni sulla stazione radio/sulla traccia INTRO – Riproduzione delle tracce REPEAT – Selezione della modalità di ripetizione SHUFFLE – Riproduzione casuale A-B – Riproduzione di un passaggio della traccia ON/OFF – Accensione del dispositivo; pressione prolungata: spegnimento del dispositivo (quando il dispositivo è...
  • Page 165: Collegamento Alla Rete Elettrica

    8.1. Collegamento alla rete elettrica Collegare il cavo di alimentazione.  A tale scopo inserire l’estremità piatta nel collegamento AC ~ e l’altra estremi- tà del cavo in una presa con messa a ter- ra installata a regola d’arte, ben raggiun- gibile e sempre accessibile da 220-240 V ~ 50/60 Hz.
  • Page 166: Collegamento Di Un Dispositivo Esterno Alla Presa Aux In

    8.3. Collegamento di un dispositivo esterno alla presa AUX IN Nella parte anteriore del dispositivo è presente una presa da 3,5 mm con la scritta AUX IN.  Inserire nella presa il connettore jack da 3,5 mm del cavo di collegamento. 8.4. Collegamento di un dispositivo USB La presa USB è...
  • Page 167: Selezione Della Modalità Di Funzionamento

    9.2. Selezione della modalità di funzionamento  Premere il tasto del dispositivo una o più volte per passare tra le diverse mo- dalità di funzionamento.  Sul telecomando premere uno dei tasti CD, USB, AUX, BT, FM e WIFI corri- spondenti alle modalità...
  • Page 168: Sveglia

    9.4.2. Impostazione manuale dell’ora/sincronizzazione dell’ora  Premere il tasto ON/OFF e mantenerlo premuto per spegnere il dispositivo.  A dispositivo spento, mantenere premuto il tasto CLOCK fino a quando sul di- splay non viene visualizzata l’indicazione CLOCK SET.  L’indicazione delle ore lampeggia. Impostare le ore con i tasti / . ...
  • Page 169: Spegnimento Temporizzato

    9.5.2. Spegnimento della sveglia  Quando suona la sveglia è possibile spegnerla immediatamente premendo il ta- sto ON/OFF sul dispositivo o sul telecomando. 9.5.3. Attivazione/disattivazione della sveglia  Premere il tasto ON/OFF e mantenerlo premuto per spegnere il dispositivo.  Premere il tasto TIMER per visualizzare la sveglia impostata. ...
  • Page 170: Radio

    9.8. Radio 9.8.1. Impostazione di una stazione radio  Premere brevemente il tasto  o  per impostare una determinata frequenza.  Premere il tasto  o  e mantenerlo premuto finché la ricerca della stazione successiva non inizia automaticamente. 9.8.2.
  • Page 171: Inserimento/Espulsione Del Cd

    9.10. Inserimento/espulsione del CD Assicurarsi che sopra al dispositivo vi sia uno spazio libero di circa 15 cm in modo da poter inserire ed espellere il CD senza difficoltà.  Inserire delicatamente il CD nel relativo vano con il lato scritto rivolto in avanti. Il CD viene prelevato automaticamente e sul display viene visualizzata l’indicazione LOADING.
  • Page 172: Programmazione Di Una Sequenza Di Riproduzione

    9.15. Programmazione di una sequenza di riproduzione Con la funzione di programmazione è possibile comporre il proprio programma musicale selezionando soltanto determinate tracce da riprodurre. La sequenza nella quale vengono riprodotti i capitoli può essere definita in modo personalizzato. Pro- cedere come segue: ...
  • Page 173: Informazioni Sulla Traccia (Id3)

    9.17.3. A-B (funzione di loop)  Durante la riproduzione premere il tasto A-B per determinare il punto iniziale del passaggio che si desidera riprodurre. Sul display viene visualizzata l’indica- zione RPT A-.  Premere di nuovo il tasto determinare il punto finale. Sul display viene visualizza- ta l’indicazione RPT A-B.
  • Page 174: Collegamento Di Un Dispositivo Di Riproduzione Esterno

    9.19.2. Controllo La riproduzione delle tracce, il volume e le funzioni speciali possono essere control- lati sia tramite dispositivo esterno, sia tramite l’impianto audio micro. Le funzioni di- sponibili dipendono dal dispositivo esterno e dal software che viene utilizzato. Nor- malmente sul dispositivo sono previsti i seguenti tasti per il comando via Bluetooth: Riduzione/aumento del volume ...
  • Page 175: Assistente Vocale Amazonalexa

     Ora occorre configurare l’account di Amazon Alexa. Seguire le istruzioni visualiz- zate sullo schermo. Per attivare Amazon Alexa®, registrare l’impianto audio micro sull’account Amazon. A tale fine è necessario essere già registrati sul sito di Amazon.  Dopo aver effettuato tutte le impostazioni è possibile chiudere l’app Medion Speaker.
  • Page 176: Ripristino Delle Impostazioni Di Fabbrica

    9.21.2. Controllo L’assistente vocale reagisce alla voce dell’utente. Non appena ci si rivolge al disposi- tivo chiamandolo “Alexa”, questo risponde agli ordini.  La funzione di Amazon Alexa® può essere richiamata anche premendo il tasto 9.21.3. Spegnimento del microfono Premere il tasto per la disattivazione del microfono per disattivare temporane- amente il microfono del dispositivo.
  • Page 177: In Caso Di Problemi

    12. In caso di problemi Se dovessero verificarsi problemi, innanzitutto verificare se sia possibile risolverli au- tonomamente. La seguente tabella può essere di aiuto. Anomalia Possibile causa Provvedimento  Staccare l’alimentatore Guasto dovuto a temporale, scarica elettrostatica o altro dalla presa elettrica e rein- fattore esterno.
  • Page 178: Messa Fuori Servizio Del Dispositivo

    PERICOLO! Pericolo di scossa elettrica! Pericolo di lesioni da scossa elettrica per la presenza di parti sotto tensione.  Non provare in nessun caso a riparare il dispositivo autonomamente. Nel caso sia necessaria una ripara- zione , rivolgersi al nostro centro di assistenza o a un altro centro specializzato.
  • Page 179: Smaltimento

    14. Smaltimento IMBALLAGGIO L’imballaggio protegge il dispositivo eventuali danni durante il traspor- to. Gli imballaggi sono prodotti con materiali che possono essere smalti- ti nel rispetto dell’ambiente e destinati a un corretto riciclaggio. DISPOSITIVO I dispositivi usati non devono essere smaltiti insieme ai rifiuti domestici. Come previsto dalla direttiva 2012/19/UE, al termine del ciclo di vita del dispositivo occorre smaltirlo correttamente.
  • Page 180: Dati Tecnici

    15. Dati tecnici Dispositivo Tensione in entrata 220-240 V ~ 50/60 Hz Assorbimento di potenza duran- 15 Watt circa te il funzionamento Consumo di energia in modali- 0,7 Watt circa tà OFF Potenza di uscita 2 x 15 Watt RMS Classe di protezione Classe di protezione II Potenza laser Laser di classe 1 Formati supportati...
  • Page 181: Simboli Sulla Targhetta E Sull'alimentatore

    Dimensioni/peso Dimensioni (LxAxP) circa 175 x 182 x 175 mm Peso ca. 2,5 kg Telecomando 2 batterie da 1,5 V di tipo R03/LR03/AAA/mi- Batteria ® Bluetooth FREQUENZ 2402-2480 MHz Potenza di trasmissione massima -3,8 dBm Versione Profili A2DP 1.3, AVRCP 1.5 Portata fino a 8 metri (senza ostacoli) Frequenza operativa 2,4 GHz 15.1.
  • Page 182: Informazioni Relative Al Servizio Di Assistenza

    Orari di apertura Assistenza Post-Vendita  Lun.-ven.: 9.00-19.00 0848 - 33 33 32 Indirizzo del servizio di assistenza MEDION/LENOVO Service Center Ifangstrasse 6 8952 Schlieren Svizzera Italia Queste e altre istruzioni per l’uso possono essere scaricate dal portale dell’assistenza www.medion.com/it/.
  • Page 183: Note Legali

    Svizzera Queste e altre istruzioni per l’uso possono essere scaricate dal portale dell’assistenza www.medion.com/ch/de/service/start/. Lì sono disponibili anche driver e altri software per diversi dispo- sitivi. È inoltre possibile effettuare una scansione del codice QR ripor- tato a fianco e scaricare le istruzioni per l’uso dal portale dell’as- sistenza utilizzando un dispositivo portatile.
  • Page 184 Inhoudsopgave Informatie over deze gebruiksaanwijzing ..........187 1.1. Betekenis van de symbolen ................187 Gebruiksdoel .................... 188 EU-conformiteitsinformatie ..............189 3.1. Informatie over wifi ..................189 3.2. Informatie over handelsmerken ..............189 Veiligheidsvoorschriften ................ 190 4.1. Personen die het apparaat niet mogen gebruiken ......190 4.2.
  • Page 185 9.13. Nummers selecteren, snel achteruit/vooruit ......... 208 9.14. Map selecteren ....................208 9.15. Afspeelvolgorde programmeren ..............209 9.16. Herhaling ......................209 9.17. Afspelen in willekeurige volgorde / Intro / A-B ........209 9.18. Nummerinformatie (ID3) ................210 9.19. Bluetooth-modus ..................... 210 9.20.
  • Page 186: Informatie Over Deze Gebruiksaanwijzing

    1. Informatie over deze gebruiksaanwijzing Hartelijk dank dat u voor ons product hebt gekozen. Wij wensen u veel plezier met het apparaat. Lees de veiligheidsvoorschriften en de volledige gebruiksaanwijzing aandachtig door voordat u het apparaat in gebruik neemt. Neem de waarschuwingen op het apparaat en in de gebruiksaanwijzing in acht.
  • Page 187: Gebruiksdoel

    WAARSCHUWING! Waarschuwing voor gevaar door een elektrische schok. Opsommingsteken/informatie over gebeurtenissen die zich tijdens • de bediening kunnen voordoen.  Instructie voor een uit te voeren handeling. 2. Gebruiksdoel Dit apparaat biedt een breed scala aan toepassingen: het apparaat dient voor het afspelen van geluidsmedia (cd’s, mp3-gegevensdragers, USB-apparaten, via Bluetooth) en ana- loge radio-ontvangst, en ondersteunt spraakbesturing via Ama- zon Alexa®.
  • Page 188: Eu-Conformiteitsinformatie

    – hoge luchtvochtigheid en vocht – extreem hoge en lage temperaturen – direct zonlicht – open vuur 3. EU-conformiteitsinformatie Hierbij verklaart MEDION AG dat dit apparaat in overeenstemming is met de funda- mentele eisen en de overige toepasselijke voorschriften: • Radioapparatuurrichtlijn 2014/53/EU •...
  • Page 189: Veiligheidsvoorschriften

    4. Veiligheidsvoorschriften 4.1. Personen die het apparaat niet mogen gebruiken • Het apparaat is niet bedoeld voor gebruik door personen (in- clusief kinderen) met een lichamelijke, zintuiglijke of gees- telijke beperking of met onvoldoende ervaring en/of kennis, tenzij iemand die verantwoordelijk is voor hun veiligheid toe- zicht op hen houdt of hen instructie heeft gegeven hoe ze het apparaat moeten gebruiken.
  • Page 190: Bedrijfszekerheid

    4.2. Bedrijfszekerheid  Controleer het apparaat vóór gebruik op beschadigingen. Een defect of beschadigd apparaat mag niet worden gebruikt. GEVAAR! Gevaar voor een elektrische schok! Gevaar voor letsel als gevolg van een elektrische schok door onderdelen die onder spanning staan. Bij deze on- derdelen bestaat gevaar voor een elektrische schok of brand door onbedoelde kortsluiting.
  • Page 191: Stroomvoorziening

    4.3. Stroomvoorziening GEVAAR! Gevaar voor een elektrische schok! Gevaar voor letsel als gevolg van een elektrische schok door onderdelen die onder spanning staan.  Sluit het apparaat alleen aan op een goed bereikbaar en volgens voorschrift geïnstalleerd, geaard stop- contact (230 V~/50 Hz) in de buurt van het apparaat. Zorg ervoor dat het stopcontact altijd vrij toeganke- lijk is, zodat de stekker er moeiteloos uit kan worden gehaald.
  • Page 192: Plaats Van Opstelling / Omgeving

    4.4. Plaats van opstelling / omgeving GEVAAR! Gevaar voor een elektrische schok! Bij grote schommelingen in temperatuur of luchtvoch- tigheid kan er door condensatie vocht in het apparaat terechtkomen, waardoor er kortsluiting kan ontstaan.  Neem het apparaat nadat het is vervoerd pas weer in gebruik als het de omgevingstemperatuur heeft aan- genomen.
  • Page 193: Reparatie

    4.5. Reparatie GEVAAR! Gevaar voor een elektrische schok! Er bestaat gevaar voor een elektrische schok door on- derdelen die onder spanning staan.  Controleer het apparaat en het netsnoer vóór inge- bruikname en na elk gebruik op beschadigingen.  Gebruik het apparaat niet als het zichtbaar bescha- digd is.
  • Page 194: Drives En Aansluitingen

    4.7. Drives en aansluitingen • Steek geen vreemde voorwerpen in de openingen van de cd-speler. Het apparaat kan hierdoor beschadigd raken. • Plaats cd's altijd met het label naar voren in de cd-lade. Oefen bij het plaatsen van een cd of het aansluiten van een extern apparaat nooit veel kracht uit.
  • Page 195 • Plaats uitsluitend nieuwe batterijen van hetzelfde type. Ge- bruik nooit oude en nieuwe batterijen door elkaar. • Let bij het plaatsen van de batterijen op de polariteit (+/-). • Als de batterijen niet op de juiste manier worden vervangen, bestaat er explosiegevaar.
  • Page 196: Apparaat Reinigen

    4.9. Apparaat reinigen GEVAAR! Gevaar voor een elektrische schok! Gevaar voor letsel als gevolg van een elektrische schok door onderdelen die onder spanning staan.  Trek de stekker uit het stopcontact voordat u het ap- paraat reinigt. LET OP! Mogelijke materiële schade! Door verkeerde behandeling van kwetsbare oppervlak- ken kan het apparaat beschadigd raken.
  • Page 197: Overzicht Van Het Apparaat

    6. Overzicht van het apparaat 6.1. Bovenkant ON/OFF Volumeregelaar ON/OFF – apparaat inschakelen, ingedrukt houden: apparaat uitschakelen (in uitgeschakelde toestand wordt de tijd weergegeven, de Alexa-functie is gedeactiveerd) – bedrijfsmodus selecteren – cd uitwerpen – ingedrukt houden: tijd weergeven (alleen de Alexa-functie blijft actief ); apparaat vanuit de tijdmodus inschakelen –...
  • Page 198: Achterkant

    6.2. Achterkant ANT. – aansluiting voor FM-antenne AUX IN – connector voor extern apparaat USB – connector voor USB-opslagmedium AC~ – connector voor netsnoer Plaats van het typeplaatje (aan de onderkant)
  • Page 199: Afstandsbediening

    6.3. Afstandsbediening – cd uitwerpen – tijd weergeven (ingedrukt houden, alleen de Alexa-functie blijft actief ); ap- paraat vanuit de tijdmodus inschakelen Bedrijfsmodus selecteren CD – cd-modus USB – USB-modus AUX – AUX-modus BT – Bluetooth-modus FM – radio-modus WIFI – wifi-modus RESET –...
  • Page 200: Batterij In De Afstandsbediening Plaatsen/Vervangen

    SHUFFLE – afspelen in willekeurige volgorde A-B – herhaling van een passage van een nummer ON/OFF – apparaat inschakelen, ingedrukt houden: Apparaat uitschakelen (in uitgeschakelde toestand wordt de tijd weergegeven, de Alexa-functie is gedeactiveerd) 7. Batterij in de afstandsbediening plaatsen/ vervangen Plaats twee 1,5 V-batterijen R03/LR03/AAA/Micro in de afstandsbediening.
  • Page 201: Aansluiting Op De Netvoeding

    8.1. Aansluiting op de netvoeding Sluit het netsnoer aan.  Steek het vlakke uiteinde van het snoer in de AC ~-connector en het andere uitein- de in een volgens de voorschriften geïn- stalleerd, goed bereikbaar geaard stopcon- tact van 220-240 V ~ 50/60 Hz. 8.2.
  • Page 202: Extern Apparaat Aansluiten Op De Aux In-Connector

    8.3. Extern apparaat aansluiten op de AUX IN- connector Aan de voorkant van het apparaat bevindt zich een 3,5 mm-connector met het opschrift AUX  Steek de aansluitkabel met een 3,5 mm jack- plug in de connector. 8.4. USB-apparaat aansluiten Op de USB-connector kunt u USB-sticks aansluiten.
  • Page 203: Modus Selecteren

    9.2. Modus selecteren  Druk een of meerdere keren op de toets op het apparaat, om door de be- drijfsmodi te bladeren.  Op de afstandsbediening drukt u op de toetsen CD, USB, AUX, BT, FM en WIFI om de betreffende bedrijfsmodus in te schakelen. De gekozen modus wordt weergegeven in de display: –...
  • Page 204: Wekker

    9.4.2. Tijd handmatig instellen / synchronisatie van de tijd  Houd de toets ON/OFF ingedrukt om het apparaat uit te schakelen.  Houd terwijl het apparaat is uitgeschakeld de toets CLOCK ingedrukt tot CLOCK SET in de display wordt weergegeven. ...
  • Page 205: Sleeptimer

    9.5.2. Weksignaal beëindigen  Wanneer het weksignaal klinkt, kunt u het onmiddellijk stoppen door op ON/ OFF op het apparaat of op de afstandsbediening te drukken. 9.5.3. Weksignaal activeren/deactiveren  Houd de toets ON/OFF ingedrukt om het apparaat uit te schakelen. ...
  • Page 206: Radio

    9.8. Radio 9.8.1. Zenders instellen  Druk kort op de toetsen  of  om een specifieke frequentie in te stellen.  Houd een van de toetsen of  ingedrukt om automatisch naar de volgende zender te zoeken. 9.8.2. Radio Data System Met het Radio Data System kan extra informatie worden weergegeven, zoals de naam van de zender, de radiotekst of het huidige type uitzending van een radiozen- der.
  • Page 207: Cd Plaatsen/Uitwerpen

    9.10. Cd plaatsen/uitwerpen Zorg ervoor dat boven het apparaat circa 15 cm ruimte vrij is om belemmeringen bij het plaatsen of uitwerpen van de cd te voorkomen.  Schuif voorzichtig een cd met het label naar voren in de cd-lade. De cd-lade wordt automatisch gesloten en in de display verschijnt LOADING.
  • Page 208: Afspeelvolgorde Programmeren

    9.15. Afspeelvolgorde programmeren Met de programmafunctie kunt u uw eigen muziekprogramma samenstellen door alleen bepaalde nummers te selecteren voor het afspelen. De volgorde waarin de nummers worden afgespeeld, kunt u hierbij zelf bepalen. Ga als volgt te werk:  Stop het afspelen met . ...
  • Page 209: Nummerinformatie (Id3)

    9.17.3. A-B (loop-functie)  Druk op de toets A-B, om tijdens het afspelen het startpunt van een fragment vast te leggen. In de display verschijnt RPT A-.  Druk opnieuw op de toets om het eindpunt vast te leggen. In de display ver- schijnt RPT A-B.
  • Page 210: Extern Afspeelapparaat Aansluiten

    9.19.2. Bediening Het afspelen van nummers, het volume en speciale functies kunnen zowel via uw externe apparaat als via het micro-audiosysteem worden geregeld. Welke functies beschikbaar zijn, hangt af van het externe apparaat en van de software die u ge- bruikt.
  • Page 211: Amazon Alexa®-Spraakbesturing

    Volg ook daarvoor de instructies in de display. Meld u op het micro-audiosysteem bij uw Amazon-account aan om Amazon Alexa® te activeren. Daarvoor moet u al geregistreerd zijn bij Amazon.  Zodra u klaar bent met de instellingen, kunt u de Medion Speaker-app sluiten.
  • Page 212: Instellingen Naar De Fabriekswaarden Terugzetten

    9.21.2. Bediening De spraakbesturing reageert op uw stem. Als u het apparaat met 'Alexa' aanspreekt, reageert het op wat u zegt.  U kunt de Amazon Alexa®-functie ook activeren door op de toets te drukken. 9.21.3. Microfoon dempen Druk op de toets voor het dempen van microfoon als u de microfoon van het ap- paraat tijdelijk wilt dempen.
  • Page 213: Storingen

    12. Storingen Controleer bij storingen eerst of u het probleem zelf kunt oplossen. Hierbij kunt u het volgende overzicht gebruiken. Storing Mogelijke oorzaak Maatregel  Haal de netadapter uit het Er is sprake van een storing als gevolg van onweer, stati- stopcontact en steek de sche elektriciteit of een ande- adapter opnieuw in het...
  • Page 214: Buitengebruikstelling

    GEVAAR! Gevaar voor een elektrische schok! Gevaar voor letsel als gevolg van een elektrische schok door onderdelen die onder spanning staan.  Probeer in geen geval om het apparaat zelf te repa- reren. Neem als een reparatie nodig is contact op met ons Service Center of een ander professioneel reparatiebedrijf.
  • Page 215: Afvalverwerking

    14. Afvalverwerking VERPAKKING Het apparaat zit ter bescherming tegen transportschade in een verpak- king. Verpakkingen zijn gemaakt van materialen die milieuvriendelijk kunnen worden afgevoerd en vakkundig kunnen worden gerecycled. APPARAAT Gebruikte apparaten mogen niet met het gewone huishoudelijke afval worden meegegeven. Volgens richtlijn 2012/19/EU moet het apparaat aan het einde van de le- vensduur volgens voorschrift worden afgevoerd.
  • Page 216: Technische Gegevens

    15. Technische gegevens Apparaat Ingangsspanning 220–240 V ~ 50/60 Hz Opgenomen vermogen tijdens ca. 15 watt gebruik Opgenomen vermogen in uitge- ca. 0,7 watt schakelde toestand Uitgangsvermogen 2 x 15 watt RMS Veiligheidsklasse Veiligheidsklasse II Laservermogen Laserproductklasse 1 Ondersteunde indelingen cd-r, cd-rw, audio-cd Aantal geheugenplaatsen voor 20 nummers (cd)
  • Page 217: Symbolen Op Het Typeplaatje En De Netadapter

    Afmetingen/gewicht Gewicht ca. 2,5 kg Afstandsbediening Batterij 2x 1,5 V batterijen R03/LR03/AAA/Micro ® Bluetooth Frequentie 2402–2480 MHz Maximaal zendvermogen -3,8 dBm Versie Profielen A2DP 1.3, AVRCP 1.5 Bereik tot 8 meter (zonder obstakels) Gebruiksfrequentie 2.4 GHz 15.1. Symbolen op het typeplaatje en de netadapter Veiligheidsklasse II Elektrische apparaten van veiligheidsklasse II zijn elektrische appa- raten die zijn voorzien van dubbele en/of extra sterke isolatie en die...
  • Page 218: Service-Informatie

    • In onze Service Community vindt u andere gebruikers en onze medewerkers en daar kunt u uw ervaringen uitwisselen en uw kennis delen. U vindt onze Service Community onder http://community.medion.com. • U kunt natuurlijk ook ons contactformulier gebruiken onder www.medion.com/contact.
  • Page 219 Openingstijden Service Hotline  Ma - vr: 09:00 - 19:00 34 - 20 808 664 Serviceadres MEDION B.V. John F.Kennedylaan 16a 5981 XC Panningen Nederland Nederland Deze en vele andere gebruiksaanwijzingen staan ter beschikking om te downloaden via het serviceportaal www.medion.com/nl/service/start/.
  • Page 220: Colofon

    Deze gebruiksaanwijzing is auteursrechtelijk beschermd. Verveelvoudiging in mechanische, elektronische of welke andere vorm dan ook zonder schriftelijke toestemming van de fabrikant is verboden. Het copyright berust bij de firma: MEDION AG Am Zehnthof 77 45307 Essen Duitsland Houd er rekening mee dat het bovenstaande adres geen retouradres is. Neem eerst...

Ce manuel est également adapté pour:

Md 44300

Table des Matières