
Manuels Connexes pour Karl Storz T-SCOPE Série


Sommaire des Matières pour Karl Storz T-SCOPE Série
- Page 1 Gebrauchsanweisung Instruction Manual Manuel d’utilisation Manual de instrucciones...
-
Page 3: Gamme De Produits
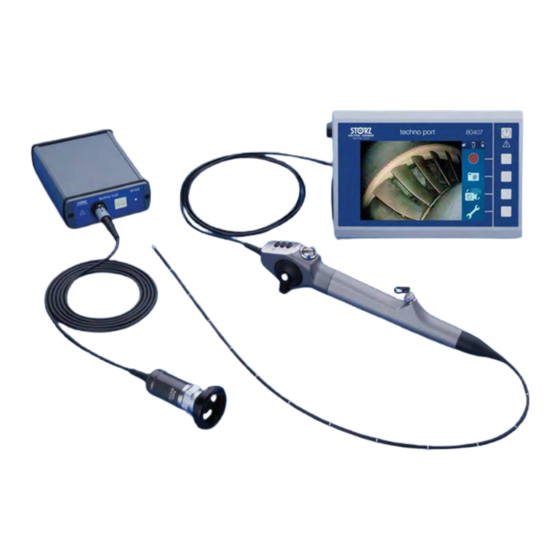
Gebrauchsanweisung Instruction Manual Manuel d’utilisation Manual de instrucciones Familia de productos 80407/ 80408 Gamme de produits 80407/ 80408 KARL STORZ T-SCOPE Produktfamilie Modelle: TECHNO PORT 80407/T-CAM VIDEOENDOSKOP 81251001-xx, TECHNO HUB 80408... -
Page 4: Table Des Matières
1 Inhaltsverzeichnis Table of Content Allgemeines ..........6 General information ........6 1. 1 Wichtiger Hinweis für Benutzer instruments ..........6 Instrumenten ..........6 ........8 ........8 2. 1 Warning symbols ........8 2. 1 Warnsymbole ........... 8 ....8 .... - Page 5 1 Table des matières Índice ..........7 .......... 7 ........... 7 ........... 7 ......9 ....... 9 ......9 ....... 9 .. 9 ..9 ....21 ....21 ........23 ........... 23 ......25 ..... 25 2. 6 ....25 ..........
- Page 6 1 Inhaltsverzeichnis Table of Content Installing the ....... 88 ......... 88 ....... 88 ......88 ..... 88 ..88 ..... 90 ........90 ... 90 ....90 ....96 ......96 ..........98 monitor ..........98 ......102 ....102 ..
- Page 7 1 Table des matières Índice ........... 85 ......89 livraison ..........89 ......89 ......89 ... 91 ..... 89 ..........91 conexiones y sus funciones ....91 ....... 97 ........... 91 ............. 99 ......97 ..103 ..99 ..
-
Page 8: Allgemeines
1 Allgemeines General information Wichtiger Hinweis Important information 1. 1 Important note for users of 1. 1 Wichtiger Hinweis für Benutzer instruments Instrumenten Thank you for your expression of confidence in the decided in favor of a modern, high-quality item of equipment Die vorliegende Gebrauchsanweisung soll helfen, das This instruction manual is intended to serve as an aid in the proper setup, installation, and operation of this device from... -
Page 9: Généralités
1 Généralités Generalidades 1. 1 1. 1 facilitar su consulta. alguno. REMARQUE : NOTA: manuel. -
Page 10: Warning Symbols
Refer servicing to the Gehäuse vom Gerät nicht öffnen! Lassen Sie Service- manufacturer KARL STORZ, or the manufacturer’s arbeiten nur durch den Hersteller KARL STORZ oder authorized service personnel. Any opening of the durch vom Hersteller autorisiertes Personal durch- device by unauthorized persons will result in the führen. -
Page 11: Instrucciones De Seguridad
2 Consignes de sécurité Instrucciones de seguridad Avertissements et consignes de sécurité Indicaciones de alarma y advertencia Mesures de sécurité Medidas de seguridad 2. 1 2. 1 AVERTISSEMENT : CUIDADO: AVIS : ADVERTENCIA: REMARQUE : NOTA: 2. 2 2. 2 AVERTISSEMENT : CUIDADO: AVERTISSEMENT :... - Page 12 WARNING: The electrical installations in the room in WARNUNG: Die elektrischen Installationen des Rau- which the device is connected and operated must mes, in dem das Gerät angeschlossen und betrieben comply with the applicable IEC standards. wird, müssen die Anforderungen der geltenden IEC-Normen erfüllen.
- Page 13 2 Consignes de sécurité Instrucciones de seguridad Avertissements et consignes de sécurité Indicaciones de alarma y advertencia AVERTISSEMENT : CUIDADO: AVERTISSEMENT : CUIDADO: AVERTISSEMENT : CUIDADO: AVERTISSEMENT : CUIDADO: AVERTISSEMENT : CUIDADO: AVERTISSEMENT : CUIDADO: AVERTISSEMENT : CUIDADO: CUIDADO: AVERTISSEMENT : CUIDADO: AVERTISSEMENT : CUIDADO:...
- Page 14 CAUTION: VORSICHT: Machen Sie sich vor der ersten Anwen- familiarize yourself with how the systems are used dung der Geräte mit der Funktionsweise und Bedie- and operate. nung der Systeme vertraut. VORSICHT: CAUTION: VORSICHT: CAUTION: VORSICHT: CAUTION: VORSICHT: Führen Sie den Schaft des VIDEO- CAUTION: Do not insert the sheath of the ENDOSKOPS nicht in ein zu betrachtendes Objekt VIDEOSCOPE into an object to be examined if...
- Page 15 2 Consignes de sécurité Instrucciones de seguridad Avertissements et consignes de sécurité Indicaciones de alarma y advertencia AVIS : ADVERTENCIA: ADVERTENCIA: AVIS : ADVERTENCIA: AVIS : ADVERTENCIA: AVIS : ADVERTENCIA: AVIS : ADVERTENCIA: AVIS : AVIS : ADVERTENCIA: AVIS : ADVERTENCIA: ADVERTENCIA: AVIS :...
- Page 16 CAUTION: Do not store the VIDEOSCOPE at VORSICHT: Lagern Sie das VIDEOENDOSKOP ambient temperatures above +55°C or below 0°C. nicht in Umgebungstemperaturen höher als +55 °C Please also observe the storage conditions of the oder niedriger als 0 °C. Beachten Sie auch die La- other devices.
- Page 17 2 Consignes de sécurité Instrucciones de seguridad Avertissements et consignes de sécurité Indicaciones de alarma y advertencia AVIS : ADVERTENCIA: AVIS : ADVERTENCIA: AVIS : ADVERTENCIA: AVIS : ADVERTENCIA: AVIS : ADVERTENCIA: AVIS : ADVERTENCIA: AVIS : AVIS : ADVERTENCIA: ADVERTENCIA: AVIS : ADVERTENCIA:...
- Page 18 CAUTION: Observe the following points when VORSICHT: Beim Verstauen oder der Entnahme der stowing the devices away in or removing them from Geräte im Transportkoffer sind folgende Punkte zu the carrying case: beachten: stored in a twisted position and use the recess Zustand lagern und verwenden Sie die vorgesehene provided in the carrying case insert.
- Page 19 2 Consignes de sécurité Instrucciones de seguridad Avertissements et consignes de sécurité Indicaciones de alarma y advertencia AVIS : ADVERTENCIA: ADVERTENCIA: AVIS : AVIS : ADVERTENCIA: MANIPULATION DE LA BATTERIE INTÉGRÉE MANIPULACIÓN DEL ACUMULADOR INTEGRADO AVERTISSEMENT : CUIDADO: AVERTISSEMENT : CUIDADO: AVERTISSEMENT : CUIDADO:...
- Page 20 NOTE: Under normal conditions, a fully charged HINWEIS: Ein voll aufgeladener Akku ermöglicht battery enables continuous operation for the period (unter normalen Bedingungen) eine durchgehende of time indicated on the data sheet. The actual Betriebszeit wie im Datenblatt angegeben. Die tat- operating time depends on the charging method, the operating conditions, and the device settings.
- Page 21 2 Consignes de sécurité Instrucciones de seguridad Avertissements et consignes de sécurité Indicaciones de alarma y advertencia REMARQUE : NOTA: REMARQUE : NOTA:...
-
Page 22: Explanation Of Symbols
2. 3 Explanation of symbols 2. 3 Important: Accompanying documents Achtung: Begleitpapiere beachten must be observed Gebrauchsanweisung beachten Do not use the product if the packaging has been damaged nicht verwenden Trocken aufbewahren Transport and storage conditions Humidity Atmospheric pressure Atmospherischer Druck Cleaning instructions Control of pollution caused by electronic... - Page 23 2 Consignes de sécurité Instrucciones de seguridad 2. 3 2. 3 Pictogrammes Explication Pictograma Explicación almacenamiento Batterie lithium-ion IP 54 ta40 IP 54 ta40...
-
Page 24: Intended Use
control key) Video recording Videoaufnahme Manufacturer Hersteller 2. 4 Intended use 2. 4 inspection of technical assemblies, such as turbines, motors, Inspektion von technischen Baugruppen, wie z. B. Turbinen, to play back images during an endoscopic inspection. and consumables which have been designated as suitable those described above is not permitted for safety reasons. - Page 25 2 Consignes de sécurité Instrucciones de seguridad Pictogrammes Explication Pictograma Explicación 2. 4 2. 4 TECHNO PORT TECHNO PORT T-CAM T-CAM VIDÉOENDOSCOPE VIDEOENDOSCOPIO...
-
Page 26: Qualifikation Des Anwenders
Erlöschen aller Garantieansprüche. control signals to external devices in industrial endoscopy. inspection of technical assemblies, such as turbines, motors, Inspektion von technischen Baugruppen, wie z. B. Turbinen, cavities in buildings and vehicle bodies, etc., for use with the and consumables which have been designated as suitable those described above is not permitted for safety reasons. - Page 27 2 Consignes de sécurité Instrucciones de seguridad TECHNO HUB TECHNO HUB 2. 5 2. 5 2. 6 2. 6...
- Page 28 WARNING: WARNUNG: WARNING: WARNUNG: CAUTION: Only use accessories (guide probes, etc.) from KARL STORZ. Accessories from other manufacturers can damage the VIDEOSCOPE. VORSICHT: Verwenden Sie ausschließlich Zubehör CAUTION: (Führungssonden usw.) von KARL STORZ. Zubehör anderer Hersteller kann das VIDEOENDOSKOP be- schädigen.
- Page 29 2 Consignes de sécurité Instrucciones de seguridad AVERTISSEMENT : CUIDADO: AVERTISSEMENT : CUIDADO: AVERTISSEMENT : CUIDADO: AVERTISSEMENT : CUIDADO: AVERTISSEMENT : CUIDADO: AVERTISSEMENT : CUIDADO: ADVERTENCIA: AVIS : ADVERTENCIA: AVIS : ADVERTENCIA: AVIS : ADVERTENCIA: AVIS : ADVERTENCIA: AVIS : AVIS : ADVERTENCIA:...
- Page 30 VORSICHT: Die Geräte dürfen nicht installiert und CAUTION: Do not install or operate the devices betrieben werden im Bereich radioaktiver Strahlung near radioactive radiation (nuclear diagnostic and (nukleare Diagnose- und Therapiegeräte). therapeutic devices). VORSICHT: CAUTION: VORSICHT: CAUTION: CAUTION: VORSICHT: CAUTION: VORSICHT: CAUTION: VORSICHT:...
- Page 31 2 Consignes de sécurité Instrucciones de seguridad AVIS : ADVERTENCIA: ADVERTENCIA: AVIS : ADVERTENCIA: AVIS : ADVERTENCIA: AVIS ADVERTENCIA: AVIS : ADVERTENCIA: AVIS : ADVERTENCIA: AVIS : NOTA: REMARQUE :...
-
Page 32: Monitor Status Bar
3 Inbetriebnahme des Installing the Bedienelemente, Anzeigen, Anschlüsse Controls, displays, connectors Aufladen des Monitor-Akkus Charging the monitor battery 3.10 3.10 Connection of primary camera 3.11 Einschalten des Monitors 3.11 3.12 3.12 Monitor status bar 3.13 Betriebsmodi und Menüführung 3.13 3.14 3.14 3.15 Energiemanagement... - Page 33 3 Mise en service du Puesta en marcha del 3.10 3.10 3.11 3.11 3.12 3.12 3.13 3.13 3.14 3.14 3.15 3.15 3.16 3.16 3.18 3.18 3. 1 3. 1 3. 2 3. 2 AVIS : ADVERTENCIA:...
-
Page 34: Controls, Displays, Connectors And Their Uses
3 Inbetriebnahme des Installing the Bedienelemente, Anzeigen, Anschlüsse Controls, displays, connectors 3. 3 Bedienelemente, Anzeigen, 3. 3 Controls, displays, connectors and their uses Pilot lamp (green) Pilot lamp (orange) Bedientasten Control keys HDMI-Anschluss HDMI port Anschluss für Videoeinheit 2 Connection for video unit 2 Anschluss für Videoeinheit 1 Connection for video unit 1 Netzanschluss... - Page 35 3 Mise en service du Puesta en marcha del 3. 3 3. 3 conexiones y sus funciones...
-
Page 36: External System Components
3 Inbetriebnahme des Installing the 3. 4 External system components 3. 4 recharged within a very short time. Moreover, using the werden. The charger has a green light indicator 1, which indicates 1, die das the presence of the correct output voltage. Vorhandensein der korrekten Ausgangsspannung anzeigt. -
Page 37: Composants Externes Du Système
3 Mise en service du Puesta en marcha del Composants externes du système Componentes externos del sistema 3. 4 3. 4 Chargeur Cargador Configuration nationale Configuración específica por países... -
Page 38: Aufladen Des Monitor-Akkus
3 Inbetriebnahme des Installing the Aufladen des Monitor-Akkus Charging the monitor battery When inserting a new adaptor, this must be placed in the Beim Einsetzen eines neuen Adapters muss dieser in die an audible click. 3. 5 Preparing the device for use 3. - Page 39 3 Mise en service du Puesta en marcha del Composants externes du système Componentes externos del sistema un clic. 3. 5 3. 5 REMARQUE NOTA: 3. 6 3. 6 courant alternatif. AVIS : ADVERTENCIA:...
-
Page 40: Verwendung Des Hdmi-Ausgangs
HINWEIS: Der angeschlossene Monitor muss die stützen. NOTE: To connect the TECHNO PORT monitor to a KARL STORZ monitor with DVI video input, the HINWEIS: Zum Anschließen des TECHNO PORT HDMI-DVI adaptor with article number 20 9190 10 is Monitors an einen KARL STORZ Monitor mit DVI- required. - Page 41 3 Mise en service du Puesta en marcha del REMARQUE : NOTA: REMARQUE : NOTA: AVIS : ADVERTENCIA: 3. 7 3. 7 AVIS : ADVERTENCIA: REMARQUE : NOTA: NOTA: REMARQUE : 3. 8 3. 8 le logement e ranura e.
- Page 42 3 Inbetriebnahme des Installing the Never force the card into the card receptacle or insert it with the contacts facing in the wrong direction. This may directly result in the contacts or the receptacle being damaged. In order to remove the memory card, please press the memory card a little further into the receptacle using a finger and then release it.
- Page 43 3 Mise en service du Puesta en marcha del REMARQUE : NOTA: REMARQUE : NOTA: REMARQUE : NOTA: 3. 9 3. 9 REMARQUE : NOTA: REMARQUE : NOTA: REMARQUE : NOTA: REMARQUE : NOTA: REMARQUE : NOTA:...
-
Page 44: Connection Of Primary Camera And Secondary Camera
NOTE: The VIDEOSCOPE (Article: 81251001-465) HINWEIS: An beiden Anschlüssen kann das or T-CAM (Article: 80407 CA) from KARL STORZ can VIDEOENDOSKOP (Artikel: 81251001-465) oder be connected at both connections. Video units from die T-CAM (Artikel: 80407 CA) von KARL STORZ other manufacturers cannot be connected. - Page 45 3 Mise en service du Puesta en marcha del d’une caméra secondaire y secundaria 3. 10 3. 10 carcasa. REMARQUE : NOTA: REMARQUE : NOTA: 3. 11 3. 11...
- Page 46 3 Inbetriebnahme des Installing the 3. 12 Monitor status bar 3. 12 The charge state of the battery, the amount of available of a second camera are all displayed in the monitor status bar e. The symbols mean: Displays the currently active camera (only active if 2 cameras are connected) NOTE: The VIDEOSCOPE or the T-CAM camera HINWEIS: Das VIDEOENDOSKOP oder der T-CAM...
-
Page 47: Barre D'état Du Moniteur
3 Mise en service du Puesta en marcha del 3.12 Barre d’état du moniteur 3.12 Barra de estado del monitor 3. 12 3. 12 Branchement d’une deuxième caméra Conexión de una segunda cámara REMARQUE : NOTA: État de charge de la batterie Estado de carga del acumulador 30 minutes 2 heures... - Page 48 3 Inbetriebnahme des Installing the 100% of memory capacity available 50% of memory capacity available 25% of memory capacity available 0% of memory capacity available 100% of memory capacity available 50% of memory capacity available 25% of memory capacity available 0% of memory capacity available The monitor provides additional notifications in certain critical situations.
- Page 49 3 Mise en service du Puesta en marcha del 3.12 Barre d’état du moniteur 3.12 Barra de estado del monitor Carte mémoire SD Tarjeta de memoria SD 100% Clé USB Memoria USB 100% Messages Notificaciones successivement. forma sucesiva.
- Page 50 3 Inbetriebnahme des Installing the Erreicht der Akkuladestand einen kritischen Wert, so If the battery charge state reaches a critical level, the battery symbol in the status bar is highlighted white. At the Gleichzeitig erscheint in der unteren rechten Ecke des same time, in the bottom right-hand corner of the display, an empty battery symbol also appears against a white Grund sowie ein Ausrufezeichen.
- Page 51 3 Mise en service du Puesta en marcha del 3.12 Barre d’état du moniteur 3.12 Barra de estado del monitor État de charge de la batterie critique Estado crítico de carga del acumulador Carte mémoire SD pleine Tarjeta de memoria SD llena Sauvegarde de données impossible sur la clé...
-
Page 52: Betriebsmodi Und Menüführung
3 Inbetriebnahme des Installing the NOTE: When transferring the data from the SD HINWEIS: Beim Übertragen der Daten von memory card to a USB memory stick, the data is SD-Speicherkarte auf einen USB-Speicherstick copied from the SD memory card and not deleted. werden die Daten von der SD-Speicherkarte kopiert The data on the SD memory card must be deleted und nicht gelöscht. - Page 53 3 Mise en service du Puesta en marcha del 3.12 Barre d’état du moniteur 3.12 Barra de estado del monitor 3.13 Modes de fonctionnement et guidage par menu REMARQUE : NOTA: 3. 13 3. 13 menús iconos en el monitor. REMARQUE : NOTA: REMARQUE :...
- Page 54 3 Inbetriebnahme des Installing the Beendet die Aufnahme eines Videostreams. NOTE: Video recording is stopped if HINWEIS: Die Videoaufnahme wird the battery is empty, if the SD card gestoppt, wenn der Akku leer ist, wenn is full or if the user has switched the die SD-Karte voll ist oder wenn der Be- device to standby mode.
-
Page 55: Modes De Fonctionnement Et Guidage Par Menu
3 Mise en service du Puesta en marcha del 3.13 Modes de fonctionnement et guidage par menu Arrêt de l’enregistrement vidéo : Detener grabación de vídeo: REMARQUE : NOTA: REMARQUE : NOTA: Enregistrement exposition unique : Grabación de imágenes individuales: REMARQUE : NOTA: Arrêt sur image avec enregistrement... - Page 56 3 Inbetriebnahme des Installing the Videostreams auf der in die Aufnahme w HINWEIS: Die Durchführung des Löschvorganges wird durch einen Fortschritts- balken in der Menüleiste visualisiert. Taste solange drücken, bis der Fortschritts- balken in der Menüleiste vollständig durchgelaufen ist. HINWEIS: Die Durchführung des Löschvorganges wird durch einen Fortschrittsbalken in der Menüleiste visualisiert.
- Page 57 3 Mise en service du Puesta en marcha del 3.13 Modes de fonctionnement et guidage par menu Fonctions du niveau 2/Level 2 Level 2 Menu Lecture Lecture des enregistrements vidéo : Niveau 2A Faire défiler la liste vers le haut : Faire défiler la liste vers le bas : Lecture : Niveau 2B...
- Page 58 3 Inbetriebnahme des Installing the HINWEIS: Die Durchführung des Weißabgleichs wird durch einen Fortschritts- balken in der Menüleiste visualisiert. HINWEIS: angeschlossen ist oder der USB-Stick zu klein ist. HINWEIS: Die Einstellungen der Kameras für die Helligkeit, den Kontrast, die Sättigung und den Farbton werden auf die empfohlenen Werte zurückgesetzt. HINWEIS: Die Einstellungen für die Bildrotation, die Tastensperre und die Freeze-Funktion werden auf die Grundeinstellung zurückgesetzt.
- Page 59 3 Mise en service du Puesta en marcha del 3.13 Modes de fonctionnement et guidage par menu Niveau 2A Active les touches de commande du niveau suivant. Appuyer plusieurs fois sur le menu tournant pour avancer de plusieurs niveaux. Fonctions du niveau 3/Level 3 Level 3 Équilibrage des blancs : REMARQUE :...
- Page 60 3 Inbetriebnahme des Installing the Bildhelligkeit justiert werden kann. Der Helligkeitswert wird als Prozentzahl angezeigt und HINWEIS: Durch Drücken des Menü-Rades wird die Ebene der +/– Tasten wieder verlassen. HINWEIS: Durch Drücken des Menü-Rades wird die Ebene der +/– Tasten wieder verlassen.
- Page 61 3 Mise en service du Puesta en marcha del 3.13 Modes de fonctionnement et guidage par menu Fonctions du niveau 5/Level 5 Level 5 pourcentage et sauvegardée pour cette caméra. REMARQUE : et sauvegardé pour cette caméra. REMARQUE : Appuyer sur le menu tournant pour quitter à nouveau le niveau des touches +/–.
- Page 62 Videoendoskops an. Ist kein Videoendoskop angeschlossen, erscheint die Angabe N.C (not connected). HINWEIS: Ein Software-Update darf nur von einem autorisierten KARL STORZ Mitarbeiter durchgeführt werden. HINWEIS: Vor dem Start des Software-Updates sollte sichergestellt sein, dass der Akku geladen oder der TECHNO PORT Monitor ans Netz angeschlossen ist.
- Page 63 Cette fonction permet de déclencher la mise à jour du logiciel si l’on insère une carte comporte pas de logiciel. REMARQUE : KARL STORZ autorisé. REMARQUE : S’assurer avant de lancer la mise à jour du logiciel que l’a batterie est chargée ou que le moniteur TECHNO PORT est branché sur le secteur.
- Page 64 3 Inbetriebnahme des Installing the HINWEIS: Diese Funktion wird nur dann aktiviert, wenn die angeschlossene Kamera die Funktion unterstützt. gespeichert. HINWEIS: Nicht alle Kameras unterstützen diese Funktionalität. gespeichert. HINWEIS: Diese Funktion wird nur dann aktiviert, wenn die angeschlossene Kamera die Funktion unterstützt.
- Page 65 3 Mise en service du Puesta en marcha del 3.13 Modes de fonctionnement et guidage par menu Fonctions du niveau 9/Level 9 Level 9 caméra. REMARQUE : verrouillage activé (cadenas ouverts). sauvegardé pour cette caméra. REMARQUE : Cette fonction n’est pas prise en charge par toutes les caméras. Active les touches de commande du niveau suivant.
- Page 66 3 Inbetriebnahme des Installing the Plays back and deletes recorded video streams on Plays back the selected video stream. Pressing the button for an extended period deletes the video. After deletion, the list of video recordings is shown. NOTE: The deletion process is visualized by a progress bar in the menu bar. Keep the key held down until the progress bar in the menu bar is complete.
- Page 67 3 Mise en service du Puesta en marcha del 3.13 Modes de fonctionnement et guidage par menu Funciones del nivel 2/Level 2 Nivel 2 Menú de reproducción Reproducción de las grabaciones de vídeo: Nivel 2A Recorrer la lista hacia arriba: Recorrer la lista hacia abajo: Reproducir: Nivel 2B...
- Page 68 3 Inbetriebnahme des Installing the repeatedly pressing the menu wheel. Enables the user to carry out a manual white balance. Point the tip of the videoscope at a white surface and press the softkey. NOTE: The performance of a white balance is visualized via a progress bar in the menu bar.
- Page 69 3 Mise en service du Puesta en marcha del 3.13 Modes de fonctionnement et guidage par menu Nivel 2A regreso al nivel 1. regreso al nivel 1. Funciones del nivel 3/Level 3 Nivel 3 Balance de blancos: NOTA: forma manual. Dicha transferencia puede durar varios minutos. NOTA: El botón “Transferencia de datos”...
- Page 70 3 Inbetriebnahme des Installing the brightness can be adjusted. The brightness value is shown as a percentage and is saved for this camera. NOTE: can be adjusted. The contrast value is shown as a percentage and is saved for this camera.
- Page 71 3 Mise en service du Puesta en marcha del 3.13 Modes de fonctionnement et guidage par menu Funciones del nivel 5/Level 5 Nivel 5 puede ajustar el brillo de la imagen. El valor del brillo se muestra en forma de porcentaje NOTA: puede ajustar el contraste.
- Page 72 3 Inbetriebnahme des Installing the NOTE: Allows the time to be entered and corrected. After pressing the softkey, enter the hours repeatedly pressing the menu wheel. Displays the version number of the installed firmware version and the version number of the connected videoscope. If a videoscope is not connected, N.C. (not connected) appears on the display.
- Page 73 Funciones del nivel 8/Level 8 Nivel 8 Acerca de TECHNO PORT - VIDEOENDOSCOPIO: NOTA: Únicamente personal autorizado por KARL STORZ puede efectuar una actualización del software. NOTA: Antes de iniciar la actualización del software, asegúrese de que el acumulador está cargado o el monitor TECHNO PORT está conectado a la red.
- Page 74 3 Inbetriebnahme des Installing the NOTE: Allows the camera keys to be locked. The symbol changes (locks open) upon activation. Pressing again serves to unlock the keys. The setting is saved for this camera. NOTE: repeatedly pressing the menu wheel. same time, an image is saved.
- Page 75 3 Mise en service du Puesta en marcha del 3.13 Modes de fonctionnement et guidage par menu Funciones del nivel 9/Level 9 Nivel 9 NOTA: (candado abierto). NOTA: No todas las cámaras son compatibles con esta función. regreso al nivel 1. Funciones del nivel 10/Level 10 Nivel 10 NOTA:...
-
Page 76: Energy Management
3 Inbetriebnahme des Installing the 3.15 Energiemanagement 3.15 Energy management 3. 14 3. 14 Monitors monitor 2 briefly switches the monitor to standby mode. This allows 1 ober- light 1 above the power switch indicates that the device is in halb des Netzschalters angezeigt. - Page 77 3 Mise en service du Puesta en marcha del 3.14 3. 14 3. 14 REMARQUE : NOTA: Mise hors tension : Desconexión: 1 se vert 1 3. 15 3. 15 30 minutes 2 heures Batterie en cours de recharge inférieure à 50 % de la capacité maximale d’origine original.
- Page 78 3 Inbetriebnahme des Installing the 3.15 Energiemanagement 3.15 Energy management HINWEIS: Nach 20 Minuten ohne Tastenbedienung NOTE: After 20 minutes of keyboard inactivity the schaltet der Monitor in den Standby-Modus. monitor switches to standby mode. VORSICHT: Beschädigung des Netzkabels: Zum CAUTION: Damage to the power cord: To remove Entfernen des Netzkabels aus der Steckdose nur am the power cord from the socket, pull only on the plug...
- Page 79 3 Mise en service du Puesta en marcha del sur un pied a un soporte REMARQUE : NOTA: AVIS : ADVERTENCIA: NOTA: REMARQUE : NOTA: REMARQUE : control 1 3. 16 3. 16...
-
Page 80: Carrying Out A Reset
3 Inbetriebnahme des Installing the a cross section of less than 25 mm. Carrying out a reset If a system error occurs (device no longer reacts although connections and power supply are in order), a system reset entspricht dem Neustart eines Computers. Dazu wird ein this, a thin screwdriver or similar device is inserted into the pushed downward, in order to activate the reset button. - Page 81 3 Mise en service du Puesta en marcha del sur un pied a un soporte 3. 17 3. 17 3. 18 3. 18...
-
Page 82: Description Of The Device
4 Inbetriebnahme der Installing the T-CAM 4. 1 4. 1 Description of the device The T-CAM is a camera head for the transmission of und Datensignalen in der industriellen Endoskopie zur image and data signals in industrial endoscopy for use T-CAM camera head is equipped with a standard holding for processing image and control signals to external devices in industrial endoscopy. - Page 83 4 Mise en service de la Puesta en servicio de la 4. 1 4. 1 4. 2 4. 2 AVIS : ADVERTENCIA:...
-
Page 84: Controls, Displays, Connectors And Their Uses
4 Inbetriebnahme der Installing the T-CAM Bedienelemente, Anzeigen, Anschlüsse Controls, displays, connectors 4. 3 Bedienelemente, Anzeigen, 4. 3 Controls, displays, connectors and their uses Example of fiberscope Example of an endoscope telescope Camera device connecting cable with 8-pin camera head plug... - Page 85 4 Mise en service de la Puesta en servicio de la raccordements et leurs fonctions conexiones y sus funciones 4. 3 4. 3 conexiones y sus funciones...
-
Page 86: Preparing The Device For Use
4 Inbetriebnahme der Installing the T-CAM 4. 4 4. 4 Preparing the device for use Das Anschlusskabel 5 The connecting cable 5 of the T-CAM camera head is processing image and control signals to external devices in industrial endoscopy. Endoskopie. Connect a fiberscope or endoscope (borescope) to the quick-release coupling 3 and focus the image. - Page 87 4 Mise en service de la Puesta en servicio de la 4. 4 4. 4 REMARQUE NOTA: REMARQUE : NOTA: REMARQUE : NOTA: au moins.
- Page 88 4 Inbetriebnahme der Installing the T-CAM and be damaged. Always coil the cable slowly and carefully. abrollen. avoiding extreme impacts to the device. When transporting, use the original shipping box to prevent damage to the device. vermeiden.
- Page 89 4 Mise en service de la Puesta en servicio de la...
- Page 90 5 Inbetriebnahme des Installing the Bedienelemente, Anzeigen, Anschlüsse Controls, displays, connectors 5. 1 5. 1 Description of the device The exact scope of supply is listed under chapter '5. 2 integrierten, 2 Meter langen Versorgungskabels an den sheath which has a diameter of 4 mm, is made of Durchmesser aus Pellethane und einen Arbeitskanal mit Pellethane and has a working channel with a diameter (polyetheretherketone) and has a diameter of 4 mm.
- Page 91 5 Mise en service du Puesta en marcha del raccordements et leurs fonctions conexiones y sus funciones 5. 1 5. 1 vaina flexible. 5. 2 5. 2 toutes les informations garantissant une mise en œuvre sûre moniteur. AVIS : ADVERTENCIA: «...
- Page 92 5 Inbetriebnahme des Installing the Bedienelemente, Anzeigen, Anschlüsse Controls, displays, connectors 5. 3 Bedienelemente, Anzeigen, 5. 3 Controls, displays, connectors and their uses Anschlusskabel Connecting cable Anschluss für Dichtigkeitsprüfer oder Connection for leakage tester or pressure Druckausgleichskappe (Entlüftungsstutzen) compensation cap (vent port) Absaugzylinder Handgriff Handle...
- Page 93 5 Mise en service du Puesta en marcha del raccordements et leurs fonctions conexiones y sus funciones 5. 3 5. 3 conexiones y sus funciones 5. 4 5. 4 AVERTISSEMENT : CUIDADO:...
- Page 94 5 Inbetriebnahme des Installing the VORSICHT: Der einwandfreie Zustand des CAUTION: Whenever the VIDEOSCOPE is used, VIDEOENDOSKOPS sowie des in Kombination verwendeten Zubehörs ist vor jeder Anwendung zu used in combination with it, are in perfect condition. überprüfen. Beschädigte VIDEOENDOSKOPE bzw. Damaged VIDEOSCOPES or damaged accessories beschädigtes Zubehör dürfen nicht verwendet wer- must not be used.
- Page 95 5 Mise en service du Puesta en marcha del AVIS : ADVERTENCIA: AVIS : ADVERTENCIA: AVIS : ADVERTENCIA: REMARQUE : NOTA: L’extrémité distale mobile El extremo distal móvil de la vaina chemise. REMARQUE : il est donc nécessaire de protéger NOTA: Por este motivo, debe proteger plus particulièrement l’extrémité...
- Page 96 5 Inbetriebnahme des Installing the VORSICHT: CAUTION: muss optisch und durch vorsichtiges Abtasten unter- inspected visually and by carefully feeling it, to detect sucht werden, um Risse, Schnitte, Einbuchtungen, any cracks, cuts, dents, foreign bodies or other forms Fremdkörper oder andere Schäden festzustellen. of damage.
- Page 97 5 Mise en service du Puesta en marcha del Contrôle des surfaces Verificación de las superficies AVIS : ADVERTENCIA: AVIS : ADVERTENCIA: Contrôle de la déflexion Verificación de la deflexión AVIS : ADVERTENCIA: AVIS ADVERTENCIA:...
-
Page 98: Bedienung Und Handhabung
5 Inbetriebnahme des Installing the 5. 5 Bedienung und Handhabung 5. 5 Die folgenden Angaben dienen der korrekten Bedienung und The following instructions outline the correct operation accessories. Abbildung in die linke oder rechte Hand nehmen. Mit einem hand, as shown in the picture. With this kind of control grip, Hand bedient werden. - Page 99 5 Mise en service du Puesta en marcha del 5. 5 5. 5 Position correcte Sujeción correcta Manipulation de la chemise Manipulación de la vaina AVIS : ADVERTENCIA: AVIS : ADVERTENCIA: Manipulation du mécanisme de déflexion Manipulación del mecanismo deflector REMARQUE : NOTA: AVIS :...
- Page 100 5 Inbetriebnahme des Installing the Do not force instruments or cleaning brushes through the channels. This can lead to damage to the sheath, especially if the tip of the instrument is deflected. When connecting and operating light sources, pay attention to the instruction manuals for the particular devices.
- Page 101 5 Mise en service du Puesta en marcha del Manipulation du canal de travail Manipulación del canal de trabajo AVIS : ADVERTENCIA: AVIS : ADVERTENCIA: AVIS : ADVERTENCIA: 5. 6 5. 6 AVERTISSEMENT : CUIDADO:...
- Page 102 5 Inbetriebnahme des Installing the Das Anschlusskabel 1 Insert the connecting cable 1 Das Anschlusskabel 1 The connecting cable 1 can be connected or disconnected tiert oder diskonnektiert werden. during operation. Connect the cable of the power supply up to the connection des Monitors einstecken und das Netzteil mit einer socket on the monitor and plug it into the power supply.
- Page 103 5 Mise en service du Puesta en marcha del AVIS : ADVERTENCIA: Mise au point de l’image du VIDÉOENDOSCOPE Enfoque de imagen del VIDEOENDOSCOPIO manual. Touches de commande du VIDÉOENDOSCOPE Teclas de función del VIDEOENDOSCOPIO AVERTISSEMENT : CUIDADO: AVIS : ADVERTENCIA: NOTA: REMARQUE :...
-
Page 104: Checking The Image Quality
5 Inbetriebnahme des Installing the The functions can also be performed via the control keys and menu navigation. HINWEIS: Die Wiedergabe des Videostreams am NOTE: The video stream can only be viewed on a PC ist nur möglich, wenn auf dem PC ein MPEG PC if an MPEG 4-codec is installed on the PC. - Page 105 5 Mise en service du Puesta en marcha del REMARQUE : NOTA: 5. 7 5. 7 AVIS : ADVERTENCIA: 5. 8 5. 8 NOTA: REMARQUE :...
- Page 106 6 Inbetriebnahme des Installing the Bedienelemente, Anzeigen, Anschlüsse Controls, displays, connectors 6. 1 6. 1 Description of the device 6. 2 6. 2 and its accessories from their packaging. Check the delivery complaints immediately with the manufacturer or supplier. If possible, retain the original packaging materials for later use;...
- Page 107 6 Mise en service du Puesta en marcha del raccordements et leurs fonctions conexiones y sus funciones 6. 1 6. 1 6. 2 6. 2 ADVERTENCIA: AVIS : 6. 3 6. 3 conexiones y sus funciones R T Y...
-
Page 108: Installation And Interfaces
HINWEIS: Die im Lieferumfang enthaltene NOTE: The KARL STORZ video editor software KARL STORZ Video Editor Software kann für die included in the scope of supply can be used to Darstellung und Aufzeichnung des Videostreams ver- display and record the videostream. -
Page 109: Installation Et Interfaces
6 Mise en service du Puesta en marcha del 6. 4 6. 4 REMARQUE NOTA: 6. 5 Installation et interfaces 6. 5 funcionamiento correcto y seguro. AVIS : ADVERTENCIA: Branchement du bloc d’alimentation Conexión de la fuente de alimentación alimentation sur secteur. Branchement du TECHNO HUB sur un moniteur Conexión de TECHNO HUB con el monitor REMARQUE :... - Page 110 6 Inbetriebnahme des Installing the Prozessor: Pentium II, 2,4 GHz Processor: Pentium II, 2.4 GHz video units. Connect a supported camera to the camera connection. The following cameras are currently supported: unterstützt: 1-xx 01-xx Perform a white balance before every use. To do this, hold the connected camera in front of a white, non-reflective object (e.g., white sheet) and press the white balance button.
- Page 111 6 Mise en service du Puesta en marcha del Équipement minimum du système Requisitos mínimos del sistema Branchement de la caméra Conexión de la cámara 1001-xx Réalisation d’un équilibrage des blancs Realización del balance de blancos Touche de service Tecla de servicio...
-
Page 112: Maintenance, Care And Cleaning
Maintenance, care and cleaning Preventive maintenance of the devices is not essential. potential problems before they become serious, thus enhancing the device's reliability and extending its useful service life. Maintenance services can be obtained from your Gebietsvertretung oder beim Hersteller erfragt werden. local representative or from the manufacturer. - Page 113 appareils aparatos 7. 1 7. 1 Maintenance Mantenimiento fabricante. Entretien Conservación accesorios. Nettoyage du moniteur TECHNO PORT et du TECHNO Limpieza del monitor TECHNO PORT y del TECHNO HUB NOTA: REMARQUE : Limpieza del cabezal de cámara T-CAM Nettoyage de la tête de caméra T-CAM NOTA: REMARQUE : NOTA:...
- Page 114 WARNUNG: Das VIDEOENDOSKOP darf nicht im WARNING: The VIDEOSCOPE must not be cleaned Ultraschallbad gereinigt werden. in an ultrasound bath. WARNUNG: WARNING: VORSICHT: Das VIDEOENDOSKOP darf keinesfalls CAUTION: Never immerse the VIDEOSCOPE in a in physiologische Kochsalzlösung eingelegt werden, normal saline solution, since even brief contact can da bereits kurzzeitiger Kontakt zu Lochfraß...
- Page 115 appareils aparatos AVERTISSEMENT : CUIDADO: AVERTISSEMENT : CUIDADO: AVIS : ADVERTENCIA: ADVERTENCIA: AVIS : AVIS : ADVERTENCIA: Brossage du canal Cepillado del canal...
- Page 116 VORSICHT: Das VIDEOENDOSKOP nicht im CAUTION: Do not expose the VIDEOSCOPE to direkten Sonnenlicht oder in einer extrem heißen direct sunlight or excessive heat. Umgebung aufbewahren. VORSICHT: CAUTION: VORSICHT: CAUTION: VORSICHT: Der Schaft des VIDEOENDOSKOPS CAUTION: The sheath of the VIDEOSCOPE darf keinesfalls geknickt oder in zu enge Schlingen must never be kinked or coiled up too tightly.
- Page 117 appareils aparatos Rangement Almacenamiento AVIS : ADVERTENCIA: AVIS : ADVERTENCIA: AVIS : ADVERTENCIA: AVIS : ADVERTENCIA:...
- Page 118 Geräte darf nur durch KARL STORZ Endoskope KARL STORZ Endoskope or by persons authorized oder durch Personen vorgenommen werden, die by KARL STORZ Endoskope. Only original parts from durch KARL STORZ Endoskope autorisiert sind. KARL STORZ Endoskope may be used for repairs.
- Page 119 7. 2 7. 2 Contrôle visuel : Inspección visual: entraver leur bon fonctionnement. funcionamiento. 7. 3 7. 3 AVIS : ADVERTENCIA: AVIS : ADVERTENCIA: AVERTISSEMENT : ADVERTENCIA: Programme de réparation KARL STORZ Programa de reparaciones de KARL STORZ...
-
Page 120: Entsorgung
CAUTION: The devices must not be opened. den. Die Instandsetzung defekter Geräte darf nur Defective units must only be repaired by durch KARL STORZ Endoskope oder durch Perso- KARL STORZ Endoskope or by persons authorized nen vorgenommen werden, die durch KARL STORZ by KARL STORZ Endoskope. -
Page 121: Élimination
appareils aparatos 7. 4 Élimination 7. 4 7. 5 7. 5 e 117. na 117. AVERTISSEMENT : CUIDADO: AVIS : ADVERTENCIA:... - Page 122 Isopropylalkohol (100 %) befeuchtetes schmutzt. T-CAM ausstecken und (bei angeschlossener T-CAM) Isopropylalkohol (100 %) befeuchtetes Isopropylalkohol (100 %) befeuchtetes Netzverbindung herstellen. tioniert nicht Netzversorgung ausgefallen Versorgungsnetz überprüfen. oder T-CAM) nicht ganz eingesetzt durchführen. Videoeinheit defekt Monitor nicht korrekt Gebrauchsanweisung des Monitors). gebrochen.
- Page 123 appareils aparatos Exemple de dysfonctionnement Causes possibles Solutions insuffisante blancs.
- Page 124 in der Menüleiste nicht angezeigt. oder nicht geeignet. haben. MPEG-4-Codec auf dem PC installieren formatieren MPEG-Codec auf dem PC installiert. PC-Bildschirm wiedergeben.
- Page 125 appareils aparatos Exemple de dysfonctionnement Causes possibles Solutions...
- Page 126 Cloudy picture, stripes, streaks, or similar Distal object lens misted or lens soiled distal lens with cotton tip applicator moistened with isopropyl alcohol (100%). for repair. Clean contacts Cloudy picture, stripes, steaks, or similar Camera objective lens misted or lens Withdraw T-CAM and clean camera (with T-CAM connected) soiled...
- Page 127 appareils aparatos Descripción del error Causas posibles Solución lente sucia lente sucia funciona blancos. memoria.
- Page 128 Color rendering alternates Memory card is not recognized (standard). Image cannot be saved. The icon is not displayed in the menu bar. or unsuitable. stick may only have one partition. No MPEG-4 Codec installed. Install an MPEG-4 Codec on the PC Video stream cannot be played back on the No MPEG-4 Codec installed.
- Page 129 appareils aparatos Descripción del error Causas posibles Solución memoria...
-
Page 130: Technische Daten
8 Technische Daten Technical data 8. 1 8. 1 Abmessungen: 230 x 155 x 54 mm Dimensions: 230 x 155 x 54 mm Höhe) Height) Gewicht: 1250g Weight: 1250g Tropfwasserschutz: IP54 Drip water protection: IP54 VORSICHT: Der CAUTION: Drip- Tropfwasserschutz water protection kann nur gewähr- can only be... -
Page 131: Données Techniques
8 Données techniques Datos técnicos 8. 1 8. 1 230 x 155 x 54 mm 230 x 155 x 54 mm hauteur 1250 g 1 250 g IP54 Protection contre les IP54 ADVERTENCIA: AVIS : 1280 x 800 1280 x 800 150 mm 150 mm 94 mm... - Page 132 Sie sich bitte über die please contact the Technical Support via the German deutsche KARL STORZ Website (www.karlstorz.com) KARL STORZ website at www.karlstorz.com. an den Technischen Support.
- Page 133 8 Données techniques Datos técnicos Chargeur ET27-30-0004515 Cargador ET27-30-0004515 Protection contre les IP40 IP40 env. 87 x 52 x 33 mm env. 130 g Peso AVIS : ADVERTENCIA: REMARQUE : NOTA: Remarques relatives aux logiciels libres : Nota sobre software de código abierto: REMARQUE : NOTA: REMARQUE :...
- Page 134 8 Technische Daten Technical data Betriebsbedingungen: 0 °C bis 40 °C Ambient temperature 0°C to 40°C Humidity Atmosph. Druck Atmosph. pressure Transportbedingungen conditions -10 °C bis 60 °C Ambient temperature -10°C to 60°C Humidity (nicht kondensierend) (non-condensing) Atmosph. Druck Atmosph. pressure 8.
- Page 135 8 Données techniques Datos técnicos Conditions de service, de stockage et de transport Condiciones servicio, almacenamiento y transporte Pression 700 a 1080 hPa Pression 8. 3 8. 3 65 cm 65 cm Éclairage Peso 385 g 385 g IPX8 Protection contre les IPX8 notamment exclus le Condiciones de servicio/almacenamiento...
- Page 136 8 Technische Daten Technical data VORSICHT: Die Angaben über den atmosphärischen CAUTION: Druck können nur gewährleistet werden, wenn wäh- atmospheric pressure can only be guaranteed if the rend des Transports die Druckausgleichskappe auf den Entlüftungsstutzen montiert ist. during transportation. 8. 4 8.
- Page 137 8 Données techniques Datos técnicos AVIS : ADVERTENCIA: 8. 4 8. 4 140 x 111 x 44 mm 140 x 111 x 44 mm largeur x hauteur Peso env. 420 g IP 20 IP 20 Condiciones servicio, almacenamiento y transporte Conditions de service, de stockage et de transport 30% a 70% 30 % à...
- Page 138 Die in dieser Gebrauchsanweisung beschriebenen elektri- The electrical products described in this manual bear the CE mark and comply with the relevant directives and standards. Type of protection against electric shock: Protection Class II Type of protection against electric shock: Protection class III...
- Page 139 directives et normative directivas y normas Moniteur TECHNO PORT 80407, TECHNO HUB 80408 Monitor TECHNO PORT 80407, TECHNO HUB 80408 Selon les normes EN/CEI 61010-1, UL 61010-1; Según EN/CEI 61010-1, UL 61010-1; CAN/CSA-22.2 N° 61010-1, EN/CEI 62471, directive CAN/CSA-22.2 n.º 61010-1, EN/CEI 62471, RoHS 2011/65/EU directiva RoHS 2011/65/UE Tête de caméra T-CAM 80407 CA,...
- Page 140 10 Hinweise zur 10 Information on elektromagnetischen Electromagnetic The immunity to electromagnetic interference of the bestanden nach IEC 61326-1 in einer grundlegenden elek- Bildstörungen kommen oder die Notwendigkeit bestanden nach IEC 61326-1 in einer beherrschten elekt- bestanden nach IEC 61326-1 in einer industriellen elekt- Bildstörungen kommen oder die Notwendigkeit Interference immunity for use...
- Page 141 la compatibilité compatibilidad électromagnétique (CEM) electromagnética (CEM) Test d’immunité Résultat des contrôles Remarque concernant l’environnement électromagnétique – Directives Ensayo de inmunidad Resultado del ensayo Observación sobre entorno electromagnético – Directrices...
- Page 142 10 Hinweise zur 10 Information on elektromagnetischen Electromagnetic The immunity to electromagnetic interference of the geprüft. bestanden nach IEC 61326-1 in einer grundlegenden elek- Bildstörungen kommen oder die Notwendigkeit bestanden nach IEC 61326-1 in einer beherrschten elekt- bestanden nach IEC 61326-1 in einer industriellen elekt- Bildstörungen kommen oder die Notwendigkeit Interference immunity for use...
- Page 143 la compatibilité compatibilidad électromagnétique (CEM) electromagnética (CEM) Test d’immunité Résultat des contrôles Remarque concernant l’environnement électromagnétique – Directives Ensayo de inmunidad Resultado del ensayo Observación sobre entorno electromagnético – Directrices...
- Page 144 10 Hinweise zur 10 Information on elektromagnetischen Electromagnetic The immunity to electromagnetic interference of the T-CAM The immunity to electromagnetic interference of the T-CAM geprüft. bestanden nach IEC 61326-1 in einer grundlegenden elek- Bildstörungen kommen oder die Notwendigkeit bestanden nach IEC 61326-1 in einer beherrschten elekt- bestanden nach IEC 61326-1 in einer industriellen elekt-...
- Page 145 la compatibilité compatibilidad électromagnétique (CEM) electromagnética (CEM) Test d’immunité Résultat des contrôles Remarque concernant l’environnement électromagnétique – Directives Ensayo de inmunidad Resultado del ensayo Observación sobre entorno electromagnético – Directrices...
- Page 146 10 Hinweise zur 10 Information on elektromagnetischen Electromagnetic The immunity to electromagnetic interference of the T-CAM geprüft. bestanden nach IEC 61326-1 in einer grundlegenden elek- Bildstörungen kommen oder die Notwendigkeit bestanden nach IEC 61326-1 in einer beherrschten elekt- bestanden nach IEC 61326-1 in einer industriellen elekt- Bildstörungen kommen oder die Notwendigkeit Interference immunity for use...
- Page 147 la compatibilité compatibilidad électromagnétique (CEM) electromagnética (CEM) Test d’immunité Résultat des contrôles Remarque concernant l’environnement électromagnétique – Directives Ensayo de inmunidad Resultado del ensayo Observación sobre entorno electromagnético – Directrices...
-
Page 148: Garantie, Technische
11 Garantie, technische 11 Warranty, technical The warranty is valid for two years from the date when the give further details. or modifications to the equipment by unauthorized persons performance. If such action is taken, all warranty claims will become void. Any damage to the unit resulting from incorrect operation is not covered by the warranty. - Page 149 technique técnica...
-
Page 150: Ersatzteilliste
12. 1 Ersatzteilliste 12. 1 11025 E 11025 E 12. 2 12. 2 up to 24 mm in diameter and rails up to 25 mm in height 25 mm Höhe Höhe 120 cm, mit height 120 cm, rollable, with five legs and anti-static casters, crossbar 25 cm x diameter 25 mm, des Monitors, mit Ablagekorb... -
Page 151: Accessoires Recommandés
rechange, accessoires accesorios 12.2 Accessoires recommandés 12.2 Accesorios recomendados 12. 1 12. 1 Article N° de cde Artículo N.° de pedido Capuchon d’équilibre de 11025 E Tapón de compensación 11025 E pression de presiones 12. 2 12. 2 Article N° de cde Artículo N.°... - Page 152 12. 2. 1 Artikelbestellung 12. 2. 1 'Technical Endoscopes' catalog. This catalog is available on anfordern bei: request from: Industrial Group Industrial Group E-Mail: industrialgroup@karlstorz.com E-mail: industrialgroup@karlstorz.com Internet: www.karlstorz.com Internet: www.karlstorz.com HINWEIS: Konstruktionsänderungen, insbesondere NOTE: We reserve the right to make engineering im Zusammenhang mit der Weiterentwicklung und Verbesserung unserer Geräte, behalten wir uns vor.
- Page 153 rechange, accessoires accesorios 12. 2. 1 12. 2. 1 .com NOTA: REMARQUE :...
- Page 156 Germany E-mail: industrialgroup@karlstorz.com Internet: www.karlstorz.com...