
Manuels Connexes pour Warm Tech PAP24000


Sommaire des Matières pour Warm Tech PAP24000
- Page 1 PAP24000 / PAP30000 / PAP24001 FR POELE A GRANULES AUTONOME NL VRIJSTAANDE PELLETKACHEL GB FREESTANDING PELLET STOVE 2011...
-
Page 2: Table Des Matières
POELE A GRANULES AUTONOME (VEUILLEZ CONSERVER CES INSTRUCTIONS POUR CONSULTATION FUTURE) UNE VIE DE CHALEUR *Veuillez lire ce manuel en entier avant d'installer et d'utiliser ce poêle de chauffage à granules. Le non-respect de ces instructions peut entraîner des dommages matériels, des blessures corporelles ou même la mort. -
Page 3: Exigences Posées Au Combustible
1. Exigences posées au combustible Avant d'expliquer le fonctionnement du poêle, le combustible utilisé par le poêle doit être brièvement présenté, vu qu'il est en relation avec les performances du poêle. (Votre poêle à granules a été conçu pour brûler des granules de bois uniquement. N'utilisez pas d'autre type de combustible, ce qui annulerait la toutes les garanties accordées dans ce manuel.) La qualité... - Page 4 CENDRES : La teneur en cendres du combustible et le fonctionnement de votre poêle détermineront directement la fréquence de nettoyage. L'utilisation de combustibles à teneur élevée en cendres peut rendre nécessaire de nettoyer le poêle tous les jours. Un combustible à basse teneur en cendres peut permettre des intervalles plus longs entre les nettoyages.
- Page 5 Cet appareil n'est pas destiné à l'utilisation par des personnes (y compris des enfants) avec des aptitudes physiques, sensorielles ou mentales réduites, ni ayant un manque d'expérience et de connaissance, à moins qu'elles ne soient sous la supervision ou n'aient reçu des instructions d'une personne responsable de leur sécurité : les enfants doivent être surveillés afin de s'assurer qu'ils ne jouent pas avec l'appareil.
-
Page 6: Caractéristiques Du Poêle
élevé et une faible production de cendres durant la combustion. Le poêle se ferme automatiquement en cas de combustion incorrecte ou de manque de combustible. Ses avantages sont un grand débit de chaleur, un échauffement rapide et de faibles coûts de combustible. 1. Performances principales Modèle PAP24000 Dimension (LxHxP) 449x918x486 Poids Conduit d'entrée d'air... - Page 7 Modèle PAP24001 Dimension (LxHxP) 558x712x584 Poids Conduit d'entrée d'air Conduit de sortie d'air Surface de chauffe Temps de combustion automatique (min.-max.) 15/24 Combustible Granules de bois Consommation de granules (min.-max.) KG/H 0,5/1,3 Rendement Capacité de la trémie Consommation électrique 100-400 Tension et fréquence nominales V/Hz 230/50-115/60-...
-
Page 8: Instructions Sur La Structure
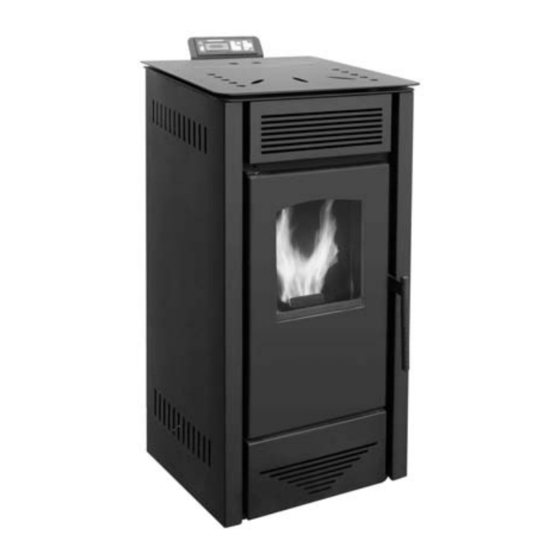
3. Instructions sur la structure Le poêle comporte les éléments principaux suivants : (PAP24000 A TITRE D'EXEMPLE) 1. Couvercles de la trémie 2. Trémie 3. Vis sans fin 5. Ventilateur de convection 4. Moteur de la vis sans fin 6. Conduit d'échappement 7. Ventilateur d'échappement 8. Couvercle avant 9. Cendrier 10. -
Page 9: Interrupteur De Dépression
INTERRUPTEUR DE DÉPRESSION Le POÊLE a un interrupteur de dépression situé derrière la porte de gauche, fixé à la base. Si une basse pression est créée dans le foyer par une fuite, l'ouverture de la porte avant, un conduit de cheminée bloqué... -
Page 10: Installation Du Poêle À Granules
4. Installation du poêle à granules TOUTES LES RÉGLEMENTATIONS NATIONALES ET LOCALES ET NORMES EUROPÉENNES SERONT RESPECTÉES LORS DE L'INSTALLATION DE L'APPAREIL Avant d'installer un poêle dans un local, sélectionner le poêle approprié capable de chauffer la pièce. Veuillez contrôler la surface de chauffe des POÊLES dans le chapitre des CARACTÉRISTIQUES DE POÊLES. - Page 11 2. Installation de l'entrée d'air et du conduit d'échappement Plusieurs exemples, donnés pour le modèle NB-P15, sont montrés ci-après Horizontalement et vers le haut, Horizontalement (non recommandé : lorsque le bloc électronique est désactivé, la fumée peut sortir si le poêle est enclenché)
- Page 12 Horizontalement et vers le haut à travers l'avant-toit La distance entre la paroi et le poêle lorsqu'il est installé dans la maison (MM)
- Page 13 Le diamètre du conduit d'entrée d'air du poêle est de 50 mm, le diamètre du conduit d'échappement est de 80 mm. La longueur totale des conduits ne dépasse pas 3 m et il n'y a pas de coudes. Les joints du conduit d'échappement intérieur devraient être étanchés à la silicone afin d'empêcher la fuite de fumée vers le local.
- Page 14 Exigences d'aboutissement du conduit d'échappement (1) Ne laissez pas aboutir le conduit d'échappement dans des zones fermées ou semi-fermées telles qu'un abri à voitures, un garage, une mansarde, une galerie technique, une galerie étroite, une zone étroitement clôturée, en dessous d'une terrasse ou d'un porche, ni tout emplacement susceptible de donner lieu à...
-
Page 15: Voici Quelques Exemples D'installation Dans Différentes Situations
Plus le conduit est long et plus il y a de coudes, plus grande est la résistance à l'écoulement des gaz de combustion. On recommande un diamètre de conduit à granules de quatre pouces pour les longueurs de conduit supérieures à 15 pieds ou si on utilise plusieurs coudes. NE PAS INSTALLER DE REGISTRE DE TIRAGE DANS LE CONDUIT D'ÉCHAPPEMENT DE CET APPAREIL. -
Page 16: Limiteurs De Surtension
* Installations dans des mobiles homes Les exigences suivantes sont d'application pour l'installation du POÊLE dans des mobiles homes. 1) La connexion du POÊLE à l'air de combustion extérieur est optionnelle, sauf dans des installations de mobile homes et lorsque cela est exigé par des codes de construction locaux. La prise d'air du poêle accepte un conduit de 3”... - Page 17 Ne pas faire fonctionner l'appareil si la vitre avant est démontée, fissurée ou cassée. Le remplacement de la vitre doit être effectué par un technicien de maintenance qualifié. WARM TECH, ses employés ainsi que tout représentant de celle-ci, déclinent toute responsabilité en cas de dommages causés par un état inapte au fonctionnement, inadéquate ou état dangereux découlant de procédures de...
-
Page 18: Fonctionnement
5. Fonctionnement TOUTES LES RÉGLEMENTATIONS NATIONALES ET LOCALES ET NORMES EUROPÉENNES SERONT RESPECTÉES LORS DU FONCTIONNEMENT DE L'APPAREIL 1.) Le premier allumage Lors de la première mise en service, la peinture peut être éliminée par combustion. Ceci peut donner lieu au dégagement d'une mauvaise odeur. Veuillez ouvrir la fenêtre et la porte pour évacuer l'odeur. Note : pour un poêle neuf, lors de la première utilisation, il est nécessaire de placer au préalable une poignée de granules de bois dans le foyer. - Page 19 De la même manière, appuyer sur , puis ce message est affiché pendant la période de mise hors service : Lorsque la température dans le poêle est finalement inférieure à 30 degrés, la phrase ‘GOODBYE’ est affichée. !! ATTENTION !! Durant la phase de mise hors service et le refroidissement de l'échangeur, il n'est pas possible de remettre l'appareil de chauffage en service avant la fin de cette opération ;...
- Page 20 Deuxièmement, Troisièmement, La première phase de démarrage est affichée par le message ‘FEED’. Lors de cette phase sont effectuées les opérations de vérification de la cheminée et des granules sont chargés dans le foyer. La phase successive est affichée par l'inscription « Lighting ». Lors de cette phase apparaissent les premières flammes.
-
Page 21: Variation De L'intensite De La Flamme
!! ATTENTION !! Lorsque l'appareil de chauffage est mis hors service, la flamme continue d'être présente jusqu'à l'épuisement du combustible dans le foyer, cette phase gère automatiquement les deux ventilateurs et a une durée de jusqu'à 5-8 minutes. La phase de mise hors service est affichée par le message « SWITCHING OFF » présent jusqu'à... -
Page 22: Reglage De La Temperature De Consigne
PUISSANCE MOYENNE P2 PUISSANCE MAXIMUM P1 STADE ECO Si la température ambiante dépasse la température de consigne, le poêle est automatiquement arrêté ou se met à la puissance minimum afin d'économiser l'énergie. Cela se présente comme suit : Lorsque la température ambiante redescend en dessous de la température de consigne, le poêle se remet automatiquement en service ou revient au niveau de puissance antérieur. -
Page 23: Reglage De L'horloge
3.) Comment régler l'appareil REGLAGE DE l'HORLOGE Appuyer sur les touches pendant jusqu'à 2 secondes, l'horloge est sélectionnée à l'écran : Vous pouvez régler les semaines avec les touches , en maintenant la touche enfoncée Pour régler l'heure, utiliser également pour sélectionner les valeurs correctes. -
Page 24: Regler La Minuterie
REGLER LA MINUTERIE Les mots suivants vont apparaître à l'écran Avec cette fonction, vous programmez l'appareil de chauffage pour une programmation hebdomadaire, en combinant la mise en service et la mise hors service à des moments prédéfinis. Vous pouvez programmer une mise en service et une mise hors service journalières pour toute la semaine. - Page 25 Réglage du mode ECO Maintenir la touche enfoncée pour faire apparaître les mots suivants : Appuyer sur la touche pour sélectionner le Mode 1 ou le Mode 0, le Mode 1 est pour régler la puissance minimale, le Mode 0 pour arrêter le poêle. Sélectionner le Blower Aux Maintenir la touche enfoncée pour faire apparaître les mots suivants...
- Page 26 !! ATTENTION !! Si les mots suivants s'affichent, tels que : Cela signifie que le capteur de température élevée présente un problème. Par exemple : 1. l'interrupteur est cassé, 2. La température est trop élevée pour que le poêle fonctionne correctement Ceci signifie un défaut au démarrage.
- Page 27 Cela signifie qu'il y a des problèmes avec l'interrupteur de dépression. Par exemple, la porte n'est pas fermée correctement La vitesse du ventilateur de combustion devrait augmenter. Il y a une fuite au poêle etc. !! ATTENTION !! pour quitter l'état du programme. Sinon, continuer d'appuyer sur Vous pouvez appuyer sur Si les mots suivants s'affichent, tels que : Cela signifie que le capteur de température 1 est en court-circuit.
-
Page 28: Commande À Distance
Cela signifie que le circuit du capteur de température 2 est ouvert. Cela signifie que le capteur de température 3 est en court-circuit. Cela signifie que le circuit du capteur de température 3 est ouvert. COMMANDE À DISTANCE Mini commande à distance... -
Page 29: L'utilisation De Bois De Corde Est Défendue Par La Loi
4.) Sécurité (1) Le poêle va se mettre hors service et le feu sera éteint vu que le poêle diminue jusqu'à la (T1) température de sécurité, (2) Le poêle sera mis à l'arrêt lorsque le thermodisque (pour la trémie) T2≥70˚C (3) Si le conduit d'échappement est bloqué, le témoin de conduit d'échappement est allumé... - Page 30 SUIE : le fonctionnement du poêle avec un apport insuffisant d'air de combustion entraînera la formation de suie, qui s'accumule sur la vitre, l'échangeur de chaleur, le système de conduit d'échappement et peut salir l'extérieur de la maison. Ceci est une situation dangereuse et inefficiente. Contrôlez fréquemment le poêle et éliminez la poussière à...
-
Page 31: Maintenance
6. Maintenance Débrancher et laisser refroidir le POÊLE avant d'effectuer la maintenance ou le nettoyage. Certaines marques de granules produisent plus de cendres et de clinkers que d'autres. Dès lors, la fréquence des procédures de nettoyage suivantes dépend largement de la qualité des granules brûlés. Le non- nettoyage de cet appareil entraînera une mauvaise combustion et conduira à... -
Page 32: Nettoyage De La Vitre
NETTOYAGE DE LA VITRE Attention: ne pas ouvrir la porte avant lorsque le poêle est chaud. Pour ouvrir la porte, suivre les deux premières étapes décrites dans Dépose de la porte avant. Nettoyer la vitre avec un chiffon doux ou une serviette en papier et du Windex ou un produit de nettoyage de fenêtre de poêle à... -
Page 33: Nettoyage Des Conduits De Gaz D'échappement
NETTOYAGE DES CONDUITS DE GAZ D'ÉCHAPPEMENT Le nettoyage des conduits de gaz d'échappement doit être fait une fois par an. La combustion de granules à teneur en cendres élevée peut rendre nécessaire d'effectuer ce nettoyage plus souvent. Nettoyer ces conduits uniquement lorsque le poêle et les cendres sont froids afin de ne pas provoquer un incendie dans l'aspirateur en aspirant des cendres chaudes. -
Page 34: Nettoyage Du Conduit D'échappement
NETTOYAGE DU CONDUIT D'ÉCHAPPEMENT Suie et cendres volantes : formation et nécessité de les éliminer Les produits de combustion contiennent de petites particules de cendres volantes qui s'accumulent dans le système d'échappement et réduisent le débit des gaz de combustion. Une combustion incomplète, telle qu'elle se produit durant le démarrage, l'arrêt, ou un fonctionnement incorrect du chauffage d'ambiance conduisent à... -
Page 35: Dépannage
7. Dépannage Le panneau de commande du poêle a des capteurs de dépannage. Lorsque le capteur détecte des températures de fonctionnement anormales (inférieures à 30˚C), ou si la température du capteur est supérieure à 70˚C, les thermocontacts d'autorégulation vont réagir en conséquence. Si la température est inférieure à... - Page 36 A. Pour le premier stade L'unité d'alimentation est Contrôler si la vis sans fin est bloquée ou (durant les quelques premières bloquée. non. minutes) Il y a un problème de Contrôler si la vis de fixation entre la vis connexion entre le sans fin et le moteur est desserrée ou non.
- Page 37 conduit d'échappement sont bloqués ou non et les nettoyer. Remplacer les conduits par des conduits de plus grand diamètre si les conduits sont trop longs et affectent la combustion. Augmenter la vitesse du ventilateur de combustion Appeler le distributeur pour réinitialiser le programme 7.
-
Page 38: Fonctionnement Du Générateur Electrique
FONCTIONNEMENT DU GÉNÉRATEUR ELECTRIQUE Votre poêle peut être alimenté à l'aide d'un générateur électrique à gaz. Cependant, le régulateur électrique du générateur peut ne pas être compatible avec l'électronique du poêle. Plus la qualité du générateur est élevée, plus grande est la chance qu'il soit compatible avec le poêle. -
Page 39: Schéma Électronique
9. Schéma électronique... -
Page 40: Environnement
ENVIRONNEMENT Si, après un certain temps, vous décidez de remplacer votre machine, ne vous en débarrassez pas avec les ordures ménagères mais destinez-la à un traitement respectueux de l’environnement. WARM TECH 81, rue de gozée 6110 Montigny-le-Tilleul Belgique Tél : 0032 (0) 71 29 70 70... - Page 41 VRIJSTAANDE PELLETKACHEL (GELIEVE DEZE INSTRUCTIES TE BEWAREN ALS TOEKOMSTIG REFERENTIEMATERIAAL) LEVENSLANGE WARMTE *Gelieve deze volledige handleiding te lezen vooraleer deze pelletkachel voor de huiskamer te installeren en in gebruik te nemen. Als u deze instructies niet opvolgt, kan dit leiden tot eigendomschade, kwetsuren of zelfs de dood.
- Page 42 1. Brandstofvereiste Vooraleer u mee te delen hoe de kachel kan worden bediend, moeten we u de kachelbrandstof kort voorstellen, aangezien deze verantwoordelijk is voor de prestaties van de kachel. (Uw pelletkachel werd ontworpen voor uitsluitend stoken van houtpellets. Gebruik geen ander type brandstof, aangezien dit eventuele waarborgen vermeld in deze handleiding zal ongedaan maken.) Pelletkwaliteit is belangrijk, gelieve de volgende richtlijnen te lezen: De prestaties van uw pelletkachel worden sterk beïnvloed door het type en de kwaliteit van de houtpellets...
- Page 43 SLAKKEN: slakken zijn silicium (zand) en andere onzuiverheden in de brandstof die een harde massa vormen tijdens het verbrandingsproces. Deze harde massa zal de luchtstroom doorheen de verbrandingspotvoering blokkeren en de prestaties van de kachel nadelig beïnvloeden. Elke brandstof, zelfs goedgekeurde types, kan slakken beginnen vertonen.
- Page 44 De pelletkachel heeft een geavanceerd ontwerp en een individueel verseluchtinvoer- en ventilatiesysteem. Negatieve drukverbrandingstechnologie veroorzaakt hoog rendement en weinig asuitvoer tijdens verbranding. Het systeem wordt automatisch uitgeschakeld bij verkeerde verbranding of brandstofgebrek. Grote BTU, snelle verwarming en lage brandstofkosten zijn de voordelen. HoofdprestatiesModel PAP24000 Afmetingen (BxHxD) 449x918x486 Gewicht Luchtinlaatpijp...
- Page 45 Model PAP24001 Afmetingen (BxHxD) 558x712x584 Gewicht Luchtinlaatpijp Luchtuitlaatpijp Hittezone Automatische verbrandingstijd (Min-Max.) 15/24 Brandstof Houtpellets Pelletsverbruik (Min-Max) KG/U 0,5/1,3 Rendement Hoppercapaciteit Elektronisch verbruik 100-400 Nominale spanning en frequentie V/HZ 230/50-115/60-100/50 Nominaal vermogen Dikte van staal, binnenkant: Dikte van staal, buitenkant: 1,5-2 UITZICHTKEUZES De KACHEL kan worden besteld met de volgende zijpaneel- en deurkleur:...
- Page 46 3. Structuurinstructies De kachel is hoofdzakelijk vervaardigd uit de volgende elementen: (PAP24000 ALS VOORBEELD) 1. Hopperdeksels 2.Hopper 3.Avegaar 5.Conversieblazer 4.Avegaarmotor 6.Afblaaspijp 7. Uitlaatblazer 8.Voordeksel 9.Aslade 10.Vuurschildbord 11.Kacheldeur 12.Hittewisselaar 13. Controlebord Hierna volgt een lijst van hoofdcomponenten en hun functies ONTSTEKER De KACHEL is uitgerust met een automatische ontsteker voor het aansteken van de brandstof als de kachel in ontstekingsmodus staat.
- Page 47 AVEGAAR EN AVEGAARMOTOR De 5 RPM avegaarmotor draait de avegaar en heft de pellets op de avegaarbuis. De pellets vallen dan een buis naar onder en in de vuurpot. De avegaar wordt geregeld door het regelbord. OVERTEMPERATUURMOMENTSCHAKELAAR Deze schakelaar is geïnstalleerd op de bodem van de hopper en schakelt de kachel uit als deze te hoge temperaturen voelt (70 graden).
- Page 48 4. Installatie van pelletkachel VER MOET AAN ALLE NATIONALE EN LOKALE REGLEMENTEN EN EUROPESE STANDAARDEN WORDEN VOLDAAN BIJ HET INSTALLEREN VAN DE KACHEL Vooraleer een kachel in een ruimte te installeren, moet u de juiste kachel kiezen om de kamer te kunnen verwarmen.
- Page 49 Horizontaal (Maar dit is niet aan te raden, als de elektronische voeding uit is, kan de rook naar buiten komen als de kachel uit staat) Horizontaal en Omhoog doorheen de dakrand...
- Page 50 De afstand tussen wand en kachel als deze in het huis is geïnstalleerd (MM)
- Page 51 De luchtinlaatpijpdiameter van de kachel is 50 mm, afblaaspijpdiameter is ¢80 mm. De totale lengte van de pijpen is niet meer dan 3m en ellebogen zijn niet beschikbaar. Binnenbuisafblaaspijppakking moet worden afgedicht met silicondichtingsmiddel om uitlaatlek in de kamer te voorkomen. Afblaaspijp en eindstuk moeten waterdicht zijn en mogen niet geblokkeerd raken.
- Page 52 creëren om de mogelijkheid van rook of geur te voorkomen tijdens kacheluitschakeling of voedingsuitval en voorkomt mensen of struiken bloot te stellen aan hoge temperaturen. (4)De afblaaspijp moet eindigen minstens 1,20 meter lager, niet meer dan 1,20 meter horizontaal van en niet minder dan 30 cm boven deuren en vensters, of zwaartekracht/ventilatieluchtinlaten in het gebouw.
- Page 53 Gemetselde schoorsteen Bij afblazen in een gemetselde schoorsteen kan de pelletpijp eindigen net binnen de schoorsteen. Het is echter aan te raden de pelletpijp naar de top van de schoorsteen te voeren. Open haard Bij afblazen in een haardschoorsteen kan de pelletpijp eindigen net boven de demper. Het is echter aan te raden de pelletpijp naar de top van de schoorsteen te voeren.
- Page 54 Jonge kinderen moeten goed in het oog worden gehouden als ze zich in dezelfde ruimte bevinden als de WARM TECH. Kleding of andere ontvlambare materialen mogen niet op of in de buurt van de kachel worden geplaatst. Elk rooster, paneel of glas dat wordt verwijderd voor werkzaamheden MOET opnieuw worden aangebracht vooraleer de kachel in gebruik te nemen.
- Page 55 5. Bediening VER MOET AAN ALLE NATIONALE EN LOKALE REGLEMENTEN EN EUROPESE STANDAARDEN WORDEN VOLDAAN BIJ HET BEDIENEN VAN DE KACHEL 1.) De eerste keer ontsteken Bij de eerste ingebruikname kan de verf eventueel afbranden. Dit kan eventueel een onaangename geur veroorzaken.
- Page 56 Als de temperatuur in de kachel tot onder 30°C is gedaald, verschijnt uiteindelijk de tekst ‘GOODBYE’ op het display. !! OPGELET !! Tijdens de vlamuitschakelingsfase en wisselaarafkoeling is het niet mogelijk de kachel opnieuw aan te zetten tot het bedrijfseinde; deze toestand wordt aangegeven door de boodschap ‘SWITCHING OFF’ Bij het aanzetten wordt de vlam niet onmiddellijk gestart, dit is afhankelijk van de geselecteerde werkingsformaliteit.
- Page 57 Eerste startfase wordt getoond door de boodschap ‘FEED’. In deze fase worden de schoorsteencontroleverrichtingen uitgevoerd en de pellets worden in de smeltpot geladen. De volgende fase wordt getoond met de boodschap “Lighting”. In deze fase verschijnt de eerste vuurbasis. Deze toestand houdt aan tot wanneer de rooktemperatuur de geplande drempel niet langer overschrijdt.
- Page 58 Opmerking : als de ontsteking mislukt, zal de thermische regeling de kachel automatisch uitschakelen. Als u wenst te herstarten, zet de voeding dan enige tijd uit en dan weer aan (om het vorige progammaproces uit te schakelen) en volg dan het bovenstaande proces om te ontsteken en opnieuw te starten. VLAMKRACHTVARIATIE Afhankelijk van de verwarmingswens kan de aangevoerde brandstofhoeveelheid worden ingesteld van weinig tot veel door middel van de brandstofaanvoerknop.
- Page 59 ECO STADIUM Als de kamertemperatuur de ingestelde temperatuur overschrijdt, wordt de kachel automatisch gestopt of op minimum vermogen ingesteld om energie te besparen. Het volgende is dan op het display te zien: Nadat de kamertemperatuur is gedaald en tot onder de ingestelde temperatuur is gedaald, wordt deze automatisch opnieuw ingeschakeld of wordt teruggekeerd naar het Vermogensniveau van voorheen.
- Page 60 REINIGING-instelling Na de toets ingedrukt te hebben gehouden, , kunt u de X minuten aanpassen, laatste Y seconden voor reiniging van verbrandingspot met de toetsen Bijvoorbeeld Elke 30minuten Laatste 15 seconden: TIMER-instelling Op het display verschijnt de volgende formulering : Met deze functie programmeert u de kachel voor een weekprogramma, waarbij u de inschakel- en uitschakeltijden koppelt aan de vooringestelde tijdsroosters.
- Page 61 TAAL-instelling Door de knop ingedrukt te houden verschijnen de volgende woorden op het display: Met deze functie kunt u de taal selecteren. Druk de toetsen in om de taal te selecteren. Mogelijke taalkeuzes zijn Engels, Japans, Italiaans en Spaans. ECO-modusinstelling Door de knop ingedrukt te houden verschijnen volgende woorden op het display: Druk op de knop...
- Page 62 Sommige Kachels hebben twee blazers, met deze functie kunt u de werking van één of twee blazers selecteren. Blower AUX 0 selecteren betekent werking met één blazer, Blower AUX1 selecteren betekent werking met twee blazers. Werking met twee blazers kan het rendement van de kachel verbeteren. Druk op de knop , om te selecteren.
- Page 63 Dit betekent vuur automatisch uitgeschakeld. Zoals: 1.Er is geen brandstof aanwezig in de hopper. 2. Avegaarmotor is stuk en de aanvoer van brandstof is gestopt. Dit betekent dat seismische schakelaar open is. Als seismische schakelaar of kachel kantelt, verschijnen deze woorden op het display. Dit betekent dat er enige problemen zijn met de vacuümschakelaar.
- Page 64 Betekent dit dat temperatuursensor 1 een open kring heeft ondergaan. Betekent dit dat temperatuursensor 2 een kortsluiting heeft ondervonden. Betekent dit dat temperatuursensor 2 een open kring heeft ondergaan. Betekent dit dat temperatuursensor 3 een kortsluiting heeft ondervonden. Betekent dit dat temperatuursensor 3 een open kring heeft ondergaan.
- Page 65 AFSTANDSBEDIENING Min afstandsbediening 4. )Veiligheid (1) De kachel wordt uitgeschakeld en het vuur wordt gedoofd aangezien de kachel daalt naar veiligheidstemperatuur, (T1) (2) De kachel wordt uitgeschakeld, als de thermodisc (voor de hopper)T2≥70˚C (3) Als de afblaaspijp geblokkeerd is, zal het afblaaspijplampje aangaan en de kachel zal uitschakelen. Controleer het systeem dan of bel naar uw dealer! HET GEBRUIK VAN VADEMHOUT IS BIJ WET VERBODEN.
- Page 66 Veiligheidswaarschuwingen en Aanbevelingen: Opgepast. Het is belangrijk alleen pellets te selecteren en te gebruiken die droog en vrij van vuil of onzuiverheden zoals hoog zoutgehalte zijn. Vuile brandstof zal een averechtse invloed hebben op de werking en prestaties van de kachel en zal de waarborg ongeldig maken. We hebben een standaardlijst opgesteld voor houtpellets (controleer BRANDSTOFVEREISTE pagina 3).
- Page 67 6. Onderhoud Trek de stekker uit en laat de WARM TECH afkoelen vooraleer enig onderhoud of reiniging uit te voeren. Sommige pelletmerken produceren meer as en slakken dan andere. Bijgevolg is de frequentie van uitvoering van de volgende reinigingsprocedures in grote mate afhankelijk van de kwaliteit van de verbrande pellets.
- Page 68 UITNEMEN VAN ASLADE EN REINIGEN Waarschuwing: Neem de aslade niet uit als de kachel heet is. Trek de aslade naar voor en weg van de kachel. Waarschuwing: De opruiming van de warme kachelas moet in een metalen container met een goed sluitend deksel plaatsvinden. De gesloten container moet op een onbrandbare vloer of op de grond worden geplaatst, ver uit de buurt van alle brandbare materialen, in afwachting van uiteindelijke opruiming.
- Page 69 DE CONVECTIEBLAZER REINIGEN Om de convectieblazer te reinigen moet u de deur aan de rechterzijde uitnemen (zie de volgende pagina). Maak het kachelvoedingssnoer los van het wandstopcontact. Verwijder de twee schroeven (A op de tekening rechts) die de blazer vasthouden op het blazerkanaal. Schuif de blazer naar achter en maak deze zo los uit het blazerkanaal.
-
Page 70: Problemen Verhelpen
7. Problemen verhelpen Het bedieningspaneel van de kachel is uitgerust met probleemonderzoeksensors. Als de sensors een abnormale werktemperatuur (minder dan 30°C) detecteren of de temperatuur van de andere sensor bedraagt meer dan 70°C, zullen de zelfregelende temperatuurschakelaars overeenkomstig reageren. Als de temperatuur minder dan 30°C bedraagt, zal het veiligheidsregelsysteem de kachel automatisch uitschakelen;... - Page 71 C. Betreffende het laatste Aanvoereenheid is Controleer of de avegaar al dan niet stadium geblokkeerd. geblokkeerd is. Er bestaat een probleem Controleer of de bevestigingsschroef met de verbinding tussen tussen avegaar en motor al dan niet motor en avegaar loszit. Of de avegaar kan uitspringen Geen brandstof in de Vul de brandstof in de hopper.
- Page 72 Ingestelde temperatuur is vervang de lagetemperatuurschakelaar bereikt (30°C). "ECO" is normaal, wachtend, nadat temperatuur door blazen wordt aangezet, wordt deze automatisch opnieuw ingeschakeld 8 De blazer werkt nog altijd Verander deze schakelaar. nadat de kachel is afgekoeld lagetemperatuurschakelaar en de brandstofaanvoer is (30°C) is gebroken.
- Page 73 8. Waarborg 1. Als de eigenaar de bedieningsinstructies van deze handleiding opvolgt, heeft hij de waarborg dat de kachel normaal zal blijven werken binnen 1 jaar na aankoop. Als de kachel wordt vernield door de zwakke hoeveelheid of de kachel werkt abnormaal binnen de waarborgperiode, dan wordt deze kosteloos hersteld of onderdelen worden kosteloos vervangen.
- Page 74 9.Elektronisch Plan...
- Page 75 MILIEU Indien u een nieuw apparaat wilt hebben na lang gebruik, gooit u het oude niet weg als gewoon afval maar in een milieuvriendelijke methode. WARM TECH 81, rue de gozée 6110 Montigny-le-Tilleul Belgique Tél : 0032 (0) 71 29 70 70...
- Page 76 FREESTANDING PELLET STOVE (PLEASE KEEP THESE INSTRUCTIONS FOR FUTURE REFERENCE) A LIFETIME OF WARMTH *Please read this entire manual before installation and use of this pellet fuel burning room heater. Failure to follow these instructions could result in property damage, bodily injury, or even death.
-
Page 77: Fuel Requirement
1. Fuel Requirement Before introducing how the stove can be operated, the fuel of stove should be briefly introduced since it is related to the performance of the stove. (Your pellet stove has been designed to burn wood pellets only. Do not use any other type of fuel, as this will void any warranties stated in this manual.) Pellet quality is important, please read the following: The performance of your pellet stove is greatly affected by the type and quality of wood pellets... - Page 78 ASH: The ash content of the fuel and operation of your stove will directly determine the frequency of cleaning. The use of high ash fuels may result in the stove needing to be cleaned daily. A low ash fuel may allow longer intervals between cleaning. CLINKERING: [clinkers are silica (sand) or other impurities in the fuel that will form a hard mass during the burning process].
-
Page 79: Stove Features
It will be shut off automatically by wrong burning or out of fuel. Large BTU, quick heating and low fuel cost are its advantages. Main performance Model PAP24000 Dimension (WxHxD) 449x918x486 Weight Air inlet Pipe... - Page 80 Model PAP24001 Dimension (WxHxD) 558x712x584 Weight Air inlet Pipe Air outlet Pipe Heat Area Automatic Burning Time (Min-Max.) 15/24 Fuel Wood Pellet Consumption for Pellet (Min-Max) KG/H 0.5/1.3 Efficiency Hopper Capacity Electronic consumption 100-400 Rating Voltage and Frequency V/HZ 230/50-115/60-100/50 Rating Power Thickness of steel, inside: Thickness of steel, outside:...
-
Page 81: Structure Instruction
3. Structure instruction The stove is mainly made up of following items: (PAP24000 AS EXAMPLE) 1. Hopper covers 2.hopper 3.auger 5.convertion blower 4. Auger motor 6.venting pipe 7. Exhaust blower 8.front cover 9.ash drawer 10.fire shield board 11.stove door 12.heat exchanger 13. Control... - Page 82 VACCUM SWITCH The STOVE has s vacuum switch located behind the left door, fastened to the base. If a low pressure is created in the firebox by a leak, opening the front door, a blocked flue, or unsealed ash drawer, the vacuum switch will sense it and cause the stove to go into a shutdown mode.
- Page 83 4. Pellet Stove installation All NATIONAL AND LOCAL REGULATIONS AND EUROPEAN STANDARDS SHALL BE COMPLIED WITH WHEN INSTALLING THE APPLIANCE Before install a stove in a room, select the right stove to be able to heat the room. Please check the STOVES’...
- Page 84 2. Air input and venting pipe Installation Several examples, taken by NB-P15, are the following Horizontal and Up, Horizontal (But it is not recommended, when the electronic power is off, the smoke might come out if the stove is on )...
- Page 85 Horizontal and Up through the eave The Distance between wall and stove when it is installed in the house (MM)
- Page 86 All the stoves' air input pipe diameter is 50 mm, venting pipe diameter is ¢80 mm. The total length of pipes is no longer than 3m and elbows are not available. Indoor venting pipe joint should be sealed by silicone sealant to prevent exhaust leaking into the room. Venting pipe and termination should be waterproof and avoid being blocked.
- Page 87 (3)Termination must exhaust above the inlet elevation. It is recommended that at least five feet of vertical pipe be installed outside when the stove is vented directly through a wall. This will create a natural draft to prevent the possibility of smoke or odor during appliance shut down or power failure and avoids exposing people or shrubs to high temperatures.
- Page 88 To aid in cleaning, wherever possible, the venting system should include a tee with clean out attached to the flue collar on the stove. Masonry Chimney When venting into a masonry chimney, the pellet pipe can terminate just inside the chimney .However, it is recommended to run the pellet pipe to the top of the chimney.
-
Page 89: Thermostat Installation
CAUTION: THE STRUCTURAL INTEGRITY OF THE MANUFACTURED HOME FLOOR, WALL ,AND CEILING/ROOF MUST BE MAINTAINED. SURGE PROTECTORS A surge protector is recommended to ensure the stove’s electrical components are not damaged due to a surge in the electrical supply. Only high quality protector should be used—cheap ones do not provide the protection needed. - Page 90 Do not operate appliance with the glass front removed, cracked, or broken. Replacement of the glass should be done by a qualified service technician. WARM TECH, its employees, or any of its representatives assume no responsibility for any damages caused by an inoperable, inadequate, or unsafe condition as a result of any improper operation, service, or installation procedures.
-
Page 91: Operation
5. Operation ALL NATIONAL AND LOCAL REGULATIONS AND EUROPEAN STANDARDS SHALL BE COMPLIED WITH WHEN OPERATING THE APPLIANCE 1.) The first ignition When first time’s running, the paint can be get rid of by burning. So some unpleasant Smell might come out. - Page 92 After the temperature in the stove is lower than 30degree, finally, the phrase ‘GOODBYE’ is displayed. !! ATTENTION !! During the flame switching off phase and exchanger cooling, it isn’t possible to switch on again the heater up to the operation end; this state is highlighted from the message ‘SWITCHING OFF’ At the switching on the flame isn’t started immediately, depends from the selected functioning formality.
- Page 93 The starting first phase is showed from the message ‘FEED’. In this phase are performed the chimney verification operations and the pellets will be loaded in the melting pot. The successive phase will be showed from the inscription “Lighting”. In this phase there will be the appearance of the first breeding grounds.
- Page 94 Note: if the ignition is failure, the thermal control will shut off the stove automatically. If want to restart it again, Please Switch off the power for a while and then switch on the power (In order to shut down the previous process of program), follow the above process to ignite and start again.
-
Page 95: Clock Setting
ECO STAGE If the room temperature exceeds the set out temperature, automatically the stove is stopped or turn to minimum power in order to save energy, It shows like following: After the room temperature drops down, and below the set out temperature, it automatically, switching on again or come back to the previous Power level. -
Page 96: Cleaning Setting
The time can by select, also using , to select the right one. CLEANING SETTING After keeping pressing the key, , you can adjust every X mins, last Y Seconds to cleaning the burning pot by the key For example Every 30mins Last 15 seconds: TIMER SETTING On the display the following wording will appear With this function you program the heater for a weekly programming, associating the switching... -
Page 97: Language Setting
LANGUAGE SETTING By keeping pressing the key it will appear the following words: With this function you can select language. Pressing the key , to select the language. Language select include English, Japanese, Italiano and Espanol. ECO mode SETTING By keeping pressing the key it will appear the following words: Pressing the key , to select the Mode 1 or Mode 0, Mode 1 is for turning to minimum... - Page 98 Some Stove has two blowers, with this function you can select operation one or two blower. select Blower AUX 0 is operation one blower, select Blower AUX 1 is operation two blowers. Two blowers operation could improve the stove efficiency. Pressing the key , to select.
- Page 99 It means seism switch is open. If seism or stove tilts it will appear these words. It means that there are some problems with vacuum Switch. Such as door has not been closed properly Combustion fan's speed should be up. There is some leakage about the stove and so on.
- Page 100 It means temperature sensor 2 is short-circuit. It means temperature sensor 2 is open-circuit. It means temperature sensor 3 is short-circuit. It means temperature sensor 3 is open-circuit.
-
Page 101: Remote Control
REMOTE CONTROL Min remote control 4. )Safety (1) The stove will power off and the fire will be put out since the stove decreases to the safety temperature, (T1) (2) The stove will be shut down, when thermodisc (for the hopper)T2≥70˚C (3) When vent pipe is blocked, the vent pipe indicator light will be on and the stove will shut down. - Page 102 SAFETY WARNINGS AND RECOMMENDATIONS: Caution. It is important to select and use only pellets that are dry and free of dirt or any impurities such as high salt content. Dirty fuel will adversely affect the operation and performance of the unit and will void the warranty.
- Page 103 Against any unauthorized modification of the appliance. The parts can be replaced only recommended by manufacturer.
-
Page 104: Maintenance
6. Maintenance Unplug and let the STOVE cool before performing any maintenance or cleaning. Some brands of pellets produce more ash and clinkers than others. Therefore the frequency of performing the following cleaning procedures depends to a great degree on the quality of the pellets burned. Not cleaning this unit will cause it to burn poorly and will avoid your stove’s warranty. -
Page 105: Cleaning The Flue Gas Passage Ways
ASH DRAWER REMOVAL AND CLEANING Caution: Do not remove the ash drawer when the stove is hot. Pull the ash drawer forward and away from the stove. Caution: Disposal of Ashes should be placed in a metal container with a tight fitting lid. The closed container should be placed on a noncombustible floor or the ground well away from all combustible materials, pending final disposal. - Page 106 Remove the ash drawer (see the previous page) and loosen the two 5/32’’ allen head screws shown as D in the drawing below. Rotate the covers over the access holes and use a brush and vacuum to clean the ash. Rotate the covers back over the holes and tighten the screws. Front View Looking into the Ash Drawer Cavity with the Ash Drawer Removed.
- Page 107 NOTE: Cleaning schedule will vary depending on quality of pellets used. Burned high ash pellets used. Burned high ash pellets will require more frequent cleaning...
-
Page 108: Troubleshooting
7. Troubleshooting The control panel of the stove has trouble examine sensors. When the sensor detect the abnormal work temperature (below 30˚C), or the other sensor’s temperature is above 70˚C the auto-control temperature switches will react accordingly. When temperature is below 30˚C, the safety control system will stop the stove automatically;... - Page 109 C. Regarding to the last Feed unit is blocked. Check the auger is blocked or not. stage There is the problem Check the fasten screw between about the connection auger and motor loose or not. between motor and auger Or the auger might jump out No fuel in the hopper.
- Page 110 8 The blower still works The low temperature Change this switch. after the stove is cool and switch (30˚C) is broken. fuel feed stops. 9 no enough heat wind Unqualified fuel Use the standard specially pellet. Blower speed is too high. Use higher power Heat exchange tubes are Clean the heat exchange tubes.
-
Page 111: Warranty
8. Warranty 1. If the owner follows the operation of this manual, it is guaranteed the stove can well work normally within one year after selling. If the stove be destroyed by the poor quantity or the stove works abnormally within the guarantee period, it will be repaired or changed parts with free charge. 2. -
Page 112: Electronic Plan
9.Electronic Plan... - Page 113 ENVIRONMENT Should your machine need replacement after extended use, do not put it in the domestic waste but dispose of it in an environmentally safe way. WARM TECH 81, rue de gozée 6110 Montigny-le-Tilleul Belgique Tél : 0032 (0) 71 29 70 70...
- Page 114 Ne jamais laisser un enfant ou une autre personne n’ayant pas pris connaissance des instructions d’utilisation se servir de la machine. Il est possible que les réglementations locales fixent une limite d’âge minimum de l’utilisateur. Gardez la machine non utilisée hors de la portée des enfants. Cet appareil n’est pas conçu pour être utilisé...
- Page 115 Non permettere a bambini oppure a persone che non abbiano preso visione delle presenti istruzioni di utilizzare la macchina. Le norme nazionali prevedono eventualmente dei limiti di restrizione relativamente all’età dell’operatore. Se la macchina non viene impiegata, conservarla fuori della portata dei bambini. Questo apparecchio non è...
- Page 116 81, rue de Gozée 6110 Montigny-le-Tilleul Belgique Tél : 0032 71 29 70 70 Fax : 0032 71 29 70 86 Made in China S.A.V 32 / 71 / 29 . 70 . 88 32 / 71 / 29 . 70 . 99 sav@eco-repa.com Service Parts separated 32 / 71 / 29 .