Teac SL-D920 Mode D'emploi
Masquer les pouces Voir aussi pour SL-D920:
Table des Matières

Publicité

Les langues disponibles

Les langues disponibles

Liens rapides

D01123020C
Z
SL-D920
STEREO CD RADIO
OWNER'S MANUAL
MODE D'EMPLOI
MANUAL DEL USUARIO

Publicité

Table des Matières
loading

Sommaire des Matières pour Teac SL-D920

  • Page 1 D01123020C SL-D920 STEREO CD RADIO OWNER’S MANUAL MODE D'EMPLOI MANUAL DEL USUARIO...
  • Page 2: Important Safety Instructions

    IMPORTANT SAFETY INSTRUCTIONS 1) Read these instructions. 2) Keep these instructions. CAUTION: TO REDUCE THE RISK OF ELECTRIC SHOCK, DO NOT REMOVE COVER (OR BACK). NO USER- SERVICEABLE PARTS INSIDE. REFER SERVICING TO 3) Heed all warnings. QUALIFIED SERVICE PERSONNEL. 4) Follow all instructions.
  • Page 3 An independent license for such use is required. For details, please visit http://mp3licensing.com. < IF YOU ARE EXPERIENCING PROBLEMS WITH THIS PRODUCT, CONTACT TEAC FOR A SERVICE REFERRAL. DO MPEG Layer-3 audio coding technology licensed from NOT USE THE PRODUCT UNTIL IT HAS BEEN REPAIRED.
  • Page 4: Table Des Matières

    Contents Before Use Thank you for choosing TEAC. Read this manual Read this before operation carefully to get the best performance from this unit. < As the unit might become warm during operation, always leave sufficient space around the unit for ventilation.
  • Page 5: Beware Of Condensation

    Maintenance Information for users on the collection and disposal of old equipment and used batteries If the surface of the unit gets dirty, wipe with a soft cloth or use diluted neutral cleaning liquid. Be sure The following symbols displayed on products, to remove any fluid completely.
  • Page 6: Discs

    If you use such discs in this unit, TEAC Corporation from heat sources such as radiators and heat-generating and its subsidiaries cannot be responsible for any electrical devices.
  • Page 7: Mp3/Wma Compatibility

    RESET Switch MP3/WMA compatibility This unit can play MP3/WMA files recorded on a CD-R, CD-RW disc, or USB memory. Refer the instruction manual of software when making an MP3 or a WMA file using a PC. < This unit can play back monaural and stereo MP3/WMA files that are in the MPEG-1 Audio Layer 3 format with a sampling rate of 44.1 or 48 kHz and a bit rate of 320 kbps or less.
  • Page 8: Connections

    Connections CAUTION < Turn off the power before making connections. < Read the instructions for each component that you intend to use with this unit. < Be sure to insert each plug securely. To prevent hum and noise, do not bundle the connection cords.
  • Page 9: Usb Connector

    PHONES Battery installation 1. Loosen the fixing screw. For private listening, connect the headphones plug into this jack, and adjust the volume using the 2. Push the other end of the cover to open the VOLUME knob. compartment. 3. Insert a CR2032 lithium-ion battery with the positive USB connector (+) side facing the cover.
  • Page 10: Names Of Controls 1

    Names of Controls 1 F G H FRONT REMOTE CONTROL...
  • Page 11 Disc compartment cover TUNING Push the L mark on the cover to open the cover Turn this knob to tune in to a station. upwards. During playback of an MP3/WMA disc or a USB memory, use this knob to select a folder on the disc or USB SNOOZE memory.
  • Page 12 Names of Controls 2 REAR REMOTE CONTROL BASS CONTROL knob Number buttons Use this knob to raise and lower the loudness of bass frequencies. BAND Use this button to switch between AM and FM radio SLEEP bands. Use this button to set the sleep timer. MUTING MP3 FOLDER/PRESET Use this button to mute the sound.
  • Page 13: Battery Installation

    Remote Control The included remote control allows the main unit to be Precautions concerning batteries operated from a distance. < Be sure to insert the batteries with the positive “+” and When operating the remote control, point it towards the negative “_”...
  • Page 14: Basic Operation

    Basic Operation Dimmer You can change the brightness of the front panel display. Push the SNOOZE button to darken the display. Push it again to restore regular brightness. This function also works in standby mode. Press the STANDBY/ON switch to turn the unit Sleep Timer Each press of the SLEEP button changes the amount of time (between 15 and 90 minutes) until the unit...
  • Page 15: Listening To A Cd/Mp3/Wma Disc

    Listening to a CD/MP3/WMA disc < It takes a few seconds for the unit to load the disc. No buttons will work during loading. Wait until the total number of tracks/files and the total play time of the disc are displayed. <...
  • Page 16: Listening To Mp3/Wmas (Usb)

    Listening to MP3/WMAs (USB) Controlling playback (disc/USB) < Do NOT use high-capacity USB hard discs with this INFO unit. Press the FUNCTION button to select “USB”. Plug your USB memory into the USB connector. < You can reverse steps Suspending playback temporarily (pausing) Press the PLAY/PAUSE (G/J) button during playback to stop playback at the current position.
  • Page 17: Direct Playback

    Searching for a part of a track/file Direct playback During playback, hold down a SKIP (. or /) When the unit is stopped or playing back, you can use button and release it when the desired part is found. the number buttons on the remote control to select tracks/files.
  • Page 18: Program Playback

    Program Playback P r e s s t h e M P3/ W M A F O L D E R b u t t o n s repeatedly to select a folder on an MP3/WMA disc or USB memory. <...
  • Page 19 Adding a track/file to the end of the programme When the unit is stopped, press the PROGRAM button repeatedly until “PXX” blinks on the display. Select a PROGRAM folder number using the MP3/WMA FOLDER button and a track/file number using a SKIP (. or /) button and then press the PROGRAM button.
  • Page 20: Repeat/Shuffle Playback

    Repeat/Shuffle/Intro Playback Repeat all tracks/files To play back all the tracks/files repeatedly, press the PLAY MODE button repeatedly until “REPEAT ALL” appears. During programmed playback, the programmed tracks/files will be played back repeatedly. Repeat all the files in a folder (MP3/WMA) To play back all the files in a folder repeatedly, press the PLAY MODE button twice.
  • Page 21: Listening To The Radio

    Listening to the Radio FM MODE button FM MODE Press this button to alternate between STEREO and MONO modes. STEREO Press the FUNCTION button to select “AM” or FM stereo broadcasts are received in stereo, and the “FM”. “STEREO” indicator lights. MONO Select this mode in areas where FM stereo reception is weak.
  • Page 22: Preset Tuning

    Preset Tuning Within 10 seconds, press the PROGRAM button. 1, 2, 3..MP3/PRESET ( / ) The station is stored. The preset number and the MEMORY indicator stop blinking. To store more stations, repeat steps You can store 20 FM and 20 AM stations as preset channels.
  • Page 23: Rds

    RDS (PTY Search) 1 The Radio Data System (RDS) is a broadcasting service that allows stations to send additional information along with regular radio programme signals. RDS works on the FM waveband in Europe only. Tune in to an FM RDS station (see page 21). The RDS indicator appears.
  • Page 24: Listening To An External Source

    RDS (PTY Search) 2 Listening to an External Source Connect the PHONES jack (audio output jack) of PTY (Programme Type) a portable audio player to the AUX IN jack of NEWS: Brief announcements, events, public opinion, this unit using a stereo mini-plug cable. reports and real situations AFFAIRS: Various kinds of information other than...
  • Page 25: Before Recording

    Before Recording Recording to USB 1 This unit can record from CDs, radio and the AUX IN jack FUNCTION as MP3 files onto USB memory devices, . CAUTION < Do not disconnect the USB memory during recording. Do not disconnect the power cord during recording. Doing so could damage the products.
  • Page 26: Deleting A File From Usb

    Recording to USB 2 Deleting a file from USB If you want to stop recording, press the RECORD ERASE button again. < Only the RECORD button and the volume knob can be used while recording. The volume knob only affects the recorded level when recording from the AUX IN.
  • Page 27: Setting The Clock

    Setting the Clock Use the SKIP ( . / / ) buttons to set the CLOCK ADJ current hour. The clock can be set both when the power is on and when the unit is in standby. Press the CLOCK ADJ button again. Press the CLOCK ADJ button for more than 2 The “minute”...
  • Page 28: Setting The Timer 1

    Setting the Timer 1 Use the SKIP ( . / / ) buttons to set the TIMER minute, and then press the TIMER button. You can set the timer that can be used to play or record at the specified time. Set the clock before setting the timer.
  • Page 29 Use the SKIP ( . / / ) buttons to select “PLAY” Use the SKIP ( . / / ) buttons to set the or “REC”, and then press the TIMER button. volume, and then press the TIMER button. TIMER indicator appeares. The source is displayed.
  • Page 30: Specifications

    Setting the Timer 2 Specifications TUNER Section Turning the timer on and off Frequency Range (FM) ..87.50 MHz to 108.00 MHz Press the TIMER button. Frequency Range (AM)... . . 522 kHz to 1629 kHz CD PLAYER Section Frequency Response.
  • Page 31: Cd-Player

    Cannot hear a station, or the signal is too weak dealer or TEAC service centre. e Tune in the station properly. e Rotate the unit or antenna for the best reception General position.
  • Page 32: Avant L'utilisation

    Sommaire Avant l’utilisation Nous vous remercions d’avoir choisi TEAC. Lisez Lisez ce qui suit avant toute utilisation ce manuel avec attention pour tirer les meilleures < Il est possible que l’appareil devienne chaud durant performances de cet appareil. l’utilisation, laissez donc toujours un espace suffisant autour de lui pour la ventilation.
  • Page 33: Entretien

    Entretien Information pour les utilisateurs sur la collecte et l’enlèvement des équipements et piles usagés Si la surface de l’unité est sale, essuyez-la avec un chiffon doux ou utilisez un savon liquide neutre dilué. Les symboles suivants sur les produits, emballages et/ Veillez à...
  • Page 34: Disques Lisibles Par Cet Appareil

    CD ordinaires. Si vous utilisez de tels disques dans cette unité, TEAC Il est important de ne pas les conserver à un endroit Corporation et ses filiales ne pourront être tenues pour directement exposé...
  • Page 35: Compatibilité Mp3/Wma

    Commutateur RESET Compatibilité MP3/WMA Cet appareil peut lire les fichiers MP3/WMA enregistrés sur CD-R, CD-RW ou mémoire USB. Reportez-vous au mode d'emploi du logiciel quand vous créez un fichier MP3 ou WMA à l'aide d'un ordinateur. < Cet appareil peut lire les fichiers MP3 mono et stéréo au format MPEG-1 Audio Layer 3 et ayant une fréquence d'échantillonnage de 44,1 ou 48 kHz et un débit binaire de 320 kb/s ou moins.
  • Page 36: Raccordements

    Raccordements ATTENTION < Coupez l'alimentation avant de faire les raccordements. < Lisez les modes d'emploi de tous les éléments que vous comptez employer avec cet appareil. < Assurez vous que chaque fiche est bien enfoncée. Pour éviter tout ronflement ou bruit parasite, ne regroupez pas les câbles de connexion.
  • Page 37: Cordon D'alimentation Secteur

    PHONES 1. Desserrez la vis de blocage. Pour bénéficier d’une écoute privée, insérez la fiche 2. Appuyez sur l'autre extrémité du couvercle pour ouvrir d’un casque d’écoute dans cette prise et réglez le le compartiment. volume à l'aide du bouton VOLUME. 3.
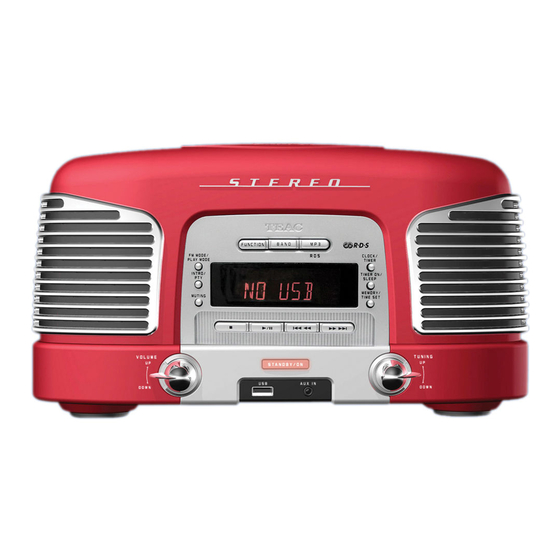
  • Page 38: Nom Des Commandes 1

    Nom des commandes 1 DESSUS F G H AVANT TÉLÉCOMMANDE...
  • Page 39 Couvercle du compartiment de disque Haut-parleurs (stéréo) Appuyez sur le symbole L du couvercle pour l'ouvrir vers le haut. ERASE Utilisez cette touche pour effacer un fichier de la SNOOZE mémoire USB. Une fois l'heure de réveil atteinte, utilisez cette touche pour éteindre l'appareil durant 5 minutes.
  • Page 40 Nom des commandes 2 ARRIÈRE TÉLÉCOMMANDE Bouton BASS CONTROL Touches numériques Utilisez ce bouton pour monter et baisser les basses fréquences. BAND Utilisez cette touche pour alterner entre les bandes SLEEP radio AM et FM. En mode CD ou USB, utilisez cette Utilisez cette touche pour régler la minuterie touche pour arrêter la lecture.
  • Page 41: Mise En Place Des Piles

    Télécommande La télécommande fournie permet la commande à distance Précautions concernant les piles de cet appareil. < Placez bien les piles en respectant les polarités positive Pour utiliser la télécommande, pointez-la vers le capteur de “+” et négative “_”. télécommande en face avant de l’appareil. <...
  • Page 42: Coupure Du Son

    Fonctionnement de base Atténuateur de luminosité (Dimmer) Vous pouvez changer la luminosité de l'écran de face avant. Appuyez sur la touche SNOOZE pour assombrir l'écran. Appuyez à nouveau pour retrouver une luminosité normale. Appuyez sur la touche STANDBY/ON pour Cette fonction agit aussi en mode de veille (standby). allumer l’appareil.
  • Page 43: Écoute D'un Cd/Disque Mp3/Wma

    Écoute d'un CD/disque MP3/WMA < Il faut quelques secondes à l'appareil pour charger le disque. Aucune touche ne fonctionne pendant ce chargement. Attendez que le nombre total de fichiers/pistes du disque soit affiché. < S'il n'y a pas de disque chargé dans le lecteur de CD, “NO DISC”...
  • Page 44: Écoute De Mp3/Wma (Usb)

    Écoute de MP3/WMA (USB) Contrôle de la lecture (disque/USB) < N'employez PAS de disques durs USB haute capacité INFO avec cet appareil. Appuyez sur la touche FUNC TION pour sélectionner “USB”. B r a n c h e z vo t r e m é m o i r e U S B d a n s l e Suspension temporaire de la lecture connecteur USB.
  • Page 45: Recherche D'un Passage De Piste/Fichier

    Recherche d'un passage de piste/fichier Lecture directe Durant la lecture, tenez enfoncée une touche de saut À l'arrêt ou en lecture, vous pouvez utiliser les touches (. ou /) et relâchez-la une fois le passage désiré numériques de la télécommande pour sélectionner les atteint.
  • Page 46: Lecture De Programme

    Lecture de programme Appuyez répétitivement sur une touche de saut (. ou /) pour sélectionner un fichier/ piste, puis appuyez sur la touche PROGRAM. Le fichier/piste est programmé, et “P-02” s'affiche. < Répétez les étapes pour programmer des fichiers/pistes supplémentaires. <...
  • Page 47: Vérification De L'ordre De Programmation

    Ajout de fichier/piste à la fin du programme À l'arrêt, appuyez répétitivement sur la touche PROGRAM jusqu'à ce que “PXX” clignote à l'écran. PROGRAM Sélectionnez un numéro de dossier à l'aide de la touche MP3/WMA FOLDER et un numéro de fichier/ piste à...
  • Page 48: Lecture En Boucle/Aléatoire/Des Intros

    Lecture en boucle/aléatoire/des intros Vous pouvez aussi sélectionner un fichier/piste à lire en boucle alors que la lecture est arrêtée. Appuyez sur la touche PLAY MODE, sélectionnez un fichier/ piste à l'aide d'une touche de saut (. ou /), puis appuyez sur la touche LECTURE/PAUSE (G/J) pour lancer la lecture.
  • Page 49: Écoute De La Radio

    Écoute de la radio Touche FM MODE FM MODE Appuyez sur cette touche pour alterner entre les modes STEREO et MONO. STEREO Appuyez sur la touche FUNC TION pour Les émissions stéréo FM sont reçues en stéréo et sélectionner “AM” ou “FM”. l’indicateur “STEREO”...
  • Page 50: Syntonisation Préréglée (Preset)

    Syntonisation préréglée (preset) Dans les 10 secondes, appuyez sur la touche PROGRAM. 1, 2, 3..MP3/PRESET ( / ) La station est mémorisée et l'indicateur MEMORY cesse de clignoter. Pour mémoriser d’autres stations, répétez les étapes à Vous pouvez mémoriser (prérégler) 20 stations FM et 20 stations AM.
  • Page 51: Rds

    RDS (recherche PTY) 2 Le système RDS (Radio Data System) est un service de diffusion qui permet aux stations d’envoyer des informations supplémentaires en même temps que le programme radio normal. Le RDS ne fonctionne sur la bande FM qu'en Europe. Réglez-vous sur une station FM RDS (voir page 49).
  • Page 52: Écoute D'une Source Externe

    RDS (recherche PTY) 2 Écoute d'une source externe Reliez la prise PHONES (prise de sortie audio PTY (Type de programme) pour casque) d'un appareil audio portable à la NEWS : communiqués, événements, sondages, prise AUX IN de cet appareil à l'aide d'un câble reportages, situations vécues mini-jack stéréo.
  • Page 53: Avant L'enregistrement

    Avant l’enregistrement Enregistrement sur USB 1 FUNCTION This unit can record from CDs, radio and the AUX IN jack as MP3 files onto USB memory devices. CAUTION < Do not disconnect the USB memory during recording. Do not disconnect the power cord during recording. Doing so could damage the products.
  • Page 54: Suppression D'un Fichier Sur Support Usb

    Enregistrement sur USB 2 Suppression d'un fichier sur support USB Si vous voulez arrêter l'enregistrement, appuyez ERASE à nouveau sur la touche RECORD. < Seuls la touche RECORD et le bouton de volume peuvent être employés pendant l'enregistrement. Le bouton de volume n'affecte le niveau d'enregistrement que si vous enregistrez depuis l'entrée AUX IN.
  • Page 55: Réglage De L'horloge

    Réglage de l'horloge Utilisez les touches de saut ( . / / ) pour CLOCK ADJ régler l'heure. L'horloge peut être réglée aussi bien quand l'appareil est en service que quand il est en veille. Appuyez à nouveau sur la touche CLOCK ADJUST. Appuyez sur la touche CLOCK ADJUST durant La valeur des “minutes”...
  • Page 56: Réglage De La Minuterie 1

    Réglage de la minuterie 1 Utilisez les touches de saut ( . / / ) pour régler TIMER les minutes, puis appuyez sur la touche TIMER. Vous pouvez régler la minuterie pour lire ou enregistrer à une heure spécifique. Réglez l'horloge avant la minuterie. À...
  • Page 57 Utilisez les touches de saut ( . / / ) pour Utilisez les touches de saut ( . / / ) pour régler sélec t ionner “PL AY” (lec ture) ou “R EC” le volume, puis appuyez sur la touche TIMER. (enregistrement), puis appuyez sur la touche TIMER.
  • Page 58: Activation/Désactivation De La Minuterie

    Réglage de la minuterie 2 Caractéristiques techniques Section TUNER (syntoniseur) Activation/désactivation de la minuterie Plage de fréquences (FM) ..87,50 MHz à 108,00 MHz Appuyez sur la touche TIMER. Plage de fréquences (AM) ..522 kHz à 1 629 kHz Section LECTEUR DE CD Réponse en fréquence .
  • Page 59: Guide De Dépannage

    Si vous avez des problèmes avec votre système, lisez cette e N'utilisez pas de disques rayés, endommagés ou section et essayez de résoudre vous-même le problème avant d'appeler votre revendeur ou le service après-vente gondolés. TEAC. Tuner (syntoniseur) Générales Impossible d'entendre une station, ou le signal est Pas d’alimentation trop faible.
  • Page 60: Antes De Su Utilización

    Índice Antes de su utilización G racias por e le gir TE AC . Lea este manual Lea esto antes de hacer funcionar la atentamente para obtener el mejor rendimiento de unidad esta unidad. < Dado que la unidad puede calentarse durante el funcionamiento, deje siempre suficiente espacio a su alrededor para su ventilación.
  • Page 61 Mantenimiento Información para consumidores sobre recogida y eliminación de equipos viejos y pilas usadas Si la superficie de esta unidad se ensucia, límpiela con un paño suave o use un líquido limpiador Los siguientes símbolos en los productos, embalajes neutro diluido. Deje secar la superficie de la unidad y/o documentos que los acompañan significan que completamente antes de usarla.
  • Page 62: Discos

    CDs reproducirse correctamente en este reproductor. ordinarios. Es importante que no se guarden en ningún Si utiliza dichos discos en esta unidad, TEAC sitio donde les pueda dar directamente la luz solar. Corporation y sus subsidiarias no se responsabilizan También deben estar alejados de fuentes de calor como...
  • Page 63: Compatibilidad Mp3/Wma

    Interruptor de reinicialización RESET Compatibilidad MP3/WMA Esta unidad puede reproducir archivos MP3/ WMA grabados en un disco CD-R o CD-RW o en una memoria USB. Remítase al manual de instrucciones del software cuando cree un archivo MP3 o WMA usando un PC. <...
  • Page 64: Conexiones

    Conexiones PRECAUCIÓN < Apague la corriente antes de hacer las conexiones. < Lea las instrucciones de cada uno de los componentes que pretenda utilizar con esta unidad. < Asegúrese de insertar bien todos los conectores. Para evitar ruido y zumbidos, no agrupe los cables de las conexiones.
  • Page 65: Cable De Corriente

    PHONES Instalación de la pila 1. Afloje el tornillo de fijación. Para una escucha privada, conecte los auriculares a este conector y ajuste el volumen usando el control 2. Empuje el otro extremo de la tapa para abrir el VOLUME. compartimento.
  • Page 66: Nombres De Los Controles 1

    Nombres de los controles 1 PARTE SUPERIOR F G H FRONTAL MANDO A DISTANCIA...
  • Page 67 Tapa del compartimento de disco Altavoces (estéreo) Presione sobre el símbolo L situado en la tapa para abrirla hacia arriba. ERASE Utilice este botón para borrar un archivo de la memoria SNOOZE USB. Una vez alcanzada la hora especificada al activar el temporizador (TIMER ON), utilice este botón para apagar TUNING la unidad durante unos 5 minutos.
  • Page 68 Nombres de los controles 2 PARTE POSTERIOR MANDO A DISTANCIA Mando BASS CONTROL BAND Use este botón para subir y bajar la intensidad de las Use este botón para alternar entre las bandas de radio frecuencias graves. AM y FM. En el modo de CD o USB, utilice este botón para SLEEP detener la reproducción.
  • Page 69: Instalación De Las Pilas

    Mando a distancia El mando a distancia suministrado permite manejar la Precauciones con respecto a las pilas unidad desde la distancia. < Asegúrese de introducir las pilas con las polaridades Cuando utilice el mando a distancia, oriéntelo hacia el positiva “+” y negativa “_” correctamente orientadas. sensor de control remoto del panel frontal de la unidad.
  • Page 70: Funcionamiento Básico

    Funcionamiento básico Atenuador de pantalla Se puede cambiar la intensidad de brillo de la pantalla del panel frontal. Pulse el botón SNOOZE para oscurecer la pantalla. Púlselo otra vez para restablecer el brillo normal. Esta función también está operativa en el modo de Pulse el botón STANDBY/ON para encender la reposo (standby).
  • Page 71: Escuchar Un Disco Cd/Mp3/Wma

    Escuchar un disco CD/MP3/WMA < La unidad tarda unos segundos en cargar el disco. Ningún botón funcionará durante la carga. Espere hasta que el número total del pistas/archivos del disco aparezcan en pantalla. < Cuando no hay ningún disco cargado en el reproductor de CD, en la pantalla aparece “NO DISC”.
  • Page 72: Escuchar Mp3/Wma (Usb)

    Escuchar MP3/WMA (USB) Controlar la reproducción (disco/USB) < NO utilice discos duros USB de alta capacidad con INFO esta unidad. Pulse el botón FUNCTION para seleccionar “USB”. Conecte la memoria USB en el terminal USB. < Se pueden invertir los pasos Suspender la reproducción temporalmente (poner en pausa) Pulse el botón de REPRODUCCIÓN/PAUSA (G/J)
  • Page 73: Reproducción Directa

    Buscar una parte de una pista/archivo Reproducción directa Durante la reproducción, mantenga pulsado un Cuando la unidad está parada o reproduciendo, usted botón de SALTO (. o /) y suéltelo cuando haya puede usar los botones numéricos del mando a encontrado la parte.
  • Page 74: Reproducción Programada

    Reproducción programada Pulse los botones MP3 FOLDER repetidamente para seleccionar una carpeta en un disco o una memoria USB con archivos MP3/WMA. < Los archivos MP3/WMA no almacenados en carpetas son tratados como si estuvieran en la carpeta raíz (root) “001”. <...
  • Page 75 Añadir una pista/archivo al final del programa Con la unidad detenida, pulse el botón PROGRAM repetidamente hasta que en la pantalla parpadee “PXX”. PROGRAM Seleccione un número de carpeta usando el botón MP3 FOLDER y un número de pista/archivo usando un botón de SALTO (.
  • Page 76: Reproducción Repetida/Aleatoria/De Comienzos

    Reproducción repetida/aleatoria/de comienzos También puede seleccionar una pista/archivo para que se repita con la unidad parada. Pulse el botón PLAY MODE, seleccione una pista/archivo usando un botón de SALTO (. o /) y después pulse el botón de REPRODUCCIÓN/PAUSA (G/J) para comenzar la reproducción.
  • Page 77: Escuchar La Radio

    Escuchar la radio Botón FM MODE FM MODE Pulse este botón para alternar entre los modos STEREO y MONO. STEREO Pulse el botón FUNCTION para seleccionar “AM” Las emisiones FM estereofónicas se reciben en estéreo o “FM”. y se ilumina el indicador “STEREO”. MONO Seleccione este modo en las zonas donde la recepción de FM estéreo es débil.
  • Page 78: Sintonización De Presintonías

    Sintonización de presintonías En los siguientes 10 segundos, pulse el botón PROGRAM. 1, 2, 3..MP3/PRESET ( / ) La emisora es almacenada y el número de presintonía y el indicador MEMORY dejan de parpadear. Para almacenar más emisoras, repita los pasos Se pueden almacenar hasta 20 emisoras de FM y 20 de AM como canales presintonizados.
  • Page 79: Rds

    RDS (búsqueda PTY) 1 El Sistema de Datos por Radio (RDS) es un servicio de radiodifusión que permite a las emisoras enviar información adicional junto con las señales de la programación de radio convencional. El sistema RDS sólo funciona en la banda de FM en Europa.
  • Page 80: Escuchar Una Fuente Externa

    RDS (búsqueda PTY) 2 Escuchar una fuente externa Conecte el terminal de salida de auriculares PTY (Tipo de programa) (PHONES) de un reproductor de audio portátil NEWS: noticias breves, convocatorias, opinión al terminal de entrada auxiliar (AUX IN) de esta pública, informes, situaciones reales unidad usando un cable con mini conector AFFAIRS:...
  • Page 81: Antes De Grabar

    Antes de grabar Grabar en un USB 1 Esta unidad puede grabar en dispositivos de memoria FUNCTION USB desde CDs, desde la radio y desde la entrada auxiliar AUX IN, resultando archivos con formato MP3. PRECAUCIÓN < No desconecte la memoria USB durante la grabación. No desconecte el cable de corriente durante la grabación.
  • Page 82: Borrar Un Archivo De Un Usb

    Grabar en un USB 2 Borrar un archivo de un USB Si quiere parar de grabar, puse el botón RECORD otra ERASE vez. < Durante la grabación solamente se pueden usar el botón RECORD y el control de volumen. El control de volumen sólo afecta al nivel de grabación cuando se graba desde AUX IN.
  • Page 83: Ajustar El Reloj

    Ajustar el reloj Use los botones de SALTO ( . / / ) para CLOCK ADJ ajustar el valor de las horas. El reloj se puede ajustar tanto si la unidad está encendida como si está en modo de reposo (standby).
  • Page 84: Ajustar El Temporizador 1

    Ajustar el temporizador 1 Use los botones de SALTO ( . / / ) para TIMER ajustar los minutos y después pulse el botón TIMER. Usted puede ajustar el temporizador, que le servirá para reproducir o grabar a la hora especificada. Ajuste el reloj antes de ajustar el temporizador.
  • Page 85 Ahora está ajustado el horario de apagado (OFF). Use los botones de SALTO ( . / / ) para “PLAY” (reproducir) o “REC” (grabar) aparecerá en la ajustar el volumen y después pulse el botón pantalla. TIMER. Use los botones de SALTO ( . / / ) para seleccionar “PLAY”...
  • Page 86: Activar Y Desactivar El Temporizador

    Ajustar el temporizador 2 Especificaciones Sección del SINTONIZADOR Activar y desactivar el temporizador Rango de frecuencias (FM) ..87,50 MHz a 108,00 MHz Pulse el botón TIMER. Rango de frecuencias (AM)..522 kHz a 1.629 kHz Sección del REPRODUCTOR DE CD Respuesta de frecuencias .
  • Page 87: Solución De Posibles Fallos

    Si tiene problemas con el equipo, lea esta sección e intente Sintonizador resolver el problema usted mismo antes de llamar a su No se puede escuchar una emisora o la señal es distribuidor o a un servicio técnico TEAC. demasiado débil e Sintonice la emisora correctamente. General...
  • Page 88 7733 Telegraph Road, Montebello, California 90640 U.S.A. Phone: (323) 726-0303 TEAC CANADA LTD. 5939 Wallace Street, Mississauga, Ontario L4Z 1Z8, Canada Phone: (905) 890-8008 TEAC MEXICO, S.A. DE C.V. Río Churubusco 364, Colonia Del Carmen, Delegación Coyoacàn, CP 04100, México DF, México Phone: (5255) 5010-6000 TEAC UK LTD.

Table des Matières