Cattani Micro- Smart Manuel D'utilisation
Masquer les pouces Voir aussi pour Micro- Smart:
Table des Matières

Publicité

Les langues disponibles
  • FR

Les langues disponibles

Liens rapides

MANUALE ISTRUZIONI
OPERATOR'S HANDBOOK
MANUEL D'UTILISATION
GEBRAUCHSANWEISUNG
MANUAL DE ISTRUCCIONES
M I C R O
SUSTAINABLE PROGRESS

Publicité

Table des Matières
loading

Sommaire des Matières pour Cattani Micro- Smart

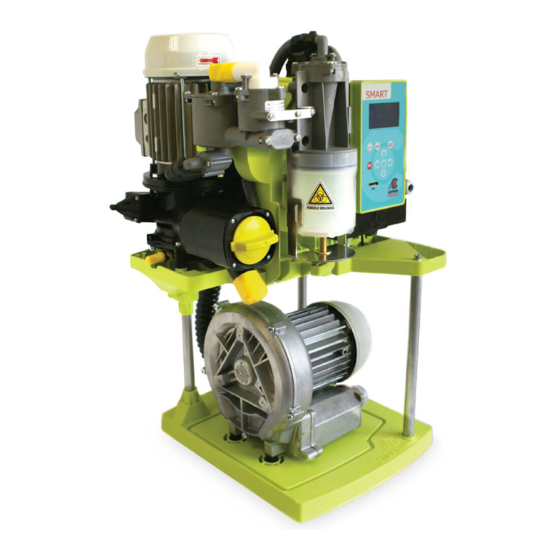
  • Page 1 MANUALE ISTRUZIONI OPERATOR’S HANDBOOK MANUEL D’UTILISATION GEBRAUCHSANWEISUNG MANUAL DE ISTRUCCIONES M I C R O SUSTAINABLE PROGRESS...
  • Page 2: Table Des Matières

    M I C R O SUSTAINABLE PROGRESS INDICE Dati generali di funzionamento aspiratore ad uso dentistico Micro-Smart .....2 Introduzione ........................3 Segnali ed avvisi .......................3 Montaggio e messa in funzione ..................4 Manutenzione ordinaria .....................7 Manutenzione straordinaria ....................8 Istruzioni per muoversi e modifi care alcuni parametri nei menù del Micro-Smart ...9 Descrizione allarmi ......................18 Trasporto e stoccaggio ....................19 Trasporto di apparecchi usati ...................19...
  • Page 3: Dati Generali Di Funzionamento Aspiratore Ad Uso Dentistico Micro-Smart

    • Dati generali di funzionamento Aspiratore ad uso dentistico Micro-Smart Modello Micro-Smart Tensione nominale 230 V Frequenza nominale 50/60 Hz Corrente nominale 6,3 A Tipo di protezione contro i Classe I contatti diretti e indiretti Modalità di impiego Funzionamento continuo Protezione contro l’umidità...
  • Page 4: Segnali Ed Avvisi

    Il presente manuale deve essere sempre disponibile per consultazioni durante il montaggio, la messa in funzione, l’uso e la manutenzione del Vostro aspiratore Micro-Smart. Nel sito Internet www.cattani.it sono rintracciabili i nostri manuali aggiornati. Ne consigliamo la consultazione specialmente per gli aggiornamenti sulla sicurezza.
  • Page 5: Montaggio E Messa In Funzione

    • Montaggio e messa in funzione • Precauzioni raccomandate HANDLE WITH CARE WARNING WARNING Prima di disimballare l’apparecchio, controllare l’esterno SHOCKWATCH dell’imballo, fare attenzione all’indicatore di urti, trovando RED INDICATES ROUGH HANDLING IF RED, NOTE ON BILL OF LADING l’indicatore rosso, od il cartone danneggiato, accettarlo INSPECTION MAY BE WARRANTED con riserva di controllare l’apparecchio.
  • Page 6 • Montaggio Prima di collegare l’aspiratore alla canalizzazione dell’im- pianto centralizzato, accertarsi che le tubazioni aspiranti siano pulite, i detriti pesanti potrebbero danneggiare l’ap- parecchio. Il tubo di aspirazione (in PVC (3) di colore grigio chiaro in dotazione all’apparecchio) deve essere collegato al porta- tubo (2) diametro 30 mm “ingresso fl uido aspirato”.
  • Page 7 Da ultimo si collegherà la linea dei consensi a bassa tensio- ne che collega il riunito al suo aspiratore, accertarsi che si tratti di un contatto pulito (non in tensione). • Messa in funzione, collaudo ed istruzione del personale. Una volta montato e collegato elettricamente l’aspiratore, basterà...
  • Page 8: Manutenzione Ordinaria

    • Manutenzione ordinaria La manutenzione ordinaria deve essere affi data al persona- le dello studio appositamente istruito. • Si raccomanda di fare particolare attenzione a tutti i segnali di pericolo e di proteggersi con occhiali, guanti e grembiule monouso. ALLARME: TEMPERATURA ELEVATA Ogni giorno (specialmente a fi...
  • Page 9: Manutenzione Straordinaria

    • Manutenzione straordinaria La manutenzione straordinaria va affi data ad un tecnico preparato ed in possesso dei ricambi originali. • Fare particolare attenzione a tutti i segnali di pericolo e proteggersi con occhiali, guanti e grembiule monouso. • Controllare lo stato di manutenzione ordinaria, verifi care che si usino prodotti Magnolia.
  • Page 10: Istruzioni Per Muoversi E Modifi Care Alcuni Parametri Nei Menù Del Micro-Smart

    Micro-Smart Menù principali All’accensione del Micro-Smart, il display grafi co mostra per 10 secondi il logo della Cattani S.p.A., al termine del quale apparirà il menù principale. Menù principale “A1” Sono visibili alcuni parametri come il livello di vuoto, il tem- po di attivazione dell’aspiratore, la temperatura, il conteni-...
  • Page 11 System Parameters Setup Si accede digitando la password “0000456000”. Quindi modifi care il ritardo allo spegnimento, ed altri para- metri di tipo tecnico. Factory Settings Restricted Access Menù non accessibile al pubblico, di esclusivo utilizzo dell’azienda Cattani.
  • Page 12 La “Password di accesso al menù “User Parameters” è “0000123000”. La “Password di accesso al menù “System Parameters Se- tup” è “0000456000”. Dal menù “CATTANI S.p.A.”, premere la freccia quindi la freccia e sul display apparirà il menù “Access Pas- sword”0000000000...
  • Page 13 Menù “Drive Status o Stato Inverter” Questo menù è visibile senza l’inserimento di alcuna pas- sword, ed ha la funzione di rendere visibili alcuni parametri sullo stato di funzionamento del Micro-Smart. Qui di segui- to sono indicati alcuni di questi parametri. Frequenza Soffi ante (Max.
  • Page 14 Temperatura del Sistema Massima Temperatura Registrata (60°C Allarme e Blocco Aspiratore resettabile ) Massima Temperatura Registrata (60°C memoria tempera- tura non resettabile ) Tensione di bus (Max. 390 V) Massima tensione di bus memorizzata (Max. 390 V) Tensione di Ripple Bus Livello di Vuoto Istantaneo (Max.
  • Page 15 Enter per confermare la modifi ca e conti- nuare. Generated Code - Codice Generato - Questo codice è generato dalla Cattani S.p.A.. Ogni appa- recchiatura ha un codice unico e dedicato. Per il momento non ha nessun tipo di utilizzo...
  • Page 16 Menù “System Parameters Setup o Impostazione Dati Sistema” A questo menù, si accede inserendo la “Password di Ac- cesso” 0000456000 (vedi istruzioni a pag. 11). Sarà ora possibile modifi care alcune impostazioni. Per cambiare i parametri in questo menù: Scorrere le pagi- ne dei menù...
  • Page 17 Massima Frequenza Soffi ante al livello Medio Limite corrente soffi ante livello Medio Livello di Vuoto Chirurgia Massima Frequenza Soffi ante al livello Chirurgia Limite corrente soffi ante livello Chirurgia Ritardo spegnimento (Max. 300 S ) Ritardo spegnimento Pompa (Max. 30 S )
  • Page 18 Ritardo spegnimento Ventola (Max. 300 S ) Opzioni Utilizzate Abilita o disabilita la lettura del sensore di amalgama. 0- senza separatore di amalgama 2- con separatore di amalgama Comandi ad Inverter. Riservato a regolazioni in fabbrica...
  • Page 19: Descrizione Allarmi

    • Nel sito internet www.cattani.it sono rintracciabili i nostri manuali aggiornati. Ne consigliamo la consultazione specialmente per gli aggiornamenti sulla sicurezza.
  • Page 20 • Trasporto e stoccaggio • Trasporto di apparecchi usati • Trasporto e stoccaggio • Nel trasporto e nello stoccaggio le attrezzature imballate potranno essere sottoposte alle temperature di -10 °C e + 60 °C. • I colli non potranno essere esposti all’acqua ed agli spruzzi e non potranno sopportare umidità superiore al 70%.
  • Page 22 M I C R O SUSTAINABLE PROGRESS INDEX General running data of the micro-smart dental aspirator ………………......22 Introduction ........................23 Signals and warnings ....................23 Installation and initial operation ..................24 Routine maintenance .....................27 Extraordinary maintenance ....................28 Instructions to navigate micro-smart menus and to modify some parameters ....29 Description of alarms.....................38 Transport and storage ....................39 Transport of second-hand appliances ................39...
  • Page 23: General Running Data Of The Micro-Smart Dental Aspirator

    • General running data Micro-Smart dental aspirator Model Micro-Smart Rated voltage 230 V Rated frequency 50/60 Hz Rated current 6,3 A Protection against electric shock Class I Operating conditions Continuous operation Protection against ingress of liquids Ordinary Degree of protection against Type B electric shock Max.
  • Page 24: Signals And Warnings

    This manual should be always available for consultation during installation, initial operation, use and maintenance operations of Micro-Smart. Our updated manuals are available at www.cattani.it. We recommend their consultation, especially for updates concerning safety. • Signals and warnings •Electrical shock risk: also 230 V...
  • Page 25: Installation And Initial Operation

    • Installation and initial operation • Recommended precautions HANDLE WITH CARE WARNING WARNING Before unpacking the appliance, check the warning shock- SHOCKWATCH watch on the carton. In the case of it being red or the car- RED INDICATES ROUGH HANDLING IF RED, NOTE ON BILL OF LADING ton being damaged, accept the material while reserving the INSPECTION MAY BE WARRANTED...
  • Page 26 • Installation Before connecting the aspirator to the piping of the centra- lized system, ascertain that aspiration piping is clean, as heavy debris can damage the appliance. Connect the PVC light grey aspiration tube (3) (supplied with the machine) to the 30 mm Ø tube-holder (2) (“aspira- ted fl uid inlet”).
  • Page 27 Finally, connect the low voltage line which connects the dental unit to the aspirator. Ascertain that the contacts on the dental unit are clean (volt-free contacts ). • Starting, fi nal testing and users instructions Install and connect the aspirator. Select the ON position on the switch, which is illuminated once one of the dental units has started working.
  • Page 28: Routine Maintenance

    • Routine maintenance Routine maintenance must be entrusted to specially in- structed surgery staff. • We recommend that special attention be paid to all dan- ger signals, and that protective goggles, gloves and dispo- sable overalls for personal protection be used. ALLARME: TEMPERATURA ELEVATA Daily...
  • Page 29: Extraordinary Maintenance

    • Extraordinary maintenance Extraordinary maintenance must be entrusted to a trained technician in possession of original spare parts. • Pay special attention to danger signals. Use protective goggles, gloves and disposable overalls for personal pro- tection. • Check that routine maintenance has been duly carried out and make sure that Magnolia products are used.
  • Page 30: Instructions To Navigate Micro-Smart Menus And To Modify Some Parameters

    Main menus When Micro-Smart is switched on, the display shows the Cattani logo for 10 seconds, after which time the main menu appears. Main Menu “A1” This menu shows some parameters such as: cycles, suc- tion activation time, temperature, presence/absence of the amalgam container and system software release.
  • Page 31 Secondary Menus Press to enter the Secondary Menus. Pressing the key takes you through the other menus. Drive Status This menu can be accessed without any access password. The display shows useful information about the Micro- Smart functioning. User Parameters Use the password 0000123000 to enter this menu.
  • Page 32 Enter Key to confi rm the password. The cursor will disappear. Press to return to the Cattani S.p.A. menu. It is now possible to modify the parameters of the User Parameters menu. Repeat the same process and enter the password 0000456000 instead of 0000123000 to gain access to the System Parameters Setup menu.
  • Page 33 Drive Status Menu This menu can be accessed without any access password. It displays various technical parameters regarding the real- time working conditions of MICRO-Smart. Listed below is the more commonly required information. Blower Output Frequency (max. setting: 120 Hz) Blower Output Voltage (max.
  • Page 34 System Temperature Maximum Detected Temperature (+60 °C: Alarm and Stop of the aspirator, it can be reset) Maximum Detected Temperature (+60 °C: Temperature me- mory, it cannot be reset) Power Bus Voltage (Max. 390V) Max. Detected Power Bus Voltage (Max. 390V) Power Bus Ripple Vacuum Set Point (max.
  • Page 35 Enter Key again to confi rm the change and continue. Generated Code This code is generated by Cattani S.p.A. Each unit is allo- cated a unique code. At present this code is not used. Activation Code At present this code is not used.
  • Page 36 System Parameters Setup menu To access this menu and/or make any changes, you are required to enter the access password 0000456000 (see instructions on page 31). To change any parameters in this menu: Scroll with through to display the required para- meter.
  • Page 37 Max. Blower Output Frequency at the Medium Setting Blower Current limit at the Medium Setting Surgery Vacuum Setting Max. Blower Output Frequency at the Surgical Setting Blower Current limit at the Surgical Setting Off Delay Time (max. setting: 300”) Pump Off Delay Time (max. setting: 30”)
  • Page 38 Blower Off Delay Time (max. setting: 300”) Running Options This enables or disables the amalgam level sensor. Set to 0: without amalgam separator Set to 2: with amalgam separator Drive Commands Factory use only.
  • Page 39: Description Of Alarms

    • The manufacturer reserves the right to modify the products for improvements, for technical, normative and functional reasons or for problems due to the availability of products or semi-fi nished products, without prior notice. • Our updated manuals are available at www.cattani.it. We recommend they are consulted especially for updates concerning safety.
  • Page 40 • Transport and storage • Transport of second-hand appliances • Transport and storage • Packed appliances can be transported and stored at a temperature ranging from -10 °C to + 60 °C. • Packages must be kept away from water and splashing and cannot tolerate humidity >70%. •...
  • Page 42 M I C R O SUSTAINABLE PROGRESS INDEX Données générales de fonctionnement de l’aspirateur pour l’usage dentaire Micro-smart ....42 Introduction ............................43 Signaux et avertissement ........................43 Installation et mise en marche ......................44 Entretien ordinaire ..........................47 Entretien extraordinaire ........................48 Instructions pour naviguer dans les menus du Micro-smart et modifi er certains paramètres .....
  • Page 43: Données Générales De Fonctionnement De L'aspirateur Pour L'usage Dentaire Micro-Smart

    • Données générales de fonctionnement Aspirateur pour l’usage dentaire Micro-Smart Modèle Micro-Smart Tension nominale 230 V Fréquence nominale 50/60 Hz Courant nominal 6,3 A Type d’isolation contre les contacts Classe I directs et indirects Mode d’emploi Fonctionnement continu Protection contre l’humidité Commune Degré...
  • Page 44: Signaux Et Avertissement

    Ce manuel doit être toujours disponible pendant l’installation, la mise en marche, l’utilisation et l’entretien du Micro-Smart. Sur le site internet www.cattani.it on peut trouver nos manuels techniques mis à jour. Nous recommandons de les consulter surtout pour les mises à jour concernant la sécurité.
  • Page 45: Installation Et Mise En Marche

    • Installation et mise en marche • Précautions recommandées HANDLE WITH CARE WARNING WARNING Avant d’installer l’appareil, contrôler l’extérieur de l’embal- SHOCKWATCH lage. Faites attention à l’étiquette shockwatch. Si elle est RED INDICATES ROUGH HANDLING IF RED, NOTE ON BILL OF LADING rouge ou si le carton a été...
  • Page 46 • Installation Avant de relier l’appareil à la canalisation du système cen- tralisé, s’assurer que les tuyauteries d’aspiration sont pro- pres ; les débris lourds pourraient endommager l’appareil. Le tuyau en PVC (3) gris clair qui est fourni avec l’appareil doit être relié...
  • Page 47: Fonctionnement

    A la fi n, brancher la ligne de télécommande des utilisateurs qui relie l’unit dentaire à l’aspirateur.S’assurer que le con- tact sur l’unit dentaire est sans tension (contact sec). • Mise en marche, essai et instruction des utilisateurs. Lorsque l’aspirateur a été installé et branché au courant, positionner l’interrupteur sur la position ON, l’interrupteur va s’éclairer et dès qu’un des units commande l’aspiration elle se met en marche.
  • Page 48: Entretien Ordinaire

    • Entretien ordinaire L’entretien ordinaire doit être confi é au personnel du cabi- net expressément instruit. • Nous recommandons de faire attention à tous les signaux de danger et de se protéger avec lunettes, gants et tablier jetable. ALLARME: TEMPERATURA ELEVATA Tous les jours, surtout le soir, ou plusieurs fois par jour selon le besoin •...
  • Page 49: Entretien Extraordinaire

    • Entretien extraordinaire L’entretien extraordinaire doit être confi é à un technicien formé et autorisé disposant des pièces de rechange d’ori- gine. • Faire attention à tous les signaux de danger et se proté- ger avec lunettes, gants et un tablier jetable. •...
  • Page 50: Instructions Pour Naviguer Dans Les Menus Du Micro-Smart Et Modifi Er Certains Paramètres

    • Instructions pour naviguer dans les menus du Micro-Smart et modifi er certains paramètres Menus principaux Au démarrage du Micro-Smart, le logo Cattani S.p.A. ap- paraît sur l’écran pendant 10 secondes avant que le menu principal soit visualisé. Menu principal “A1”...
  • Page 51: Menus Secondaires

    Menus secondaires Cliquer sur la touche entrée pour accéder aux menus secondaires. En cliquant la touche vous entrez dans les autres me- nus. Drive Status (Etats machine) Ce menu est accessible sans mot de passe. L’écran affi che des informations utiles sur le Micro-Smart. User Parameters (Paramètres utilisateur) Insérer le mot de passe 0000123000 pour entrer dans ce menu.
  • Page 52: Insérer Les Mots De Passe

    Le mot de passe pour accéder au menu User Parameters est 0000123000. Le mot de passe pour accéder au menu System Parame- ters Setup est 0000456000. Quand vous vous trouvez dans le menu CATTANI S.p.A., utilisez les touches directionnelles pour faire apparaître sur l’écran le menu Access Password Access Password 0000000000.
  • Page 53 Menu Drive Status (Menu Etats machine) Ce menu est accessible sans mot de passe. Il affi che diffé- rents paramètres techniques concernant les conditions de travail du Micro-Smart en temps réel. Les informations les plus consultées sont : Blower Output Frequency (Fréquence de fonctionnement du moteur d’aspiration) (Valeur maxi.
  • Page 54 System Temperature (Température Système) Maximum Detected Temperature (Température maxi. ef- façable détectée) (+ 60 °C : Alarme et Arrêt de l’aspirateur, réinitialisable) Maximum Detected Temperature (Température maxi. abso- lue détectée) (+ 60 °C : Mémoire Température non réinitia- lisable) Power Bus Voltage (Tension Bus) (Valeur maxi. : 390V) Maximum Detected Power Bus Voltage (Tension maxi.
  • Page 55: Menu User Parameters (Menu Paramètres Utilisateur)

    Generated Code (Code machine) Ce code est crée par Cattani S.p.A. Chaque machine pos- sède un code. Au présent ce code n’est pas utilisable. Activation Code (Code activation) Non utilisable au présent.
  • Page 56 Menu System Parameters Setup (Menu Paramétrages Système) Pour entrer dans ce menu et/ou modifi er certains pa- ramètres il faut insérer le mot de passe 0000456000 (suivre les instructions à la page 51). Pour modifi er les paramètres de ce menu faire défi ler les pages des sous-menus avec les touches jusqu’à...
  • Page 57 Max. Blower Output Frequency at the Medium Setting (Ré- glage de la fréquence maximum de l’aspirateur niveau 2) Blower Current Limit at the Medium Setting (Réglage de l’intensité maximum de l’aspirateur niveau 2) Surgery Vacuum Setting (Réglage de la dépression maxi- mum niveau 3) Max.
  • Page 58 Blower Off Delay Time (Réglage de la temporisation d’arrêt de l’aspirateur) (Valeur maxi. : 300˝) Running Options (Options Système) (Activation ou désactivation du détecteur du niveau d’amal- game) Sur 0 : absence séparateur amalgame Sur 1 : présence séparateur amalgame Drive Commands (Calibration Inverter) Procédure permettant la calibration de certains paramètres par le fabricant.
  • Page 59: Description Des Alarmes

    • Sur le site internet www.cattani.it on peut trouver nos manuels techniques mis à jour. Nous recommandons de les consulter surtout pour les mises à jour concernant la sécurité.
  • Page 60: Transport Et Stockage

    • Transport et stockage • Transport des appareils usagés • Transport et stockage • Températures extrêmes de transport et de stockage des équipements emballés : de - 10 °C à + 60 °C. • Les colis ne doivent pas être exposés à l’eau ou aux éclaboussures et doivent être stockés dans un endroit ou le taux d’humidité...
  • Page 62 M I C R O SUSTAINABLE PROGRESS INHALTSVERZEICHNIS Allgemeine Betriebsdaten Saugmaschine für die Zahnarztpraxis Micro-Smart....62 Einleitung ........................63 Signale und Hinweise ....................63 Montage und Inbetriebnahme..................64 Ordentliche Wartung .....................67 Ausserordentliche Wartung ...................68 Anleitung zum Steuern der Micro-Smart Menüs und zum Abändern von Parametern..69 Alarmbeschreibung .......................78 Transport und Lagerung ....................79 Transport von Gebrauchtgeräten ..................79...
  • Page 63: Allgemeine Betriebsdaten Saugmaschine Für Die Zahnarztpraxis Micro-Smart

    • Allgemeine Betriebsdaten Saugmaschine für die Zahnarztpraxis Micro-Smart Modell Micro-Smart Nennspannung 230 V Nennfrequenz 50/60 Hz Nennstrom 6,3 A Schutztyp gegen direkte Klasse I und indirekte Berührung Betriebsweise Dauerbetrieb Schutz gegen Feuchtigkeit normal Schutzgrad gegen direkte Typ B und indirekte Berührung Höchstaufnahme 1,30 kW Höchstdurchsatz...
  • Page 64: Einleitung

    Während der Montage, der Inbetriebnahme, des Betriebes und der Wartung des Micro-Smarts sollte das Handbuch jederzeit als Ratgeber verfügbar sein. Auf der Internetseite www.cattani.it fi nden Sie unsere aktualisierten Handbücher. Wir empfehlen, diese Handbücher und insbesondere die enthaltenen Aktualisierungen betreffend Sicherheit zu lesen.
  • Page 65: Montage Und Inbetriebnahme

    • Montage und Inbetriebnahme • Empfohlene Vorsichtsmaßnahmen HANDLE WITH CARE WARNING WARNING Vor dem Auspacken die Außenseite der Verpackung kon- SHOCKWATCH trollieren. Im Falle, dass der Shockwatch-Indikator rot RED INDICATES ROUGH HANDLING IF RED, NOTE ON BILL OF LADING geworden ist oder die Verpackung beschädigt wurde, das INSPECTION MAY BE WARRANTED Material annehmen, sich aber die Möglichkeit vorbehalten, MODEL L-55 (37g)
  • Page 66: Montage

    Heller Bodenbelag aus Holz, Linoleum, Gummi oder Mar- mor kann beim Kontakt mit dem Vibrationsschutz aus Gum- mi (1) seine Farbe ändern oder dunkle Flecken bekommen. Daher ist eine Kunststoffunterlage oder ein anderes für die- sen Zweck geeignetes Produkt zwischen Vibrationsschutz und Boden zu verwenden, um den Bodenbelag vor Abrieb- spuren zu schützen.
  • Page 67 Rohr in den Eingang des zentrifugalen Abscheiders ste- cken (Der zentrifugale Abscheider ist auf einer höherer Fläche) (Abb.B, Seite 101). Die abgesaugte Flüssigkeit wird von der Saugmaschine abgesaugt. Nach der Montage ist das Versorgungskabel an das Strom- netz nach der Norm EN 61008-1 anzuschließen. Zuletzt ist die Steuerleitung der Dentaleinheit an die Sau- gmaschine anzuschließen.
  • Page 68: Ordentliche Wartung

    • Ordentliche Wartung • Amalgamabscheider gemäß den Normen ISO 11143 Auf Anfrage liefern wir den Micro-Smart auch mit dem Amalgamabscheider „Hydrozyklon ISO 5,5 l/min.” (kom- plett mit Gebrauchsanweisung). ALLARME: Die ordentliche Wartung muss entsprechend eingewiese- TEMPERATURA ELEVATA nem Praxispersonal anvertraut werden. •...
  • Page 69: Ausserordentliche Wartung

    • Außerordentliche Wartung Mit der außerordentlichen Wartung ist ein kompetenter Techniker zu beauftragen, der über Originalersatzteile ver- fügt. • Auf alle Warnhinweise besonders achten und sich mit Schutzbrille, Handschuhen und Einwegschürze schützen. • Den Zustand der ordentlichen Wartung überprüfen und sicherstellen, dass Magnolia-Produkte verwendet werden.
  • Page 70: Anleitung Zum Steuern Der Micro-Smart Menüs Und Zum Abändern Von Parametern

    • Anleitung zum Steuern der Micro-Smart Menüs und zum Abändern von Parametern Hauptmenüs Wenn der Micro-Smart angeschaltet wird, zeigt das Display für 10 Sekunden das CATTANI-Logo. Danach erscheint das Hauptmenü. Hauptmenü “A1” Dieses Menü zeigt einige Parameter wie: Unterdruck, Ab- saugaktivierungszeit, Temperatur, Abwesenheit des Amal- gambehälters und Systemsoftwareversion.
  • Page 71 Untermenüs drücken, um in die Untermenüs zu gelangen. Durch Drücken der Scroll Down Taste gelangt man durch die anderen Menüs. Drive Status (Betriebszustand) Auf dieses Menü kann ohne Zugangspasswort zugegriffen werden. Das Display zeigt nützliche Informationen über den Micro-Smart. User Parameters (Benutzerparameter) Das Passwort 0000123000 benutzen, um in dieses Menü...
  • Page 72 Zahl 3 erscheint. Die Eingabetaste drücken, um das Passwort zu bestäti- gen. Der Cursor verschwindet. drücken, um zum Menü „Cattani S.p.A.“ zurückzu- kehren. Es ist nun möglich, die Parameter des Menüs „User Para- meters“ abzuändern. Den Prozess wiederholen und das Passwort 0000456000 an Stelle von 0000123000 eingeben, um Zugang zum Menü...
  • Page 73 Drive Status (Betriebszustand) Auf dieses Menü kann ohne Passwort zugegriffen werden. Es zeigt verschiedene technische Parameter bezüglich der Echtzeit-Arbeitungsbedingungen des Micro-Smarts. Unten aufgelistet sind weitere allgemein benötigte Informationen. Blower Output Frequency (Arbeitsfrequenz des Absau- gmotors) (max. Einstellung: 120 Hz) Blower Output Voltage (Spannung des Absaugmotors) (max.
  • Page 74 System Temperature (Temperatur des Systems) Maximum Detected Temperature (Max. gespeicherte Tem- peratur) (+60 °C: Alarm und Stopp des Absauggerätes zurücksetzbarer Wert) Maximum Detected Temperature (Max. gespeicherte Tem- peratur) (+60 °C: Temperaturspeicher, nicht zurücksetzba- rer Wert) Power Bus Voltage (Gleichrichterspannung) (max. Einstel- lung: 390V) Max.
  • Page 75 Die Eingabetaste erneut drücken, um die Änderung zu bestätigen und fortzufahren. Generated Code (Herstellercode) Dieser Code wird von der Cattani S.p.A. erzeugt. Jeder Einheit ist ein einziger Code zugeordnet. Dieser Code ist derzeit nicht benutzbar. Activation Code (Aktivierungskode) Dieser Code ist derzeit nicht benutzbar.
  • Page 76 System Parameters Setup menu (Menü Systemparametereinstellung) Um Zugang zu diesem Menü zu bekommen und/ oder Änderungen vorzunehmen, muss man das Passwort 0000456000 eingeben (siehe Anweisungen auf Seite 71). Um Parameter in diesem Menü abzuändern: scrollen, um das benötigte Parameter im Display anzuzeigen.
  • Page 77 Max. Blower Output Frequency at the Medium Setting (Max. Arbeitsfrequenz des Absaugmotors bei der mittleren Einstellung) Blower Current limit at the Medium Setting (Max I. des Ab- saugmotors bei der mittleren Einstellung) Surgery Vacuum Setting (Chirurgische Unterdruckeinstel- lung) Max. Blower Output Frequency at the Surgical Setting (Max.
  • Page 78 Blower Off Delay Time (Abschaltverzögerung des Lüfters) (Max. Einstellung: 300˝) Running Options (Systemeinstellungskode) Diese Option aktiviert oder deaktiviert den Amalgamstan- dsensor. Einstellung auf 0: ohne Amalgamabscheider Einstellung auf 2: mit Amalgamabscheider Drive Commands (Systemkalibrierung) Nur Werksbenutzung.
  • Page 79: Alarmbeschreibung

    Produkte vor, wenn technische Anforderungen, Produktverbesserungen, Zulassungs- und Betriebsschwierigkeiten sowie die Verfügbarkeit von Produkten und Ersatzteilen es erfordern. • Auf der Internetseite www.cattani.it fi nden Sie unsere aktualisierten Handbücher. Wir empfehlen, diese Handbücher und insbesondere die Aktualisierungen betreffend Sicherheit zu lesen.
  • Page 80: Transport Und Lagerung

    • Transport und Lagerung • Transport von Gebrauchtgeräten • Transport und Lagerung • Beim Transport und bei der Lagerung können die verpackten Ausrüstungen Temperaturen zwischen - 10 °C und + 60 °C ausgesetzt werden. • Die Kolli dürfen keinem Wasser und Wasserstrahl und keiner Feuchtigkeit über 70% ausgesetzt werden.
  • Page 82 M I C R O SUSTAINABLE PROGRESS INDICE Datos generales de funcionamiento aspirador para usos dentales Micro-Smart....82 Introducción ........................83 Señales y avisos ......................83 Montaje y puesta en funcionamiento ................84 Mantenimiento ordinario ....................87 Mantenimiento extraordinario ..................88 Instrucciones para moverse y modifi car algunos parámetros en los menús ....89 Descripciones de alarmas .....................98 Transporte y almacenamiento ..................99 Transporte de los aparatos usados ................99...
  • Page 83: Datos Generales De Funcionamiento Aspirador Para Usos Dentales Micro-Smart

    • Datos generales de funcionamiento Aspirador para usos dentales Micro-Smart Modelo Micro-Smart Tensión nominal 230 V Frecuencia nominal 50/60 Hz Corriente nominal 6,3 A Tipo de protección contra Clase I los contactos directos o indirectos Modalidad de empleo Funcionamiento continuo Protección contra la humedad Común Grado de protección contra los contactos...
  • Page 84: Señales Y Avisos

    Este manual debe estar siempre disponible para ser consultado durante el montaje, la puesta en Funcionamiento, el uso y el mantenimiento del Micro-Smart. En el sitio de Internet www.cattani.it pueden encontrarse nuestros manuales actualizados. Recomendamos su consulta especialmente para las actualizaciones sobre la seguridad.
  • Page 85: Montaje Y Puesta En Funcionamiento

    • Montaje y puesta en funcionamiento • Precauciones recomendadas HANDLE WITH CARE WARNING WARNING Antes de desembalar el aparato, comprobar el exterior del SHOCKWATCH embalaje, poner atención al indicador de daños, si el indi- RED INDICATES ROUGH HANDLING IF RED, NOTE ON BILL OF LADING cador está...
  • Page 86 Los pavimentos de color claro, de madera, linóleo, goma o mármol, en contacto con los antivibrantes de goma (1), pueden cambiar de color o quedar marcados por sombras más oscuras. Aislar por tanto los antivibrantes del suelo con un hoja de plástico o de otro producto adecuado para tal fi n.
  • Page 87 Terminado el montaje se deberá conectar el cable de ali- mentación a la línea eléctrica del edifi cio según la norma- tiva EN 61008-1. Por último se conectará la línea de las señales de baja ten- siónque une el equipo al aspirador. Asegurarse de que se trata de un contacto límpio (sin tensión).
  • Page 88: Mantenimiento Ordinario

    • Mantenimiento ordinario • El separador de amalgama ISO según las normas ISO 11143 El Micro-Smart puede ser pedido con separador de amal- gama “Hidrociclón ISO 5,5 l/min.” (el separador de amalga- ma va siempre acompañado del manual de instrucciones y manutención).
  • Page 89: Mantenimiento Extraordinario

    • Mantenimiento extraordinario El mantenimiento extraordinario debe ser confi ado a un té- cnico preparado dotado de repuestos originales. • Poner particular atención a todas las señales de peligro y protegerse con gafas, guantes y mascarillas monouso. • Controlar el estado de mantenimiento ordinario; verifi car que se usen productos Magnolia.
  • Page 90: Instrucciones Para Moverse Y Modifi Car Algunos Parámetros En Los Menús

    Menús principales Al encender el Micro-Smart, el display gráfi co muestra por 10 segundos el logo de Cattani S.p.A., al fi nal del cual apa- recerá el menú principal. Menú principal “A1” Son visibles algunos parámetros como la frequencia, el tiempo de activación del aspirador, la temperatura, el con-...
  • Page 91 Se accede introduciendo la password “0000456000”. Permite modifi car el retardo de parada y otros parámetros de tipo técnico. Factory Settings Restricted Access (Ajustes fábrica. Acceso restr.) Menú no accesible al público, es para uso exclusivo de la fábrica Cattani.
  • Page 92 La “Password” de acceso al menú “User Parameters” es “0000123000”. La “Password” de acceso al menú “System Parameters Setup” es “0000456000”. Del menú “CATTANI S.p.A.”, pulsar la fl echa después la fl echa y en el display aparecerá el menú “Access Password”...
  • Page 93 Drive Status Menu (Menú Acceso Libre) Este menú es visible sin la introducción de niguna “pas- sword”, y tiene como fi nalidad hacer visibles algunos pará- metros del estado de funcionamento del Micro-Smart. A continuación se indican algunos de éstos parámetros. Blower Output Frequency (Frecuencia Actual Motor Aspi- ración) (Máx.
  • Page 94 System Temperature (Temperatura del Sistema) Maximum Detected Temperature (Máxima Temperatura Detectada) (+60 °C: Alarma y Bloqueo motor Aspiración reseteable) Maximum Detected Temperature (Máxima Temperatura Detectada) (+60 °C: memoria temperatura no reseteable) Power Bus Voltage(Tension Bus potencia) (Máx. 390 V) Max. detected Power Bus Voltage (Máx. Tension Bus po- tencia detectada) (Máx.
  • Page 95 Pulsar Enter para confi rmar la modifi cación y continuar. Generated Code (Código Generado) Este código es generado por Cattani S.p.A. Cada aparato tiene un código único específi co. Por el momento no tiene- ningún tipo de uso. Activation Code (Código de Activación)
  • Page 96 System Parameters Setup Menu (Menú Ajustes Datos del Sistema) A este menú se accede introduciendo la “Password de Ac- ceso” 0000456000 (ver instrucciones en la pag. 91). Será ahora posible realizar algunas modifi caciones. Para cambiar los parámetros en este menu: Mover las pá- ginas de los menús con las fl echas para buscar el o los parámetros a modifi car.
  • Page 97 Max. Blower Output Frequency at the Medium Setting (Máx. Frecuencia Salida Motor Aspiración al Nivel Medio) Blower Overall Current limit at the Medium Setting (Limite Corriente Motor Aspiración al Nivel Medio) Surgery Vacuum Level (Nivello de Vacío Quirúrgico) Max. Blower Output Frequency at the Surgery Setting (Máx. Frecuencia Salida Motor Aspiración al Nivel Quirúrgico) Blower Overall Current limit at the Surgery Setting (Limite Corriente Motor Aspiración al Nivel Quirúrgico)
  • Page 98 Fan Off Delay Time (Retardo Apagado Véntola) (Máx.: 300˝) Running Options (Opciones usadas) Habilita o deshabilita la lectura del sensor de amalgama. 0-sin separador de amalgama 2-con separador de amalgama Drive Commands (Comandos Inverter) Reservado a regulaciones en fábrica.
  • Page 99: Descripciones De Alarmas

    • En la página web: www.cattani.it se puede encontrar los manuales actualizados. Se aconseja su consulta especialmente para las actualizaciónes de seguridad.
  • Page 100 • Transporte y almacenamiento • Transporte de los aparatos usados • Transporte y almacenamiento • Durante el transporte y almacenamiento, los equipamientos embalados podrán ser expuestos a temperaturas comprendidas entre - 10 °C y + 60 °C. • Los bultos no podrán ser expuestos al agua y salpicaduras y no podrán soportar una humedad superior al 70%.
  • Page 102: Zeichnungen

    • SCHEMA DI MONTAGGIO MICRO-SMART • MICRO-SMART INSTALLATION LAYOUT MONTAGGIO AL PIANO INSTALLATION ON THE SAME FLOOR OF THE DENTAL UNITS Fig. A Draw. A all’aspiratore to the aspirator MONTAGGIO SOTTOSTANTE INSTALLATION ON A LOWER FLOOR THAN THE ONE OF THE DENTAL UNITS Fig.
  • Page 103 • COLLEGAMENTI CIRCUITO INVERTER AC100 • INVERTER AC100 CONNECTIONS TI P SU PPORT DI SPLAY LI NE ALARM CONT ACT CENTRIFUGAL SEPARATOR BLOWER Fig. C Draw. C...
  • Page 104 Fig. D Draw. D...
  • Page 105 • PROVE DI DIAGNOSI SUI MICRO-SMART • DIAGNOSTIC TESTS ON MICRO-SMART Per verifi care il corretto funzionamento del Micro-Smart, si possono effettuare alcuni test di tipo dinamico, di seguito esposti. Si dovrà eseguire il test a macchina in funzione e con l’ingresso d’aspirazione libero, non collegato alla tubazione. Here below you can fi nd the description of some dynamic tests useful to check the correct working of Micro-Smart.
  • Page 106 • DIAGRAMMA DI LAVORO IN ASPIRAZIONE (MOD. MICRO-SMART) AL VARIARE DELLE FREQUENZE • ASPIRATION WORKING DIAGRAM (MODEL MICRO-SMART) WITH VARIABLE FREQUENCY Fig. F Draw.F...
  • Page 107 023770 025401 014057 Fig. G COD. 023770 CENTRALINO ELETTRICO COD. 025401 SEPARTORE CENTRIFUGO Draw. G COD. 014057 SOFFIANTE CODE 023770 ELECTRIC CONTROL PANEL CODE 025401 CENTRIFUGAL SEPARATOR CODE 014057 BLOWER...
  • Page 108 Scarico liquidi Liquids outlet Aspirazione Aspiration Aria espulsa Exhausted air outlet Fig. H Draw.H...
  • Page 109 ESAM: 1225173 - 1253783 - 0791751 FOREIGN PATENTS OR PATENT APPLICATIONS: CATTANI: AU 546.143 - US 4,386,910 - US 4,787,846 - US 5,039,405 - US 5,002,486 AU 580839 - US 4,684,345 - US 5,330,641 - AT 0040181 - CH 0040181 - DE 0040181...

Table des Matières