Num'axes CANICOM 800 Expert Guide D'utilisation
Masquer les pouces Voir aussi pour CANICOM 800 Expert:
Table des Matières

Publicité

Les langues disponibles
  • FR

Les langues disponibles

  • FRANÇAIS, page 3

Liens rapides

Guide d'utilisation
User's guide
Manual de instrucciones
Gebrauchsanleitung
Manuale d'uso
Fr
3
Gb 19
Es 35
D
51
It
67

Publicité

Table des Matières
loading

Sommaire des Matières pour Num'axes CANICOM 800 Expert

  • Page 1 Guide d’utilisation User’s guide Gb 19 Manual de instrucciones Es 35 Gebrauchsanleitung Manuale d’uso...
  • Page 2 / declares that les colliers d’éducation / the training collars CANICOM 800 Expert / CANICOM 1200 Expert satisfont à toutes les dispositions de la Directive N° 1999/5/CE du 07/04/99 du Conseil Européen comply to all dispositions of the European Council Directives below N° 1999/5/CE...
  • Page 3 électromagnétiques hautes fréquences (fréquence = 869 Mhz, puissance Maxi d’émission = 250 mW pour le CANICOM 800 Expert et 500 mW pour le CANICOM 1200 Expert). Ces appareils répondent à la norme européenne ETSI EN 300 220.
  • Page 4: Table Des Matières

    Usure/remplacement de la ou des pile(s) de la télécommande ..............Usure/recharge de la batterie du collier ......................Changement des électrodes ........................... Vérification de votre CANICOM 800 Expert/CANICOM 1200 Expert ............. Pour obtenir les meilleures performances ....................Ajustement du collier ............................
  • Page 5: Composition Du Canicom 800 Expert

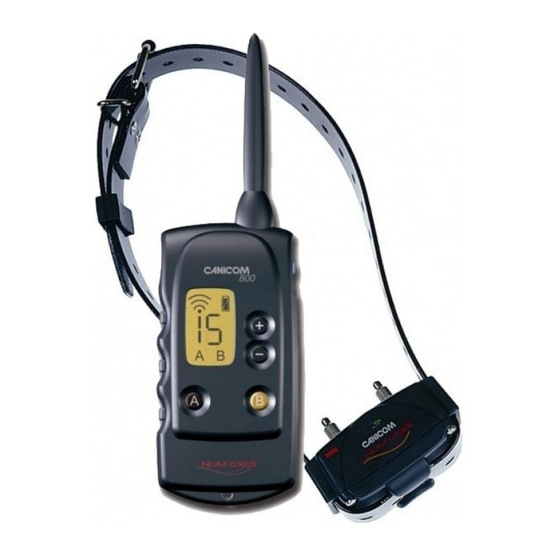
    - une sangle - une dragonne - un chargeur pour le collier - ce guide d’utilisation - une télécommande CANICOM 800 Expert équipée d’une pile lithium 3 Volts CR2 Composition du CANICOM 1200 Expert  - un collier CANICOM Expert équipé d’une - une clé...
  • Page 6 1 à 15 de 1 à 18 Indicateur de sélection Indicateur de sélection du collier A ou B du collier 1, 2, 3 ou 4 Fig. 4 - Ecran LCD CANICOM 800 Expert Fig. 5 - Ecran LCD CANICOM 1200 Expert...
  • Page 7: Première Mise En Service

    Fr - 7 Première mise en service    Charger la batterie du collier CANICOM Expert Pour charger votre collier, veuillez procéder de la façon suivante : − connectez le chargeur à une prise secteur murale − connectez le cordon d’alimentation au collier, après quelques secondes, le témoin lumineux vert du collier clignote (double clignotement) −...
  • Page 8 Fig. 8 Mise en/hors service du collier Mise en/hors service du collier récepteur avec une télécommande récepteur avec une télécommande CANICOM 800 Expert CANICOM 1200 Expert Mettre physiquement en Mettre physiquement en contact ces 2 zones pendant contact ces 2 zones pendant une durée d’une seconde...
  • Page 9 1. Mettre en service la télécommande : appui prolongé d’une seconde sur le bouton Marche/Arrêt 2. Sélectionner le collier que vous souhaitez coder : Pour CANICOM 800 Expert : Faire un appui bref sur la touche A ou B pour sélectionner le collier (la lettre A ou B apparaît en bas de l’écran LCD).
  • Page 10: Utilisation De La Télécommande

    Pour sélectionner le chien sur lequel vous souhaitez agir, procédez de la façon suivante : Pour CANICOM 800 Expert : faites un appui bref sur la touche A ou B de la télécommande (la lettre A ou B apparaît en bas de l’écran LCD) Pour CANICOM 1200 Expert : faites un appui bref sur la touche 1, 2, 3 ou 4 de la télécommande (le chiffre...
  • Page 11 Les touches « + » et « - » permettent de régler très rapidement le niveau d’intensité des stimulations délivrées par le collier. 15 niveaux de stimulations sont disponibles sur la télécommande CANICOM 800 Expert 18 niveaux de stimulations sont disponibles sur la télécommande CANICOM 1200 Expert Niveau 1 : stimulation très faible –...
  • Page 12: Usure/Remplacement De La Ou Des Pile(S) De La Télécommande

    Vous pouvez vous procurer les piles adéquates auprès de NUM’AXES ou de votre distributeur. Remplacez la ou les pile(s) usagée(s) par de nouvelles piles de même type : − une pile lithium 3 Volts CR2 pour la télécommande CANICOM 800 Expert − deux piles alcalines LR06 pour la télécommande CANICOM 1200 Expert Pour changer la pile, procédez de la façon suivante :...
  • Page 13: Usure/Recharge De La Batterie Du Collier

    − Mettez la télécommande et le collier en marche. − Sélectionnez le collier que vous souhaitez tester : Pour CANICOM 800 Expert : Faites un appui bref sur la touche A ou B pour sélectionner le collier (la lettre A ou B apparaît en bas de l’écran LCD).
  • Page 14: Pour Obtenir Les Meilleures Performances

    Ces ondes radio sont sensibles et « portent » à une distance pouvant atteindre 800 mètres environ pour le CANICOM 800 Expert et 1200 m pour le CANICOM 1200 Expert (distance variable selon l’environnement et le relief dans lequel vous évoluez).
  • Page 15: Précautions D'emploi

    Fr - 15 - Ne brûlez pas les étapes pour une éducation positive et sereine : • Choisissez un terrain familier où votre chien a l’habitude d’aller. • Déterminez le niveau de stimulation à partir duquel votre chien réagit en commençant par le niveau d’intensité...
  • Page 16: Entretien

    De plus, cette manipulation aura pour effet d’annuler votre garantie. - Ne laissez pas votre ensemble CANICOM 800 Expert/CANICOM 1200 Expert à la portée des enfants. Ne le considérez pas comme un jouet pour vos enfants ou vous-même.
  • Page 17: Caractéristiques Techniques

    Fr - 17 Caractéristiques techniques   Télécommande Télécommande Collier CANICOM 800 Expert CANICOM 1200 Expert CANICOM Expert Alimentation 1 pile lithium 3 Volts CR2 2 piles alcalines LR06 Batterie lithium polymère rechargeable Autonomie Environ 30 000 Environ 50 000 Environ 3 jours déclenchements...
  • Page 18: Enregistrement De Votre Produit

    Fr - 18 3. Si le produit est reconnu défectueux, NUM’AXES le réparera ou l’échangera selon son choix. 4. NUM’AXES garantit le délai d’intervention de 48 heures (hors délais postaux). 5. NUM’AXES ne pourra être tenu pour responsable des dommages qui pourraient résulter d’une mauvaise utilisation ou d’une panne du produit.
  • Page 19 These devices emit some static magnetic fields (a magnet is located in the remote control). Frequency= 869 Mhz, at = 250 mW for CANICOM 800 Expert and 500 mW for CANICOM 1200 Expert The devices comply with the European Standard ETSI EN 300 220.
  • Page 20 Checking/replacing battery(ies) of remote control ..................Checking/reloading battery of receiver collar ....................Changing the contact points ........................... How to check that your CANICOM 800 Expert/CANICOM 1200 Expert is functioning properly ....Getting the best results ..........................Fitting the collar ..............................
  • Page 21: Contents Of The Product Canicom 800 Expert

    Gb - 21 Contents of the product CANICOM 800 Expert  - CANICOM Expert receiver collar fitted with - magnetic key (magnet) a rechargeable battery and short contact - neon test lamp points - pair of long contact points - strap...
  • Page 22 1 to 15 from 1 to 18 Collar selection indicator Collar selection indicator A or B 1, 2, 3 or 4 Diagram 4 - CANICOM 800 Expert LCD SCREEN Diagram 5 - CANICOM 1200 Expert LCD SCREEN...
  • Page 23: First Use From New

    Gb - 23 First use from new    Charge of the CANICOM Expert collar To charge your collar, proceed in the following way: − connect the charger to a wall outlet − connect the power cord to the collar, after a few seconds, the green indicator light starts blinking −...
  • Page 24 Diagram 7 Diagram 8 Activate/Deactivate a collar Activate/Deactivate a collar with a CANICOM 800 Expert with a CANICOM 1200 Expert remote control remote control Place these 2 areas together Place these 2 areas together...
  • Page 25 2. Select the collar you want to code on the remote control: For CANICOM 800 Expert: Press the A or B key in order to select the collar (the letter A or B will appear on the LCD screen).
  • Page 26: How To Use The Remote Control

    How to use the remote control   The CANICOM 800 Expert remote control is designed to operate with 1 or 2 receiver collars. The CANICOM 1200 Expert remote control is designed to operate with 1, 2, 3 or 4 receiver collars.
  • Page 27  “+” and “-”: stimulation level control buttons Use the +/- buttons for rapid adjustment of the level of stimulation of the receiver collar. 15 levels of stimulation are available for CANICOM 800 Expert. 18 levels of stimulation are available for CANICOM 1200 Expert.
  • Page 28: Checking/Replacing Battery(Ies) Of Remote Control

    You can purchase the suitable batteries from NUM’AXES or from your distributor. Remove the old battery(ies) and replace it(them): - 1 3-V Lithium CR2 battery for the CANICOM 800 Expert remote control - 2 alkaline LR06 AA batteries for the CANICOM 1200 Expert remote control Replace the battery(ies) as follows: - On the back of the remote control, unscrew the screw and remove the battery cover (ref.
  • Page 29: Checking/Reloading Battery Of Receiver Collar

      functioning properly You can check that your CANICOM 800 Expert/CANICOM 1200 Expert is operating correctly at any time. - Before doing so, make sure that the receiver collar is turned “Off” (indicator light off). - Fix each wire of the neon test lamp under each contact point (unscrewing them lightly and retightening them so as to pinch the test lamp wires under the contact points).
  • Page 30: Getting The Best Results

    Gb - 30 Getting the best results   The training instructions you send to your dog are sent from the remote control to the receiver collar(s) by radio waves. These radio waves are sensitive and the range reaches approximately 800 meters for the CANICOM 800 Expert and 1200 meters for the CANICOM 1200 Expert (depending on geography and environment).
  • Page 31: The Difference Between "Continuous" And "Flash" Stimulation

    Moreover, if you do this, your guarantee will be cancelled. - Keep your CANICOM 800 Expert/CANICOM 1200 Expert unit out of reach of children. It is not a toy for you or your children.
  • Page 32: Maintenance

    Troubleshooting   Should your CANICOM 800 Expert/CANICOM 1200 Expert stop working or develop a fault, first read this guide over, and then check the batteries and replace or recharge them if necessary. Also check that you are using the product correctly.
  • Page 33: Guarantee

    Gb - 33 CANICOM 800 Expert CANICOM 1200 Expert CANICOM Expert remote control remote control receiver collar Radio operator safety By microcontroller By microcontroller By microcontroller and coding Battery level Indicator on the Indicator on the Indicator light indicator LCD screen...
  • Page 34: Register Your Product

    Gb - 34 Register your product   Your product can be registered on our website at www.numaxes.com. Spare parts   You can purchase spare parts (batteries, strap, contact points, additional collars …) from your supplier at any time. Collection and recycling of your device at the end of its life  ...
  • Page 35 (frecuencia = 869 Mhz, una potencia de emisión máxima = 250 mW para CANICOM 800 Expert y 500 mW para CANICOM 1200 Expert). Estos aparatos se ajustan a la normativa europea ETSI EN 300 220.
  • Page 36 Desgaste/sustitución de la(s) pila(s) del mando a distancia ................Desgaste/carga de la batería del collar ......................Cambio de los electrodos ..........................Verificación de su CANICOM 800 Expert/CANICOM 1200 Expert ..............Para obtener los mejores resultados ......................Ajuste del collar ...............................
  • Page 37: Composición Del Canicom 800 Expert

    - 1 correa de seguridad - 1 cargador de batería - este manual de instrucciones - 1 mando CANICOM 800 Expert equipado con una pila de litio 3 V CR2 - 1 llave magnética (imán) Composición del CANICOM 1200 Expert ...
  • Page 38 + codificación radio mando/collar mando/collar verde correa roja Fig. 2 - Mando a distancia CANICOM 800 Expert Fig. 3 - Mando a distancia CANICOM 1200 Expert Indicador de Indicador de Indicador Indicador emisión radio emisión radio...
  • Page 39: Primera Puesta En Servicio

    Es - 39 Primera puesta en servicio    Carga de la batería del collar CANICOM Expert Para cargar la batería, proceda de la siguiente manera: − conecte el cargador a un enchufe de red − conecte el cargador al collar en la toma de carga, tras algunos segundos, la luz indicadora verde parpadea (doble parpadeo) −...
  • Page 40 Es - 40 Fig. 6 Puesta en/fuera de servicio del collar CANICOM Expert con la llave magnética  Puesta en/fuera de servicio del collar con el mando a distancia Un imán situado en el mando a distancia permite poner en servicio o fuera de servicio el collar receptor. - Puesta en servicio: acercar la marca que se encuentra en el lado del mando hasta tocar el indicador rojo del collar receptor durante 1 segundo (cf.
  • Page 41 2. Seleccionar el collar que desean codificar, procediendo de la manera siguiente: Para el CANICOM 800 Expert: Pulsar la tecla A o B elegida (la letra A o B aparece abajo de la pantalla LCD). Para el CANICOM 1200 Expert: Pulsar la tecla 1, 2, 3 o 4 elegida (la cifra 1, 2, 3 o 4 aparece abajo de la pantalla LCD).
  • Page 42: Utilización Del Mando A Distancia

    Para el CANICOM 800 Expert: pulsar la tecla A o B (la letra A o B aparece abajo de la pantalla LCD) Para el CANICOM 1200 Expert: pulsar la tecla 1, 2, 3 o 4 (la cifra 1, 2, 3, o 4 aparece abajo de la pantalla LCD) ...
  • Page 43: Desgaste/Sustitución De La(S) Pila(S) Del Mando A Distancia

    En caso de desgaste de la(s) pila(s), las prestaciones (alcance radio) del mando disminuirán. ¡Sustituir la(s) pila(s)! Para comprobar la pila, poner en servicio su mando a distancia CANICOM 800 Expert/CANICOM 1200 Expert y controlar el indicador de nivel de carga de la pila sobre la pantalla LCD.
  • Page 44: Desgaste/Carga De La Batería Del Collar

    Pueden conseguirse las pilas adecuadas directamente en NUM’AXES o en su distribuidor. Sustituir la(s) pila(s) gastada(s) por una(s) pila(s) nueva(s) de mismo tipo: - una pila de litio 3V CR2 para el mando CANICOM 800 Expert - dos pilas alcalinas LR06 para el mando CANICOM 1200 Expert Para cambiar la(s) pila(s) proceder de la siguiente manera: - Saque el tornillo y la tapa de la pila situados en la parte posterior del mando (cf.
  • Page 45: Cambio De Los Electrodos

    Las órdenes de adiestramiento que envíen a su perro son transmitidas del mando a distancia al collar receptor por ondas radio. Estas ondas radio son sensibles y “alcanzan” una distancia de 800 metros para el CANICOM 800 Expert y 1200 metros para el CANICOM 1200 Expert (estas distancias pueden variar según el entorno y la...
  • Page 46: Ajuste Del Collar

    Es - 46 Las prestaciones de su producto serán óptimas si respetan las siguientes recomendaciones: - Para un alcance correcto de las ondas, debe sostener su mando de manera que la antena esté al descubierto. - Siempre fijar el collar CANICOM Expert alrededor del cuello del perro de manera que la luz indicadora esté...
  • Page 47: La Diferencia Entre Estímulo "Continuo" Y "Flash

    Además, esta manipulación tendrá como efecto cancelar su garantía. - No deje el CANICOM 800 Expert/CANICOM 1200 Expert al alcance de los niños. Ni ustedes ni los niños deben considerarlo como un juguete.
  • Page 48: Mantenimiento

    Si olvida usted uno de estos elementos, el Servicio Post Venta le facturará el arreglo. Características técnicas   Mando a distancia Mando a distancia Collar receptor CANICOM 800 Expert CANICOM 1200 Expert CANICOM Expert Alimentación 1 pila de litio 3V tipo CR2 2 pilas alcalinas LR06 1 batería litio polimérico...
  • Page 49: Garantía

    Es - 49 Mando a distancia Mando a distancia Collar receptor CANICOM 800 Expert CANICOM 1200 Expert CANICOM Expert Niveles de estímulos Temperatura de Entre – 20°C y +40°C Entre – 20°C y +40°C Entre – 10°C et +55°C utilización...
  • Page 50: Inscriba Su Producto

    Es - 50 Inscriba su producto   Puede inscribir su producto en nuestro sitio web www.numaxes.com. Accesorios   Puede encargar a su distribuidor, en cualquier momento, los accesorios (pila, correa, cargador, electrodos…). Reciclaje de aparatos electrónicos al final de su vida  ...
  • Page 51 Diese Geräte strahlen statische Magnetfelder (ein Magnet befindet sich im Handsender) sowie elektromagnetische Hochfrequenzenwellen ab (Frequenz= 869 Mhz, maximale Sendeleistung = 250 mW für das CANICOM 800 Expert und 500 mW für das CANICOM 1200 Expert). Diese Geräte entspricht der europäischen Normen ETSI EN 300 220.
  • Page 52 Zustand/Auswechseln der Batterie(n) des Hansenders ................Abnutzung und Aufladen der Batterie des Empfänger-Halsbandes ............Auswechseln der Kontakte ..........................Prüfung Ihres CANICOM 800 Expert/CANICOM 1200 Expert ............... So erzielen Sie die besten Ergebnisse ......................Justierung des Halsbandes ..........................Die Gewöhnung an das Halsband zur Hundeerziehung ................
  • Page 53: Lieferumfang Des Canicom 800 Expert

    D - 53 Lieferumfang des CANICOM 800 Expert  Beim Öffnen der Verpackung finden Sie: - Einen Handsender CANICOM 800 Expert mit - Das CANICOM Expert Halsband mit kurzen einer Lithium Batterie 3V CR2 Kontakten und einer wiederaufladbaren - Einen Magnetschlüssel (Magnet)
  • Page 54 1 bis 15 von 1 bis 18 Anzeige für das Halsband Anzeige für das Halsband A oder B 1, 2, 3 oder 4 Abb. 4 - CANICOM 800 Expert – LCD Bildschirm Abb. 5 - CANICOM 1200 Expert – LCD Bildschirm...
  • Page 55: Erste Inbetriebnahme

    D - 55 Erste Inbetriebnahme    Die Batterie des CANICOM Expert Halsbandes aufladen So gehen Sie vor, um Ihr Halsband zu laden: − Das Ladegerät an einer Netzsteckdose anschließen und mit dem Halsband verbinden. − Nach einigen Sekunden blinkt die grüne Anzeige des Halsbandes (Doppelblinken). −...
  • Page 56 Wir empfehlen Ihnen, nach jedem Gebrauch das Halsband auszuschalten, um die Batterie zu schonen. Abb. 7 Abb. 8 Das Empfänger Halsband mit dem Das Empfänger Halsband mit dem CANICOM 800 Expert Sender CANICOM 1200 Expert Sender ein-/ausschalten ein-/ausschalten Beide Teile eine Sekunde...
  • Page 57 Kodierung der fremden Komponente kommen. In diesem Fall wären Sie dann gezwungen, den Sender mit dem Empfänger-Halsband neu zu programmieren. Für CANICOM 800 Expert: Halsband A: mit dem roten Gurt – Halsband B: mit dem grünen Gurt Für CANICOM 1200 Expert: Halsband 1: mit dem roten Gurt – Halsband 2: mit dem grünen Gurt Halsband 3: mit dem blauen Gurt –...
  • Page 58: Bedienung Des Handsenders

    Sie einwirken wollen, und zwar: − Hund A (mit dem roten Gurt) oder B (mit dem grünen Gurt) für das CANICOM 800 Expert − Hund 1 (mit dem roten Gurt), 2 (mit dem grünen Gurt), 3 (mit dem blauen Gurt) oder 4 (mit dem gelben Gurt) für das CANICOM 1200 Expert...
  • Page 59  „+“ und „-“ Tasten: Einstellung der Impulsstärke Mit den +/- -Tasten können Sie die Impulsstärke des Empfänger-Halsbandes sehr schnell regulieren. CANICOM 800 Expert: Sie verfügen über 15 Stufen. CANICOM 1200 Expert: Sie verfügen über 18 Stufen. Bei der ersten Stufe ist die Stärke sehr schwach.
  • Page 60: Zustand/Auswechseln Der Batterie(N) Des Hansenders

    Die Batterie ist im guten Zustand. Die Batterieleistung ist schwach: Sorgen Sie für eine Ersatzbatterie. Die Batterie ist leer: Ihr CANICOM 800 Expert/CANICOM 1200 Expert blockiert sich aus Sicherheitsgründen. Wechseln Sie die Batterie aus. NUM’AXES empfehlt Ihnen Batterie gleicher Marke und gleicher Art wie di Batterie, die beim kauf des Gerätes mitgeliefert wurden, zu benützen.
  • Page 61: Abnutzung Und Aufladen Der Batterie Des Empfänger-Halsbandes

    - Schalten Sie den Handsender und das Empfänger-Halsband ein. - Wählen Sie das Halsband, das Sie kontrollieren wollen: Für CANICOM 800 Expert: Drücken Sie kurz auf der A oder B-Taste je nach Ihrer Wahl (der Buchstabe A oder B erscheint unter dem LCD-Bildschirm).
  • Page 62: So Erzielen Sie Die Besten Ergebnisse

    Die Signale zwischen Ihnen (dem Sender) und dem Hund (Halsband) werden über Funkwellen übertragen. Die maximale Reichweite beträgt je nach Gelände bis zu 800 Metern für das CANICOM 800 Expert und bis zu 1200 Metern für das CANICOM 1200 Expert (je nach Geländebeschaffenheit können die Distanzen reduziert werden).
  • Page 63: Vorsichtsmaßnahmen

    - Das CANICOM Expert Empfänger-Halsband ist wasserdicht. Ihr Hund kann daher ohne Probleme auch mal in einen See springen. - Der CANICOM 800 Expert/CANICOM 1200 Expert Handsender ist spritzwassergeschützt. Ein leichter Regenguss kann ihm nichts anhaben. Stärkere Wassereinwirkung könnte ihn jedoch irreparabel zerstören.
  • Page 64: Pflege

    D - 64 - Achten Sie darauf, dass das Gerät nicht an Orten gelagert wird, die hohen Temperaturen ausgesetzt sind. - Die Batterie des Handsenders muss alle zwei Jahre ausgewechselt werden, auch wenn das Gerät über längere Zeit hinweg nicht benutzt wurde. - Im Falle einer verlängerte Nicht-Benutzung des Gerätes (z.B.
  • Page 65: Technische Merkmale

    D - 65 Technische Merkmale   CANICOM 800 Expert CANICOM 1200 Expert CANICOM Expert Handsender Handsender Empfänger-Halsband Spannungsversorgung 1 Batterie Lithium 3V CR2 2 Alkalische Batterien LR06 Integrierte wiederaufladbare Lithium Polymere Batterie Durchschnittliche Ca. 30 000 Ca. 50 000 Ca. 3 Tage...
  • Page 66: Registrieren Ihres Produktes

    D - 66 4. Rechtsmittel gegen NUM’AXES, insbesondere bei unsachgemäßem Gebrauch oder technischem Defekt des Gerätes, können in keiner Form geltend gemacht werden. 5. NUM’AXES behält sich das Recht vor, die Eigenschaften seiner Produkte zur technischen Verbesserung bzw. zur Einhaltung von neuen Vorschriften zu verändern. 6.
  • Page 67 (frequenza = 869 Mhz, Potenza Massima di emissione = 250 mW per CANICOM 800 Expert e 500 mW per CANICOM 1200 Expert). CANICOM 800 Expert e CANICOM 1200 Expert sono conformi alle norme europee ETSI EN 300 220. Vi ringraziamo di avere scelto un apparecchio della gamma NUM’AXES.
  • Page 68 Verifica/sostituzione della pila del telecomando ................... Verifica/ricarica della batteria del collare ...................... Sostituzione elettrodi ............................Verifica del corretto funzionamento di CANICOM 800 Expert/CANICOM 1200 Expert ....... Per ottenere le migliori prestazioni ........................ Posizionamento del collare ..........................Regole di base per utilizzare i collari educativi ....................
  • Page 69: Composizione Di Canicom 800 Expert

    - coppia di elettrodi lunghi - cinghia - collarino porta telecomando - carica batteria per il collare - manuale d’uso - telecomando CANICOM 800 Expert dotato di una pila al litio 3 Volts CR2 - chiave magnetica Composizione di CANICOM 1200 Expert ...
  • Page 70 Indicatore collare selezionato Indicatore collare selezionato (da 1 a 15) (da 1 a 18) A o B 1, 2, 3 o 4 Fig. 4 - Schermo LCD CANICOM 800 Expert Fig. 5 - Schermo LCD CANICOM 1200 Expert...
  • Page 71: Primo Utilizzo

    It - 71 Primo utilizzo    Ricarica della batteria del collare CANICOM Expert Attenzione: al primo utilizzo fare una ricarica completa della batteria (tempo di ricarica: circa 3 ore). Per ricaricare la batteria del collare procedete nel modo seguente: −...
  • Page 72: Codifica Del Telecomando Con Il Collare

    It - 72  Accensione/spegnimento del collare con il telecomando Il magnete situato nel telecomando permette di accendere e spegnere il collare. - Accensione: portare a contatto il magnete del telecomando con l’indicatore rosso del collare per circa 1 secondo (Fig. 7 o Fig. 8). Il LED del collare si illumina di colore verde e comincia a lampeggiare : il collare è...
  • Page 73: Utilizzo Del Telecomando

    CANICOM Expert (Vedi Procedura di codifica). Utilizzo del telecomando   Il telecomando CANICOM 800 Expert è predisposto per gestire 1 o 2 collari. Il telecomando CANICOM 1200 Expert è predisposto per gestire 1, 2, 3 o 4 collari.
  • Page 74 Prima di qualsiasi azione d’addestramento (vibrazione o stimolazione), dovete scegliere il cane sul quale desiderate agire: - CANICOM 800 Expert : cane A (collare cinghia rossa) o cane B (collare cinghia verde) - CANICOM 1200 Expert : cane 1 (collare cinghia rossa), cane 2 (collare cinghia verde), cane 3 (collare...
  • Page 75 I tasti «+» e «-» permettono di regolare rapidamente il livello di stimolazione del collare, secondo necessità. Sul telecomando CANICOM 800 Expert sono disponibili 15 livelli Sul telecomando CANICOM 1200 Expert sono disponibili 18 livelli Il livello 1 equivale ad una stimolazione appena percettibile, il livello 15/18 alla massima stimolazione.
  • Page 76: Verifica/Sostituzione Della Pila Del Telecomando

    It - 76 Programmazione del tasto Booster CANICOM 800 Expert: Esempio di programmazione riferito al collare A = cinghia rossa − Accendere il telecomando. − Premere e mantenere premuto il tasto A fino a quando il display lampeggia. − Con i tasti +/- modificare il livello di stimolazione sul valore desiderato.
  • Page 77 It - 77 Il telecomando CANICOM 800 Expert ha 1 pila litio tipo CR2 da 3V. Il telecomando CANICOM 1200 Expert ha 2 pile stilo alcaline tipo AA da 1,5V LR06. Sostituzione pila telecomando CANICOM 800 Expert: − Svitare il coperchio sul retro del telecomando ed estrarre la pila (Fig. 9).
  • Page 78: Verifica Del Corretto Funzionamento Di Canicom 800 Expert/Canicom 1200 Expert

    − Accendete il collare e il telecomando. − Selezionate sul telecomando il collare da provare (A o B per CANICOM 800 Expert / 1, 2, 3 o 4 per CANICOM 1200 Expert) − Premete il tasto F o C del telecomando: la lampadina test si deve illuminare, indicando che il collare emette stimolazioni e quindi funziona correttamente.
  • Page 79: Regole Di Base Per Utilizzare I Collari Educativi

    It - 79 Se avete necessità di utilizzare il collare per molte ore, preoccupatevi ogni tanto di riposizionarlo correttamente al collo del vostro cane. Lo sfregamento degli elettrodi sempre nella stessa zona del collo, potrebbe causare eventuali irritazioni. Non lasciare il collare per più di otto ore al giorno al vostro cane, avendo inoltre cura di verificare che non abbia provocato irritazioni.
  • Page 80: Precauzioni Per L'uso

    It - 80 Precauzioni per l’uso   - Prima dell’utilizzo del collare, si raccomanda di far visitare il vostro cane da un veterinario per verificare che non ci sussistano controindicazioni. - Il collare CANICOM Expert è impermeabile all’immersione : il vostro cane può attraversare i corsi d’acqua senza alcuna preoccupazione.
  • Page 81: Caratteristiche Tecniche

    Tel. +39 0583 462363 - Fax +39 0583 462411 info@canicomitalia.com Caratteristiche tecniche   Telecomando Telecomando Collare CANICOM 800 Expert CANICOM 1200 Expert CANICOM Expert Alimentazione 1 pila litio 3V tipo CR2 2 pile alcaline tipo LR06 Batteria ricaricabile ai Polimeri di Litio...
  • Page 82: Condizioni Di Garanzia

    It - 82 Condizioni di garanzia   1. La garanzia è riconosciuta solo se il prodotto inviato in riparazione è corredato di certificato di garanzia in originale, con timbro del rivenditore e data di acquisto, senza alcuna manomissione. 2. La garanzia non comprende: −...
  • Page 83 Distributore per l’Italia ∙- Servizio Assistenza Clienti CANICOM Srl Via di Sottopoggio, 32 - 55060 GUAMO (LU) Tel. +39 0583 462363 - Fax +39 0583 462411 www.canicomitalia.com - info@canicomitalia.com...
  • Page 84 www.numaxes.com...

Ce manuel est également adapté pour:

Canicom 1200 expert

Table des Matières