Table des Matières
Publicité
Les langues disponibles
Les langues disponibles
Liens rapides
DE Muskelstimulationsgerät
Gebrauchsanweisung ......................................... 2
EN Muscle stimulation device
Instructions for use ........................................... 18
FR Appareil de musculation
Mode d'emploi .................................................. 33
ES Aparato de estimulación muscular
Instrucciones de uso ........................................ 49
IT
Apparecchio per la stimolazione muscolare
Istruzioni per l'uso ............................................ 65
TR Kas stimülasyon cihazı
Video
Kullanım kılavuzu .............................................. 81
RU Миостимулятор
Инструкция по применению ........................... 96
PL
Urządzenie do stymulacji mięśni
Instrukcja obsługi............................................ 112
Tutorial
EM 95
Publicité
Chapitres
Table des Matières

Manuels Connexes pour Beurer EM 95


Sommaire des Matières pour Beurer EM 95
- Page 1 EM 95 DE Muskelstimulationsgerät Gebrauchsanweisung ......... 2 EN Muscle stimulation device Instructions for use ........... 18 FR Appareil de musculation Mode d’emploi ..........33 ES Aparato de estimulación muscular Instrucciones de uso ........49 Apparecchio per la stimolazione muscolare Istruzioni per l’uso ..........65 TR Kas stimülasyon cihazı...
-
Page 2: Table Des Matières
Warnhinweis auf Verletzungsgefahren oder Gefahren 5.2 Hinweise zur Anwendung ............9 für Ihre Gesundheit 5.3 Geräteeinstellungen ..............10 ACHTUNG 5.4 Anwendung mit „beurer EMS HomeStudio“ App ....11 Sicherheitshinweis auf mögliche Schäden am Gerät/ 6. Programmübersicht ................12 Zubehör 6.1 Fitness & Power-Workouts ............12 6.2 Relax &... - Page 3 Lieferumfang und Zubehör Dieses CE-Symbol bescheinigt, dass das Produkt den, Überprüfen Sie das Set auf äußere Unversehrtheit der Kartonverpa- dem Hersteller auferlegten Anforderungen der Europä- ischen Gemeinschaft entspricht. ckung und auf die Vollständigkeit des Inhalts. Vor dem Gebrauch ist sicherzustellen, dass das Gerät und Zubehör keine sichtbaren Schä- den aufweisen und jegliches Verpackungsmaterial entfernt wird.
-
Page 4: Zum Kennenlernen
Leistung (z.B. nach einem Marathon). Zu Beginn der Trainingseinheit können Sie in der App zunächst Durch die vier separat justierbaren Kanäle bietet das EM 95 Muskel- einen Virtual Coach und das gewünschte Workout auswählen. An- stimulationsgerät den Vorteil die Intensität der Stimulation unabhän- schließend wird Ihnen sowohl auf dem farbigen 3,5‘‘... - Page 5 Brustmuskeln. Hier kann es das Risiko von Herzkammerflimmern ACHTUNG! erhöhen und einen Herzstillstand herbeiführen. Verwenden Sie das EM 95 ausschließlich: • Am knöchernen Schädel, im Bereich des Mundes, des Rachen- • Am Menschen raumes oder des Kehlkopfes • Für den Zweck, für den es entwickelt wurde und auf die in dieser •...
- Page 6 • Nicht anwenden bei allen Tätigkeiten, bei denen eine unvorherge- mit neuen Klebeelektroden. Andernfalls könnte die ungleichmä- sehene Reaktion (z.B. verstärkte Muskelkontraktion trotz niedriger ßige Haftung der Klebeelektroden zu Hautverletzungen führen. Intensität) gefährlich werden kann. Tauschen sie die Elektroden spätestens nach 20 Anwendungen •...
-
Page 7: Gerätebeschreibung
3. Gerätebeschreibung • Akkus müssen vor dem Gebrauch korrekt geladen werden. Die Hinweise des Herstellers bzw. die Angaben in dieser Gebrauchs- anweisung für das korrekte Laden sind stets einzuhalten. • Laden Sie den Akku vor der ersten Inbetriebnahme vollständig auf (siehe Kapitel „Akku aufladen“). •... -
Page 8: Vor Der Anwendung
4. Vor der Anwendung 5. Anwendung 4.1 Akku aufladen 5.1 Anwendung beginnen Bevor Sie das Muskelstimulationsgerät das erste Mal in Betrieb nehmen, müssen Sie ihn Schritt 1: Halten Sie die EIN /AUS-Tas- zuerst für mindestens 4 Stunden für ca. 3 Sekunden gedrückt, um aufladen. -
Page 9: Hinweise Zur Anwendung
Schritt 4: Wählen Sie mit einer der + /- Schritt 6: Im Display des Geräts wird Tasten den Schwierigkeitsgrads Ihres die verbleibende Anwendungsdauer ausgewählten Workouts. Sie können und das aktuell eingestellte Intensi- bei allen Workouts im Bereich „Fitness tätslevel der verwendeten Kanäle an- &... -
Page 10: Geräteeinstellungen
Kontaktverlust Erholungspause Lösen sich während dem Training die Elektroden/Manschetten/Ka- Trainieren Sie die gleiche Körperpartie nicht öfters als 1mal am Tag. bel wird der Stromkreis unterbrochen und die Intensität des betrof- Achten Sie darauf, dass zwischen dem nächsten Training derselben fenen Kanals automatisch auf 0 zurückgesetzt. In der Intensitäts- Körperpartie mindestens 24 Stunden Pause liegen. - Page 11 • Wählen Sie mit mit einer + /- Tasten Ihre gewünschte Sprache und Gerät zurücksetzen bestätigen Sie mit der OK-Taste . Sie gelangen danach auto- Sie können das Muskelstimulationsgerät auf die Werkseinstellung matisch in das Einstellungsmenü zurück. zurücksetzen. Dabei werden sowohl die Einstellungen von Sprache, Helligkeit Helligkeit und Sound als auch die Betriebsdauer und die tatsächliche Sie können am Muskelstimulationsgerät die Helligkeit des Displays...
-
Page 12: Anwendung Mit „Beurer Ems Homestudio" App
5.4 Anwendung mit „beurer EMS HomeStudio“ App 6.1 Fitness & Power-Workouts Mit Hilfe der „beurer EMS HomeStudio“ App können Sie das Gerät Schwierigkeitsgrad Sinnvolle Progr.- Frequenz Laufzeit auch bequem über Ihr Smartphone steuern. In der App finden Sie Anwendungs bereiche,... -
Page 13: Stromparameter
Richtung, bei biphasischen Pulsen wechselt der Erfolg einer Stimulations-Anwendung wichtig. Erregerstrom seine Richtung ab. Im EM 95 finden sich ausschließlich biphasi sche Pulsströme, da sie Die Elektrodenplatzierung im Gerät dient als eine erste Hilfestel- den Muskel entlasten, zu einer geringeren Muskel ermüdung sowie lung für die Platzierung der Elektroden. -
Page 14: Impulsintensität
7.4 Impulsintensität Aufbewahrung • Knicken Sie die Anschlussleitungen und Elektroden nicht scharf ab. Die Einstellung des Intensitätsgrades richtet sich • Trennen Sie die Anschlussleitungen von den Elektroden ab. individuell nach dem subjektiven Empfinden je- • Kleben Sie nach Gebrauch die Elektroden wieder zurück auf die des einzelnen Anwenders und wird durch eine Träger folie. -
Page 15: Ersatz- Und Verschleißteile
Laden Sie den Akku auf. 12. Technische Angaben Sie verspüren ein unangenehmes Gefühl an den Elektroden. Was tun? EM 95 (1) Die Elektroden sind schlecht platziert. Prüfen Sie die Platzierung Ausgangs-Kurvenform biphasische Rechteckimpulse und nehmen Sie gegebenenfalls eine Neupositionierung vor. -
Page 16: Hinweise Zu Elektromagnetischer Verträglichkeit
• Das Gerät kann in der Gegenwart von elektromagnetischen Störgrö- Abmessungen ca. 136 x 89 x 26 mm (ohne Gürtelclip) ßen unter Umständen nur in eingeschränktem Maße nutzbar sein. Gewicht 200 g (inkl. Gürtelclip) Infolgedessen können z.B. Fehlermeldungen oder ein Ausfall des Maximal zulässiger 700 –... - Page 17 Garantiezeit ist durch den Kunden der Nachweis des Kaufes zu führen. Die Garantie ist innerhalb eines Zeitraumes von 3 Jahren ab Kaufdatum gegenüber der Beurer GmbH, Ulm (Germany) geltend zu machen. Bitte wenden Sie sich im Falle von Reklamationen an unseren...
- Page 18 5.2 Notes on use ................25 IMPORTANT 5.3 Device settings ................26 Safety note indicating possible damage to the device/ 5.4 Using your device with the “beurer EMS HomeStudio” accessory app ....................27 6. Program overview ................28 Note 6.1 Fitness & Power workouts ............28 Note on important information 6.2 Relax &...
- Page 19 Delivery scope and accessories The CE symbol certifies that the product complies with Check that the set packaging has not been tampered with and make the requirements imposed upon the manufacturer by the European Community. sure that all contents are present. Before use, ensure that there is no visible damage to the device or accessories and that all packaging material has been removed.
-
Page 20: Getting To Know Your Device
EMS training program. You can choose between the categories of “Fitness & Power” and “Relax & Wellbeing”. Overall, An advantage of the EM 95 muscle stimulation device is that you you have 20 workout options with predefined exercises and which can adjust the intensity of the stimulation independently for four have adjustable levels of difficulty. - Page 21 (e.g. a navel piercing), these must be removed before using the device. Failure to do so could result in spot burns. The EM 95 must only be used: • Keep the device away from children to prevent potential risks. • On humans •...
- Page 22 • Do not use the device whilst using other devices that transmit • Never attempt to open and/or repair the device yourself. Repairs electrical impulses to your body. may only be carried out by Customer Services or authorised re- tailers. Failure to comply with this instruction will void the warran- •...
-
Page 23: Device Description
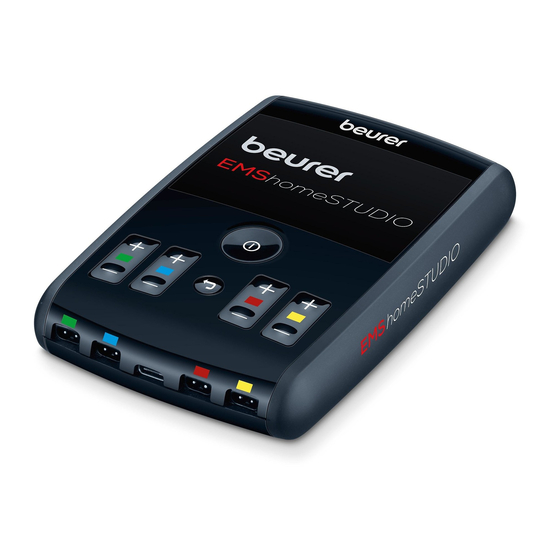
3. Device description 7 Connection socket for channel 1 ON/OFF/OK button 1 (green) 8 Connection socket for channel 2 Return button 2 (blue) 3 Intensity button for channel 1 9 USB charging socket (green) 4 Intensity button for channel 2 10 Connection socket for channel (blue) 3 (red) -
Page 24: Before Use
4. Before use 5. Use 4.1 Charging the battery 5.1 Starting use Before you use the muscle stimulation device for the first time, let it charge for a minimum of Step 1: Press and hold the ON/OFF 4 hours. Proceed as follows: button for around 3 seconds in or- der to switch on the device. -
Page 25: Notes On Use
Step 4: Select the level of difficul- Step 6: The display of your device ty for your chosen workout by using will indicate how much usage time re- the + / - buttons. You can select one mains, and the current intensity levels of three levels of difficulty (“Beginner”, of the channels that you are using. -
Page 26: Device Settings
Loss of contact Recovery break If any of the electrodes/cuffs/cables become loose during training, Do not train the same part of the body more than once a day. Make the flow of electricity is interrupted and the intensity of the affected sure that you wait at least 24 hours before you train that part of the channel resets to 0 automatically. -
Page 27: Using Your Device With The "Beurer Ems Homestudio" App
Thanks to the “beurer EMS HomeStudio” app, it is also easy to con- Green = Button tone is on trol your device from your smartphone. The app contains add itional Red = Button tone is off training videos for all of the individual workouts. -
Page 28: Program Overview
Step 3: Start the “beurer EMS HomeStudio” app and follow the in- Running Level of difficulty Progr. Practical areas for Frequency structions in the app. time application, indications (Hz) Beginners Advanced Expert (min) Step 4: As soon as the “beurer EMS HomeStudio” app has con- On 4 sec. -
Page 29: Electric Current Parameters
Do not apply the electrodes to the front wall of the chest. The EM 95 only provides biphasic pulse currents, as these relieve It is fundamental to the intended success of electrostimulation appli- muscles, cause little muscle fatigue and are safe for use. -
Page 30: Cleaning And Storage
8. Cleaning and storage Note: The codes below are printed on batteries containing harmful substances: Pb = Battery contains lead, Adhesive electrodes Cd = Battery contains cadmium, Hg = Battery contains • To ensure that the adhesive electrodes remain adhesive for as mercury. -
Page 31: Replacement Parts And Wearing Parts
12. Technical specifications You have an unpleasant sensation at the electrodes. How to proceed: Type EM 95 (1) The electrodes are not positioned correctly. Check their positions Output waveform Biphasic rectangular pulses and re-position, if necessary. Pulse length 100 – 350 µs ±10% (2) The electrodes are worn. -
Page 32: Notes On Electromagnetic Compatibility
“service international”. In case of returning the unit please add a copy of your receipt and a short report of the defect. The following warranty terms shall apply: 1. The warranty period for BEURER products is either 3 years or... - Page 33 ATTENTION 5.3 Paramètres de l’appareil ............41 Ce symbole vous avertit des éventuels dommages au 5.4 Utilisation avec l’application « beurer EMS HomeStudio » ..42 niveau de l’appareil ou d’un accessoire 6. Liste des programmes................43 6.1 Entraînements « Entraînement & force » ........43 Remarque 6.2 Entraînements «...
- Page 34 Livraison et accessoires Le symbole CE atteste que ce produit répond aux exi- Vérifiez si l’emballage carton extérieur du kit est intact et si tous les gences de la Communauté européenne imposées au fabricant. éléments sont inclus. Avant l’utilisation, assurez-vous que l’appareil et les accessoires ne présentent aucun dommage visible et que tout l’emballage a bien été...
-
Page 35: Familiarisation Avec L'appareil
Grâce à ses 4 canaux à régler séparément, l’appareil de musculation Au début de la séance d’entraînement, vous sélectionnez dans EM 95 permet un réglage indépendant de l’intensité de la stimula- l’application un coach virtuel et l’entraînement de votre choix. Puis, tion sur les quatre parties du corps à... - Page 36 pectoraux. Cela risque d’augmenter le risque de fibrillation ventri- ATTENTION ! culaire et de provoquer un arrêt cardiaque. Utilisez uniquement l’EM 95 : • Sur le crâne, dans la zone de la bouche, de la gorge ou du larynx • Sur un être humain •...
- Page 37 • N’utilisez pas pendant le sommeil, en conduisant un véhicule ou de leur sécurité, ou s’ils ont reçu de leur part les instructions né- en actionnant des machines. cessaires à une bonne utilisation de l’appareil. • N’utilisez pas l’appareil en parallèle de toutes les activités dans •...
-
Page 38: Description De L'appareil
3. Description de l’appareil • Protégez les batteries contre toute chaleur excessive. • Risque d’explosion ! Ne jetez pas les batteries dans le feu. • Ne démontez, n’ouvrez et ne cassez pas les batteries. • N’utilisez que le chargeur indiqué dans le mode d’emploi. •... -
Page 39: Avant L'utilisation
4. Avant l’utilisation 5. Utilisation 4.1 Charger la batterie 5.1 Commencer l’utilisation Avant de mettre en service pour la première fois l’appareil de musculation, vous devez tout Étape 1 : pour allumer l’appareil, d’abord le charger pendant au moins appuyez et maintenez la touche 4 heures. -
Page 40: Conseils D'utilisation
Étape 4 : utilisez les touches +/- pour Étape 6 : l’écran de l’appareil affiche la sélectionner le niveau de difficulté de durée restante de l’entraînement ainsi l’entraînement de votre choix. Pour que le niveau d’intensité actuellement tous les entraînements de type « En- paramétré... -
Page 41: Paramètres De L'appareil
Perte de contact N’effectuez pas plus d’un entraînement par jour sur la même partie Si une électrode/une manchette/un câble se détache pendant du corps. Respectez une pause au minimum de 24 heures pour ré- l’entraînement, le circuit électrique est interrompu et l’intensité du péter un entraînement sur la même partie du corps. -
Page 42: Utilisation Avec L'application « Beurer Ems Homestudio
Rouge = sons désactivés 5.4 Utilisation avec l’application « beurer EMS HomeStudio » Réinitialiser l’appareil L’application « beurer EMS HomeStudio » vous permet de contrôler Vous pouvez réinitialiser l’appareil de facilement l’appareil depuis votre smartphone. L’appli contient éga- musculation sur ses paramètres par... -
Page 43: Liste Des Programmes
Santé du dos 40 / 4 Arrêt 10 s. Arrêt 10 s. Arrêt 10 s. Étape 3 : démarrez l’application « beurer EMS HomeStudio » et sui- Marche 6 s. Marche 8 s. Marche 8 s. Entraînement croisé 80 / 4 vez les instructions indiquées dans l’application. -
Page 44: Paramètres Électriques
7. Paramètres électriques N° de Domaines d’application Fréquence Durée Durée d’impulsion / Durée prog. utiles, indications (Hz) (min) de pause Les appareils d’électrostimulation fonctionnent avec les réglages Yoga en continu électriques suivants, qui ont un effet différent sur la stimulation en Mobiliser la colonne en continu, variable fonction du réglage :... -
Page 45: Intensité D'impulsion
7.4 Intensité d’impulsion Le réglage du degré d’intensité dépend du res- Stockage senti subjectif de chaque utilisateur, et est dé- • Ne pliez pas trop les cordons de raccordement ni les électrodes. terminé par de nombreux paramètres tels que la •... - Page 46 Les électrodes ne collent pas bien. Que faire ? Si l’irritation persiste et provoque des démangeaisons ou une in- (1) Nettoyez la surface adhésive des électrodes avec un chiffon non flammation, consultez votre médecin avant toute nouvelle utilisation. pelucheux humide. Si les électrodes n’adhèrent toujours pas, Il se peut qu’il s’agisse d’une allergie à...
-
Page 47: Pièces De Rechange Et Consommables
12. Caractéristiques techniques cations indiquées, le fonctionnement irréprochable ne peut pas être garanti ! Type EM 95 Nous nous réservons le droit d’effectuer des modifications tech- Courbe de sortie impulsions rectangulaires biphasiques niques pour améliorer et faire évoluer le produit. -
Page 48: Garantie/Maintenance
Les conditions de garantie suivantes s’appliquent : 1. La période de garantie des produits BEURER est de 3 ans ou, si elle est plus longue, elle est applicable dans le pays concerné à... - Page 49 5.2 Indicaciones de utilización ............57 otros peligros para la salud 5.3 Ajustes del aparato ..............57 ATENCIÓN 5.4 Utilización con la app “beurer EMS HomeStudio” ....59 Indicación de seguridad sobre posibles daños en el 6. Visión general de los programas ............59 aparato o los accesorios 6.1 Sesiones de entrenamiento Fitness y potencia ......59...
- Page 50 Artículos suministrados y accesorios El sello CE garantiza que el producto cumple las es- Compruebe que el envoltorio del producto esté intacto y que su pecificaciones impuestas al fabricante por la Comu- nidad Europea. contenido esté completo. Antes de utilizar el aparato, deberá asegu- rarse de que ni este ni los accesorios presentan daños visibles y de que se retira el material de embalaje correspondiente.
-
Page 51: Información General
ADVERTENCIA Al finalizar la sesión de ejercicios se visualiza en la app un informe Para prevenir daños en la salud, se aconseja no usar el EM 95 detallado del progreso del entrenamiento. El rendimiento personal se bajo ningún concepto en los siguientes casos: representa claramente mediante gráficos. - Page 52 ATENCIÓN Esto puede aumentar el riesgo de fibrilación ventricular y causar una parada cardiaca. El EM 95 solo puede utilizarse: • En el cráneo, en la zona de la boca, la faringe y la laringe • En personas • En la zona del cuello/la carótida •...
- Page 53 9 mA/cm²; con una densidad de corriente efectiva superior a ser que los vigile una persona responsable de su seguridad o que 2 mA/cm² se requiere especial precaución). esta persona les indique cómo se debe utilizar el aparato. • No se debe utilizar mientras se duerme, se conduce o se maneja •...
-
Page 54: Descripción Del Aparato
3. Descripción del aparato • Si se derrama el líquido de una batería, póngase guantes protec- tores y limpie el compartimento con un paño seco. • Proteja las baterías de un calor excesivo. • ¡Peligro de explosión! No arroje las baterías al fuego. •... -
Page 55: Antes De La Aplicación
4. Antes de la aplicación 5. Aplicación 4.1 Carga de la batería 5.1 Comienzo de la aplicación Antes de utilizar por primera vez el aparato de estimulación muscular deberá cargarlo como Paso 1: Mantenga pulsado el botón mínimo durante 4 horas. Proceda de encendido y apagado durante para ello de la siguiente manera:... - Page 56 Paso 4: Seleccione con uno de los Paso 5: botones + /- el grado de dificultad de la Si para la sesión de entrenamiento sesión de entrenamiento seleccionada. seleccionada se necesitan los En todas las sesiones de entrenamiento brazaletes y las perneras, deberá del nivel “Fitness y potencia”...
-
Page 57: Indicaciones De Utilización
5.2 Indicaciones de utilización 22-35 cm Ajustar la intensidad 28-45 cm Puede ajustar la intensidad en pasos individuales de 1 a 100. Para 36-54 cm acelerar el ajuste puede mantener pulsado el botón de intensidad; 50-70 cm de este modo, la intensidad aumentará o se reducirá más rápidamente. - Page 58 aparato a la configuración de fábrica y consultar la información del • Seleccione con uno de los botones + /- “2 Luminosidad” y confir- sistema. me con el botón OK • Seleccione con uno de los botones + /- la luminosidad que desee y Abrir el menú...
-
Page 59: Utilización Con La App "Beurer Ems Homestudio
Apple App Store (iOS) o en Google Play (Android Abdominales 60/4 Off 9 seg. Off 9 seg. Off 8 seg. Paso 3: Inicie la app “beurer EMS HomeStudio” y siga las instruc- On 4 seg. On 6 seg. On 8 seg. Espalda sana 40/4 ciones que se dan en ella. -
Page 60: Sesiones De Entrenamiento Relajación Y Bienestar
6.2 Sesiones de entrenamiento Relajación y bienestar Campos de aplicación Grado de dificultad N.° Frecuencia Duración adecuados, N.° Campos de aplicación Frecuencia Duración Duración de impulso/ progr. (Hz) (min.) Principiante Avanzado Experto indicaciones progr. adecuados, indicaciones (Hz) (min.) duración de pausa On 4 seg. -
Page 61: Parámetros De Corriente
En caso de una aplicación prolongada puede ser necesario un re- cambia de dirección alternativamente. ajuste debido a los procesos de adaptación temporales en el lugar En el EM 95 se producen exclusivamente corrientes de impulsos de aplicación. bifásicas, ya que descargan la tensión muscular, provocan menos cansancio en los músculos y avalan una aplicación más segura. -
Page 62: Eliminación
Conservación (2) Limpie la piel antes de cada aplicación, pero prescinda de pro- • No doble con fuerza los cables de conexión ni los electrodos. ductos como bálsamos o aceites. Un afeitado puede contribuir a • Separe los cables de conexión de los electrodos. prolongar la vida útil de los electrodos. -
Page 63: Piezas De Repuesto Y De Desgaste
12. Datos técnicos Nos reservamos el derecho de efectuar modificaciones técnicas para mejorar y perfeccionar el producto. Tipo EM 95 Forma de onda de salida impulsos cuadrados bifásicos 13. Indicaciones relativas a la compatibilidad elec- Duración del impulso 100 – 350 µs ±10% tromagnética... -
Page 64: Garantía/Asistencia
Se aplican las siguientes condiciones de garantía: 1. El periodo de garantía para productos de BEURER es de 3 años o, si es superior, se aplica el periodo de garantía vigente en el país correspondiente a partir de la fecha de compra. - Page 65 Segnalazione di rischio di lesioni o pericoli per la 5.2 Indicazioni di impiego ..............72 salute 5.3 Impostazioni apparecchio ............73 ATTENZIONE 5.4 Impiego con la app "beurer EMS HomeStudio" ....75 Indicazione di sicurezza per possibili danni all'appa- 6. Panoramica dei programmi ...............75 recchio 6.1 Allenamenti Fitness & Power .............75 6.2 Allenamenti Relax &...
- Page 66 Fornitura e accessori Il marchio CE certifica che il prodotto è conforme ai Controllare l'integrità esterna della confezione e del contenuto. Pri- requisiti imposti al produttore da parte della Comuni- tà Europea. ma dell'uso assicurarsi che l'apparecchio e gli accessori non pre- sentino nessun danno palese e che il materiale di imballaggio sia stato rimosso.
-
Page 67: Introduzione
EMS homeSTUDIO di Beurer è un apparecchio EMS high-end da • Accelerazione della rigenerazione muscolare in seguito a presta- utilizzare a casa e, in combinazione con l'app gratuita "beurer EMS zioni muscolari elevate (ad esempio, dopo una maratona). HomeStudio", consente un allenamento EMS professionale. È pos- sibile scegliere tra "Fitness &... - Page 68 • Nella zona dei genitali ATTENZIONE! • Sulla pelle affetta da patologie acute o croniche (lesioni o infiam- Utilizzare l'apparecchio EM 95 esclusivamente: mazioni), ad esempio, in caso di infiammazioni dolorose e indolo- • Su persone ri, arrossamenti, eruzioni cutanee (ad es. allergie), ustioni, contu- •...
- Page 69 • Non utilizzare durante tutte le attività per le quali una reazione im- degli elettrodi adesivi può causare lesioni cutanee. Sostituire gli prevista (ad es. un aumento delle contrazioni muscolari nonostan- elettrodi con elettrodi nuovi dopo massimo 20 utilizzi. te l'intensità ridotta) possa comportare un pericolo. Danni •...
-
Page 70: Descrizione Dell'apparecchio
3. Descrizione dell'apparecchio • Le batterie ricaricabili devono essere caricate correttamente pri- ma dell'uso. Rispettare le avvertenze del produttore e le indica- zioni fornite nelle presenti istruzioni per l'uso per caricare corret- tamente le batterie. • Prima della prima messa in funzione, caricare completamente la batteria ricaricabile (vedere capitolo "Caricamento della batteria"). -
Page 71: Prima Dell'utilizzo
4. Prima dell'utilizzo 5. Impiego 4.1 Caricamento della batteria 5.1 Inizio dell'utilizzo Prima di mettere in funzione per la prima volta l'apparecchio per la stimolazione muscolare è Fase 1: Tenere premuto il pulsante ON/ necessario caricarlo per almeno per circa 3 secondi per accen- 4 ore. -
Page 72: Indicazioni Di Impiego
Fase 4: Con uno dei pulsanti + /- sele- Fase 6: Sul display dell'apparecchio zionare il grado di difficoltà dell'allena- vengono mostrati la durata di utilizzo mento scelto. Per tutti gli allenamenti rimanente e il livello di intensità attual- nella zona "Fitness e Power" (tranne mente impostato per i canali utilizzati. -
Page 73: Impostazioni Apparecchio
Perdita di contatto Non allenare la stessa parte del corpo più di 1 volta al giorno.Ac- Se durante l’allenamento gli elettrodi/i manicotti/i cavi si staccano, certarsi che tra un allenamento e l'altro della stessa parte del corpo il circuito viene interrotto e l’intensità del canale in questione viene trascorrano almeno 24 ore. - Page 74 tempo di stimolazione effettivo vengono resettati. In questo caso con il pulsante OK . Dopodiché si ritorna automaticamente al le impostazioni di lingua, luminosità e volume, nonché la durata menu delle impostazioni. d’esercizio e il tempo di stimolazione effettivo vengono resettati. •...
-
Page 75: Impiego Con La App "Beurer Ems Homestudio
On 5 sec. On 8 sec. On 8 sec. Six Pack 60 / 4 Fase 3: Avviare l'app "beurer EMS HomeStudio" e seguire le istru- Off 9 sec. Off 9 sec. Off 8 sec. zioni al suo interno. On 4 sec. -
Page 76: Allenamenti Relax & Wellbeing
Non è consentito applicare gli elettrodi alla parete toracica anteriore. eccitazione alterna la sua direzione. Il posizionamento corretto degli elettrodi è importante per ottenere il Nell'EM 95 sono presenti unicamente correnti ad impulso di tipo bi- risultato di stimolazione desiderato. fasico, perché rilassano i muscoli, causano un minore affaticamento La posizione degli elettrodi nell'apparecchio può... -
Page 77: Frequenza Dell'impulso
7.2 Frequenza dell'impulso 8. Pulizia e conservazione La frequenza di stimolazione indica il numero Elettrodi adesivi Periodo di singoli impulsi al secondo e il suo valore è • Per garantire un'aderenza degli elettroni applicati per il maggior espresso in Hz (Hertz). Può essere determinata tempo possibile, pulirli attentamente con un panno umido privo di calcolando il valore inverso del periodo. -
Page 78: Problemi E Soluzioni
Nota: Sulle batterie ricaricabili contenenti sostanze Appare il simbolo della batteria. Cosa fare? tossiche sono riportati i seguenti simboli: Pb = batteria Caricare la batteria ricaricabile. contenente piombo, Cd = batteria contenente cadmio, Si percepisce una sensazione sgradevole sugli elettrodi. Cosa Hg = batteria contenente mercurio. -
Page 79: Dati Tecnici
Dimensione L (50-70 cm) Compatibile con smartphone/tablet Bluetooth ® 12. Dati tecnici Elenco degli smartphone/tablet Tipo EM 95 supportati Forma d'onda di uscita impulsi rettangolari bifasici Durata dell'impulso 100 – 350 µs ±10% Frequenza dell'impulso 4 – 100 Hz ±10% Tensione di uscita max. -
Page 80: Garanzia/Assistenza
Allegare al reso dell‘apparecchio una copia della prova d‘acquisto e una breve descrizione del difetto. Si applicano le seguenti condizioni di garanzia: 1. La garanzia dei prodotti BEURER dura 3 anni oppure, se più lunga, fa fede la durata di garanzia valida dalla data di acquisto di ciascun paese. - Page 81 5.2 Kullanım ile ilgili bilgiler ...............88 DİKKAT 5.3 Cihaz ayarları ................89 Cihazda/aksesuarlarda oluşabilecek hasarlara yönelik 5.4 “beurer EMS HomeStudio” uygulaması ile kullanım ....90 güvenlik uyarısı 6. Program tablosu .................90 6.1 Zindelik ve Güç egzersizleri ............90 6.2 Gevşeme ve Sağlık egzersizleri ..........91 Önemli bilgilere yönelik not...
- Page 82 Teslimat kapsamı ve aksesuarlar Bu CE işareti bu ürünün, üreticisinden istenen Avrupa Seti kontrol ederek karton ambalajın dıştan hasar görmemiş ve Birliği şartlarına uygun olduğunu belgelendirir. içeriğin eksiksiz olduğundan emin olun. Cihazı kullanmadan önce, cihazda ve aksesuarlarında görünür hasarlar olmadığından ve tüm ambalaj malzemelerinin çıkarıldığından emin olun.
-
Page 83: Ürün Özellikleri
Egzersiz seansını başlatmak için uygulamada önce bir Virtual Coa- EM 95 kas stimülasyon cihazı, ayrı ayarlanabilir dört kanalı sayesin- ch, ardından istediğiniz egzersizi seçebilirsiniz. Devamında size 3,5" de vücutta uygulama yapılacak dört bölge için stimülasyon yoğunlu- renkli TFT ekranda ve uygulamada manşetleri ve elektrotları... - Page 84 • Öngörülmeyen bir reaksiyonun (örn. düşük yoğunluğa rağmen DİKKAT! daha kuvvetli kas kontraksiyonu) tehlikeli olabileceği aktiviteler sırasında uygulamayın. EM 95 cihazını sadece: • Stimülasyon esnasında kemer tokası veya kolye gibi metal nes- • İnsanlarda ve nelerin elektrotlarla temas etmemesine dikkat edin. Uygulama...
- Page 85 bölgesinde takı veya piercing (örn. göbek deliği piercing’i) taşıyor- • Cihazı yıpranma veya hasar belirtileri bakımından kontrol edin. Bu sanız bunları, cihazı kullanmadan önce çıkartmalısınız; aksi halde tür belirtiler olduğunda veya cihaz usulüne uygun olmayan bir şe- kilde kullanılmış olduğunda, yeniden kullanılmadan önce üreticiye noktasal yanmalar meydana gelebilir.
-
Page 86: Cihaz Açıklaması
3. Cihaz açıklaması 4. Uygulamadan önce 4.1 Şarj edilebilir pilin şarj edilmesi Kas stimülasyon cihazını ilk kez çalıştırmadan önce en az 4 saat şarj etmeniz gerekir. Bunun için aşağıdakileri yapın: 1. USB şarj kablosunu elektrik adaptörüne ve kas stimülasyon cihazına bağlayın. 2. -
Page 87: Uygulama
5. Uygulama Adım 4: + /- tuşlarını kullanarak seçti- ğiniz egzersizin zorluk derecesini be- 5.1 Uygulamaya başlama lirleyin. “Zindelik ve Güç” bölümündeki tüm egzersizler (“Soğuma” ve “Daya- Adım 1: Cihazı açmak için açma/kapat- nıklılık” hariç) için “Başlangıç”, “İleri” ve ma tuşunu 3 saniye basılı... -
Page 88: Kullanım Ile Ilgili Bilgiler
Temas kaybı Adım 6: Cihazın ekranında, kalan uy- Egzersiz sırasında elektrotlar/manşetler/kablo çıkarsa, elektrik devre- gulama süresi ve kullanılan kanallar için sinde kesinti olur ve ilgili kanalın yoğunluğu otomatik olarak sıfırlanır. ayarlanmış güncel yoğunluk seviyesi Kanalın yoğunluk göstergesinde bir ünlem işareti yanıp söner ve ci- gösterilir. -
Page 89: Cihaz Ayarları
Su içme Parlaklık Egzersizden önce, egzersiz sırasında ve egzersizden sonra yeterince Kas stimülasyon cihazının ekran parlaklığını değiştirebilirsiniz. su içmeye dikkat edin. Egzersize başlamadan önce en az bir bardak • Ekran parlaklığını değiştirmek için, su için. cihaz açık durumdayken + /- tuşlarını kullanarak “Ayarlar”... -
Page 90: Beurer Ems Homestudio" Uygulaması Ile Kullanım
9 sn dur. 9 sn dur. 8 sn dur. 4 sn yap 6 sn yap 8 sn yap Adım 3: “beurer EMS HomeStudio” uygulamasını açın ve uygulama- Sağlıklı sırt 40 / 4 10 sn dur 10 sn dur 10 sn dur daki talimatları... -
Page 91: Gevşeme Ve Sağlık Egzersizleri
EM 95 cihazında sadece iki fazlı darbe akımları UYARI! bulunur, çünkü bunlar kasların yükünü hafifletir, kasların daha az yo- Elektrotlar göğüs kafesinin ön cephesinde kullanılmamalıdır. -
Page 92: İmpuls Genişliği
şük impuls frekanslarına ve hızlı tepki gösteren lifler ise yakl. 35 Hz Cihazın temizlenmesi ve üstü impuls frekanslarına tepki gösterir. • Cihazı kullandıktan sonra yumuşak veya hafif nemli bir bez ile si- lin. Çok kirliyse, bezi hafif sabunlu su ile nemlendirebilirsiniz. Yakl. -
Page 93: Sorunlar Ve Çözümleri
Pil sembolü gösteriliyor. Ne yapmalıyım? Şarj edilebilir pili şarj edin. 12. Teknik veriler Elektrotlar rahatsız edici bir his veriyor. Ne yapmalıyım? EM 95 (1) Elektrotlar yanlış konumlandırılmış. Elektrotların konumunu kont- Çıkış dalga biçimi İki fazlı dörtgen impuls rol edin ve gerekirse yeniden konumlandırın. -
Page 94: Elektromanyetik Uyumluluk Hakkında Bilgiler
Not: Cihaz belirtilen şartlar dışında kullanılırsa, kusursuz çalışması Yoğunluk 0 ila 100 arasında ayarlanabilir garanti edilemez! Çalışma koşulları 10 °C – 40 °C (50 °F – 104 °F), %30 – 85 Ürünü iyileştirmek ve geliştirmek için teknik değişiklik yapma hakkı- bağıl hava nemi mız saklıdır. - Page 95 Aşağıdaki garanti koşulları geçerlidir: 1. BEURER ürünlerinin garanti süresi 3 yıldır veya – daha uzun ise – ilgili ülkede geçerli olan satın alma tarihinden itibaren garanti süresi kabul edilir. Garanti talebinde satın alma tarihi bir satış fişi veya fatura ile belgelenmelidir.
- Page 96 5.1 Начало использования............102 ПРЕДУПРЕЖДЕНИЕ 5.2 Указания к применению ............103 Предупреждает об опасности травмирования или 5.3 Настройки прибора ..............104 ущерба для здоровья. 5.4 Пользование прибором с помощью приложения beurer ВНИМАНИЕ EMS HomeStudio ..............106 Обращает внимание на возможность 6. Обзор программ ................106 повреждения прибора/принадлежностей.
- Page 97 Комплект поставки и принадлежности Символ CE подтверждает, что изделие соответствует Проверьте комплектность поставки и убедитесь в том, что на кар- требованиям, установленным для изготовителя Европейским сообществом. тонной упаковке нет внешних повреждений. Перед использовани- ем убедитесь в том, что прибор и его принадлежности не имеют видимых...
-
Page 98: Ознакомительная Информация
манжеты и электроды. Все упражнения демонстрируются вир- жете самостоятельно подобрать уровень интенсивности стиму- туальным тренером в видеоролике. ляции прибора EM 95 для каждой из четырех конечностей. После упражнения Вы получите в приложении детальное описа- 2. Важные указания ние процесса и эффекта от тренировки. Ваши достижения будут... - Page 99 • После операций, при которых усиленное со- нии на эти заболевания, а также при злокачественных кращение мышц может повредить процессу новообразованиях; заживления. • любых заболеваний кожи; • Следует избегать применения в области серд- • диабета; ца. Стимулирующие электроды не должны на- •...
- Page 100 • Если прибор работает некорректно или у Вас появились ния травм. Если появится ощущение слабости, немедлен- недомогание или боли, сразу же прекратите использование но отключите прибор и положите ноги повыше (примерно прибора. на 5–10 мин). • Для удаления или замены электродов предварительно необ- •...
-
Page 101: Описание Прибора
3. Описание прибора официальными дистрибьюторами. Несоблюдение этого тре- бования ведет к потере гарантии. • Изготовитель не несет ответственности за ущерб, вызванный неквалифицированным или ненадлежащим использованием прибора. Обращение с аккумуляторными батарейками • При попадании жидкости из аккумуляторной батарейки на кожу или в глаза необходимо промыть соответствующий участок... -
Page 102: Перед Началом Использования
4. Перед началом использования 5. Применение 4.1 Зарядка аккумулятора 5.1 Начало использования Перед первым применением миостимулятор необходимо заряжать не менее 4 часов. Для Шаг 1. Нажмите кнопку ВКЛ./ВЫКЛ. этого выполните следующие и удерживайте ее нажатой в тече- действия. ние прибл. 3 секунд для включения прибора. -
Page 103: Указания К Применению
Шаг 4. С помощью кнопок +/– на- Шаг 6. На дисплее отображается стройте уровень сложности для оставшееся время использования выбранной тренировки. Во всех тре- и актуальный уровень интенсив- нировках Fitness & Power (кроме «По- ности для используемого канала. степенное замедление» (Cool Down) Кроме... -
Page 104: Настройки Прибора
или 6 Вы не нажимаете на кнопки и не начинаете тренировку, • Каждая манжета оборудована отдельным каналом (2 штеке- прибор отключается через 5 минут. ра). Запрещено подключать две манжеты к одному каналу. • Убедитесь в том, что размещаете манжеты таким образом, Потеря... - Page 105 • Для смены языка меню выберите на включенном приборе Возврат к заводским настройкам с помощью кнопок + /– «Настройки» и подтвердите выбор Вы можете выполнить сброс настроек миостимулятора до за- кнопкой ОК водских. При этом будут сброшены настройки языка, яркости •...
-
Page 106: Пользование Прибором С Помощью Приложения Beurer
зогрева мышц) HomeStudio в Apple App Store (iOS) или Google Play (Android Cool Down Вкл. 1 с/выкл. 1 с Шаг 3. Откройте приложение beurer EMS HomeStudio и следуй- Six Pack (Кубики Вкл. 5 с Вкл. 8 с Вкл. 8 с... -
Page 107: Параметры Тока
Уровень сложности № про- Рекомендуемые зоны Время ПРЕДУПРЕЖДЕНИЕ! Частота грам- применения, инди- работы Продвину- С п е ц и а - Запрещено использовать электроды на передней стенке груд- (Гц) Новичок мы кация (мин) тый лист ной клетки. Стабильная сере- Вкл. 6 с Вкл. -
Page 108: Форма Импульса
лывание говорит о достаточной энергии стимуляции, но следует ния меняет свое направление. избегать настроек, вызывающих болевые ощущения. В миостимуляторе EM 95 используется исключительно двух- При продолжительном применении прибора может потре- фазный импульсный ток, так как он разгружает мускулату- боваться перенастройка вследствие процессов привыкания... -
Page 109: Утилизация
10. Неполадки/решение проблем Хранение • Не перегибайте соединительные провода и электроды. Прибор не включается нажатием кнопки ВКЛ./ВЫКЛ. . Что • Отсоедините провода от электродов. делать? • После применения наклейте электроды обратно на несущую (1) Убедитесь в том, что аккумулятор заряжен. пленку. (2) Обратитесь... -
Page 110: Запасные Части И Детали, Подверженные Быстрому Износу
нов/планшетов: 2 манжеты Арт. 662.08 Размер L (50–70 см) 12. Технические данные Указание. Если способ и условия применения прибора Тип EM 95 не соответствуют спецификации, его безупречная работа Форма кривой Двухфазные прямоугольные не гарантируется! на выходе импульсы Мы оставляем за собой право на технические изменения... -
Page 111: Указания По Электромагнитной Совместимости
13. Указания по электромагнитной совместимости ПРЕДУПРЕЖДЕНИЕ! • Прибор предназначен для работы в условиях, перечисленных в настоящей инструкции по применению, в том числе дома у пользователя. • При наличии электромагнитных помех возможности использо- вания прибора могут быть ограничены. В результате, например, могут появляться сообщения об ошибках или произойдет выход из... - Page 112 5.2 Wskazówki dotyczące użytkowania ........119 Ostrzeżenie przed niebezpieczeństwem utraty zdro- 5.3 Ustawienia urządzenia ..............120 wia lub odniesienia obrażeń ciała 5.4 Użycie z aplikacją „beurer EMS HomeStudio” .....121 UWAGA 6. Przegląd programów ................122 Ostrzeżenie przed niebezpieczeństwem uszkodzenia 6.1 Treningi Fitness & Power ............122 urządzenia lub akcesoriów...
- Page 113 Zakres dostawy i akcesoria Symbol CE potwierdza zgodność produktu z wyma- Zestaw należy sprawdzić pod kątem zewnętrznych uszkodzeń opa- ganiami Wspólnoty Europejskiej nałożonymi na pro- ducenta. kowania kartonowego oraz kompletności zawartości. Przed użyciem istotne jest upewnienie się, że na urządzeniu i akcesoriach nie widać żadnych uszkodzeń, a wszystkie części opakowania zostały usunię- Producent te.
-
Page 114: Informacje Ogólne
Dzięki czterem osobno ustawianym kanałom urządzenie do elek- i żądany trening. Prawidłowe ułożenie mankietów i elektrod jest nas- trycznej stymulacji mięśni i nerwów EM 95 oferuje możliwość dopa- tępnie pokazywane na kolorowym wyświetlaczu TFT 3,5", jak rów- sowania intensywności stymulacji dla czterech partii ciała, niezależ- nież... - Page 115 z przodu klatki piersiowej (żebra i mostek), szczególnie na obu UWAGA! większych mięśniach piersiowych. Mogłoby to zwiększyć ryzyko Urządzenie EM 95 stosować wyłącznie: wystąpienia migotania komór serca i spowodować zatrzymanie • U ludzi akcji serca. • W celu zgodnym z przeznaczeniem oraz w sposób opisany w ni- •...
- Page 116 • Urządzenia nie stosować podczas czynności, w których nieprze- razie nieregularny rozkład przyczepności elektrod samoprzylep- widziana reakcja (np. silny skurcz mięśni pomimo niskiej inten- nych mógłby doprowadzić do obrażeń skóry. Elektrody należy sywności) mogłaby stanowić zagrożenie. wymienić na nowe po maksymalnie 20 zabiegach. •...
-
Page 117: Opis Urządzenia
3. Opis urządzenia • Przed użyciem akumulatory należy odpowiednio naładować. Na- leży zawsze przestrzegać zaleceń producenta i danych zawartych w niniejszej instrukcji obsługi dotyczących prawidłowego ładowa- nia. • Przed pierwszym użyciem akumulator należy całkowicie nałado- wać (patrz rozdział „Ładowanie akumulatora”). •... -
Page 118: Przed Użyciem
4. Przed użyciem 5. Zastosowanie 4.1 Ładowanie baterii 5.1 Rozpoczęcie użytkowania Przed pierwszym użyciem urządzenia do stymulacji mięśni należy je najpierw ładować przez Krok 1: Przytrzymaj wciśnięty przycisk co najmniej 4 godz. W tym celu WŁ./WYŁ. przez 3 sekundy, aby należy wykonać... -
Page 119: Wskazówki Dotyczące Użytkowania
Krok 4: Za pomocą przycisków + /- Krok 6: Pozostały czas aplikacji i aktu- wybierz poziom trudności wybrane- alnie ustawiony poziom intensywności go treningu. Dla wszystkich treningów używanych kanałów są wyświetlane w obszarze „Fitness & Power” (z wyjąt- na wyświetlaczu urządzenia. Wyświe- kiem „Cool Down”... -
Page 120: Ustawienia Urządzenia
Utrata kontaktu Dostarczanie wody W przypadku poluzowania się elektrod/mankietów/kabli podczas Zadbaj o to, aby przed, w trakcie i po treningu pić wystarczającą treningu obwód zostaje przerwany i intensywność danego kanału ilość wody. Przed rozpoczęciem treningu wypij co najmniej jedną zostaje automatycznie zresetowana do 0. Na wyświetlaczu in- szklankę... -
Page 121: Użycie Z Aplikacją „Beurer Ems Homestudio
W aplikacji znajdują się dodatkowe filmy wideo z poszczególnymi Zielony = dźwięk przycisku włączony treningami. Czerwony = dźwięk przycisku wyłą- czony Aby połączyć urządzenie z aplikacją „beurer EMS HomeStudio”, na- leży postępować w następujący sposób: Resetowanie urządzenia Krok 1: Aktywuj opcję Bluetooth na swoim smartfonie. -
Page 122: Przegląd Programów
6. Przegląd programów Krok 4: Po połączeniu się aplikacji „beurer EMS HomeStudio” z urządzeniem do stymulacji mięśni na wyświetlaczu urządzenia Urządzenie do stymulacji mięśni udostępnia łącznie ponad 20 tre- do stymulacji mięśni wyświetla się sześciocyfrowy kod. Wprowadź ningów. sześciocyfrowy kod w smartfonie. Urządzenie do stymulacji mięśni •... -
Page 123: Treningi Relax & Wellbeing
Odpowiednie umieszczenie elektrod jest ważne dla uzyskania za- W EM 95 działają tylko dwufazowe prądy im- mierzonego efektu stymulacji. pulsowe, ponieważ odciążają mięśnie i prowadzą do mniejszego Umieszczenie elektrod w urządzeniu służy jako pierwsza pomoc zmniejszenia mięśni oraz bezpieczniejszego użytkowania. -
Page 124: Szerokość Impulsu
7.3 Szerokość impulsu • Do czyszczenia nie używać środków chemicznych ani środków o działaniu ścierającym. Szerokość impulsu informuje o czasie trwania Szerokość impulsu pojedynczego impulsu w mikrosekundach. Sze- Nie wolno dopuścić, aby woda dostała się do wnętrza urządze- rokość impulsu określa przy tym głębokość wni- nia. -
Page 125: Problemy/Rozwiązywanie Problemów
(1) Elektrody są źle umieszczone. Sprawdź umieszczenie elektrod 12. Dane techniczne i w razie potrzeby ponownie je naklej. (2) Elektrody są zużyte. Może to prowadzić do podrażnień skóry, EM 95 ponieważ nie gwarantują one równomiernego rozłożenia prądu Krzywa impulsów dwufazowe impulsy prostokątne na całej powierzchni. -
Page 126: Wskazówki Dot. Kompatybilności Elektromagnetycznej
13. Wskazówki dot. kompatybilności elektroma- Napięcie wyjściowe maks. 120 V pp ±10% (przy 500 Ω) gnetycznej Prąd wyjściowy maks. 240 mA pp ±10% (przy 500 Ω) Napięcie zasilania Akumulator litowo-polimerowy OSTRZEŻENIE! 1170 mAh Czas zastosowania 5 – 20 minut • Urządzenie jest przeznaczone do użytkowania w każdym otocze- Intensywność... - Page 127 Obowiązują następujące warunki gwarancji: 1. Okres gwarancji na produkty firmy BEURER wynosi 3 lata lub, jeśli jest dłuższy, obowiązuje w danym kraju od daty zakupu. W przypadku roszczeń z tytułu gwarancji konieczne jest potwier- dzenie daty zakupu przez okazanie dowodu zakupu lub faktury.
- Page 128 The Bluetooth word mark and logos are registered trademarks owned by Bluetooth SIG, Inc. and any use of such marks by Beurer GmbH is ® under license. Other trademarks and trade names are those of their respective owners. Apple and the Apple logo are trademarks of Apple Inc., registered in the U.S. and other countries. App Store is a service mark of Apple Inc., registered in the U.S.