uebe visomat handy IV Mode D'emploi

Manuels Connexes pour uebe visomat handy IV


Sommaire des Matières pour uebe visomat handy IV
- Page 1 visomat handy IV ® Gebrauchsanleitung (2-29) Instruction manual (30-55) Mode d‘emploi (56-66) Manuale di istruzioni (67-77) Manual de instrucciones (78-87) 0123...
-
Page 2: Table Des Matières
Inhaltsangabe Gerätebeschreibung/Kontrollanzeigen B Kurzanleitung zur Messung C Bedienung des Gerätes 1. Inbetriebnahme des Gerätes 2. Anlegen des Gerätes 3. Die richtige Lage des Gerätes 4. Manschette aufpumpen 5. Blutdruck messen 6. Messwertspeicher abrufen 7. Messwertspeicher löschen D Wichtige Hinweise 1. Grundregeln zur Ermittlung des Blutdrucks 2. Was noch zu beachten ist Armumfang Herzrhythmusstörungen Frequenz von Herzschrittmachern Schwangerschaft Medikamente... - Page 3 Inhaltsangabe Was Sie über Blutdruck wissen sollten 1. Der systolische und diastolische Blutdruckwert 2. Warum Sie unterschiedliche Werte messen 3. Warum regelmäßig Blutdruck messen? 4. Was sind normale Blutdruckwerte? F Pflege des Gerätes 1. Batterien wechseln 2. Reinigen und desinfizieren 3. Kundendienst G Anhang Was tun bei Mess- und Bedienungsfehlern? Technische Daten/Zubehör/Ersatzteile CE-Zeichen Messtechnische Kontrolle Herstellergarantie...
-
Page 4: Gerätebeschreibung
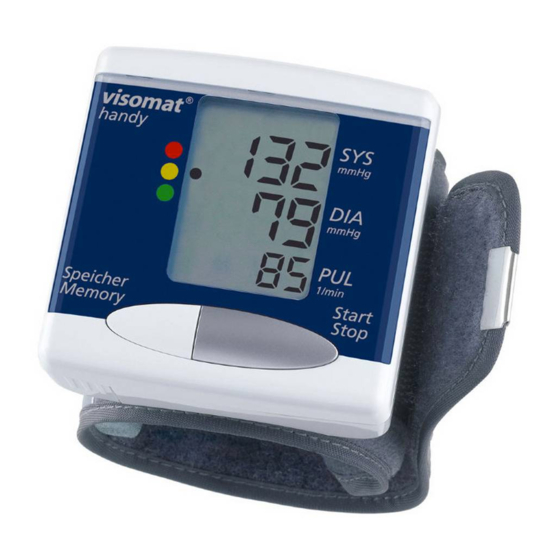
Gerätebeschreibung ... - Page 5 Kontrollanzeigen/Symbole Anzeigen für Systole, Diastole, Puls, Kontrollanzeigen Speicher Nr. (Nr. der Messung) Start/Stop-Taste A 13 Mittelwert und Anzahl gespeicherter Messwerte Memory-Taste (Speicher-Abruf-Taste) Pulsfrequenzanzeige Batterieabdeckung Batterien wechseln Handgelenkmanschette Systole SYS Diastole DIA Pulsfrequenz P UL Aufpumpen / Entlüften visomat handy IV: ® Digitales Automatikgerät mit Elektropumpe zur Blutdruckmessung am Handgelenk.
-
Page 6: B Kurzanleitung Zur Messung
Kurzanleitung zur Messung Bitte vor der ersten Messung die ausführliche Gebrauchsanweisung lesen! (ab Seite 9) 1. Batterien einlegen (2 x 1,5V Alkali Mangan) Abb. 1 2. Anlegen der Manschette Linkes Handgelenk freimachen. Gerät am Handgelenk anlegen. Abstand vom oberen Manschettenrand zur Handfläche ca. 1 cm (Abb. 1). Manschette schließen. Gerät auf Herzhöhe halten (Abb. 2). Abb. 2 Arm ruhig halten, nicht sprechen. - Page 7 Kurzanleitung zur Messung 3. Aufpumpen der Manschette Start-Taste drücken. Das Gerät führt einen Funktionstest durch, alle Anzeigenelemen- te werden sichtbar. Das Aufpumpen der Manschette erfolgt automatisch bis ca. 190 mmHg. Bei zu niedrigem Manschet- tendruck erhöht das Gerät selbständig den Druck in Schritten von ca. 30 mmHg. 4. Blutdruck messen Nach dem Aufpumpen entweicht die Luft automatisch, der fallende Manschet- tendruck wird angezeigt und das „“ Symbol blinkt und piepst. Das automatische Entlüften der Man- schette signalisiert das Ende der Messung.
- Page 8 Kurzanleitung zur Messung Auf der Anzeige erscheinen die Blut- druckwerte Systole und Diastole sowie die Pulsfrequenz. 5. Gerät abschalten Start/Stop-Taste drücken. Die gemessenen Werte werden automa- tisch abgespeichert.
-
Page 9: C Bedienung Des Gerätes
Bedienung des Gerätes 1. Inbetriebnahme des Gerätes Legen Sie die beigefügten Batterien in das Gerät ein, falls sie nicht bereits eingelegt wurden (siehe Seite 20, Batterien wech- seln). 2. Anlegen des Gerätes Linkes Handgelenk freimachen, die Hand- innenfläche zeigt nach oben. Gerät mit Manschette über das Handgelenk schie- Manschette am rechten Arm anlegen, ben. Der Abstand zwischen Handfläche die Gebrauchsanweisung gilt sinngemäß. und Oberkante der Manschette soll ca. Ziehen Sie jetzt das freie Manschettenende 1 cm betragen. straff und schließen die Manschette mit dem Klettverschluss. Durch die optimierte Der Manschettensensor auf der Unter- Form sitzt die Manschette sehr straff, um seite des Gerätes liegt dann direkt auf evtl. Messfehler zu vermeiden. der Pulsstelle. Linkshänder können die... -
Page 10: Die Richtige Lage Des Gerätes
Bedienung des Gerätes 3. Die richtige Lage des Gerätes 3 Messhaltungen sind möglich: 1. Legen Sie den linken Arm auf einen Ess- tisch und winkeln ihn so an, dass sich das Handgelenk genau auf Herzhöhe befindet. 2. Erfolgt die Messung einmal nicht an einem Tisch, kann auch in folgender Haltung gemessen werden: Legen Sie den linken Arm nach Betätigen der Starttaste locker so an den Körper, dass sich die Manschette des Gerätes auf Herzhöhe be- findet. Zur Unterstützung und Entlastung des linken Armes können Sie den rechten Arm als Auflage nehmen. Beide Arme ruhig halten, bis die Messung abgeschlos- sen ist. D-10... - Page 11 Bedienung des Gerätes 3. Messung im Liegen Legen Sie sich auf den Rücken. Das Gerät am Handgelenk anlegen und z. B. durch ein Kissen gestützt in Herzhöhe halten. Um sich vor der Messung zu entspannen, atmen Sie 5- oder 6-mal tief durch. Arm während der Messung unbedingt ruhig halten und nicht sprechen. Falls sich die Manschette in einer zu niedri- gen bzw. zu hohen Stellung als Herzhöhe Korrekte Messwerte können nur befindet, neigt der gemessene Wert dazu, dann erzielt werden, wenn sich das höher bzw. niedriger auszufallen. Handgelenk in Herzhöhe befindet. Eine zu hohe oder zu tiefe Haltung des Handgelenks führt zu falschen Messergebnissen. D-11...
-
Page 12: Manschette Aufpumpen
Bedienung des Gerätes 4. Manschette aufpumpen Das Gerät durch Drücken auf die Start/ Stop-Taste einschalten. Es leuchtet das gesamte Display auf (Segmentkontrolle). Sie können damit überprüfen, dass alle Anzeigenelemente in Ordnung sind. Kurz danach erscheint ein Pfeil nach unten, dann die Anzeige „0“, anschließend wird die Manschette automatisch bis ca. 190 mmHg aufgepumpt. Falls dieser Manschettendruck für die Messung der Blutdruckwerte nicht ausreicht, erhöht das Gerät selbständig den Manschettendruck in Schritten von 30 mmHg bis ein ausrei- chender Druck erreicht ist. Der Aufpump- und Messvorgang kann jederzeit durch Drücken der Start/Stop-Taste abgebro- D-12... - Page 13 Bedienung des Gerätes Bitte beachten Sie: chen werden. Um den Aufpumpvorgang manuell zu steuern, halten Sie sofort nach Die Manschette darf nur aufgepumpt werden, wenn sie am Handgelenk Beginn des Aufpumpens die Start/Stop- Taste gedrückt und lassen sie wieder los, angelegt ist. sobald der Manschettendruck eine Höhe von 30 mmHg über dem zu erwartenden systolischen Maximaldruck erreicht. Wenn der Manschettendruck ca. 190 mmHg überschritten hat, wird das Aufpumpen gestoppt, sobald man die Taste loslässt. Der Druck kann bis ca. 300 mmHg erhöht werden. D-13...
-
Page 14: Blutdruck Messen
Bedienung des Gerätes 5. Blutdruck messen Sobald der notwendige Manschettendruck erreicht ist, schaltet die Pumpe ab und die Luft entweicht automatisch. In der Anzeige erscheint der fallende Manschet- tendruck. Nach kurzer Zeit blinkt das „“ Symbol im Rhythmus des Pulsschlages. Am Ende der Messung wird die Manschet- te automatisch entlüftet. Auf der Anzeige erscheinen die gemessenen Blutdruckwer- Übertragen Sie die Speicherwerte in te sowie die Pulsanzeige. Die Werte von Ihren Blutdruckpass. Dadurch erhalten Systole und Diastole werden automatisch Sie über einen längeren Zeitraum einen beim Start einer neuen Messung oder beim Ausschalten des Gerätes gespeichert. Überblick über Ihre Blutdrucksituation, die Sie ggf. mit Ihrem Arzt besprechen können. -
Page 15: Messwertspeicher Abrufen
Bedienung des Gerätes zurückgehend alle 30 Messwerte aufrufen. Vor Beginn einer Wiederholungsmes- Wird die Taste erneut gedrückt, erscheint sung sollten Sie drei Minuten warten, der Mittelwert aller Messungen. bis sich die Blutzirkulation in Ihrem Arm wieder normalisiert hat. 7. Messwertspeicher löschen 6. Messwertspeicher abrufen Um einzelne Messwerte zu löschen, rufen Das Gerät hat einen Messwertspeicher, Sie mit der Memory-Taste durch mehrma- der es ermöglicht, die 30 zuletzt gemes- liges Drücken den gewünschten Messwert senen Blutdruck- und Pulswerte und den auf und halten Sie die Taste 4 Sekunden Mittelwert (Durchschnittswert) anzuzei- lang gedrückt. Um den gesamten Speicher gen. Durch Drücken der Memory-Taste zu löschen, drücken Sie die Memory-Taste erscheint der Mittelwert, sofern bereits 2 und halten sie gedrückt, bis der Messwert Messwerte gespeichert wurden. Noch- erloschen ist (7-8 sec). -
Page 16: D Wichtige Hinweise
Wichtige Hinweise 1. Grundregeln zur Ermittlung • Exakte Werte ermitteln Sie am sichersten, des Blutdrucks wenn Sie Armbanduhr oder Schmuck ab- legen und am bloßen Handgelenk messen. • Die Messung muss in Ruhe vorgenom- men werden. Gehen oder Treppensteigen • Bei der Messung darf der Arm mit dem erhöht den Blutdruck. Warten Sie min- Gerät nicht bewegt werden, um Störim- destens 5 Minuten, bis Ihr Kreislauf sich pulse auf jeden Fall zu vermeiden. Spre- beruhigt hat. chen Sie während der Messung nicht. • Kontrollieren Sie den Blutdruck zweimal • Zwischen aufeinanderfolgenden Messun- täglich – morgens nach dem Aufstehen gen muss immer eine Pause von etwa 3 und abends, wenn Sie sich nach der Arbeit Minuten zur Vermeidung von Fehlmessun- entspannt haben. gen eingelegt werden. • Der Blutdruck muss im Sitzen gemessen werden. Setzen Sie sich für die Messung an Ihren Esstisch (keinesfalls niedriger Couchtisch) und halten Sie das Handge- lenk auf Herzhöhe. D-16... -
Page 17: Was Noch Zu Beachten Ist
Wichtige Hinweise 2. Was noch zu beachten ist • Schwangerschaft Die Blutdruckwerte können durch die • Armumfang Schwangerschaft verändert werden. Füh- Die Manschette ist auf einen Handgelenk- ren Sie eine Blutdruck-Selbstkontrolle nur umfang von 12,5 – 21,5 cm ausgelegt. in Absprache mit Ihrem Arzt durch. • Herzrhythmusstörungen • Medikamente Wenn Sie an Herzrhythmusstörungen oder Bei Einnahme von Blut verdünnenden/ge- Arhythmien leiden, kann dies zu falschen rinnungshemmenden Mitteln nur nach Messergebnissen führen (Achten Sie Rücksprache mit Ihrem Arzt messen. auf gleichmäßige Pieptöne während der Messung). Sprechen Sie deshalb mit Ihrem Arzt, bevor Sie Ihren Blutdruck messen. • Frequenz von Herzschrittmachern Selbstmessung bedeutet noch keine Thera- Die Anzeige der Pulsfrequenz ist nicht pie. Verändern Sie auf keinen Fall von sich geeignet zur Kontrolle der Frequenz von aus die vom Arzt verschriebene Dosierung Herzschrittmachern. -
Page 18: Was Sie Über Blutdruck Wissen Sollten
Was Sie über Blutdruck wissen sollten 1. Der systolische und diastolische Bei Ihrer täglichen Messung ermitteln Sie Blutdruckwert beide Werte. Herz- und Blutkreislauf haben die wichtige Aufgabe, alle Organe und Gewebe des 2. Warum Sie unterschiedliche Werte Körpers ausreichend mit Blut zu versorgen messen. und Stoffwechselprodukte abzutrans- Unser Blutdruck reagiert wie ein emp- portieren. Das Herz zieht sich dazu in findliches Messinstrument auf äußere regelmäßigem Rhythmus etwa 60–80 mal und innere Einflüsse. Schon geringfügige pro Minute zusammen und dehnt sich Änderungen können auf ihn einwirken. wieder aus. Das macht verständlich, dass häufig beim Der Druck des strömenden Blutes, der Arzt oder Apotheker gemessene Werte beim Zusammenziehen (Kontraktion) des höher sind als jene, die Sie zu Hause in Herzens auf die Arterienwände entsteht gewohnter Umgebung erhalten. Aber wird als Systole bezeichnet. Der Druck in auch Wetterumschwung, Klimawechsel, der darauf folgenden Erschlaffungsphase, körperliche und seelische Belastungen wenn sich das Herz wieder mit Blut füllt, können sich auswirken. wird als Diastole bezeichnet. D-18... -
Page 19: Warum Regelmäßig Blutdruck Messen
Was Sie über Blutdruck wissen sollten 3. Warum regelmäßig Blutdruck 4. Was sind normale Blutdruckwerte? messen? Die Weltgesundheitsbehörde (WHO) hat Auch die Tageszeit hat einen Einfluss auf folgende Übersicht für die Einordnung der die Höhe des Blutdruckes. Tagsüber sind Blutdruckwerte zusammengestellt: die Werte meist höher als während der Ruhephasen in der Nacht. Einmalige und Hochdruck Grenzwert Normalwert unregelmäßige Messungen sagen daher systolischer systolischer systolischer kaum etwas über den tatsächlichen Blut- Druck ≥140* Druck Druck ≤119 druck aus. Eine zuverlässige Beurteilung ist und / oder** 120–139 diastolischer nur möglich, wenn regelmäßig Einzelmes- diastolischer diastolischer Druck ≤79 sungen durchgeführt werden. Besprechen Druck ≥90 Druck 80–89 Sie die Messwerte mit Ihrem Arzt. * mmHg = Millimeter Hydragyrum (Quecksilber) ** Es genügt, wenn bereits einer der Werte erhöht ist. D-19... -
Page 20: F Pflege Des Gerätes
Pflege des Gerätes 1. Batterien wechseln den Batteriedeckel wieder in das Gerät einschieben. • Batteriefach öffnen • Bitte beachten Sie: Deckel des Batteriefaches an der Seite des Gerätes öffnen. Wechseln Sie die Batterien, – wenn nach der Segmentkontrolle das • Batterie einlegen Batteriesymbol im Display erscheint, Nehmen Sie die alten Batterien aus dem – trotz Drücken der Starttaste keine Gerät und legen die neuen Batterien ein. Displayanzeige erscheint. Achten Sie beim Einlegen auf die richtige Polung (Markierung im Batteriefach). Die Wechseln Sie stets alle 2 Batterien aus. Batterien können einfach eingelegt wer- Verwenden Sie nur Markenbatterien der den, in dem man Sie in das Batteriefach angegebenen Qualitätsstufen (siehe techn. drückt, während man ihre (–) Seite gegen Daten). Wird das Gerät längere Zeit nicht die Feder presst. benutzt, entfernen Sie bitte die Batteri- en. Sie beugen so einem Auslaufen vor. • Batteriefach schließen Grundsätzlich kann jede Batterie auslaufen. Schließen Sie das Batteriefach, indem Sie D-20... -
Page 21: Reinigen Und Desinfizieren
Die Manschette darf nicht gewaschen nicht in den Hausmüll, bitte bei Sammel- oder chemisch gereinigt werden. stellen in Geschäften oder bei der Stadtreinigung (Schadstoffsamm- 3. Kundendienst lung) abgeben. Eine Reparatur des Gerätes darf nur durch 2. Reinigen und desinfizieren den Hersteller oder eine von UEBE aus- drücklich dazu ermächtigte Stelle erfolgen. Reinigen Sie das Gerät nur mit einem weichen, leicht angefeuchteten Tuch Bitte wenden Sie sich an: und etwas Spülmittel. Flecken auf der UEBE Medical GmbH Manschette können vorsichtig mit einem Zum Ottersberg 9 feuchten Tuch und Seifenwasser entfernt 97877 Wertheim/Germany werden. Tel.-Nr.: 09342/924040 Für eine eventuelle Desinfektion emp- Fax-Nr.: 09342/924080 fehlen wir das Mittel Descosept AF, Dr. E-mail: info@uebe.com Schumacher GmbH, Melsungen. Schnell- Internet: www.uebe.de desinfektion zum Wischen und Sprühen. D-21... - Page 22 Was tun bei Mess- oder Bedienungsfehlern? Menschen mit Herzrhythmusstörungen, Gefäßverengungen, Arteriosklerose in den Extremitäten sowie Diabetiker sollten sich vor Blutdruck-Selbstmessungen mit dem Arzt abstimmen, da in solchen Fällen abweichende Blutdruckwerte auftreten können. Aufgetretener Fehler Ursache Beseitigung ERR 1: Messfehler Bewegen des Arms oder des Körpers während Wiederholen Sie die Messung. Bewegen Sie den der Messung. Manschette sitzt nicht. Arm nicht und sprechen Sie nicht. Bei wiederholtem Sprechen während der Messung. Auftreten Kundendienst kontaktieren. ERR 2: Aufpumpfehler Im System wird kein Druck aufgebaut Messung wiederholen, bei mehrmaligem Auftreten Service-Telefon anrufen ERR 3: Ablassfehler Ablassrate zu hoch oder zu niedrig Bei mehrmaligem Auftreten Service-Telefon anrufen ERR 330 Aufpumpdruck über 330 mmHg Messung wiederholen Batteriefehler Batterien überprüfen Keine Mess- und Kontrollanzei- Keine Batterien eingesetzt. Batterien überprüfen und ggf. austauschen. gen in den Anzeigenfeldern. Batterien falsch eingesetzt. Batterien leer. Batterieanzeige Batterien leer. Batterien überprüfen und ggf. austauschen. Fehlerhafte Messwerte. Bewegen des Arms oder des Körpers während Wiederholen Sie die Messung. Bewegen Sie den der Messung. Arm nicht und sprechen Sie nicht.
-
Page 23: Technische Daten/Zubehör/Ersatzteile
Anhang Technische Daten/Zubehör/Ersatzteile • Messbereich: Blutdruckmessung: 0–300 mmHg • Gerätetyp: Pulsmessung: 40–160 Puls/min. Digitales Automatikgerät mit Elektro- pumpe zur Blutdruckmessung am Hand- • Fehlergrenzen: gelenk Blutdruckmessung: entspricht EN 1060 Teil 3 • Messverfahren: Druckmessung: ± 3 mmHg Oszillometrische Bestimmung von Systole, Pulsmessung: ± 5% Diastole und Puls • Manschette: • Referenzverfahren der klinischen Prüfung: Schalenmanschette Auskultatorische Messung • Ablassventil: • Anzeige: elektronisch geregeltes Linearventil LCD-Anzeige für Messwerte (7-stellig) und • Aufpumpdruck: Kontrollanzeigen ca. 190 mmHg • Speicher: 30 Messwerte (automatische Speicherung) und Mittelwert D-23... - Page 24 Anhang • Ablassrate • Lager/ und Transportbedingungen: Ø 5,5 mmHg Umgebungstemperatur -5 bis +50°C Rel. Luftfeuchtigkeit bis 85% • Batterie: – Batterietyp: Technische Änderungen vorbehalten. 2 x 1,5 V Micro/AAA LR 03-Zellen Alkali-Mangan oder Lithium (FR 03) Zubehör/Ersatzteile – Lebensdauer: Folgende Ersatzteile bzw. Zubehör können Mehr als 600 Messungen in 2 Jahren Sie über den Fachhandel erhalten: – Batteriekontrolle: • Schalenmanschette „Typ H4“ Kontrollanzeige „ “ für Batterie- wechsel (12,5 – 21,5 cm) – Automatische Abschaltung: Art.-Nr. 2104001 ca. 3 Minuten nach Messende Wichtig: • Betriebsbedingungen: Das Gerät darf nur mit Originalmanschetten Umgebungstemperatur 10 – 40°C vom „Typ H4“...
-
Page 25: Ce-Zeichen
Anhang CE-Zeichen Die Forderung folgender Normen werden eingehalten: Dieses Blutdruckmessgerät entspricht den eu- ropäischen Vorschriften, die dem Medizinpro- • EN 1060 Teil 1: 1995 duktegesetz (MPG) zugrundeliegen und trägt Nichtinvasive Blutdruckmessgeräte das CE-Zeichen „CE 0123“. Das Gerät wurde Teil 1: Allgemeine Anforderungen qualitätskontrolliert nach der EG-Richtlinie • EN 1060 Teil 3: 1997 93/42/EWG, es unterliegt deshalb nicht der Nichtinvasive Blutdruckmessgeräte Eichpflicht und trägt keine Eichmarke. Teil 3: Ergänzende Anforderungen für elektromechanische Blutdruckmesssysteme Schutzgrad gegen elektrischen • prEN 1060-4: 2002 Schlag: TYP BF Nicht-invasive Blutdruckmessgeräte (Klinische Validierung) Gebrauchsanweisung beachten. D-25... -
Page 26: Messtechnische Kontrolle
Anhang Messtechnische Kontrolle • EN 60601-1:1990 +A1:1993 Gemäß „Medizinprodukte-Betreiberver- +A2:1995 ordnung“ sind fachliche Benutzer dazu 1. Mediz. elektr. Geräte angehalten, alle 2 Jahre eine messtechnische 2. Allg. Festlegungen für die Sicherheit Kontrolle durchzuführen. Diese kann entwe- • EN 60601-1-2:2001 der durch UEBE Medical GmbH, eine für das Mediz. elekt. Geräte Messwesen zuständige Behörde oder durch Elektromagn. Verträglichkeit autorisierte Wartungsdienste erfolgen. Hersteller Zuständige Behörden oder autorisierte Wartungsdienste erhalten auf Anforderung UEBE Medical GmbH eine „Prüfanweisung zur messtechnischen Zum Ottersberg 9 Kontrolle“ vom Hersteller. 97877 Wertheim/Germany D-26... -
Page 27: Herstellergarantie
Anhang Herstellergarantie Handhabung (z.B. ungeeignete Strom- quellen, Bruch, ausgelaufene Batterien) Das Gerät wurde mit aller Sorgfalt hergestellt und/oder Demontage des Gerätes durch und geprüft. Für den Fall, dass es trotzdem den Käufer entstehen. Ferner werden bei Auslieferung Mängel aufweisen sollte, durch die Garantie keine Schadenersatz- geben wir eine Garantie zu den nachfolgen- ansprüche gegen uns begründet. den Konditionen: 3. Garantieansprüche können nur in der 1. Während der Garantiezeit von 3 Jahren ab Garantiezeit und durch Vorlage des Kaufdatum beheben wir solche Mängel Kaufbeleges geltend gemacht werden. nach unserer Wahl und auf unsere Kosten Im Garantiefall ist das Gerät zusammen durch Reparatur (nach Rücksendung in mit dem Kaufbeleg und Beschreibung der unserem Werk) oder Ersatzlieferung eines Reklamation zu senden an UEBE Medical mangelfreien Gerätes. GmbH, Service-Center, Zum Schlag 18, 97877 Wertheim, Germany. 2. Nicht unter die Garantie fallen die normale Abnutzung von Verschleißteilen oder Schäden, die durch Nichtbeachtung der Gebrauchsanleitung, unsachgemäße D-27... - Page 28 Anhang 4. Die vertraglichen Mängelansprüche des Bitte beachten Sie: Käufers gegen den Verkäufer gemäß Im Garantiefall unbedingt den Kaufbeleg § 437 BGB werden durch die Garantie beilegen. nicht eingeschränkt. D-28...
- Page 29 Anhang D-29...
- Page 30 Contents A Description of device B Brief instructions for use C Display unit operation 1. Setting up the display unit 2. Fitting the cuff 3. Correct posture of device 4. Inflating the cuff 5. Blood pressure measurement 6. Memory recall 7. Memory deletion D Important information 1. Basic rules for blood pressure measurement 2. Other points to note Circumference of arm Heart rhythm malfunctions Frequency of cardiac pacemaker Pregnancy Medicines...
- Page 31 Contents E What you should know about blood pressure 1. Systolic and diastolic blood pressure values 2. Reasons for measuring different values 3. Why you should measure regularly 4. What are standard values? F Maintenance 1. Battery exchange 2. Cleaning and disinfecting 3. After-sales service G Appendix Malfunctions Technical specifications/accessories/replacement parts CE-mark Metrological inspection Manufacturer‘s guarantee ...
-
Page 32: A Description Of Device
Description of device GB-32... - Page 33 Check display symbols Display for systole, diastole, pulse and control readings Memory data (No. of measurement) Start/Stop button A 13 Average No. of stored data Memory button Pulse rate mark (memory recall button) Battery exchange Battery compartment Systole SYS Cuff Diastole DIA Pulse P UL Inflation / Deflation visomat handy IV: ® Digital display unit with electronic pump for measurement of blood pressure on the wrist.
-
Page 34: B Brief Instructions For Use
Brief instructions for use Please read detailed instructions prior to first your wrist. The cuff should fit snugly. measurement! (Page 37) Stretch your left arm out and rest it on the table with your palm facing upwards (Fig. 1. Insert batteries 2). Keep your arm still, and do not talk. Press the surface of the cuff to make sure (2 x 1.5 V alcaline-mangane batteries) that it is attached securely. 2. Fitting the cuff Bare your left wrist. With the palm of your left hand up, put the cuff on your wrist so that the main body is on the same side as your palm. Adjust the cuff, with your palm up, until its edge is positioned 5 to 10 mm Fig.1 (1/2 to 1/1 in.) from the lowest part of your palm (Fig.1). Fasten the cuff around your wrist so that there is no space between the cuff and GB-34 Fig.2... - Page 35 Brief instructions for use 3. Pumping up the cuff Press the “Start/Stop” button. The machine will carry out a function test, and all display elements will be visible. The cuff will be pumped up automatically to about 190 mmHg. If the pressure in the cuff is still too low, the machine will continue to pump it up in steps of about 30 mmHg at a time. 4. Blood pressure measurement After inflation, the air escapes automati- cally, the falling pressure in the cuff will be shown automatically, and the “-symbol” will flash and beep. GB-35...
- Page 36 Brief instructions for use The automatic release of the air from the cuff will show the end of the measuring cycle. The systolic and diastolic blood pressure readings will appear in the display alternating in time with your pulse. 5. Switching the machine off Press the Start/Stop button. The readings will be stored in the memory automati- cally. GB-36...
-
Page 37: C Display Unit Operation
Display unit operation 1. Setting up the display unit Load enclosed batteries, if this has not already been done (see “Battery ex- change”). 2. Fitting the cuff Bare your left wrist. Left-handed users can fit the cuff to their right arm (observing the general sense of wrist so that there is no space between instructions). With the palm of your left the cuff and your wrist. The cuff should fit hand up, put the cuff on your wrist so that snugly. The cuff sensor underside should the main body is on the same side as your now lie directly on your pulse. Press the palm. Adjust the cuff, with your palm up, surface of the cuff to make sure that it is until its edge is positioned 5 to 10 mm attached securely. With its improved shape (1/4 to 1/2 in.) from the lowest part of the cuff fits tightly to prevent measure- your palm. Fasten the cuff around your ment failures. GB-37... -
Page 38: Correct Posture Of Device
Display unit operation 3. Correct posture of device 3 postures for measurement are possible: 1. Stretch your left arm out and rest it on the table with your palm facing upwards. Bend the arm to the same height as your heart. 2. If you once do not measure at a table, you can measure in a posture as follows: After pressing the Start/Stop button lay our arm on your body so that the cuff is at the same height as your heart. In order to relieve the left arm you can rest it on your right arm. Do not move until measure- ment has finished. GB-38... - Page 39 Display unit operation 3. Making a Measurement in Lying Lie on your back. Adjust the cuff to the same height as your heart (e.g. with a pillow). Breathe deeply 5 or 6 times to relax before measurement. Measured data may differ very slightly depending on the posture during measu- rement. Correct measurements can only be Keep your arm still, and do not talk. achieved when the cuff is adjusted at the same height as your heart. If the cuff is lower (higher) in position than the heart, the measured reading tends to become larger (smaller).
-
Page 40: Inflating The Cuff
Display unit operation 4. Inflating the cuff Press the Start/Stop button. The machi- ne will carry out a function test, and all display elements will be visible. First the display shows an arrow down, then “0” and the cuff will be pumped up automati- cally to about 190 mmHg. If the pressure in the cuff is too low, the machine will continue to pump it up in steps of 30 mmHg at a time. Inflating the cuff and measuring can be stopped at any time by pressing the Start/ Stop button again. To manually control pressurization, hold down the Start/Stop button immediately after the start of inflation and release it GB-40... - Page 41 Display unit operation Attention: when the pressure reaches the level 30 mmHg higher than the expected Do not inflate the cuff if it is not fitted to your arm. maximum systolic pressure. If the pressure value has exceeded 190 mmHg, the in- flation will stop when the key is released. Pressure can be increased to approximately 300 mmHg. GB-41...
-
Page 42: Blood Pressure Measurement
Display unit operation 5. Blood pressure measurement Once the necessary pressure in the cuff is reached, the pump stops and the air escapes automatically. The falling cuff pressure appears in the display. After a short time, the symbol “” flashes in time with your pulse. At the end of the measurement the remaining air escapes automatically from the cuff. The display unit than shows the measured value of the blood pressure alternating in time with the Enter the memorised value in your pulse speed. When a new measurement is blood pressure chart. This will provide started, or the device is switched off, the you with an overview of your blood values of systolic and diastolic blood pres- pressure situation for a longer period, sure are automatically memorized. -
Page 43: Memory Recall
Display unit operation With this procedure all 30 memories can Please wait 3 minutes before taking a be recalled. Finally, another pressing of the new measurement. memory button recalls the average of all measured values. 6. Memory recall After the 30th measurement, the oldest measurement will be deleted and the The device is equipped with a memory latest measured value will be memorised. which is able to show the last 30 values of the blood pressure and pulse measure- 7. Memory deletion ments as well as an average value. When the memory button is pressed, the Single memorized values can be deleted average value appears first (as far as 2 va- when the memory button is pressed seve- ral times until the wanted value appears . lues are stored). When the memory button is pressed again the last measured value When the button is pressed 4 seconds the value will be deleted. To delete the com- (no. 1) appears. After pressing the button a third time the second latest memory (no. plete storage the memory button must be pressed until the display is blank (7-8 sec). 2) appears, and so on. GB-43... -
Page 44: D Important Information
Important information When the data on the display flashes the at your dining table. This ensures that the deletion was not completed and has to be cuff is kept at heart level. repeated. • Perform the measurement on your bare arm to reach exact values. 1. Basic rules for blood pressure measurement • Do not move the arm while wearing the cuff. • The measurement must be carried out whilst you are relaxed. Walking or going • Please wait at least 3 minutes between upstairs increases the blood pressure. successive measurements in order to avoid Please wait at least 5 minutes until your measurement errors. pulse rate has returned to normal. • Check the blood pressure twice a day – in 2. Other points to note the morning after getting up and in the • Circumference of arm evening after work when you are relaxed. The cuff is made to fit an arm • To carry out the measurement, sit down circumference of 12.5–21.5 cm. GB-44... -
Page 45: Heart Rhythm Malfunctions
Important information • Heart rhythm malfunctions • Medicines False results can be obtained if you are If you are taking blood-thinning/anti-coag- suffering from heart rhythm malfunctions ulating drugs (clot prevention) you should or arrhythmia. Pay attention to regular only make a measurement after consulting beeps during measurement. your doctor. • Frequency of cardiac pacemaker Measuring your own blood The pulse frequency display is not suitable pressure is not the same as treatment! for checking the frequency of cardiac Do not change any drug dosage deter- pacemakers. mined by your doctor. • Pregnancy During pregnancy blood pressure meas- urement should not be performed without... -
Page 46: E What You Should Know About Blood Pressure
What you should know about blood pressure 1. Systolic and diastolic blood 2. Reasons for measuring different values pressure values Our blood pressure reacts like a sensitive The cardio vascular system has the impor- measurement instrument to external and tant function of supplying all organs and internal influences. Even slights alterati- tissue in the body with sufficient blood ons can have an effect. This explains why and of eliminating the products of meta- measurements taken at your doctor’s or bolism. The heart contracts and relaxes in chemist’s are often higher than those a regular rhythm around 60–80 times per taken at home. But also such factors as minute. The pressure of the blood applied weather changes, change of climate, to the artery walls during contraction of physical and mental stress can affect the the heart is described as systole. The measurements. pressure in the subsequent relaxed phase, when the heart fills up with blood again, is described as diastole. You determine both values in your daily measurements. GB-46... -
Page 47: Why You Should Measure Regularly
What you should know about blood pressure 3. Why you should measure regularly? High blood Borderline Normal pressure pressure Even the time of day has an influence on systolic pres- systolic pres- systolic pres- your blood pressure. During the day the sure ≥140* sure 120–139 sure ≤119 values are generally higher than during the and/or** diastolic pres- diastolic pres- period of relaxation at night. One-off and diastolic pres- sure 80–89 sure ≤79 irregular measurements therefore say little sure ≥90 about your daily blood pressure. A reliable * mmHg = Millimetres of hydragyrum (mercury) assessment is possible only when measu- ** It suffices for one of the values to be raised rements are taken regularly. Speak to your doctor about the results. 4. What are standard values? The World Health Organization (WHO) has drawn up the following overview for assessing blood pressure values: GB-47... -
Page 48: Battery Exchange
Maintenance 1. Battery exchange • Please note: • Open battery compartment Replace the batteries when: Open the cover on the side of the device – The battery replacement indication by applying light pressure and pushing in appears on the display. the direction of the arrow. – Nothing is displayed even if the power button is depressed. • Insert batteries Always exchange both batteries. Use only Remove the old batteries from the display high quality batteries as indicated in the unit and insert the new ones. Make sure technical specifications. that the polarity is correct (marks inside of If the display unit is not going to be used the battery compartment). for a longer period, remove the batteries to prevent leakage. • Close battery compartment Close the battery compartment by repla- • Dispose of batteries and technical de- cing the cover. vices at a recycling point in your area. GB-48... -
Page 49: Cleaning And Disinfecting
Appendix 2. Cleaning and disinfecting Please contact Clean the display unit only by using a soft, Uebe Medical GmbH slightly damp cloth and some detergent. Zum Ottersberg 9 Stains on the cuff can be removed careful- 97877 Wertheim/Germany ly in the same way. Phone: +49 / 93 42 / 92 40 40 Please note: Fax: +49 / 93 42 / 92 40 80 Do not wash or dry-clean the cuff. E-Mail: info@uebe.com Internet: www.uebe.de 3. After-sales service Malfunctions Any repairs to the display unit may only be In rare cases, you may receive no results or carried out by the manufacturer/ supplier false results of measurements. Your display or by a service centre authorized by UEBE. unit shows you a code which will help you to rectify malfunctions (see list on page GB-49... - Page 50 Appendix Malfunctions shown Reasons Corrective Action Symbol ERR 1 is displayed – Movement of the arm or body during Repeat the measurement. Don’t move the arm and Measurement error the measurement. Do not talk during the don’t talk. In case of recurrence please contact our measurement after-sales service ERR 2 – inflation error Pump problem Repeat measurement. In case of recurrence please contact our after-sales service ERR 3 – deflation error Deflation rate too high or too low, valve In case of recurrence please contact our after-sales problem service ERR 330 Air pressure exceeds 330 mmHg Repeat measurement Battery problem Check batteries No measuring or check displays No battery inserted – Battery incorrectly Please check battery and replace if necessary on the screen inserted – Flat battery Battery is flat Please check battery and replace if necessary Battery symbol Faulty measurement values Moving your arm or body Repeat the measurement. Don’t move the arm and during the measurement. don’t talk. Too low or high position of wrist Repeat measurement with correct posture Cuff does not fit Check wrist circumference...
-
Page 51: Technical Specifications/Accessories/Replacement Parts
Appendix Technical specifications/ • Memory: accessories/replacement parts 30 measurements (saved automatically) and the average value • Display unit type: Digital display unit with electric pump for • Measuring range: measurement of blood pressure on wrist. Blood pressure measurement: 0–300 mmHg • Measuring system: Pulse measurement: Oscillometric determination of systole, 40–160 pulse/min. diastole and pulse value • Error range: • Reference procedure of clinical – Blood pressure measurement: investigation: correspond to EN 1060 Part 3 Auscultatory measurement – Pressure measurement: ±3 mmHg – Pulse measurement: ±5% • Display: LCD-display for 7-digit measuring parame- • Type of cuff: ters and check display Shell-shaped cuff GB-51... - Page 52 Appendix • Deflation valve: – Automatic power-off: Electronically regulated linear valve About 3 minutes after end of measurement • Deflation rate: average 5,5 mmHg • Conditions of use: Temperature between 10–40°C • Inflating pressure: Humidity 15–90% Approx. 190 mmHg • Accessory • Battery: Shell-shaped cuff ”Type H4“ – Battery type: (12,5 – 21,5 cm) 2 x AAA alkaline-manganate block cell (LR 03) or lithium (FR 03) Art.No. 2104001 – Durability: More than 600 measurements in 2 years Important: – Battery check: Use the display unit only Display ” “ means exchange with original cuff Type H4. battery GB-52...
-
Page 53: Ce-Mark
Appendix CE-mark • EN 1060 Part 3: 1997 Non-invasive sphygmomanometers This blood pressure display unit corresponds to the European regulation of EC directive Part 3: Supplementary requirements for 93/42/EEC on medical devices and bears the electromechanical blood pressure measu- CE-mark “CE 0123”. ring systems Reference procedure of clinical investigation: • prEN 1060-4: 2002 auscultatory measurement. Non-invasive sphygmomanometers (clini- cally validated) Protection grade against electric shock: Type BF • EN 60601-1:1990 +A1:1993 note instruction manual +A2:1995 1. Medical electrical devices Applied standards: 2. General commitment for safety • EN 1060 Part 1: 1995 • EN 60601-1-2:2001 Non-invasive sphygmomanometers Medical electrical devices Part 1: General requirements Electromagnetic tolerance GB-53... -
Page 54: Metrological Inspection
Appendix Producer UEBE Medical GmbH Manufacturer’s guarantee Zum Ottersberg 9 The equipment was manufactured and tested 97877 Wertheim/Germany with great care. However, in the unlikely event of a defect being detected after deli- Metrological inspection very, we are prepared to give a guarantee in (for professional users) accordance with the following conditions: A metrological inspection corresponding to 1. During the guarantee period of 3 years the “Regulations for the Retail of Medical from the date of purchase, we reserve the Products” should be carried out every two right to either repair any such defect at years either by Uebe Medical GmbH, a public our expense or supply a perfect replace- authority responsible for weights and measu- ment unit (in any case the defective equip- res or by an authorised service centre. ment must be returned to our factory). On request, the responsible authority or 2. Excluded from the guarantee are parts maintenance service will be sent a copy of subject to normal wear and tear as well the “Instructions for metrological inspec- as damage caused by non-compliance tions” by the manufacturer. with the operating instructions, improper GB-54... - Page 55 4. In the case of defectiveness of the goods, mains, breakages, leaking batteries) and/or the contractual rights of the purchaser dismantling of the unit by the purchaser. to claim against the supplier/salesman in Furthermore, no claims for damages accordance with § 437 BGB (The German against us can be justified through the Civil Code) are not limited by the guaran- guarantee. tee. 3. Claims under the guarantee can only be Please note: made during the guarantee period by In a warranty case, please return the entire presentation of the purchase receipt. unit together with the sales slip. In the case of claim under the guarantee, the equipment together with the purchase receipt and a written justification of the claim are to be sent to UEBE Medical GmbH, Service-Center, Zum Schlag 18, 97877 Wertheim, Germany. GB-55...
- Page 56 Sommaire Descriptif de l’appareil/Indications de contrôle A Bref descriptif des mesures 1. Insertion des piles 2. Application de l’appareil 3. Gonflage du brassard 4. Mesure de la tension artérielle 5. Eteindre l‘appareil 6. Rappel des valeurs mémorisées 7. Effacer les valeurs mémorisées B Remarques importantes 1. Règles de base pour la mesure de la tension artérielle 2. Autres remarques C Annexe Service client Garantie du fabricant...
-
Page 57: Descriptif De L'appareil/Indications De Contrôle
Descriptif de l’appareil Affichage systole, diastole et pouls, Brassard pour affichage de contrôle poignet Touche Start/Stop Touche mémoire (rappel des Couvercle du données enregistrées) boîtier à piles F-57... -
Page 58: A Bref Descriptif Des Mesures
Bref descriptif des mesures Avant de procéder à la première mesure, nous vous prions de lire attentivement et entièrement le mode d’emploi!. 1. Insertion des piles 2. Application de l’appareil Dégager le poignet gauche Enfiler le brassard jusqu’au poignet. Fig. 1 Maintenir une distance d’environ 1 cm (Fig. 1) entre le bord supérieur du brassard et la paume de la main. Fermer le brassard. Maintenir l’appareil à la hauteur du coeur (Fig. 2). Immobiliser le bras et ne pas parler. Fig. 2 F-58... -
Page 59: Gonflage Du Brassard
Bref descriptif des mesures 3. Gonflage du brassard Appuyer sur la touche « Start/Stop ». L’appareil effectue un test de fonction, toutes les données affichables apparais- sent sur l’écran. Le gonflage du brassard s’effectue automatiquement jusqu’à une pression de 190 mmHg. Au cas où la pression du brassard serait insuffisante, l’appareil augmente automatiquement la pression au pas de 30 mmHg environ. 4. Mesure de la tension artérielle Une fois le gonflage terminé, l’air se dégage automatiquement, la valeur de la pression descendante du brassard apparaît sur l’affichage et le symbole „“ clignote et donne un signal sonore. F-59... -
Page 60: Eteindre L'appareil
Bref descriptif des mesures Le dégonflage automatique du brassard signale la fin de la mesure. En alternance avec la fréquence des pul- sations cardiaques, les valeurs de tension artérielle systolique et diastolique apparais- sent sur l’écran 5. Eteindre l’appareil Appuyer sur la touche Start/Stop. Les valeurs qui viennent d’être mesurées sont mémorisées automatiquement. F-60... -
Page 61: Rappel Des Valeurs Mémorisées
Bref descriptif des mesures 6. Rappel des valeurs mémorisées Reportez les valeurs mémorisées dans votre carnet de tension artérielle. De cette ma- L’appareil est équipé d’une mémoire qui nière vous disposez d’une documentation permet de rappeler et de visualiser les 30 de vos valeurs de tension artérielle sur une dernières valeurs de tension artérielle ainsi plus grand période, que vous pourrez, le cas que la valeur moyenne. échant, présenter à... - Page 62 Bref descriptif des mesures 7. Effacer les valeurs mémorisées Avertissement: Les piles vides et les appareils techniques Pour effacer certaines valeurs, appuyez plu- ne doivent pas être jetés avec les ordures sieurs fois sur la touche «Memory» jusqu’à ménagères. Merci de les considérer ce que la valeur désirée apparaisse puis comme des déchets toxiques. effacer la valeur en maintenant la touche appuyée pendant 4 secondes. Pour effacer toute la mémoire appuyez pendant une durée d’environ 7-8 secondes sur la touche «Memory». Se l’affichage clignote, c’est que la mémoire n’a pas été effacée dans sa tota- lité. Dans ce cas répétez tout le procéssus. F-62...
-
Page 63: B Remarques Importantes
Remarques importantes 1. Règles de base pour la mesure trop bas) et maintenez votre poignet à la de la tension artérielle hauteur du cœur. • La mesure de la tension artérielle doit être • Pour être sûr d’obtenir des mesures ex- effectuée au repos. Marcher ou monter les actes, ôtez votre montre ou vos bijoux et escaliers fait monter la tension artérielle. appliquez l’appareil sur le poignet nu. Attendez au moins 5 minutes pour per- • Pendant le laps de temps nécessaire à la mettre à votre circulation de se stabiliser. mesure, le poignet sur lequel se trouve • Contrôlez votre tension artérielle deux fois l’appareil doit être maintenu immobile afin par jour – le matin après le lever et le soir d’éviter des impulsions étrangères suscep- lorsque vous êtes reposé de votre journée tibles de fausser la mesure. Ne parlez pas de travail. pendant la mesure. • Il est préférable d’effectuer la prise de • Entre plusieurs mesures consécutives il est tension en position assise. Pour cela as- nécessaire d’observer une pause de trois seyez-vous sur une chaise près d’une table minutes environ pour éviter d’obtenir des (en aucun cas sur un canapé en général résultats erronés. F-63... -
Page 64: Autres Remarques
Remarques importantes 2. Autres remarques • Grossesse Une grossesse peut entraîner une modi- • Circonférence du bras fication des valeurs de tension artérielle. Le brassard est calculé pour une circonfé- C’est pourquoi nous vous conseillons de rence du poignet entre 12,5 et 21,5 cm. consulter votre médecin avant de procéder au contrôle de la tension artérielle par • Perturbations de rythme cardiaque vous-même. Si vous souffrez de perturbations cardiaques ou bien d’arythmie, cela peut fausser le • Medicaments résultat des mesures. Faites attention à des Si vous utilisez des médicaments qui flui- pépiements réguliers durant la mesure. Dans difient le sang / anticoagulants (formation ce cas, nous vous conseillons de consulter d’hématome) consultez votre médecin votre médecin traitant avant de mesurer traitant avant d’effectuer une mesure. votre tension artérielle par vous-même. L’autocontrôle de la tension artérielle ne • Fréquence du stimulateur cardiaque signifie pas thérapie! Ne modifiez en aucun L’indication de la fréquence du pouls n’est cas le dosage des médicaments prescrits par pas adéquate pour le contrôle de la fré-... -
Page 65: Annexe
Annexe Service client Garantie du fabricant Une réparation éventuelle de l’appareil ne L’appareil a été fabriqué et contrôlé avec doit être effectuée que par le fabricant lui- le plus grand soin. Cependant, pour le cas même ou bien l’un des représentants agrées. d’une constatation de vice à la livraison, nous accordons une garantie aux conditions Dans ce cas veuillez vous adresser à: suivantes: Uebe Medical GmbH 1. Pendant la période de garantie de 3 ans à Zum Otterberg 9 partir de la date d’achat, nous corrigeons 97877 Wertheim/Germany de tels vices à notre convenance et à nos frais soit en effectuant une réparation Téléphone : + 49 / 93 42 / 92 40 40 (après retour de la marchandise en usine) Télécopie : + 49 / 93 42 / 92 40 80 soit par livraison d’un appareil de re- Email : info@uebe.com change en état de marche. Internet : www.uebe.de 2. La garantie ne couvre pas l’usure des pièces soumises à l’usure ni les dommages causés par un non respect du mode F-65... - Page 66 Annexe d’emploi, par un maniement non adéquat 4. En cas de réclamation pour vice, les droits (par exemple alimentation électrique non contractuels de acheteur contre le vendeur appropriée, cassure, piles non étanches) conformément à l’article 437 du Code et/ou par un démontage de l’appareil ef- Civil allemand ne sont pas restreints par la fectué par l’acheteur. En outre la garantie garantie. ne justifie aucune réclamation de dom- mages et intérêts. 3. Les réclamations sous garantie ne sont valables que pendant la période de garantie et sur présentation du bon d’achat. En cas de réclamation sous garantie, retourner l’appareil accompagné du bon d’achat ainsi que d’une description Remarque: du vice à l’adresse suivante: UEBE Medical Pour une réclamation sous garantie GmbH, Service-Center, Zum Schlag 18, n’oubliez pas de joindre la bon 97877 Wertheim, Germany. d‘achat. F-66...
- Page 67 Indice Descrizione dello strumento/Indicazioni per il controllo A Come missura la pressione: breve descrizione 1. Inserire le pile 2. Applicazione dello strumento al polso 3. Gonfiaggio del bracciale 4. Misurazione della pressione 5. Spegnimento dello strumento 6. Richiamo della memoria dei valori misurati 7. Cancellazione della memoria dei valori misurati B Avvertenze importanti 1. Regole principali per la misurazione della pressione 2. Ulteriori fattori da osservare C Allegato Assistenza clienti Garanzia del produttore I-67...
-
Page 68: Descrizione Dello Strumento/Indicazioni Per Il Controllo
Descrizione dello strumento/Indicazioni per il controllo Indicazioni per valori sistolici, diastolici, Bracciale polso, controllo gonfiabile Pulsante di accen- sione/spegnimento Start/Stop Pulsante Memory Coperchio del (richiamo della memoria) vano batterie I-68... -
Page 69: A Come Missura La Pressione: Breve Descrizione
Come missura la pressione: breve descrizione Per un impiego corretto dello strumento, vi preghiamo di leggere attentamente le istru- zioni per l’uso prima di effettuare la prima misurazione. 1. Inserire le pile 2. Applicazione dello strumento al polso Fig. 1 Scoprire il polso sinistro. Avvolgere lo strumento al polso. Mantenere una distanza di ca. 1 cm (Fig. 1) tra il bordo superiore del bracciale ed il palmo della mano. Chiudere il bracciale. Mantenere lo strumento all’altezza del Fig. 2 cuore (Fig. 2). Tenere immobile il braccio, non parlare. I-69... -
Page 70: Gonfiaggio Del Bracciale
Breve descrizione 3. Gonfiaggio del bracciale Premete il pulsante di accensione Start/ Stop. Lo strumento esegue un test delle funzioni utilizzate e tutti gli elementi di in- dicazione vengono visualizzati sul display. Il bracciale si gonfia automaticamente sino a raggiungere una pressione di 190 mmHg. Qualora la pressione all’interno del bracciale non fosse sufficiente, lo stru- mento l’aumenterà automaticamente ad intervalli di circa 30 mmHg. 4. Misurazione della pressione Una volta che il bracciale si è gonfiato sufficientemente, l’aria fuoriesce automati- camente ed il display visualizza la diminu- I-70... -
Page 71: Spegnimento Dello Strumento
Breve descrizione zione della pressione facendo lampeggiare il simbolo „“ e si sente un segnale acustico.. Lo sgonfiamento automatico del braccia- le segnala la fine della misurazione. Sul display vengono visualizzati alternativa- mente i valori della pressione arteriosa massima (sistolica) e minima (diastolica) e la frequenza del polso. 5. Spegnimento dello strumento Premete il pulsante di accensione/spegni- mento Start/Stop. I valori misurati vengono memorizzati automaticamente. I-71... -
Page 72: Richiamo Della Memoria Dei Valori Misurati
Breve descrizione 6. Richiamo della memoria dei valori Riportate i valori memorizzati misurati nell’apposito libretto per il control- lo della pressione. In questo modo L‘apparecchio è dotato di una memoria disporrete di un quadro generale della dei valori misurati che consente di visualiz- pressione che potrete eventualmen- zare gli ultimi trenta valori pressori misurati te discutere con il vostro medico di per ultimi ed il valore intermedio (media). fiducia. Premendo il tasto Memory sul display compare il valore intermedio se sono già... -
Page 73: Cancellazione Della Memoria Dei Valori Misurati
Breve descrizione 7. Cancellazione della memoria dei valori Prima di ripetere una misurazione è misurati necessario attendere tre minuti per consentire alla circolazione del braccio Per cancellare singoli valori misurati, di normalizzarsi. richiamate il valore desiderato premendo ripetutamente il tasto Memory quindi tenete premuto il tasto per 4 secondi. Per Attenzione: cancellare l‘intera memoria, premete il le batterie e apparecchi elettrici tasto Memory e tenetelo premuto per 7-8 non devono essere smaltite insieme secondi. all‘immondizia domestica, bensì dov- Se la visualizzazione a display lampeggia, ranno essere riconsegnate al produt- significa che la cancellazione non è conclu- tore, al negoziante o ad altri enti preposti. sa e deve essere ripetuta. I-73... -
Page 74: B Avvertenze Importanti
Avvertenze importanti 1. Regole principali per la misurazione • Per ottenere valori assolutamente esatti, della pressione toglietevi l’orologio o eventuali gioielli ed effettuate la misurazione sul polso nudo. • La misurazione deve essere eseguita in assoluta tranquillità. Camminare o salire • Durante la misurazione, il braccio con lo le scale aumenta la pressione sanguigna. strumento deve restare completamente Attendete almeno 5 minuti per consentire immobile per evitare qualsiasi interferenza alla vostra circolazione di stabilizzarsi. con la rilevazione. Non parlate durante la misurazione. • Controllate la pressione due volte al gior- no, cioè al mattino appena alzati e la sera, • Tra diverse misurazioni consecutive si deve quando siete rilassati. sempre osservare una pausa di circa 3 mi- nuti per evitare di ottenere risultati errati. • La pressione deve essere misurata stando seduti. Per effettuare la misurazione, sedetevi ad un tavolo da pranzo sufficien- temente alto, non al tavolino da salotto, e tenete sempre il polso all’altezza del cuore. I-74... -
Page 75: Ulteriori Fattori Da Osservare
Avvertenze importanti 2. Ulteriori fattori da osservare • Gravidanza In gravidanza, la misurazione della pressio- • Circonferenza del braccio ne sanguigna deve essere eseguita sotto il Il bracciale gonfiabile è idoneo ad una controllo del medico, poiché nel periodo circonferenza del polso compresa tra di gestazione i valori di pressione possono 12,5–21,5 cm. variare. • Disturbi cardiaci • Farmaci Disturbi cardiaci o aritmie possono alterare Se si assumono sostanze emodiluenti/an- i risultati della misurazione, pertanto vi ticoagulanti (formazione di ematomi), consigliamo di consultare il vostro medico effettuare la misurazione solo dietro con- curante prima di procedere alla misura- sultazione del medico curante. zione. Durante la misurazione, i segnali acustici devono essere uniformi. Misurare da soli la pressione non vuol dire seguire una terapia! • Frequenza dei pace-maker Non modificate in nessun caso i L’indicazione della frequenza del polso non... -
Page 76: Assistenza Clienti
Allegato Assistenza clienti Garanzia del produttore Eventuali riparazioni dello strumento pos- L’apparecchio è stato prodotto e controllato sono essere effettuate unicamente presso il con la massima precisione. Ciò nonostante, produttore, il distributore oppure un centro qualora si riscontrassero vizi al momento di assistenza espressamente autorizzato. In della consegna, viene concessa una garanzia caso di guasto siete pregati di rivolgervi al alle seguenti condizioni: seguente indirizzo: 1. Durante il periodo di garanzia di 3 anni dalla data di acquisto, i vizi verranno elimi- UEBE Medical GmbH nati a nostra discrezione e a nostre spese Zum Ottersberg 9 tramite riparazione (l’apparecchio dovrà 97877 Wertheim/Germany essere rispedito alla nostra fabbrica) oppu- Tel.-Nr.: +49 / 9342 / 924040 re tramite sostituzione con un apparecchio Fax-Nr.: +49 / 9342 / 924080 nuovo in perfette condizioni. E-mail: info@uebe.com Internet: www.uebe.de 2. Dalla garanzia sono esclusi la normale usura dei componenti usurabili ed i danni derivanti dall’inosservanza delle istruzioni I-76... - Page 77 Allegato per l’uso, da un impiego improprio (ad 4. I diritti di denuncia dei vizi dell’acquirente esempio fonti di energia elettrica non nei confronti del venditore derivanti dal idonee, rottura, batterie scariche) e/o dallo contratto ai sensi del § 437 del codice smontaggio dell’apparecchio da parte civile tedesco non vengono limitati dalla dell’acquirente. Inoltre, la garanzia non garanzia. prevede alcun diritto al risarcimento dei danni nei nostri confronti. 3. I diritti alla garanzia valgono unica- mente entro il periodo di garanzia e solo dietro presentazione dello scon- trino di acquisto. In caso di garanzia, l’apparecchio dovrà essere inviato al seguente indirizzo unitamente al scontrino Nota: di acquisto ed alla descrizione del reclamo: accludere sempre il certificato di garanzia UEBE Medical GmbH, Service-Center, Zum debitamente compilato in ogni sua parte. Schlag 18, 97877 Wertheim, Germany. I-77...
- Page 78 Tabla de contenido Descripción del aparato A Breves instrucciones de medición 1. Colocar las pilas 2. Colocar el aparato 3. Inflado del brazalete 4. Medir la presión arterial 5. Apagar el aparato 6. Consultar la memoria de los valores de medición 7. Borrar la memoria de los valores de medición B Indicaciones importantes 1. Reglas básicas para medir la presiónarterial 2. Lo que ha de observarse además C Apéndice Servicio postventa Garantía del fabricante E-78...
-
Page 79: Descripción Del Aparato
Descripción del aparato Indicadores corre- spondientes a sístole y Brazalete diástole, pulso, de muñeca indicadores de control Botón de encendido/ parada Botón de memoria (botón de recuperación de Tapa la memoria) de las pilas E-79... -
Page 80: Colocar Las Pilas
Breves instrucciones de medición ¡Antes de realizar la primera medición, se ruega leer detenidamente el manual de instrucciones! 1. Colocar las pilas 2. Colocar el aparato Ilu. 1 Dejar libre la muñeca izquierda. Colocar el aparato en la muñeca. Distancia desde el borde superior del brazalete a la palma de la mano aprox. 1 cm (ilustración 1). Cerrar el brazalete. Mantener el aparato a la altura del co- razón (ilustración 2). Mantener quieto el Ilu. 2 brazo y no hablar. E-80... -
Page 81: Inflado Del Brazalete
Breves instrucciones de medición 3. Inflado del brazalete Pulsar el botón de encendido. El aparato realizará un ensayo funcional. Quedarán visibles todos los elementos indicadores. El inflado del brazalete se efectúa automáti- camente hasta aprox. 190 mmHg. Con una presión del brazalete demasiado baja, el aparato aumentará automáticamente la presión en pasos de unos 30 mmHg. 4. Medir la presión arterial Después de inflar, el aire se evacuará au- tomáticamente, se indicará la presión del brazalete que baja y parpadeará el símbolo „“ e indica una señal acústica. El deshinchado automático del brazalete señalará el fin de la medición. E-81... -
Page 82: Apagar El Aparato
Breves instrucciones de medición En el indicador aparecerán alternativa- mente con la frecuencia de pulsaciones los valores de la presión arterial sistólica y diastólica. 5. Apagar el aparato Pulsar el botón de encendido/parada. Los valores medidos se almacenarán automáti- camente. Traspase los valores de memoria a su 6. Consultar la memoria de los valores cartilla de presión arterial. De esta de medición forma obtendrá durante un periodo de tiempo prolongado un resumen de su El aparato dispone de una memoria para situación de presión arterial sobre la los valores de medición, la cual permite cual, dado el caso, podrá... -
Page 83: Consultar La Memoria De Los Valores De Medición
Breves instrucciones de medición aparecerá el valor medio, si previamente se memoria, pulsar la tecla Memory y man- han registrado 2 valores de medición. Una tenerla pulsada durante 7-8 segundos. nueva pulsación visualizará el último valor Si el indicador del visualizador destella, medido. Mediante una nueva pulsación el proceso de borrado no ha concluido y aparecerá el valor de medición anterior. debe repetirse. De esta forma se podrán consultar los 30 Antes de comenzar una nueva medici- valores de medición anteriores. Con una ón repetida, debería esperar durante nueva pulsación de la tecla se visualizará el tres minutos hasta que se haya nueva- valor medio de todas las mediciones. mentenormalizado la circulación de la sangre en su brazo. 7. Borrar la memoria de los valores de medición Atención:... -
Page 84: Reglas Básicas Para Medir La Presiónarterial
Indicaciones importantes 1. Reglas básicas para medir la presión • Los valores más exactos se obtendrán con arterial mayor seguridad cuando se haya quitado el reloj de pulsera o las joyas yefectúe la • La medición deberá realizarse en calma. medición en la muñeca desnuda. Andando o subiendo escaleras aumenta la presión arterial. Espere al menos 5 minutos • Durante la medición no deberá moverse hasta que se haya tranquilizada su circula- el brazo con el aparato con el fin de evitar ción. en todo caso impulsos perturbadores. No hable durante la medición. • Controle la presión arterial dos veces al día; por la mañana después de levantarse • Siempre deberá guardarse un descanso de y por la noche cuando se haya relajado unos 3 minutos entre las mediciones para después del trabajo. evitar mediciones erróneas. • La presión arterial deberá tomarse senta- do. Para efectuar la medición, siéntese en su mesa (en ningún caso una mesa de sofá baja) y mantenga la muñeca a la altura del corazón. E-84... -
Page 85: Lo Que Ha De Observarse Además
Indicaciones importantes 2. Lo que ha de observarse además: • Embarazo Los valores de la presión arterial pueden • Circunferencia del brazo variar como consecuencia del embarazo. El brazalete está diseñado para una circun- Realice un autocontrol de la presión arteri- ferencia de muñeca de 12,5 a 21,5 cm. al previa consulta con su médico. • Alteraciones del ritmo cardíaco • Medicamentos Si padece de alteraciones del ritmo cardía- Cuando se están tomando fármacos co o de arritmia, pueden producir resulta- diluyentes de la sangre/ anticoagulantes dos de medición incorrectos. Compruebe (aparición de hematomas), efectuar la que los pitidos durante la medición sean medición solamente tras consultarlo con uniformes.Por esta razón, hable con su su médico. médico antes de que mida su presión arterial. La automedición no significa ninguna • Frecuencia de marcapasos terapia. No modifique en ningún caso La indicación de ritmo cardíaco no es la dosis del medicamento prescrita por válida para controlar la frecuencia de los... -
Page 86: Servicio Postventa
Apéndice Servicio postventa Garantía del fabricante La reparación del aparato sólo podrá ser lle- El aparato ha sido fabricado y revisado vada a cabo por el fabricante o por un centro cuidadosamente. En el caso de que a pesar expresamente autorizado para ello. de ello presentara vicios en el momento de su entrega, concedemos una garantía en las Rogamos se dirija a: siguientes condiciones: UEBE Medical GmbH Zum Ottersberg 9 1. Durante el plazo de garantía de 3 años a 97877 Wertheim/Germany partir de la fecha de compra, corregiremos Tel.-Nr.: +49 / 93 42 / 92 40 40 estos vicios a nuestro criterio y a nuestra Fax-Nr.: +49 / 93 42 / 92 40 80 cuenta mediante reparación (después de la E-mail: info@uebe.com devolución a nuestra fábrica) o sustitución Internet: www.uebe.de por un aparato sin vicios. 2. La garantía no comprende el desgaste normal de las piezas de desgaste ni los daños que se produzcan por la inobservan- cia de las instrucciones de uso, el manejo E-86... - Page 87 Apéndice inapropiado (p. ej. fuentes de electricidad 4. Las reclamaciones contractuales por vicios inapropiadas, rotura, baterías desgastadas), del comprador contra el vendedor confor- y / o por el desmontaje del aparato por me al Art. 437 del Código Civil Alemán no parte del comprador. Además, la garantía se verán restringidas por la garantía. no supone ninguna base para realizar reclamaciones de indemnización. Por favor, tenga en cuenta lo siguiente: En caso de garantía es imprescindible 3. Los derechos de garantía solamente se adjuntar el comprabante de compra. pueden reclamar durante el plazo de garantía y mediante la presentación del ticket de compra. En caso de garantía, enviar el aparato junto con el ticket de compra y una descripción de la reclama- ción a UEBE Medical GmbH, Service-Center, Zum Schlag 18, 97877 Wertheim, Germa- E-87...
- Page 88 UEBE Art.-Nr. 21040 visomat und UEBE sind international geschützte Warenzeichen der UEBE Medical GmbH Zum Ottersberg 9 97877 Wertheim/Germany Phone: + 49 93 42 / 92 40 40 Fax: + 49 93 42 / 92 40 80 E-Mail: info@uebe.com Internet: www.uebe.de Technische Änderungen vorbehalten. © Copyright UEBE Medical GmbH...