Table des Matières

Publicité

Les langues disponibles

Les langues disponibles

Liens rapides

LCD Projector
Operating Instructions
Mode d'emploi
CPJ-D500
© 1997 by Sony Corporation
3-859-828-14 (1)
EN
F

Publicité

Chapitres

Table des Matières
loading

Sommaire des Matières pour Sony CPJ-D500

  • Page 1 3-859-828-14 (1) LCD Projector Operating Instructions Mode d’emploi CPJ-D500 © 1997 by Sony Corporation...
  • Page 2 The model and serial numbers are located on U.S.A. the bottom. Record the serial number in the space provided below. Refer to these numbers whenever you call upon your Sony CAUTION dealer regarding this product. You are cautioned that any changes or modifications not expressly approved in this Model No.
  • Page 3: Table Des Matières

    Table of contents Welcome Precautions Selecting the projecting location Connecting Connecting to an IBM PC/AT and its compatible Connecting to a Macintosh and its compatible Connecting to video equipment Connecting to external speaker(s) Connecting the power cord 12 Projecting Turning on the projector Selecting the input signal Adjusting the focus Adjusting the volume...
  • Page 4: Welcome

    Welcome Congratulations on your purchase of the Sony CPJ- D500 LCD projector. Here are just some of the features your Sony projector offers. Compact design A4 size Similar in shape to a notebook computer, the projector is easy to carry by hand.
  • Page 5: Precautions

    Precautions Installation Operation • Place the unit so that the lens is • Do not point the lens toward the perpendicular to the projected sun. plane. Otherwise the picture will • Do not look into the lens during become distorted and may be out of projection.
  • Page 6: Selecting The Projecting Location

    Selecting the projecting location The size of the projected plane depends on the distance from the unit to the projected plane. Locate the unit with the lens pointed toward the projected plane referring to the figure and table below. We recommend using the unit at a distance of 1 - 2.5 m (3 - 8 feet) to the projected plane.
  • Page 7: Connecting

    Connecting Connecting to an IBM PC/AT and its compatible Connect the projector to a PC having an external Notes on connection monitor port using the supplied D-sub 15-pin signal • Turn off the PC and the projector before cable. connecting. •...
  • Page 8: Connecting To A Macintosh And Its Compatible

    Connecting (continued) Connecting to a Macintosh and its compatible Connecting to a notebook model Notes on connection You need to use a commercially available adaptor • Turn off the PC and illustrated below. the projector before VGA type (D-sub connecting. 15-pin, female) •...
  • Page 9 Connecting to a desktop model Notes on connection You need to use a commercially available adaptor • Turn off the PC and illustrated below. the projector before VGA type (D-sub connecting. 15-pin, female) • Refer to the PC’s manual as well. Connector should match the monitor port of the desktop model...
  • Page 10: Connecting To Video Equipment

    Connecting (continued) Connecting to video equipment Connect video equipment such as a VCR or video camera recorder using an A/V connecting cable (not supplied). This unit accepts the video signals of both NTSC Notes on connection and PAL color systems. •...
  • Page 11: Connecting To External Speaker(S)

    Connecting to external speaker(s) When you want to connect external speaker(s) (not supplied) to the projector, connect to the PHONE jack of the projector. Notes on connection • Turn off the speaker Rear and the projector before connecting. Active speakers •...
  • Page 12: Projecting

    Projecting ON/STANDBY LAMP POWER PC/VIDEO FUNCTION FUNCTION RESET COUNT DOWN START FOCUS Control panel LOCK Front stand Side stands Turning on the projector Press POWER of the control panel. The ON/STANDBY indicator turns green. The LAMP indicator starts flashing. The bulb lights up and the projected plane appears. If the bulb does not light up If necessary, adjust the position of the projected...
  • Page 13 To turn off the projector Note on the LCD screen Press the POWER button of the control panel. The LCD screen are manufactured using high-precision When you have finished using the unit technology. However, Disconnect the power cord. there may be some tiny black points and/or bright points (red, blue or green in color) that...
  • Page 14: Selecting The Input Signal

    Projecting (continued) Selecting the input signal Select the appropriate signal corresponding to the connected equipment. If you project the source from a PC, you further need to select RGB mode according to your PC, IBM PC/AT or Macintosh. Input the signal to the projector. When connected to the video equipment, start playback.
  • Page 15: Adjusting The Focus

    Adjusting the focus Turn the FOCUS ring. • To focus on the nearer position, turn to the NEAR side. • To focus on the farther position, turn to the FAR side. Adjusting the volume Note Adjust the volume by pressing VOL + or –. The speaker of the unit is monaural.
  • Page 16: Using The Countdown Function

    Projecting (continued) Using the countdown function If you have limited time during a situation such as presentation or lecture, you can check the remaining time at the right bottom of the projected plane. You can start counting down from 5, 10, 15, 20, 30 or 60 minutes.
  • Page 17: Adjusting The Picture Of The Rgb Input

    Adjusting the picture of the RGB input ON/STANDBY LAMP POWER PC/VIDEO FUNCTION COUNT DOWN FUNCTION RESET START FOCUS Control panel LOCK Front stand Side stands You can adjust the brightness, centering, tracking and synchronization. If necessary, you can also reset the adjustment to the factory preset level.
  • Page 18: Adjusting The Brightness

    Adjusting the picture of the RGB input (continued) Adjusting the brightness Press FUNCTION until “BRIGHTNESS” appears. BRIGHTNESS Press + or – so that the brightness becomes appropriate. • To make brighter, press +. • To make darker, press –. The display will go off after 5 seconds. Adjusting the vertical centering Press FUNCTION until “V CENT”...
  • Page 19: Adjusting The Tracking

    Adjusting the horizontal centering Press FUNCTION until “H CENT” appears. H CENT (–) B b (+) Press + or – so that the picture appears at the center in the horizontal direction. • To move the picture right, press +. •...
  • Page 20 Adjusting the picture of the RGB input (continued) Resetting the adjustment to the factory preset level The adjustment for the Press FUNCTION RESET. video signal is not The adjustment for the current input signal is reset to reset. the factory preset level. Note ON/STANDBY LAMP...
  • Page 21: Adjusting The Picture Of The Video Input

    Adjusting the picture of the video input ON/STANDBY LAMP POWER PC/VIDEO FUNCTION COUNT DOWN FUNCTION RESET START FOCUS Control panel LOCK Front stand Side stands You can adjust the brightness, contrast, hue (NTSC color system only) and color intensity of the video signal.
  • Page 22 Adjusting the picture of the video input (continued) Adjusting the hue (NTSC color system only) Press FUNCTION until “HUE” appears. Note “HUE” does not appear when the PAL color system video signal is input. Press + or – so that the hue becomes appropriate. •...
  • Page 23 Adjusting the brightness Press FUNCTION until “BRIGHTNESS” appears. BRIGHTNESS Press + or – so that brightness becomes appropriate. • To make brighter, press +. • To make darker, press –. The display will go off after 5 seconds. Resetting the adjustment to the factory preset level Press FUNCTION RESET.
  • Page 24: Maintenance

    Make sure that the Three filter sponges for replacement are supplied. filter sponge is completely dry before replacing it in the unit. • If the filter is damaged, consult your nearest Sony dealer. Maintenance...
  • Page 25: Changing The Bulb

    The brightness of the bulb becomes about half after about 2000 hours of use. If the projected picture is dark, change the bulb. Use only the Sony XB-CPJ1MH Lamp Unit for replacement. Notes Turn off the power and disconnect the power cord.
  • Page 26: Specifications

    Specifications LCD type 1.3 inches, 921,600 pixel (Full VGA compatible) Lens F1.8, f = 55 mm Lamp 80 W Metal Halide bulb 8 Ω, 1 W, ø 50 mm x 1, monaural Speaker Input signals RGB: D-sub 15 RGB Audio: Stereo minijack (327 mVrms) S Video: Mini DIN 4-pin Luminance signal: 1 Vp-p, 75 Ω, unbalanced, sync negative...
  • Page 27: Identifying The Parts

    Identifying the parts See the pages in the parenthesis for the operation of each part. ON/STANDBY LAMP POWER PC/VIDEO FUNCTION COUNT DOWN FUNCTION RESET START 9 10 Lens 12 Control panel FOCUS ring (p. 15) ON/STANDBY indicator (p. 11, Handle LAMP indicator (p.
  • Page 28: Troubleshooting

    Troubleshooting If you run into any problems using the unit, use the following table to troubleshoot the problem. If the problem persists, consult your nearest Sony dealer. The ON/STANDBY indicator keeps flashing. • Disconnect the power cord. Wait for more than 3 seconds and connect again.
  • Page 29 The picture is noisy • Check the connection (p. 7 - 11). • Select the input signal (p. 14). • Select the RGB mode when using with a PC (p. 14). • Adjust the tracking (p. 19). • Set the output mode to VGA/SVGA on the PC. Refer to the PC’s manual for details.
  • Page 30 AVERTISSEMENT our éviter tout risque d’incendie ou de décharge électrique, ne pas exposer cet appareil à la pluie ou à l’humidité. Pour éviter tout risque de décharge électrique, ne pas ouvrir le coffret de cet appareil et ne confier son entretien qu’à un personnel qualifié.
  • Page 31 Table des matières Bienvenue Précautions Sélection de la position de projection Raccordement Raccordement à un PC/AT IBM ou compatible Raccordement à un Macintosh ou compatible Raccordement à un appareil vidéo Raccordement à des haut-parleurs externes Raccordement du cordon d’alimentation 12 Projection Mise sous tension du projecteur Sélection du signal d’entrée Réglage de la mise au point...
  • Page 32: Bienvenue

    Bienvenue Nous vous félicitons pour l’achat de votre projecteur LCD Sony CPJ-D500. Voici quelques caractéristiques offertes par votre projecteur Sony. Format A4 de conception compacte Comparable en taille à un ordinateur portable, le projecteur est facile à transporter à la main.
  • Page 33: Précautions

    Précautions Installation Utilisation • Installez l’appareil de façon à ce que • Ne dirigez pas l’objectif vers le l’objectif soit perpendiculaire au soleil. plan de projection. Sinon, l’image • Ne regardez pas vers l’objectif en risque de présenter des distorsions cours de projection.
  • Page 34: Sélection De La Position De Projection

    Sélection de la position de projection Le format du plan de projection dépend de la distance comprise entre l’appareil et le plan de projection. Installez l’appareil avec l’objectif dirigé vers le plan de projection en vous référant à l’illustration et au tableau ci-dessous.
  • Page 35: Raccordement

    Raccordement Raccordement à un PC/AT IBM ou compatible Raccordez le projecteur à un PC doté d’un port moniteur externe au moyen du câble de signal D- sub 15 broches fourni. Avant Remarques sur le raccordement • Mettez le PC et le projecteur hors tension avant de procéder au raccordement.
  • Page 36: Raccordement À Un Macintosh Ou Compatible

    Raccordement (suite) Raccordement à un Macintosh ou compatible Raccordement à un ordinateur portable Remarques sur le Vous devez utiliser un adaptateur disponible dans le raccordement commerce, comme illustré ci-dessous. • Mettez le PC et le projecteur hors Type VGA (D-sub tension avant de à...
  • Page 37 Raccordement à un ordinateur de bureau Vous devez utiliser un adaptateur disponible dans Remarques sur le raccordement le commerce, comme illustré ci-dessous. • Mettez le PC et le projecteur hors Type VGA (D-sub à tension avant de 15 broches, femelle) procéder au raccordement.
  • Page 38: Raccordement À Un Appareil Vidéo

    Raccordement (suite) Raccordement à un appareil vidéo Raccordez un appareil vidéo comme un magnétoscope ou un caméscope au moyen d’un câble de connexion A/V (non fourni). Remarques sur le Cet appareil accepte les signaux vidéo des systèmes raccordement couleur NTSC et PAL. •...
  • Page 39: Raccordement À Des Haut-Parleurs Externes

    Raccordement à des haut-parleurs externes Si vous voulez raccorder des haut-parleurs externes Remarques sur le (non fournis) au projecteur, raccordez-les à la prise raccordement PHONE du projecteur. • Mettez les haut- parleurs et le Arrière projecteur hors Haut-parleurs actifs tension avant de procéder au raccordement.
  • Page 40: Projection

    Projection ON/STANDBY LAMP POWER PC/VIDEO FUNCTION COUNT DOWN FUNCTION RESET START FOCUS Panneau de LOCK commande Support avant Supports latéraux Mise sous tension du projecteur Appuyez sur la touche POWER du panneau de commande. L’indicateur ON/STANDBY vire au vert. L’indicateur LAMP se met à clignoter. La lampe s’allume et le plan de projection apparaît.
  • Page 41 Remarque sur l’écran Pour mettre le projecteur hors tension Appuyez sur la touche POWER du panneau de L’écran LCD est commande. fabriqué au moyen d’une technologie de haute précision. Lorsque vous avez fini d’utiliser l’appareil Toutefois, il se peut qu’il y ait de tout petits Débranchez le cordon d’alimentation.
  • Page 42: Sélection Du Signal D'entrée

    Projection (suite) Sélection du signal d’entrée Sélectionnez le signal approprié correspondant à l’appareil raccordé. Si vous projetez le signal source d’un PC, vous devez également sélectionner le mode RVB selon que vous utilisez un PC, un PC/AT IBM ou Macintosh. Transmettez le signal au projecteur.
  • Page 43: Réglage De La Mise Au Point

    Réglage de la mise au point Tournez la bague FOCUS. • Pour faire la mise au point sur la position la plus proche, tournez-la vers le côté NEAR. • Pour faire la mise au point sur la position la plus éloignée, tournez-la vers le côté...
  • Page 44: Utilisation Du Compte À Rebours

    Projection (suite) Utilisation du compte à rebours Si vous disposez d’un temps limité durant une présentation ou une conférence, vous pouvez contrôler la durée restante de projection dans le coin inférieur droit du plan de projection. Vous pouvez démarrer le compte à rebours à partir de 5, 10, 15, 20, 30 ou 60 minutes.
  • Page 45: Réglage De L'image Transmise Via L'entrée Rvb

    Réglage de l’image transmise via ON/STANDBY LAMP l’entrée RVB POWER PC/VIDEO FUNCTION COUNT DOWN FUNCTION RESET START FOCUS Panneau de LOCK commande Support avant Supports latéraux Vous pouvez régler la luminosité, le centrage, l’alignement et la synchronisation. Si nécessaire, vous pouvez également réinitialiser les réglages aux valeurs par défaut.
  • Page 46: Réglage De L'image Transmise Via L'entrée Rvb (Suite)

    Réglage de l’image transmise via l’entrée RVB (suite) Réglage de la luminosité Appuyez sur FUNCTION jusqu’à ce que l’indication “BRIGHTNESS” apparaisse. BRIGHTNESS Appuyez sur + ou – de façon à obtenir la luminosité voulue. • Pour rendre l’image plus lumineuse, appuyez sur +.
  • Page 47: Réglage Du Centrage Horizontal

    Réglage du centrage horizontal Appuyez sur FUNCTION jusqu’à ce que l’indication “H CENT” apparaisse. H CENT (–) B b (+) Appuyez sur + ou – de façon à ce que l’image apparaisse au centre dans le sens horizontal. • Pour déplacer l’image vers la droite, appuyez sur +.
  • Page 48: Réinitialisation Des Réglages Au Valeurs Par Défaut

    Réglage de l’image transmise via l’entrée RVB (suite) Réinitialisation des réglages au valeurs par défaut Conseil Le réglage du signal Appuyez sur FUNCTION RESET. vidéo n’est pas Le réglage pour le signal d’entrée actuel est réinitialisé. réinitialisé aux valeurs par défaut. Remarque ON/STANDBY LAMP...
  • Page 49: Réglage De L'image Transmise Via L'entrée Vidéo

    Réglage de l’image transmise via ON/STANDBY LAMP l’entrée POWER PC/VIDEO FUNCTION vidéo COUNT DOWN FUNCTION RESET START FOCUS Panneau de LOCK commande Support avant Supports latéraux Vous pouvez régler la luminosité, le contraste, la teinte (système couleur NTSC uniquement) ainsi que l’intensité...
  • Page 50: Réglage De L'image Transmise Via L'entrée Vidéo (Suite)

    Réglage de l’image transmise via l’entrée vidéo (suite) Réglage de la teinte (système couleur NTSC uniquement) Appuyez sur FUNCTION jusqu’à ce que l’indication “HUE” apparaisse. Remarque “HUE” n’apparaît pas lorsque le signal vidéo du système couleur PAL est entré. Appuyez sur + ou – de façon à obtenir la teinte voulue.
  • Page 51: Réinitialisation Des Réglages Aux Valeurs Par Défaut

    Réglage de la luminosité Appuyez sur FUNCTION jusqu’à ce que l’indication “BRIGHTNESS” apparaisse. BRIGHTNESS Appuyez sur + ou – de façon à obtenir la luminosité voulue. • Pour augmenter la luminosité, appuyez sur +. • Pour diminuer la luminosité, appuyez sur –. L’affichage est désactivé...
  • Page 52: Entretien

    Assurez-vous que la mousse filtrante est tout à fait sèche avant Trois mousses filtrantes de rechange sont fournies. de la remettre en place dans l’appareil. • Si le filtre est endommagé, consultez votre revendeur Sony. Entretien...
  • Page 53: Remplacement De La Lampe

    L’éclat de la lampe diminue environ de moitié au bout de 2000 heures d’utilisation. Si l’image projetée est foncée, remplacez la lampe. Pour le remplacement, utilisez uniquement une lampe Sony XB-CPJIMH Module de lampe. Remarques Mettez l’appareil hors tension et débranchez le • Ne touchez pas la cordon d’alimentation.
  • Page 54: Spécifications

    Spécifications Type LCD 1,3 pouces, 921.600 pixels (totalement compatible VGA) Objectif F1,8, f = 55 mm Lampe à halogène-métal Lampe de 80 W 8 Ω, 1 W, ø Haut-parleur 50 mm x 1, monaural Signaux d’entrée RVB: D-sub à 15 broches RVB Audio: miniprise stéréo (327 mVrms) S-VIDEO: Miniconnecteur DIN à...
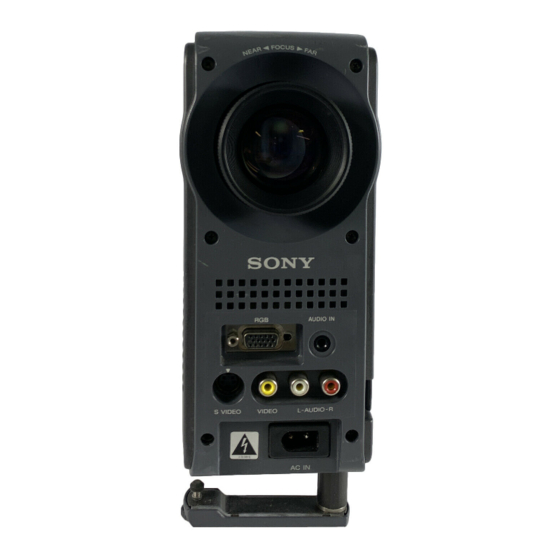
  • Page 55: Identification Des Composants

    Identification des composants Reportez-vous aux pages entre parenthèses pour le fonctionnement de chaque composant. ON/STANDBY LAMP POWER PC/VIDEO FUNCTION COUNT DOWN FUNCTION RESET START 9 10 Objectif 12 Panneau de commande Bague FOCUS (p. 15) Indicateur ON/STANDBY (p. 11, 12) Poignée Indicateur LAMP (p.
  • Page 56: Dépannage

    Si le problème persiste, consultez votre revendeur Sony. L’indicateur ON/STANDBY ne cesse pas de clignoter. • Débranchez le cordon d’alimentation. Attendez au moins 3 secondes et rebranchez-le ensuite.
  • Page 57 L’image est distordue. • Installez l’appareil de façon à ce que l’objectif soit perpendiculaire au plan de projection. • Réglez l’angle à l’aide du support (p. 12) L’image comporte des parasites. • Vérifiez le raccordement (p. 7 - 11). • Sélectionnez le signal d’entrée (p. 14). •...
  • Page 58 Sony Corporation Printed in Japan...
  • Page 59 3-859-828-13 (1) LCD Projector Operating Instructions Mode d’emploi CPJ-D500 © 1997 by Sony Corporation...

Table des Matières