Table des Matières

Publicité

Les langues disponibles
  • FR

Les langues disponibles

Liens rapides

NAGELSTUDIO-SET SNS 45 A3
NAGELSTUDIO-SET
Bedienungsanleitung
SET RICOSTRUZIONE UNGHIE
Istruzioni per l'u so
NAIL STUDIO SET
Operating instructions
IAN 90252
SET DE MANUCURE
Mode d'emploi
NAGELSTUDIOSET
Gebruiksaanwijzing
1

Publicité

Table des Matières
loading

Sommaire des Matières pour SilverCrest SNS 45 A3

  • Page 1 NAGELSTUDIO-SET SNS 45 A3 NAGELSTUDIO-SET SET DE MANUCURE Bedienungsanleitung Mode d’emploi SET RICOSTRUZIONE UNGHIE NAGELSTUDIOSET Istruzioni per l’u so Gebruiksaanwijzing NAIL STUDIO SET Operating instructions IAN 90252...
  • Page 2 Klappen Sie vor dem Lesen die Seite mit den Abbildungen aus und machen Sie sich anschließend mit allen Funktionen des Gerätes vertraut. Avant de lire le mode d‘emploi, ouvrez la page contenant les illustrations et familiarisez-vous ensuite avec toutes les fonctions de l‘appareil. Prima di leggere aprire la pagina con le immagini e prendere confi...
  • Page 4: Table Des Matières

    Service ..... . 30 Nagelansatz anpassen ..19 Importeur ....30 SNS 45 A3...
  • Page 5: Einführung

    Eine andere oder darüber hinausgehende Benutzung gilt als nicht bestimmungs- gemäß. WARNUNG Gefahr durch nicht bestimmungsgemäße Verwendung! Von dem Gerät können bei nicht bestimmungsgemäßer Verwendung und/ oder andersartiger Nutzung Gefahren ausgehen. ► Das Gerät ausschließlich bestimmungsgemäß verwenden. ► Die in dieser Bedienungsanleitung beschriebenen Vorgehensweisen einhalten. SNS 45 A3...
  • Page 6: Warnhinweise

    Sachschaden. Falls die Situation nicht vermieden wird, kann dies zu Sachschäden führen. ► Die Anweisungen in diesem Warnhinweis befolgen, um Sachschäden zu vermeiden. HINWEIS ► Ein Hinweis kennzeichnet zusätzliche Informationen, die den Umgang mit dem Gerät erleichtern. SNS 45 A3...
  • Page 7: Sicherheitshinweise

    Direkter Blick in das UV-Licht der UV-Lampen im Gerät kann zu Augenverlet- zungen und Minderung der Sehfähigkeit führen! ► Niemals direkt in das ultraviolette Licht der UV-Lampen blicken. ► UV-Lampen bei Nichtgebrauch ausschalten. ► Nicht-Anwender und insbesondere Kinder dürfen bei dem Betrieb des Geräts nicht anwesend sein. SNS 45 A3...
  • Page 8 Das Einatmen von lösemittelhaltigen Substanzen und Dämpfen kann zu Ge- sundheitsschäden führen! ► Dämpfe von lösemittelhaltigen Substanzen (z. B. Aceton) nicht einatmen. ► Für ausreichende Belüftung beim Umgang mit lösemittelhaltigen Substan- zen sorgen. ► Hinweise auf den Behältern der lösemittelhaltigen Substanzen beachten. SNS 45 A3...
  • Page 9 Das Gerät nicht in der Nähe von off enen Flammen (z.B. Kerzen) betreiben. ► Vermeiden Sie direkte Sonneneinstrahlung. ► Das Netzkabel immer am Anschlussstecker aus der Steckdose ziehen, nicht am Kabel selbst. ► Ziehen Sie bei auftretenden Störungen und bei Gewitter den Netzstecker aus der Steckdose. SNS 45 A3...
  • Page 10 Personen, die überhaupt nicht bräunen können oder nicht bräunen können, ohne einen Sonnenbrand zu bekommen, wenn sie der Sonne ausgesetzt sind, ► Personen, die leicht einen Sonnenbrand bekommen, wenn sie der Sonne ausgesetzt sind, ► schwangeren Personen. SNS 45 A3...
  • Page 11 Einige Medikamente oder Kosmetika erhöhen die Sensibilität gegenüber UV-Strahlung. ■ Das ungeschützte Auge kann oberfl ächliche Entzündungen erleiden und in ei- nigen Fällen können nach übermäßiger Bestrahlung Schäden an der Netzhaut entstehen. Häufi g wiederholte Bestrahlungen können zu grauem Star führen. SNS 45 A3...
  • Page 12 Überschreiten Sie die empfohlene Anzahl von 400 Behandlungen pro Jahr nicht. ■ Entfernen Sie Kosmetik und Sonnenschutzprodukte vor der Inbretriebnahme des Gerätes. Ansonsten kann es zu Hautirritationen führen. HINWEIS ► Erkundigen Sie sich im Zweifelsfall vor Benutzung des Gerätes bei Ihrem Arzt über die Anwendungsmöglichkeit. SNS 45 A3...
  • Page 13: Gerät Und Zubehör

    Sandblatt-Feile (zum Feilen der Nägel) i Nagel-Tips (künstliche Fingernägel) o Finishing-Lösung (zur Endbehandlung und für die Pinselreinigung) p Nagelkleber (zum Aufkleben der Nagel-Tips „GLUE“) a UV-Gel (zum Auff üllen der Nägel) s French-Gel (zum Modellieren von „French-Nails“) SNS 45 A3...
  • Page 14: Aufstellen Und Anschließen

    ● Bedienungsanleitung HINWEIS ► Prüfen Sie die Lieferung auf Vollständigkeit und auf sichtbare Schäden. ► Bei einer unvollständigen Lieferung oder bei Schäden infolge mangelhafter Verpackung oder durch Transport wenden Sie sich an die Service-Hotline (siehe Kapitel Service). SNS 45 A3...
  • Page 15: Auspacken

    Stellen Sie das Gerät nicht in einer nassen Umgebung und nicht im Spritzwas- ser-Bereich auf. ■ Stellen Sie das Gerät nicht direkt neben einem Heizkörper oder einem Heiz- strahler auf. ■ Die Steckdose muss gut zugänglich sein, so dass der Netzstecker notfalls leicht abgezogen werden kann. SNS 45 A3...
  • Page 16: Elektrischer Anschluss

    über heiße Flächen und/oder scharfe Kanten verlegt wird. ♦ Achten Sie darauf, dass das Netzkabel nicht straff gespannt oder geknickt wird. ♦ Lassen Sie das Netzkabel nicht über Ecken hängen (Stolperdrahteff ekt). ♦ Stecken Sie den Netzstecker in die Steckdose. SNS 45 A3...
  • Page 17: Bedienung Und Betrieb

    Zeitvorwahl-Taste 9, 7 oder 5. HINWEIS ► Die UV-Lampen schalten sich nach Ablauf der voreingestellten Zeit automa- tisch wieder aus. ♦ Drücken Sie die Zeitvorwahl-Taste 9, 7 oder 5 und die Start-Taste 0 für jede weitere Behandlung wie oben beschrieben erneut. SNS 45 A3...
  • Page 18: Anwendung

    Wählen Sie einen Nagel-Tip i, dessen Krümmung so genau wie möglich der Krümmung Ihres Naturnagels entspricht. ♦ Wählen Sie einen Nagel-Tip i, der exakt am Rand Ihres Naturnagels ab- schließt, wobei die Seiten parallel zu Ihrem Naturnagel sind. SNS 45 A3...
  • Page 19: Aufsetzen Der Nagel-Tips

    Behandeln Sie nun die Nageloberfl äche mit dem Schleifblock r, bis der Fingernagel nicht mehr glänzt. ♦ Entfernen Sie den Schleifstaub mit einem Papiertuch oder einer Zellette z. ♦ Reiben Sie die Nägel mit der Finishing-Lösung o ab, damit letzte Staub- und Fettreste entfernt werden. SNS 45 A3...
  • Page 20 Kante des Nagel-Tips i an der Kante des Naturnagels liegt. ♦ Kippen Sie den Nagel-Tip i nun mit leichtem Druck auf den Naturnagel, so das eventuelle Lufteinschlüsse herausgedrückt werden. HINWEIS Wischen Sie überschüssigen Nagelkleber p mit einer Zellette z, einem ► Wattestäbchen oder einem Papiertuch weg. SNS 45 A3...
  • Page 21 Feilen Sie sehr vorsichtig, da die Nagel-Tips i nur mit Nagelkleber p ► fi xiert sind. ► Falls Sie lange Nägel nicht gewohnt sind, schneiden Sie sie vorher etwas zu, um ein Anstoßen und Abfallen der Nagel-Tips i zu vermeiden. SNS 45 A3...
  • Page 22: Nagelansatz Anpassen

    Modellieren Sie die erste Schicht des UV-Gels a besonders sorgfältig, ► da diese die spätere Form des Nagels bestimmt. Modellieren Sie eine mög- lichst natürliche Nagelform. ♦ Halten Sie beim Auftragen ca. 1 mm Abstand zur Nagelhaut. SNS 45 A3...
  • Page 23: Aushärten Des Uv-Gels

    Behandeln Sie den Daumennagel separat, da das UV-Licht diesen, wenn man die Hand in das UV-Gerät hält, nur seitlich triff t. ♦ Wiederholen Sie das Auftragen des UV-Gels a und das Aushärten im UV- Gerät 1 wie beschrieben noch einmal. SNS 45 A3...
  • Page 24 90 Sekunden (je nach Menge des aufgetragenen UV-Gels a). Auch nach dem Aushärten der letzten Gel-Schicht können sich die Nägel etwas klebrig anfühlen („Schwitzschicht“ bzw. Polymerisationsschicht). ♦ Befeuchten Sie eine Zellette z mit Finishing-Lösung o und wischen Sie damit über den Nagel. SNS 45 A3...
  • Page 25: Auff Üllen

    Verwenden Sie den Schleifblock r, bis der Nagel nicht mehr glänzt. ♦ Tragen Sie danach wieder UV-Gel a auf und härten Sie dieses erneut. HINWEIS ► Siehe hierzu die vorigen Kapitel Auftragen des UV-Gels, Aushärten des UV-Gels SNS 45 A3...
  • Page 26: French-Nails

    ♦ Feilen Sie dann die Nagel-Tips i mit der Sandblatt-Feile u ab. TIPP ► Tragen Sie anschließend zur Pfl ege Ihrer Naturnägel etwas Nagelöl auf oder benutzen Sie eine reichhaltige Handcreme, die Hände und Nägel pfl egt. SNS 45 A3...
  • Page 27: Pfl Ege

    Stellen Sie sicher, dass bei der Reinigung keine Feuchtigkeit in das UV- Gerät 1 eindringt, um eine irreparable Beschädigung des Gerätes zu vermeiden. Gerät reinigen ♦ Reinigen Sie die Oberfl ächen des UV-Gerätes 1 nur mit einem weichen, trockenen Tuch. SNS 45 A3...
  • Page 28: Zubehör Reinigen

    HINWEIS ► Die UV-Lampen dürfen nur durch den gleichen Lampentyp ersetzt werden. Entnehmen Sie den genauen Lampentyp bitte dem Kapitel „Technische Daten“. ♦ Schrauben Sie die beiden Schrauben an den Seiten des Gerätes mit einem Kreuzschlitzschraubendreher heraus. SNS 45 A3...
  • Page 29: Fehlerbehebung

    Beachten Sie die folgenden Sicherheitshinweise um Gefahren und Sachschä- den zu vermeiden: ► Reparaturen an Elektrogeräten dürfen nur von Fachleuten durchgeführt werden, die vom Hersteller geschult sind. Durch unsachgemäße Reparatu- ren können erhebliche Gefahren für den Benutzer und Schäden am Gerät entstehen. SNS 45 A3...
  • Page 30: Fehlerursachen Und -Behebung

    Schicht UV-Gel a auf und härten Sie aufgetragen. diese aus. Eine UV-Lampe Tauschen Sie die defekte UV-Lampe UV-Lampe defekt. leuchtet nicht. aus. HINWEIS ► Wenn Sie mit den vorstehend genannten Schritten das Problem nicht lösen können, wenden Sie sich bitte an den Service. SNS 45 A3...
  • Page 31: Lagerung/Entsorgung

    Dieses Gerät entspricht hinsichtlich Übereinstimmung mit den grundlegenden Anforderungen und den anderen relevanten Vorschriften... – der europäischen Richtlinie für elektromagnetische Verträglichkeit 2004/108/EC, – der Niederspannungsrichtlinie 2006/95/EC, – der RoHS-Richtlinie 2011/65/EU. Die vollständige Original-Konformitätserklärung ist beim Impor- teur erhältlich. SNS 45 A3...
  • Page 32: Technische Daten

    Technische Daten Modell SNS 45 A3 Betriebsspannung 220 - 240 V ~ / 50 Hz Leistungsaufnahme 45 W Betriebstemperatur +5 - +45 °C Feuchtigkeit (keine Kondensation) 5 - 90 Abmessungen (H x B x T) 23,1 x 29,6 x 14,3 Gewicht ca.
  • Page 33: Service

    Service Schweiz Tel.: 0842 665566 (0,08 CHF/Min., Mobilfunk max. 0,40 CHF/Min.) E-Mail: kompernass@lidl.ch IAN 90252 Erreichbarkeit Hotline: Montag bis Freitag von 8:00 Uhr – 20:00 Uhr (MEZ) Importeur KOMPERNASS HANDELS GMBH BURGSTRASSE 21 44867 BOCHUM GERMANY www.kompernass.com SNS 45 A3...
  • Page 34 Importateur ....60 Adapter la racine des ongles ..49 Application du gel UV ..49 SNS 45 A3...
  • Page 35: Introduction

    Danger suite à un usage non conforme ! L'appareil peut présenter un danger en cas d'utilisation non conforme ou anormale. ► Utiliser l'appareil exclusivement de manière conforme à sa destination. ► Respecter les procédures décrites dans la présente notice d'utilisation. SNS 45 A3...
  • Page 36: Avertissements

    Si vous ne pouvez éviter la situation dangereuse, cela peut entraîner des dommages matériels. ► Suivre les instructions dans cet avertissement, pour éviter tous dommages matériels. REMARQUE ► Une remarque signale des informations supplémentaires qui facilitent la manipulation de l'appareil. SNS 45 A3...
  • Page 37: Consignes De Sécurité

    Ne regardez jamais directement dans les rayons ultraviolets des ampoules UV. ► Eteindre les ampoules UV lorsque vous ne les utilisez pas. ► Les non-utilisateurs et en particulier les enfants ne doivent pas être présents lors de l'opération de l'appareil. SNS 45 A3...
  • Page 38 Ne pas inhaler les vapeurs de substances contenant des solvants (par ex. de l'acétone). ► Assurer une aération suffi sante lors de la manipulation de substances contenant des solvants. ► Respecter les remarques sur les conteneurs des substances contenant des solvants. SNS 45 A3...
  • Page 39 Retirez toujours le cordon d'alimentation de la prise au niveau de la fi che, pas au niveau du cordon en tant que tel. ► En cas de perturbations et d'orage, retirez la fi che secteur de la prise secteur. SNS 45 A3...
  • Page 40 ► les personnes qui prennent facilement un coup de soleil, lorsqu'elles sont exposées au soleil, ► les femmes enceintes. SNS 45 A3...
  • Page 41 Les rayons UV peuvent entraîner des blessures au niveau des yeux et de la peau, comme par exemple un vieillissement prématuré de la peau, voire même un cancer. Lisez attentivement la notice d’utilisation. Certains médicaments ou produits cosmétiques accroissent la sensibilité aux rayons UV. SNS 45 A3...
  • Page 42 Retirez les produits cosmétiques et les produits de protection solaire avant la mise en service de l’appareil. Sinon, il peut en résulter des irritations cutanées. REMARQUE ► En cas de doute, renseignez-vous auprès de votre médecin pour savoir si vous pouvez utiliser l'appareil sans problèmes. SNS 45 A3...
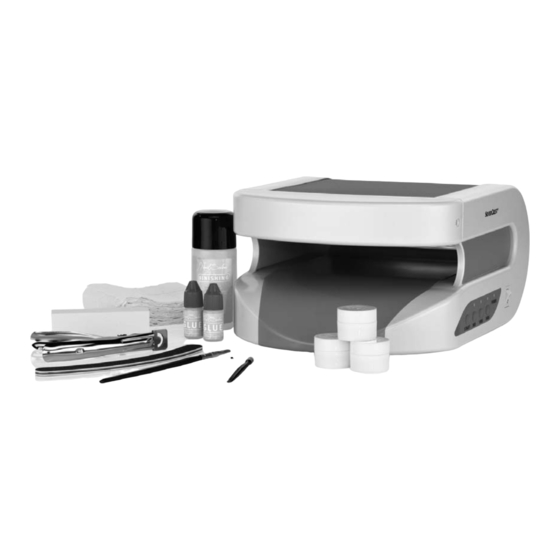
  • Page 43: Appareil Et Accessoires

    Solution de fi nition (pour le traitement fi nal et le nettoyage du pinceau) p Colle à ongles (pour coller les faux ongles «GLUE») a Gel UV (pour remplir les ongles) s French Gel (pour le modelage des «French-Nails») SNS 45 A3...
  • Page 44: Installation Et Raccordement

    Vérifi ez que la livraison est bien complète et qu'elle ne présente pas de dommages apparents. ► En cas de livraison incomplète ou de dommages résultant d'un emballage défi cient ou du transport, veuillez vous adresser à la hotline du service après-vente (cf. le chapitre Service après-vente). SNS 45 A3...
  • Page 45: Déballage

    éclaboussures. ■ N’installez pas l’appareil directement à côté d’un radiateur ou d’un corps de chauff e. ■ La prise doit être facilement accessible, de sorte qu’en cas d’urgence, la fi che secteur puisse être facilement retirée. SNS 45 A3...
  • Page 46: Raccord Électrique

    Veillez à ce que le cordon d’alimentation ne soit pas tendu ou plié. ♦ Ne laissez pas le cordon secteur pendre sur les angles (danger de trébuche- ment). ♦ Insérez la fi che secteur dans la prise secteur. SNS 45 A3...
  • Page 47: Fonctionnement Et Opération

    Les ampoules UV s'éteignent automatiquement après écoulement du temps prédéfi ni. ♦ Appuyez à nouveau sur la touche de départ diff éré 9, 7 ou 5 et la touche de démarrage 0 pour chaque nouveau traitement comme décrit ci-dessus. SNS 45 A3...
  • Page 48: Utilisation

    Sélectionnez un faux-ongle i, dont la courbure correspond au plus près à la courbure de votre ongle naturel. ♦ Sélectionnez un faux-ongle i, qui s’achève au bord de votre ongle naturel, le tracé des côtés étant parallèle à ceux de votre ongle naturel. SNS 45 A3...
  • Page 49: Mise En Place Des Faux-Ongles

    Supprimez la poussière de ponçage à l’aide d’un essuie-tout en papier ou d’un tampon d’ouate z. ♦ Frottez les ongles à l’aide de la solution de fi nition o afi n de supprimer les derniers résidus de poussière et de graisse. SNS 45 A3...
  • Page 50 Basculez à présent le faux-ongle i sur l’ongle naturel en exerçant une lé- gère pression, afi n de faire sortir toutes les occlusions d’air éventuelles. REMARQUE Essuyez la colle à ongles excédentaire p à l'aide d'un tampon d'ouate z, ► d'un coton-tige ou d'un mouchoir en papier. SNS 45 A3...
  • Page 51 ► ment fi xés par la colle à ongles p. ► Si vous n'avez pas l'habitude des ongles longs, coupez-les un peu au préa- lable, pour éviter que les faux-ongles i ne se cognent ou ne tombent. SNS 45 A3...
  • Page 52: Adapter La Racine Des Ongles

    Procédez au modelage de la première couche de gel UV a avec un soin ► tout particulier, dans la mesure où elle détermine la forme ultérieure de l'ongle. Optez pour la forme la plus naturelle possible. ♦ Lors de l’application, veuillez maintenir une distance d’env. 1 mm avec le cuticule. SNS 45 A3...
  • Page 53: Durcissement Du Gel Uv

    Traitez l’ongle du pouce séparément, dans la mesure où la lumière UV ne le touche que de côté, lorsque l’on tient la main dans l’appareil UV. ♦ Répétez à nouveau l’application du gel UV a et le durcissement dans l’appa- reil UV 1 conformément à la description. SNS 45 A3...
  • Page 54 Même après le durcissement de la dernière couche de gel, les ongles peuvent paraître un peu collants («couche de sueur» ou couche de polymérisation). ♦ Humidifi ez un tampon d’ouate z avec la solution de fi nition o et essuyez l’ongle. SNS 45 A3...
  • Page 55: Remplissage

    Utilisez le bloc polissoir r, jusqu’à ce que l’ongle ne brille plus. ♦ Appliquez ensuite à nouveau du gel UV a et durcissez-le à nouveau. REMARQUE ► Consultez pour ce faire les chapitres précédents Application du gel UV, Durcissement du gel UV SNS 45 A3...
  • Page 56: French-Nails

    Limez ensuite les faux-ongles i avec la lime émeri u. CONSEIL ► Pour l'entretien de vos ongles naturels, appliquez pour fi nir un peu d'huile à ongles ou utilisez une crème mains hydratante pour soigner vos mains et vos ongles. SNS 45 A3...
  • Page 57: Entretien

    Lors du nettoyage, assurez-vous qu'aucune humidité ne pénètre dans l'appa- reil UV 1, pour éviter tous dommages irréparables sur l'appareil. Nettoyage de l’appareil ♦ Nettoyez les surfaces de l’appareil UV 1 uniquement à l’aide d’un chiff on doux et sec. SNS 45 A3...
  • Page 58: Nettoyage Des Accessoires

    Les ampoules UV doivent uniquement être remplacées par des ampoules du même type. Vous trouverez le type d'ampoules précis dans le chapitre "Caractéristiques techniques". ♦ Dévissez les deux vis sur les côtés de l’appareil à l’aide d’un tournevis cru- ciforme. SNS 45 A3...
  • Page 59: Dépannage

    ► Les réparations sur les appareils électriques doivent exclusivement être confi ées à des spécialistes qui ont été formés par le fabricant. Toutes réparations non conformes peuvent entraîner des dangers signifi catifs pour l'utilisateur et endommager l'appareil. SNS 45 A3...
  • Page 60: Causes Des Pannes Et Remèdes

    Une ampoule UV Une ampoule UV est Remplacez l'ampoule UV défectueuse. n'est pas allumée. défectueuse. REMARQUE ► Si vous ne parvenez pas à résoudre le problème à l'aide des mesures suscitées, veuillez vous adresser au service après-vente. SNS 45 A3...
  • Page 61: Entreposage/Elimination

    – de la directive européenne en matière de compatibi- lité électromagnétique 2004/108/EC, – de la directive «basse tension» 2006/95/EC, – de la directive RoHS 2011/65/EU. La déclaration de conformité originale est disponible dans son intégralité chez l’importateur. SNS 45 A3...
  • Page 62: Caractéristiques Techniques

    Caractéristiques techniques Modèle SNS 45 A3 Tension de service 220 - 240 V ~ / 50 Hz Puissance absorbée 45 W Température de service +5 - +45 °C Humidité (pas de condensation) 5 - 90 Dimensions (h x l x p)
  • Page 63: Service Après-Vente

    Tel.: 0842 665566 (0,08 CHF/Min., mobile max. 0,40 CHF/Min.) E-Mail: kompernass@lidl.ch IAN 90252 Heures de service de notre hotline : du lundi au vendredi de 8 h à 20 h (HEC) Importateur KOMPERNASS HANDELS GMBH BURGSTRASSE 21 44867 BOCHUM GERMANY www.kompernass.com SNS 45 A3...
  • Page 64 ....79 Importatore ....90 Applicazione del gel UV ..79 SNS 45 A3...
  • Page 65: Introduzione

    Pericolo derivante da uso non conforme! In caso di uso non conforme o diverso da quello previsto, possono verifi carsi situazioni di pericolo. ► Utilizzare l'apparecchio esclusivamente in conformità alla sua destinazione. ► Attenersi alle procedure descritte nel presente manuale di istruzioni. SNS 45 A3...
  • Page 66: Avvertenze

    Qualora sia impossibile evitare tale situazione pericolosa, essa può dare luogo a danni materiali. ► Seguire le istruzioni contenute in questa avvertenza, per evitare danni materiali. AVVERTENZA ► Un avviso contrassegna ulteriori informazioni volte a facilitare l'uso dell'appa- recchio. SNS 45 A3...
  • Page 67: Indicazioni Di Sicurezza

    Non guardare mai direttamente nella luce ultravioletta delle lampadine UV. ► Spegnere le lampadine a raggi UV in caso di mancato utilizzo. ► Coloro che non utilizzano l'apparecchio e in particolare i bambini non devono essere presenti durante l'uso dell'apparecchio. SNS 45 A3...
  • Page 68 ► Non inalare i vapori di sostanze contenenti solventi (ad es. acetone). ► Provvedere a un'aerazione suffi ciente in caso di uso di sostanze contenenti solventi. ► Rispettare le indicazioni riportate sui contenitori delle sostanze contenenti solventi. SNS 45 A3...
  • Page 69 ► Evitare l'esposizione diretta ai raggi solari. ► Disconnettere il cavo di rete tirando sempre dalla spina, mai dal cavo stesso. ► In caso di guasti e in presenza di temporali, disconnettere sempre la spina dalla presa. SNS 45 A3...
  • Page 70 Persone che non riescono ad abbronzarsi aff atto ovvero non riescono ad ab- bronzarsi senza riportare scottature solari dopo l'esposizione ai raggi solari, ► Persone che si scottano facilmente se esposte ai raggi solari, ► In gravidanza. SNS 45 A3...
  • Page 71 L'irradiazione UV può provocare lesioni agli occhi e alla pelle, come ad esempio invecchiamento cutaneo precoce o anche cancro alla pelle. Leggere attentamente il presente manuale di istruzioni per l'uso. Alcuni farmaci o co- smetici aumentano la sensibilità ai raggi UV. SNS 45 A3...
  • Page 72 Rimuovere cosmetici e prodotti solari prima della messa in funzione dell'appa- recchio. In caso contrario si possono riportare irritazioni cutanee. AVVERTENZA ► In caso di dubbi, prima di utilizzare l'apparecchio, informarsi presso il proprio medico sulle possibilità di impiego. SNS 45 A3...
  • Page 73: Apparecchio E Accessori

    Soluzione di fi nissaggio (per il trattamento fi nale e la pulizia pennello) p Colla per unghie (per incollare le tip “GLUE”) a Gel UV (per riempire le unghie) s gel french (per modellare le “French-Nails”) SNS 45 A3...
  • Page 74: Installazione E Collegamento

    Controllare la completezza e integrità della fornitura in relazione ai danni visibili. ► In caso di fornitura incompleta o in presenza di danni derivanti da imballaggio insuffi ciente o causati dal trasporto, rivolgersi alla Hotline di assistenza (v. capitolo Assistenza). SNS 45 A3...
  • Page 75: Estrazione Dalla Confezione

    Non collocare l'apparecchio in un ambiente umido e in un'area interessata da spruzzi d'acqua. ■ Non collocare l'apparecchio direttamente accanto a un termosifone o un ra- diatore. ■ La presa di rete dev'essere facilmente accessibile in modo da poter estrarre la spina facilmente in caso di emergenza. SNS 45 A3...
  • Page 76: Connessione Elettrica

    ♦ Assicurarsi che il cavo di rete non sia teso o schiacciato. ♦ Non lasciare pendere il cavo di rete agli angoli (eff etto di inciampo). ♦ Inserire la spina elettrica nella presa di corrente. SNS 45 A3...
  • Page 77: Comandi E Funzionamento

    AVVERTENZA ► Le lampadine UV si spengono automaticamente alla scadenza del tempo impostato. ♦ Premere il tasto di preselezione del tempo 9, 7 o 5 e il tasto Start 0 per ogni ulteriore trattamento, come precedentemente descritto. SNS 45 A3...
  • Page 78: Impiego

    Selezionare una tip i la cui curvatura si avvicini il più possibile a quella delle proprie unghie naturali. ♦ Selezionare una tip i che si connetta esattamente al margine dell'unghia naturale, e i cui lati siano paralleli all'unghia naturale. SNS 45 A3...
  • Page 79: Applicazione Delle Tip

    Rimuovere i residui di limatura con un fazzolettino di carta o un pezzo di cotone pressato z. ♦ Strofi nare la soluzione di fi nissaggio o sulle unghie per rimuovere gli ultimi resti di polvere e grasso. SNS 45 A3...
  • Page 80 Poggiare quindi la tip i con una leggera pressione sull'unghia naturale in modo da eliminare eventuali inclusioni d'aria. AVVERTENZA Rimuovere la colla per unghie p in eccesso con un pezzo di cotone pres- ► sato z, un bastoncino di ovatta o un fazzolettino di carta. SNS 45 A3...
  • Page 81 Eseguire la limatura con cautela, poiché le tip i sono fi ssate solo con la ► colla per unghie p. ► Se non si fosse abituati alle unghie lunghe, tagliarle un po' prima di appli- carle, al fi ne di evitare urti e cadute delle tip i. SNS 45 A3...
  • Page 82: Adeguamento Delle Unghie Applicate

    Modellare il primo strato di gel UV a con particolare cura, poiché esso ► determina la successiva forma dell'unghia. Modellare una forma il più possibile naturale. ♦ Nell'applicazione tenersi a circa 1 mm di distanza dalla cuticola. SNS 45 A3...
  • Page 83: Indurimento Del Gel Uv

    Trattare separatamente l'unghia del pollice, poiché è diffi cile che la luce UV riesca a colpirla mentre si tengono le mani nell'apparecchio UV. ♦ Ripetere ancora una volta l'applicazione del gel UV a e dell'indurimento nell'apparecchio UV 1 come descritto. SNS 45 A3...
  • Page 84 UV a applicato). Anche dopo l'indurimento dell'ultimo strato di gel, le unghie potrebbero essere leggermente appiccicose (strato di polimerizzazione). ♦ Inumidire un pezzo di cotone pressato z con soluzione di fi nissaggio o e strofi narla sulle unghie. SNS 45 A3...
  • Page 85: Riempimento

    Utilizzare il buff er per unghie r fi no a quando l'unghia non brilla più. ♦ Applicare quindi nuovamente il gel UV a e farlo indurire. AVVERTENZA ► V. al riguardo il capitolo precedente Applicazione del gel UV, Indurimento del gel UV SNS 45 A3...
  • Page 86: French-Nails

    Limare le tip i con la lima sabbiata u. SUGGERIMENTO ► Per proteggere le unghie naturali applicare poi un po' di olio per unghie oppure utilizzare una crema per le mani nutriente, in grado di trattare mani e unghie. SNS 45 A3...
  • Page 87: Cura

    Assicurarsi che nel corso della pulizia non penetri umidità nell'apparecchio UV 1, al fi ne di evitare l'irreparabile danneggiamento dell'apparecchio stesso. Pulizia dell'apparecchio ♦ Pulire le superfi ci dell'apparecchio UV 1 solo con un panno morbido e asciutto. SNS 45 A3...
  • Page 88: Pulizia Degli Accessori

    Le lampadine UV devono essere sostituite solo da lampadine dello stesso tipo. Per conoscere il tipo di lampadina preciso, consultare il capitolo "Dati tecnici". ♦ Svitare le due viti sui lati dell'apparecchio con un cacciavite a stella. SNS 45 A3...
  • Page 89: Guasti E Possibili Rimedi

    Rispettare le seguenti indicazioni di sicurezza per evitare rischi e danni materiali: ► Le riparazioni agli apparecchi elettrici devono essere eseguite solo da personale specializzato addestrato dal produttore. Le riparazioni non eseguite a regola d'arte possono causare gravi pericoli per l'utente e danni all'apparecchio. SNS 45 A3...
  • Page 90: Cause Ed Eliminazione Dei Guasti

    Lampadina a raggi UV Sostituire la lampadina a raggi UV a raggi UV non si guasta. guasta. accende. AVVERTENZA ► Se non si riesce a risolvere il problema con le istruzioni precedentemente riportate, rivolgersi al servizio di assistenza ai clienti. SNS 45 A3...
  • Page 91: Conservazione/Smaltimento

    Questo apparecchio è conforme ai requisiti di base e alle altre norme rilevanti... – della direttiva europea sulla compatibilità elettro- magnetica 2004/108/EC, – della direttiva bassa tensione 2006/95/EC, – della direttiva RoHS 2011/65/EU. La dichiarazione di conformità originale e completa è a disposizione presso l’importatore. SNS 45 A3...
  • Page 92: Dati Tecnici

    Dati tecnici Modello SNS 45 A3 Tensione di esercizio 220 - 240 V ~ / 50 Hz Assorbimento di potenza 45 W Temperatura di esercizio +5 - +45 °C Umidità (nessuna condensa) 5 - 90 Dimensioni (A x L x P)
  • Page 93: Assistenza

    Assistenza Svizzera Tel.: 0842 665566 (0,08 CHF/Min., telefonia mobile max. 0,40 CHF/Min.) E-Mail: kompernass@lidl.ch IAN 90252 Raggiungibilità della hotline: dal lunedì al venerdì, dalle 8.00 alle 20.00 (CET) Importatore KOMPERNASS HANDELS GMBH BURGSTRASSE 21 44867 BOCHUM GERMANY www.kompernass.com SNS 45 A3...
  • Page 94 Importeur ....120 Nagelbed aanpassen ..109 UV-gel aanbrengen ...109 SNS 45 A3...
  • Page 95: Inleiding

    Er kan gevaar van het apparaat uitgaan in geval van gebruik dat niet in overeenstemming is met de bestemming en/of andersoortig gebruik. ► Het apparaat uitsluitend gebruiken in overeenstemming met de bestemming. ► De beschreven procedures in deze gebruiksaanwijzing nakomen. SNS 45 A3...
  • Page 96: Waarschuwingen

    Als de gevaarlijke situatie niet wordt vermeden, kan dit materiële schade tot gevolg hebben. ► De aanwijzingen in deze waarschuwing opvolgen om materiële schade te vermijden. OPMERKING ► Een opmerking wijst op extra informatie, die de omgang met het apparaat vergemakkelijkt. SNS 45 A3...
  • Page 97: Veiligheidsvoorschriften

    Kijk nooit direct in het ultraviolette licht van de UV-lampen. ► UV-lampen uitschakelen als deze niet worden gebruikt. ► Personen die het apparaat niet gebruiken en vooral kinderen mogen bij het gebruik van het apparaat niet aanwezig zijn. SNS 45 A3...
  • Page 98 ► Dampen van oplosmiddelhoudende substanties (bijv. aceton) niet inademen. ► Zorg voor voldoende ventilatie bij de omgang met oplosmiddelhoudende substanties. ► Let op de aanwijzingen op de reservoirs van de oplosmiddelhoudende substanties. SNS 45 A3...
  • Page 99 Gebruik het apparaat niet in de buurt van open vlammen (bijv. kaarsen). ► Vermijd rechtstreeks zonlicht. ► Trek het netsnoer altijd aan de netstekker uit het stopcontact, niet aan het snoer zelf. ► Trek de netstekker uit het stopcontact in geval van storingen en bij onweer. SNS 45 A3...
  • Page 100 ► personen, die gemakkelijk een zonnebrand krijgen, als zijn blootgesteld zijn aan de zon, ► tijdens de zwangerschap. SNS 45 A3...
  • Page 101 ■ UV-straling kan letsel aan ogen en huid teweegbrengen, zoals bijvoorbeeld voortijdige huidveroudering of zelfs huidkanker. Lees de gebruiksaanwijzing zorgvuldig. Een aantal medicijnen of cosmetica verhogen ook de gevoelig- heid ten opzichte van UV-straling. SNS 45 A3...
  • Page 102 Ga het geadviseerde aantal van 400 behandelingen per jaar niet te boven. ■ Verwijder cosmetica en zonnebrandproducten alvorens het apparaat in gebruik te nemen. Anders kunnen er huidirritaties optreden. OPMERKING ► Informeer in geval van twijfel alvorens het apparaat te gebruiken bij uw arts over de toepassingsmogelijkheid. SNS 45 A3...
  • Page 103: Apparaat En Accessoires

    Finishing-oplossing (voor de eindbehandeling en voor de reiniging van het kwastje) p Nagellijm (“Glue”, om de nageltips op te plakken) a UV-gel (om de nagels op te vullen) s French-Gel (voor het modelleren van “French nails”) SNS 45 A3...
  • Page 104: Opstellen En Aansluiten

    Controleer of de levering compleet is en of er sprake is van zichtbare schade. ► In geval de levering niet compleet is of indien er sprake is van schade door gebrekkige verpakking of door transport, neemt u contact op met de Service-Hotline (zie hoofdstuk Service). SNS 45 A3...
  • Page 105: Uitpakken

    Plaats het apparaat niet in een natte omgeving en niet in het bereik van spat- water. ■ Plaats het apparaat niet direct naast een verwarming of een straalkachel. ■ Het stopcontact moet goed te bereiken zijn, zodat de netstekker in geval van nood gemakkelijk uit het stopcontact gehaald kan worden. SNS 45 A3...
  • Page 106: Elektrische Aansluiting

    ♦ Let erop, dat het netsnoer niet strak gespannen of geknikt wordt. ♦ Laat het netsnoer niet over hoeken hangen (struikelblokeff ect). ♦ Steek de stekker in het stopcontact. SNS 45 A3...
  • Page 107: Bediening En Bedrijf

    OPMERKING ► De UV-lampen worden na afl oop van de vooraf ingestelde tijd automatisch weer uitgeschakeld. Druk opnieuw op de tijdvoorkeuze-toets 9, 7 of 5 en de start-toets 0 voor ♦ iedere verdere behandeling zoals boven beschreven. SNS 45 A3...
  • Page 108: Gebruik

    Kies een nagel-tip i, waarvan de kromming zo precies mogelijk overeen- ♦ komt met de kromming van uw natuurlijke nagel. Kies een nagel-tip i, die exact afsluit aan de rand van uw natuurlijke nagel, ♦ waarbij de zijkanten parallel verlopen aan uw natuurlijke nagel. SNS 45 A3...
  • Page 109: De Nagel-Tips Opzetten

    Behandel het nageloppervlak nu met het schuurblok r, totdat de vinger- ♦ nagel niet meer glanst. Verwijder het vijlstof met een tissue of een depper z. ♦ Neem de nagels af met de fi nishing-oplossing o, zodat de laatste stof- en ♦ vetresten worden verwijderd. SNS 45 A3...
  • Page 110 Kantel de nagel-tip i nu met lichte druk op de natuurlijke nagel, zodat even- ♦ tuele luchtbellen eruit worden gedrukt. OPMERKING Veeg overtollige nagellijm p weg met een depper z, een wattenstaafje ► of een tissue. SNS 45 A3...
  • Page 111 Vijl erg voorzichtig, omdat de nagel-tips i alleen met nagellijm p gefi xeerd ► zijn. ► Als u geen lange nagels gewend bent, knipt u ze eerst een beetje af, om een aanstoten en afvallen van de nagel-tips i te vermijden. SNS 45 A3...
  • Page 112: Nagelbed Aanpassen

    Modelleer de eerste laag van het UV-gel a bijzonder zorgvuldig, omdat ► deze de later vorm van de nagel bepaalt. Modelleer een zo natuurlijke mogelijke nagelvorm. ♦ Houd ca. 1 mm afstand tot de nagelhuid bij het aanbrengen. SNS 45 A3...
  • Page 113: Uv-Gel Laten Uitharden

    Behandel de duimnagel afzonderlijk, omdat het UV-licht deze, als men de hand in het UV-apparaat houdt, slechts zijdelings raakt. Herhaal nog een keer het aanbrengen van het UV-gel a en het uitharden in ♦ het UV-apparaat 1 zoals beschreven. SNS 45 A3...
  • Page 114 UV-gel a). Ook na het uitharden van de laatste laag gel kunnen de nagels een beetje plakkerig aanvoelen („zweetlaag”, resp. polymerisatie-laag). Maak een depper z vochtig met fi nishing-oplossing o en veeg daarmee ♦ over de nagel. SNS 45 A3...
  • Page 115: Opvullen

    ♦ Gebruik het schuurblok r, totdat de nagel niet meer glanst. ♦ Doe er daarna weer UV-gel a op en laat dit weer uitharden. ♦ OPMERKING ► Zie hierover de vorige hoofdstukken UV-gel aanbrengen, UV-gel laten uitharden SNS 45 A3...
  • Page 116: French-Nails

    Knip de nagels eerst met de nagelknipper q helemaal kort. ♦ Vijl de nagel-tips i dan met de zandvijl u af. ♦ ► Breng vervolgens voor onderhoud van de eigenlijke nagel een beetje nagelolie aan of gebruik een rijke handcrème die de handen en nagels verzorgt. SNS 45 A3...
  • Page 117: Verzorging

    Verzeker u ervan, dat bij de reiniging geen vochtigheid binnendringt in het UV-apparaat 1, om een onherstelbare beschadiging van het apparaat te vermijden. Apparaat reinigen Reinig de oppervlakken van het UV-apparaat 1 alleen met een zachte, ♦ droge doek. SNS 45 A3...
  • Page 118: Accessoires Reinigen

    ► De UV-lampen mogen alleen worden vervangen door hetzelfde type lamp. Het exacte type lamp leest u in het hoofdstuk „Technische gegevens“. ♦ Draai de beide schroeven aan de zijkanten van het apparaat eruit met een kruiskopschroevendraaier. SNS 45 A3...
  • Page 119: Problemen Oplossen

    ► Reparaties aan elektrische apparatuur mogen alleen worden uitgevoerd door vakmensen, die door de fabrikant zijn geschoold. Door onvakkundige reparaties kunnen aanzienlijke gevaren optreden voor de gebruiker en kan er schade ontstaan aan het apparaat. SNS 45 A3...
  • Page 120: Oorzaken Van Storingen En Het Verhelpen Ervan

    Nog een dunne laag UV-gel a aangebracht. aanbrengen en deze uitharden. Een UV-lamp brandt UV-lamp defect. Vervang de defecte UV-lamp. niet. OPMERKING ► Als u met de eerdergenoemde stappen het probleem niet kunt verhelpen, neem dan a.u.b. contact op met de klantenservice. SNS 45 A3...
  • Page 121: Opslag/Milieurichtlijnen

    Dit apparaat voldoet wat betreft overeenstemming met de fun- damentele eisen en de andere relevante voorschriften aan... – de Europese richtlijn voor elektromagnetische compa- tibiliteit 2004/108/EC, – de laagspanningsrichtlijn 2006/95/EC, – de RoHS-richtlijn 2011/65/EU. De volledige originele conformiteitsverklaring is te verkrijgen bij de importeur. SNS 45 A3...
  • Page 122: Technische Gegevens

    Technische gegevens Model SNS 45 A3 Bedrijfsspanning 220 - 240 V ~ / 50 Hz Vermogen 45 W Bedrijfstemperatuur +5 - +45 °C Vochtigheid (geen condensatie) 5 - 90 Afmetingen (H x B x D) 23,1 x 29,6 x 14,3 Gewicht ca.
  • Page 123: Service

    Service Service Nederland Tel.: 0900 0400223 (0,10 EUR/Min.) E-Mail: kompernass@lidl.nl IAN 90252 Bereikbaarheid hotline: Maandag t/m vrijdag van 8:00 tot 20:00 uur (CET) Importeur KOMPERNASS HANDELS GMBH BURGSTRASSE 21 44867 BOCHUM GERMANY www.kompernass.com SNS 45 A3...
  • Page 124 Importer ....150 Matching a nail set ... .139 Application of the UV-Gel ..139 SNS 45 A3...
  • Page 125: Introduction

    Risks from unintended use! Risks can be engendered by the appliance if it is used for unintended purposes and/or other types of use. ► Use the appliance exclusively for intended purposes. ► Observe the procedures described in these operating instructions. SNS 45 A3...
  • Page 126: Warning Notices

    If the situation is not avoided it can lead to property damage. ► The directives in this warning are there to avoid property damage. NOTICE ► A notice signifi es additional information that assists in the handling of the appliance. SNS 45 A3...
  • Page 127: Safety Instructions

    NEVER look directly into the ultraviolet light from the UV lamps. ► If the UV lamps are not in use, switch them off . ► Non-users, and especially children, may not be present during the opera- tion of the appliance. SNS 45 A3...
  • Page 128 ► Do not breathe in the vapours from solvent-containing substances (e.g. acetone). ► Ensure there is adequate ventilation when interacting with solvent-containing substances. ► Pay heed to the instructions on the containers of the solvent-containing substances. SNS 45 A3...
  • Page 129 Always pull the plug itself out of the mains power socket, do not pull it with the power cable. ► In the case of a malfunction occurring or a thunderstorm, disconnect the plug from the mains power socket. SNS 45 A3...
  • Page 130 People who absolutely cannot tan at all, or who cannot tan without getting sunburned, when they are exposed to the sun, ► People who are easily sunburned when they are exposed to the sun, ► during pregnancy. SNS 45 A3...
  • Page 131 UV radiation. ■ The unprotected eye can suff er superfi cial infl ammation and, in some cases, excessive exposure may cause damage to the retina. Frequently repeated exposures can lead to cataracts. SNS 45 A3...
  • Page 132 Remove cosmetics and sun care products before using the appliance. If you do not, it could lead to skin irritation. NOTICE ► If in any doubt, consult your doctor about the possible applications before using the appliance. SNS 45 A3...
  • Page 133: Appliance And Accessories

    (artifi cial fi ngernails) o Finishing solution (for fi nal treatment and for cleaning brushes) p Nail glue (to glue the “GLUE” nail tips on) a UV gel (for topping up nails) s French gel (for modelling “French nails”) SNS 45 A3...
  • Page 134: Setting Up And Connecting To The Power Supply

    Check the contents to ensure everything has been provided, and for signs of visible damage. ► If the contents are incomplete, or have been damaged due to defective packaging or transportation, contact the Service Hotline (see chapter Service). SNS 45 A3...
  • Page 135: Unpacking

    Do not place the appliance in a damp environment and not in an area at risk from spraywater. ■ Do not place the appliance adjacent to a radiator or a raiation heater. ■ The mains power socket must be easily accessible, so that the plug can be easily removed in an emergency. SNS 45 A3...
  • Page 136: Electrical Connection

    ♦ Ensure that the power cable is not over-taut or kinked. ♦ Do not let the power cable hang over edges (trip wire eff ect). ♦ Insert the plug into the mains power socket. SNS 45 A3...
  • Page 137: Handling And Operation

    The UV lamps switch off automatically after the lapse of the preset time. ♦ Press the time preselect button 9, 7 or 5 and the Start button 0 once again as described above for any further treatments. SNS 45 A3...
  • Page 138: Utilisation

    Select a nail tip i whose curvature corresponds as closely as possible to the natural curve of your nail. ♦ Select a nail tip i which closes exactly at the edge of your natural nail and whereby the sides are parallel to your natural nail. SNS 45 A3...
  • Page 139: Attaching Artifi Cial Nails

    ♦ Remove the dust from fi ling with a paper cloth or cellulose pad z. ♦ Rub the nails with the fi nishing solution o so that the last remnants of dust and grease are removed. SNS 45 A3...
  • Page 140 Now tilt the nail tip i with gentle pressure onto the natural nail, so that po- tential air bubbles are squeezed out . NOTICE Wipe away excess nail glue p with a cellulose pad z, a cotton bud or ► a paper towel. SNS 45 A3...
  • Page 141 File very carefully, because the nail tips i are held only with a nail glue p. ► ► If you are not used to long nails, cut them back a little in order to avoid knocks and the falling off of the nail tips i. SNS 45 A3...
  • Page 142: Matching A Nail Set

    Model the fi rst layer of the UV Gel a very carefully, as this determines the ► future shape of the nail. Model the best possible natural nail shape. ♦ Maintain a distance of about 1 mm from the cuticle during the application. SNS 45 A3...
  • Page 143: Hardening Of The Uv-Gel

    Treat the thumbnail separately because, when you hold your hand in the UV unit, the UV light only shines on the side of it. ♦ Repeat the application of the UV gel a and the hardening in the UV appli- ance 1 as described above once more. SNS 45 A3...
  • Page 144 Even after the last hardening of the Gel layer, the nails may feel a feel sticky (“sweat-layer” or polymerization layer). ♦ Moisten a cellulose pad z with fi nishing solution o and then wipe this over the nail. SNS 45 A3...
  • Page 145: Topping Up

    Use the sanding block r until the nail is no longer shiny. ♦ When done, reapply UV gel a and harden it again. NOTICE ► In this regard, see the previous chapters Application of the UV-Gel and Hardening of the UV-Gel SNS 45 A3...
  • Page 146: French-Nails

    Then fi le the nail tips i off with the sandpaper fi le u. ► After this, apply a little nail oil or use a rich hand cream for hands and nails in order to care for your natural nails. SNS 45 A3...
  • Page 147: Care

    To avoid irreparable damage, ensure that no moisture can penetrate inside the UV appliance 1 when you are cleaning it. Cleaning the appliance ♦ Clean the surfaces of the UV appliance 1 only with a soft and dry cloth. SNS 45 A3...
  • Page 148: Cleaning Accessories

    The UV lamps may ONLY be replaced with lamps of the same type. The speci- fi cations for the precise lamp type are given in the chapter "Technical Data". ♦ Unscrew the two screws on the sides of the appliance with a cross-head screwdriver. SNS 45 A3...
  • Page 149: Troubleshooting

    ► Repairs to electronic appliances may only be carried out by specialists who have been trained by the manufacturer. Considerable risk to the consumer and damage to the appliance can occur as a result of incompetent repairs. SNS 45 A3...
  • Page 150: Malfunction Causes And Remedies

    UV gel a and then harden it. A UV lamp does UV lamp defect. Replace the defective UV lamp. not glow. NOTICE ► If you cannot solve the problem with the aforementioned solutions, please contact Customer Services. SNS 45 A3...
  • Page 151: Storage/Disposal

    ... – the European directive on electromagnetic compat- ibility 2004/108/EC, – the Low Voltage Directive 2006/95/EC, – and the RoHS Directive 2011/65/EU. The full original Declaration of Conformity is available from the importer. SNS 45 A3...
  • Page 152: Technical Data

    Technical data Model SNS 45 A3 Operating voltage 220 - 240 V ~ / 50 Hz Power consumption 45 W Operating temperature +5 - +45 °C Humidity (no condensation) 5 - 90 Dimensions (W x H x D): 23,1 x 29,6 x 14,3 Weight approx.
  • Page 153: Service

    Service Service Great Britain Tel.: 0871 5000 720 (£ 0.10/Min.) E-Mail: kompernass@lidl.co.uk IAN 90252 Hotline availability: Monday to Friday 08:00 - 20:00 (CET) Importer KOMPERNASS HANDELS GMBH BURGSTRASSE 21 44867 BOCHUM GERMANY www.kompernass.com SNS 45 A3...
  • Page 154 KOMPERNASS HANDELS GMBH BURGSTRASSE 21 44867 BOCHUM DEUTSCHLAND / GERMANY www.kompernass.com Stand der Informationen · Version des informations Versione delle informazioni · Stand van de informatie Last Information Update: 07 / 2013 · Ident.-No.: SNS45A3-042013-2 IAN 90252...

Table des Matières