
Manuels Connexes pour De Dietrich G30


Sommaire des Matières pour De Dietrich G30
- Page 1 All manuals and user guides at all-guides.com 99632241_FR_A.qxd 23/12/03 14:40 Page 1 Le guide d’utilisation de votre table de cuisson Hob operating guide...
- Page 2 All manuals and user guides at all-guides.com 99632241_FR_A.qxd 23/12/03 14:40 Page 2 Sommaire Votre table en toute sécurité Comment se présente votre table ? Comment se présente votre clavier de commande ? Installez facilement votre table Conseils d’encastrement Raccordement électrique Raccordement gaz 11-13 Changement de gaz...
- Page 3 14:40 Page 3 dito Chère Cliente, Cher Client, Vous venez d'acquérir une table DE DIETRICH et nous vous en remercions. Nos équipes de recherche ont conçu pour vous une nouvelle génération d'appareils, qui par leur qualité, leur design et leurs évolutions technologiques en font des produits d'exception et...
- Page 4 All manuals and user guides at all-guides.com 99632241_FR_A.qxd 23/12/03 14:40 Page 4 otre table en toute sécurité tilisez votre table en toute sécurité Nous avons conçu votre table de Ne rangez pas dans le meuble situé cuisson pour une utilisation par des sous votre table de cuisson, vos particuliers dans un lieu d’habitation.
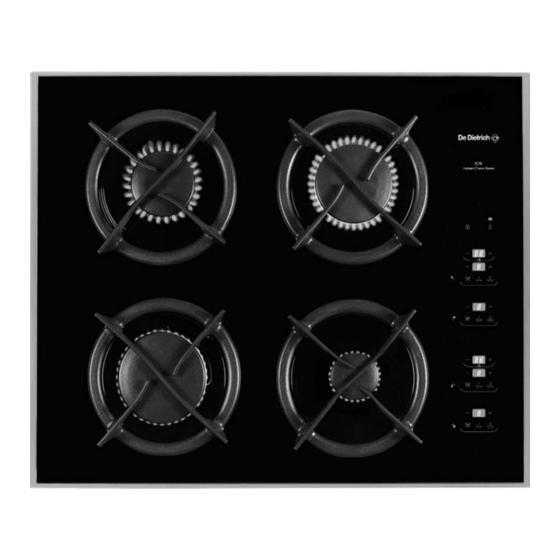
- Page 5 All manuals and user guides at all-guides.com 99632241_FR_A.qxd 23/12/03 14:40 Page 5 omment se présente votre table ? Brûleur semi-rapide Brûleur rapide 1,5 kW* 2,3 kW* Brûleur grand rapide Brûleur auxiliaire 3,1 kW* 0,85 kW* ) Ces puissances sont exprimées en G20/20mbar. Le clavier de commande de cette table est équipé...
- Page 6 All manuals and user guides at all-guides.com 99632241_FR_A.qxd 23/12/03 14:40 Page 6 omment se présente votre clavier de commande ? OYANT DE VERROUILLAGE OUCHE DE VERROUILLAGE DÉVERROUILLAGE DU CLAVIER OUCHE ARRET GÉNÉRAL FFICHAGE TEMPS MINUTERIE ÉGLAGE MINUTERIE OUCHE MARCHE ARRET FOYER ARRIERE GAUCHE OUCHES DE RÉGLAGE DE LA PUISSANCE DU BRULEUR...
- Page 7 All manuals and user guides at all-guides.com 99632241_FR_A.qxd 23/12/03 14:40 Page 7 Installez facilement votre table onseils d’encastrement Modèle Largeur Profondeur Epaisseur Suivant meuble Découpe meuble 56 cm 49 cm Dimensions hors tout au-dessus du 65 cm 51,8 cm 5 cm plan de travail Dimensions hors tout au-dessous...
- Page 8 All manuals and user guides at all-guides.com 99632241_FR_A.qxd 23/12/03 14:40 Page 8 Installez facilement votre table onseils d’encastrement (suite) La table de cuisson doit être encastrée dans le plateau d'un meuble support de 3 cm d'épaisseur minimum, fait en matière qui résiste à la chaleur, ou bien revêtu d'une telle matière.
- Page 9 All manuals and user guides at all-guides.com 99632241_FR_A.qxd 23/12/03 14:40 Page 9 Installez facilement votre table onseils d’encastrement (suite) Pour assurer l'étanchéité entre le cais- son et le plan de travail, collez le joint mousse sur le pourtour extérieur du cadre. Collez le joint fourni dans la pochette avant l’installation de la table : Joint...
- Page 10 All manuals and user guides at all-guides.com 99632241_FR_A.qxd 23/12/03 14:40 Page 10 Installez facilement votre table accordement électrique Table gaz ECTION DU CABLE À UTILISER Cette table de cuisson doit être rac- 220-240 V~ - 50 Hz cordée sur le réseau 220-240 V nophasé...
- Page 11 All manuals and user guides at all-guides.com 99632241_FR_A.qxd 23/12/03 14:41 Page 11 Installez facilement votre table accordement gaz Remarques préliminaires Si la table de cuisson est installée au- dessus d'un four ou si la proximité d'autres éléments chauffants risque de provoquer un échauffement du raccordement, il est impératif de réali- ser celui-ci en tube rigide.
- Page 12 All manuals and user guides at all-guides.com 99632241_FR_A.qxd 23/12/03 14:41 Page 12 Installez facilement votre table accordement gaz (suite) Raccordements possibles AZ DISTRIBUÉ PAR CANALISATION GAZ NATUREL NATUREL Choisir exclusivement l’un des 3 rac- cordements suivants : - le raccordement en tube rigide (appellation norme gaz G1/2).
- Page 13 All manuals and user guides at all-guides.com 99632241_FR_A.qxd 23/12/03 14:41 Page 13 Installez facilement votre table accordement gaz (suite) Raccordements possibles AZ DISTRIBUÉ PAR BOUTEILLE OU RÉ BUTANE/PROPANE SERVOIR GAZ BUTANE PROPANE Détendeur obligatoire Pour la sécurité de l’utilisateur, nous conseillons un raccordement soit en tube rigide si cela est possible, soit avec un tuyau flexible métallique on-...
- Page 14 All manuals and user guides at all-guides.com 99632241_FR_A.qxd 23/12/03 14:41 Page 14 Installez facilement votre table hangement de gaz Remarques préliminaires Cette table de cuisson est livrée A chaque changement de gaz, cochez pré-réglée pour le gaz naturel. la case correspondant au nouveau gaz sur l’étiquette située dans la Les injecteurs nécessaires à...
- Page 15 All manuals and user guides at all-guides.com 99632241_FR_A.qxd 23/12/03 14:41 Page 15 Installez facilement votre table hangement de gaz (suite) Passage du gaz naturel en gaz butane/propane. Lors de cette opération À EFFECTUER , vous devrez AVANT TOUT BRANCHEMENT successivement : Basculer l’interrupteur de changement de gaz.
- Page 16 All manuals and user guides at all-guides.com 99632241_FR_A.qxd 23/12/03 14:41 Page 16 Installez facilement votre table hangement de gaz (suite) Passage du gaz naturel en gaz butane/propane (suite). • Montez à la place les injecteurs fournis dans la pochette, conformé- Ligne ment au tableau des caractéristiques gaz en fin de chapitre ;...
- Page 17 All manuals and user guides at all-guides.com 99632241_FR_A.qxd 23/12/03 14:41 Page 17 Installez facilement votre table hangement de gaz (suite) Passage du gaz Butane/Propane au gaz naturel Lors de cette opération À EFFECTUER , vous devrez AVANT TOUT BRANCHEMENT successivement : Basculer l’interrupteur de changement de gaz.
- Page 18 All manuals and user guides at all-guides.com 99632241_FR_A.qxd 23/12/03 14:41 Page 18 Installez facilement votre table hangement de gaz (suite) Passage du gaz Butane/Propane au gaz naturel • Montez à la place les injecteurs fournis dans la pochette, conformé- Clé Ligne ment au tableau des caractéristiques gaz en fin de chapitre ;...
- Page 19 All manuals and user guides at all-guides.com 99632241_FR_A.qxd 23/12/03 14:41 Page 19 Installez facilement votre table hangement de gaz (suite) Caractéristiques gaz FR-GB FR-GB FR-GB ES-PT ES-PT ES-PT Appareil destiné à être installé en : Butane Propane FR ........Cat : II2E+3+ naturel naturel GB - ES - PT .....Cat : II2H3+...
- Page 20 All manuals and user guides at all-guides.com 99632241_FR_A.qxd 23/12/03 14:41 Page 20 Utilisez votre table en toute simplicité omment mettre en marche et ajuster la puissance ? • Sélectionnez le brûleur que vous souhaitez utiliser en appuyant sur la touche correspondante (fig.
- Page 21 All manuals and user guides at all-guides.com 99632241_FR_A.qxd 23/12/03 14:41 Page 21 Utilisez votre table en toute simplicité omment utiliser la minuterie ? Les brûleurs avant gauche et • arrière gauche sont équipés d’une minuterie (durée maximale de 99 mi- nutes).
- Page 22 All manuals and user guides at all-guides.com 99632241_FR_A.qxd 23/12/03 14:41 Page 22 Utilisez votre table en toute simplicité uels sont les récipients les plus adaptés sur les brûleurs gaz ? • Diamètres de récipients conseillés : Grand brûleur Brûleur moyen Petits brûleurs GRAND RAPIDE RAPIDE...
- Page 23 All manuals and user guides at all-guides.com 99632241_FR_A.qxd 23/12/03 14:41 Page 23 Comment entretenir votre table ? L’entretien de votre table de cuisson est facilité si vous l’effectuez avant son refroidissement complet. Cependant, ne nettoyez jamais votre appareil pendant son fonctionnement.
- Page 24 All manuals and user guides at all-guides.com 99632241_FR_A.qxd 23/12/03 14:41 Page 24 Petites pannes et anomalies Vous avez un doute sur le bon fonctionnement de votre table ..ceci ne signifie pas forcément qu'il y a une panne. Dans tous les cas, vérifiez les points suivants : CODES QUE SE PASSE-T-IL ? QUE FAIRE ?
- Page 25 All manuals and user guides at all-guides.com 99632241_FR_A.qxd 23/12/03 14:41 Page 25 Petites pannes et anomalies (suite) QUE SE PASSE-T-IL ? QUE FAIRE ? Vérifiez le branchement électrique de la table de cuisson. Allumage des brûleurs : Vérifiez la propreté des bougies d’allumage. Il n’y a pas d’étincelles lors de l’appui sur les touches.
- Page 26 All manuals and user guides at all-guides.com 99632241_FR_A.qxd 23/12/03 14:41 Page 26 Guide de cuisson - Pour régler au mieux votre temps de cuisson, n’hésitez pas à passer le récipient d’un brûleur à l’autre (par exemple : du brûleur grand rapide au brûleur semi-rapie : blan- quette, osso-bucco...).
- Page 27 All manuals and user guides at all-guides.com 99632241_FR_A.qxd 23/12/03 14:41 Page 27 List of contents Using your hob in complete safety What your hob looks like? What the control board looks like? Installing your hob in all simplicity Fitting recommendations 32-34 Electrical connections Gas connections...
- Page 28 You will find that the clean lines and modern look of your DE DIETRICH hob blends in perfectly with your kitchen décor. It is easy to use and performs to a high standard. DE DIETRICH also makes a range of products that will enhance your kitchen such as hobs, extractor hoods, built-in dishwashers and refrigerators.
- Page 29 All manuals and user guides at all-guides.com 99632241_FR_A.qxd 23/12/03 14:41 Page 29 our hob in complete safety sing your hob in complete safety We have designed your hob for Never leave any C L E A N I N G private domestic use.
- Page 30 All manuals and user guides at all-guides.com 99632241_FR_A.qxd 23/12/03 14:41 Page 30 hat your hob looks like? Semi-fast burner Fast burner 1,5 kW* 2,3 kW* Extra-fast burner Auxiliary burner 3,1 kW* 0,85 kW* ) These power settings are expressed in G20/20mbar. The control panel for this hob is equipped with touch sensitive controls.
- Page 31 All manuals and user guides at all-guides.com 99632241_FR_A.qxd 23/12/03 14:41 Page 31 hat the control board looks like? "L " INDICATOR UTTON FOR LOCKING UNLOCKING THE KEYPAD "O " SWITCH IMER DISPLAY IMER SETTING ON/OFF TOUCH CONTROL ACK LEFT HAND RING UNER POWER ADJUSTMENT BUTTONS ON/OFF...
- Page 32 All manuals and user guides at all-guides.com 99632241_FR_A.qxd 23/12/03 14:41 Page 32 Installing your hob in all simplicity itting recommendations Model Width Depth Height Depending on Cut-out 56 cm 49 cm cupboard Outside dimensions above 65 cm 51,8 cm 5 cm the work surface Outside dimensions below...
- Page 33 All manuals and user guides at all-guides.com 99632241_FR_A.qxd 23/12/03 14:42 Page 33 Installing your hob in all simplicity itting recommendations (cont'd) The hob must be built into the worktop of a support cupboard. This worktop must be at least 3 cm thick and heat-resistant or else coated with a heat resistant material.
- Page 34 All manuals and user guides at all-guides.com 99632241_FR_A.qxd 23/12/03 14:42 Page 34 Installing your hob in all simplicity itting recommendations (cont'd) To make sure that nothing can get between the frame and the worktop, stick the foam seal around the outside of the hob.
- Page 35 All manuals and user guides at all-guides.com 99632241_FR_A.qxd 23/12/03 14:42 Page 35 Installing your hob in all simplicity lectrical connections Gas Hob ROSS SECTION OF THE CABLE TO USE This hob must be connected to the 220-240 V~ - 50 Hz 220-240 V single phrase mains network using a 2-pin + earth plug...
- Page 36 All manuals and user guides at all-guides.com 99632241_FR_A.qxd 23/12/03 14:42 Page 36 Installing your hob in all simplicity as connections Preliminary remarks If the hob is to be installed above an oven or if other nearby heating appliances risk heating and damaging the gas hose then it is essential that a rigid pipe be installed instead.
- Page 37 All manuals and user guides at all-guides.com 99632241_FR_A.qxd 23/12/03 14:42 Page 37 Installing your hob in all simplicity as connections (Cont'd) Possible connections OWN GAS NATURAL GAS NATURAL GAS One of the 3 following connections must be used: - connection with a rigid pipe (gas standard G1/2).
- Page 38 All manuals and user guides at all-guides.com 99632241_FR_A.qxd 23/12/03 14:42 Page 38 Installing your hob in all simplicity as connections (Cont'd) Possible connections OTTLED OR TANKED GAS BUTANE BUTANE/PROPANE PROPANE Pressure regulator compulsory For the user's safety, we advise the connection to be made with a rigid pipe if this is possible, or with a reinforced, braided, flexible gas hose...
- Page 39 All manuals and user guides at all-guides.com 99632241_FR_A.qxd 23/12/03 14:42 Page 39 Installing your hob in all simplicity hanging the type of gas supply Preliminary remarks Your hob is delivered regulated Every time you change your gas supply, mark the square on the label for natural gas.
- Page 40 All manuals and user guides at all-guides.com 99632241_FR_A.qxd 23/12/03 14:42 Page 40 Installing your hob in all simplicity hanging the type of gas supply (cont'd) Changing from natural gas to butane/propane gas When carrying out this operation , you BEFORE CONNECTING UP ANYTHING should successively: Switch over the gas change switch.
- Page 41 All manuals and user guides at all-guides.com 99632241_FR_A.qxd 23/12/03 14:42 Page 41 Installing your hob in all simplicity hanging the type of gas supply (cont'd) Changing from natural gas to butane/propane gas (cont'd). • Replace these with the injectors s u p p l i e d t h e w a l l e t , Line...
- Page 42 All manuals and user guides at all-guides.com 99632241_FR_A.qxd 23/12/03 14:42 Page 42 Installing your hob in all simplicity hanging the type of gas supply (cont'd) Changing from butane / propane gas to natural gas When carrying out this operation , you BEFORE CONNECTING UP ANYTHING should successively : Switch over the gas change...
- Page 43 All manuals and user guides at all-guides.com 99632241_FR_A.qxd 23/12/03 14:42 Page 43 Installing your hob in all simplicity hanging the type of gas supply (cont'd) Changing from butane / propane gas to natural gas • Replace these with the injectors s u p p l i e d t h e w a l l e t ,...
- Page 44 All manuals and user guides at all-guides.com 99632241_FR_A.qxd 23/12/03 14:42 Page 44 Installing your hob in all simplicity hanging the type of gas supply (cont'd) Gaz rating FR-GB FR-GB FR-GB ES-PT ES-PT ES-PT Appliance designed for installation: Butane Propane Natural Natural FR ........Cat : II2E+3+ GB - ES - PT .....Cat : II2H3+...
- Page 45 All manuals and user guides at all-guides.com 99632241_FR_A.qxd 23/12/03 14:42 Page 45 Using your hob in all simplicity urning on the hob and adjusting the power setting • Select the burner that you wish to use by pressing on the corresponding button (fig.
- Page 46 All manuals and user guides at all-guides.com 99632241_FR_A.qxd 23/12/03 14:42 Page 46 Using your hob in all simplicity ow to use the timer? The front left and back left • burners are equipped with a timer (maximum duration of 99 min). However, they can operate without using this.
- Page 47 All manuals and user guides at all-guides.com 99632241_FR_A.qxd 23/12/03 14:42 Page 47 Using your hob in all simplicity hich pans are best adapted for use on the gas burner ? • Recommended pan sizes: Small burners Medium burner Extra burner Auxiliary burner semi-fast fast...
- Page 48 All manuals and user guides at all-guides.com 99632241_FR_A.qxd 23/12/03 14:42 Page 48 How to look after your hob? Keeping your hob in good condition is easy if you clean it before it is completely cold. Even so, never clean it when it is in use. Put all the control knobs at zero. ACCESSORIES TO HOW TO PROCEED BE USED...
- Page 49 All manuals and user guides at all-guides.com 99632241_FR_A.qxd 23/12/03 14:43 Page 49 Minor troubleshooting You have doubts about whether your hob is working correctly ..this does not necessarily mean there is a breakdown. Nevertheless, check the following points ERROR IF YOU REALIZE WHAT SHOULD...
- Page 50 All manuals and user guides at all-guides.com 99632241_FR_A.qxd 23/12/03 14:43 Page 50 Minor troubleshooting (cont’d) IF YOU REALIZE THAT WHAT SHOULD YOU DO? Check the electrical connections on the hob. Lighting the burners: Check that the sparkers are clean. There are no sparks when pressing the buttons. Check that the burners are clean and in position.
- Page 51 All manuals and user guides at all-guides.com 99632241_FR_A.qxd 23/12/03 14:43 Page 51 Cooking guide - To master your cooking times as well as possible, do not hesitate to transfer your saucepan from one burner to another (e.g. from the extra fast burner to the semi-fast burner: blanquettes, osso buccos, etc.).
- Page 52 Page 52 0 825 06 16 04 à tarif en vigueur à la date d’impression du document DE DIETRICH 7, rue Henri Becquerel 92584 REUIL MALMAISON CEDEX Tél. : 33 (0) 1 47 16 65 65 S.A.S. au capital de 10.000.000 euros - RCS NANTERRE B 440 303 196 N°...