Graco FinishPro 290 Mode D'emploi
Liens rapides
Operation / Fonctionnement / Funcionamiento / Bediening / Betrieb
™
FinishPro
290
Airless/Air-Assisted Sprayer
Pulvérisateur sans/avec commande pneumatique
Pulverizador sin aire/asistido por aire
Airless/Air-Assisted spuitapparaat
Airless-/luftunterstütztes Spritzgerät
- For the application of architectural paint and coatings - / - Pour l'application de peintures et revêtements architecturaux - /
- Para la aplicación de pinturas y revestimientos con fines arquitectónicos - / - Voor het spuiten en aanbrengen van muurverf en coatings - /
3300 psi (227 bar, 22.7 MPa) Maximum Working Pressure Airless Spraying /
3300 psi (227 bar, 22,7 MPa) Pression de service maximale pour la pulvérisation sans air comprimé /
Presión máxima de pulverización sin aire: 3300 psi (227 bar, 22,7 MPa) /
Maximum werkdruk bij airless spuiten: 3300 psi (227 bar, 22,7 MPa) /
3300 psi (227 bar, 22,7 MPa) zulässiger Betriebsüberdruck bei Airless-Spritzen
Important Safety
Instructions
Read all warnings
and instructions in this
manuals. Save these
instructions.
Models / Modèles / Modelos / Modellen / Modelle:
Region / Région / Región / Regio / Region
US / É-U / EE.UU. / VS / US
Europe CE 7/7 / Europe CE 7/7 / Europa CE 7/7 /
Europa CE 7/7 / Europa CE 7/7
Europe Multi / Europe Multi / Europa Multi /
Europa rest / Europa Multi
UK / RU / Reino Unido /
Verenigd Koninkrijk / Großbritannien
Asia/Australia / Asie/Australie / Asia/Australia /
Azië/Australië / Asien/Australien
313347
Graco Inc. P.O. Box 1441 Minneapolis, MN 55440-1441
Copyright 2009, Graco Inc. is registered to I.S. EN ISO 9001
All manuals and user guides at all-guides.com
- Zur Applikation von Bautenanstrichen -
Importantes
consignes
de sécurité
Prendre connaissance de
Lea todas las advertencias
toutes les instructions
e instrucciones de este
et mises en garde reprises
manual. Guarde estas
dans ce manuel.
instrucciones.
Conserver
ces instructions.
Instrucciones
Belangrijke
importantes
veiligheidsinstructies
de seguridad
Lees alle waarschuwingen
en instructies in deze
handleidingen. Bewaar
deze instructies.
120V
240V
249690
249690
255110
255110
255112
255112
255114
255114
255116
255116
313316A
Wichtige
Sicherheitshinweise
Lesen Sie alle
Warnhinweise
und Anweisungen
in dieser Anleitung.
Bewahren Sie diese
Anleitung auf.
ti0926a

Manuels Connexes pour Graco FinishPro 290


Sommaire des Matières pour Graco FinishPro 290
- Page 1 UK / RU / Reino Unido / 255114 255114 Verenigd Koninkrijk / Großbritannien Asia/Australia / Asie/Australie / Asia/Australia / 255116 255116 Azië/Australië / Asien/Australien ti0926a 313347 Graco Inc. P.O. Box 1441 Minneapolis, MN 55440-1441 Copyright 2009, Graco Inc. is registered to I.S. EN ISO 9001...
- Page 2 All manuals and user guides at all-guides.com Warnings Warnings The following are general warnings related to the setup, use, grounding, maintenance and repair of this equipment. Additional, more specific warnings may be found throughout the body of this manual where applicable. Symbols appearing in the body of the manual refer to these general warnings.
- Page 3 Read fluid and solvent manufacturer’s warnings. For complete information about your material, request MSDS from distributor or retailer. • Check equipment daily. Repair or replace worn or damaged parts immediately with genuine Graco replacement parts only. •...
- Page 4 All manuals and user guides at all-guides.com Mises en garde Mises en garde Les mises en gardes suivantes sont des mises en garde de sécurité relatives à la configuration, l’utilisation, la mise à la terre, l’entretien et la réparation de ce matériel. D’autres mises en garde plus spécifiques figurent dans ce manuel aux endroits concernés.
- Page 5 (fiche MSDS) aux produits à votre distributeur ou revendeur de produit. • Vérifier le matériel quotidiennement. Réparer ou remplacer immédiatement toutes les pièces usées ou endommagées uniquement par des pièces d’origine Graco. • Ne pas modifier cet équipement.
- Page 6 All manuals and user guides at all-guides.com Advertencias Advertencias A continuación se ofrecen advertencias en general relacionadas con la seguridad de la puesta en marcha, utilización, conexión a tierra, mantenimiento y reparación de este equipo. Además, puede encontrar advertencias adicionales a lo largo de este manual siempre que sea pertinente.
- Page 7 MSDS a su distribuidor o detallista. • Revise el equipo a diario. Repare o cambie inmediatamente las piezas desgastadas o dañadas únicamente con piezas de repuesto originales de Graco. • No altere ni modifique el equipo.
- Page 8 All manuals and user guides at all-guides.com Waarschuwingen Waarschuwingen Hieronder staan algemene waarschuwingen die te maken hebben met de installatie, gebruik, aarding, onderhoud en reparatie van deze apparatuur. Daarnaast zijn er meer specifieke waarschuwingen te vinden in de lopende tekst van deze handleiding, waar van toepassing.
- Page 9 • Geen veranderingen of wijzigingen in de apparatuur aanbrengen. • De apparatuur alleen voor het beoogde doel gebruiken. Neem contact op met uw Graco-leverancier voor meer informatie. • Houd slangen en kabels uit de buurt van plaatsen waar gereden wordt, scherpe randen, bewegende onderdelen en hete oppervlakken.
- Page 10 All manuals and user guides at all-guides.com Warnhinweise Warnhinweise Es folgen allgemeine Warnhinweise zu Einstellung, Bedienung, Erdung, Wartung und Reparatur des Produkts. Weitere, detailliertere Hinweise befinden sich an den entsprechenden Stellen überall in dieser Anleitung. Die in der Anleitung verwendeten Symbole beziehen sich auf diese allgemeinen Warnhinweise. Wenn Sie in der Anleitung auf diese Symbole stoßen, können Sie auf diesen Seiten eine Beschreibung des jeweiligen Risikos finden.
- Page 11 Zum Austausch nur original Graco-Ersatzteile verwenden. • Das Gerät nicht verändern oder modifizieren. • Das Gerät nur für den vorgesehenen Zweck verwenden. Bei Fragen dazu den Graco-Händler kontaktieren. • Schläuche und Kabel nicht in der Nähe von belebten Bereichen, scharfen Kanten, beweglichen Teilen oder heißen Flächen verlegen.
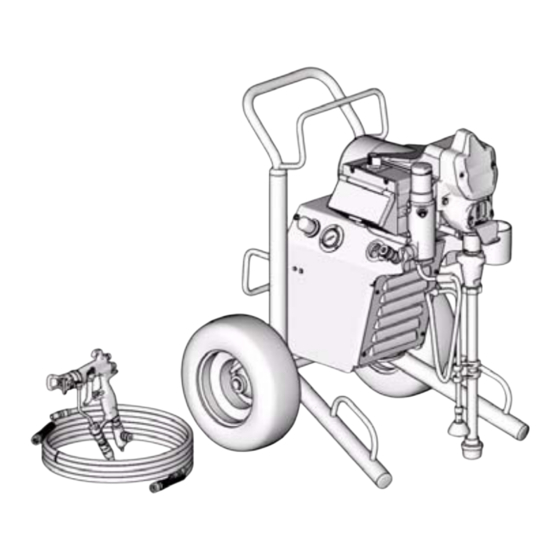
- Page 12 All manuals and user guides at all-guides.com Component Identification / Identification des composants / Identificación de los componentes / De onderdelen / Komponentenbezeichnung Component Identification / Identification des composants / Identificación de los componentes / De onderdelen / Komponentenbezeichnung FinishPro 395 ti9021 English Français...
- Page 13 All manuals and user guides at all-guides.com Grounding / Mise à la terre / Conexión a tierra / Aarding / Erdung Grounding / Mise à la terre / Conexión a tierra / Aarding / Erdung ti2810a English The sprayer must be grounded. The sprayer cord includes The plug must be plugged Grounding reduces the risk of...
- Page 14 All manuals and user guides at all-guides.com Grounding / Mise à la terre / Conexión a tierra / Aarding / Erdung Ground Ground ti4297a ti4295a English • Do not modify plug! If it will Power Requirements Extension Cords If an extension cord is not fit in outlet, have grounded •...
- Page 15 All manuals and user guides at all-guides.com Grounding / Mise à la terre / Conexión a tierra / Aarding / Erdung ti5850a ti5851a English Pails • Do not place pail on • Grounding a metal pail: • To maintain grounding •...
- Page 16 All manuals and user guides at all-guides.com Pressure Relief Procedure / Procédure de décompression / Procedimiento de descompresión / Drukontlastingsprocedure / Druckentlastung Pressure Relief Procedure / Procédure de décompression / Procedimiento de descompresión / Drukontlastingsprocedure / Druckentlastung ti13272a ti13275a ti9346a English: To reduce risk of injury Set function selection switch Hold gun to side of grounded,...
- Page 17 All manuals and user guides at all-guides.com Startup / Démarrage / Puesta en marcha / Opstarten / Inbetriebnahme Startup / Démarrage / Puesta en marcha / Opstarten / Inbetriebnahme ti9023 ti13325a ti9024 English Connect hoses to sprayer Connect Gun to hoses Attach first hose wrap two to three feet from front Attach air hose to sprayer air fitting and fluid hose to fluid fitting.
- Page 18 All manuals and user guides at all-guides.com Startup / Démarrage / Puesta en marcha / Opstarten / Inbetriebnahme ti13319a ti13361a ti13317a ti13318a English Attach additional wraps at Cut air hose to length and For Air-Assisted spraying, Attach fluid hose. two to three foot intervals. couple to air connection first connect air hose on air/fluid supply hose.
- Page 19 All manuals and user guides at all-guides.com Startup / Démarrage / Puesta en marcha / Opstarten / Inbetriebnahme ti9446a ti13320a English Install hose T-clips on flex If air cap is installed Remove and check inlet coil air hose and paint on gun, remove it.
- Page 20 All manuals and user guides at all-guides.com Startup / Mise en service / Puesta en marcha / Opstarten / Inbetriebnahme Startup / Mise en service / Puesta en marcha / Opstarten / Inbetriebnahme Priming/Flushing / Amorçage/Rinçage / Cebado/Lavado / Voorspuiten/spoelen / Entlüften/Spülen ti6581a ti13272a WASTE...
- Page 21 All manuals and user guides at all-guides.com Startup / Mise en service / Puesta en marcha / Opstarten / Inbetriebnahme ti9345a ti13273a ti10353a ti12878a ti13276a ti12879a English Turn fluid pressure all Set function selection Increase pressure to start Turn prime valve the way down.
- Page 22 All manuals and user guides at all-guides.com Startup / Mise en service / Puesta en marcha / Opstarten / Inbetriebnahme ti13324a ti10352a English 11 Hold gun against grounded Inspect for leaks. Do not stop leaks 12 Place siphon tube in paint 14 Lock gun trigger safety.
- Page 23 All manuals and user guides at all-guides.com RAC Tip and Air Cap Assembly / Assemblage de la buse RAC et du chapeau d’air / Conjunto de boquilla RAC y cabezal de aire / De RAC Tip en de luchtkap in elkaar zetten / Montage von RAC-Düse und Luftkappe RAC Tip and Air Cap Assembly / Assemblage de la buse RAC et du chapeau d’air / Conjunto de boquilla RAC y cabezal de aire /...
- Page 24 All manuals and user guides at all-guides.com Spraying / Pulvérisation / Pulverización / Spuiten / Spritzen Spraying / Pulvérisation / Pulverización / Spuiten / Spritzen Air-Assisted Spraying / Pulvérisation à commande pneumatique / Pulverización asistida por aire / Air-assisted spuiten / Luftunterstütztes Spritzen ti12879a ti12878a...
- Page 25 All manuals and user guides at all-guides.com Spraying / Pulvérisation / Pulverización / Spuiten / Spritzen ti12854a ti13274a ti13316a ti13281a English Increase air pressure Set function selection Trigger gun. Adjust gun air Use gun on/off valve to eliminate tails. switch to AA (Air-Assisted) adjustment valve until tails to save setting of air for sprayers that have...
- Page 26 All manuals and user guides at all-guides.com Spraying / Pulvérisation / Pulverización / Spuiten / Spritzen Airless Spraying / Pulvérisation Airless (sans air comprimé) / Pulverización sin aire / Airless spuiten / Airless-Spritzen ti13273a ti12879a English Set function selection switch Start with pressure turned to its lowest setting.
- Page 27 All manuals and user guides at all-guides.com Spraying / Pulvérisation / Pulverización / Spuiten / Spritzen Clearing a Clogged Tip / Débouchage d’une buse obstruée / Desobstrucción de una boquilla obstruida / Een verstopping uit de spuittip verwijderen / Reinigung einer verstopften Spritzdüse ti103521a ti13033a ti13034a...
- Page 28 All manuals and user guides at all-guides.com Cleanup / Nettoyage / Limpieza / Reinigen / Reinigung Cleanup / Nettoyage / Limpieza / Reinigen / Reinigung ti10352a ti13272a ti12879a ti13320a ti9346a ti13275a English Set function selection Turn pressure to lowest Lock trigger safety. Remove tip and air cap switch to OFF.
- Page 29 All manuals and user guides at all-guides.com Cleanup / Nettoyage / Limpieza / Reinigen / Reinigung ti13322a ti10353a ti13273a WASTE ti2756B FLUSH ti2756b ti12878a ti10352a ti9345a English Remove siphon tube set Plug in sprayer. 10 Hold gun against paint pail. 13 Move gun to flushing pail, from paint and place in hold gun against pail,...
- Page 30 All manuals and user guides at all-guides.com Cleanup / Nettoyage / Limpieza / Reinigen / Reinigung ti9345a ti13274a ti9346a ti12878a ti10353a English 14 While continuing to trigger 15 Raise siphon tube 16 Close drain valve. 18 Set function selection gun, turn prime valve above flushing fluid switch to AA (Air-Assisted).
- Page 31 All manuals and user guides at all-guides.com Cleanup / Nettoyage / Limpieza / Reinigen / Reinigung ti13275a ti13272a ti9346a ti13372a ti10352a English 20 Set function selection 22 Open prime valve. 23 Remove filter from gun. 25 If flushing with water, flush switch to OFF.
- Page 32 All manuals and user guides at all-guides.com Technical Data Technical Data FinishPro 390 Models FinishPro 395 Models ★100/120V AC, 50/60 hz, 15A, 1 phase ★100/120V AC, 50/60 hz, 15A, 1 phase Power requirements ◆230 V AC, 50/60 hz, 10A, 1 phase ◆230V AC, 50/60 hz, 10A, 1 phase Max tip size US★...
- Page 33 All manuals and user guides at all-guides.com Caractéristiques techniques Caractéristiques techniques Modèles FinishPro 390 Modèles FinishPro 395 ★100/120 V c.a., 50/60 Hz, 15A, 1 phase ★100/120 V c.a., 50/60 Hz, 15A, 1 phase Alimentation électrique ◆230 V c.a., 50/60 Hz, 10A, 1 phase ◆230 V c.a., 50/60 Hz, 10A, 1 phase Dimension max.
- Page 34 All manuals and user guides at all-guides.com Características técnicas Características técnicas Modelos FinishPro 390 Modelos FinishPro 395 ★100/120V CA, 50/60 hz, 15A, monofásico ★100/120V CA, 50/60 hz, 15A, monofásico Requisitos eléctricos ◆230V CA, 50/60 hz, 10A, monofásico ◆230V CA, 50/60 hz, 10A, monofásico Tamaño máximo de la boquilla EE.UU.★...
- Page 35 All manuals and user guides at all-guides.com Technische gegevens Technische gegevens FinishPro 390 modellen FinishPro 395 modellen ★100/120V AC, 50/60 Hz, 15A, 1 fase ★100/120V AC, 50/60 Hz, 15A, 1 fase Stroomvereisten ◆230 V AC, 50/60 Hz, 10A, 1 fase ◆230 V AC, 50/60 Hz, 10A, 1 fase Max.
- Page 36 All manuals and user guides at all-guides.com Technische Daten Technische Daten Modelle FinishPro 390 Modelle FinishPro 395 ★100/120 VAC, 50/60 Hz, 15A, 1-phasig ★100/120 VAC, 50/60 Hz, 15A, 1-phasig Spannungsversorgung ◆230 VAC, 50/60 Hz, 10A, 1-phasig ◆230 VAC, 50/60 Hz, 10A, 1-phasig Max.
- Page 37 All manuals and user guides at all-guides.com Notes / Remarques / Notas / Aantekeningen / Notizen Notes / Remarques / Notas / Aantekeningen / Notizen 313316A...
- Page 38 With the exception of any special, extended, or limited warranty published by Graco, Graco will, for a period of twelve months from the date of sale, repair or replace any part of the equipment determined by Graco to be defective.