Thetford C260 Instructions D'installation
Masquer les pouces
Voir aussi pour C260:
- Instructions d'installation (84 pages) ,
- Instructions d'installation (46 pages)
Liens rapides
ELECTRIC VENTILATOR
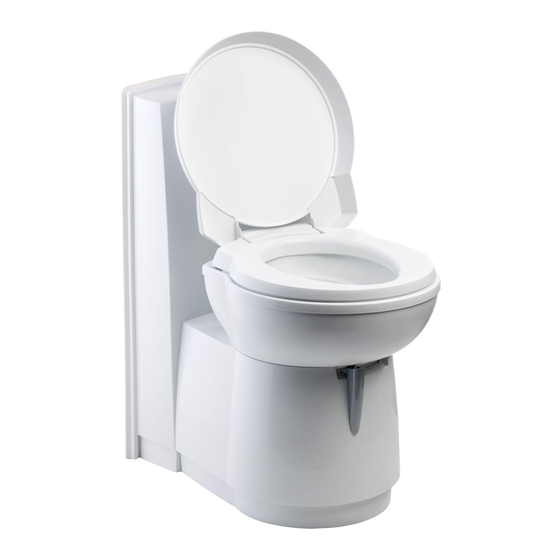
C260 Cassette Toilet
Installation instructions
GB
Instructions d'installation
FR
Einbauanleitung
DE
Installatie-instructies
NL
Instrucciones de instalación
ES
Istruzioni per l'installazione
IT
Instruções de instalação
PT
Installationsinstruktioner
SE
Installationsvejledning
DK
Installeringsinstrukser
NO
Asennusohjeet
FI
Navodila za namestitev
SI

Manuels Connexes pour Thetford C260


Sommaire des Matières pour Thetford C260
- Page 1 ELECTRIC VENTILATOR C260 Cassette Toilet Installation instructions Instructions d’installation Einbauanleitung Installatie-instructies Instrucciones de instalación Istruzioni per l’installazione Instruções de instalação Installationsinstruktioner Installationsvejledning Installeringsinstrukser Asennusohjeet Navodila za namestitev...
- Page 2 INDEX Introduction Installation instructions Introduction Instructions d’installation Einleitung Einbauanleitung Inleiding Installatie-instructies Introducción Instrucciones de instalación Introduzione Istruzioni per l’installazione Introdução Instruções de instalação Inledning Installationsinstruktioner Inledning Installationsvejledning Innledning Installeringsinstrukser Johdanto Asennusohjeet Uvod Navodila za namestitev...
- Page 3 Opmerkingen: Thetford raadt u aan deze de 85 mm • tournevis cruciforme n°2 • serres Eléctrico, también tenga presente sobre la Service Centre. Thetford is not liable for any loss câbles • lunettes de protection • protections Elektrische Ventilator door een officiële dealer posibilidad de realizar un orificio en el suelo.
- Page 4 Ventilatoren installeres av en offisiell forhandler Nödvändiga verktyg: elektrisk borr • 85 mm borr Eléctrico seja instalado por um revendedor eller på et servicesenter. Thetford er ikke ansvarlig UVOD oficial ou pelo Centro de Assistência. A Thetford • skruvmejsel - stjärnmejsel nr. 2 • buntband for eventuelle tap og/eller skader som er direkte não é...
- Page 5 Only applicable for Apenas aplicável para Applicable uniquement pour Gäller endast för Nur für Gælder kun for Enkel van toepassing op Kun aktuelt for Sólo aplica para Pätee vain seuraaviin Si applica solo per Velja samo za C26X - x XX x xx x 01 x and C26X - x XX x xx x 09 x Look on the serial label for the product code before installation.
- Page 6 Only applicable for Apenas aplicável para Only applicable for Apenas aplicável para Applicable uniquement pour Gäller endast för Applicable uniquement pour Gäller endast för Nur für Gælder kun for Nur für Gælder kun for Enkel van toepassing op Kun aktuelt for Enkel van toepassing op Kun aktuelt for Sólo aplica para...
- Page 7 Only applicable for Apenas aplicável para Only applicable for Apenas aplicável para Applicable uniquement pour Gäller endast för Applicable uniquement pour Gäller endast för Nur für Gælder kun for Nur für Gælder kun for Enkel van toepassing op Kun aktuelt for Enkel van toepassing op Kun aktuelt for Sólo aplica para...
- Page 8 Not applicable for Não aplicável para Non applicable à Gäller ej för Nicht für Ikke gældende for Niet van toepassing op Ikke aktuelt for No aplica para Ei päde seuraaviin Non si applica per Ne velja za C262 - x 19 x xx x XX x Unscrew the hose clamp and disconnect the water supply tube Disconnect the main connector.
- Page 9 Remove the covering plate Unscrew the toilet from the floor. Lift the toilet up and remove it from the bathroom. Retirez la trappe d’accès Dévissez la toilette plancher. Levez la toilette et retirez-la de la salle de bain. Entfernen Sie die Abdeckplatte Schrauben Sie die Toilette vom Boden ab.
- Page 10 Not applicable for Não aplicável para Non applicable à Gäller ej för Nicht für Ikke gældende for Niet van toepassing op Ikke aktuelt for No aplica para Ei päde seuraaviin Non si applica per Ne velja za C26X - x XX x xx x 09 x and C26X - x XX x xx x 10 x Unscrew the side cover Make two holes by removing the indicated material Dévissez le cache latéral...
- Page 11 Not applicable for Não aplicável para Not applicable for Não aplicável para Non applicable à Gäller ej för Non applicable à Gäller ej för Nicht für Ikke gældende for Nicht für Ikke gældende for Niet van toepassing op Ikke aktuelt for Niet van toepassing op Ikke aktuelt for No aplica para...
- Page 12 Not applicable for Não aplicável para Non applicable à Gäller ej för Nicht für Ikke gældende for Niet van toepassing op Ikke aktuelt for No aplica para Ei päde seuraaviin Non si applica per Ne velja za C26X - x XX x xx x 09 x and C26X - x XX x xx x 10 x Place the adaptor and screw it to the floor •...
- Page 13 Not applicable for Não aplicável para Non applicable à Gäller ej för Nicht für Ikke gældende for Niet van toepassing op Ikke aktuelt for No aplica para Ei päde seuraaviin Non si applica per Ne velja za C26X - x XX x xx x 09 x and C26X - x XX x xx x 10 x Fix the ventilator in place using the foam Fit the large seal at the bottom Verify that the ventilator is facing as per the specified positioning...
- Page 14 Only applicable for Apenas aplicável para Applicable uniquement pour Gäller endast för Nur für Gælder kun for Enkel van toepassing op Kun aktuelt for Sólo aplica para Pätee vain seuraaviin Si applica solo per Velja samo za C263 - x 20 x xx x XX x Put the toilet back into position.
- Page 15 Only applicable for Apenas aplicável para Applicable uniquement pour Gäller endast för Nur für Gælder kun for Enkel van toepassing op Kun aktuelt for Sólo aplica para Pätee vain seuraaviin Si applica solo per Velja samo za C26X - x XX x xx x 01 x and C26X - x XX x xx x 09 x Lift the control panel Replace the current printed circuit board with the new one.
- Page 16 Route the wiring to the printed circuit board via the existing wiring. Use tie wraps to secure. Connect the ventilator connector onto the printed circuit board • Replace the control panel into the housing Acheminez le câblage jusqu'au circuit imprimé via le câblage existant. Connectez le connecteur du ventilateur sur le circuit imprimé...
- Page 17 Not applicable for Não aplicável para Non applicable à Gäller ej för Nicht für Ikke gældende for Niet van toepassing op Ikke aktuelt for No aplica para Ei päde seuraaviin Non si applica per Ne velja za C263 - x 20 x xx x XX x Reconnect the main connector •...
- Page 18 Place the new sticker on top of the control panel Stick the seal onto the plate • Place the filter box in position first and then the plate on top Collez le nouvel autocollant sur le panneau de commande Apposez le joint sur la trappe d’accès • Placez tout d'abord le filtre puis la trappe sur le dessus Bringen Sie den neuen Aufkleber auf dem Bedienfeld an Kleben Sie die Dichtung auf die Platte •...
- Page 19 Not applicable for Não aplicável para Non applicable à Gäller ej för Nicht für Ikke gældende for Niet van toepassing op Ikke aktuelt for No aplica para Ei päde seuraaviin Non si applica per Ne velja za C262 - x 19 x xx x XX x Reconnect the water tube and secure together with the hose clamp Screw the toilet back to the floor and wall and replace the waste-holding tank.
- Page 20 NOTES...
-
Page 21: Installation Instructions
Installation instructions Instructions d’installation Einbauanleitung Installatie-instructies Instrucciones de instalación Istruzioni per l’installazione Instruções de instalação Installationsinstruktioner Installationsvejledning Installeringsinstrukser Asennusohjeet Navodila za namestitev Thetford is not responsible for printing errors and reserves the right to make changes to product specifications without notice. - Page 22 E infof@thetford.eu SCANDINAVIA ITALY SPAIN AND PORTUGAL AUSTRALIA Thetford Italy Mercè Grau Solà Thetford B.V. Thetford Australia Pty. Ltd. Representative Office Scandinavia c/o Tecma s.r.l. Agente para España y Portugal 41 Lara Way Hönekullavägen 13 Via Flaminia C/Libertat Campbellfield VIC 3061 43544 Mölnlycke...