Beurer BM 27 Mode D'emploi
Masquer les pouces Voir aussi pour BM 27:
Table des Matières

Publicité

Les langues disponibles
  • FR

Les langues disponibles

  • FRANÇAIS, page 36

Liens rapides

All manuals and user guides at all-guides.com
DE Oberarm-Blutdruckmessgerät
Gebrauchsanweisung .............................................. 2
EN Upper arm blood pressure monitor
Instructions for use ................................................ 17
FR Tensiomètre à bras
Mode d'emploi ...................................................... 30
ES Tensiómetro para brazo
Manual de instrucciones ....................................... 44
IT Misuratore di pressione da braccio
Istruzioni per l'uso ................................................. 59
TR Üst kol tansiyon ölçme cihazı
Kullanım kılavuzu ................................................... 73
RU Прибор для измерения кровяного давления
в плечевой артерии
Инструкция по применению ............................... 86
PL Ciśnieniomierz na przedramię
Instrukcja obsługi ................................................ 101
BM 27

Publicité

Table des Matières
loading

Sommaire des Matières pour Beurer BM 27

  • Page 1 All manuals and user guides at all-guides.com BM 27 DE Oberarm-Blutdruckmessgerät Gebrauchsanweisung ..........2 EN Upper arm blood pressure monitor Instructions for use ..........17 FR Tensiomètre à bras Mode d’emploi ............30 ES Tensiómetro para brazo Manual de instrucciones ........44 IT Misuratore di pressione da braccio Istruzioni per l’uso ..........
  • Page 2 all-guide s.com...
  • Page 3: Table Des Matières

    7. Messwerte speichern, abrufen und löschen ....13 Hinweise. 8. Fehlermeldung/Fehlerbehebung ........13 Mit freundlicher Empfehlung 9. Gerät und Manschette reinigen und aufbewahren ..13 Ihr Beurer-Team 10. Technische Angaben ........... 14 1. Kennenlernen 11. Ersatz- und Verschleißteile .......... 15 12. Garantie / Service ............15 Überprüfen Sie das Gerät auf äußere Unversehrtheit der...
  • Page 4: Wichtige Hinweise

    Das Oberarm-Blutdruckmessgerät dient zur nichtinvasiven All manuals and user guides at all-guides.com Anwendungsteil Typ BF Messung und Überwachung arterieller Blutdruckwerte von erwachsenen Menschen. Sie können damit schnell und einfach Ihren Blutdruck mes- Gleichstrom sen, die Messwerte abspeichern und sich den Verlauf und Entsorgung gemäß...
  • Page 5 Entscheidungen (z.B. Medikamente und deren Dosierun- All manuals and user guides at all-guides.com Die CE-Kennzeichnung bescheinigt die gen)! Konformität mit den grundlegenden An- • Eine Verwendung des Blutdruckmessgeräts außerhalb forderungen der Richtlinie 93/42/EEC für des häuslichen Umfelds oder unter dem Einfluss von Be- Medizinprodukte.
  • Page 6 • Das Blutdruckmessgerät darf nicht im Zusammenhang mit • Legen Sie die Manschette ausschließlich am Oberarm an. All manuals and user guides at all-guides.com einem Hochfrequenz-Chirurgiegerät verwendet werden. Legen Sie die Manschette nicht an anderen Stellen des • Verwenden Sie das Gerät nur bei Personen mit dem für Körpers an.
  • Page 7 – Verwenden Sie nur die mitgelieferte oder originale • Immer alle Batterien gleichzeitig auswechseln. All manuals and user guides at all-guides.com Ersatz-Manschetten. Ansonsten werden falsche Mess- • Keine Akkus verwenden! werte ermittelt. • Keine Batterien zerlegen, öffnen oder zerkleinern. • Falls das Gerät über einen längeren Zeitraum nicht be- Hinweise zu Reparatur und Entsorgung nutzt wird, wird empfohlen, die Batterien zu entfernen.
  • Page 8 all-guide s.com...
  • Page 9: Gerätebeschreibung

    3. Gerätebeschreibung All manuals and user guides at all-guides.com Hinweise zu Elektromagnetischer Verträglichkeit • Das Gerät ist für den Betrieb in allen Umgebungen geeig- net, die in dieser Gebrauchsanweisung aufgeführt sind, einschließlich der häuslichen Umgebung. • Das Gerät kann in der Gegenwart von elektromagneti- schen Störgrößen unter Umständen nur in eingeschränk- tem Maße nutzbar sein.
  • Page 10: Messung Vorbereiten

    4. Messung vorbereiten Anzeigen auf dem Display: All manuals and user guides at all-guides.com Batterie einlegen • Öffnen Sie den Deckel des Batterie- faches. • Legen Sie vier Batterien vom Typ 1,5V AA (Alkaline Type LR6) ein. Achten Sie unbedingt darauf, dass die Batterien entsprechend der Kennzeichnung mit korrekter Polung eingelegt werden.
  • Page 11: Blutdruck Messen

    5. Blutdruck messen entsorgen. Sie sind gesetzlich dazu verpflichtet, die Bat- All manuals and user guides at all-guides.com terien zu entsorgen. Bringen Sie das Gerät vor der Messung auf Raum tempera tur. • Diese Zeichen finden Sie auf schadstoffhaltigen Sie können die Messung am linken oder rechten Arm durch- Batterien: führen.
  • Page 12 Stecken Sie nun den Manschetten- Richtige Körperhaltung einnehmen All manuals and user guides at all-guides.com schlauch in den Anschluss für den Manschettenstecker. Diese Manschette ist für Sie geeignet, wenn nach Anlegen der • Ruhen Sie sich vor jeder Messung ca. 5 Minuten aus! Manschette die Index-Markierung Ansonsten kann es zu Abweichungen kommen.
  • Page 13: Ergebnisse Beurteilen

    bereits zu erkennenden Tendenz zu hohem Blutdruck All manuals and user guides at all-guides.com • Zum Abschalten drücken Sie die START/STOPP-Taste wird nochmals nachgepumpt und der Manschetten druck Wenn Sie vergessen das Gerät auszuschalten, schaltet nochmals erhöht. Sobald ein Puls zu erkennen ist, wird sich das Gerät nach ca.
  • Page 14 all-guide s.com...
  • Page 15 gefährlich sein. Befolgen Sie unbedingt die Anweisungen All manuals and user guides at all-guides.com Bereich der Systole Diastole Maßnahme Ihres Arztes. Blutdruckwerte (in mmHg) (in mmHg) Stufe 3: Risiko-Indikator: einen Arzt auf- starke ≥ 180 ≥ 110 Die Messergebnisse lassen sich gemäß nachfolgender Ta- suchen Hypertonie belle einstufen und beurteilen.
  • Page 16: Messwerte Speichern, Abrufen Und Löschen

    7. Messwerte speichern, abrufen und 8. Fehlermeldung/Fehlerbehebung All manuals and user guides at all-guides.com löschen Bei Fehlern erscheint auf dem Display die Fehlermeldung _. Fehlermeldungen können auftreten, wenn Die Ergebnisse jeder erfolgreichen Messung werden zusam- • der Puls nicht korrekt erfasst werden konnte: men mit Datum und Uhrzeit abgespeichert.
  • Page 17: Technische Angaben

    10. Technische Angaben Zul. Aufbewah- -20 °C bis +55 °C, 10-90% relative rungsbedingungen Luftfeuchte, 800-1050 hPa Umge- Modell-Nr. BM 27 bungsdruck Messmethode Oszillometrisch, nicht invasive Blut- druckmessung am Oberarm Stromversorgung 4 x 1,5 V AA Batterien Batterie-Lebens- Für ca.
  • Page 18: Ersatz- Und Verschleißteile

    Service-Adresse angefragt werden. ist innerhalb eines Zeitraumes von 5 Jahren ab Kaufdatum 11. Ersatz- und Verschleißteile gegenüber der Beurer GmbH, Ulm (Germany) geltend zu machen. Sie können die Ersatz- und Verschleißteile über die jewei- lige Serviceadresse unter der angegeben Materialnummer erwerben.
  • Page 19 Service Hotline: All manuals and user guides at all-guides.com Tel.: +49 (0) 731 / 39 89-144 E-Mail: kd@beurer.de www.beurer.com Fordern wir Sie zur Übersendung des defekten Pro- duktes auf, ist das Produkt an folgende Adresse zu senden: Beurer GmbH Servicecenter Lessingstraße 10 b...
  • Page 20 all-guide s.com...
  • Page 21: Getting To Know Your Device

    7. Saving, displaying and deleting measured values ..27 With kind regards, 8. Error messages/troubleshooting ......... 27 Your Beurer team 9. Cleaning and storing the device and cuff ....27 1. Getting to know your device 10. Technical specifications ..........28 Check that the device packaging has not been tampered 11.
  • Page 22: Important Notes

    This allows you to quickly and easily measure your blood All manuals and user guides at all-guides.com Disposal in accordance with the Waste pressure, save the measured values and display the devel- Electrical and Electronic Equipment EC opment and average values of the measured values taken. Directive –...
  • Page 23 • Do not use the blood pressure monitor on newborns or All manuals and user guides at all-guides.com Certification symbol for products that are patients with pre-eclampsia. We recommend consulting exported to the Russian Federation and a doctor before using the blood pressure monitor during members of the CIS pregnancy.
  • Page 24 • Avoid any mechanical restriction, compression or bending All manuals and user guides at all-guides.com Instructions for storage and maintenance of the cuff line. • The blood pressure monitor is made from precision and • Do not allow sustained pressure in the cuff or frequent electronic components.
  • Page 25 • If a battery has leaked, put on protective gloves and clean please contact the local authorities responsible for waste All manuals and user guides at all-guides.com the battery compartment with a dry cloth. disposal. • Protect batteries from excessive heat. Notes on electromagnetic compatibility •...
  • Page 26 all-guide s.com...
  • Page 27: Device Description

    3. Device description Information on the display: All manuals and user guides at all-guides.com 1. Time and date 1. Cuff 2. Systolic pressure 2. Cuff line 3. Diastolic pressure 3. Cuff connector 4. Calculated pulse value 4. Display 5. Cardiac arrhythmia symbol 5.
  • Page 28: Preparing The Measurement

    4. Preparing the measurement • The codes below are printed on batteries All manuals and user guides at all-guides.com containing harmful substances: Inserting the batteries Pb = Battery contains lead, • Open the battery compartment lid. Cd = Battery contains cadmium, •...
  • Page 29: Measuring Blood Pressure

    5. Measuring blood pressure This cuff is suitable for you if the All manuals and user guides at all-guides.com index mark ( ) is within the OK Ensure the device is at room temperature before measuring. range after fitting the cuff on the The measurement can be performed on the left or right arm.
  • Page 30 Adopting the correct posture increase the cuff’s pressure again. As soon as a pulse is All manuals and user guides at all-guides.com found, the pulse symbol will be displayed. • The cuff position control symbol is displayed throughout the entire measurement. If the cuff is ap- plied too tightly or too loosely, then and “...
  • Page 31: Evaluating Results

    6. Evaluating results It is important to consult your doctor regularly for advice. All manuals and user guides at all-guides.com Your doctor will tell you your individual values for normal Cardiac arrhythmia: blood pressure as well as the value above which your blood This device can identify potential disruptions of the heart pressure is classified as dangerous.
  • Page 32 all-guide s.com...
  • Page 33: Saving, Displaying And Deleting Measured Values

    7. Saving, displaying and deleting measured 8. Error messages/troubleshooting All manuals and user guides at all-guides.com values In the event of errors, the error message _ appears on the screen. Error messages may appear if: The results of every successful measurement are stored •...
  • Page 34: Technical Specifications

    All manuals and user guides at all-guides.com Permissible sto- -20°C to +55°C, 10-90% relative humi- rage conditions dity, 800-1050 hPa ambient pressure Model No. BM 27 Power supply 4 x 1.5 V AA batteries Measurement Oscillometric, non-invasive blood pres- method...
  • Page 35: Replacement Parts And Wearing Parts

    All manuals and user guides at all-guides.com and IEC80601-2-30 (Medical electrical equipment – Part 1. The warranty period for BEURER products is either 2 – 30: Particular requirements for the basic safety and 5 years or- if longer- the country specific warranty period essential performance of automated non-invasive sphyg- from date of Purchase.
  • Page 36: Présentation

    8. Message d’erreur/Résolution des erreurs ....41 Sincères salutations, 9. Nettoyage et rangement de l’appareil et de la manchette ...41 Votre équipe Beurer 10. Caractéristiques techniques ........41 11. Pièces de rechange et consommables ....... 43 1. Présentation 12.
  • Page 37: Conseils Importants

    Il vous permet de mesurer votre tension rapidement et faci- All manuals and user guides at all-guides.com Courant continu lement, d’enregistrer les valeurs et d’afficher l’évolution et la moyenne de ces valeurs. Élimination conformément à la directive Vous êtes averti en cas d’éventuels troubles du rythme européenne WEEE (Waste Electrical and cardiaque.
  • Page 38 all-guide s.com...
  • Page 39 dical sur la base de ces seules mesures (par ex. le choix All manuals and user guides at all-guides.com Le sigle CE atteste de la conformité aux de médicaments et de leurs dosages) ! exigences fondamentales de la directive • L’utilisation du tensiomètre en dehors de l’environnement 93/42/EEC relative aux dispositifs médi- domestique ou sous l’influence de mouvements (par ex.
  • Page 40 • Le tensiomètre ne doit pas être utilisé parallèlement à un • L’arrêt automatique permet de faire passer le tensiomètre All manuals and user guides at all-guides.com appareil chirurgical haute fréquence. en mode économie d’énergie lorsqu’aucune touche n’est • Utilisez uniquement l’appareil sur des personnes dont le manipulée pendant un délai de 30 secondes.
  • Page 41 All manuals and user guides at all-guides.com Consignes de réparation et d’élimination Remarques relatives aux piles • Les piles ne doivent pas être jetées avec les ordures mé- • Si du liquide de la cellule de pile entre en contact avec la nagères.
  • Page 42: Description De L'appareil

    3. Description de l’appareil All manuals and user guides at all-guides.com Informations sur la compatibilité électromagnétique • L’appareil est prévu pour fonctionner dans tous les envi- ronnements indiqués dans ce mode d’emploi, y compris dans un environnement domestique. • En présence d’interférences électromagnétiques, vous risquez de ne pas pouvoir utiliser toutes les fonctions de l’appareil.
  • Page 43: Préparer La Mesure

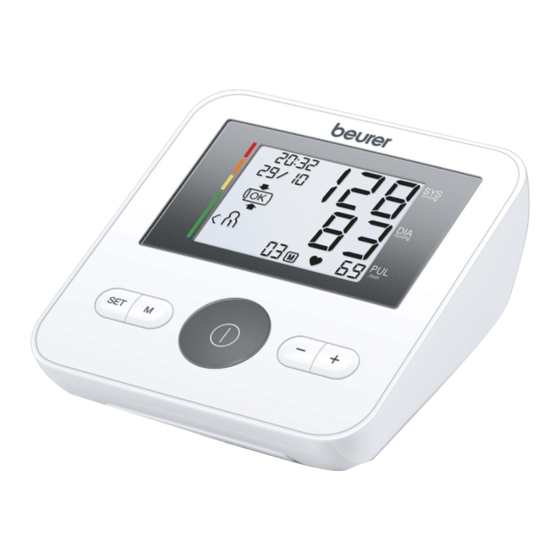
    4. Préparer la mesure Données affichées à l’écran : All manuals and user guides at all-guides.com Insertion des piles • Ouvrez le couvercle du comparti- ment à piles. • Insérez quatre piles de type 1,5 V AA (type alcaline LR6). Veillez im- pérativement à...
  • Page 44 all-guide s.com...
  • Page 45: Mesurer La Tension

    5. Mesurer la tension chez un revendeur d’appareils électriques. L’élimination All manuals and user guides at all-guides.com des piles est une obligation légale qui vous incombe. Avant la mesure, placez l’appareil à température ambiante. • Ces pictogrammes se trouvent sur les piles à Vous pouvez effectuer la mesure sur le bras gauche ou droit.
  • Page 46 Insérez maintenant le tuyau de la Adopter une position adéquate All manuals and user guides at all-guides.com manchette dans la prise de raccord de la manchette. Cette manchette vous convient si le marquage de l’index ( ) se • Avant toute mesure, reposez-vous pendant environ 5 mi- trouve dans la zone OK après la nutes ! Sinon, cela pourrait entraîner des erreurs.
  • Page 47: Évaluer Les Résultats

    de tendance connue à une tension élevée, gonflez de nou- Attendez au moins 5 minutes avant d’effectuer une nouvelle All manuals and user guides at all-guides.com veau la manchette pour augmenter la pression. Dès qu’un mesure ! pouls est reconnaissable, le symbole Pouls s’affiche.
  • Page 48: Enregistrer, Récupérer Et Supprimer Les Valeurs De Mesure

    Indicateur de risque : All manuals and user guides at all-guides.com Plage des va- Systole Diastole Mesures Les résultats de mesure sont classés et évalués selon le leurs de tension (en mmHg) (en mmHg) tableau suivant. Niveau 1 : examen régulier 140 – 159 90 –...
  • Page 49: Message D'erreur/Résolution Des Erreurs

     ; 10. Caractéristiques techniques • la mesure n’a pas pu être prise :  ; N° du modèle BM 27 • la manchette est trop ou pas assez serrée :  ; • des problèmes surviennent au moment de la mesure :  ; Mode de mesure Mesure de la tension artérielle au...
  • Page 50 all-guide s.com...
  • Page 51 All manuals and user guides at all-guides.com Précision de systolique ±3 mmHg Durée de vie de la Environ 300 mesures, selon l’indicateur diastolique ±3 mmHg batterie l’élévation de la tension artérielle pouls ±5 % de la valeur affichée ainsi que la pression de gonflage Incertitude de écart type max.
  • Page 52: Pièces De Rechange Et Consommables

    Les conditions de garantie suivantes s’appliquent : et sa durabilité a été conçue en vue d’une utilisation à 1. La période de garantie des produits BEURER est de long terme. Dans le cadre d’une utilisation médicale de 5 ans ou, si elle est plus longue, elle est applicable dans l’appareil, des contrôles techniques de mesure doivent...
  • Page 53 7. Almacenamiento, consulta y borrado de los valores medidos ............... 54 Atentamente, 8. Mensajes de error/Solución de problemas....55 El equipo de Beurer 9. Limpiar y guardar la unidad y el brazalete ....55 1. Introducción 10. Datos técnicos ............. 56 Compruebe que el envoltorio del aparato esté...
  • Page 54: Indicaciones Importantes

    Con él puede medirse la presión arterial de forma rápida y All manuals and user guides at all-guides.com Eliminación según la Directiva europea sencilla, guardar los valores de la medición en la memoria sobre residuos de aparatos eléctricos y y consultar la evolución y el promedio de los valores medidos. electrónicos - WEEE (Waste Electrical and Además, advierte de eventuales alteraciones del ritmo Electronic Equipment)
  • Page 55 ej. deporte) puede verse afectada la precisión de medida All manuals and user guides at all-guides.com Símbolo de certificación para aquellos y ocasionar errores de medición. productos que se exportan a la Federación • No utilice el tensiómetro en recién nacidos o pacientes Rusa y a los países de la CEI con preeclampsia.
  • Page 56 all-guide s.com...
  • Page 57 • La medición de la presión arterial no debe interrumpir la declinará toda responsabilidad por daños y perjuicios All manuals and user guides at all-guides.com circulación sanguínea más tiempo del necesario. En caso debidos a un uso inadecuado o incorrecto. de que el aparato no funcione correctamente, retire el Indicaciones de conservación y cuidado brazalete del brazo.
  • Page 58 • No repare ni ajuste el aparato usted mismo. Si lo hace, no All manuals and user guides at all-guides.com • ¡Peligro de asfixia! Los niños pequeños podrían se garantiza un funcionamiento correcto del mismo. tragarse las pilas y asfixiarse. Guarde las pilas fuera del •...
  • Page 59: Descripción Del Aparato

    3. Descripción del aparato provocar un funcionamiento incorrecto. Pero si resulta in- All manuals and user guides at all-guides.com evitable hacerlo, deberá vigilar este y los demás aparatos hasta estar seguro de que funcionan correctamente. • El uso de accesorios que no sean los indicados o facilita- dos por el fabricante de este aparato puede tener como consecuencia mayores interferencias electromagnéticas o una menor resistencia contra interferencias electromag-...
  • Page 60: Preparar La Medición

    4. Preparar la medición Indicaciones en la pantalla: All manuals and user guides at all-guides.com Colocar las pilas • Abra la tapa del compartimento de las pilas. • Coloque cuatro pilas de tipo 1,5 V AA (alcalinas tipo LR6). Compruebe que las pilas se hayan colocado según la polaridad indicada.
  • Page 61: Medición De La Presión Arterial

    5. Medición de la presión arterial equipos electrónicos. Los usuarios están obligados por All manuals and user guides at all-guides.com ley a eliminar las pilas correctamente. Asegúrese de que el aparato está a temperatura ambiente • Estos símbolos se encuentran en pilas que antes de realizar la medición.
  • Page 62 all-guide s.com...
  • Page 63 Introduzca el tubo flexible del Adopción de una postura correcta All manuals and user guides at all-guides.com brazalete en la toma para el conector del mismo. Este brazalete será apropiado para usted si tras colocarlo la marca de • Repose unos 5 minutos antes de cada medición. De lo índice ( ) se encuentra en el área contrario, podrían producirse variaciones.
  • Page 64: Evaluación De Los Resultados

    6. Evaluación de los resultados y aumenta de nuevo la presión del brazalete. En cuanto All manuals and user guides at all-guides.com se detecta el pulso, se muestra el símbolo de pulso Alteraciones del ritmo cardiaco: • Durante toda la medición se visualiza el símbolo del Este aparato es capaz de reconocer eventuales alteraciones control de posición del brazalete .
  • Page 65: Almacenamiento, Consulta Y Borrado De Los Valores Medidos

    Estos valores estándar sirven únicamente como referencia, All manuals and user guides at all-guides.com Rango de los Sístole Diástole dado que la presión arterial individual varía según la perso- valores de la Medida (en mmHg) na y el grupo de edad. presión arterial mmHg) Es importante que consulte periódicamente a su médico,...
  • Page 66: Mensajes De Error/Solución De Problemas

    8. Mensajes de error/Solución de problemas • Pulse la tecla de memorización M. Seleccione el registro All manuals and user guides at all-guides.com de usuario que desee ( ) volviendo a pulsar la tecla En caso de error, aparece en la pantalla el mensaje de error de memorización M.
  • Page 67: Datos Técnicos

    Condiciones de +10 °C hasta +40 °C, 10 hasta 85% 10. Datos técnicos funcionamiento de humedad relativa del aire (sin N.º de modelo BM 27 admisibles condensación) Método de me- Oscilométrico, medición no invasiva Condiciones de -20 °C hasta +55 °C, 10-90 % de dición...
  • Page 68 all-guide s.com...
  • Page 69: Piezas De Repuesto Y De Desgaste

    Se aplican las siguientes condiciones de garantía: máticos no invasivos). 1. El periodo de garantía para productos de BEURER es de • La precisión de este tensiómetro ha sido comproba- 5 años o, si es superior, se aplica el periodo de garantía da exhaustivamente y se ha diseñado para lograr una...
  • Page 70 3. La garantía no tiene validez para daños debidos a All manuals and user guides at all-guides.com a. Uso indebido, p. ej. si no se siguen las instrucciones de uso. b. Reparaciones o cambios realizados por el cliente o por una persona no autorizada. c.
  • Page 71 7. Memorizzazione, ricerca e cancellazione dei valori Cordiali saluti misurati ................ 69 Il team Beurer 8. Messaggi di errore/Soluzioni ........69 1. Introduzione 9. Pulizia e conservazione dell’apparecchio e del Controllare l’integrità esterna della confezione e del con- manicotto ..............
  • Page 72: Indicazioni Importanti

    Segnala inoltre eventuali disturbi del ritmo cardiaco. All manuals and user guides at all-guides.com Smaltire la confezione nel rispetto dell‘am- I valori rilevati vengono classificati e valutati graficamente. biente 2. Indicazioni importanti Produttore Spiegazione dei simboli I seguenti simboli sono utilizzati nelle istruzioni per l‘uso, Storage/Transport Temperatura e umidità...
  • Page 73 sione di misurazione. Gli stessi problemi si possono veri- All manuals and user guides at all-guides.com Indicazioni per l’uso ficare in caso di pressione molto bassa, diabete, disturbi • Misurare la pressione sempre allo stesso orario della gior- della circolazione e del ritmo cardiaco nonché in presenza nata, affinché...
  • Page 74 all-guide s.com...
  • Page 75 causerebbero una riduzione del flusso sanguigno con il – Non esporre l’apparecchio a urti, umidità, sporcizia, forti All manuals and user guides at all-guides.com conseguente rischio di lesioni. sbalzi di temperatura e direttamente alla luce solare. • Accertarsi che il manicotto non venga applicato su brac- –...
  • Page 76 • Le batterie non devono essere ricaricate o mandate in All manuals and user guides at all-guides.com Avvertenze sulla compatibilità elettromagnetica cortocircuito. • L’apparecchio è idoneo per l’utilizzo in qualsiasi ambiente • Qualora l’apparecchio non dovesse essere utilizzato per riportato nelle presenti istruzioni per l’uso, incluso l’am- un periodo prolungato, rimuovere le batterie dal vano biente domestico.
  • Page 77: Descrizione Dell'apparecchio

    3. Descrizione dell‘apparecchio Indicatori sul display: All manuals and user guides at all-guides.com 1. Ora e data 1. Manicotto 2. Pressione sistolica 2. Tubo del manicotto 3. Pressione diastolica 3. Attacco del manicotto 4. Battito cardiaco rilevato 4. Display 5. Icona disturbo del ritmo cardiaco 5.
  • Page 78: Preparazione Della Misurazione

    4. Preparazione della misurazione • I simboli riportati di seguito indicano che le All manuals and user guides at all-guides.com batterie contengono sostanze tossiche: Inserimento delle batterie Pb = batteria contenente piombo • Aprire il coperchio del vano batterie. Cd = batteria contenente cadmio •...
  • Page 79: Misurazione Della Pressione

    5. Misurazione della pressione Inserire l‘attacco del tubo del All manuals and user guides at all-guides.com manicotto nel relativo ingresso Prima della misurazione portare l’apparecchio a temperatura sull‘apparecchio. ambiente. La misurazione può essere eseguita sul braccio destro o sinistro. Questo manicotto è da considerarsi Applicazione del manicotto idoneo se il contrassegno indicato- Denudare il braccio e indossare...
  • Page 80 all-guide s.com...
  • Page 81 Postura corretta tando la relativa pressione. Appena è rilevabile il battito All manuals and user guides at all-guides.com cardiaco, viene visualizzata l’icona corrispondente • Per tutta la durata della misurazione viene visualizzata l’icona del controllo del posizionamento del manicotto . Se il manicotto è troppo teso o allentato, vengono visualizzati e “...
  • Page 82: Interpretazione Dell'esito

    Attendere almeno 5 minuti prima di effettuare una nuova Indicatore di rischio: All manuals and user guides at all-guides.com misurazione! I risultati di misurazione possono essere classificati e valu- tati in base alla tabella seguente. 6. Interpretazione dell‘esito Tali valori standard costituiscono tuttavia solo un riferimento Disturbi del ritmo cardiaco generale in quanto la pressione individuale presenta diffe- Questo apparecchio è...
  • Page 83: Memorizzazione, Ricerca E Cancellazione Dei Valori Misurati

    visualizzata la media delle ultime 7 misurazioni effettuate All manuals and user guides at all-guides.com Intervallo dei Sistole Diastole Misura da la sera. (Sera: dalle 18.00 alle 20.00, indicazione valori di pres- (in mmHg) (in mmHg) adottare Premendo nuovamente il pulsante funzione + il sistema sione visualizza gli ultimi esiti di misurazione con data e ora.
  • Page 84: Pulizia E Conservazione Dell'apparecchio E Del Manicotto

    Condizioni di Da -20 °C a +55 °C, 10-90% umidità rela- 10. Dati tecnici stoccaggio am- tiva, 800-1050 hPa di pressione ambiente Codice BM 27 messe Metodo di misu- Oscillometrico, misurazione non invasiva Alimentazione 4 batterie AA da 1,5 V...
  • Page 85: Pezzi Di Ricambio E Parti Soggette A Usura

    Si applicano le seguenti condizioni di garanzia: automatici non invasivi). 1. La garanzia dei prodotti BEURER dura 5 anni oppure, se • La precisione di questo misuratore di pressione è stata più lunga, fa fede la durata di garanzia valida dalla data di accuratamente testata ed è...
  • Page 86 all-guide s.com...
  • Page 87 2. La durata della garanzia non viene prolungata da ripara- All manuals and user guides at all-guides.com zioni (dell’intero apparecchio o di parti di esso). 3. La garanzia non ha validità per i danni derivanti da a. Uso improprio, ad es. mancata osservanza delle istru- zioni per l’uso.
  • Page 88: Ürün Özellikleri

    7. Ölçüm değerlerini kaydetme, çağırma ve silme... 83 Yeni cihazınızı iyi günlerde kullanmanızı dileriz. 8. Hata bildirimi/Hata giderme ......... 83 Beurer Ekibiniz 9. Cihazın ve manşetin temizlenmesi ve saklanması ..83 1. Ürün özellikleri 10. Teknik veriler ..............84 Cihazı...
  • Page 89: Önemli Bilgiler

    Bu cihazla hızlı ve kolay bir şekilde tansiyonunuzu ölçebilir, All manuals and user guides at all-guides.com AB Atık Elektrikli ve Elektronik Ekipman Di- ölçüm değerlerini kaydedebilir ve ölçüm değerlerinin seyrini rektifi - WEEE (Waste Electrical and Elec- ve ortalamasını görüntüleyebilirsiniz. tronic Equipment) uyarınca bertaraf edilir Mevcut olabilecek kalp ritmi bozukluklarında sizi uyarır.
  • Page 90 • Tansiyon ölçme cihazını yeni doğanlarda ve preeklampsi All manuals and user guides at all-guides.com Rusya ve Bağımsız Devletler Topluluğu hastalarında kullanmayın. Tansiyon ölçme cihazını hamilelikte ülkelerine ihraç edilecek ürünler için serti- kullanmadan önce bir doktora danışmanızı tavsiye ederiz. fika işareti •...
  • Page 91 • Manşette sürekli basınç olmasını önleyin ve sık ölçümler- – Cihazı düşürmeyin. All manuals and user guides at all-guides.com den kaçının. Kan akışının bunun sonucunda kısıtlanması – Cihazı güçlü elektromanyetik alanların yakınında kullan- halinde yaralanmalar meydana gelebilir. mayın ve radyo sistemlerinden veya cep telefonlarından •...
  • Page 92 all-guide s.com...
  • Page 93 • Her zaman tüm pilleri aynı anda değiştirin. All manuals and user guides at all-guides.com Elektromanyetik uyumluluk hakkında bilgiler • Şarj edilebilir pil kullanmayın! • Cihaz, konutlar dahil olmak üzere bu kullanım kılavuzunda • Pilleri parçalarına ayırmayın, açmayın veya parçalamayın. belirtilen tüm ortamlarda çalıştırılabilir.
  • Page 94: Cihaz Açıklaması

    3. Cihaz açıklaması Ekrandaki göstergeler: All manuals and user guides at all-guides.com 1. Manşet 1. Saat ve tarih 2. Manşet hortumu 2. Sistolik tansiyon 3. Manşet fişi 3. Diyastolik tansiyon 4. Ekran 4. Tespit edilen nabız değeri 5. Manşet fişi bağlantısı 5.
  • Page 95: Ölçüme Hazırlık

    4. Ölçüme hazırlık • Bu işaretler, zararlı madde içeren pillerin All manuals and user guides at all-guides.com üzerinde bulunur: Pilleri yerleştirme Pb = Pil kurşun içeriyor, • Pil bölmesi kapağını açın. Cd = Pil kadmiyum içeriyor, • Dört adet 1,5V AA tipi (alkalin tip Hg = Pil cıva içeriyor LR6) pil yerleştirin.
  • Page 96: Tansiyon Ölçme

    5. Tansiyon ölçme Manşet takıldıktan sonra indeks All manuals and user guides at all-guides.com işareti ( ) OK bölgesinin Cihazı ölçüm yapmadan önce oda sıcaklığına getirin. içindeyse, manşet sizin için uygun Ölçümü sol veya sağ koldan yapabilirsiniz. demektir. Manşeti takma Manşeti çıplak sol üst kola takın.
  • Page 97: Sonuçları Değerlendirme

    • Ölçümü otururken veya yatarken yapabilirsiniz. Manşetin • Ölçüm doğru şekilde gerçekleştirilemediğinde _ sembolü All manuals and user guides at all-guides.com kalp yüksekliğine gelmesine mutlaka dikkat edin. gösterilir. Bu kullanım kılavuzundaki Hata bildirimi/Hata • Tansiyon ölçümü için rahat bir şekilde oturun. Sırtınızı ve giderme bölümüne bakın ve ölçümü...
  • Page 98 all-guide s.com...
  • Page 99 gösterilirse ölçümü tekrarlayın. Lütfen 5 dakika dinlenmeye All manuals and user guides at all-guides.com Tansiyon Sistol Diyastol ve ölçüm esnasında konuşmamaya veya hareket etmemeye değerlerinin (mmHg (mmHg Önlem dikkat edin. sembolü sık gösterilirse, lütfen doktorunuza aralığı olarak) olarak) başvurun. Ölçüm sonuçlarına göre kendi kendinize teşhis Kademe 3: Bir doktora koymanız ve kendi kendinizi tedavi etmeniz tehlikeli olabilir.
  • Page 100: Ölçüm Değerlerini Kaydetme, Çağırma Ve Silme

    7. Ölçüm değerlerini kaydetme, çağırma ve 8. Hata bildirimi/Hata giderme All manuals and user guides at all-guides.com silme Hata olduğunda ekranda hata bildirimi _ gösterilir. Şu durumlarda hata bildirimleri görüntülenebilir: Başarılı her ölçümün sonuçları, tarih ve saat ile birlikte kay- •...
  • Page 101: Teknik Veriler

    All manuals and user guides at all-guides.com İzin verilen sakla- -20 °C ile +55 °C arası, %10-90 ma koşulları bağıl hava nemi, 800-1050 hPa Model no. BM 27 ortam basıncı Ölçüm yöntemi Üst koldan, osilometrik, invazif Güç kaynağı 4 adet 1,5 V AA pil olmayan tansiyon ölçümü...
  • Page 102: Yedek Parçalar Ve Yıpranan Parçalar

    All manuals and user guides at all-guides.com 2–30: Otomatik, invazif olmayan tansiyon ölçme cihazla- 1. BEURER ürünlerinin garanti süresi 5 yıldır veya – daha rının temel özellikleri dahil olmak üzere güvenlik için özel uzun ise – ilgili ülkede geçerli olan satın alma tarihinden koşullar) uyarıncadır.
  • Page 103: Знакомство С Прибором

    9. Очистка и хранение прибора и манжеты ....98 10. Технические данные ..........98 С наилучшими пожеланиями, 11. Запасные части и детали, подверженные быстрому компания Beurer износу ............... 100 1. Знакомство с прибором 12. Гарантия / сервисное обслуживание ....... 100 Убедитесь в том, что упаковка прибора не повреждена, Комплект...
  • Page 104 all-guide s.com...
  • Page 105: Важные Указания

    Прибор для измерения кровяного давления в плечевой All manuals and user guides at all-guides.com Рабочая часть типа BF артерии служит для неинвазивного измерения и контро- ля артериального давления взрослого человека. С ним Вы сможете легко и быстро измерить свое арте- Постоянный ток риальное давление, сохранить результаты измерений Утилизация...
  • Page 106 и не могут заменить медицинского обследования! All manuals and user guides at all-guides.com Серийный номер Результаты измерений следует обсуждать врачом, их ни в коем случае нельзя использовать для принятия Символ CE подтверждает соответствие самостоятельных решений относительно лечения (на- основным требованиям директивы пример, о приеме лекарств и их дозировке)! о медицинских...
  • Page 107 стями, с недостаточными знаниями или опытом, за для внутрисосудистого доступа или внутрисосудистой All manuals and user guides at all-guides.com исключением случаев, когда за ними осуществляется терапии, а также артериовенозный шунт). надлежащий надзор или они получили инструкции • Не используйте манжету у женщин, перенесших ампу- по...
  • Page 108 — Защищайте прибор от ударов, влажности, загряз- • Если батарейка потекла, очистите отделение для All manuals and user guides at all-guides.com нения, сильных колебаний температуры и прямых батареек сухой салфеткой, предварительно надев солнечных лучей. защитные перчатки. • Защищайте батарейки от чрезмерного воздействия —...
  • Page 109 • Ремонтные работы должны производиться только ним и другими устройствами, чтобы убедиться, что All manuals and user guides at all-guides.com сервисной службой или авторизованными торговыми они работают надлежащим образом. представителями. Перед предъявлением претензий • Применение сторонних принадлежностей, отлича- проверьте и при необходимости замените батарейки. ющихся...
  • Page 110 all-guide s.com...
  • Page 111: Описание Прибора

    3. Описание прибора Индикация на дисплее: All manuals and user guides at all-guides.com 1. Время и дата 1. Манжета 2. Систолическое давление 2. Шланг манжеты 3. Диастолическое давление 3. Штекер манжеты 4. Измеренное значение пульса 4. Дисплей 5. Символ нарушения сердечного ритма 5.
  • Page 112: Подготовка К Измерению

    4. Подготовка к измерению All manuals and user guides at all-guides.com Утилизация батареек Установка батареек • Выбрасывайте использованные, полностью разряжен- • Откройте крышку отделения для ные батарейки в специальные контейнеры, сдавайте батареек. в пункты приема спецотходов или в магазины элек- • Вставьте четыре батарейки 1,5 В трооборудования.
  • Page 113: Измерение Кровяного Давления

    • Прибор для измерения кровяного давления отключается под нее можно было просунуть All manuals and user guides at all-guides.com автоматически. два пальца. Вставьте шланг манжеты 5. Измерение кровяного давления в разъем для штекера манжеты. Для проведения измерений температура прибора долж- на соответствовать комнатной. Манжета...
  • Page 114 Правильное положение тела нии тенденции к высокому давлению манжета будет All manuals and user guides at all-guides.com снова накачана, а ее давление снова увеличится. Как только прибор распознает пульс, отобразится символ пульса • В течение всего измерения отображается символ проверки посадки манжеты . Если манжета сидит слишком...
  • Page 115: Оценка Результатов

    появляется часто, обратитесь к врачу. Самодиагно- • Для выключения нажмите кнопку ВКЛ./ВЫКЛ. All manuals and user guides at all-guides.com стика и самолечение на основе результатов измерения Если вы забудете выключить прибор, он отключится могут быть опасны. Обязательно следуйте рекоменда- автоматически примерно через 3 минуту. циям...
  • Page 116 all-guide s.com...
  • Page 117: Сохранение, Просмотр И Удаление Результатов Измерения

    • Нажмите кнопку сохранения M. Выберите нужную All manuals and user guides at all-guides.com Диапазон Систолическое Диастолическое пользовательскую память ( ) повторным нажа- значений Рекомендуемые давление давление кровяного меры тием кнопки сохранения M. (в мм рт. ст.) (в мм рт. ст.) давления...
  • Page 118: Сообщение Об Ошибке/Устранение Ошибок

    слишком сильно сгибать шланг манжеты. • не удалось правильно измерить пульс: 10. Технические данные • если измерение было невозможным: • манжета прилегает слишком плотно или слишком сла- № модели BM 27 бо: Метод изме- Осциллометрическое, неинвазивное • во время измерения возникли ошибки: рения...
  • Page 119 • Данный прибор соответствует европейскому стандар- All manuals and user guides at all-guides.com Память 4 блока по 30 ячеек памяти ту EN60601-1-2 (Соответствие стандартам CISPR 11, Размеры Д 112 мм x Ш 110 мм x В 53 мм IEC 61000-4-2, IEC 61000-4-3, IEC 61000-4-8) и требует Вес Около 341 г (без батареек, с манжетой) особых...
  • Page 120: Запасные Части И Детали, Подверженные Быстрому Износу

    учреждениях следует выполнять метрологический All manuals and user guides at all-guides.com контроль с помощью соответствующих средств. 11. Запасные части и детали, подверженные быстрому износу Запасные части и детали, подверженные быстрому из- носу, можно приобрести в соответствующих сервисных центрах, указав номер детали в каталоге. Название...
  • Page 121: Informacje O Urządzeniu

    All manuals and user guides at all-guides.com POLSKI Spis treści Szanowna Klientko, szanowny Kliencie! Cieszymy się, że wybrali Państwo nasz produkt. Firma Beurer 1. Informacje o urządzeniu ..........101 oferuje dokładnie przetestowane, wysokiej jakości produkty 2. Ważne wskazówki ............. 102 przeznaczone do pomiaru ciepła, wagi, ciśnienia tętniczego, 3.
  • Page 122 all-guide s.com...
  • Page 123: Ważne Wskazówki

    Umożliwia on łatwy i szybki pomiar ciśnienia krwi, a także All manuals and user guides at all-guides.com Utylizacja zgodnie z dyrektywą WE zapisanie zmierzonych wartości (łącznie z wartościami śred- w sprawie zużytego sprzętu elektrycznego nimi) i wyświetlenie ich w formie wykresu. i elektronicznego – WEEE (Waste Electrical Użytkownik jest ostrzegany o wystąpieniu zaburzeń rytmu and Electronic Equipment) serca.
  • Page 124 nych, np. sportu) może wpływać na dokładność pomiaru i All manuals and user guides at all-guides.com Oznakowanie certyfikacyjne dla produktów prowadzić do błędów pomiaru. eksportowanych do Federacji Rosyjskiej • Nie wolno używać ciśnieniomierza do pomiaru ciśnienia oraz państw WNP tętniczego u noworodków i kobiet cierpiących na zatrucie ciążowe.
  • Page 125 • Unikać mechanicznego zwężania, ściskania lub zaginania Wskazówki dotyczące przechowywania All manuals and user guides at all-guides.com wężyka mankietu. i konserwacji • Unikać utrzymywania ciśnienia w mankiecie oraz częstych • Ciśnieniomierz jest wykonany z precyzyjnych podzespo- pomiarów. Wynikające z tego zaburzenie przepływu krwi łów elektronicznych. Z urządzeniem należy obchodzić się może spowodować...
  • Page 126 • Należy zwrócić uwagę na znak polaryzacji plus (+) i minus (-). złożeniem reklamacji należy zawsze sprawdzić baterie i w All manuals and user guides at all-guides.com • Jeśli z baterii wyciekł elektrolit, należy założyć rękawice razie potrzeby je wymienić. ochronne i wyczyścić komorę baterii suchą szmatką. •...
  • Page 127: Opis Urządzenia

    3. Opis urządzenia • Stosowanie innych akcesoriów niż te określone lub All manuals and user guides at all-guides.com udostępnione przez producenta urządzenia może prowadzić do zwiększenia zakłóceń elektromagnetycz- nych lub do zmniejszenia odporności elektromagnetycz- nej urządzenia oraz do nieprawidłowego działania. •...
  • Page 128 all-guide s.com...
  • Page 129: Przygotowanie Do Pomiaru

    4. Przygotowanie do pomiaru Wskazania na wyświetlaczu: All manuals and user guides at all-guides.com Wkładanie baterii • Otwórz pokrywę baterii. • Włóż 4 baterie 1,5 V AA (alkaliczne, typ LR6). Należy zwrócić uwagę na zachowanie prawidłowej biegunowo- ści przy wkładaniu baterii, zgodnie z oznakowaniem.
  • Page 130: Pomiar Ciśnienia Tętniczego

    5. Pomiar ciśnienia tętniczego lub do sklepu ze sprzętem elektrycznym. Użytkownik jest All manuals and user guides at all-guides.com zobowiązany do utylizacji baterii zgodnie z przepisami. Przed przystąpieniem do pomiaru urządzenie powinno osią- • Na bateriach zawierających szkodliwe związki gnąć temperaturę pokojową. znajdują...
  • Page 131 Podłącz wężyk mankietu do Należy przyjąć prawidłową pozycję ciała All manuals and user guides at all-guides.com gniazdka w urządzeniu. Mankiet nadaje się dla użytkownika, gdy oznaczenie ( • Przed każdym pomiarem należy odpocząć ok. 5 minut! po włożeniu mankietu znajduje się W przeciwnym razie pomiar może być...
  • Page 132: Interpretacja Wyników

    w mankiecie. Po rozpoznaniu tętna pojawia się symbol Przed rozpoczęciem kolejnego pomiaru odczekaj co naj- All manuals and user guides at all-guides.com tętna mniej 5 minut. • Przez cały czas trwania pomiaru wyświetlany będzie 6. Interpretacja wyników symbol kontroli prawidłowego założenia mankietu.
  • Page 133: Zapis, Odczyt I Usuwanie Wyników Pomiaru

    Wskaźnik ryzyka: All manuals and user guides at all-guides.com Ciśnienie Ciśnienie Wyniki pomiarów można klasyfikować i oceniać zgodnie Zakres wartości rozkurczo- skurczowe Rozwiązanie z poniższą tabelą. ciśnienia (w mmHg) Podane wartości standardowe służą jedynie jako ogólne wy- (w mmHg) tyczne, ponieważ indywidualne wartości ciśnienia u różnych Poziom 1: lekkie Regularna kon- 140–159...
  • Page 134 all-guide s.com...
  • Page 135: Komunikaty Błędów/Usuwanie Błędów

    ści średniej pomiarów porannych z ostatnich 7 dni (rano: • wystąpił błąd systemu. W przypadku pojawienia się tego All manuals and user guides at all-guides.com godz. 5.00–9.00, symbol ). Kolejne naciśnięcie przy- komunikatu o błędzie proszę zwrócić się do serwisu cisku funkcyjnego + spowoduje wyświetlenie wartości klienta: średniej pomiarów wieczornych z ostatnich 7 dni (wieczór: •...
  • Page 136: Dane Techniczne

    All manuals and user guides at all-guides.com Dop. warunki od -20°C do +55°C, 10-90% względnej przechowywania wilgotności powietrza, 800–1050 hPa Model nr BM 27 ciśnienia otoczenia Metoda pomiaru Oscylometryczny, nieinwazyjny pomiar Źródło zasilania 4 baterie AA 1,5 V  ciśnienia na ramieniu Trwałość...
  • Page 137: Części Zamienne I Części Ulegające Zużyciu

    Obowiązują następujące warunki gwarancji: ciśnieniomierzy). 1. Okres gwarancji na produkty firmy BEURER wynosi 5 lat • Dokładność niniejszego ciśnieniomierza została starannie lub, jeśli jest dłuższy, obowiązuje w danym kraju od daty sprawdzona i dostosowana do długiego okresu użytko- zakupu.
  • Page 138 4. Odpowiedzialność za szkody bezpośrednio lub pośred- All manuals and user guides at all-guides.com nio spowodowane przez urządzenie jest wykluczona także wtedy, gdy w przypadku jego uszkodzenia uznane zostanie roszczenie z tytułu gwarancji.
  • Page 139 All manuals and user guides at all-guides.com Beurer GmbH • Söflinger Straße 218 • 89077 Ulm, Germany • www.beurer.com www.beurer-blutdruck.de • www.beurer-gesundheitsratgeber.com • www.beurer-healthguide.com...
  • Page 140 all-guide s.com...

Table des Matières