Edirol COSM Audio Capture UA-700 Mode D'emploi
Liens rapides
Owner's Manual
Thank you for purchasing the UA-700 USB Audio Interface.
Before using this unit, carefully read the sections entitled: "USING THE
UNIT SAFELY" and "IMPORTANT NOTES" (Owner's manual pp. 2--5).
These sections provide important information concerning the proper
operation of the unit. Additionally, in order to feel assured that you have
gained a good grasp of every feature provided by your new unit, Owner's
manual should be read in its entirety. The manual should be saved and kept
on hand as a convenient reference.
Copyright © 2002 ROLAND CORPORATION
All rights reserved. No part of this publication may be reproduced in any
form without the written permission of ROLAND CORPORATION.
Chapitres

Manuels Connexes pour Edirol COSM Audio Capture UA-700


Sommaire des Matières pour Edirol COSM Audio Capture UA-700
- Page 1 Owner’s Manual Thank you for purchasing the UA-700 USB Audio Interface. Before using this unit, carefully read the sections entitled: “USING THE UNIT SAFELY” and “IMPORTANT NOTES” (Owner’s manual pp. 2--5). These sections provide important information concerning the proper operation of the unit. Additionally, in order to feel assured that you have gained a good grasp of every feature provided by your new unit, Owner’s manual should be read in its entirety.
- Page 2 • Do not excessively twist or bend the power to do so). Refer all servicing to your retailer, cord, nor place heavy objects on it. Doing so the nearest EDIROL/Roland Service Center, can damage the cord, producing severed or an authorized EDIROL/Roland elements and short circuits.
- Page 3 012c 101b • Immediately turn the power off, remove the • The unit and the AC adaptor should be AC adaptor from the outlet, and request located so their location or position does not servicing by your retailer, the nearest Roland interfere with their proper ventilation.
-
Page 4: Important Notes
IMPORTANT NOTES Maintenance 291a In addition to the items listed under “USING THE UNIT SAFELY” on page 2 and 3, please read and 401a • For everyday cleaning wipe the unit with a soft, dry observe the following: cloth or one that has been slightly dampened with water. - Page 5 Copyright • Use a cable from Roland to make the connection. If using some other make of connection cable, please • Unauthorized recording, distribution, sale, lending, note the following precautions. public performance, broadcasting, or the like, in • Some connection cables contain resistors. Do not whole or in part, of a work (musical composition, use cables that incorporate resistors for video, broadcast, public performance, or the like)
-
Page 6: Table Des Matières
Contents IMPORTANT NOTES ..............4 Contents ................... 6 Features of the UA-700............10 Built-in COSM effects ......................10 24-bit/96 kHz data for pristine audio quality ............... 10 Wide variety of input/output jacks ................10 Direct Monitor function ....................10 WDM/ASIO 2.0 drivers included ................... 10 Contents of the package ............ - Page 7 Contents Operation ........114 Names of things and what they do........115 Panel........................... 115 Rear panel.......................... 127 Application guide..............129 Basic use ..........................129 Recording a guitar or bass ....................130 Recording from mics ....................... 131 Recording a keyboard ..................... 132 Analog recording from an audio device...............
- Page 8 Contents Définitions ................179 Face avant.......................... 179 Face arrière........................192 Guide des applications............194 Utilisation de base......................194 Enregistrement d’une guitare ou d’une basse ............. 195 Enregistrement avec des micros ..................196 Enregistrement avec un clavier..................197 Enregistrement analogique d'un appareil audio............198 Entrée d'audio d'un CD/MD/DAT sur votre ordinateur .........
- Page 9 Contents Troubleshooting..............240 Problems related to the USB driver................241 Problems when using the UA-700 ................. 243 Deleting the special driver....................251 MIDI implementation............254 Specifications............... 261 Index..................263...
-
Page 10: Features Of The Ua-700
Features of the UA-700 Thank you, and congratulations on your choice of the UA-700. The UA-700 is an audio interface that can be connected to your computer via a USB cable, allowing you to digitally record and play back high-quality audio data. Built-in COSM effects The UA-700 features the same COSM engine that has won acclaim with the BOSS GP-20 and GT-6. - Page 11 Features of the UA-700 What is USB? USB stands for Universal Serial Bus. It is a new interface used to connect various peripheral devices to a computer. USB allows more than one peripheral device to be connected via a single USB cable, and also allows data to be transmitted more rapidly than conventional serial ports.
-
Page 12: Contents Of The Package
* If you require a replacement due to loss or damage, please contact a “EDIROL/Roland Service Center” listed in the “Information” section at the end of this manual. If you purchase a new AC adaptor, please specify the special AC adaptor with ferrite core designed for the UA-700. -
Page 13: Setup
Setup This section explains how to install the drivers needed for connecting the UA-700 to a computer, and make the necessary settings. Getting Connected and Installing Drivers (Windows) .... (p. 14) Getting Connected and Installing Drivers (Macintosh) ..(p. 39) -
Page 14: Getting Connected And Installing Drivers (Windows)
Getting Connected and Installing Drivers (Windows) If you are using a Macintosh computer, please proceed to Getting Connected and Installing Drivers (Macintosh) (p. 39). What is a driver? fig.05-1e_50 A “driver” is software that transfers data between the UA-700 and application software running on your computer, when your Application USB port... -
Page 15: Installing The Special Driver
Getting Connected and Installing Drivers (Windows) Switching between Advanced mode and Standard driver mode If you first install both the special driver and the standard driver, you will be able to switch between Advance and Standard driver modes by operating the UA-700's ADVANCE (mode select) switch. -
Page 16: Windows Xp Users
Getting Connected and Installing Drivers (Windows) Windows XP users If you are using With the UA-700 disconnected, start up Windows. Windows XP Professional, you must Disconnect all USB cables except for a USB keyboard and USB mouse log on using a user name (if used). - Page 17 Getting Connected and Installing Drivers (Windows) close the System Properties dialog box. Click [OK] to Exit all currently running software (applications). Also close any open windows. If you are using virus checking or similar software, be sure to exit it as well. Prepare the CD-ROM.
- Page 18 The Found New Hardware Wizard will appear. Make sure that the screen indicates “EDIROL UA-700 (WDM)”, select “Install from a In the case of the MME list or specific location driver, make sure that (Advanced)”, and click [Next].
- Page 19 Getting Connected and Installing Drivers (Windows) fig.2-8_20 Make sure that the “Model” field indicates “EDIROL UA-700 (WDM)”, and click [Next]. Driver In the case of the MME installation will begin. driver, make sure that “EDIROL UA-700 (MME)” is displayed. If the “What action do you want Windows to take?” setting was not set to “Ignore”, a “Hardware Installation”...
- Page 20 If “What action do you want Windows to take?” is set to “Warn”, 1. Click [Continue Anyway]. 2. Continue the installation. fig.2-11_20 The Found New Hardware Wizard will appear. Verify that “EDIROL UA-700 (WDM)” or “EDIROL UA-700 (MME)” is displayed, and click [Finish]. Wait until “Found New Hardware” appears near the taskbar.
- Page 21 Getting Connected and Installing Drivers (Windows) If you changed “What action do you want Windows to take?” If you changed the What action do you want Windows to take? setting, restore the original setting after Windows restarts. 1. If you are using Windows XP Professional, log on to Windows using the user name of an administrative account (e.g., Administrator).
- Page 22 Getting Connected and Installing Drivers (Windows) fig.05-2e_30 Click the Hardware tab, and then click [Driver Signature]. Open the Driver Signing Options dialog box. fig.05-3e_30 Make sure that “File signature verification” is set to “Ignore”. If it is set to “Ignore”, simply click [OK].
- Page 23 Getting Connected and Installing Drivers (Windows) fig.05-5e_30 In this manual, the location In the dialog box that appears, of folders and files is given input the following into the in terms of the file path, “Open” field, and click [OK]. using \ as the delimiter.
- Page 24 Getting Connected and Installing Drivers (Windows) If the “File signature verification” setting was not set to “Ignore”, a “Digital Signature Not Found” dialog box will appear. If “File signature verification” is set to “Warn”, 1. Click [Yes]. 2. Continue the installation. If “File signature verification”...
- Page 25 1. Click [Yes]. 2. Continue the installation. fig.05-10e_30 The “Find New Hardware Wizard” may be displayed. Verify that “EDIROL UA-700 (WDM)” or “EDIROL UA-700 (MME)” is displayed, and click [Finish]. If the “Find New Hardware Wizard” dialog box is not displayed, proceed to step 18.
- Page 26 Getting Connected and Installing Drivers (Windows) If you changed “File signature verification” If you changed the “File signature verification” setting in step 5, restore the original setting after Windows restarts. 1. After Windows restarts, log in to Windows as a user with administrative privileges, (such as Administrator).
- Page 27 Getting Connected and Installing Drivers (Windows) fig.05-13e_30 In the dialog box that appears, input the following into the “Open” field, and click [OK]. In this manual, the location of folders and files is given in terms of the file path, using \ as the delimiter.
-
Page 28: Installing The Os-Standard Driver
Getting Connected and Installing Drivers (Windows) fig.05-16e_30 The New Hardware Found dialog box will appear. In the Copy files from field, type the folder name that is shown in the SetupInf dialog box, and click [OK]. D:\DRIVER\USB_ME98 * The drive name “D:” may be different depending on your system. Type the name of your CD-ROM drive. - Page 29 Getting Connected and Installing Drivers (Windows) Use the USB cable to connect the UA-700 to your computer. Once the connections 1. With the power switch turned OFF, connect the AC adaptor to the have been completed, UA-700. turn on power to your various devices in the 2.
- Page 30 Getting Connected and Installing Drivers (Windows) Set the UA-700’s power switch to the ON position. This unit is equipped fig.05-23e_30 with a protection circuit. A brief interval (a few Windows will detect the UA-700, seconds) after power up and the “Add New Hardware is required before the Wizard”...
- Page 31 Getting Connected and Installing Drivers (Windows) Use the USB cable to connect the UA-700 to your computer. Once the connections 1. With the power switch turned OFF, connect the AC adaptor to the have been completed, UA-700. turn on power to your various devices in the 2.
- Page 32 Getting Connected and Installing Drivers (Windows) fig.05-28e_30 A dialog box like the one shown will appear. Click [Next]. Depending on your system, the Driver location may differ from the illustration, but this is not a problem. File (driver) copying will begin. If the Windows CD-ROM is not inserted in the CD-ROM drive, a “Insert Disk”...
-
Page 33: Settings And Checking
Getting Connected and Installing Drivers (Windows) fig.05-34e_30 When installation of the USB audio device driver is complete, a dialog box like the one shown here will appear. Click [Finish]. Installation of the USB composite device driver and USB audio device driver has been completed. -
Page 34: Windows 98 Users
Advanced mode Standard driver mode Sound EDIROL UA-700 OUT EDIROL UA-700 (Windows XP) For details on Advanced USB Audio Device (Windows 2000/Me) playback mode and Standard Sound EDIROL UA-700 IN... - Page 35 Advanced mode and Standard driver mode (p. 14). Advanced mode Standard driver mode MIDI cannot be handled when EDIROL UA-700 MIDI OUT MIDI output using Standard Driver mode. Close the Multimedia Properties dialog box. Click [OK] to complete the settings.
- Page 36 UA-700 at the best audio (CD Audio) the computer. (*1) quality if you set the Controls the volume of sound output from the “EDIROL UA-700” WAVE audio output device. Digital output and analog output will change. Volume Control volume Synthesizer to the maximum setting.
- Page 37 Getting Connected and Installing Drivers (Windows) When playing audio CDs from the computer’s internal CD-ROM drive, or using the UA-700 to play game music (Standard driver mode only) Windows XP/2000 users: 1. Open the System Properties dialog box. Select Start | Settings | Control Panel, and in the Control Panel, double-click the System icon.
-
Page 38: Check Whether There Is Sound
Getting Connected and Installing Drivers (Windows) Check whether there is sound Now we will play back the sample data to check whether connections are correct. Playing back the sample data Here we will use standard Windows functionality to play back the sample In order to hear the sample data, you will data. -
Page 39: Getting Connected And Installing Drivers (Macintosh)
Getting Connected and Installing Drivers (Macintosh) If you are using a Windows computer, please proceed to Getting Connected and Installing Drivers (Windows) (p. 14). What is a driver? fig.05-1e_50 A “driver” is software that transfers data between the UA-700 and application software Application running on your computer, when your USB port... -
Page 40: Installing The Special Driver
Getting Connected and Installing Drivers (Macintosh) Switching between Advanced mode and Standard driver mode If you first install both the special driver and the standard driver, you will be able to switch between Advance and Standard driver modes by operating the UA-700's ADVANCE (mode select) switch. * In order for the setting of the ADVANCE (mode select) switch to take effect, you must exit all sequencer software and other applications that use the UA-700, switch off the UA-700, then turn it back on again. - Page 41 Getting Connected and Installing Drivers (Macintosh) Exit all currently running software (applications). If you are using a virus checker or similar software, be sure to exit this as well. Prepare the CD-ROM. Insert the CD-ROM into the CD-ROM drive. Double-click the UA-700 OMS Driver-E Installer icon (found in the Driver E folder of the CD-ROM) to start up the installer.
- Page 42 Getting Connected and Installing Drivers (Macintosh) This unit is equipped From the CD-ROM, drag the Driver E–OMS Setting with a protection circuit. folder into the Opcode–OMS folder on the hard disk A brief interval (a few of your Macintosh to copy it there. seconds) after power up is required before the unit will operate normally.
- Page 43 Getting Connected and Installing Drivers (Macintosh) fig.51e From the Edit menu, select OMS MIDI Setup. In the OMS MIDI Setup dialog box that appears, check Run MIDI in background, and click [OK]. fig.52E From the File menu, choose Make Current. If you are unable to select Make Current, it has already been applied, and you may continue to...
- Page 44 Getting Connected and Installing Drivers (Macintosh) fig.54 When you move the mouse cursor near the sound generator icon, the cursor will change to a shape. Click on the icon of each port in the diagram at right. If sound is heard from the sound module connected to the UA-700, the settings are correct.
- Page 45 Getting Connected and Installing Drivers (Macintosh) fig.3-2_40 If a message like the following is displayed, click [Continue]. The other currently running applications will exit, and installation will continue. A dialog box will indicate Installation completed. Click [Restart] to restart your Macintosh. FreeMIDI settings To check the FreeMIDI settings, you will first need to connect a MIDI sound module to the UA-700's MIDI OUT connector.
- Page 46 Getting Connected and Installing Drivers (Macintosh) When the FreeMIDI Preferences dialog box appears, click [Cancel]. When the About Quick Setup dialog box appears, click [Cancel]. From the File menu, choose Open. Select UA-700 USB from the Settings folder you copied in step 3, and click [Open].
-
Page 47: Installing The Asio Driver
Getting Connected and Installing Drivers (Macintosh) Installing the ASIO driver You must install the MIDI driver even if you will be using only audio on the UA-700. Be sure to install the MIDI driver before you install the ASIO driver. This section explains how to install the ASIO driver that allows the UA-700 to be used by your sequencer software or audio editing software. -
Page 48: Installing The Os-Standard Driver
Getting Connected and Installing Drivers (Macintosh) Installing the OS-standard driver With the UA-700 disconnected, start up Mac OS. Exit all currently running software (applications). If you are using a virus checker or similar software, be sure to exit it as well. fig.05-35e_30 After starting up Mac OS, select Apple System Profiler from the... - Page 49 Getting Connected and Installing Drivers (Macintosh) fig.05-37e_30 In order to check that detection has been completed, once again go to “Apple System Profiler”, and select “Update all information” from the Commands menu. In the USB area, three audio devices will be displayed. If these are displayed correctly, driver installation has succeeded.
- Page 50 Getting Connected and Installing Drivers (Macintosh) xfig.05-46e_30 With the volume turned down on The output volume of the the UA-700 and on your UA-700 cannot be adjusted with the Mac OS peripheral audio equipment, click sound dialog box. Make [Start Test]. volume adjustments Test signals will be output from through other means,...
- Page 51 Getting Connected and Installing Drivers (Windows) Windows XP-Anwender Wenn Sie Windows XP Starten Sie Windows, wobei das UA-700 ausgesteckt sind. Professional verwenden, müssen Sie sich mit Stecken Sie alle USB-Kabel außer der USB-Tastatur und der USB-Maus aus einem Benutzernamen (falls vorhanden). vom Typ Administrationskonto Öffnen Sie das Dialogfeld Systemeigenschaften.
- Page 52 Getting Connected and Installing Drivers (Windows) Nachdem Sie den Treiber installiert haben, stellen Sie die ursprünglichen Einstellungen wieder her. (➝ Wenn Sie die Einstellung für “Wie soll Windows vorgehen?” geändert haben (S. 57)) Systemeigenschaften zu schließen. [OK] Klicken Sie auf , um das Dialogfeld Beenden Sie alle aktuell ausgeführten Programme (Anwendungen).
- Page 53 Der Assistent für das Suchen Sekunden), bis es den neuer Hardware erscheint. normalen Betrieb Prüfen Sie, ob der Bildschirm aufnimmt. “EDIROL UA-700” anzeigt, wählen Sie “Software von einer Liste oder bestimmten Quelle installieren (für fortgeschrittene Bei Verwendung des Benutzer)” und klicken Sie auf MME-Treibers sollten Sie [Weiter].
- Page 54 Wählen Sie “Nicht suchen, sondern den zu installierenden Treiber selbst wählen”, und klicken Sie auf [Weiter]. fig.2-8_20 Prüfen Sie, ob das Feld “Modell” “EDIROL UA-700 (WDM)” anzeigt und klicken Sie auf [Weiter]. Die Installation des Bei Verwendung des Treibers beginnt. MME-Treibers sollten Sie prüfen, ob “EDIROL...
- Page 55 Getting Connected and Installing Drivers (Windows) Wenn die Einstellung für “Wie soll Windows vorgehen?” nicht “Ignorieren” lautet, wird das Dialogfeld “Hardware-Installation” angezeigt. Wenn die Einstellung für “Wie soll Windows vorgehen?” “Warnen” lautet, 1. klicken Sie auf [Trotzdem fortsetzen]. 2. Setzen Sie die Installation fort. Wenn für “Wie soll Windows vorgehen?”...
- Page 56 2. Setzen Sie die Installation fort. fig.2-11_20 Der Assistent für das Suchen neuer Hardware erscheint. Prüfen Sie, ob “EDIROL UA-700 (WDM)” oder “EDIROL UA-700 (MME)” angezeigt wird und klicken Sie auf [Beenden]. Warten Sie, bis die Meldung “Neue Hardware gefunden” in der Nähe der Task-Leiste...
- Page 57 Getting Connected and Installing Drivers (Windows) Wenn Sie die Einstellung für “Wie soll Windows vorgehen?” geändert haben Wenn Sie die Einstellung “Wie soll Windows vorgehen?” geändert haben, müssen Sie die ursprüngliche Einstellung nach dem Neustart von Windows wiederherstellen. 1. Wenn Sie Windows XP Professional verwenden, melden Sie sich in Windows mit dem Benutzernamen eines Administrationskontos an (z.B.
- Page 58 Getting Connected and Installing Drivers (Windows) I Windows Me/98-Anwender Wenn das UA-700 bereits Starten Sie Windows, wobei das UA-700 ausgesteckt sind. mit Ihrem Computer Stecken Sie alle USB-Kabel außer der USB-Tastatur und der USB-Maus aus verbunden ist und der (falls vorhanden). “Hardware-Assistent angezeigt wird, wechseln Sie in den Ordner auf der...
- Page 59 Getting Connected and Installing Drivers (Windows) Verwenden Sie das USB-Kabel, um das UA-700 mit Ihrem Computer zu verbinden. Nachdem die Anschlüsse fertig gestellt wurden, 1. Verbinden Sie bei ausgeschaltetem Netzschalter den schalten Sie die Wechselstromadapter mit dem UA-700. verschiedenen Geräte in 2.
-
Page 60: Einstellungen Und Überprüfung
Getting Connected and Installing Drivers (Windows) Als nächstes nehmen Sie die Einstellungen für den Treiber vor. (➝ Einstellungen und Überprüfung (S. 60)) Einstellungen und Überprüfung I Angabe des Audio- und MIDI-Eingabe/Ausgabeziels Windows XP/2000/Me-Anwender Öffnen Sie die Systemsteuerung. Klicken Sie in Windows auf Start und wählen Sie im daraufhin angezeigten Abhängig von der Menü... -
Page 61: Überprüfung, Ob Sound Zu Hören Ist
Me rechts von [Bevorzugtes Gerät] und wählen Sie folgende Option aus der angezeigten Liste aus. Erweiterter Modus Standardtreiber-Modus Audio- EDIROL UA-700 OUT EDIROL UA-700 (Windows XP) Weitere Informationen USB-Audiogerät (Windows 2000/Me) Wiedergabe zum Erweiterten Modus Audio- EDIROL UA-700 IN EDIROL UA-700 (Windows XP) - Page 62 Getting Connected and Installing Drivers (Windows) Die Verwendung von Kopieren Sie die Datei Alright(.wav) aus dem Ordner Sample auf der Songdaten, die mit diesem CD-ROM auf den Desktop, indem Sie Drag-and-Drop verwenden. Produkt ausgeliefert fig.05-42e_30 werden, für andere als private Zwecke oder persönlichen Gebrauch Klicken Sie mit der rechten Maustaste auf sind ohne Genehmigung...
-
Page 63: Installation Des Speziellen Treibers
Getting Connected and Installing Drivers (Macintosh) Installation des speziellen Treibers Sie müssen den MIDI-Treiber auch dann installieren, wenn Sie auf dem UA-700 nur Audio verwenden. Installieren Sie unbedingt den MIDI-Treiber. Verwenden Sie entweder OMS oder FreeMIDI als MIDI-Treiber. Wenn Sie OMS verwenden........... (S. 63) Wenn Sie FreeMIDI verwenden ........ - Page 64 Getting Connected and Installing Drivers (Macintosh) Halten Sie die CD-ROM bereit. Legen Sie die CD-ROM in das CD-ROM-Laufwerk ein. Doppelklicken Sie auf das Symbol UA-700 OMS Driver-E Installer (das sich im Ordner Driver E auf der CD-ROM befindet), um das Installationsprogramm zu starten.
- Page 65 Getting Connected and Installing Drivers (Macintosh) Bringen Sie den Netzschalter des UA-700 in die Position ON. Dieses Gerät ist mit einem Schutzschaltkreis ausgestattet. Nach dem Ziehen Sie den Ordner Driver E-OMS Setting auf der Einschalten benötigt das CD-ROM in den Ordner Opcode–OMS auf der Gerät eine kurze Zeitspanne (einige Festplatte Ihres Macintosh, um ihn zu kopieren.
- Page 66 Getting Connected and Installing Drivers (Macintosh) fig.51e Wählen Sie im Menü Edit die Option OMS MIDI Setup. Aktivieren Sie im daraufhin angezeigten Dialogfeld OMS MIDI Setup die Option Run MIDI in background und klicken Sie auf [OK]. fig.52E Wählen Sie im Menü File die Option Make Current.
- Page 67 Getting Connected and Installing Drivers (Macintosh) fig.54 Wenn Sie den Mauszeiger über das Soundgenerator-Symbol bewegen, ändert sich der Mauszeiger zu einem . Klicken Sie auf die Soundgenerator-Symbole für jeden Anschluss im Diagramm rechts. Wenn das UA-700 Sound ausgibt, wurden die Einstellungen korrekt vorgenommen.
- Page 68 Getting Connected and Installing Drivers (Macintosh) I Installation des UA-700-Treibers ((FreeMIDI) Installieren Sie den UA-700-Treiber wie anschließend beschrieben. Der UA-700 FreeMIDI-Treiber im Lieferumfang ist ein Add-On-Modul für die Verwendung des UA-700 mit FreeMIDI. Damit Sie dieses Modul verwenden können, muss FreeMIDI auf der Festplatte installiert sein, von der Sie den Computer gestartet haben.
- Page 69 Getting Connected and Installing Drivers (Macintosh) Einstellungen für FreeMIDI Bevor Sie die FreeMIDI-Einstellungen prüfen können, müssen Sie ein MIDI- Soundmodul mit dem MIDI OUT-Anschluss des UA-700 verbinden. Weitere Informationen zum Anschluss eines MIDI-Soundmoduls erhalten Sie im Benutzerhandbuch für Ihr MIDI-Soundmodul. Verwenden Sie das USB-Kabel, um das UA-700 mit Ihrem Computer zu Nachdem die Anschlüsse verbinden.
-
Page 70: Installation Des Asio-Treibers
Getting Connected and Installing Drivers (Macintosh) Wählen Sie im Menü File die Option Open. Wählen Sie UA-700 USB im Ordner Settings, den Sie in Schritt 3 kopiert haben, und klicken Sie auf Open. Prüfen Sie, ob die MIDI-Übertragung und der MIDI-Empfang fehlerfrei erfolgen. - Page 71 Getting Connected and Installing Drivers (Macintosh) Das UA-700 kann im erweiterten Modus keine Audiodaten vom ASIO (Steinberg Audio Soundmanager des Macintosh wiedergeben (wie z.B. Audio-CDs und Stream In/Out- Warntöne). Schnittstelle) Dieser Audio- Schnittstellenstandard Der ASIO-Treiber des UA-700 unterstützt folgende Audioeingangs-/ wird von der Steinberg Ausgangskanäle.
-
Page 72: Windows Xp
Getting Connected and Installing Drivers (Windows) Windows XP Si vous utilisez L’UA-700 étant débranché, démarrez Windows. Windows XP Professional, vous devez Débranchez tous les câbles USB, à l’exception de ceux du clavier et de la ouvrir une session avec souris (le cas échéant). un nom d’utilisateur disposant des droits Ouvrez la boîte de dialogue Propriétés Système. - Page 73 Getting Connected and Installing Drivers (Windows) [OK] fermer la boîte de dialogue Propriétés système. Cliquez sur pour Quittez tous les logiciels (applications) actifs. Fermez également toutes les fenêtres éventuellement ouvertes. Si vous utilisez un anti-virus, quittez-le également. Munissez-vous du CD-ROM. Introduisez-le dans le lecteur de CD de votre ordinateur.
- Page 74 La boîte de dialogue Assistant ajout de nouveau matériel s'affiche. Vérifiez que l’écran indique “EDIROL UA-700 (WDM)”, sélectionnez “Installer à partir d’une liste ou d’un emplacement spécifique Dans le cas du pilote (Avancé)” puis cliquez sur MME, vérifiez que...
- Page 75 Getting Connected and Installing Drivers (Windows) Si le paramètre “Que voulez-vous faire ?” n'est pas défini sur “Ignorer”, la boîte de dialogue “Installation du matériel” s'affiche. Si le paramètre “Que voulez-vous faire ?” est défini sur “Avertir” 1. Cliquez sur [Continuer]. 2.
- Page 76 La boîte de dialogue Assistant ajout de nouveau matériel s'affiche. Vérifiez que “EDIROL UA-700 (WDM)” ou “ EDIROL UA-700 (MME)” est affiché, puis cliquez sur [Terminer]. Attendez que “Nouveau matériel détecté” s’affiche près de la barre des tâches. Une fois l’installation du pilote terminée, la boîte de dialogue Modification des paramètres système s’affiche.
- Page 77 Getting Connected and Installing Drivers (Windows) Si vous avez modifié “Que voulez-vous faire ?” Si vous avez modifié “Que voulez-vous faire ?” restaurez le paramètre d’origine après le redémarrage de Windows. 1. Si vous utilisez Windows XP Professional, vous devez ouvrir une session avec un nom d’utilisateur disposant des droits d’administrateur.
- Page 78 Getting Connected and Installing Drivers (Windows) I Windows Me/98 Si l'UA-700 est déjà L’UA-700 étant débranché, démarrez Windows. connecté à votre Débranchez tous les câbles USB, à l’exception de ceux du clavier et de la ordinateur et que le souris. message “Assistant ajout de nouveau matériel”...
- Page 79 Getting Connected and Installing Drivers (Windows) Utilisez le câble USB pour relier l’UA-700 à votre ordinateur. Une fois les connexions 1. L’interrupteur d’alimentation sur OFF, reliez le cordon secteur à effectuées, mettez sous l'UA-700. tension les différents appareils dans l’ordre 2.
- Page 80 Getting Connected and Installing Drivers (Windows) Une fois le pilote installé, la boîte de dialogue Nouveau matériel détecté se ferme. Dans la boîte de dialogue SetupInf, cliquez sur [OK]. La boîte de dialogue SetupInf se ferme. Vous devez ensuite procéder à la configuration du pilote. (➝...
-
Page 81: Configuration Et Contrôle
Avancé et le mode Standard, reportez- Mode Avancé Mode Standard vous à la section EDIROL UA-700 OUT EDIROL UA-700 (Windows XP) Advanced mode and USB Audio Device (Windows 2000/Me) Lecture Standard driver mode EDIROL UA-700 OUT EDIROL UA-700 (Windows XP) -
Page 82: Vérifiez La Présence De Son
Getting Connected and Installing Drivers (Windows) Fermez la boîte de dialogue Propriétés Son et périphériques multimédia. Cliquez sur [OK] pour terminer les réglages. Passez à la section suivante. (➝ Volume Control setting (p. 36)) Vérifiez la présence de son Pour vérifier que les connexions sont correctes, il faut lire un exemple de données. - Page 83 Getting Connected and Installing Drivers (Windows) fig.05-43e_30 Ce que vous voyez à Lisez l'exemple de données l'écran peut être Cliquez sur l'onglet [Aperçu], puis différent de ce qui est cliquez sur le bouton. présenté ici, selon votre environnement informatique (notamment, le système d'exploitation).
-
Page 84: Installation Du Pilote Spécial
Getting Connected and Installing Drivers (Macintosh) Installation du pilote spécial Vous devez installer le pilote MIDI même si vous ne travaillez qu'avec de l'audio. N'oubliez pas d'installer le pilote MIDI. Utilisation d’OMS ou de FreeMIDI comme pilote MIDI. Si vous utilisez OMS............(p. 84) Si vous utilisez FreeMIDI .......... - Page 85 Getting Connected and Installing Drivers (Macintosh) Cliquez deux fois sur l'icône UA-700 OMS Driver-E Installer (dans le dossier Driver E du CD-ROM) pour lancer l'installeur. Vérifiez l’emplacement de l’installation et cliquez sur [Install]. L'emplacement fig.03-scdrv2Z.e d’installation dépend de votre système Si un message du type suivant d’exploitation.
- Page 86 Getting Connected and Installing Drivers (Macintosh) Dans le dossier Opcode-OMS Application où vous avez installé OMS, cliquez deux fois sur OMS Setup pour le lancer. fig.03-omsusb1a.e Si une boîte de dialogue similaire à celle présentée ici s'affiche, cliquez sur [Turn It Off]. Une boîte de confirmation s'affiche, cliquez sur [OK].
- Page 87 Getting Connected and Installing Drivers (Macintosh) fig.51e Dans le menu Edit, sélectionnez OMS MIDI Setup. Dans la boîte de dialogue OMS MIDI Setup qui s'affiche, sélectionnez Run MIDI in background (Lancer MIDI en tâche de fond), puis cliquez sur [OK]. fig.52E Dans le menu File, sélectionnez Make Current (Rendre actif).
- Page 88 Getting Connected and Installing Drivers (Macintosh) fig.54 Lorsque vous déplacez le pointeur de la souris sur l'icône du module de sons, il se transforme en . Cliquez sur l’icône de chaque port sur le schéma ci-contre. Si du son est audible depuis le module de sons connecté...
- Page 89 Getting Connected and Installing Drivers (Macintosh) I Installation du pilote UA-700 (FreeMIDI) Procédez comme suit pour installer le pilote UA-700. Le pilote UA-700 FreeMIDI est un module supplémentaire fourni pour pouvoir faire fonctionner l'UA-700 avec FreeMIDI. Pour pouvoir l'utiliser, FreeMIDI doit déjà...
- Page 90 Getting Connected and Installing Drivers (Macintosh) Paramètres FreeMIDI Pour vérifier les paramètres FreeMIDI, vous devez d'abord connecter un module de sons MIDI à la prise MIDI OUT de l'UA-700. Pour plus d'informations sur la connexion d'un module de sons MIDI, reportez-vous à...
- Page 91 Getting Connected and Installing Drivers (Macintosh) Sélectionnez UA-700 USB dans le dossier Settings que vous avez copié à l'étape 3, puis cliquez sur [Open]. Vérifiez que l'envoi et la réception MIDI fonctionnent correctement. Dans le menu MIDI, sélectionnez Check Connections. fig.fm2 Le pointeur de la souris prend la forme d'un clavier.
-
Page 92: Installation Du Pilote Asio
Getting Connected and Installing Drivers (Macintosh) Installation du pilote ASIO Vous devez installer le pilote MIDI même si vous ne travaillez qu'avec de l'audio. N'oubliez pas d'installer le pilote MIDI. avant d'installer le pilote ASIO. Cette section explique comment installer le pilote ASIO pour permettre à votre UA-700 d’utiliser votre logiciel séquenceur ou votre logiciel audio. - Page 93 Getting Connected and Installing Drivers (Macintosh) A partir du dossier Driver E–ASIO Driver du CD-ROM, copiez [UA-700 ASIO1.0 16bit] dans le dossier [ASIO Drivers] du dossier ASIO Drivers du logiciel ASIO que vous utilisez (Cubase VST, Logic Audio, Digital Performer, Metro, SPARK LE, etc.). La boîte de dialogue des réglages audio portera un nom différent selon le logiciel...
- Page 94 Getting Connected and Installing Drivers (Windows) Utenti Windows XP Se si utilizza Dopo aver scollegato l’UA-700, avviare Windows. Windows XP Professional, è necessario Scollegare tutti i cavi USB, ad eccezione della tastiera e del mouse USB, se collegarsi come un nome utilizzati.
- Page 95 Getting Connected and Installing Drivers (Windows) [OK] chiudere la finestra di dialogo Proprietà del sistema. Fare clic su Chiudere tutti i programmi in corso di esecuzione. Chiudere anche le altre finestre aperte. Se si utilizza un programma antivirus o simile, accertarsi che sia anch’esso chiuso. Preparare il CD-ROM.
- Page 96 Installazione guidata l’apparecchio funzioni nuovo hardware. normalmente. Accertarsi che sullo schermo appaia “EDIROL UA-700 (WDM)”, selezionare “Installa da un elenco o percorso specifico (per utenti esperti)” e fare clic su Se si tratta del driver [Avanti].
- Page 97 Getting Connected and Installing Drivers (Windows) fig.2-8_20 Accertarsi che il campo “Modello” visualizzi “EDIROL UA-700 (WDM)”” e fare clic su [Avanti]. La procedura di installazione del driver verrà Se si tratta del driver avviata. MME, accertarsi che “EDIROL UA-700 (MME)”...
- Page 98 Getting Connected and Installing Drivers (Windows) fig.2-9_30 Viene visualizzata la finestra di dialogo Inserire il disco Viene visualizzata la finestra di dialogo Fare clic su [OK]. Inserire il disco. In questo caso passare al fig.2-10_30 passo 17. Viene visualizzata la finestra di dialogo Richiesta file Immettere quanto segue nel campo “Copia file da”...
- Page 99 Verrà visualizzata la finestra di dialogo Installazione guidatanuovo hardware. Accertarsi che “EDIROL UA-700 (WDM)” o “EDIROL UA-700 (MME)” sia visualizzato e fare clic su [Fine]. Attendere fino a quando nella barra delle applicazioni non appare il messaggio “Trovato nuovo hardware”.
- Page 100 Getting Connected and Installing Drivers (Windows) I Utenti Windows Me/98 Se l’UA-700 è già Dopo aver scollegato l’UA-700, avviare Windows. collegato al computer Scollegare tutti i cavi USB ad eccezione della tastiera e del mouse. e appare il messaggio “Installazione guidata nuovo hardware”...
- Page 101 Getting Connected and Installing Drivers (Windows) Utilizzare il cavo USB per collegare l’UA-700 al computer. Una volta terminati i 1. Dopo aver spostato l’interruttore di alimentazione su OFF, collegare collegamenti, accendere l’adattatore AC all’UA-700. i vari dispositivi nell’ordine indicato. 2. Collegare l’adattatore AC a una presa elettrica. Se i dispositivi vengono 3.
-
Page 102: Configurazione E Verifica
Per maggiori informazioni sul modo Advanced, modo Modo driver standard driver Advanced e Registrazione EDIROL UA-700 OUT EDIROL UA-700 (Windows XP) Standard, fare suoni Periferica audio USB (Windows 2000/Me) Registrazione EDIROL UA-700 IN EDIROL UA-700 (Windows XP) riferimento alla sezione... -
Page 103: Verificare Se L'audio Viene Riprodotto
Getting Connected and Installing Drivers (Windows) Chiudere la finestra di dialogo Proprietà – Suoni e periferiche audio. Fare clic su OK per completare le impostazioni. Passare alla sezione successiva. (➝ Volume Control setting (pag. 36)) Verificare se l’audio viene riprodotto. A questo punto riprodurre i dati esempio per controllare il corretto funzionamento dei collegamenti. - Page 104 Getting Connected and Installing Drivers (Windows) fig.05-43e_30 Le finestre effettivamente Riprodurre i dati esempio. visualizzate sullo Fare clic sulla scheda Anteprima e poi sul schermo del computer pulsante potrebbero essere diverse da quelle illustrate in quando dipendono dalla configurazione di lavoro e dal sistema operativo utilizzati.
-
Page 105: Installazione Del Driver Speciale
Getting Connected and Installing Drivers (Macintosh) Installazione del driver speciale È necessario installare il driver MIDI anche se si utilizzerà solo l’audio dell’UA-700. Non dimenticare di installare il driver MIDI. Utilizzare come driver MIDI OMS o FreeMIDI. Se si utilizza OMS ............(pag. 105) Se si utilizza FreeMIDI ........... - Page 106 Getting Connected and Installing Drivers (Macintosh) Fare doppio clic sull’icona UA-700 OMS Driver-E Installer, che si trova nella cartella Driver E del CD-ROM, per avviare il programma d’installazione. Controllare la destinazione dell'installazione e fare clic su [Install]. La posizione di fig.03-scdrv2Z.e installazione cambia a seconda del sistema...
- Page 107 Getting Connected and Installing Drivers (Macintosh) Nella cartella Opcode-OMS Application dove è stato installato OMS, fare doppio clic su OMS Setup per avviarlo. fig.03-omsusb1a.e Se compare una finestra di dialogo come quella illustrata, fare clic su [Turn It Off]. Verrà visualizzata una finestra di dialogo di conferma;...
- Page 108 Getting Connected and Installing Drivers (Macintosh) fig.51e Nel menu Edit selezionare OMS MIDI Setup. Nella finestra di dialogo OMS MIDI Setup visualizzata, selezionare Run MIDI in background e fare clic su [OK]. fig.52E Nel menu File selezionare Make Current. Se non è possibile selezionare Make Current, vuol dire che è...
- Page 109 Getting Connected and Installing Drivers (Macintosh) fig.54 Quando il cursore del mouse passa vicino all’icona del generatore di suoni, il cursore assumerà la forma di una nota . Fare clic sull’icona di ogni porta nello schema a destra. Se il modulo sonoro collegato all’UA- 700 emette dei suoni, le impostazioni sono corrette.
- Page 110 Getting Connected and Installing Drivers (Macintosh) I Installazione del driver UA-700 (FreeMIDI) Seguire la procedura sotto indicata per installare il driver UA-700. Il driver UA-700 FreeMIDI in dotazione è un modulo aggiuntivo che permette di utilizzare l’UA-700 con FreeMIDI. Per poterlo utilizzare, FreeMIDI deve essere già...
- Page 111 Getting Connected and Installing Drivers (Macintosh) Impostazioni FreeMIDI Per controllare le impostazioni FreeMIDI sarà necessario innanzitutto collegare un modulo sonoro MIDI al connettore MIDI OUT dell’UA-700. Per maggiori informazioni sul collegamento del modulo sonoro MIDI, fare riferimento al manuale utente del modulo sonoro MIDI. Utilizzare il cavo USB per collegare l’UA-700 al computer.
- Page 112 Getting Connected and Installing Drivers (Macintosh) Selezionare UA-700 USB nella cartella Settings copiata al passo 3 e fare clic su [Open]. Controllare che l’invio e la ricezione MIDI siano corrette. Nel menu MIDI selezionare Check Connections. fig.fm2 Il cursore del mouse assumerà la forma di una tastiera.
-
Page 113: Installazione Del Driver Asio
Getting Connected and Installing Drivers (Macintosh) Installazione del driver ASIO È necessario installare il driver MIDI anche se si utilizzerà solo l’audio dell’UA-700. Non dimenticare di installare il driver MIDI prima di installare il driver ASIO. In questa sezione viene spiegato come installare il driver ASIO per poter utilizzare l’UA-700 con il software sequencer o un software di editing audio. -
Page 114: Operation
Operation This section explains the function and use for each part of the UA-700. -
Page 115: Names Of Things And What They Do
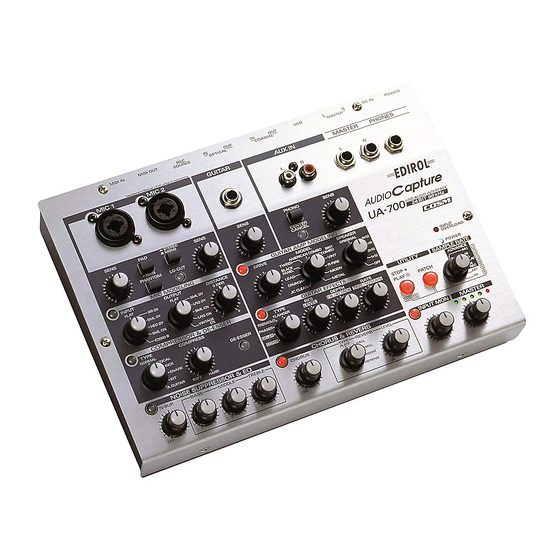
Names of things and what they do The following introduces the various knobs, switches, etc., and explains what they do. Panel The UA-700 can be divided into the main control section, and four control sections for specific purposes. The explanation here is organized by these control sections, and explains the names and functions of each section. -
Page 116: Main Control
Names of things and what they do Main control fig.04-12 1. Master output jacks (phone type) These are analog audio output jacks. They output the same sound as the master output jacks on the rear panel (RCA phono type). Use the set of jacks that is appropriate for the device you are connecting or the cables you are using. - Page 117 Names of things and what they do A. Mic control I Mic input section fig.04-1fig.04-1a XLR type Phone type phone type (Unbalanced) (Balanced) 1. Mic input jacks (MIC1, MIC2) These are input jacks for analog audio signals. You can use either XLR type or phone type connectors, depending on the device you are connecting.
- Page 118 Names of things and what they do 6. STEREO/MONO select switch This selects whether the input from the Mic input jacks will be handled as stereo or monaural. If you select stereo mode, MIC 1 will be recorded on the left channel, and MIC 2 on the right channel. If you select monaural mode, MIC 1 and MIC 2 will be mixed, and the same signal will be recorded on the left channel and right channel.
- Page 119 Names of things and what they do I Mic effect section/Compressor & De-esser fig.04-3 A compressor is an effect that makes the volume more consistent by compressing high input levels and boosting low input levels. A de-esser is an effect that cuts the sibilants from a vocal, producing a softer tone.
- Page 120 Names of things and what they do 3. Compressor level knob Controls the depth of compression. Turning this toward HARD will produce a stronger effect. This knob controls the threshold level (the level at which the effect begins to be applied) and the compressor output level.
- Page 121 Names of things and what they do 3. Model knob (MODEL) Selects the type of guitar amp. Type Character JC CLEAN The sound of a Roland JC-120. A naturally distorted crunch sound. CRUNCH LEAD Powerful, high-gain metal sound. BLACK PANEL Models a Fender Twin Reverb.
- Page 122 Names of things and what they do Flanger Produces a flanging effect which gives a “twisting” character to the sound. Adjusts the amount of resonance (amount of Effect control knob 1 Resonance feedback). Turning the knob clockwise pro- duces a stronger and more distinctive effect. Effect control knob 2 Depth Adjusts the depth of modulation.
- Page 123 Names of things and what they do C. Line control I Line input section fig.04-7 1. Line input jacks Use these jacks to input audio signals from an audio device or MIDI sound module. 2. Input sensitivity knob Adjusts the input level. 3.
- Page 124 Names of things and what they do Equalizer/Tone controls These adjust the tonal character. 3. Bass knob (BASS) Adjusts mainly the lower range. 4. Middle knob (MIDDLE) Adjusts mainly the midrange. 5. Treble knob (TREBLE) Adjusts mainly the upper range. I Chorus/Reverb section Chorus This effect adds a slightly modulated sound to the direct sound, creating beautiful spaciousness...
- Page 125 Names of things and what they do E. Utility section I Sample rate/Patch select fig.04-11 1. Sample rate select switch This selects the sample rate (sampling frequency) that is used when recording or playing audio signals. In order for this setting to take effect, you must exit all applications, switch off the UA-700, then turn it on again.
- Page 126 When you load a patch, all parameters of the patch will be transmitted to your computer in the form of a bulk dump. You can record this bulk dump into your sequencer software in order to save UA-700 patch parameters on your computer. In your sequencer software, select [EDIROL UA-700 CONTROL] as the MIDI port.
-
Page 127: Rear Panel
Names of things and what they do Rear panel fig.04rear 9 10 1. Power switch Press this switch to turn the power on/off. The power is on when the switch is pressed inward. 2. AC adaptor jack Connect the included AC adaptor to this jack. Insert the plug firmly so it won’t get unplugged accidentally. - Page 128 Names of things and what they do 9. Security Slot ( http://www.kensington.com/ 10. Grounding terminal Depending on the conditions under which you use the UA-700, noise may appear in the audio signal. If this occurs, you may be able to solve the problem by connecting this terminal to an external ground connection.
-
Page 129: Application Guide
Application guide This chapter explains various ways in which you can connect and use the UA-700. To prevent malfunction and/or damage to speakers or other devices, always turn down the volume, and turn off the power on all devices before making any connections. Basic use You can connect headphones and/or monitor speakers as shown in the diagram, and monitor the playback of your application, or the sound of instruments or audio devices connected to the... -
Page 130: Recording A Guitar Or Bass
Application guide Recording a guitar or bass With these connections and settings, only the guitar sound will be recorded on your computer when you record into your sequencer application by playing your guitar along with the audio data from your computer. fig.guitar Guitar / Bass Adjust the... -
Page 131: Recording From Mics
Application guide Recording from mics fig.Mic Stereo recording Monaural recording Signal flow Adjust the input level Turn on if using condenser mics Adjust the tone Turn this ON if you want to Adjust the equalizer and monitor the input directly chorus/reverb If you are using condenser mics, turn on the Phantom power switch. -
Page 132: Recording A Keyboard
Application guide Recording a keyboard Here’s how your keyboard performance can be sent to the computer as audio data. The audio data can be recorded on your sequencer software. fig.keyboard Keyboard OUTPUT Select STEREO or MONO Turn PAD Adjust the input level Turn this ON if you want to Signal flow... -
Page 133: Analog Recording From An Audio Device
Application guide Analog recording from an audio device Make connections as shown in the diagram. fig.aux OUTPUT Turn on if using MIDI a record player Sound Module Audio amp Record player (cassette deck) Adjust the input level Cancel the vocal * Depending on your system, the sound may be affected by noise from your computer. -
Page 134: Input Audio From A Cd/Md/Dat To Your Computer
Application guide Input audio from a CD/MD/DAT to your computer Make connections as shown in the diagram. fig.digital CD/MD/DAT player or Optical similar device digital cable Use either OPTICAL or COAXIAL according to the DIGITAL OUT cable you are using. DIGITAL Input the mixed and Input the sound... -
Page 135: Digitally Recording The Ua-700'S Output To An Md
Application guide Digitally recording the UA-700’s output to an MD Make connections as shown in the diagram. fig.MD MD player Use either OPTICAL or COAXIAL according to the cable you are using. DIGITAL IN Optical Coaxial digital cable cable Set to match the sampling frequency of the application you are using or the audio data being played. -
Page 136: Using Asio Direct Monitor
Application guide 2. Adjust the driver buffer size. The following setting will produce the shortest latency. Windows: Set “Audio Buffer Size” to the far left (Min). Macintosh: Set “Buffer Size” to the far left (Min). 3. Click [OK] to close the driver settings dialog box. 4. - Page 137 1. Open the “Control Panel” and double-click “EDIROL UA-700”. 2. The “EDIROL UA-700 Driver Settings” dialog box will appear. In Windows XP, click “Switch to classic view” to switch the display to the classic view. EDIROL UA-700 will not be displayed unless the classic view is selected.
-
Page 138: Advanced Applications
Advanced applications Customizing the effects You can make additional detailed adjustments to the settings of each effect unit. These parameters are called “Custom parameters”. Custom parameters can be controlled using the switches of each section and the effect control knobs of the Guitar Effects section. Guitar Amp Modeling section (p. - Page 139 Advanced applications I Guitar Amp Modeling section NProcedureN fig.02-1 1. Turn the Model knob to select the guitar amp that you want to adjust. 2. Press and hold the Guitar Amp Modeling switch for at least three seconds. The Guitar Amp Modeling switch and the Guitar Effects switch will blink, and the UA-700 will enter a mode that lets you adjust the Guitar Amp Modeling custom parameters.
- Page 140 Advanced applications 3. With the indicators of the Compressor/De-esser switch and Guitar Effects switch both blinking, turn the Guitar Effects section Effect control knobs 1–3 (p. 121) to adjust each custom parameter. Effect control knob 1 Level Effect control knob 2 Attack time Effect control knob 3 Release time...
-
Page 141: Adjusting The Volume Of The Effects
Advanced applications Adjusting the volume of the effects In some cases, the sound may become distorted during recording or playback when delay, reverb, or other effect sound is added. If this occurs, use the following procedure to adjust the level appropriately. -
Page 142: Switching Patches From An External Device
Here’s how the six patches stored in the UA-700 can be selected from your sequencer software. 1. Select [EDIROL UA-700 CONTROL] as the output destination for a MIDI track in your sequencer software that contains MIDI data for switching patches. -
Page 143: Sequencer Control Switch Settings
Settings for SONAR 1.0 1. From the Options menu, choose MIDI Devices. In the MIDI Devices dialog box, select [EDIROL UA-700 CONTROL] as both the Inputs and Outputs. 2. From the Options menu, choose Key Bindings. Make the following settings in the Key Bindings dialog box. -
Page 144: Send/Return Mode
If you are using another sequencer If you press the Sequencer control switch when the button is dark, the following messages will be transmitted from the UA-700 to the MIDI port [EDIROL UA-700 CONTROL] of your computer. fig.02-a Note #00 on... -
Page 145: Restoring The Factory Settings
Advanced applications fig.block3 To cancel Send/Return mode, turn on the power once again without holding down the Input Monitor switch. External input from a guitar or mic is not possible in this EFFECT mode. SYSTEM EFFECT EFFECT GUITAR EFFECT Restoring the factory settings fig.02-6 1. -
Page 146: Bezeichnungen Und Funktionen
Bezeichnungen und Funktionen Es folgt eine Beschreibung der verschiedenen Schaltknöpfe, Schalter etc. und eine Erklärung ihrer Funktionen. Bedienfeld Das UA-700 kann in den Hauptsteuerbereich und vier Steuerbereiche für bestimmte Zwecke eingeteilt werden. Die Erklärungen sind entsprechend diesen Steuerungsgruppen organisiert und erläutern die Namen und Funktionen der einzelnen Gruppen. - Page 147 Bezeichnungen und Funktionen Hauptsteuerung fig.04-12 1. Master-Ausgangsbuchsen (Typ Phone) Dies sind die Analog-Audioausgangsbuchsen. Diese geben den gleichen Sound aus wie die Master-Ausgangsbuchsen an der Rückseite (Typ RCA-Phono). Verwenden Sie die Buchsen, die für das von Ihnen angeschlossene Gerät bzw. für die von Ihnen verwendeten Kabel geeignet sind.
- Page 148 Bezeichnungen und Funktionen I Input-Monitor-Gruppe fig.04-10 1. Input-Monitor-Schalter Schalter für die Auswahl, ob das Eingangssignal von den Mic- Eingangsbuchsen, Gitarreneingangsbuchsen, Line-Eingangsbuchsen und Digitaleingangsbuchsen aus derKopfhörerbuchse, aus den Master- Ausgangsbuchsen oder Digitalausgangsbuchsen ausgegeben werden. Wenn dieser Schalter eingeschaltet ist, wird das Eingangssignal ausgegeben. Wenn dieser Schalter ausgeschaltet ist, wird das Eingangssignal nicht ausgegeben.
- Page 149 Bezeichnungen und Funktionen Dieses Gerät ist mit symmetrischen (XLR/ TRS) Eingangsbuchsen ausgestattet. Die GND(SLEEVE) Schaltpläne für diese Buchsen werden 1:GND 2:HOT HOT(TIP) 3:COLD rechts angezeigt. Nehmen Sie die Anschlüsse vor, nachdem Sie zuerst die COLD(RING) Schaltpläne der weiteren Geräte geprüft haben, die Sie anschließen möchten.
- Page 150 Bezeichnungen und Funktionen I Mic-Effekt-Gruppe/Mic-Modeling fig.04-2 Diese Gruppe kann den Charakter eines kostengünstigen Mikrofons für allgemeine Zwecke in den Charakter eines teuren Studiomikrofons transformieren (Mikrofon -> Mikrofon-Konvertierung). Ähnliche Transformationen können angewendet werden, um den Mikrofontyp und die Distanz von der Soundquelle zu ändern.
- Page 151 Bezeichnungen und Funktionen I Mic-Effektabschnitt/Compressor & De-esser fig.04-3 Ein Kompressor ist ein Effekt, der die Lautstärke konsistenter macht, indem er hohe Eingangspegel komprimiert und niedrige Eingangspegel verstärkt. Ein “De-esser” ist ein Effekt, von dem die Zischlaute einer Stimme ausgeschnitten werden, womit ein sanfterer Ton erzeugt wird.
- Page 152 Bezeichnungen und Funktionen Der Zeitraum, ab dem der Eingangspegel den Schwellpegel überschreitet, bis der Attack Effekt angewendet wird. Der Zeitraum, ab dem der Eingangspegel unterhalb des Schwellpegels fällt, bis der Release Effekt nicht mehr angewendet wird. Das Verhältnis, in dem der Pegel komprimiert wird, wenn das Signal den Schwellpegel Verhältnis überschreitet.
- Page 153 Bezeichnungen und Funktionen 3. Model-Schaltknopf (MODEL) Wählt den Typ Gitarrenverstärker aus. Charakter JC CLEAN Der Sound eines Roland JC-120. Natürlich verzerrter Crunch-Sound. CRUNCH LEAD Mächtiger, High-Gain Metal-Sound. BLACK PANEL Ahmt Fender Twin Reverb nach. TWEED Ahmt Fender Bassman 4 x 10“ Combo nach. AMERICAN COMBO Ahmt einen MESA/Boogie Kombinationsverstärker nach.
- Page 154 Bezeichnungen und Funktionen 3. Effektsteuerungs-Schaltknopf 1 (RES) 4. Effektsteuerungs-Schaltknopf 2 (DEPTH) 5. Effektsteuerungs-Schaltknopf 3 (RATE) Flanger Der "Flanger"-Effekt verleiht dem Ton einen verzerrten" Charakter. Regelt den Umfang der Resonanz (Feedbackmenge). Wenn Sie diesen Effektsteuerung-Schaltknopf 1 Resonanz Schaltknopf in Uhrzeigerrichtung drehen, wird ein deutlicherer Effekt erzielt.
- Page 155 Bezeichnungen und Funktionen Compressor Dieser Effekt macht den Pegel konsistenter, indem er laute Geräusche komprimiert und weiche Klänge verstärkt, der Sound wird gehalten, ohne ihn zu verzerren. Effektsteuerung-Schaltknopf 1 Level Stellt die Lautstärke ein. Passt die Tiefe der Picking-Attack an. Wenn Effektsteuerung-Schaltknopf 2 Attack Sie diesen Schaltknopf in Uhrzeigerrichtung...
- Page 156 Bezeichnungen und Funktionen D. System-Effekt-Regelungsgruppe I Noise-Suppressor/Equalizer-Gruppe fig.04-8 1. Noise-Suppressor/Equalizer-Schalter Schaltet den Noise-Suppressor/Equalizer ein/aus. Diese Effekte werden nicht aktiviert, wenn dieser Schalter ausgeschaltet ist. Noise-Suppressor Dieser Effekt unterdrückt das Brummen und Rauschen, das von einer Gitarrenaufnahme oder von einem Mikrofon verursacht wird. Da Rauschen entsprechend dem Envelope des eingegebenen Sounds reduziert wird (Lautstärkeänderung), wird ein natürlicher Effekt mit praktisch keiner Änderung am Eingabesound erzielt.
- Page 157 Bezeichnungen und Funktionen I Chorus/Reverb-Gruppe Chorus Dieser Effekt ergänzt den direkten Sound mit einem leicht modulierten Sound, der ein schönes Raumgefühl und Tiefe erzeugt. Reverb Dieser Effekt fügt Widerhall hinzu, der für die Aufführung in einer Konzerthalle typisch ist. fig.04-9 1.
- Page 158 Bezeichnungen und Funktionen ADVANCE (Modusauswahl) Schalter Der Sampling-Frequenz-Auswahlschalter wird auch als ADVANCE (Modusauswahl) Schalter verwendet, der den Betriebsmodus festlegt, wenn das UA-700 mit Ihrem Computer verbunden ist. ADVANCE ON (Erweiterter Modus) Bringen Sie den Schalter in Stellung ADVANCE 44,1, 48, 96 PLAY Advance mode is oder 96 REC.
- Page 159 Bulk Dump übertragen. Sie können diesen Bulk Dump in Ihrer Sequenzer-Software aufzeichnen, um die UA-700-Patchparameter auf Ihrem Computer zu speichern. Wählen Sie in Ihrer Sequenzer- Software [EDIROL UA-700 CONTROL] als MIDI-Port aus. GSpeichern eines PatchesG Auf dem UA-700 können Sie die Einstellungen der Mic-Modeling-Gruppe, Kompressor & De-esser- Gruppe, Guitar Amp Modeling-Gruppe, Guitar-Effektgruppe, Noise-Suppressor &...
-
Page 160: Rückseite
Bezeichnungen und Funktionen Rückseite fig.04rear 9 10 1. Netzschalter Drücken Sie diesen Schalter, um den Netzstrom einzuschalten/auszuschalten. Der Netzstrom ist eingeschaltet, wenn der Schalter nach innen gedrückt wird. 2. Wechselstromadapter-Buchse Verbinden Sie den mitgelieferten Wechselstromadapter mit dieser Buchse. Stecken Sie das Kabel fest ein, damit es nicht versehentlich vom Anschluss getrennt werden kann. - Page 161 Bezeichnungen und Funktionen 7. Recording Input-Auswahlschalter Dieser Schalter wählt das Einspeisesignal, das via USB an Ihren Computer als Aufnahmequelle gesendet werden wird. Nur der Input aus der Digitaleingangsbuchse (koaxial oder optisch) wird an den Computer gesendet. DIGITAL Verwenden Sie die Einstellung DIGITAL, wenn Sie Digitaldaten von CD oder MD einspeisen möchten.
-
Page 162: Anleitungen Für Die Verwendung
Anleitungen für die Verwendung In diesem Kapitel werden die verschiedenen Methoden beschrieben, mit denen das UA-700 angeschlossen und verwendet werden kann. Um Fehlfunktionen und/oder Schäden an Lautsprechern oder anderen Geräten zu verhindern, reduzieren Sie stets die Lautstärke und schalten alle Geräte ab, bevor Sie die Verbindungen einrichten. Grundlegende Verwendung Wie im Diagramm gezeigt, können Sie Kopfhörer und/oder Monitor-Lautsprecher anschließen und den Wiedergabesound Ihrer Anwendung bzw. -
Page 163: Aufnahme Von Gitarre Oder Bass
Anleitungen für die Verwendung Aufnahme von Gitarre oder Bass Bei diesen Verbindungen und Einstellungen wird nur der Gitarrensound auf Ihrem Computer aufgenommen, wenn Sie Aufnahmen in Ihrer Sequenzeranwendung aufzeichnen, indem Sie Gitarre begleitet von Audiodaten von Ihrem Computer spielen. fig.guitar.e Guitar / Bass Adjust the input level... -
Page 164: Aufnahme Mit Mikrofon
Anleitungen für die Verwendung Aufnahme mit Mikrofon fig.Mic Stereo recording Monaural recording Signal flow Adjust the input level Turn on if using condenser mics Adjust the tone Turn this ON if you want to Adjust the equalizer and monitor the input directly chorus/reverb Wenn Sie Kondensatormikrofone verwenden, betätigen Sie den Phantomstrom-Schalter. -
Page 165: Aufnahme Von Einem Keyboard
Anleitungen für die Verwendung Aufnahme von einem Keyboard Nachfolgend wird erklärt, wie Ihre Keyboard-Performance an den Computer als Audiodaten gesendet werden kann. Die Audiodaten können auf Ihrer Sequenzersoftware aufgezeichnet werden. fig.keyboard.e Keyboard OUTPUT Select STEREO or MONO Turn PAD Adjust the input level Turn this ON if you want to Signal flow... -
Page 166: Analogaufnahme Von Einem Audiogerät
Anleitungen für die Verwendung Analogaufnahme von einem Audiogerät Nehmen Sie die Anschlüsse wie im Diagramm gezeigt vor. fig.aux OUTPUT Turn on if using MIDI a record player Sound Module Audio amp Record player (cassette deck) Adjust the input level Cancel the vocal * Depending on your system, the sound may be affected by noise from your computer. -
Page 167: Eingabe Von Audio Von Einem Cd/Md/Dat An Ihren Computer
Anleitungen für die Verwendung Vermeiden Sie schleifenförmige Verbindungen fig.loop Audio amp UA-700 (cassette deck, Example of loop connection record player) INPUT LINE OUT OUTPUT LINE IN Wenn das UA-700 wie in der Abbildung oben gezeigt mit einem anderen Gerät verbunden wird, das eingespeiste Sounds an einen Ausgang weitergibt, und wenn der Input Monitor -Schalter eingeschaltet ist, bildet der Sound zwischen dem UA-700 und dem anderen Gerät eine Schleife, die zu elektrischen Schwingungen (Oszillation) sowie zu einer unerwartet hohen Lautstärke führt. - Page 168 Anleitungen für die Verwendung Stellen Sie den Record Source-Auswahlschalter an der Rückseite auf DIGITAL, wenn Sie das Signal von der Digitaleingangsbuchse direkt ohne Verarbeitung eingeben möchten. Bei dieser Einstellung wird das Digitalsignal mit seiner ursprünglichen hohen Qualität eingegeben. Sie werden Equalizer oder Chorus/Reverb nicht anwenden können. Sie werden auch nicht dazu in der Lage sein, über Gitarre oder Mikrofon gemeinsam mit dem Digital-Input Aufzeichnungen zu erstellen.
-
Page 169: Digitale Aufnahme Der Ausgabe Des Ua-700 Auf Einem Md-Gerät
Anleitungen für die Verwendung Digitale Aufnahme der Ausgabe des UA-700 auf einem MD-Gerät Nehmen Sie die Anschlüsse wie im Diagramm gezeigt vor. fig.MD MD player Use either OPTICAL or COAXIAL according to the cable you are using. DIGITAL IN Optical Coaxial digital cable cable... -
Page 170: Regelung Der Audiolatenz
Anleitungen für die Verwendung Regelung der Audiolatenz Bei Verwendung des UA-700 im Erweiterten Modus können Sie die Treibereinstellungen anpassen, um die Latenz des Sounds anzupassen. Um die Latenz anzupassen, ändern Sie die Puffergröße im Dialogfeld für die Treibereinstellungen. Latenz ist die zeitliche Verzögerung zwischen dem Abspielen von Audiodaten durch die Anwendung und der tatsächlichen Wiedergabe aus einem Audiogerät, wie z.B. -
Page 171: Verwendung Des Asio Direct Monitor
Anleitungen für die Verwendung Verwendung des ASIO Direct Monitor Wenn Sie das UA-700 von einer ASIO 2.0-kompatiblen Anwendung aus im Erweiterten Modus einsetzen, kann der Input Monitor-Auswahlschalter des UA-700 automatisch von der ASIO 2.0-kompatiblen Anwendung aus gesteuert werden. 1. Wie in Öffnen des Dialogfelds für die Einstellungen des speziellen Treibers (S. 172) beschrieben, öffnen Sie das Dialogfeld “Treibereinstellungen”. - Page 172 (Unter Windows 98: doppelklicken Sie auf “Multimedia”.) 2. Klicken Sie auf die Registerkarte “Geräte” und doppelklicken Sie auf “Audio-Geräte”. 3. Wählen Sie “EDIROL UA-700 Audio” und klicken Sie anschließend auf die Schaltfläche [Eigenschaften], um die Eigenschaftenzu öffnen. 4. Klicken Sie auf die Schaltfläche [Einstellungen] und das Dialogfeld “EDIROL UA-700 Treibereinstellungen”...
-
Page 173: Erweiterte Verwendung
Erweiterte Verwendung Anpassen der Effekte Sie können zusätzliche detaillierte Anpassungen an den Einstellungen jeder Effekteinheit vornehmen. Diese Parameter werden als “Angepasste Parameter” bezeichnet. Angepasste Parameter können mit Hilfe der Schalter für jede Gruppe und der Effektsteuerungsschaltknöpfe der Guitar-Effektgruppe gesteuert werden. Guitar Amp Modeling-Gruppe (S. - Page 174 Erweiterte Verwendung I Guitar Amp Modeling-Gruppe NVorgehensweiseN fig.02-1 1. Drehen Sie den Model-Schaltknopf , um den Gitarrenverstärker auszuwählen, den Sie regulieren möchten. 2. Drücken und halten Sie mindestens drei Sekunden lang den Guitar Amp Modeling-Schalter . Der Guitar Amp Modeling-Schalter und der Guitar- Effektschalter beginnen zu blinken, und das UA-700 wird in einen Modus versetzt, der es Ihnen erlaubt, die angepassten Parameter für Guitar Amp Modeling...
- Page 175 Erweiterte Verwendung 3. Während die Anzeigen des Compressor/De-essor-Schalters und Guitar Effektschalters beide blinken, drehen Sie in der Guitar-Effektgruppe die Effektsteuerungs-Schaltknöpfe 1–3 (S. 154), um die einzelnen angepassten Parameter zu verstellen. Effektsteuerung-Schaltknopf 1 Level Effektsteuerung-Schaltknopf 2 Attack Time Effektsteuerung-Schaltknopf 3 Release Time 4.
-
Page 176: Regelung Der Lautstärke Der Effekte
Erweiterte Verwendung Regelung der Lautstärke der Effekte In einigen Fällen kann der Sound während der Aufnahme oder Wiedergabe verzerrt klingen, wenn Delay, Reverb oder anderer Effektsound hinzugefügt wird. Wenn das der Fall ist, gehen Sie wie folgt vor, um die Lautstärke entsprechend anzupassen. NVorgehensweiseN 1. -
Page 177: Send/Return-Modus
Erweiterte Verwendung Blockdiagramm fig.block2 SYSTEM EFFECT OUTPUT INPUT MONITOR Effect output level adjustment volume Send/Return-Modus Das UA-700 bietet einen Modus, der es Ihnen ermöglicht, auf Audiodaten, die von Ihrem Computer wiedergegeben werden, Effekte anzuwenden und anschließend erneut auf Ihrem Computer aufzuzeichnen. (Siehe das Blockdiagramm) Verwenden Sie diesen Modus, wenn Sie Effekte auf vorhandene Audiodaten anwenden möchten. -
Page 178: Wiederherstellen Der Werkseitigen Einstellungen
Erweiterte Verwendung Wiederherstellen der werkseitigen Einstellungen fig.02-6 1. Schalten Sie das Geräte ein, während Sie die Schalter Patch Mode und Sequencer Control gedrückt halten. 2. Alle Bedienfeldschalter blinken mehrmals. Die werkseitigen Einstellungen wurden damit wiederhergestellt. Die Patch-Daten wurden auf die ursprünglichen Einstellungen zurückgesetzt. -
Page 179: Définitions
Définitions Les sections suivantes présentent les différents boutons, commutateurs, etc. et leurs fonctions. Face avant On peut considérer l'UA-700 comme étant organisé en une section de contrôle général et quatre sections spécifiques. Les explications données suivent cette organisation et expliquent les noms et les fonctions de chaque section. -
Page 180: Fonctions Générales
Définitions Fonctions générales fig.04-12 1. Sorties générales (type jack) Il s'agit de sorties jack audio analogiques. Leur fonction est identique à celle des prises de sortie générales de la face arrière (type phono RCA). Utilisez les jacks adéquats pour brancher un appareil sur ces prises. 2. -
Page 181: Entrées Micro
Définitions 2. Volume de contrôle d'entrée Ce bouton sert à régler le volume du signal entré sur les prises micro, guitare, ligne et numériques et dirigé vers les sorties casque et générales (Master). Si ce bouton est placé en position , le volume sera le même que celui d'enregistrement. -
Page 182: Commutateur D'alimentation Fantôme (Phantom 48V)
Définitions 4. Commutateur d'alimentation fantôme (PHANTOM 48V) Ce commutateur à deux positions contrôle l'alimentation fantôme fournie aux prises d'entrée micro de type XLR. * Vous devez désactiver cette alimentation si vous voulez brancher avec des câbles de type XLR un appareil ou instrument ne nécessitant pas d'alimentation fantôme, sinon vous risqueriez d'endommager l'appareil ou l'instrument. - Page 183 Définitions Micro avec réponse de fréquences uniforme. Utilisez ce type pour éliminer les FLAT caractéristiques particulières du micro utilisé à l'enregistrement. Micro à condensateur avec réponse de fréquences uniforme. Adapté aux vocaux, aux LRG CN narrations et aux instruments acoustiques. Micro à...
-
Page 184: Bouton De Niveau De Compression
Définitions Compression adaptée à une batterie complète. Attaque Médium Sortie Médium A.GUITAR Adapté à l'enregistrement des guitares acoustiques. Contrôle le son avec délicatesse, produisant un effet naturel en cas de réverb ou de chorus ajouté. Taux Bas (2 : 1) Attaque Rapide Sortie... - Page 185 Définitions I Section Guitar Amp Modeling fig.04-5 Utilisant la technologie COSM, le bouton MODEL permet de simuler les caractéristiques d'un ampli guitare, alors que le bouton SPEAKER permet de simuler la taille du haut-parleur et le style d'enceinte. 1. Commutateur Guitar Amp Modeling Permet d'activer/désactiver la modélisation d'ampli guitare.
- Page 186 Définitions I Section d'effets guitare fig.04-6 1. commutateur d'effets guitare Active ou désactive les effets guitare. 2. bouton de sélection de type d'effet Sélectionnez entre Flanger, Tremolo, Phaser, Delay et Compressor. La fonction des boutons de réglage d'effet 1, 2 et 3 dépendra de l'effet sélectionné. Quand vous sélectionnez un effet, ses paramètres par défaut sont ceux réglés en usine.
-
Page 187: Ligne
Définitions Delay Ajoute un son retardé au son direct, produisant une sensation de profondeur accrue. bouton de réglage d’effet 1 Level Règle le volume du son retardé. Règle le niveau du son retardé renvoyé sur l'entrée du delay. En tournant ce bouton vers la bouton de réglage d’effet 2 Feedback droite, vous augmenterez le nombre de... -
Page 188: Effets Système
Définitions D. Section de réglage d'effets système I Section Noise Suppressor & EQ fig.04-8 1. Commutateur Noise Suppressor & Eq Active ou désactive l'effet Noise suppressor & Eq. L'effet sera ignoré si ce commutateur est désactivé. Noise Suppressor Cet effet supprime les bruits repris par un micro guitare ou chant. Etant donné que le bruit est réduit selon une enveloppe (variation de volume) autour du son entré, un effet naturel est obtenu sans modifier de façon perceptible les caractéristiques du son entré. -
Page 189: Commutateur De Type De Réverb
Définitions 3. Commutateur de type de réverb Sélectionne le type de réverbération. Il est possible de simuler différents effets acoustiques, en fonction de la position du bouton. Type Caractéristique Simule une unité de réverb à plaque métallique. (Unité de réverb qui Plate (PLATE) utilise les vibrations d'une plaque métallique.) Cette réverb se caractérise par une résonance métallique complétée par des fréquences aiguës. -
Page 190: Commutateur Utility (Séquenceur)
Définitions Sélecteur ADVANCE Le sélecteur de taux d'échantillonnage sert également de sélecteur ADVANCE pour spécifier le mode opératoire utilisé lorsque l'UA-700 est connecté à votre ordinateur. ADVANCE ON (mode Avancé) Placez le commutateur sur ADVANCE 44.1, 48, 96 PLAY ou 96 REC. Advance mode is ADVANCE OFF (Mode pilote Standard) Placez le commutateur sur la position... - Page 191 Vous pouvez enregistrer ce dump dans votre logiciel séquenceur dans le but de sauvegarder les paramètres de patch de l'UA-700 sur votre ordinateur. Dans votre logiciel séquenceur, sélectionnez [EDIROL UA-700 CONTROL] comme port MIDI. GSauvegarde d'un patchG Sur l'UA-700, la configuration des sections de modélisation de micros, de compresseur et de-esser,...
-
Page 192: Face Arrière
Définitions Face arrière fig.04rear 9 10 1. Interrupteur d'alimentation (POWER) Cet interrupteur permet de mettre l’appareil sous/hors tension. L'alimentation est activée lorsque l'interrupteur est enfoncé. 2. Prise d'adaptateur secteur Branchez l’adaptateur secteur livré avec l'appareil sur cette prise. Enfoncez fermement la fiche afin d'éviter qu'elle ne se débranche accidentellement. -
Page 193: Sélection De La Source D'enregistrement
Définitions 7. Sélection de la source d’enregistrement Ce sélecteur permet de sélectionner le signal entrant qui sera envoyé via USB à votre ordinateur en tant que source d'enregistrement. Seuls les signaux arrivant sur la prise numérique (coaxiale ou optique) seront envoyés à l'ordinateur. -
Page 194: Guide Des Applications
Guide des applications Ce chapitre décrit les différentes manières de connecter et d'utiliser l'UA-700. Afin d’éviter un mauvais fonctionnement et/ou d’endommager les haut-parleurs et autres périphériques, diminuez toujours le volume et mettez toujours les périphériques hors tension avant d’effectuer toute connexion. -
Page 195: Enregistrement D'une Guitare Ou D'une Basse
Guide des applications Enregistrement d’une guitare ou d’une basse Avec ces connexions et ces réglages, seule la guitare sera enregistrée sur votre ordinateur lorsque vous jouez (accompagnez) de l'audio avec le logiciel séquenceur. fig.guitar Guitar / Bass Adjust the input level Signal flow Adjust the effects... -
Page 196: Enregistrement Avec Des Micros
Guide des applications Enregistrement avec des micros fig.Mic Stereo recording Monaural recording Signal flow Adjust the input level Turn on if using condenser mics Adjust the tone Turn this ON if you want to Adjust the equalizer and monitor the input directly chorus/reverb Si vous utilisez un micro à... -
Page 197: Enregistrement Avec Un Clavier
Guide des applications Enregistrement avec un clavier Vous pouvez enregistrer ce que vous jouez au clavier sur votre ordinateur en tant que données audio. Ces données audio peuvent être enregistrées par votre logiciel séquenceur. fig.keyboard Keyboard OUTPUT Select STEREO or MONO Turn PAD Adjust the input level... -
Page 198: Enregistrement Analogique D'un Appareil Audio
Guide des applications Enregistrement analogique d'un appareil audio Etablissez les connexions comme indiqué sur la figure. fig.aux OUTPUT Turn on if using MIDI a record player Sound Module Audio amp Record player (cassette deck) Adjust the input level Cancel the vocal * Depending on your system, the sound may be affected by noise from your computer. -
Page 199: Evitez Les Connexions En Boucle
Guide des applications Evitez les connexions en boucle fig.loop Audio amp UA-700 (cassette deck, Example of loop connection record player) INPUT LINE OUT OUTPUT LINE IN Si l'UA-700 est connecté, comme montré dans la figure ci-dessus, à un appareil qui renvoie l'audio entré... -
Page 200: Convertisseur De Taux D'échantillonnage Intégré
Guide des applications Placez le sélecteur RECORD SOURCE sur MIX si vous désirez mélanger les sons entrés par les prises jack MIC ou GUITAR avec le signal entré par la prise jack DIGITAL et enregistrer le résultat. Avec cette configuration, vous pourrez appliquer des effets d'égalisation et de chorus/réverb. Placez le sélecteur RECORD SOURCE de la face arrière sur DIGITAL si vous désirez entrer directement le signal de la prise jack DIGITAL sans traitement. -
Page 201: Enregistrement Numérique De L'ua-700 Sur Un Md
Guide des applications Enregistrement numérique de l'UA-700 sur un MD Etablissez les connexions comme indiqué sur la figure. fig.MD MD player Use either OPTICAL or COAXIAL according to the cable you are using. DIGITAL IN Optical Coaxial digital cable cable Set to match the sampling frequency of the application you are using or the audio... -
Page 202: Utilisation D'asio Direct Monitor
Guide des applications 2. Modifiez la taille des buffers du pilote (buffer size). Les réglages suivants permettre de réduire la latence au minimum. Windows : Réglez “Audio Buffer Size” au maximum vers la gauche (Min). Macintosh : Réglez “Buffer Size” au maximum vers la gauche (Min). 3. -
Page 203: Ouverture De La Boîte De Dialogue Des Paramètres Du Pilote Spécial
Avec le pilote WDM et Windows XP/2000 : 1. Ouvrez le “Panneau de configuration” et cliquez deux fois sur l'icône “EDIROL UA-700”. 2. La boîte de dialogue “EDIROL UA-700 Driver Settings” s’affiche. Avec Windows XP, cliquez sur “Switch to classic view” (Vue classique) pour passer en mode Vue classique. -
Page 204: Applications Avancées
Applications avancées Personnalisation des effets Vous pouvez configurer individuellement les paramètres de chaque unité d’effets. Ces paramètres sont appelés des “Paramètres personnalisés”. Les paramètres personnalisés peuvent être configurés à l’aide des commutateurs de chaque section et des boutons de réglage de la section Guitar Effects. Section Guitar Amp Modeling (p. - Page 205 Applications avancées I Section Guitar Amp Modeling NProcédureN fig.02-1 1. Tournez le bouton Model pour sélectionner un ampli guitare. 2. Maintenez enfoncé le commutateur Guitar Amp Modeling pendant au moins trois secondes. Le commutateur Guitar Amp Modeling et le commutateur Guitar Effects clignotent, l’UA-700 bascule dans un mode qui vous permet de régler les paramètres personnalisés de la section Guitar Amp Modeling.
- Page 206 Applications avancées 2. Maintenez enfoncé le commutateur Compressor/De-esser pendant au moins trois secondes. Le commutateur Compressor/De-esser et le commutateur Guitar Effects clignotent, l’UA-700 bascule dans un mode qui vous permet de régler les paramètres personnalisés du compresseur. 3. Les témoins du commutateur Compressor/De-esser et du commutateur Guitar Effects clignotant tous les deux, tournez les boutons de réglage 1–3 de la section Guitar Effects (p.
-
Page 207: Réglage Du Volume Des Effets
Applications avancées 3. Appuyez à nouveau sur le commutateur Chorus/Reverb pour l’allumer. Le commutateur Guitar Effects s’arrête de clignoter, vous quittez le mode de réglage des paramètres personnalisés. Les paramètres personnalisés que vous avez réglés retrouvent leur configuration d’usine à la mise hors tension. -
Page 208: Send/Return Afx
Applications avancées Schéma fig.block2 SYSTEM EFFECT OUTPUT INPUT MONITOR Effect output level adjustment volume Send/Return AFX L'UA-700 dispose d'un mode qui vous permet d'appliquer des effets aux données audio lues par votre ordinateur, puis de les réenregistrer sur votre ordinateur. (Voir le schéma) Utilisez ce mode si vous voulez appliquer des effets à... -
Page 209: Restauration Des Paramètres D'usine
Applications avancées Restauration des paramètres d’usine fig.02-6 1. Mettez l'appareil sous tension tout en maintenant enfoncé le commutateur Patch et le commutateur Utility. 2. Tous les voyants clignotent plusieurs fois. Les réglages d'usine sont restaurés. Les données de patch sont également restaurées à leurs valeurs d'usine. -
Page 210: Parti E Relative Funzioni
Parti e relative funzioni Il seguente capitolo presenta i vari controlli, interruttori e altri elementi dell’apparecchio e le relative funzioni. Panello Il pannello dell’UA-700 è suddiviso in una sezione principale e in altre quattro sezioni destinate ciascuna a un uso specifico. Le informazioni di seguito contenute sono organizzate sezione per sezione con spiegazione dei relativi controlli e funzioni. - Page 211 Parti e relative funzioni Controlli principali fig.04-12 1. Prese d’uscita Master (doppino telefonico) Sono uscite audio analogiche. Trasmettono lo stesso suono delle prese d’uscita masterdel pannello posteriore (tipo RCA phono). Utilizzare il gruppo di prese adeguate all’apparecchio o ai cavi utilizzati. 2.
-
Page 212: Controlli Microfono
Parti e relative funzioni 2. Controllo del volume dell’input Questa manopola permette di regolare il volume del segnale proveniente dalle prese d’ingresso microfono, chitarra, linea e digitale e emesso dalle prese cuffia o master. Se questa manopola è in posizione , il volume sarà... - Page 213 Parti e relative funzioni 4. Interruttore di alimentazione phantom (PHANTOM 48V) Attiva o disattiva l’alimentazione phantom delle prese d’ingresso microfono di tipo XLR. * Disattivare questo controllo se alle prese XLR viene collegato un dispositivo che non utilizza l’alimentazione phantom in modo da evitare eventuali danni o malfunzionamenti all’apparecchio collegato. 5.
- Page 214 Parti e relative funzioni Un microfono con una risposta in frequenza piatta. Utilizzare questo tipo di FLAT microfono per eliminare le idiosincrasie del microfono utilizzato per registrare. Un microfono condenser con una risposta in frequenza piatta. Adatto per LRG CN vocalismi, narrazione e strumenti acustici.
-
Page 215: Controlli Chitarra
Parti e relative funzioni SNARE Compressione indicata per registrare un snare drum. Produce un suono potente e pesante. Rapporto alto (8 : 1) Attacco veloce Release veloce Compressione indicata per registrare un intero drum kit. Rapporto medio (4 : 1) Attacco medio Release... - Page 216 Parti e relative funzioni I Sezione Guitar Amp Modeling fig.04-5 Grazie alla tecnologia COSM, la manopola Model simula le caratteristiche di un amplificatore per chitarra mentre la manopola Speaker simula le dimensioni degli altoparlanti e il tipo di cabinet. 1. Interruttore Guitar Amp Modeling Attiva o disattiva la modellazione di amplificatori per chitarra.
- Page 217 Parti e relative funzioni I Sezione Guitar Effects fig.04-6 1. Interruttore Guitar Effects Attiva o disattiva gli effetti chitarra. 2. Manopola Type di selezione del tipo di effetto Selezionare Flanger, Tremolo, Phaser, Delay o Compressor. La funzione delle manopole 1, 2 e 3 di controllo degli effetti dipende dall’effetto selezionato. Subito dopo aver selezionato un effetto, i parametri corrispondenti verranno configurati in base alle impostazioni di fabbrica.
-
Page 218: Controlli Linea
Parti e relative funzioni Delay Aggiunge un suono ritardato al suono d’origine per dare l’impressione di profondità. Manopola 1 di controllo degli effetti Level Regola il volume del suono ritardato. Regola la quantità di suono che verrà sottoposta nuovamente all’effetto delay. Manopola 2 di controllo degli effetti Feedback Ruotare la manopola in senso orario per... -
Page 219: Controlli Effetti Sistema
Parti e relative funzioni D. Sezione dei controlli effetti sistema I Sezione Noise Suppressor/Equalizer fig.04-8 1. Interruttore Noise Suppressor/Equalizer Attiva o disattiva l’equalizzatore e l’effetto noise suppressor. Se l’interruttore è in posizione off, gli effetti non sono applicati. Noise suppressor Questo effetto elimina il ronzio e il rumore ambientali tipici di quando si utilizza la chitarra o il microfono. -
Page 220: Utility
Parti e relative funzioni 2. Manopola di livello dell’effetto Chorus Regola il volume del suono dell’effetto. 3. Interruttore di selezione Reverb Type Seleziona il tipo di riverbero. È possibile simulare un’ampia serie di spazi acustici a seconda della posizione della manopola. Tipo Descrizione Simula il riverbero di una piastra. - Page 221 Parti e relative funzioni ADVANCE (interruttore di selezione del modo) L’interruttore di selezione della frequenza di campionamento viene utilizzato anche come interruttore di selezione del modo ADVANCE che imposta il modo operativo quando l’UA-700 è collegato al computer. Modo ADVANCE ATTIVATO (modo Advanced) Impostare l’interruttore ADVANCE su Advance mode is...
- Page 222 Questo bulk dump può essere registrato nel software sequencer in modo da poter salvare sul computer i parametri patch dell’UA-700. Nel software sequencer selezionare [EDIROL UA-700 CONTROL] come porta MIDI. GCome salvare un patchG È possibile scegliere uno dei sei patch disponibili e salvare nell’UA-700 le impostazioni relative alle sezioni di modellazione microfono e amplificatore per chitarra, compressor e de-esser, effetti chitarra, noise suppressor e equalizer, effetti reverb e chorus, nonché...
-
Page 223: Pannello Posteriore
Parti e relative funzioni Pannello posteriore fig.04rear 9 10 1. Interruttore di alimentazione Attiva o disattiva l'alimentazione. L’apparecchio è alimentato quando l’interruttore risulta premuto. 2. Presa per adattatore AC Collegare l’adattatore AC in dotazione a tale presa. Inserire bene la spina per evitare che esca accidentalmente. - Page 224 Parti e relative funzioni 8. Connettori MIDI IN/OUT Collegare questi connettori ai connettori MIDI di altri dispositivi per permettere lo scambio di messaggi MIDI con il computer. 9. Slot per la sicurezza ( http://www.kensington.com/ 10. Contatto di messa a terra A seconda di come viene utilizzato l’UA-700, il segnale audio potrebbe risultare disturbato.
-
Page 225: Guida All'uso
Guida all’uso Questo capitolo illustra i vari collegamenti e usi possibili dell’UA-700. Per evitare malfunzionamenti e/o danni ai diffusori o ad altri dispositivi, abbassare sempre il volume e accertarsi che tutti gli apparecchi non siano alimentati prima di effettuare i collegamenti. Nozioni fondamentali È... -
Page 226: Registrazione Di Una Chitarra O Di Un Basso
Guida all’uso Registrazione di una chitarra o di un basso Quando si utilizza un’applicazione sequencer per registrare la chitarra e i dati audio del computer con i collegamenti e le impostazioni illustrate di seguito sarà possibile registrare solo la chitarra sul computer. -
Page 227: Registrazione Da Microfoni
Guida all’uso Registrazione da microfoni fig.Mic Stereo recording Monaural recording Signal flow Adjust the input level Turn on if using condenser mics Adjust the tone Turn this ON if you want to Adjust the equalizer and monitor the input directly chorus/reverb Quando si utilizza un microfono condenser, attivare l’interruttore Phantom power. -
Page 228: Registrazione Di Una Tastiera
Guida all’uso Registrazione di una tastiera Nei paragrafi che seguono viene illustrato come inviare i suoni della chitarra al computer sotto forma di dati audio. I dati audio possono essere registrati nel software sequencer. fig.keyboard Keyboard OUTPUT Select STEREO or MONO Turn PAD Adjust the input level... -
Page 229: Registrazione Analogica Da Un Dispositivo Audio
Guida all’uso Registrazione analogica da un dispositivo audio Effettuare i collegamenti come illustrato. fig.aux OUTPUT Turn on if using MIDI a record player Sound Module Audio amp Record player (cassette deck) Adjust the input level Cancel the vocal * Depending on your system, the sound may be affected by noise from your computer. -
Page 230: Trasmettere I Dati Audio Da Un Cd/Md/Dat Al Computer
Guida all’uso Evitare i collegamenti a ciclo chiuso fig.loop Audio amp UA-700 (cassette deck, Example of loop connection record player) INPUT LINE OUT LINE IN OUTPUT Se l’UA-700 è collegato come illustrato a un dispositivo che ne riceve i dati audio e li rinvia dall’uscita e l’interruttore di controllo dell’input è... -
Page 231: Registrazione Digitale Dell'output Dell'ua-700 Su Un Md
Guida all’uso Impostare l’interruttore Record Source su DIGITAL per trasmettere direttamente il segnale proveniente dalla presa d’ingresso digitale senza elaborarlo. Questa impostazione permette di conservare l’alta qualità del segnale d’origine. Non sarà possibile applicare gli effetti equalizer o chorus/reverb e nemmeno registrare l’input della chitarra o dei microfoni insieme all’input digitale. -
Page 232: Regolazione Della Latenza Audio
Guida all’uso Impostare l’interruttore di selezione della frequenza di campionamento dell’UA-700 su una frequenza supportata dal dispositivo utilizzato per la registrazione, ad esempio un MD. Si ricorda che anche l’applicazione utilizzata deve essere configurata con la stessa frequenza di campionamento. L’UA-700 non supporta i formati audio di dispositivi audio professionali digitali. - Page 233 5. Fare clic sulla scheda “Proprietà” e nella zona “Periferiche multimediali” fare doppio clic su “Periferiche audio”. 6. Selezionare “EDIROL UA-700” e fare clic sul pulsante [Proprietà]. 7. Fare clic sul pulsante [Impostazioni] e verrà visualizzata la finestra di dialogo “EDIROL UA-700 Driver Settings”. Se si utilizza Windows Me/98: 1.
-
Page 234: Applicazioni Avanzate
Applicazioni avanzate Personalizzazione degli effetti È possibile personalizzare la configurazione di ogni modulo effetti. I parametri che hanno subito questa operazione sono definiti di seguito come “parametri personalizzati”. I parametri personalizzati possono essere gestiti tramite gli interruttori di ogni sezione e le manopole degli effetti della sezione Guitar Effects. - Page 235 Applicazioni avanzate I Sezione Guitar Amp Modeling NProceduraN fig.02-1 1. Ruotare la manopola Model per selezionare l’amplificatore per chitarra da impostare. 2. Tenere premuto l’interruttore Guitar Amp Modeling per almeno tre secondi. L’interruttore Guitar Amp Modeling e l’interruttore Guitar Effects lampeggeranno ad indicare l’UA-700 è nel modo che permette di impostare i parametri personalizzati Guitar Amp Modeling.
- Page 236 Applicazioni avanzate 3. Quando gli indicatori degli interruttori Compressor/De-esser e Guitar Effects lampeggiano, utilizzare le manopole di controllo degli effetti 1–3 (pag. 217) della sezione Guitar Effects per regolare ogni parametro personalizzato. Manopola 1 di controllo degli effetti Level Manopola 2 di controllo degli effetti Attack Time Manopola 3 di controllo degli effetti Release Time...
-
Page 237: Regolare Il Volume Degli Effetti
Applicazioni avanzate Regolare il volume degli effetti. In alcuni casi, dopo applicazione degli effetti, ad esempio delay, reverb o altri ancora, il suono potrebbe risultare alterato durante la registrazione o la riproduzione. In questo caso seguire la procedura sotto illustrata per regolare opportunamente il livello. NProceduraN 1. -
Page 238: Modo Send/Return
Applicazioni avanzate Schema di flusso fig.block2 SYSTEM EFFECT OUTPUT INPUT MONITOR Effect output level adjustment volume Modo Send/Return Sull’UA-700 si troverà un modo che permette di applicare gli effetti ai dati audio riprodotti dal computer per registrarli di nuovo nel computer. (Vedere lo schema di flusso.) Utilizzare questo modo per applicare degli effetti a dati audio esistenti. -
Page 239: Ripristino Delle Impostazioni Di Fabbrica
Applicazioni avanzate Ripristino delle impostazioni di fabbrica fig.02-6 1. Accendere l’apparecchio tenendo premuti gli interruttori Patch Mode e Sequencer Control. 2. Tutti i pulsanti del pannello lampeggeranno più volte. Le impostazioni di fabbrica sono state ripristinate Verranno ripristinati anche i dati patch. Limiti a 96 kHz •... -
Page 240: Troubleshooting
Device Manager shows “?”, “!”, or “USB Composite Device” ........242 The “Insert Disk” dialog box does not appear ..............242 A dialog box says “Can't use driver required by USB device 'EDIROL UA-700'” ..243 Problems when using the UA-700 .................... 243 Operating system becomes unstable .................. -
Page 241: Problems Related To The Usb Driver
Troubleshooting Problems common to Windows and Macintosh Problems occurring only in Windows Problems occurring only in Macintosh Problems related to the USB driver An “Unknown driver found” dialog box appears, and you are unable to install the driver “Find new hardware wizard” does not execute automatically “Find new hardware wizard”... -
Page 242: Found Unknown Device" Appears Even Though You Installed The Driver
Troubleshooting “Found unknown device” appears even though you installed the driver If your computer or USB hub has two or more USB connectors, and you connect the UA-700 to a USB connector to which the UA-700 has never been connected before, the “Unknown device” dialog box may appear even on a computer onto which you have already installed the driver. -
Page 243: Problems When Using The Ua-700
[OK]. In the same way, delete all indications of “?Composite USB Device”, “?USB Device”, “USB Device”, and “USB composite device” that you find. 8. If you find EDIROL UA-700 with a yellow “!” or a red “?” displayed beside it, delete this in the same way. - Page 244 Troubleshooting In order for the setting to take effect, you must exit all applications, switch off the UA-700, then turn it back on again. (1. Sample rate select switch (p. 125)) • Is it possible that the UA-700’s Master volume has been placed at 0 (turned fully counterclockwise)? •...
-
Page 245: Can't Play Back / Record Midi
Also make sure that the input port and output port are set as follows in your software. INPUT port OUTPUT port EDIROL UA-700 MIDI IN EDIROL UA-700 MIDI OUT • Has the MIDI device you are using been selected correctly? Select [UA-700 MIDI IN/OUT] as the MIDI output device. -
Page 246: Sound From Devices Connected To The Input Jack Is Not Heard In The Headphones
Troubleshooting fig.2-30 4. Click the Advanced tab. 5. At the right of the Performance field, click [Settings]. The Performance Options dialog box will appear. 6. Click the Advanced tab. 7. In the Processor Scheduling field, select “Background services”, and click [OK]. 8. -
Page 247: Sound Is Interrupted During Audio Playback
Troubleshooting • Are two or more audio devices such as the UA-700 or a mixer connected to your computer? Try connecting only a single UA-700 unit, and check whether the noise disappears. If numerous audio devices are connected to a computer, noise may occur depending on your system. In such cases, connect only the UA-700 to your computer. - Page 248 Troubleshooting For Windows 2000, click Advanced, and then click the Troubleshooting tab. 3. Set the Hardware acceleration slider to None, and click [OK]. 4. In the Display Properties dialog box, click [OK] to close the dialog box. Then restart your computer.
-
Page 249: Digitally Recorded Sound Is Distorted, Is At The Wrong Pitch, Or Contains Noise
7. In the System Properties dialog box, click [OK]. 8. Restart Windows. • If you are using the special driver, you can solve this problem in the “EDIROL UA-700 Driver Settings” dialog box. For details, refer to the section “Something is wrong with playback; sound is interrupted or notes are missing”... -
Page 250: Playback Or Recording Halts Midway Through, And Then Becomes Impossible
Troubleshooting • Does the sampling frequency setting of your application match the setting of the UA-700’s sampling frequency switch? Playback or recording halts midway through, and then becomes impossible • Was a heavy processing load experienced while using the UA-700, such as accessing the CD-ROM drive or a network? If an operation involving a heavy processing load is performed while the UA-700 is in use, it may not operate correctly. -
Page 251: Deleting The Special Driver
5. Exit all applications before deleting the driver. 6. Open the Control Panel, and double-click System. * In Windows XP, click “Switch to classic view” to switch the display to the classic view. EDIROL UA-700 will not be displayed unless the classic view is selected. -
Page 252: Windows Me/98 Users
9. From the list, click “EDIROL UA-700 (WDM)” or “EDIROL UA-700 (MMX)” to select it. Then right-click, and from the menu that appears, select “Delete”. * If “EDIROL UA-700 (WDM)” or “EDIROL UA-700 (MMX)” does not appear in the list, refer to the “Can’t install/delete/use the driver in Windows XP/2000” section (p. 242) in “Troubleshooting”. -
Page 253: Macintosh Users
Troubleshooting 17. Restart Windows. Macintosh users 1. Disconnect the USB cable (by which the UA-700 is connected) from your Macintosh. 2. From the system extensions folder, drag “USB UA-700 Driver” into the trash to delete it. 3. Delete UA-700 from the OMS Folder inside the System folder, or drag UA-700 Driver from the FreeMIDI Folder to the trash. -
Page 254: Midi Implementation
MIDI implementation GData Set 1 (DT1) The operation of the UA-700 can be controlled by MIDI messages. The following MIDI messages are used for control. These messages transmit the actual data, and are used to transfer data settings to a device. - Page 255 MIDI implementation 2. Individual parameter transfer 0 - +127 0=zero - 100=0dB - 127=+6dB 00 20 00 6d Comp & De-Esser Snare Ratio Individual parameter transfer allows a single exclusive message (a “F0...F7” packet) 0 - +8 1.0:1/1.2:1/1.5:1/2.0:1/2.8:1/4.0:1/8.0:1/ to transmit (or request transmission of) data for a single parameter. 16.0:1/inf:1 Use the addresses in the parameter address map listed below for individual 00 20 00 71...
- Page 256 MIDI implementation 00 20 01 65 Amp Modeling Crunch Pre Drive 0 - +127 00 20 01 69 Amp Modeling Crunch Pre Lowcut -32 - 0 Parameter no. Address Parameter Range Default Comment 00 20 01 6d Amp Modeling Crunch Pre Highcut -32 - 0 00 20 01 71 Amp Modeling Crunch Bottom...
- Page 257 MIDI implementation 00 20 03 75 Amp Modeling R-Fire Treble 1 - 420 1ms - 150ms - 420ms , step 1ms -24 - 24 00 20 04 7d Guitar Effect Delay Feedback 00 20 03 79 Amp Modeling R-Fire Presence 0 - +98 0% - 98% -24 - 24...
- Page 258 MIDI implementation 00 20 06 05 Chorus & Reverb Room HF Damp -10 - 0 00 20 06 09 Chorus & Reverb Spring Time 1 - 100 0.1s - 10.0s, step 0.1s Parameter no. Address Parameter Range Default Comment 00 20 06 0d Chorus &...
- Page 259 MIDI implementation GExample of an actual MIDI message 4. Supplementary material <Example1> CE 04 CnH is the Program Change status. “n” is the MIDI channel number. EH = 14, and GDecimal and Hexadecimal table 04H = 04. Thus, this is a program change message on MIDI channel 15, for program (An “H”...
-
Page 260: Midi Implementation Chart
MIDI implementation USB AUDIO INTERFACE Date : June 1, 2002 MIDI Implementation Chart Model: UA-700 Version : 1.00 Transmitted Recognized Function... Remarks Basic Default 1–16 Channel Changed Default Mode 2 Mode Messages Altered ************** Note Number : True Voice ************** Note On Velocity Note Off... -
Page 261: Specifications
Specifications I UA-700: USB Audio Interface GNumber of Audio Record/Playback GEffects N Guitar effects Channels Amp modeling Record: 1 pair of stereo Modeling type: 11 types Playback: 1 pair of stereo JC CLEAN, CRUNCH, LEAD, BLACK PANEL, TWEED, * Full duplex (except for 96 kHz setting) AMERICAN COMBO, BRIT COMBO, VINTAGE GSignal Processing STACK, R-FIRE STACK,... - Page 262 Specifications GConnectors GDimensions MIC Input Jack 1, 2 257 (W) x 183.5 (D) x 58.3 (H) mm (XLR type (phantom power), 1/4 inch TRS phone type) 10-1/8 (W) x 7-1/4 (D) x 2-5/16 (H) inches Guitar Input Jack GWeight (Mono 1/4 inch phone type) 1.3 kg / 2 lbs 14 oz AUX Input Jack GAccessories...
-
Page 263: Index
Index Numerics Bouton de réglage d’effet 1 ............ 247 24-bit Bouton de réglage d’effet 2 ......115 96 kHz Bouton de réglage d’effet 3 ... Bouton de sélection de type d'effet....Bouton de sélection de type de compresseur ........127 AC adaptor jack ........ - Page 264 ......Compressor, manopola del livello ..........215 dell’effetto EDIROL UA-700.......138 Compressor/De-esser section EDIROL UA-700 CONTROL....Compressor/De-esser switch ....214 Compressor/De-esser, interruttore Effect control knob 1 .... Effect control knob 2 ...... Compressor/De-esser, sezione....
- Page 265 Index Effect type select knob ........Giradischi ............Effects ..............Gitarre ..............Effekte ..............Gitarren-Eingangsbuchse..........152 Effekt-Output-Lautstärke......... Gitarreneingangsbuchse Effektsteuerung-Schalter ........Grounding terminal............... 174 Effektsteuerung-Schaltknopf Guadagno, interruttore di selezione ......154 Effektsteuerung-Schaltknopf 1 Guitar ..............120 Guitar Amp Modeling section Effektsteuerung-Schaltknopf 2 ..
- Page 266 Index Input Monitor, interruttore ............201 Latence Input Monitor, interruttore di controllo..Latence audio..................... 135 Input Monitor, manopola..... Latency Input Monitor, manopola di controllo ... Latenz..............Input Monitor, sezione ........Latenza..............Input Monitor, volume ........Latenza audio ..............
- Page 267 Index Mic-Effektabschnitt/Compressor & .. 219 Noise suppressor, manopola di sensibilità ..........151 De-esser ..123 Noise Suppressor/Equalizer section .... 150 Mic-Effekt-Gruppe/Mic-Modeling ... 123 Noise Suppressor/Equalizer switch ....... 165 Mic-Eingangsbuchse ... 219 Noise Suppressor/Equalizer, interruttore ......148 Mic-Eingangsbuchsen Noise Suppressor/Equalizer, sezione..... Mic-Input-Gruppe ..........Noise-Suppressor ..........
- Page 268 Index Phantom, interruttore di ....127 Recording source select switch ......212 alimentazione Recording Source-Auswahlschalter ......148 Phantomstrom-Schalter ........116 Phone type Regelungsmodus für angepasste ........155 ..........175 Phono Equalizer Parameter Regelungsmodus für die Effekt- phono equalizer .................. 176 Output-Lautstärke Phono equalizer switch ......
- Page 269 Index ..........148 Section Utility............. Typ XLR .......... 128 ..........180 Security Slot Type jack ......190 Sélecteur ADVANCE Sélecteur de gain....................11 ..193 Sélecteur de source d'enregistrement ..........12 USB cable Sélecteur de taux ........127 USB connector d'échantillonnage......
- Page 270 MEMO...
-
Page 271: Declaration Of Conformity
For the USA DECLARATION OF CONFORMITY Compliance Information Statement Model Name : UA-700 Type of Equipment : USB Audio Interface Responsible Party : Edirol Corporation North America Address : 425 Sequoia Drive, Suite 114, Bellingham, WA 98226 Telephone : (360) 594-4276... - Page 272 Information When you need repair service, call your nearest EDIROL/Roland Service Center or authorized EDIROL/Roland distributor in your country as shown below. HONG KONG BRAZIL HUNGARY AUSTRALIA MIDDLE EAST Tom Lee Music Co., Ltd. Intermusica Ltd Roland Brasil Ltda EDIROL Australia Pty. Ltd.