Publicité

Les langues disponibles

Les langues disponibles

Liens rapides

FRPRO10HD
ISTRUZIONI PER L'USO
OPERATING INSTRUCTIONS
INSTRUCTIONS D'EMPLOI

Publicité

Table des Matières
loading

Sommaire des Matières pour Fracarro FRPRO10HD

  • Page 1 FRPRO10HD ISTRUZIONI PER L’USO OPERATING INSTRUCTIONS INSTRUCTIONS D’EMPLOI...
  • Page 2: Avvertenze Per L'installazione

    2.1 CARATTERISTICHE DEL PRODOTTO FRPRO10HD è una centrale a cluster (gruppi di canali) programmabili ad alta selettività che permette di fi ltrare e amplifi care diversi canali TV. I cluster in banda UHF sono programmabili per gruppi di canali, da un minimo di 1 a un massimo di 6 per cluster.
  • Page 3 FRPRO10HD Fig 2.1 UHF1 UHF2 UHF3 B||| + DAB + FM USB Stick OUT TV UHF1: primo ingresso programmabile banda UHF (470÷862 MHz). UHF2: secondo ingresso programmabile banda UHF (470÷862 MHz). UHF3: terzo ingresso programmabile banda UHF (470÷862 MHz). BIII+DAB+FM: ingresso larga banda per segnali in banda III, FM e segnali DAB (88÷320 MHz).
  • Page 4 Led di indicazione della presenza telealimenta- zione. Quando il led è acceso (rosso) significa che l’alimentazione è attiva per quell’ingresso. L’alimentazione può essere selezionata tramite programmazione (12V o 24V). UHF1 UHF2 UHF3 * 2.2 DESCRIZIONE DEI CLUSTER Tramite programmazione si definiscono i cluster impostando il canale d’inizio e il canale di fine, il tipo di ca- nale (analogico o digitale), il guadagno e l’ingresso UHF associato.
  • Page 5 2.3 DESCRIZIONE DEGLI STADI DI AMPLIFICAZIONE Il Profiler è costituito da tre stadi di amplificazione: dinamica di ingresso, amplificazione deI cluster e gua- dagno finale. Tutti e tre questi guadagni sono interessati nella fase automatica di autoallineamento e sono modificabili manualmente dall’installatore. La funzione di autoallineamento consente di mantenere la figura di rumore più...
  • Page 6: Installazione Del Prodotto

    3. INSTALLAZIONE DEL PRODOTTO 3.1 CONTENUTO DELL’IMBALLO All’interno dell’imballo sono contenuti i seguenti materiali: • Centrale FRPRO10HD • Alimentatore 4AL827 12V/1.4A • Cavo RCA maschio/RCA maschio • Manuale d’istruzioni 3.2 MONTAGGIO ALIMENTATORE Collegare l’alimentatore 4AL827 in dotazione al connettore di alimentazione della centrale. Vedi figura se- guente.
  • Page 7: Montaggio A Muro

    3.3 MONTAGGIO A MURO La centrale va installata facendo riferimento alla figura 3.1 , utilizzando le staffe integrate nella meccanica del prodotto. Si deve prevedere lo spazio necessario per l’eventuale collegamento del cavo di alimentazione e la corretta ventilazione del prodotto (15cm di aria su tutti i lati). Ogni altra modalità...
  • Page 8: Istruzioni Per La Programmazione

    4. ISTRUZIONI PER L’UTILIZZO Per la corretta programmazione della centrale FRPRO10HD si eseguano i seguenti punti: Collegare l’alimentatore della centrale FRPRO alla rete di alimentazione. Attendere l’inizializzazione della centrale (compare il logo FRACARRO FRPRO10HD sul display). Attendere l’inizializzazione della centrale (compare il logo FRACARRO FRPRO10HD sul display).
  • Page 9: Menu Iniziale

    5.1 MENU INIZIALE Dal menu iniziale si ha accesso alle 5 sottoprogrammazioni principali: Impostazioni CENTRALE: le principali funzioni di questo menu sono la selezione della lingua, la gestione del PIN di accesso, il caricamento/salvataggio dei file da pen drive USB e il reset alle impostazioni di fabbrica. Impostazioni INGRESSO: Il menù...
  • Page 10: Menu Centrale

    5.2 MENU CENTRALE Nel menu “CENTRALE” è possibile: - Cambiare la lingua del menu del PROFILER. - Impostare il codice utente per l’accesso alla programmazione. - Modifi care il contrasto LCD del display. - Salvare/caricare la confi gurazione del Profi ler su una pen drive USB. - Variare la velocità...
  • Page 11: Cambio Della Lingua

    • Non è permesso impostare un codice con prima cifra “0” • Premere il tasto per ritornare al menu precedente e annullare la modifi ca del codice • In caso di smarrimento del codice utente, contattare il supporto tecnico Fracarro...
  • Page 12 5.2.3 MENU MEMORIA USB CARICAMENTO FILE DI CONFIGURAZIONE Nel menu “CENTRALE - MEMORIA USB” è possibile caricare (menu “CARICA”) una confi gurazione prece- dentemente memorizzata nella Pen drive USB. Appena viene indicato nel display “inserire USB” inserire la pen drive e premere il tasto Utilizzare la freccia GIU per scorrere i fi le presenti nella pen drive e selezionare il fi le di confi gurazione desi- Utilizzare la freccia GIU per scorrere i fi le presenti nella pen drive e selezionare il fi le di confi gurazione desi- derato premendo il tasto...
  • Page 13 5.3 MENU IMPOSTAZIONI INGRESSO Nel menu “INGRESSO” si esegue la programmazione dei cluster UHF e del livello di amplificazione dell’in- gresso B.III+DAB+FM. 5.3.1 PROGRAMMAZIONE INGRESSO UHFx E CLUSTER ASSOCIATI Ogni cluster deve essere programmato singolarmente, impostando i seguenti parametri: il canale di inizio cluster, il canale di fine cluster, il tipo di canale (analogico, digitale o cluster spento), il guadagno del cluster e l’ingresso UHF associato al cluster.
  • Page 14 Entrare con il tasto nel menu “IMPOSTAZIONI INGRESSO”, spostarsi con le frecce su/giù e selezionare l’ingresso UHF da programmare. Comparirà la seguente schermata: ATTENZIONE: le seguenti istruzioni si basano sull’ingresso UHF 3, essendo più fl essibile e con la possibilità di programmare tutti i cluster. Indicazione dell’ingresso che UHF 3 si stà...
  • Page 15 Note • Un cluster, quando attivato, viene associato all’ingresso UHF che si sta programmando. Per cambiare l’associazione cluster-ingresso selezionare la voce INGRESSO nel menu del cluster. • Tutti i cluster sono spenti di default. Per attivarli si deve impostare il tipo di canale (Analogico o digitale) CELLA 1 - UHF 3 E21 : E21 - Cluster spento...
  • Page 16: Programmazione Avanzata

    5.4 MENU IMPOSTAZIONI AUTOALLINEAMENTO Il menu “AUTOALLINEAMENTO” può essere utilizzato dopo la programmazione dei cluster. Avviata la pro- cedura di autoallineamento automaticamente il profiler calcola le potenze dei canali in ingresso ed imposta i valori di tutti i guadagni: dinamica iniziale, guadagno celle e guadagno finale. Risulterà quindi ottimizzato la figura di rumore dei singoli cluster ed equalizzato il guadagno delle celle.
  • Page 17 5.6 MENU TELEALIMENTAZIONE La telealimentazione è attivabile separatamente per i tre ingressi UHF1, UHF2 e UHF3. Nel menu “TELEALIMENTAZ. – TELE. 12V/24V” si dovrà selezionare la tensione desiderata per la teleali- mentazione (12V o 24V DC); questa impostazione è unica per tutti gli ingressi UHF, per cui non è possibile impostare la telealimentazione su un ingresso a 12V e su un secondo a 24V.
  • Page 18 6. SOFTWARE PER LA PROGRAMMAZIONE Il software di programmazione è “FRPRO” e può essere scaricato dal sito www.fracarro.it Requisiti minimi di sistema: • Dotnet Framework v.2 o superiore • Windows XP Service Pack 2 o superiore (Windows Vista, 7 e 8) Utilizzando il software FRPRO si può...
  • Page 19 Definizione dei cluster Per definire i cluster si può operare in due modi: 1) Modalità grafica 2) Modalità Mask Di seguito una breve descrizione per entrambe le modalità: 1) Modalità grafica Per la definizione dei cluster in modalità grafica è sufficiente spostare il selettore di cella che si stà pro- grammando, allargandolo per aumentare il numero dei canali appartenenti alla cluster, e aumentandone la dimensione verso l’alto per incrementarne il guadagno.
  • Page 20 Impostazione guadagno B.III+DAB+FM Per determinare il guadagno sull’ingresso B.III+DAB+FM è sufficiente alzare/abbassare la corrispondente barra verde. Regolazione del Guadagno per la cella B.III+FM+DAB Valore del Guadagno (in dB) per la Cella B.III+FM+DAB Indicazione della Cella: FM+VHF Impostazioni del guadagno finale (Master Level) Modificando la barra Master Level si può...
  • Page 21: Aggiornamento Firmware

    Per eseguire la stampa cliccare su File e poi selezionare Print. 7. AGGIORNAMENTO FIRMWARE La centrale FRPRO10HD è aggiornabile sul campo direttamente utilizzando un PC per mezzo della porta seriale RJ45. Per reperire l’ultimo firmware, si faccia riferimento alla sezione “Software aggiornamento” del...
  • Page 22: Specifiche Tecniche

    8. SPECIFICHE TECNICHE Caratteristiche generali del prodotto FRPRO10HD Tastiera a bordo centrale per la programmazione con display 16 caratteri x 2 righe Led verde di stato per indicare il corretto funzionamento della centrale 3 Led sugli ingressi UHF che indicano l’attivazione della telealimentazione Porta USB 2.0 per caricamento/salvataggio file di configurazione da/su penna USB...
  • Page 23 5.2.3 ESEMPI DEL LIVELLO D’USCITA VHF: FRPRO10HD ha una potenza massima di 120dBuV in uscita in VHF utilizzando e amplificando un solo canale in ingresso. Nel momento in cui si immettono in ingresso più canali il livello d’uscita per canale del profiler riduce.
  • Page 24: Installation Warnings

    2. DESCRIPTION OF THE PRODUCT 2.1 PRODUCT CHARACTERISTICS FRPRO10HD is a high selectivity cluster headend unit (channel groups) that allows the fi ltering and amplifi ca- tion of several TV channels. The UHF band clusters can be programmed per channel group, from a minimum of 1 channel to a maximum of 6 channels per cluster The maximum number of clusters per headend is 10.
  • Page 25 FRPRO10HD Fig 2.1 UHF1 UHF2 UHF3 B||| + DAB + FM USB Stick OUT TV UHF1: fi rst programmable input of UHF band (470÷862 MHz). UHF2: second programmable input of UHF band (470÷862 MHz). UHF3: third programmable input of UHF band (470÷862 MHz).
  • Page 26 LED to show remote power supply. When the LED is ON (red), it means that the power is activated for that input. The power supply can be selected by means of programming (12V or UHF1 24V). UHF2 UHF3 * 2.2 CLUSTER DESCRIPTION Programming defines the clusters by setting the initial channel and the end channel, channel type (analog or digital), the gain and UHF associated input.
  • Page 27 2.3 DESCRIPTION OF THE AMPLIFICATION STAGES The Profiler unit is comprised of 3 amplification stages: input dynamics, cluster amplification and final gain. These 3 gains are included in the automatic phase of the self-alignment and they can be modified manually by the user.
  • Page 28: Installation Of The Product

    FRPRO10HD unit • Feeder 4AL827 12V/1.4A • Power cord RCA male/RCA male • Installation instructions 3.2 FEEDER ASSEMBLY Connect the 4AL827 feeder supplied with the unit power connector. See the following figure. Use only the feeder supplier by Fracarro (Fracarro 4AL827).
  • Page 29: Wall Assembly

    3.3 WALL ASSEMBLY Install the unit by means of the brackets integrated in the mechanic parts of the product. Please leave a gap to connect the power supply cable and allow the ventilation (15 cm of gap on all sides). Other methods of installation can negatively affect the operation of the unit.
  • Page 30: Default Parameters

    For programming the FRPRO10HD unit proceed as follows: Connect the FRPRO unit feeder to the mains. Wait for the unit initialization (the FRACARRO FRPRO10HD logo appears on the display). Wait for the unit initialization (the FRACARRO FRPRO10HD logo appears on the display).
  • Page 31 5.1 INITIAL MENU From the initial menu, 5 sub-programming items are available: Setting headend parametres CHAPTER SETTINGS FRACARRO CONTROL UNIT FRPRO10HD Insert PIN Enter Code SETTINGS CHAPTER Setting cluster input parametres INPUT Setting and start the gain CHAPTER SETTINGS self-aligning...
  • Page 32 5.2 CONTROL UNIT MENU From the “CONTROL UNIT” menu it is possible to carry out the following: - to change the menu language of the unit - to set the user code to enter programming - to modify the LCD contrast of the display - to save/load the Profi ler unit confi guration in a USB pen drive - to change the communication speed of the serial port (we recommend 57600 bps) - to check the software version of the Profi ler unit...
  • Page 33: Changing The Language

    It is not possible to set a code if the fi rst digit is “0” • Press the key to come back to the previous menu and undo the code’s modifi cation • If the user code is lost, contact Fracarro Technical Support.
  • Page 34 5.2.3 USB MEMORY MENU LOADING THE CONFIGURATION FILE By means of a pen drive, a confi guration that was previously memorized or saved from a PC can be loaded into the “CONTROL UNIT - UBS MEMORY”. When the display shows “insert USB,” insert the pen drive and press the key.
  • Page 35: Input Menu

    5.3 INPUT MENU From the “INPUT” menu, you can program the UHF clusters and the amplification level of B.III+DAB+FM input. 5.3.1 PROGRAMMING THE UHFx INPUT AND ASSOCIATED CLUSTERS Each cluster shall be individually programmed by setting the cluster’s initial channel, the cluster’s initial channel, the cluster’s end channel, the channel type (analog or digital or cluster OFF), the cluster gain and the UHF input associated to the cluster.
  • Page 36 Indication of input being pro- UHF 3 gramming <XXXXXXXXXX> -- Indication the clusters of FRPRO10HD D: cluster with digital channels; A: cluster with analog channels; X: cluster off; _: cluster cannot be selected for this input UHF E: cluster in Error (possible overlapping of channels with other clusters);...
  • Page 37 Notes • Once activated the cluster is associated to the UHF input you are programming. To change the cluster- input association, select the INPUT item from the cluster menu. • All clusters are off by default. To enable the cluster, set the channel type (analog or digital). CELLA 1 - UHF 3 E21 : E21 - Cluster Off...
  • Page 38: Advanced Programming

    5.4 SELF-ALIGNMENT SETTINGS MENU The “SELF-ALIGNMENT” menu can be used after programming all the clusters. That way, the Profiler unit will automatically calculate the powers of each input channel and set the values of all gains such as the initial dynamics, the cell gain and the final gain.
  • Page 39 5.5 FINAL GAIN MENU The “FINAL GAIN” menu allows for the modification the output level of all mixed signals with a gain that varies from 0 to 20 dB. The final gain performs the amplifications of all UHF inputs and for the B.III+DAB input. 5.6 REMOTE POWER SUPPLY MENU The remote power supply can be enabled individually for the three inputs UHF1, UHF2 and UHF3.
  • Page 40 6. SOFTWARE FOR PROGRAMMING FR PRO software can be downloaded from the website www.fracarro.com. Minimum requirements for the system: • Dotnet Framework v.2 or later • Windows XP Service Pack 2 or later (Windows Vista, 7 e 8) Using the FRPRO software, you can create a configuration of the clusters (initial channel and end channel, channel type, cluster level, etc.) and of the other inputs by working from the computer.
  • Page 41 Cluster definition To define the clusters, choose one of the following methods: 1) Graphic mode 2) Mask mode The following is a brief description of both modes: 1) Graphic mode To define the clusters within the graphics mode, move the cell selector you are programming and enlarge it if you wish to increase the number of channels in the cell and enlarge it upwards if you want to increase the gain.
  • Page 42 Setting the gain of the FM, B.III+DAB+FM To determine the gain in the B.III+DAB+FM input, lift/lower the corresponding green bar. Gain adjustment of the cell FM + VHF Gain value (in dB) of the cell FM + VHF Indication of the cell FM+VHF Setting the final gain (Master Level) By modifying the Master Level bar, you can set the final gain of all inputs.
  • Page 43: Firmware Update

    The Print function allows for the configuration to be printed either in graphics mode or in text mode. To print, click File and then Print. 7.FIRMWARE UPDATE The FRPRO10HD unit can be upgraded by a PC by means of the RJ45 serial port. To find the last firmware, refer to the section “Software updating” in the website www.fracarro.com.
  • Page 44: Tecnical Specifications

    8. TECNICAL SPECIFICATIONS General features of the FRPRO10HD 16 letters on 2 row display, built-in keypad for programming Green LED that shows that the unit is working properly 3 LEDs that show the remote power supply is enabled in the UHF inputs USB 2.0 port to load/save configuration file by means of a USB pen drive...
  • Page 45: Conformity To European Directives

    5.2.3 ESEMPI DEL LIVELLO D’USCITA VHF: FRPRO10HD has a maximum power of 120dBuV at the output in VHF using and amplifying only one input channel. When more channels are in the input, the output level of the profile channel reduces.
  • Page 46: Précautions D'installation

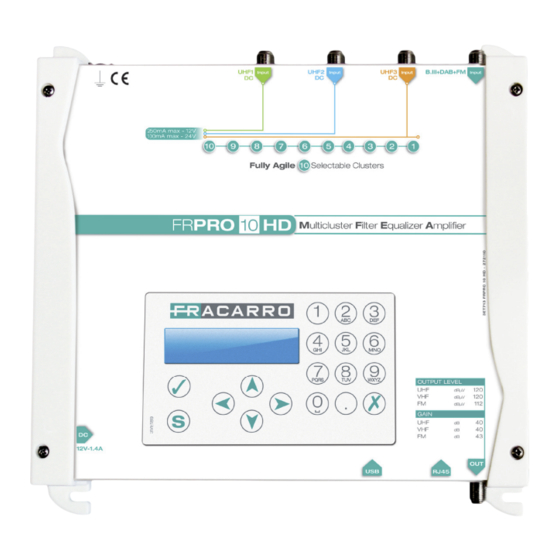
    2. DESCRIPTION DU PRODUIT 2.1 CARACTÉRISTIQUES DU PRODUIT FRPRO10HD est une unité centrale à clusters (groupes de canaux) programmables à haute sélectivité per- mettant de filtrer et d’amplifier les différents canaux TV. Les clusters en bande UHF sont programmables par groupes de canaux, de 1 à...
  • Page 47 FRPRO10HD Fig 2.1 UHF1 UHF2 UHF3 B||| + DAB + FM USB Stick OUT TV UHF1: première entrée programmable bande UHF (470÷862 MHz). UHF2: deuxième entrée programmable bande UHF (470÷862 MHz). UHF3: troisième entrée programmable bande UHF (470÷862 MHz). BIII+DAB+FM: entrée bande large pour signaux en bande III, FM et signaux DAB (88÷320 MHz).
  • Page 48 LED d’indication de la téléalimentation. Lor- sque la LED est allumée (rouge) l’alimentation est activée pour cette entrée. L’alimentation peut être sélectionnée par l’intermédiaire de la UHF1 programmation (12V ou 24V). UHF2 UHF3 * 2.2 CLUSTER DESCRIPTION Par l’intermédiaire de la programmation, les clusters sont définis en réglant le canal de début et le canal de fin, le type de canal (analogique ou numérique), le gain et l’entrée UHF associée.
  • Page 49: Description Des Étages D'amplification

    2.3 DESCRIPTION DES ÉTAGES D’AMPLIFICATION Le Profiler est constitué de trois étages d’amplification : dynamique d’entrée, amplification du cluster et gain final. Les trois gains sont impliqués dans la phase automatique d’alignement automatique et ils sont programmables manuellement par l’utilisateur. La fonction d’alignement automatique permet de maintenir la figure de bruit la plus basse possible et elle aligne les clusters pour le niveau maximum de sortie.
  • Page 50: Installation Du Produit

    • Alimentation 4AL827 12V/1.4A • Câble RCA mâle/RCA mâle • Mode d’emploi 3.2 MONTAGE DE L’ALIMENTATION Brancher l’alimentation 4AL827 fourni au connecteur d’alimentation de l’unité centrale. Voir la figure ci- dessous. Use only the feeder supplier by Fracarro (Fracarro 4AL827).
  • Page 51: Montage Mural

    3.3 MONTAGE MURAL L’unité centrale est installée comme montré sur la figure 3.1 en utilisant les brides intégrées dans la méca- nique du produit. Prévoir l’espace nécessaire pour le branchement éventuel du câble d’alimentation et la ventilation correcte du produit (15 cm d’espace sur tous les côtés). Tout autre mode d’installation pourrait compromettre le fonctionnement de l’unité...
  • Page 52: Instructions Pour L'utilisation

    Pour programmer correctement l’unité centrale FRPRO10HD, suivre les instructions suivantes: brancher l’alimentation de l’unité centrale FRPRO au secteur. attendre l’initialisation de l’unité centrale (le logo FRACARRO FRPRO10HD apparaît à l’écran). attendre l’initialisation de l’unité centrale (le logo FRACARRO FRPRO10HD apparaît à l’écran).
  • Page 53: Menu Initial

    5.1 MENU INITIAL Le menu initial permet d’accéder aux 5 sous-programmations principales: Réglages de l’UNITÉ CENTRALE: les fonctions principales de ce menu sont la sélection de la langue, la gestion des PIN d’accès, le chargement/sauvegarde du fichier depuis la clé USB et la mise à zéro des réglages d’usine.
  • Page 54: Menu De L'unitè De Commande

    5.2 MENU DE L’UNITÈ DE COMMANDE Le menu “UNITÉ CENTRALE” permet : - de changer la langue du menu du PROFILER. - de régler le code utilisateur pour accéder à la programmation. - de modifi er le contraste LCD de l’écran. - de mémoriser/charger la confi guration du Profi ler sur une clé...
  • Page 55: Changer La Langue

    • Le premier chiffre du code ne peut jamais être “0” • Appuyer sur la touche pour revenir au menu précédent et annuler la modifi cation du code • En cas de perte du code, contacter le support technique Fracarro...
  • Page 56: Menu Mémoire Usb

    5.2.3 MENU MÉMOIRE USB CHARGEMENT FICHIER DE CONFIGURATION Sur le menu “UNITÉ CENTRALE - MÉMOIRE USB” charger (menu “CHARGER”) une confi guration mémo- risée précédemment sur la clé USB. Lorsque l’écran affi che le message “insérer USB”, insérer la clé et appuyer sur la touche Utiliser la fl èche BAS pour faire défi ler les fi chiers présents sur la clé...
  • Page 57: Programmation Entrée Uhfx Et Clusters Associés

    5.3 MENU DE ENTREE Depuis le menu “ENTREE”, programmer les clusters UHF et le niveau d’amplification de l’entrée B.III+DAB+FM. 5.3.1 PROGRAMMATION ENTRÉE UHFx ET CLUSTERS ASSOCIÉS Chaque cluster doit être programmé individuellement en réglant les paramètres suivants : canal de début cluster, canal de fin cluster, type de canal (analogique, numérique ou cluster éteint), gain du cluster, entrée UHF associée au cluster.
  • Page 58 Indication of input being pro- UHF 3 gramming <XXXXXXXXXX> -- Indication the clusters of FRPRO10HD D: cluster à canaux Numériques; A: cluster à canaux Analogiques; X: cluster éteint; _: cluster non sélectionnable pour cette entrée UHF;...
  • Page 59 Notes • Le cluster, quand activé, est associé à l’entrée UHF qui est en phase de programmation. • Pour modifi er l’association cluster-entrée sélectionner la voix ENTRÉE à l’intérieur du menu du cluster. • Tous les clusters sont éteints par défaut. Pour les activer, programmer le type de canal (Analogique ou Numérique).
  • Page 60: Programmation Avancée

    5.4 REGLAGES AUTO-ALIGNEMENT MENU Le menu “ALIGNEMENT AUTOMATIQUE» peut être utilisé après avoir programmé tous les clusters. Après avoir activé la procédure d’alignement automatique, le profiler calcule automatiquement les puissances de chaque canal en entrée et il programme les valeurs de tous les gains : dynamique initiale, gain cellules et gain final.
  • Page 61 5.5 FINAL GAIN MENU Le menu “GAIN FINAL” permet de modifier le niveau de sortie de tous les signaux mélangés avec un gain variable de 0 à 20 dB. Le Gain final exécute donc une amplification pour toutes les entrées UHF et pour l’entrée B.III+DAB+FM. 5.6 TELEALIMENTATION MENU La téléalimentation est activable séparément pour les trois entrées UHF1, UHF2 et UHF3.
  • Page 62 6. PROGRAMMATION SOFTWARE Le logiciel de programmation est “FRPRO” et il peut être téléchargé du site www.fracarro.it Dispositions minimum du système: • Dotnet Framework v.2 ou supérieur • Windows XP Service Pack 2 ou supérieur (Windows Vista, 7 et 8) Le logiciel FRPRO permet de configurer les clusters (canal de début et de fin cluster, type de canal, niveau du...
  • Page 63 Définition des clusters Deux modes sont disponibles pour définir les clusters: 1) Mode graphique 2) Mode Mask Les deux modes sont décrits brièvement ci-dessous: 1) Mode graphique Pour définir les clusters en mode graphique, il suffit de déplacer le sélecteur de la cellule en programmation. Elargir le sélecteur pour augmenter le nombre de canaux qui appartiennent à...
  • Page 64 Réglage du gain B.III+DAB+FM Pour déterminer le gain sur les entrées B.III+DAB+FM, il suffit de lever/baisser la barre verte correspondante Gain adjustment of the cell FM + VHF Gain value (in dB) of the cell FM + VHF Indication of the cell FM+VHF Réglages du gain final (Master Level) Pour ajuster le gain final sur toutes les entrées, il suffit de lever/baisser la barre Master Level...
  • Page 65: Mise À Jour Du Firmware

    7.MISE À JOUR DU FIRMWARE L’unité centrale FRPRO10HD peut être mise à jour sur place en utilisant un PC par le biais du port série RJ45. Pour trouver le dernier firmware, se rapporter à la section “Mise à jour Logiciel” sur notre site Internet www.
  • Page 66: Caractéristiques Générales Du Produit Frpro10Hd

    8. TECNICAL SPECIFICATIONS Caractéristiques générales du produit FRPRO10HD Pavé numérique intégré sur l’unité centrale pour la programmation avec écran 16 caractères x 2 lignes LED verte d’état indiquant le fonctionnement correct de l’unité centrale 3 LED rouges sur les entrées UHF indiquant l’activation de la téléalimentation Port USB 2.0 pour télécharger/sauver fichier de configuration par/sur une clé...
  • Page 67: Exemples Du Niveau De Sortie

    5.2.3 EXEMPLES DU NIVEAU DE SORTIE VHF : FRPRO10HD a une puissance maximum de 120dBuV en sortie en VHF en utilisant et en amplifiant un seul canal en entrée. Lorsque plusieurs canaux sont présents en entrée, le niveau de sortie du profiler pour chaque canal est réduit.
  • Page 68 Garantito da/ Guaranteed by/ Garanti par/ Garantizado por/ Garantido por/ Garantiert durch/ Zajamčena od/ Garantirano od/ Garantovano od/ Gwarantowane przez / Εγγυημένο από/ Гарантировано Fracarro Radioindustrie SRL, Via Cazzaro n. 3, 31033 Castelfranco Veneto (Tv) – Italy Fracarro Radioindustrie SRL Via Cazzaro n.3 - 31033 Castelfranco Veneto (TV) - ITALIA - Tel: +39 0423 7361 - Fax: +39 0423 736220 -...

Table des Matières