Abicor Binzel WH Mode D'emploi
Masquer les pouces
Voir aussi pour WH:
- Mode d'emploi (101 pages) ,
- Mode d'emploi (44 pages) ,
- Mode d'emploi (56 pages)
Table des Matières
Publicité
Les langues disponibles
Les langues disponibles
Liens rapides
T E C H N O L O G Y F O R T H E W E L D E R ´ S W O R L D .
DE Betriebsanleitung / EN Operating instructions
FR Mode d'emploi / ES Instructivo de servicio
WH / WHPP
DE Schweißbrenner-System
EN Welding torch system
FR Système de torche de soudage
ES Antorcha de soldadura WH, WHPP
www.binzel-abicor.com
Publicité
Table des Matières

Manuels Connexes pour Abicor Binzel WH


Sommaire des Matières pour Abicor Binzel WH
- Page 1 T E C H N O L O G Y F O R T H E W E L D E R ´ S W O R L D . DE Betriebsanleitung / EN Operating instructions FR Mode d’emploi / ES Instructivo de servicio WH / WHPP DE Schweißbrenner-System EN Welding torch system FR Système de torche de soudage ES Antorcha de soldadura WH, WHPP www.binzel-abicor.com...
- Page 2 Informationen oder Verbesserung dieses Produktes erforderlich werden. Diese Änderungen werden jedoch in neuen Ausgaben berücksichtigt. Alle in der Betriebsanleitung genannten Handelsmarken und Schutzmarken sind Eigentum der jeweiligen Besitzer/Hersteller. Die Kontaktdaten der ABICOR BINZEL Ländervertretungen und Partner weltweit entnehmen Sie bitte unserer Homepage www.binzel-abicor.com. Identifikation DE-3 Schweißbrenner-System am Roboter...
-
Page 3: Bestimmungsgemäße Verwendung
WH / WHPP 1 Identifikation 1 Identifikation Das Schweißbrenner-System WH/WHPP wird in der Industrie und im Gewerbe zum Schutzgasschweißen mit inerten Gasen (MIG) oder aktiven Gasen (MAG) eingesetzt. Es ermöglicht auf einfachste Weise sowohl einen manuellen als auch automatischen Brennerhalswechsel. Der automatische Wechsel erfolgt in Verbindung mit dem ATS-Rotor. Diese Baureihe ist in allen Schweißpositionen einsetzbar. -
Page 4: Persönliche Schutzausrüstung (Psa)
2 Sicherheit WH / WHPP 2.3 Persönliche Schutzausrüstung (PSA) Um Gefahren für den Nutzer zu vermeiden, wird in dieser Anleitung das Tragen von persönlicher Schutzausrüstung (PSA) empfohlen. • Sie besteht aus Schutzanzug, Schutzbrille, Atemschutzmaske Klasse P3, Schutzhandschuhen und Sicherheitsschuhen. 2.4 Klassifizierung der Warnhinweise Die in der Betriebsanleitung verwendeten Warnhinweise sind in vier verschiedene Ebenen unterteilt und werden vor potenziell gefährlichen Arbeitsschritten angegeben. -
Page 5: Angaben Für Den Notfall
WH / WHPP 3 Produktbeschreibung 2.6 Angaben für den Notfall Unterbrechen Sie im Notfall sofort folgende Versorgungen: • Elektrische Energieversorgung • Kühlmittelversorgung • Druckluftzufuhr • Gaszufuhr Weitere Maßnahmen entnehmen Sie der Betriebsanleitung der Stromquelle oder der Dokumentation weiterer Peripheriegeräte. 3 Produktbeschreibung WARNUNG Gefahren durch nicht bestimmungsgemäße Verwendung... - Page 6 10 - 20 652D (TS) flüssig 1,0 - 1,6 10 - 20 Tab. 4 Produktspezifische Brennerdaten nach EN 60974-7 1Die Belastungsdaten reduzieren sich bei Impulslichtbogen bis zu 35% Abb. 1 Brennerhals-Geometrie ROBO WH 241D/WH 242D DE - 6 BAL.0014 • 2019-01-16...
- Page 7 WH / WHPP 3 Produktbeschreibung Abb. 2 Brennerhals-Geometrie ROBO WH 455D/WH W500 Abb. 3 Brennerhals-Geometrie ROBO WH 650/WH 652D (TS) Abb. 4 Wechselkörper WH BAL.0014 • 2019-01-16 DE - 7...
- Page 8 WH / WHPP Abb. 5 Wechselkörper WHPP WHPP Gewicht 0,65 kg 1,2 kg Adaptierbare Brennerhälse WH 241D, WH 242D, WH 455D, WH 650, WH 652D (TS), Sonder WH Pull Motor Stromversorgung 24 VDC oder 42 VDC Dauernennstrom 0,44 A Getriebeübersetzung 17, 1:1 oder 15, 3:1 Tab.
-
Page 9: Verwendete Zeichen Und Symbole
Tool Center Point (Werkzeugmittelpunkt) Tab. 7 Abkürzungen 3.3 Typenschild Das Schweißbrenner-System WH/WHPP ist mit einem Aufkleber am maschinenseitigen Anschlussgehäuse gekennzeichnet. Beachten Sie für alle Rückfragen folgende Angaben: • Angabe der Werksbescheinigung, Produktionsstempel auf dem Brennerhals, z.B. WH 455D, Angaben von Aufkleber 3.4 Verwendete Zeichen und Symbole... -
Page 10: Lieferumfang
Die Schlauchpakete für das Schweißbrenner-System WH/WHPP sind in Standardlänge bzw. in kundenspezifischen Längen lieferbar. Option: Nahezu alle Robotersteuerungen bieten die Möglichkeit der Nahtsuche mit taktilem Sensor. ABICOR BINZEL hat hierzu die notwendige Brennerausrüstung. Mit der Option „Sensor“ wird das Gasdüsenpotential an der maschinenseitigen Steuerleitung bereitgestellt. -
Page 11: Funktionsbeschreibung
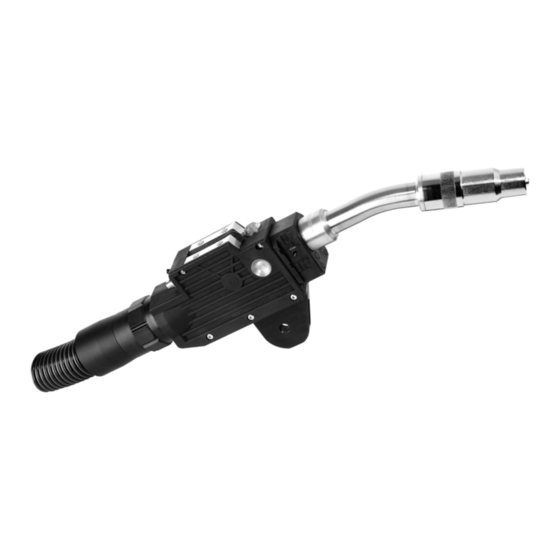
Gas (MIG) und aktives Gas (MAG) geschützt. 5.1 Brennerhals Die Standard-Brennerhälse der Typen ROBO WH 241D, WH 455D und WH 650 sind in den Geometrien gerade, 22° und 45° gebogen verfügbar. Sonderausführungen werden je nach Anwendungsfall auf Anforderung gefertigt. Durch die einheitliche Trennstelle am Wechselkörper sind alle Brennerhälse untereinander kompatibel. - Page 12 6 Inbetriebnahme WH / WHPP 5.2 Wechselkörper WH und WHPP Der Wechselkörper ist die Schnittstelle zwischen Schlauchpaket und Brennerhals. Die folgenden Unterbaugruppen sind im Wechselkörper integriert: • Standardisierte Trennstelle • Verriegelungsmechanik mit Drahtschneidefunktion • Rückschlagventile der Kühlmittelanschlüsse • NOT-AUS Steckverbinder •...
- Page 13 WH / WHPP 6 Inbetriebnahme 6.1 Brennerhals ROBO WH 241D, WH 455D ausrüsten Gasdüse Stromdüse Brennerhals Spritzerschutz Düsenstock Ausrüstsatz Abb. 7 Brennerhals ROBO WH 241D und ROBO WH 455D 1 Auswechselbaren Düsenstock (4) in Brennerhals (5) einschrauben. 2 Stromdüse (3) in Düsenstock (4) einschrauben und mit Mehrfachschlüssel festziehen.
- Page 14 6 Inbetriebnahme WH / WHPP 6.3 Brennerhals ROBO WH 652D (TS)/WH W500 ausrüsten Gasdüse Düsenstock Brennerhals Stromdüse Spritzerschutz Ausrüstsatz Abb. 9 Brennerhals ROBO WH 652D (TS)/WH W500 1 Düsenstock (3) in Brennerhals (5) schrauben. 2 Stromdüse (2) in Düsenstock (3) einschrauben und mit Mehrfachschlüssel festziehen.
- Page 15 Schweißbrenner-System am Roboter montieren 1 Halter (6) mit beigelegten sechs Zylinderkopfschrauben (1) am Wechselkörper (2) befestigen. 2 Halter (6) an der ABICOR BINZEL Brennerhalterung CAT (4) montieren. 3 In beiden Haltern (6) eine 6H7 Bohrung vornehmen und mit der beigelegten Passschraube (5) verstiften.
-
Page 16: Kühlmittel Anschließen
• Verwenden Sie kein deionisiertes oder demineralisiertes Wasser als Kühlmittel oder für Dichtheits- und Durchflussprüfungen. Dies kann die Lebensdauer Ihres Schweißbrenners beeinträchtigen. • Wir empfehlen für flüssiggekühlte Schweißbrenner die Verwendung von ABICOR BINZEL Kühlmittel der Reihe BTC. Beachten Sie hierzu das entsprechende Sicherheitsdatenblatt. Kühlmittelrücklauf-Schlauch Umlaufkühlaggregat Druckluftschlauch Abb. - Page 17 WH / WHPP 6 Inbetriebnahme 6.8 Steuerleitung anschließen – a = grün, b = weiß, c = braun, d = gelb, e = grau, f = blau (-), g = rosa (+), h = schwarz, i = violett, j = rot (isoliert) Abb.
- Page 18 6 Inbetriebnahme WH / WHPP Option ABICOR BINZEL- Steuerplatine zur Widerstandsanpassung Für diese Anschlussvariante installieren Sie die Steuerplatine und die Feinsicherung an gut zugänglicher Stelle im Drahtvorschubgerät. Die notwendige Versorgungsspannung entnehmen Sie z. B. am Magnetventilanschluss „Schutzgas EIN/AUS“ oder am „Steuerschütz“. In Einzelfällen ist der Einbau eines Reihenwiderstandes zur Motorstrombegrenzung erforderlich.
-
Page 19: Schutzgasmenge Einstellen
Feinjustierung. • Achten Sie bei jedem Drahtwechsel auf einen gratfreien Drahtanfang. 2 Gehäusedeckel am Wechselkörper WHPP öffnen, Blattfeder entspannen und Andruckrolle heraus schwenken. 3 Drucktaster „Stromloser Drahtvorschub“ am Wechselkörper WH betätigen. 6.12 Manueller Brennerhalswechsel Abb. 16 Manueller Brennerhalswechsel BAL.0014 • 2019-01-16... - Page 20 7 Betrieb WH / WHPP HINWEIS • Verändern Sie zwischen dem Wechselvorgang nicht die Stellung des Handhebels! Dadurch werden Störungen verursacht. Der vorgespannte Schweißdraht entspannt sich durch das geöffnete Messer und wird bei erneuter Betätigung Stück für Stück abgeschnitten. Diese Drahtstücke blockieren die Verriegelungsmechanik und führen zwangsweise zu Ausfällen des gesamten Systems!
- Page 21 WH / WHPP 8 Außerbetriebnahme WARNUNG Blendung der Augen Der erzeugte Lichtbogen kann Augen schädigen. • Überprüfen und tragen Sie Ihre persönliche Schutzausrüstung. HINWEIS • Stellen Sie sicher, dass alle erforderlichen Parameter eingestellt sind. 7.1 Schweißprozess 1 Schutzgasflasche öffnen. 2 Stromquelle einschalten.
-
Page 22: Wartung Und Reinigung
9 Wartung und Reinigung WH / WHPP 9 Wartung und Reinigung Regelmäßige und dauerhafte Wartung und Reinigung sind Voraussetzung für eine lange Lebensdauer und eine einwandfreie Funktion. GEFAHR Verletzungsgefahr durch unerwarteten Anlauf Für die gesamte Dauer von Wartungs-, Instandhaltungs-, Montage- bzw. Demontage- und Reparaturarbeiten ist Folgendes zu beachten: •... - Page 23 WH / WHPP 9 Wartung und Reinigung 9.1 Drahtführung reinigen 1 Schlauchpaket maschinenseitig lösen und in gestreckte Position bringen. 2 Überwurfmutter abschrauben und Führungsspirale bzw. Kunststoffseele herausziehen. WARNUNG Verletzungsgefahr Schwere Verletzungen durch herumwirbelnde Teile. • Tragen Sie beim Ausblasen der Drahtführung geeignete Schutzkleidung, insbesondere eine Schutzbrille.
- Page 24 3 Verschleißteile auf sichtbare Schäden überprüfen und ggf. austauschen. 4 Ausrüstsatz bei Verschleiß oder Verschmutzung austauschen. 5 Trennstelle säubern und O-Ringe mit silikonfreiem Dichtfett einfetten. 6 TCP nach jedem Einsatz bzw. nach einer Kollision in der Einstellvorrichtung WH überprüfen. DE - 24 BAL.0014 • 2019-01-16...
- Page 25 WH / WHPP 9 Wartung und Reinigung 9.5 Wechselkörper WH/WHPP 1 Kupplungsteile säubern und mit silikonfreiem Dichtfett leicht einfetten. 2 Spannbügel auf sichtbare Schäden überprüfen; ggf. den kompletten Wechselkörper austauschen. WHPP 1 Druckhebel, Führungs- und Drahteinlaufnippel bei Verschleiß austauschen. HINWEIS •...
-
Page 26: Störungen Und Deren Behebung
10 Störungen und deren Behebung WH / WHPP 10 Störungen und deren Behebung GEFAHR Verletzungsgefahr und Geräteschäden durch unautorisierte Personen Unsachgemäße Reparaturen und Änderungen am Produkt können zu erheblichen Verletzungen und Geräteschäden führen. Die Produktgarantie erlischt bei Eingriff durch unautoristierte Personen. - Page 27 WH / WHPP 11 Demontage 11 Demontage Die Demontage darf nur vom Fachhändler durchgeführt werden. Achten Sie darauf, dass vor Beginn der Demontagearbeiten die Abschaltprozeduren unbedingt eingehalten werden. Beachten Sie dabei auch die im Schweißsystem eingebundenen Komponenten. GEFAHR Verletzungsgefahr durch unerwarteten Anlauf Für die gesamte Dauer von Wartungs-, Instandhaltungs-, Montage- bzw.
-
Page 28: Entsorgung
Kontaminierte Reinigungswerkzeuge (Pinsel, Lappen usw.) müssen ebenfalls entsprechend den Angaben des Betriebsmittelherstellers entsorgt werden. 12.3 Verpackungen ABICOR BINZEL hat die Transportverpackung auf das Notwendigste reduziert. Bei der Auswahl der Verpackungsmaterialien wird auf eine mögliche Wiederverwertung geachtet. DE - 28 BAL.0014 • 2019-01-16... - Page 29 WH / WHPP 12 Entsorgung BAL.0014 • 2019-01-16 DE - 29...
- Page 30 All brand names and trademarks that appear in these operating instructions are the property of their respective owners/manufacturers. Our latest product documents as well as all contact details for the ABICOR BINZEL national subsidiaries and partners worldwide can be found on our website at www.binzel-abicor.com.
-
Page 31: Responsibilities Of The User
1 Identification 1 Identification The Welding torch system WH/WHPP is used in industry and in the trade for inert gas welding using inert gases (MIG) or active gases (MAG). It allows the torch neck to be easily changed either manually or automatically. The automatic change is done in connection with the ATS rotor. -
Page 32: Classification Of The Warnings
2 Safety WH / WHPP 2.3 Classification of the warnings The warnings used in the operating instructions are divided into four different levels and shown prior to potentially dangerous work steps. Arranged in descending order of importance, they have the following meanings: DANGER Describes an imminent threatening danger. -
Page 33: Product Description
WH / WHPP 3 Product Description 3 Product Description WARNING Hazards caused by improper use If improperly used, the device can present risks to persons, animals and material property. • Use the device according to its designated use only. • Do not convert and modify the device to enhance its performance without authorization. - Page 34 Product specific torch data as laid out in EN 60974-7 1For pulse arcs, the load data are reduced by up to 35%. Fig. 1 ROBO WH 241D/WH 242D torch neck geometry Fig. 2 ROBO WH 455D/WH W500 torch neck geometry EN - 6 BAL.0014 •...
- Page 35 WH / WHPP 3 Product Description Fig. 3 ROBO WH 650/WH 652D (TS) torch neck geometry Fig. 4 Changeable body WH Fig. 5 Changeable body WHPP BAL.0014 • 2019-01-16 EN - 7...
- Page 36 3 Product Description WH / WHPP WHPP Weight 0,65 kg 1,2 kg Adaptable torch necks WH 241D, WH 242D, WH 455D, WH 650, WH 652D (TS), Special WH Pull Motor Power supply 24 VDC or 42 VDC Continuous nominal current 0,44 A...
-
Page 37: Type Plate
WH / WHPP 4 Scope of delivery 3.3 Type plate The Welding torch system WH/WHPP is identified by a sticker on the machine side connection housing. When making any inquiries, please remember the following information: • Specify the certificate of conformity, Production stamp on the torch neck, for example WH 455D, Sticker data 3.4 Signs and symbols used... -
Page 38: Transport
The welding wire required for welding is fed by the Welding torch system WH/WHPP all the way to the contact tip. The contact tip transmits the welding current to the welding wire, producing an arc between the welding wire and work- EN - 10 BAL.0014 •... -
Page 39: Putting Into Operation
(MAG). 5.1 Torch neck The standard torch necks of types ROBO WH 241D, WH 455D and WH 650 are available in the geometries straight, 22° and 45° bends. Special designs will be manufactured upon request depending on the application. The uniform separating point at the changeable body makes all torch necks compatible with one another. - Page 40 Equipment kit Fig. 7 Equipping the ROBO WH 241D and ROBO WH 455D torch neck 1 Screw the replaceable tip adaptor (4) into the torch neck (5). 2 Screw the contact tip (3) into the tip adaptor (4) and tighten it using a multiple wrench.
- Page 41 WH / WHPP 6 Putting into operation 6.3 Equipping the ROBO WH 652D (TS) /WH W500 torch neck Gas Nozzle Tip adaptor Torch neck Contact tip Welding spatter guard Equipment kit Fig. 9 Equipping the ROBO WH 652D (TS)/WH W500 torch neck 1 Screw the tip adaptor (3) into the torch neck (5).
- Page 42 1 Mount the mounting bracket (6) at the changeable body (2) using the enclosed six pan head screws (1). 2 Mount the mounting bracket (6) to the CAT (3) ABICOR BINZEL torch holder. 3 Drill a 6H7 bore in both mounting brackets (6) and pin them together using the enclosed shoulder bolt (4).
-
Page 43: Connecting The Coolant
• Do not use any deionized or demineralized water as coolant or for tightness or flow tests. This may impair the service life of your welding torch. • We recommend the use of ABICOR BINZEL series BTC coolant for liquid-cooled welding torches. -
Page 44: Parallel Connection
6 Putting into operation WH / WHPP 6.8 Connect the control line – a = green, b = white, c = brown, d = yellow, e = grey, f = blue (-), g = pink (+), h = black, i = purple, j = red (insulated) Fig. - Page 45 WH / WHPP 6 Putting into operation ABICOR BINZEL control board option for resistance adjustment For this connection version, the control board and the micro-fuse are installed in the wire feed unit at a readily accessible location. The required supply voltage is tapped, for example, at the solenoid valve connection "Shielding gas ON/OFF"...
- Page 46 2 Open the housing cover at the changeable body WHPP, relieve the leaf spring tension and swing out the pressure roller. 3 Press the "Currentless wire feed" pushbutton at the changeable body WH. 4 This completes the introduction of the wire.
- Page 47 WH / WHPP 7 Operation NOTICE • Do not change the hand lever position during the change procedure! This will result in malfunctions. The open knife will cause the pre-tensioned welding wire to expand and to become cut off when actuated next. These wire pieces will block the locking mechanism and inevitably lead to failures of the entire system! 1 Insert the hand lever through the sealing lips of the clamp clip into the bore.
-
Page 48: Welding Process
8 Putting out of operation WH / WHPP WARNING Arc eye The produced arc can damage the eyes. • Wear your personal protective equipment. • Check the personal protective equipment before every process. NOTICE • Ensure that all the parameters are set at the power supply for your welding task. -
Page 49: Electric Shock
WH / WHPP 9 Maintenance and cleaning DANGER Electric shock Dangerous voltage due to defective cables. • Check all live cables and connections for proper installation and damage. • Replace any damaged, deformed or worn parts. NOTICE • The maintenance intervals given are standard values and refer to single-shift operation. -
Page 50: Risk Of Injury
9 Maintenance and cleaning WH / WHPP 9.1 Wire guide 1 Unscrew the hose assembly on the machine side and bring it into a stretched position. 2 Unscrew liner nut and pull out guide spiral liner or PA liner. WARNING Risk of injury Serious injuries caused by parts swirling around. - Page 51 Fig. 18 PA liner 1 Sharpen the beginning of the PA liner (1) to approx. 40° with the ABICOR BINZEL sharpener. 2 Slide PA liner (1) through the wire feed hose (2) until a noticeable resistance (7) is felt in the connector nipple.
- Page 52 9 Maintenance and cleaning WH / WHPP 9.5 Changeable body WH/WHPP 1 Clean coupling parts and slightly grease them with silicone-free sealing grease. 2 Check clamp clip for visible damage and replace the complete changeable body, if required. WHPP 3 Replace pressure lever, guide and wire delivery nipple when worn out.
- Page 53 WH / WHPP 10 Troubleshooting 10 Troubleshooting DANGER Risk of injury and device damage when handled by unauthorised persons Improper repair work and modifications to the product may lead to serious injuries and damage to the device. The product warranty will be rendered invalid if work is carried out on the product by unauthorised persons.
- Page 54 11 Dismounting WH / WHPP 11 Dismounting Dismounting may only be carried out by specialized personnel. Please make sure that the shutdown procedures are strictly observed, before the dismounting work begins. Ensure this also for the components integrated into the welding system.
- Page 55 12.3 Packaging ABICOR BINZEL has reduced the shipping packaging to a minimum. Packaging materials are always selected with regard to their possible recycling ability. BAL.0014 • 2019-01-16...
- Page 56 Toutes les marques déposées et marques commerciales contenues dans le présent mode d'emploi sont la propriété de leurs titulaires/fabricants respectifs. Vous trouverez nos documents actuels sur les produits, ainsi que l’ensemble des coordonnées des représentants et des partenaires d'ABICOR BINZEL dans le monde sur la page d'accueil www.binzel-abicor.com Identification...
-
Page 57: Utilisation Conforme Aux Dispositions
1 Identification 1 Identification Le système de torche de soudage WH/WHPP est utilisé dans l'industrie et l'artisanat pour le soudage sous gaz de protection inerte (MIG) ou sous gaz de protection actif (MAG). Ce système permet de procéder très facilement à un changement manuel et automatique du col de cygne. -
Page 58: Équipement De Protection Individuel (Epi)
2 Sécurité WH / WHPP 2.3 Équipement de protection individuel (EPI) Afin d'éviter des risques pour l'utilisateur, il est recommandé de porter un équipement de protection individuel (EPI). • L'équipement de protection individuel comprend des vêtements de protection, des lunettes de protection, un masque de protection respiratoire classe P3, des gants de protection et des chaussures de sécurité. -
Page 59: Instructions Concernant Les Situations D'urgence
WH / WHPP 3 Description du produit 2.6 Instructions concernant les situations d'urgence En cas d'urgence, coupez immédiatement les alimentations suivantes : • Alimentation électrique • Alimentation en liquide de refroidissement • Alimentation en air comprimé • Alimentation en gaz D'autres mesures sont décrites dans le mode d'emploi de la source de courant ou dans la... - Page 60 1,0 - 1,6 10 - 20 800 Tab. 4 Caractéristiques des torches selon EN 60974-7 1En mode pulsé, ces capacités sont réduites jusqu'à 35% Fig. 1 Géométrie du col de cygne ROBOT WH 241D/WH 242D FR - 6 BAL.0014 • 2019-01-16...
- Page 61 WH / WHPP 3 Description du produit Fig. 2 Géométrie du col de cygne ROBOT WH 455D/WH W500 Fig. 3 Géométrie du col de cygne ROBOT WH 650/WH 652D (TS) Fig. 4 Corps interchangeable WH FR - 7 BAL.0014 • 2019-01-16...
- Page 62 Corps interchangeable WHPP WHPP Poids 0,65 kg 1,2 kg Cols de cygne adaptables WH 241D, WH 455D, WH 650, WH 652D (TS), WH spécial Moteur pull Alimentation électrique 24 V C.C. ou 42 V C.C. Courant nominal continu 0,44 A...
-
Page 63: Abréviations
• Mode d´emploi • Faisceau ROBOT Equipé uniquement du faisceau ROBOT, le système de torche de soudage WH/WHPP n'est pas prêt à l'emploi. Pour la première mise en service vous avez besoin d'autres pièces supplémentaires dépendant du travail de soudage correspondant. Il s'agit des pièces suivantes : Tab. - Page 64 Tab. 8 Matériel fourni Les faisceaux pour le système de torche de soudage WH/WHPP sont disponibles en longueur standard et en plusieurs longueurs spécifiques au client. Option : Presque toutes les commandes de robot permettent de rechercher la soudure à l'aide d'un capteur tactile. ABICOR BINZEL dispose de l'équipement de torche nécessaire à...
-
Page 65: Description Du Fonctionnement
(MIG) ou le gaz actif (MAG). 5.1 Col de cygne Pour les cols de cygne standard des types ROBOT WH 241D, WH 455D et WH 650, les versions suivantes sont disponibles : droites et inclinées de 22° et de 45°. Des versions spéciales sont fabriquées sur demande en fonction de l'application. -
Page 66: Mise En Service
En option, tous les cols de cygne peuvent être livrés avec un sensor intégré. Pour le raccordement du câble de commande, voir le schéma des connexions. 6.1 Equiper les cols de cygne ROBO WH 241D et WH 455D Buse gaz... - Page 67 3 Placer la buse gaz (1) sur le col de cygne (5) en la tournant légèrement dans le sens des aiguilles d'une montre. 4 Visser la gaine guide fil-col (6) côté raccord. 6.3 Equiper le col de cygne ROBOT WH 652D (TS)/WH W500 Buse gaz Support tube-contact...
-
Page 68: Equiper Le Faisceau
6 Mise en service WH / WHPP 5 Visser le jeu gaine guide fil-col (6) dans le raccordement du col de cygne. 6.4 Equiper le faisceau AVIS • Choisissez le type de fil correct et la gaine guide-fil correspondant pour votre application. -
Page 69: Monter Le Système De Torche De Soudage Sur Le Robot
1 Fixer la patte de fixation (6) sur le corps interchangeable (2) à l'aide des six vis cylindriques jointes (1). 2 Monter la patte de fixation (6) sur le support de torche CAT (4) de ABICOR BINZEL. 3 Percer un alésage d'un diamètre de 6H7 dans les deux supports (6)et les goujonner à l'aide de la vis calibrée (5). - Page 70 Cela peut réduire la durée de vie de votre torche de soudage. • Nous recommandons le liquide BTC pour les torches ABICOR BINZEL refroidies par liquide. Respectez à ce sujet la fiche de données de sécurité correspondante.
-
Page 71: Connexion Du Câble De Commande
WH / WHPP 6 Mise en service 6.8 Connexion du câble de commande – a = vert, b = blanc, c = brun, d = jaune, e = gris, f = bleu (-), g = rose (+), h = noir, i = violet, j = rouge (isolé) Fig. - Page 72 6 Mise en service WH / WHPP Option carte de commande de ABICOR BINZEL pour l'adaptation de la résistance Pour réaliser cette version de connexion, installez la carte de commande et le fusible fin à un endroit facilement accessible dans le dévidoir. Pour la tension d'alimentation nécessaire, voir les indications figurant par ex.
-
Page 73: Insérer Le Fil
2 Ouvrir le couvercle du boîtier sur le corps interchangeable WHPP, détendre le ressort à lames et pivoter vers l'extérieur le rouleau presseur. 3 Activer le bouton-poussoir "Avance de fil sans courant" sur le corps interchangeable WH. 6.12 Changement manuel du col de cygne Fig. -
Page 74: Changement Automatique Du Col De Cygne
7 Fonctionnement WH / WHPP AVIS • Ne pas modifier la position du levier à main pendant le changement ! Une modification de position entraîne des défauts. En raison de la lame ouverte, le fil-électrode prétendu se détend et en activant de nouveau la lame, le fil-électrode est découpé morceau par morceau. -
Page 75: Éblouissement Des Yeux
WH / WHPP 8 Mise hors service DANGER Risque de brûlures Lors des travaux de soudage, il existe un risque de formation de flammes dû à des étincelles jaillissantes ou des scories chaudes. • Enlever tous les matériaux inflammables de la zone de travail. -
Page 76: Entretien Et Nettoyage
9 Entretien et nettoyage WH / WHPP 9 Entretien et nettoyage L'entretien et le nettoyage réguliers et permanents sont indispensables pour une longue durée de vie et un fonctionnement sans problème. Veuillez respecter à ce sujet : DANGER Risque de blessure en cas de démarrage inattendu Pendant toute la durée des travaux d'entretien, de maintenance, de montage, de démontage... -
Page 77: Risque De Blessure
WH / WHPP 9 Entretien et nettoyage AVERTISSEMENT Risque de blessure Risque de blessures graves par des pièces projetées. • Portez des vêtements de protection, en particulier des lunettes de protection, lors du nettoyage à l'aide d'air comprimé. 3 Nettoyer le câble transport de fil des deux côtés à l'aide d'air comprimé. -
Page 78: Gaine Guide-Fil Synthétique
(4) de ABICOR BINZEL. 7 Affûter le bord de coupe. 9.4 Col de cygne Pour augmenter la disponibilité du robot de soudage, ABICOR BINZEL offre la possibilité d'un nettoyage automatique de la torche. 1 Enlever la buse gaz . -
Page 79: Dépannage
WH / WHPP 10 Dépannage 5 Nettoyer le point de connexion et graisser les joints toriques en utilisant une graisse d'étanchéité sans silicone. 6 Contrôler le TCP après chaque utilisation et à la suite d'une collision dans le marbre de contrôle/rectification. - Page 80 11 Démontage WH / WHPP Défaut Origine Solution Le fil est coincé dans • Réglage de paramètres incorrects • Contrôler le réglage et le corriger, si nécessaire le tube-contact • Tube-contact usé • Le remplacer Avance de fil • Gaine guide fil bouchée •...
-
Page 81: Elimination
Les outils de nettoyage contaminés (pinceau, chiffon etc.) doivent être également éliminés selon les indications du fabricant des produits consommables. 12.3 Emballages ABICOR BINZEL a réduit l'emballage de transport au nécessaire. Lors du choix des matériaux d'emballage, veiller à ce que ces derniers soient recyclables. FR - 27... - Page 82 Para obtener la documentación actual sobre nuestros productos así como para conocer los datos de contacto de los representantes locales y socios de ABICOR BINZEL en todo el mundo, consulte nuestra página de inicio en www.binzel-abicor.com.
-
Page 83: Utilización Conforme A Lo Prescrito
1 Identificación 1 Identificación El Antorcha de soldadura WH/WHPP se utiliza en la industria y los oficios para la soldadura con gases inertes (MIG) o activos (MAG). Permite cambiar manualmente y automáticamente el cuello de antorcha de manera muy fácil. El cambio automático se realiza en conexión con el rotor ATS. -
Page 84: Equipo De Protección Individual (Epi)
2 Seguridad WH / WHPP 2.3 Equipo de protección individual (EPI) A fin de evitar riesgos para el usuario, en el presente manual se recomienda el uso de equipo de protección individual (EPI). • El equipo de protección personal consiste en un traje de protección, gafas de protección, máscara antigás clase P3, guantes de protección y zapatos de seguridad. -
Page 85: Indicaciones Para Emergencias
WH / WHPP 3 Descripción del producto 2.6 Indicaciones para emergencias En caso de emergencia, interrumpa inmediatamente los siguientes suministros: • Alimentación de energía eléctrica • Suministro de refrigerante • Suministro de aire comprimido • Suministro de gas Para conocer más medidas, consulte el manual de instrucciones de la fuente de corriente o la documentación del resto de aparatos periféricos. - Page 86 Datos específicos de las antorchas según EN 60974-7 1Los datos de carga se reducen de un máximo de un 35% con arco pulsado Fig. 1 Geometría del cuello de antorcha ROBO WH 241D/WH 242D ES - 6 BAL.0014 • 2019-01-16...
- Page 87 WH / WHPP 3 Descripción del producto Fig. 2 Geometría del cuello de antorcha ROBO WH 455D/WH W500 Fig. 3 Geometría del cuello de antorcha ROBO WH 650/WH 652D (TS) Fig. 4 Dispositivo de cambio WH ES - 7 BAL.0014 • 2019-01-16...
- Page 88 Fig. 5 Dispositivo de cambio WHPP WHPP Peso 0,65 kg 1,2 kg Cuellos de antorcha adaptables WH 241D, WH 455D, WH 650, WH 652D (TS), WH especial Motor pull Alimentación eléctrica 24 VCC o 42 VCC Corriente nominal permanente 0,44 A Transmisión del engranaje...
-
Page 89: Placa De Características
Tab. 7 Abreviaciones 3.3 Placa de características El Antorcha de soldadura WH/WHPP está marcado con un adhesivo en la carcasa de conexión en el lado de la máquina. Para todas las preguntas, tener en cuenta los datos siguientes: • Indicación del certificado de conformidad, Sello de producción en el cuello de antorcha, p. -
Page 90: Volumen De Suministro
• Manual de instrucciones • Conjunto de cables ROBO El Antorcha de soldadura WH/WHPP no está listo para el funcionamiento con el conjunto de cables ROBO. Para el equipamiento inicial se necesitan componentes que dependen de la tarea de soldadura correspondiente. -
Page 91: Almacenamiento
El hilo para soldar se transporta a través del Antorcha de soldadura WH/WHPP al tubo de contacto. El tubo de contacto transmite la corriente de soldadura al hilo de soldadura y genera un arco entre el hilo y la pieza. El gas inerte (MIG) y el gas activo (MAG) protegen el arco y el baño de fusión. -
Page 92: Puesta En Marcha
6 Puesta en marcha WH / WHPP 5.2 Dispositivo de cambio WH y WHPP El dispositivo de cambio es la interfaz entre el conjunto de cables y el cuello de antorcha. Los siguientes grupos constructivos están integrados en el dispositivo de cambio: •... - Page 93 WH / WHPP 6 Puesta en marcha 6.1 Equipar el cuello de antorcha ROBO WH 241D, WH 455D Tobera de gas Tubo de contacto Cuello de antorcha Protección antiproyecciones Portatubos Equipos Fig. 7 Cuello de antorcha ROBO WH 241D y ROBO WH 455D 1 Atornillar el portatubos intercambiable (4) en el cuello de antorcha (5).
- Page 94 6 Puesta en marcha WH / WHPP 6.3 BEquipar el cuello de antorcha ROBO WH 652D (TS)/WH W500 Tobera de gas Portatubos Cuello de antorcha Tubo de contacto Protección antiproyecciones Equipos Fig. 9 Cuello de antorcha ROBO WH 652 D (TS)/WH W500 1 Atornillar el portatubos (3) en el cuello de antorcha (5).
- Page 95 (1) en el dispositivo de cambio (2). 2 Montar la pieza de amarre (6) en el soporte de antorcha de ABICOR BINZEL (4). 3 En ambas piezas de amarre (6) realizar un taladro 6H7 y fijarlas mediante los tornillos de ajuste (5) suministrados.
-
Page 96: Peligro De Quemaduras
Esto puede perjudicar la vida útil de su antorcha de soldadura. • Recomendamos el uso de la línea de refrigerantes BTC de ABICOR BINZEL para antorchas enfriadas por líquido. Consulte la ficha de datos de seguridad correspondiente. - Page 97 WH / WHPP 6 Puesta en marcha 6.8 Conectar el cable de señal – a = verde, b = blanco, c = marrón, d = amarillo, e = gris, f = azul (-), g = rosa (+), h = negro, i = violeta, j = rojo (aislado) Fig.
- Page 98 6 Puesta en marcha WH / WHPP Opción Placa de control de ABICOR BINZEL para adaptar la resistencia Para esa opción de conexión, instalar la placa de control y el fusible fino en un punto fácilmente accesible en la devanadora. La tensión de alimentación necesaria, está indicada p. ej. en la conexión de la electroválvula "Gas inerte CON/DES"...
- Page 99 2 Abrir la tapa de la carcasa del dispositivo de cambio WHPP, distender la muelle de hoja y girar hacia fuera el rodillo de presión. 3 Accionar el pulsador "Avance de hilo sin corriente" en el dispositivo de cambio WH. 6.12 Cambio manual del cuello de antorcha Fig.
-
Page 100: Riesgo De Quemaduras
7 Operación WH / WHPP AVISO • ¡No cambiar la posición de la palanca de mano durante el proceso de cambio! Eso causaría fallos. El hilo para soldar pretensado se distiende por el cuchillo abierto y es cortado pieza por pieza si se activa otra vez. ¡Esas piezas de hilo bloquean el mecanismo de bloqueo y llevan inevitablemente a fallos del sistema entero! 1 Insertar la palanca de mano por las faldas de obturación del estribo de sujeción en el... -
Page 101: Proceso De Soldadura
WH / WHPP 8 Desconexión de la antorcha ¡ADVERTENCIA! Deslumbramiento de los ojos El arco generado puede dañar los ojos. • Lleve puesto su equipo de protección individual. • Supervise el equipo de protección personal. AVISO • En la puesta fuera de servicio, observar también la desconexión de todos los componentes integrados en el sistema de soldadura. -
Page 102: Mantenimiento Y Limpieza
9 Mantenimiento y limpieza WH / WHPP 9 Mantenimiento y limpieza El mantenimiento y la limpieza regulares son la condición previa para una larga vida útil y un funcionamiento perfecto. Observar lo siguiente: ¡PELIGRO! Peligro de lesiones por arranque inesperado Lleve a cabo las acciones siguientes durante todos los trabajos de mantenimiento, servicio, montaje, desmontaje y reparación:... -
Page 103: Peligro De Lesiones
WH / WHPP 9 Mantenimiento y limpieza ¡ADVERTENCIA! Peligro de lesiones Lesiones graves debido a piezas proyectadas. • Llevar ropa de protección laboral adecuada, sobre todo gafas protectoras, mientras se sopla la sirga. 3 Limpiar el conductor de hilo desde ambos lados con aire comprimido. -
Page 104: Sirga De Material Plástico
ABICOR BINZEL (4). 7 Aguzar el punto de corte. 9.4 Cuello de antorcha Para aumentar la vida de consumibles del robot de soldadura, ABICOR BINZEL ofrece la posibilidad de limpiar automáticamente la antorcha. 1 Sacar la tobera de gas. 2 Eliminar las salpicaduras de soldadura y rociar la tobera con el medio de protección contra salpicaduras de ABICOR BINZEL. - Page 105 WH / WHPP 10 Identificación y eliminación de averías 6 Controlar el TCP después de cada aplicación y después de una colisión en el dispositivo de ajuste WH. 9.5 Dispositivo de cambio WH/WHPP 1 Limpiar las piezas del acoplamiento y lubricarlas ligeramente con grasa de obturación sin silicona.
- Page 106 11 Desmontaje WH / WHPP Avería Causa Eliminación El hilo se ha fundido • Parámetros ajustados no son correctos • Revisar y corregir los ajustes en el tubo de • Tubo de contacto desgastado • Reemplazar contacto Problemas de • Sirga obstruida •...
- Page 107 Los útiles de limpieza (cepillos, paños, etc.) también deben eliminarse según las indicaciones del fabricante de los combustibles. 12.3 Embalajes ABICOR BINZEL ha reducido el embalaje de transporte a un mínimo necesario. Al seleccionar los materiales de embalaje, se tiene en cuenta un posible reciclaje. ES - 27...
- Page 108 T E C H N O L O G Y F O R T H E W E L D E R ´ S W O R L D . Alexander Binzel Schweisstechnik GmbH & Co.KG Postfach 10 01 53 • D–35331 Giessen Tel.: ++49 (0) 64 08 / 59–0 Fax:...