Hamax CARESS Mode D'emploi
Support monté sur cadre
Masquer les pouces
Voir aussi pour CARESS:
- Manuel de l'utilisateur ,
- Mode d'emploi (42 pages) ,
- Manuel d'instructions (25 pages)

Manuels Connexes pour Hamax CARESS


Sommaire des Matières pour Hamax CARESS
- Page 1 User Manual CARESS with carrier adapter DE mit Gepäckträgerbefestigung FR support monté sur cadre NO Festeplate Tested and certified according to EN14344:2022 Hamax id: 12180, rev. 000, Manual Caress seat carrier mounted...
-
Page 2: Important
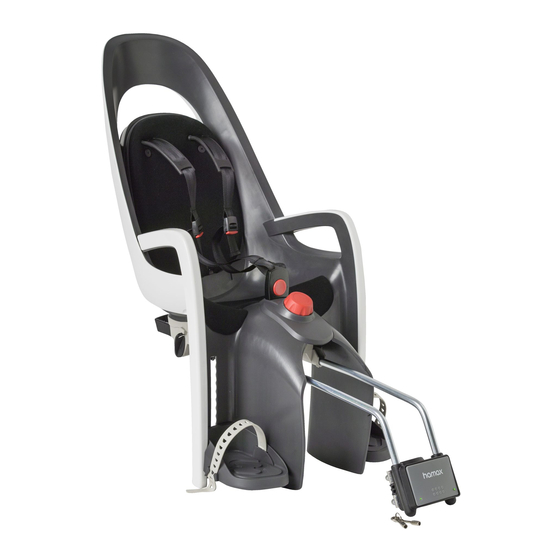
Important ! Safety instructions Sicherheitshinweise Congratulations on purchasing the Hamax bicycle child seat. You now have a comfortable and safe Consignes de sécurité child seat that can be adjusted to fit your child as she/he grows. Sikkerhetsinstruksjoner Please first read the Hamax safety instructions carefully before installing... - Page 3 1. Sitz 1. Main seat 2. Sicherheitsgurt 3. Sitzpolster 2. Restraint system 4. Gurtverschluss 3. Seat padding 5. Fußstützen 6. Komplette Montageplatte 4. Belt lock 7. Entriegelungstasten 5. Foot rests 8. Sechskantschlüssel 9. Einstellknopf für Liegeposition 6. Carrier adapter complete 10.
- Page 4 Take off the carrier adapter Entfernen Sie den Adapter | Enlever l’ a daptateur Now rotate the rear of the Unlock the hooks by seat upwards (a) and then pushing the release pull it rearwards (b). buttons (7) of the seat. To take the seat off, press the release button (6b) up and hold.
- Page 5 Mount the adapter on the carrier Montageplatte an den Gepäckträger anbringen I Fixer l’ adaptateur sur le porte-bagages Unscrew the 2 bolts (6f) with the Hex tool (6e) until the 4 clamps (6) fit over the carrier rack of the bicycle. Place the Carrier adapter on the carrier rack making sure the clamps (6c) are on the Do not tighten the bolts (6f) completely yet.
- Page 6 Mount the seat on the adapter Check if the hooks (4) are in open position by pressing the button (5). Montage des Sitzes am Adapter | Fixer le siège sur l’ a daptateur The seat hooks under the pins in the front of the adapter (6a ). Slide the seat forward over the carrier adapter until it clicks in the front lock.
-
Page 7: Lock - Unlock
Lock the seat Verriegeln Sie den Sitz | Verrouiller le siège You can use the key to lock the Release button on the back of the seat. Lock - unlock Sie können den Vous pouvez utiliser la clé pour Du kan bruke nøkkelen til å låse Entriegelungsknopf auf der Rückseite verrouiller le bouton de déverrouillage utløserknappen på... - Page 8 Adjusting the seat Einstellung | Réglage as close as possible Position the seat (1) and adapter as much towards the front as possible. Note: In Germany, according to the StVZO, seats may only be attached in such a way that 2/3 of the depth of the seat or the center of gravity of the seat is between the front and rear axles of the bicycle.
- Page 9 Fix the adapter on the luggage carrier Montageplatte befestigen | Fixer l’ adaptateur Tighten the rear bolt (6f) first, with the seat still on the carrier adapter. Remove the seat and tighten the front clamps. Minimal tightening torque is 2 Nm. Make sure that the clamps have a good grip on the carrier and are not blocked by the frame or the E-bike battery (6c).
- Page 10 Attach the safety strap Sicherungsgurt befestigen | Attachez la ceinture de sécurité The additional safety strap needs to be secured to the frame or seat post. Lead the safety strap (6d) through the holes as shown in pic. 1 & 2, then pull at the end to tighten it. pic.
-
Page 11: Foot Rest Adjustment
Foot rest adjustment Einstellung Fußstützen | Réglage du repose-pieds How to release the foot rest (5): Release the footrest handle on the back by flipping it upwards. Move the foot rest (5) to the preferred height and fasten the foot rest by pressing the foot rest handle down. - Page 12 Foot strap adjustment Einstellung Fußschlaufen | Réglage de la sangle de pieds How to fasten/release the foot strap (a): To fasten the foot strap put the strap into the track and pull down to preferred length. The strap will automatically lock. It’s only possible to tighten the strap when it is in the track.
- Page 13 Restraint system Pic. 1 Sicherheitsgurt | Ceinture de sécurité The restraint system (2) can be attached and detached by pressing in or out the belt lock (4) shown in pic. 1. It is important to press at the middle of the belt lock button (pic. 2 & 3) when detaching the restraint system.
- Page 14 Chest buckle adjustment Rückhaltesystems einstellen | Régler les boucles The restraint system length can be adjusted by adjusting buckle a and b. To adjust buckles (a+b) hold the buckle as shown in pic. 1. By pressing the red button, the belt loosens by pulling the buckle Pic.
- Page 15 Restraint system connectors Anschlüsse für Rückhaltesysteme | Connecteurs du système de retenue The mounting system can be easily installed and removed. The Unlock Unlock connectors (c) can be placed in a wide (photo1) or narrow (photo2) position, depending on the size of your child. Lock Lock TIP: by removing the connectors you can also remove the backrest...
- Page 16 SLIDING BACKREST Die verschiebbare Rückenlehne | Le dossier coulissant The sliding backrest (13) position can be adjusted, so the backrest and restraint system is in the correct height to the child’s shoulders. Move backrest to preferred height, and fasten by pressing the lever down (pic.
- Page 17 Recline function Liegefunktion | Fonction inclinable To recline the seat twist the adjuster knob (9) to the position required. Um den Sitz zu neigen, den Pour incliner le siège en arrière, For å justere setet til sovestilling Einstellknopf (9) in die gewünschte tournez la molette de réglage (9) vris justeringsrattet (9) til ønsket Position drehen.
- Page 18 How to remove the seat Um den Sitz zu lösen | Pour retirer le siège Now rotate the rear of the Unlock the hooks by seat upwards (a) and then pushing the release pull it rearwards (b). buttons (7) of the seat. To take the seat off, press the release button (6b) up and hold.
- Page 19 Before embarking on a bicycle trip Vor der Fahrradtour | Avant de partir en randonnée • Adjust the safety belt (2) • Adjust the foot rests and fasten foot straps (5) • Check if the carrier adapter (7) is secured well and does not slide •...
- Page 20 With an extra adapter you can quickly move this seat from one bicycle to the next. You may also mount the seat on a bicycle frame using the Hamax frame bracket, suitable for tube diameter of 28-40 mm. This can be useful if your family uses different types of bicycles.
- Page 21 Hamax AS Visiting address: Vålerveien 159 N-1599 Moss Norway Tel.: +47 69 23 38 38 email: kontakt@hamax.no www.hamax.com...