AVS Electronics OUTSPIDER PA Mode D'emploi

Détecteur sans fil
Masquer les pouces Voir aussi pour OUTSPIDER PA:

Publicité

Les langues disponibles
  • FR

Les langues disponibles

Liens rapides

Curtarolo (Padova) Italy
www.avselectronics.com
OUTSPIDER PA
Sensore a doppio infrarosso passivo
da esterno e interno
OUTSPIDER PA WS U
OUTSPIDER PA WS UB
IST0894V4.1
- 1 -
OUTSPIDER PA WS
a doppio infrarosso passivo
da esterno e interno
Sensore via radio universale
a doppio infrarosso passivo
da esterno e interno
SISTEMA DI QUALITA'
CERTIFICATO
UNI EN ISO 9001:2008
Sensore via radio
I
T
A
E
N
G
F
R
A
E
S
P
D
E
U

Publicité

Table des Matières
loading

Sommaire des Matières pour AVS Electronics OUTSPIDER PA

  • Page 1 Sensore via radio Sensore a doppio infrarosso passivo a doppio infrarosso passivo da esterno e interno da esterno e interno OUTSPIDER PA WS U OUTSPIDER PA WS UB Sensore via radio universale a doppio infrarosso passivo da esterno e interno IST0894V4.1...
  • Page 2 OUTSPIDER DT e OUTSPIDER DT WS(UB)(U) sono composti da un doppio infrarosso e da una microonda planare, ideati per la protezione sia interna che esterna. w OUTSPIDER PA WS e OUTSPIDER DT WS sono rilevatori volumetrici di presenza, con integrato il modulo di trasmissione via radio a singola frequenza compatibile con ricevitori e centrali AVS Electronics.
  • Page 3 Descrizione del funzionamento del sensore in modalità “Default” In questa modalità la sezione infrarossa discrimina gli allarmi operando i seguenti controlli: w ampiezza e simmetria del segnale: la forma d’onda deve superare delle soglie minime sia nel verso positivo che in quello negativo; inoltre le larghezze delle semionde devono essere proporzionate w il livello di energia del segnale deve essere superiore ad un valore minimo I precedenti controlli vengono svolti sui due infrarossi in maniera indipendente l’uno dall’altro.
  • Page 4 Accessori ACCESSORI A CORREDO SNODO composto da: A. Staffa lato muro B. Snodo intermedio C. Snodo lato sensore D. Vite TC-C M6 INOX E. Dado M6 INOX F. Rondella dentata TAMPER composto da: A. Guida tamper B. Pulsante con molla C.
  • Page 5 Copertura Il codice lente è stampigliato all’interno di un lato lungo della lente stessa Con lente Wide angle (cod.FR09-0001-30): apertura 90°, VISTA DALL’ALTO Portata 15 metri portata 15 mt, altezza installazione consigliata circa 2.20 mt 90° - 15 mt - Indicata per la protezione di media portata di vaste aree w OUTSPIDER riesce a discriminare intrusioni di animali di me- dia taglia (fino a circa 70 cm di altezza) (PET IMMUNE) VISTA LATERALE...
  • Page 6: Avvertenze

    Avvertenze Evitare che nella zona di rilevazione del sensore vi siano oggetti che coprano il campo di lettura o che vi siamo piante che con il tempo po- trebbero modif icare l’ambiente circo- stante. Avvertenze 2,7 metri w Con l’utilizzo dello snodo è (max.) possibile ridurre la portata.
  • Page 7 Apertura sensore e rimozione scheda Installazione della piastra a muro e a palo Per togliere il coper- chio, alzare prima la par- Fori per il fissaggio te inferiore (1) e poi della piastra a parete sganciarlo dalla guida sulla parte superiore (2) Fori per il fissaggio della piastra a palo con adatta- tore mod.
  • Page 8: Nell'outspider Pa Ws(Ub)(U) E Outspider Dt

    Installazione Antistrappo Fissaggio della base allo snodo Scasso a rompere per Nell’OUTSPIDER PA e OUTSPIDER DT collegare il modulo l’utilizzo dello snodo tamper al negativo di alimentazione e all’ingresso AUX oppor- tunamente configurato (vedi DIP 6 e DIP 8 del banco SW2) Mousse adesiva da Nell’OUTSPIDER PA WS(UB)(U) e OUTSPIDER DT...
  • Page 9 Cambio lenti Fissaggio scheda Rimuovere le 6 viti di fermo Estrarre il supporto della lente Inserire la scheda facendo combaciare gli scansi con i fermi Sganciare la lente dal supporto facendo una leggera pressione sui quattro fermi laterali Inserire la lente seleziona- Far scorrere ta verificando che i quattro verso il basso la...
  • Page 10: Procedura Di Calibrazione

    Procedura di calibrazione Procedura di calibrazione OUTSPIDER PA OUTSPIDER PA WS(UB)(U) OUTSPIDER DT OUTSPIDER DT WS(UB)(U) Per poter eseguire le prove del sensore è necessario chiudere Per poter eseguire le prove del sensore è necessario chiudere correttamente il coperchio. correttamente il coperchio.
  • Page 11 OUTSPIDER PA WS(UB)(U) OUTSPIDER DT WS(UB)(U) OUTSPIDER DT è dotato di un buzzer e OUTSPIDER PA è dotato di un buzzer e di Nel caso si renda necessario regolare la di una serie di led per dare una segnala- un led per dare una segnalazione ottico- posizione del sensore, la scheda è...
  • Page 12 Morsettiera OUTSPIDER PA e OUTSPIDER DT Dip Switch OUTSPIDER PA e OUTSPIDER DT SW1 - FUNZIONI A UX Nel funzionamento a DIP/RELE' le configurazioni programmabili con il banco di Dip Switch SW1 sono: CONFIGURAZIONE SEZIONE INFRAROSSI DIP 1 OFF DEFAULT in questa configurazione la sezione infrarosso ha una sensibilità...
  • Page 13 USB Abilitata - Non invia Sopravvivenza USB Disabilitata (Default) DIP 7 Buzzer Abilitato (Default) Buzzer Disattivato Morsettiera e Jumper OUTSPIDER PA WS UB(U) e OUTSPIDER DT WS UB(U) DIP 8 Led Rosso Disattivato Led Rosso Abilitato (Default) Morsettiera presente su...
  • Page 14 6 di SW1, prima di inserire il cavo di collegamento tra PC e sensore. Acquisizione sensore OUTSPIDER PA WS e OUTSPIDER DT WS Una volta commutato in ON il dip 6 di SW1, attendere circa 10 secondi e poi collegare il cavo al sensore e al PC.
  • Page 15 Nei modelli OUSPIDER PA WS, OUTSPIDER DT WS e nei modelli OUSPIDER PA , OutSpider PA e OutSpider DT sono provvisti di un circuito antimascheramento, formato da un OUTSPIDER DT utilizzati con collegamento seriale (DIP 1 dell’SW 2 in OFF), i DIP ricevitore RX centrale e quattro trasmettitori TX ad infrarossi attivi posizionati ai lati dei sensori SWITCH dall’1 al 5 del banco SW 1 vengono utilizzati per assegnare al sensore un...
  • Page 16: Funzioni Speciali

    Funzioni speciali Grazie al software da PC HPWIN, è possibile sfruttare al meglio le potenzialità della tecnologia digitale. HPWIN permette per ogni sensore: Verifica: Ritorno alla schermata iniziale grafico segnali dei due infrarossi (selezionabile) Attivazione della connessione USB /Telefonica, per la grafico segnale microonda (Mod.
  • Page 17 Tipologia connessione per gestione con software HPWIN Il sensore può essere collegato al PC tramite: Connessione Seriale RS232 (non utilizzata) Connessione USB Linea telefonica (modem) (Mod. OUTSPIDERT PA e OUTSPIDER DT) Connessione USB Questo tipo di connessione permette il collegamento del sensore al PC tramite: l’adattatore mod.
  • Page 18: Visualizzazione Parametri

    Gestione sensori L’accesso a questo menù impone la scelta del tipo di connessione: 1- Seguire la procedura in base al tipo di connessione da eseguire NOTA: se fosse una connessione in USB, potrebbe richiedere l’installazione dei driver per il riconoscimento della periferica. Se i driver non vengono riconosciuti automaticamente, è...
  • Page 19 Sensibilità OutSpider: selezione della sensibilità della sezione infrarossi On/Off Antimask: gestione della funzione antimascheramento Memorizza allarmi sempre (solo Mod. OutSpider PA): memorizza tutti gli allarmi o solo quelli ad impianto inserito (nei modelli via radio questa funzione è sempre attiva) NOTA: tramite il software non è...
  • Page 20 Linea verde (V): indica il segnale del circuito antimascheramento NOTA: OutSpider PA e OutSpider PA WS(UB)(U), per nascondere il segnale dell’infrarosso inferiore è necessario togliere il segno di spunta sia dal bollino rosso che dal bollino giallo, mentre per nascondere il segnale dell’infrarosso superiore è sufficiente togliere il segno di spunta dal bollino bianco.
  • Page 21 Œ I segnali rilevati dai due infrarossi non corrispondono. La sezione infraros- Œ • Ž si segnala l’allarme solo se il segnale supera una certa soglia e se il sensore è settato nella configurazione ALTA. • I due infrarossi tornano ad un regime di quiete. Ž...
  • Page 22 Impostazioni data ed ora del sensore Tensione di alimentazione Temperatura nel sensore Stato del sensore: OutSpider PA e PA WS(UB)(U): Tamper - Allarme - Antimask OutSpider DT e DT WS(UB)(U): Tamper - Allarme generale - Antimask - Allarme sezione microonda - 22 -...
  • Page 23 Storico Eventi L’accesso a questo menù impone la scelta del tipo di connessione: 1- Seguire la procedura in base al tipo di connessione da eseguire NOTA: se fosse una connessione in USB, potrebbe richiedere l’installazione dei driver per il riconoscimento della periferica. Se i driver non vengono riconosciuti automaticamente, è...
  • Page 24 USB, se invece si è collegati tramite il satellite XSATHP è sufficiente chiudere la schermata del programma. Nel Mod.OutSpider PA e OutSpider DT, alla fine dell’aggiornamento, i led giallo e rosso del sensore lampeggiano alternativamente per qualche secondo.
  • Page 25 Il prodotto oggetto della presente dichiarazione è conforme alle prescrizioni fondamentali della Direttiva 1999/5/CEE (R&TTE) sugli apparati radiotrasmittenti di debole potenza e sull’uso delle frequenze dello spettro radioelettrico, in accordo anche con la raccomandazione CEPT 70-03. Marca AVS ELECTRONICS Modello OUTSPIDER PA WS Frequenza di lavoro 868,350 Mhz (Trasmissione radio) Tipo di alimentazione Corrente Continua...
  • Page 26 Il prodotto oggetto della presente dichiarazione è conforme alle prescrizioni fondamentali della Direttiva 1999/5/CEE (R&TTE) sugli apparati radiotrasmittenti di debole potenza e sull’uso delle frequenze dello spettro radioelettrico, in accordo anche con la raccomandazione CEPT 70-03. Marca AVS ELECTRONICS Modello OUTSPIDER PA WS - U Frequenza di lavoro 868,350 Mhz (Trasmissione radio) Tipo di alimentazione Corrente Continua...
  • Page 27 - 27 -...
  • Page 28 - 28 -...
  • Page 29 - 29 -...
  • Page 30: Caratteristiche Tecniche

    ESSERE FATTE DA PERSONALE QUALIFICATO Lenti copertura infrarosso Grado di protezione IP 65 IP 65 IP 65 IP 65 AVS ELECTRONICS S.p.a. si riserva il diritto di apportare modifiche in qualsiasi momento e senza preavviso. - 30 -...
  • Page 31 OUTSPIDER PA WS Double passive infrared Double passive infrared detector wireless detector for outdoors and indoors for outdoors and indoors OUTSPIDER PA WS UB OUTSPIDER PA WS U Double passive infrared universal wireless detector for outdoors and indoors IST0894V4.1 - 31 -...
  • Page 32: Initial Power-Up

    At the first power supply of the OUTSPIDER PA WS(UB)(U) and OUTSPIDER DT WS(UB)(U)) it is necessary to let the sensor rest with the cover on for about 90 seconds during which time it acquires the average signal of the various analog signals it will be controlling. It is important that the cover is kept closed so that it does not distort the average anti-mask signal and to avoid false detections.
  • Page 33 Description of sensor operation in “Default” mode In this mode the infrared section discriminates the alarms by operating the following controls: w signal width and symmetry: the wave shape must exceed minimum thresholds, both in the positive and in the negative direction; besides, the width of the half-waves must be proportionate.
  • Page 34: Supplied Accessories

    Accessories SUPPLIED ACCESSORIES JOINT made up of: A. Wall bracket B. Intermediate joint C. Sensor-side joint D. Stainless steel TC-C M6 screw E. Stainless steel M6 nut F. Toothed washer TAMPER made up of: A. Tamper guide B. button with spring C.
  • Page 35 Coverage The lens code is imprinted inside a long side of the actual lens With Wide Angle lens (cod FR09-0001-30): opening 90°, TOP VIEW Range 15 meters range 15 mt, suggested installation height about 2,2 mt. 90° - 15 mt - Ideal for protection of wide areas of medium range w OUTSPIDER manages to discriminate the intrusion of medium SIDE VIEW...
  • Page 36 Warnings Avoid the presence of objects in the sensor detection area that cover the read range or that there are plants that over time modify the surrounding environment. Warnings 2.7 metres It is possible to reduce (max.) capacity using the joint. It is not possible to use the joint for installation with 2,2 metres...
  • Page 37 Sensor opening and board removal Wall and pole plate installation To remove the cover, first lift the bottom part Holes for fixing the (1) and then unhook it plate to the wall from the upper part of the guide (2). Holes for fixing the plate to a pole with adaptor mod.
  • Page 38 Installazione Antistrappo Fixing the base to the joint For OUTSPIDER PA and OUTSPIDER DT connect the tamper To break for using th module to the negative power supply and to the specially swivel configured AUX input (see DIP 6 and DIP 8 from panel SW2)
  • Page 39: Important

    Lens change Fixing the board Remove the 6 set screws. Remove the lens support. Insert the board until the notches coincide with the stops Unhook the lens from the support by slightly pressing on the four side stops. Insert the selected lens Slide the verifying that the four side board downward...
  • Page 40: Calibration Procedure

    Calibration procedure Calibration procedure OUTSPIDER PA OUTSPIDER PA WS(UB)(U) OUTSPIDER DT OUTSPIDER DT WS(UB)(U) In order to test the detector, it is necessary to close the cover In order to test the detector, it is necessary to close the cover...
  • Page 41 Recommendations OUTSPIDER PA and OUTSPIDER DT WS (UB) (U) OUTSPIDER DT is equipped with a buzzer OUTSPIDER PA is equipped with a buzzer In case you need to adjust the position of OUT SPIDER PA WS(UB) (U) and and an LED in order to give an optical-...
  • Page 42: Terminal Board

    Terminal board OUTSPIDER PA e OUTSPIDER DT Dip Switch OUTSPIDER PA e OUTSPIDER DT S W 1 - F U N C T IO N S A UX In o p e ra tio n w ith re la y s , th e c o n fig u ra tio n s th a t c a n b e p ro g ra m m e d w ith th e D ip S w itc h S W 1 strip a re :...
  • Page 43: Functions

    ATTACHMENT COMPARTMENT DIP 7 Buzzer Enabled (Default) Buzzer Disabled Terminal and Jumper OUTSPIDER PA WS(UB)(B) e OUTSPIDER DT WS(UB)(B) DIP 8 Led Red Enabled (Default) Led Red Disabled Terminal block present on OUTSPIDER PA WS(UB)(U) and DIP SWITCH SW 2:...
  • Page 44 - The connection of the detector occurs by using the RS485 serial or the relays on board. OUTSPIDER PA WS (UB) (U) and OUTSPIDER DT WS (UB) (U) Only management of the LEDs and the AUX clamp cannot be modified through the To connect the sensor to the PC you must enable the USB interface via the PC, but only using the related DIP SWITCHES (1 - 2 - 3 - 4 - 5 - 6 and 8 of the SW 2).
  • Page 45 Sensor address Antimask and Dirty Lenses OutSpider PA and OutSpider DT are equipped with an anti-masking circuit, made of a central RX For OUSPIDER PA WS and OUTSPIDER DT WS models, and for OUSPIDER receives and four active infrared TX transmitters positioned on the sides of the PIR sensors, that PA and OUTSPIDER DT models used with serial connections (DIP 1 of SW2 in OFF), detects obstacles placed in front of the sensor up to a distance of about 5 cm.
  • Page 46: Special Functions

    1900 memorisations complete of date and time individual sensor status synoptic (direct USB connection) or of all sensors (connection to the XSATHP by way of RS 485) (Mod. Outspider PA and Access to the local archive for recording signals manually Outspider DT)
  • Page 47 This type of connection makes it possible to connect the sensor to the PC by way of: the OUTUSB mod. adaptor for a direct connection. the USB port of the XSATHP satellite that the sensor Mod. Outspider PA and Outspider DT is connected to for a remote connection.
  • Page 48 Sensors management Access to this menu require a choice in type of connection: 1- Follow the procedure based on the the type of connection to be carried out NOTE: if it is a USB connection, it may require installation of drivers for recognising the peripheral device. If the drivers are not recognised automatically, it is necessary to specify the following file path to the operating system C:\Programmi\Xwin\Driver\ and select the stmcdcAVS.inf file 2- Select the address of the sensor and/or the satellite on HPWIN and then chose “Connetti (Connect)”...
  • Page 49 OutSpider Sensitivity: selecting sensitivity of the infrared section Antimask On/Off: handles the Antimask function Always memorise alarms (only Mod. Outspider PA): memorises all alarms or only those occurring when the system is engaged NOTE: by way of software it is not possible to change parameters related to the AUX input and LED management.
  • Page 50 NOTE: OutSpider PA and Outspider PA WS(UB)(U), to hide the signal from the lower infrared it is necessary to remove the check mark from both the red and the yellow box, to hide the upper infrared signal instead it is sufficient to remove the check mark from the white box.
  • Page 51 Œ The signals detected by the two infrared do not correspond. The infrared Œ • Ž section signals an alarm only if the signal exceed a certain threshold and if the sensor is set with the HIGH configuration. • The two infrared go back to being quiet. Ž...
  • Page 52 Sensor address (not managed with a USB connection) Sensor date and time settings Power supply voltage Sensor temperature Sensor status: OutSpider PA and PA WS(UB)(U): Tamper-Alarm - Antimask OutSpider DT and DT WS(UB)(U): Tamper-General alarm- Antimask-Microwave section alarm - 52 -...
  • Page 53 Events Historical file Access to this menu require a choice in type of connection: 1- Follow the procedure based on the the type of connection to be carried out. NOTE: if it is a USB connection, it may require installation of drivers for recognising the peripheral device. If the drivers are not recognised automatically, it is necessary to specify the following file path to the operating system C:\Programmi\Xwin\Driver\ and select the stmcdcAVS.inf file.
  • Page 54 In order to re-initialise the sensor, if directly connected using the adapter mod. OUTUSB, it is necessary to disconnect it from the USB cable, if it is connected through the XSATHP satellite instead, it is sufficient to close the screen of the program. In the Outspider PA and Outspider DT, the end of the update the yellow and red LEDs of the sensor flash alternatively.
  • Page 55 This product subject of this declaration conforms to the fundamental requirements of Directive 1999/5/CEE (R&TTE) on weak power radio transmitting equipment and the use of the radio electric spectrum, also in agreement with recommendation CEPT 70-03. Brand AVS ELECTRONICS Model OUTSPIDER PA WS Work frequency 868,350 Mhz (Radio transmission) Type of power supply Direct Current...
  • Page 56 This product subject of this declaration conforms to the fundamental requirements of Directive 1999/5/CEE (R&TTE) on weak power radio transmitting equipment and the use of the radio electric spectrum, also in agreement with recommendation CEPT 70-03. Brand AVS ELECTRONICS Model OUTSPIDER PA WS - U Work frequency 868,350 Mhz (Radio transmission) Type of power supply Direct Current...
  • Page 57 - 57 -...
  • Page 58 - 58 -...
  • Page 59 - 59 -...
  • Page 60: Technical Features

    EXECUTED BY QUALIFIED PERSONNEL Infrared cover lenses Protection rating IP 65 IP 65 IP 65 IP 65 AVS ELECTRONICS S.p.a. reserves the right to make amendments at any moment and without notice. - 60 -...
  • Page 61 Détecteur à double infrarouge passif à double infrarouge passif pour usage interne et externe pour usage interne et externe OUTSPIDER PA WS UB OUTSPIDER PA WS U Détecteur sans fil universal à double infrarouge passif pour usage interne et externe IST0894V4.1...
  • Page 62: Caractéristiques Générales

    NB : là où non précisé de manière explicite, les instructions se rapportent à tous les modèles. Première alimentation : À la première alimentation, OUTSPIDER PA et OUTSPIDER DT sont inhibés pendant 60 secondes environ, temps durant lequel les leds jaune et rouges sont activés ; ils clignotent alternativement et le buzzer émet un son intermittent.
  • Page 63 Description du fonctionnement du détecteur en modalité “réglage d’usine”. Dans cette modalité, la section infrarouge sélectionne les alarmes en opérant les contrôles suivants : · Amplitude et symétrie du signal : la forme d’onde doit être supérieure aux seuils minimaux tant vers le positif que vers le négatif ; par ailleurs, la largeur des demi-ondes doivent être proportionnelles.
  • Page 64: Accessoires Fournis

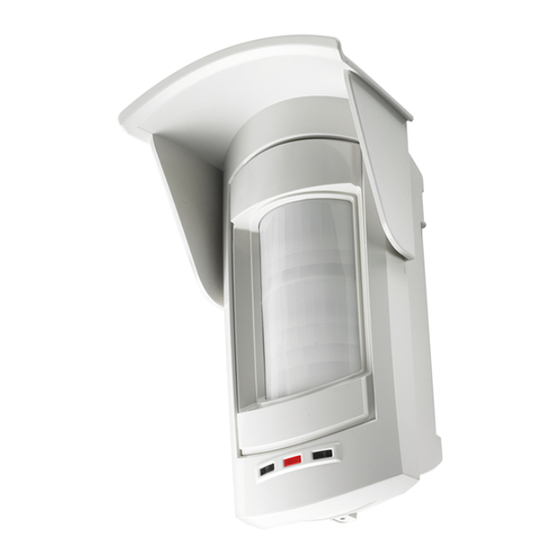
    Accessoires ACCESSOIRES FOURNIS ROTULE composée de : A. étrier coté mur B. rotule intermédiaire C. rotule coté détecteur D. Vis TC-C M6 INOX E. Écrou M6 INOX F. Rondelle dentée SABOTAGE composée de : A. Guide sabotage B. Bouton avec ressort C.
  • Page 65: Vue Latérale

    Coverture Le code de la lentille est imprimé à l’intérieur du coté long de la lentille même. Avec lentille Wide angle (réf. FR09-0001-30): ouverture 90°, VUE SUPÉRIEURE Portée 15 mètres portée 15 mt, hauteur d’installation conseillée environ 2.20 mt 90° - 15 mt - Conseillée pour la protection de zones larges de portée moyenne OUTSPIDER réussit à...
  • Page 66 Avertissement Éviter que dans le champ de révélation des détecteurs, des objets qui couvrent le champ de lecture ou que des plantes qui ne modifient l’environnement proche ne soient présents. Avertissement 2,7 mètres · Avec l’utilisation de la rotule, (max.) il est possible réduire la portée ·...
  • Page 67 Ouverture détecteur et déplacement de la carte Installation de la plaque sur un mur ou sur un poteau Pour enlever le couvercle, soulever avant Perforations pour la la partie inférieure (1) puis fixation de la plaque sur le décrocher du guide paroi.
  • Page 68 Installation antiarrachage Fixation de la base de la rotule Préforage à découper pour Dans les OUTSPIDER PA et OUTSPIDER DT brancher le module utiliser la rotule tamper au négatif d’alimentation et à l’entrée AUX configurée de manière appropriée (voir DIP 6 et DIP 8 du banc SW2) Joint autocollant à...
  • Page 69: Changement De La Lentille

    Changement de la lentille Fixation carte Retirer les 6 vis de blocage Extraire le support de la lentille Insérer la carte en faisant se rencontrer les encoches A avec les point de blocages B Décrocher la lentille du support en faisant une légère pression sur les 4 blocages latéraux.
  • Page 70 Procédure de calibration Procédure de calibration OUTSPIDER PA OUTSPIDER PA WS(UB)(U) OUTSPIDER DT OUTSPIDER DT WS(UB)(U) Afin d'effectuer les tests du détecteur, refermer correctement Afin d'effectuer les tests du détecteur, refermer correctement son couvercle avant. son couvercle avant. Avant d’effectuer cette procédure, régler correctement la Avant d’effectuer cette procédure, régler correctement la...
  • Page 71: Out Spider Pa Ws(Ub)(U) Et Out Spider Dt Ws (Ub)(B) Sont

    (UB)(B) et OUTSPIDER DT WS(UB) Dans le cas où il soit nécessaire de régler OUTSPIDER DT intègre un buzzer et une OUTSPIDER PA intègre un buzzer et une la position du capteur, la carte est série de LED d’indications visuelles et série de LED d’indications visuelles et...
  • Page 72 Bornes OUTSPIDER PA et OUTSPIDER DT Dip Switch OUTSPIDER PA et OUTSPIDER DT S W 1 - F ON C T ION S A UX Avec le fon ctio n nem en t à relais, les co n fig u ratio n s p ro gram m ab les avec le b anc d e d ip-sw itch S W 1 son t :...
  • Page 73: Batterie Outspider Pa Ws(Ub) Et Outspider Dt Ws(Ub)

    (Par défaut tous le DIP sur ON = Capteur 1) BATTERIE BATTERIE DIP 6 Active USB - Il n’envoit pas Survie Inactive USB (Default) Bornes et Jumper OUTSPIDER PA WS(UB)(U) e OUTSPIDER DT WS(UB)(U) DIP 7 Active Buzzer (Default) Inactive Buzzer DIP 8 Inactive Led Rouge Active Led Rouge (Default) Bornier présent uniquement sur...
  • Page 74: Outspider Pa Ws (Ub) (B) Et Outspider Dt Ws (Ub) (B)

    Seuls la gestion des led et de la borne AUX ne peut être modifiée par ordinateur, mais OUTSPIDER PA WS (UB) (B) et OUTSPIDER DT WS (UB) (B) exclusivement par les DIP SWITCH correspondants (1 -2 -3 - 4 -5 -6e 8 du SW 2) Pour brancher le senseur au PC il est nécessaire d’activer l’interface USB...
  • Page 75: Adresse Détecteur

    Dans les modèles OUSPIDER PAWS, OUTSPIDER DT WS et dans les modèles OUTSPIDER PA et OUTSPIDFER DT sont munis d’un circuit antimasquage, formé par un récepteur OUSPIDER PA , OUTSPIDER DT utilisés avec branchement en série (DIP 1 du SW2 RX central et 4 émetteurs TX à...
  • Page 76: Fonctions Spéciales

    Fonctions spéciales Grace au logiciel pour ordinateur HPWIN, il est possible d’utiliser au mieux la potentialité de la technologie digitale. HPWIN permet pour chaque détecteur : Vérification: Retour au menu principal ·Graphique signal des 2 infrarouges (sélectionnable) Activation de la connexion USB/téléphonique, pour la wGraphique signal hyperfréquence (Mod.
  • Page 77 Typologie de connexion pour la gestion avec logiciel HPWIN Le détecteur peut être connecté à l’ordinateur par : w Connexion série RS232 (non utilisé) w Connexion USB Ligne téléphonique (Modem) (Mod. Oustspider PA et Outspider DT) Connexion USB Ce type de connexion permet la connexion du détecteur à l’ordinateur par : w L’adaptateur modèle OUTUSB pour la connexion directe w Le port USB du satellite XSATHP auquel le détecteur Mod.
  • Page 78: Gestion Détecteurs

    Gestion détecteurs L’accès à ce menu impose le choix d’un type de connexion. 1. Suivre la procédure selon le type de connexion à effectuer. NB : s’il s’agit d’une connexion en USB, il sera peut être demandé l’installation des drivers pour la reconnaissance du périphérique. Si les drivers ne sont pas reconnus automatiquement, il est nécessaire de spécifier au système opératif le parcours suivant : C:\Programmes\Xwin\Driver\ et de sélectionner le fichier stmcdcAVS.inf.
  • Page 79 Sensibilité OutSpider : sélectionner la sensibilité de la section infrarouge On/Off antimasquage : gestion de la fonction antimasquage Mémoire alarme toujours (seul Outspider PA) : mémorise toutes les alarmes ou uniquement celles lorsque le système est Mis En Service NB : par le logiciel, il n’est pas possible de faire varier les paramètres correspondant à l’entrée AUX et à la gestion des led.
  • Page 80: Fonction Oscilloscope

    Ligne verte (V) : indique le signal du circuit antimasquage NB : OutSpider PA et Ouspider PA WS(UB)(U), pour cacher le signal de l’Infrarouge inférieur , il est nécessaire de retirer le pointage tant de la partie Rouge que le la partie Jaune (G), tandis que pour cacher le signal de l’infrarouge supérieur , il suffit d’enlever le signe sur l’emplacement Blanc (B).
  • Page 81 Œ Les signaux détectés par les 2 infrarouges ne correspondent pas. La section Œ • Ž infrarouge indique l’alarme uniquement si le signal dépasse un certain seuil et si le détecteur est réglé sur la configuration HAUTE. • Les 2 infrarouges retournent au repos. Ž...
  • Page 82: Signaux Enchainés Infrarouges Et Hyperfréquence

    · Tension d’alimentation · Température dans le détecteur · État du détecteur : · OUTSPIDER PA et PA WS(UB)(U): sabotage – alarme – antimasque · OUTSPIDER DT et DT WS(UB)(U): sabotage – alarme générale – antimasque – alarme section hyperfréquence.
  • Page 83: Librairie Des Signaux

    Librairie des signaux L’accès à ce menu impose le choix du type de connexion : 1. Suivre la procédure en fonction du type de connexion à effectuer. NB : s’il s’agit d’une connexion en USB, il sera peut être demandé l’installation des drivers pour la reconnaissance du périphérique. Si les drivers ne sont pas reconnus automatiquement, il est nécessaire de spécifier au système opératif le parcours suivant : C:\Programmes\Xwin\Driver\ et de sélectionner le fichier stmcdcAVS.inf.
  • Page 84: Mettre À Jour Firmware

    Archives • L’archive des enregistrements permet de visualiser les signaux enregistrés par l’installateur sur l’ordinateur, avec la procédure d’ « enregistrement » décrite dans le chapitre « gestion détecteurs » Œ En entrant dans cette archive, on accède à une base de donnée où les différents fichiers sont sauvés avec date et heure, description et durée de l’enregistrement.
  • Page 85: Informations En Conformité Avec La Directive 1999/5/Cee (R&Tte)

    Le produit objet de la présente déclaration est conforme aux prescriptions fondamentales de la Directive 1999/5/CEE (R&TTE) sur les appareils radio-émetteurs de faible puissance et sur l’utilisation des fréquences de spectres radioélectrique, en accord avec la recommandation CEPT 70-03 Marque AVS ELECTRONICS Modèle OUTSPIDER PA WS Fréquence de travail 868,350 (transmission radio) Type d’alimentation Courant continu Tension nominale...
  • Page 86 CEPT 70-03 Marque AVS ELECTRONICS Modèle OUTSPIDER PA WS - U Fréquence de travail 868,350 (transmission radio) Type d’alimentation Courant continu Tension nominale...
  • Page 87 - 87 -...
  • Page 88 - 88 -...
  • Page 89 - 89 -...
  • Page 90: Caractéristiques Techniques

    INSTALLATION ET MAINTENANCE DOIT ÊTRE Lentilles couverture infrarouge FAITE PAR UNE PERSONNEL QUALIFIÉE Degré de protection IP 65 IP 65 IP 65 IP 65 AVS ELECTRONICS S.P.A. se réserve le droit d’apporter des modifications à n’importe quel moment et sans préavis. - 90 -...
  • Page 91 Sensor de doble infrarrojo pasivo para exteriores e interiores OUTSPIDER PA WS Sensor vía radio de doble infrarrojo pasivo para exteriores e interiores OUTSPIDER PA WS UB OUTSPIDER PA WS U Sensor vía radio universal de doble infrarrojo pasivo para exteriores e interiores IST0894V4.1...
  • Page 92 En la primera alimentación del OUTSPIDER PA WS(UB)(U) y del OUTSPIDER DT WS(UB)(U) es necesario dejar el sensor en estado de reposo con la tapa puesta unos 90 segundos durante los cuales adquiere la señal media de las distintas señales analógicas que debe controlar. Es importante que la tapa esté cerrada para no falsear la media de la señal de antienmascaramiento y evitar que se realicen falsas detecciones a continuación.
  • Page 93 Descripción del funcionamiento del sensor en modo «Default» En este modo la sección infrarroja discrimina las alarmas efectuando los siguientes controles: w amplitud y simetría de la señal: la forma de onda debe superar unos umbrales mínimos tanto en la dirección positiva como en la negativa; además, las anchuras de las semiondas deben ser proporcionadas w el nivel de energía de la señal debe ser superior a un valor mínimo los controles anteriores se realizan en dos infrarrojos de manera independiente el uno del otro.
  • Page 94: Accesorios Suministrados

    Accesorios ACC ESORIOS SUMINISTR ADOS UN IÓN compuesta por: A. Estribo lado pared B. Unión intermedia C. Unión lado sensor D. Tornillo TC -C M6 INOX E. Tuerca M6 INOX F. Arandela dentada TAMPER compuesto por: A. Guía tamper B. Botón con muelle C.
  • Page 95: Vista Lateral

    Cobertura El código lente está impreso en el interior de un lado a lo largo de la lente misma Con lente Wide angle (cód.FR09-0001-30): apertura 90°, VISTA DESDE ARRIBA Alcance 15 metros Alcance 15 metros alcance altura instalación aconsejada 90° - 15 m aproximadamente 2,20 m - Indicada para la protección de amplias áreas de medio alcance OUTSPIDER logra discriminar la intrusiòn de animales de talla...
  • Page 96 Advertencias Evitar que en la zona de detección del sensor haya objetos que cubran el campo de lectura o que haya plantas que con el tiempo puedan modifi- ambiente circunstante. Advertencias 2,7 metros w Utilizando la unión, es (máx.) posible reducir el alcance. w No es posible utilizar la unión para la instalación 2,2 metros...
  • Page 97 Apertura sensor y extracción tarjeta Instalación de la placa en la pared o en el 1. Para quitar la tapa, levantar primero la par- Orificios para la te inferior (1) y después fijación de la placa en desengancharla de la la pared guía presente en la par- te superior (2)
  • Page 98 Instalación antiarranque Fijación de la base a la unión Pieza que se debe En elOUTSPIDER PA y OUTSPIDER DT conectar el módulo tamper romper para utilizar la al negativo de alimentación y a la entrada AUX oportunamente unión configurada (ver DIP 6 y DIP 8 del tablero SW2) Espuma adhesiva que En elOUTSPIDER PA WS(UB)(U) y OUTSPIDER DT WS(UB)(U) se debe aplicar sobre la...
  • Page 99 Cambio lentes Fijación tarjeta Extraer los 6 tornillos de fijación Extraer el soporte de la lente Introducir la tarjeta haciendo coincidir los huecos con los topes Desenganchar la lente del soporte ejerciendo una ligera presión en los cuatro topes laterales Introducir la lente Deslizar hacia seleccionada comprobando...
  • Page 100 Procedimiento para la calibracion Procedimiento para la calibracion OUTSPIDER PA OUTSPIDER PA WS(UB)(U) OUTSPIDER DT OUTSPIDER DT WS(UB)(U) Para poder efectuar las pruebasdel sensor es necesario cerrar Para poder efectuar las pruebasdel sensor es necesario cerrar correctamente la tapa. correctamente la tapa.
  • Page 101 Orificio para regulación unión Avisos OUTSPIDER PA Avisos OUTSPIDER DT Avisos OUTSPIDER PA WS (UB)(U) OUTSPIDER DT WS (UB)(U) OUT SPIDER DT está dotado de un OUT SPIDER PA está dotado de un En caso de que resulte necesario regular...
  • Page 102 Bornera OUTSPIDER PA y OUTSPIDER DT Dip Switch OUTSPIDER PA y OUTSPIDER DT SW1 - FUNCIONES A UX En el funcionamiento con DIP/RELÉ, las configuraciones programables con el tablero de Dip Switch SW1 son: CONFIGURACIÓN SECCIÓN INFRARROJOS DIP 1 OFF ESTÁNDAR en esta configuración la sección infrarrojo tiene una sensibilidad estándar...
  • Page 103 BATERÍA DIP 8 Led rojo habilitado (Estándar) Led rojo desactivado Bornera y Jumper OUTSPIDER PA WS(UB)(U) y OUTSPIDER DT WS(UB)(U) DIP SWITCH SW 2: el sensor funciona en función de las configuraciones efectuadas Bornera presente solo en a través de los DIP 2,3 y 7 del tablero SW 2 sin considerar las OUTSPIDER PA WS(UB)(U) y OUTSPIDER DT WS(UB)(U) posibles variaciones efectuadas a través de PC (Estándar)
  • Page 104 6 de SW1, antes de introducir el cable de conexión entre el PC y el sensor. Una vez conmutado en ON el dip 6 de SW1, esperar unos 10 Adquisición sensor OUTSPIDER PA WS y OUTSPIDER DT WS segundos y conectar el cable al sensor y al PC.
  • Page 105 Direccionamiento sensor Antimask y Lentes sucias OutSpider PA y OutSpider DT están provistos de un circuito antienmascaramiento, formado por En los modelos OUSPIDER PA WS, OUTSPIDER DT WS y en los modelos OUSPIDER un receptor RX central y cuatro transmisores TX de infrarrojos activos colocados a los lados de PA , OUTSPIDER DT utilizados con conexión serial (DIP 1 del SW2 en OFF), los DIP...
  • Page 106: Funciones Especiales

    Funciones especiales Gracias al software de PC HPWIN, es posible explotar al máximo las potencialidades de la tecnología digital. HPWIN permite para cada sensor: Control: Regreso a la imagen de pantalla inicial gráfico de las señales de los dos infrarrojos (seleccionable) gráfico de la señal microonda (Mod.OUTSPIDER DT y DT WS(UB)(U) Activación de la conexión USB /Telefónica, para la visión (seleccionable)
  • Page 107: Conexión Usb

    Tipo de conexión para gestión con software HPWIN El sensor puede conectarse al PC mediante: Conexión serial RS232 (no utilizada) Conexión USB Línea telefónica (módem) (Mod. OUTSPIDERT PA y OUTSPIDER DT) Conexión USB Este tipo de conexión permite conectar el sensor al PC mediante: el adaptador mod.
  • Page 108 Gestión sensores El acceso a este menú impone la elección del tipo de conexión: 1- Seguir el procedimiento en función del tipo de conexión que se debe realizar NOTA: si se trata de una conexión en USB, puede requerir la instalación de los controladores para el reconocimiento del periférico. Si los controladores no son reconocidos automáticamente, es necesario especificar al sistema operativo la siguiente ubicación C:\Programmi\Xwin\Driver\ y seleccionar el fichero stmcdcAVS.inf 2- Seleccionar la dirección del sensor o del satélite en HPWIN y luego elegir «Conectar»...
  • Page 109 Sensibilidad OutSpider: selección de la sensibilidad de la sección infrarrojos On/Off Antimask: gestión de la función antienmascaramiento Memorizar alarmas siempre (solo Mod. OutSpider PA): memoriza todas las alarmas o solo las de instalación activada (en los modelos vía radio esta función está siempre activa) NOTA: mediante el software no es posible modificar los parámetros relativos a la entrada AUX y a la gestión de los led.
  • Page 110 Línea verde (V): indica la señal del circuito antienmascaramiento NOTA: OutSpider PA y OutSpider PA WS(UB)(U), para ocultar la señal del infrarrojo inferior es necesario quitar la marca tanto del punto rojo como del punto amarillo, mientras que para ocultar la señal del infrarrojo superior es suficiente quitar la marca del punto blanco. OutSpider DT y OutSpider DT WS(UB)(B), todas las referencias corresponden al valor indicado.
  • Page 111 Œ Las señales detectadas por los dos infrarrojos no corresponden. La sección Œ • Ž infrarrojos señala la alarma solo si la señal supera un cierto umbral y si el sensor ha sido programado en la configuración ALTA. • Los dos infrarrojos regresan a un régimen de reposo. Ž...
  • Page 112 Programación fecha y hora del sensor Tensión de alimentación Temperatura en el sensor Estado del sensor: OutSpider PA y PA WS: Tamper - Alarma - Antimask OutSpider DT y DT WS: Tamper - Alarma general - Antimask Alarma sección microonda...
  • Page 113 Informe histórico eventos El acceso a este menú impone la elección del tipo de conexión: 1- Seguir el procedimiento en función del tipo de conexión a efectuar NOTA: si se trata de una conexión en USB, puede requerir la instalación de los controladores para el reconocimiento del periférico. Si los controladores no son reconocidos automáticamente, es necesario especificar al sistema operativo la siguiente ubicación C:\Programmi\Xwin\Driver\ y seleccionar el fichero stmcdcAVS.inf 2- Seleccionar la dirección del sensor o del satélite en HPWIN y a continuación elegir «Conectar»...
  • Page 114 USB, mientras que si se está conectado mediante el satélite XSATHP es suficiente cerrar la imagen de pantalla del programa. En el Mod.OutSpider PA y OutSpider DT, al final de la actualización, los led amarillo y rojo del sensor parpadean alternativamente durante algunos segundos.
  • Page 115 CEPT 70-03. Marca AVS ELECTRONICS Modelo OUTSPIDER PA WS Frecuencia de trabajo 868,350 Mhz (Transmisión radio) Tipo de alimentación Corriente continua Tensión nominal...
  • Page 116 CEPT 70-03. Marca AVS ELECTRONICS Modelo OUTSPIDER PA WS - U Frecuencia de trabajo 868,350 Mhz (Transmisión radio) Tipo de alimentación Corriente continua Tensión nominal...
  • Page 117 - 117 -...
  • Page 118 - 118 -...
  • Page 119 - 119 -...
  • Page 120: Características Técnicas

    EFECT UADOS PERSO NAL Lentes cobertura infrarrojo CUALIFICADO Grado de protección IP 65 IP 65 IP 65 IP 65 AVS ELECTRONICS S.p.a. se reserva el derecho a aportar modificaciones en cualquier momento y sin preaviso. - 120 -...
  • Page 121 OUTSPIDER PA WS OUTSPIDER PA Doppel passiv infrarot Funk-Detektor Doppel passiv infrarot Detektor für außen und innen für außen und innen OUTSPIDER PA WS UB OUTSPIDER PA WS U Doppel passiv infrarot universal Funk-Detektor für außen und innen IST0894V4.1 - 121 -...
  • Page 122 HINWEIS: wenn nicht klar angegeben, bezieht sich die Anleitung auf beide Modelle. Erste Inbetriebnahme Bei der ersten Stromaufnahme bleiben OUTSPIDER PA und OUTSPIDER DT für etwa 60 Sekunden gesperrt, währenddessen die gelbe und rote LED - wenn aktiviert - abwechselnd blinken und der Summer eine periodisches Signal wiedergibt.
  • Page 123 Beschreibung der Sensorfunktionen im „Default”-Modus In diesem Modus unterscheidet der Infrarotbereich die Alarme durch folgende Betriebseinstellungen: · Signalbreite und Symmetrie: die Wellenform muss sowohl in positiver als auch in negativer Richtung die Mindestschwelle überschreiten; außerdem müssen die Breite der Halbwellen proportional sein. ·...
  • Page 124: Mitgeliefertes Zubehör

    Zubehör MITGELIEFERTES ZUBEHÖR GELENK bestehend aus: A. Wandhalterung B. Zwischengelenk C. Gelenk Sensorseite D. Edelstahl TCC M6 Schraube E. Edelstahl M6 Mutter F. Sicherungsunterlegscheibe SABOTAGE bestehend aus: A. Sabotageführung B. Taster mit Feder Selbstschneidende Schraube TCC 2.9 x 9.5 D. TCC 4 x 45 Schraube E.
  • Page 125 Ausleuchtung Der Linsen-Code ist im Inneren aufgedruckt, an einer langen Seite der konkreten Linsen Mit Weitwinkel Linse (Art. FR09-0001-30): Öffnung 90°, DRAUFSICHT Reichweite 15 Meter Reichweite15m, empfohlene Installationshöhe ca. 2,2m. 90° - 15 m - Ideal für Schutz von weiten Ebenen mittlerer Reichweite OUTSPIDER kann vor dem Eindringen von mittelgroßen Tieren unterscheiden (bis ca.
  • Page 126 Warnungen ermeiden Sie die Anwesenheit von Objekten im Erfassungsbereichs des Sensors, die den Lesebereich abdecken oder in der Umgebung Pflanzen, die sich im Laufe der Zeit ändern. Warnungen 2,7 Meter w Es ist möglich die Leistung (Maximal) durch das Gelenk zu verringern w Es ist nicht möglich das 2,2 Meter...
  • Page 127: Montage Des Gelenks

    Sensoröffnung und Entfernung der Platine WAND- UND MASTPLATTEN MONTAGE Um die Abdeckung zu entfernen, zuerst den Bohrungen zur unteren Teil anheben (1) Befestigung Der Platte und vom oberen Teil die an der Wand. Führung (2) aushängen. Löcher zum Befestigen der Platte an einer Stange mit Adapter Mod.
  • Page 128 Selbstklebendes Schaumgummi AUXEingang verbinden (siehe DIP 6 und DIP 8 von Feld SW2) an Gehäuse kleben, vor Für OUTSPIDER PA WS (UB) (U) und OUTSPIDER DT WS (UB) (U) das Sabotage-Modul mit dem zugehörigen TT Anschluss verbinden. Befestigung des Schwenkgelenks...
  • Page 129 Linsenwechsel FIXIERUNG DER PLATINE 1. Entfernen Sie die 6 Befestigungsschrauben. Entfernen Sie den Linsenträger. Schieben Sie die Platine, bis Aussparungen A mit Anschlägen B übereinstimmen. Hängen Sie die Linse durch leichten Druck auf die vier Seitenanschläge aus Legen Sie die gewünschte Schieben Sie die Linse ein und überprüfen Sie Platine nach unten,...
  • Page 130 Kalibrierung Kalibrierung OUTSPIDER PA OUTSPIDER PA WS(UB)(U) OUTSPIDER DT OUTSPIDER DT WS(UB)(U) Um den Detektor zu testen, ist es notwendig, den Deckel Um den Detektor zu testen, ist es notwendig, den Deckel korrekt zu schließen korrekt zu schließen Zuerst muss zur Kalibrierung die Empfindlichkeit/Reichweite...
  • Page 131 Öffnung zur Gelenkanpassung Empfehlungen OUTSPIDER PA Empfehlungen OUTSPIDER DT Empfehlungen OUTSPIDER PA WS(UB)(U) OUTSPIDER PA ist mit einem Summer OUTSPIDER PA ist mit einem und einer LED ausgestattet, zur Falls Sie die Position des Sensors Summer und einer Serie von LEDs Wiedergabe eines optischakustischen anpassen müssen, ist die Platine...
  • Page 132 OUTSPIDER PA e OUTSPIDER DT Dip Schalter OUTSPIDER PA e OUTSPIDER DT Anschlussklemmen SW1 - EINSTELLUNGEN A UX Im Betrieb mit Relais, Konfigurationen die mit DIP-Schalter SW1 programmiert werden können: INFRAROT KONFIGURATIONEN DIP 1 OFF DEFAULT In dieser Konfiguration hat der Infrarot eine Defaultempfindlichkeit (für DIP 2 OFF Standardgebrauch) und führt eine digitale Analyse DIP 2 OFF der Signale aus.
  • Page 133 Batteriefach Anschluss geliefert. DIP 7 Summer aktiviert (Default) Summer deaktiviert Anschlüsse und OUTSPIDER PA WS UB(U) e OUTSPIDER DT WS UB(U) DIP 8 Rote LED deaktiviert Rote LED aktiviert (Default) Anschlüsse nur des DIP SWITCH SW 2: OUTSPIDER PA WS UB(U) und OUTSPIDER DT WS UB(U)
  • Page 134 Schnittstelle via DIP 6 auf SW1 aktivieren, bevor das Verbindungskabel zwischen PC und Sensor angeschlossen wird. Wenn DIP 6 auf SW1 auf Erkennen des Sensor OUTSPIDER PA WS unt OUTSPIDER DT ON gesetzt ist, warten Sie 10 Sekunden und verbinden Sie dann das Kabel mit dem Sensor und dem PC.
  • Page 135 Abdecküberwachung und Verschmutzte Linsen Sensoradresse Für OUSPIDER PA WS und OUTSPIDER DT WS Modelle und für OUSPIDER OUSPIDER PA und OUTSPIDER DT werden mit einer Abdecküberwachungsschaltung PA und OUTSPIDER DT Modelle, verwendet mit serieller Verbindung (DIP 1 ausgestattet, hergestellt aus einem zentralen RX Empfänger und vier aktiven Infrarot TX Sendern auf den Seiten der PIR-Sensoren, die Hindernisse bis zu einer Entfernung von etwa 5 von SW2 in OFF), werden die DIP-Schalter 1-5 von SW1 zur Adresseinstellung cm vor dem Sensor erkennen.
  • Page 136 Alarm Speicherung mit über 1900 Ereignissen, komplette mit Datum Funktion vom Sensor nicht verarbeitbar und Uhrzeit Zusammenfassung jedes Sensorstatus (direkte USB-Verbindung) oder aller Sensoren (Verbunden mit XSATHP über RS485) (Mod. Outspider PA und Outspider DT) Zugang auf das lokale Archiv, zur Aufzeichnung von Signaleinstellungen des Sensors speichern Signalen, manuell vom Errichter durchgeführt (Record)
  • Page 137 Dieser Verbindungstyp ermöglicht es, den Sensor mit dem PC zu verbinden, über: den OUTUSB Mod. Adapter zur direkten Verbindung. der USB-Anschluss des XSATHP Satelliten, über das der Sensor Mod. OUTSPIDER PA und OUTSPIDER DT über eine Remote-Verbindung angeschlossen ist. Um zu verbinden: 1.
  • Page 138 Sensor Anpassung Zugang zu diesem Menü benötigt eine Wahl des Verbindungstyps: 1- Folgen Sie dazu dem Verfahren zur Wahl des Verbindungstyps. HINWEIS: wenn es eine USB-Verbindung ist, kann es eine Installation von Treibern zur Erkennung des Peripheriegeräts erfordern. Wenn die Treiber nicht automatisch erkannt werden, ist es notwendig den folgenden Dateipfad des Betriebssystem C:\Programme\Xwin\Driver\ zu wählen und die Datei stmcdcAVS.inf.
  • Page 139 Infrarot Empfindlichkeit: Auswahl der Infrarotempfindlichkeit Abdecküberwachung AN/AUS: De-/Aktivierung der Abdecküberwachung Alarme immer speichern (nur Mod. OUTSPIDER PA): Speichert alle Alarme oder nur die, wenn System aktiv HINWEIS: über Software ist es nicht möglich Parameter im Zusammenhang mit dem AUX-Eingang und der LED-Einstellung zu ändern Aufzeichnen Die Taste „REC”...
  • Page 140 Grüne Linie: Abdecküberwachungssignal HINWEIS: OUTSPIDER PA und PA OUTSPIDER WS (UB) (U), zum Verbergen des unteren Infrarotsignals ist es notwendig, den Haken sowohl von der roten als auch der gelben Linie zu entfernen, zum Verbergen des oberen Infrarotsignals ist es ausreichend den Haken aus dem weißen Feld zu entfernen.
  • Page 141 Œ Die von den beiden Infrarot detektierten Signale stimmen nicht überein. Œ • Ž Der Infrarot erzeugt einen Alarm nur dann, wenn das Signal eine bestimmte Schwelle überschreitet und wenn der Sensor auf HOCH eingestellt wurde. • Die zwei Infrarot gehen wieder in Ruhe. Ž...
  • Page 142 Outspider DT unt Versorgungsspannung Outspider PA WS(UB)(U) Outspider DT WS(UB)(U) Sensor Temperatur Sensorstatus: OUTSPIDER PA und OUTSPIDER PA WS(UB)(U): Sabotage – Alarm – Abdecküberwachung OUTSPIDER DT und OUTSPIDER DT WS(UB)(U): Sabotage – Alllgemeiner Alarm – Abdecküberwachung –Mikrowellen Alarm - 142 -...
  • Page 143 Ereignisspeicher Zugang zu diesem Menü benötigt eine Wahl des Verbindungstyps: 1- Folgen Sie dazu dem Verfahren zur Wahl des Verbindungstyps. HINWEIS: wenn es eine USB-Verbindung ist, kann es eine Installation von Treibern zur Erkennung des Peripheriegeräts erfordern. Wenn die Treiber nicht automatisch erkannt werden, ist es notwendig den folgenden Dateipfad des Betriebssystem C:\Programme\Xwin\Driver\ zu wählen und die Datei stmcdcAVS.inf.
  • Page 144 Um den Sensor neu zu initialisieren, wenn direkt mit dem Adapter Mod. USB-OUT verbunden, ist es notwendig ihn vom USB-Kabel zu trennen, wenn durch den XSATHP Satelliten verbunden, ist es ausreichend das Fenster des Programms zu schließen. Bei dem Outspider PA und Outspider DT wird das Ende des Updates durch das abwechselnde Blinken der gelben und roten LED des Sensors signalisiert.
  • Page 145 Das hier beschriebene Produkt entspricht im Wesentlichen den Vorschriften der Richtlinie 1999/5 / CEE (R&TTE) über Funkübertragungseinrichtungen niedriger Leistung und die Verwendung von Frequenzen des funkelektrischen Spektrums, entsprechend CEPT 70-03 Empfehlung. Hersteller AVS ELECTRONICS Modell OUTSPIDER PA WS Arbeitsfrequenz 868,350 Mhz Spannungsversorgung Direkte Versorgung Nennspannung 3.6 V =...
  • Page 146 Das hier beschriebene Produkt entspricht im Wesentlichen den Vorschriften der Richtlinie 1999/5 / CEE (R&TTE) über Funkübertragungseinrichtungen niedriger Leistung und die Verwendung von Frequenzen des funkelektrischen Spektrums, entsprechend CEPT 70-03 Empfehlung. Hersteller AVS ELECTRONICS Modell OUTSPIDER PA WS - U Arbeitsfrequenz 868,350 Mhz Spannungsversorgung Direkte Versorgung...
  • Page 147 - 147 -...
  • Page 148 - 148 -...
  • Page 149 - 149 -...
  • Page 150: Technische Eigenschaften

    Technische Eigenschaften OUTSPIDER PA WS OUTSPIDER PA WS UB(U) SENSOR OUTSPIDER PA OUTSPIDER DT Via Valsugana, 63 OUTSPIDER DT WS OUTSPIDER DT WS UB(U) Curtarolo (Padova) ITALY Maximale Leistung 15 - 23 Meter 15 - 23 Meter 15 - 23 Meter 15 - 23 Meter Tel.

Table des Matières