LEGRAND MP6 Mode D'emploi
Table des Matières
Les langues disponibles
Les langues disponibles
Liens rapides
Chapitres
Table des Matières

Manuels Connexes pour LEGRAND MP6


Sommaire des Matières pour LEGRAND MP6
- Page 1 Unités de Protection MP6 - DMX Réf. 0 288 03 - Réf. 0 288 04 octobre 18 Y3838D...
-
Page 3: Table Des Matières
Unité de protection MP6 - DMX Contents 1. Introduction Identification Mise en place et changement de la batterie Mise en marche Navigation 2. Signalisation de l’état de l’unité de protection 3. Visualisation de la page principale 4. Bouton test 5. Menu principal 6. -
Page 4: Introduction
1. Introduction Identification Blocage paramètres (plombable) Touche de mise en marche (avec alimentation par batterie) -
Page 5: Unité De Protection Mp6 - Dmx
Lithium 3V L’alimentation par batterie est nécessaire pour la consultation après un déclenche- ment du disjoncteur. Pour la configuration ou une longue consultation du MP6, quand le disjoncteur est hors service, nous recommandons de l’alimenter par l’inter- médiaire du module d’alimentation externe référence 0 288 06. -
Page 6: Mise En Marche
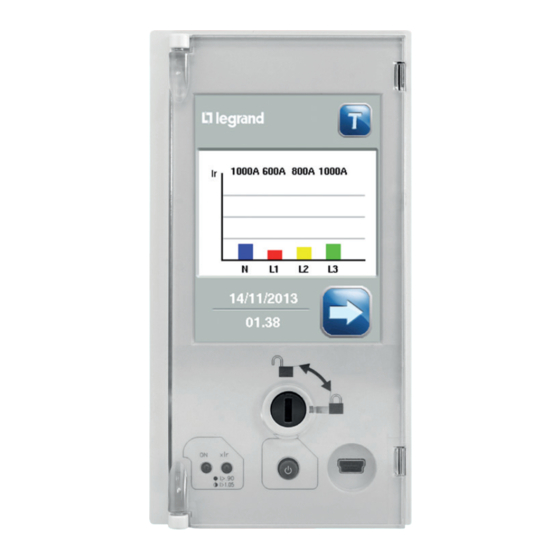
Mise en marche Au début, l’unité de protection commence par un écran noir lors du chargement. 1. Voyant vert allumé 2. Curseur clignotant en bas à droite 3. Page de chargement Après environ une minute, la page principale appairait, il est alors possible de naviguer dans l’unité... -
Page 7: Navigation
Unité de protection MP6 - DMX Navigation Les unités de protection MP6 ont un écran tactile qui permet de travailler avec les icônes affichées. a r g d i s / 2 0 / 2 0 / 1 0 / 1 0 . - Page 8 Ci dessous les principaux boutons pour la navigation. Boutons de sélection. Flèches de direction: permettent de faire défiler vers le haut ou vers le bas dans le cas où les informations sont affichées sur différents écrans. Flèche de retour: permet de revenir à l’écran de niveau supérieur. Boutons de choix: permettent d’annuler ou de confirmer ce qui a été...
-
Page 9: Signalisation De L'état De L'unité De Protection
Unité de protection MP6 - DMX 2. Signalisation de l’état de l’unité de protection 07/10/2009 10.25 LED 1 LED 2 L’état de l’unité de protection est signalé par les LED 1 et 2, selon le tableau suivant : Protection Voyant 1... -
Page 10: Visualisation De La Page Principale
En appuyant sur cet icône, vous entrez dans le “menu de dernier déclenchement”, où vous pouvez afficher la donnée pour le dernier déclenchement enregistré par le MP6; après ce contrôle, l’avis de déclenchement dans la page d’accueil disparaît;... -
Page 11: Bouton Test
Unité de protection MP6 - DMX 4. Bouton test Il est recommandé de réalisé un test de diagnostique en utilisant l’icône présent sur la page principale, afin de vérifier le bon comportement entre le disjoncteur et l’unité de protection. La séquence de déclenchement (démarre à partir d’un appareil en position fermé... -
Page 12: Menu Principal
5. Menu principal En appuyant sur l’icône , en bas à droite de l’écran principal, il est possible d’entrer dans le menu principal où il y a 6 icônes pour les sous-menus , et une flèche de retour, pour revenir sur le menu principal. “Mesures”... -
Page 13: Menu Protection
Unité de protection MP6 - DMX 6. Menu protection “protection”, il est possible d’entrer dans la page des réglages. En appuyant sur l’icône Ces icônes qui permettent d’obtenir l’accès aux différents réglages sont présents sur la plupart des pages, et accessibles en appuyant les flèches de navigation situées en bas. - Page 14 Après un appui sur les boutons de réglages, il est possible de rentrer sur une page de réglage: Valeur Valeur inférieure supérieure “Annulé” “Confirmé” Il est possible d’ajuster les réglages en appuyant sur les boutons + ou -. Automatiquement la valeur de réglage sera indiqué en valeur absolue et par rapport à...
-
Page 15: Confirmation Et Enregistrement Des Réglages
Unité de protection MP6 - DMX Confirmation et enregistrement des réglages Une fois que les réglages sont finis, en appuyant sur le bouton , il est possible de voir cette page: “Confimé” “Annulé” Il est possible d’annuler ou confirmer pour sauvegarder le réglage en mémoire. -
Page 16: Menu Mesures
7. Menu mesures En appuyant sur l’icône “mesures” dans le menu principal, il est possible d’accéder à l’écran suivant: “Courants” “Tension” “Énergies” “Puissances” “Harmoniques” “Autre” L’icône “Courants” montre les courants sur chaque phases, neutre et défaut de terre (si présent). L’icône “Tensions”... - Page 17 Unité de protection MP6 - DMX En appuyant sur les icônes “courants” , “puissances” , “tension” “énergies” , “harmoniques” et “autres” , il est possible d’accéder aux pages correspondantes des mesures. L’exemple montre un cas de mesure de courants: Instantané...
- Page 18 Les détails suivants des mesures affichées sont en accord avec la procédure de la page 17: Courants: : courant de la phase 1 : courant de la phase 2 : courant de la phase 3 si le neutre est présent : courant du neutre : courant de défaut de terre (si présent) Puissances: *...
- Page 19 Unité de protection MP6 - DMX En appuyant sur l’icône “énergies” il est possible d’entrer sur les pages suivantes: Page de l’énergie totale (consommée - restituée) Les énergies sur l’écran sont: - E(MWh): énergie totale active (Mvarh): énergie réactive totale inductive (Mvarh): énergie réactive totale capacitive...
- Page 20 En appuyant sur le bouton “harmoniques” il est possible d’accéder à l’écran suivant: “Harmoniques “Harmoniques tensions” courants” Les icônes “Harmoniques tensions” et “Harmoniques courants” permettent d'afficher les détails correspondants.
- Page 21 Unité de protection MP6 - DMX Ci-dessous l’écran générique des harmoniques: Taux d’harmoniques sélectionné (par rapport à fondamental) Harmonique non Harmonique sélectionné sélectionné Harmoniques Harmoniques suivant précédent “Taux de distortion harmonique” En touchant un des harmonique il est possible de visualiser son amplitude.
-
Page 22: Menu De Configuration
8. Menu de configuration En appuyant sur l’icône “réglages” dans le menu principal il est possible d’entrer dans le menu suivant : “Réglage “Réglage mesure” alarmes” “Réglage “Réglage date et heure” affichage” “Réglage “Réglage sorties programmable” communication” L’icône “réglage alarmes” permet l’activation et le réglage des alarmes. L’icône “réglage mesure”... - Page 23 Unité de protection MP6 - DMX En appuyant sur l’icône “réglage alarmes” il est possible d’accéder à l’écran suivant: alarme active alarme inactive Dans cet écran, tous les dispositifs avec une alarme réglable sont affichés avec le paramétrage correspondant (si il y a). Dans le cas d'une alarme activée, l'icône...
- Page 24 En appuyant sur l’icône de chaque sortie, il est possible d’entrer dans son menu de réglage : icône désactivé icône actif (rouge si désactivé) (vert si actif) réglage paramètre réglage temporisation “confirme” “annuler” Il est possile d’ajuster les réglages du paramètre sélectionné et de la temporisation associée en appuyant sur les icônes + et -.
- Page 25 Unité de protection MP6 - DMX Détails du réglage des différentes alarmes: Déséquilibre du courant sur les phases L1-L2-L3 par Déséquilibre rapport à la moyenne courant Plage de réglage: amplitude de 5% à 100% d’In Temporisation: 1 à 20s Déséquilibre de la tension (entre phases et neutre, avec neutre interne ou externe), par rapport à...
- Page 26 En appuyant sur l’icône “réglage mesure” il est possible d’ouvrir l’écran suivant: “Réglage temps moyen” “Réglage direction courant” En appuyant sur l’icône “réglage temps moyen” il est possible d’ouvrir la page de la période de temps pour l’échantillonnage de la valeur moyenne. Il est possible de réglé et changer la valeur de l’écran en utilisant + et - (valeurs: 1min=minute;...
- Page 27 Unité de protection MP6 - DMX En appuyant sur l’icône “réglage direction courant” il est possible de modifier le sens conventionnel de passage du courant réglé en usine, pour être en accord avec les conditions réelles d’installation de l’appareil. Arrivée du courant Arrivée du courant...
- Page 28 En appuyant sur l’icône “réglage affichage” il est possible d’ouvrir la page suivante où, en appuyant sur les icônes de réglage il est possible d’incrémenter ou décrémenter l’éclairage de l’écran, activé ou désactivé le son et étalonné l’écran tactile. éclairage étalonnage...
- Page 29 Unité de protection MP6 - DMX En appuyant sur l’icône “réglage date et heure” il est possible d’atteindre la page suivante. En appuyant sur les boutons “date” et “heure” il est possible de régler les valeurs avec les boutons + et -.
- Page 30 En appuyant sur l'icône “réglages communication” il est possible d'accéder à l'écran suivant: reglage adresse réglage vitesse réglage langue réglage format En touchant les icônes il est possible d’accéder aux écrans de réglages : - adresse #1..- vitesse 9600-19200-38400bps - language - format NONE-EVEN-ODD...
- Page 31 Unité de protection MP6 - DMX En appuyant sur l’icône “réglage des sorties programmables” il est possible d’entrer dans l’écran suivant: Contact local Contacts du module externe (de 1 à 6) En appuyant sur chaque bouton il est possible de configurer, vérifier et restorer les contacts du module programmable: “configuration...
- Page 32 En appuyant sur l’icône “configuration contact” il est possible de définir et régler l’événement associé avec un contact. Les événements disponibles sont pré- sent sur de multiple pages, accessibles en appuyant sur les flèche de naviguation situées en bas. événements...
- Page 33 Unité de protection MP6 - DMX En détail, les événements possibles sont les suivants : déclenchement sur court-circuit contact inactif de la protection court-retard (Isd) déclenchement sur court-circuit disjoncteur ouvert de la protection instantanée (Ii) déclenchement sur court-circuit de disjoncteur fermé...
- Page 34 Confirmer les réglages par l’utilisation du bouton , l’écran suivant apparaît : Normalement Normalement ouvert fermé Temporisation En détail, il est possible de sélectionner une temporisation suivante: - 0 (changement instantané) - ∞ (pas de changement) - 1-2-3-5-10-20-30s-1-2-5-10-20-30min (changement temporisé) En appuyant sur le bouton l’ensemble des modifications réalisées à...
-
Page 35: Menu Archives
Unité de protection MP6 - DMX 9. Menu archives En appuyant sur l'icône “archives” dans le menu principal, il est possible d'accéder à la page suivante: “Archive des “Archive déclenchements” des alarmes” En appuyant sur l’icône “archives des déclenchements” il est possible d’entrer dans le sous menu suivant: “Dernier... - Page 36 En appuyant sur l’icône “dernier déclenchement” il est possible de visualiser le dernier déclenchement enregistré par l’unité de protection. Dernier déclenchement Historique des déclenchements Les icônes des déclenchements ouvrent une page détaillée, où s’affiche toutes les informations relatives au dernier déclenchement, en terme de temps, type et source:...
- Page 37 Unité de protection MP6 - DMX L’information indiquée peut être : I>Ir : surcharge I>Isd : protection court-circuit I>Ii : instantané I>Icw : protection instantanée fixe (Isf) I>Ig : défaut de terre °C>T : surchauffe Test : après un test de déclenchement...
- Page 38 En appuyant sur l’icône “compteur de déclenchements” il est possible d’entrer sur la page suivante: Nombre total de déclenchements Type de déclenchement Cette page montrera le nombre de déclenchements réalisés et le nombre de déclen- chements classés par type*: I>Ir : nombre de déclenchement par surcharge I>Isd : nombre de déclenchement par court-circuit...
- Page 39 Unité de protection MP6 - DMX En appuyant sur l’icône “archives des alarmes” , il est possible de visualiser la liste des 20 dernières alarmes enregistrées: type d’alarme date Cette liste inclue également les alarmes système (protection contre les surcharges, les court-circuits...) et les alarmes importantes (dépassement de la limite de surcharge,...
- Page 40 En appuyant sur l'icône d'une alarme, il est possible d'ouvrir une fenêtre détaillant l'alarme où toutes les informations relatives à cette alarme sont affichées en terme de temps, type et cause: date heure alarme type d’alarme valeur détectée valeur réglée...
-
Page 41: Menu Information
Unité de protection MP6 - DMX 10. Menu information En appuyant sur l’icône “menu information” il est possible de visualiser les infor- mation concernant le disjoncteur, le logiciel et le matériel installés dans le disjoncteur. 10.1 Information de l’appareil En appuyant sur l’icône “i DMX ”... -
Page 42: Information De L'unité De Protection
10.2 Information de l’unité de protection En appuyant sur l’icône “i MP6” il est possible de lire toutes les informations con- cernant l’unité de protection installée: Symboles Version Symboles Description SW TouchScreen version du logiciel de l’écran tactile HW TouchScreen version du matériel de l'écran tactile... -
Page 43: Menu Batterie
Unité de protection MP6 - DMX 11. Menu batterie En appuyant sur l’icône “batterie” il est possible d’accéder à la page qui indique la charge restante de la batterie à l’intérieur de l’unité de protection: Niveau de la batterie NOTE: l’indicateur de charge est plein (100%) lorsque la tension des batteries est égale ou supérieure à... -
Page 44: Accessoires
Cet accessoire d’alimentation externe permet l’alimentation continue du l’unité de pro- tection électronique, même si le disjoncteur est ouvert/déclenché. Ce module permet d’alimenter, 1 unité de protection MP6 ou jusqu’à 4 unités de pro- tection MP4, en même temps. 0 288 12 Module contacts programmables Ce module de contacts est un accessoire qui permet la gestion d’autres appareils... -
Page 45: Classes De Precision
Unité de protection MP6 - DMX 13. Classes de precision Caractéristique du PMD Type de caractéristique Valeurs caractéristiques Autres possibles caractéristiques complémentaires Fonction d’évaluation de la qualité de l'alimentation Classification des pmd Température K 55 Humidité + Altitude Conditions standards... - Page 46 Caractéristiques des fonctions Symbôle des Plage de mesure Classe de per- Autres caractéris- fonctions formance de tiques complémen- fonctionnement, taires conformément à la IEC 61557-12 In DMX I max PDM Ib=In, Un=400V, fn=50Hz Ib=In, Un=400V, fn=50Hz 0…9999 GWh Ib=In, Un=400V, fn=50Hz 0…9999 Gvarh Ib=In, Un=400V, fn=50Hz 50…60 Hz...
- Page 47 Unité de protection MP6 - DMX Caractéristiques des fonctions Symbôle des Plage de mesure Classe de per- Autres caractéris- fonctions formance de tiques complémen- fonctionnement, taires conformément à la IEC 61557-12 In DMX I max PDM 88…690V Ib=In, Un=400V, fn=50Hz 110…690V...
-
Page 48: Power Control Station
14. Power Control Station Power Control Station est le logiciel Legrand pour ordinateurs équipés avec Microsoft Windows . Le logiciel permette de communiquer et échanger des données avec l’unité ® de protection du disjoncteur, avec cette porte USB. 1800A 1200A... - Page 100 Y3838D...