JVC KD-X310BT Manuel D'instructions
Table des Matières
Les langues disponibles
Les langues disponibles
Liens rapides
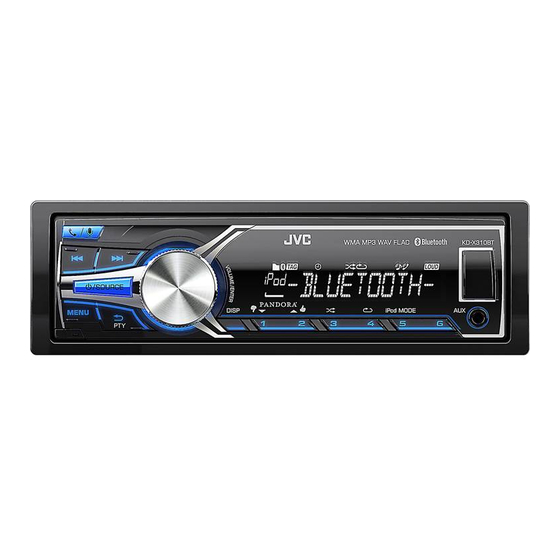
KD-X310BT
DIGITAL MEDIA RECEIVER
INSTRUCTION MANUAL
RÉCEPTEUR MULTIMÉDIA NUMÉRIQUE
MANUEL D'INSTRUCTIONS
Please read all instructions carefully before
operation to obtain the best possible performance
from the unit.
Veuillez lires les instructions attentivement avant
d'utiliser l'appareil afin d'obtenir les meilleures
performances possibles de l'appareil.
GET0988-001A [E/EN]
ENGLISH
FRANÇAIS
Chapitres
Table des Matières
Dépannage

Manuels Connexes pour JVC KD-X310BT


Sommaire des Matières pour JVC KD-X310BT
- Page 24 TABLE DES MATIERES AVANT L’UTILISATION Avertissement AVANT L’UTILISATION N’utilisez aucune fonction qui risque de vous distraire de la conduite sure de votre véhicule. FONCTIONNEMENT DE BASE 3 Précautions Réglage du volume: PRISE EN MAIN • Ajustez le volume de façon à pouvoir entendre les sons extérieurs à la voiture afin d’éviter tout risque d’accident. •...
-
Page 25: Fonctionnement De Base
FONCTIONNEMENT DE BASE Façade Télécommande (RM-RK52) (non fournie) Attachez Cet appareil peut être commandé à distance avec une télécommande vendue séparément. Capteur de télécommande (Ne l’exposez Pas à la lumière directe du soleil.) Bouton de volume Fenêtre d’affichage (tournez/appuyez) Détachez Retirez la feuille d’isolant lors de la première utilisation. -
Page 26: Prise En Main
Pour en savoir plus sur la mise à niveau du micrologiciel, référez-vous à: Tournez le bouton de volume pour choisir [CLOCK SET] , puis appuyez sur <http://www.jvc.net/cs/car/>. le bouton. * Pas d’affichage quand la source correspondante est sélectionnée. Tournez le bouton de volume pour faire les réglages, puis appuyez sur le bouton. -
Page 27: Usb / Ipod
Prise d’entrée USB Répéter la lecture Appuyez répétitivement sur la touche pour faire un choix. • Fichier JVC Playlist Creator (JPC) / JVC Music Control (JMC) ( 16) : TRACK RPT, RPT OFF • Fichier MP3/WMA/WAV/FLAC: TRACK RPT, FOLDER RPT, RPT OFF •... - Page 28 USB / iPod Sélectionnez un fichier à partir d’une liste Changez le lecteur USB Pour iPod: Fonctionne uniquement quand [HEAD MODE] est sélectionné. ( 5) Quand un smartphone (périphérique à mémoire de grande capacité) est connecté à la prise d’entrée USB, vous pouvez sélectionnez sa mémoire interne ou sa mémoire externe MENU Appuyez sur (une carte SD par exemple) pour lire les morceaux mémorisés.
-
Page 29: Radio
RADIO Recherche de votre programme préféré (recherche PTY) Disponible uniquement pour la source FM. Maintenez enfoncée Tournez le bouton de volume pour sélectionner un code PTY, puis appuyez sur la bouton pour démarrer la recherche. S’il y a une station diffusant un programme du code PTY que vous avez choisi, la station est accordée. -
Page 30: Aux
RADIO Défaut: Utilisation d’un lecteur audio portable RADIO TIMER Met la radio sous tension à une heure spécifique quelle que soit la source actuelle. Connectez un lecteur audio portable (en vente dans le commerce). 1 ONCE DAILY WEEKLY : Sélectionnez la fréquence de mise en service de la Mini fiche stéréo de 3,5 mm avec connecteur en forme de “L”... -
Page 31: Bluetooth
B /SOURCE Appuyez sur pour mettre l’appareil sous tension. Cherchez et sélectionnez “JVC UNIT” sur le périphérique Bluetooth. “BT PAIRING” clignote sur l’affichage. • Pour certains périphériques Bluetooth, il se peut que vous ayez besoin d’entrer le code PIN Fixez si nécessaire en (numéro d’identification personnel) immédiatement après la recherche. -
Page 32: Mode De Vérification De La Compatibilité Bluetooth
“CHECK MODE” apparaît. “SEARCH NOW USING PHONE” l’appareil répond automatiquement aux appels entrants. “PIN IS 0000” défile sur l’affichage. ( 11) Cherchez et sélectionnez “JVC UNIT” sur le périphérique Bluetooth Refus d’un appel avant 3 minutes. Maintenez enfoncé ou le bouton de volume. - Page 33 BLUETOOTH® Défaut: DIAL NUMBER Tournez le bouton de volume pour sélectionner un numéro (0 à 9) ou un caractère ( , #, +). MIC LEVEL –20 — ( ): La sensibilité du microphone augmente quand le numéro augmente. S / T Appuyez sur pour déplacer la position d’entrée.
- Page 34 BLUETOOTH® Notification de message texte Stockage d’un contact en mémoire Quand le téléphone reçoit un message texte, l’appareil sonne et “RCV MESSAGE” apparaît. Vous pouvez mémoriser un maximum de 6 contacts. • Vous ne pouvez pas lire, modifier ou envoyer un message via cet appareil. Appuyez sur pour entrer en mode Bluetooth.
- Page 35 : Affiche l’adresse de cet appareil, suivant), puis appuyez sur le bouton. MENU JVC Smart Music Control est conçu pour voir l’état de l’autoradio JVC et réaliser des Appuyez sur pour quitter. commandes simple à partir de smartphones Android.
-
Page 36: Réglages Audio
RÉGLAGES AUDIO BLUETOOTH® Lecteur audio Bluetooth MENU Maintenez enfoncée Tournez le bouton de volume pour réaliser une sélection voir le tableau Les opérations et les indications de l’affichage peuvent différer en fonction de leur suivant , puis appuyez sur le bouton. disponibilité... -
Page 37: Réglages D'affichage
RÉGLAGES D’AFFICHAGE RÉGLAGES AUDIO AUDIO BASS BOOST / : Choisit votre niveau préféré d’accentuation des graves. ; : Annulation. LOUD / : Accentue les basses ou hautes fréquences pour produire un son plus équilibré aux faibles niveaux de volume. ; : Annulation. SUB.W LEVEL * –08 — ... -
Page 38: Plus D'informations
• Systèmes de fichier de périphérique USB compatibles: FAT12, FAT16, FAT32 • Quand vous reproduisez un fichier audio avec des données de chanson ajoutée en utilisant JVC Playlist Creator ou Même quand les fichiers audio sont conformes aux normes établies ci-dessus, il est possible que la lecture ne soit pas JVC Music Control, vous pouvez rechercher des fichiers audio par genre, artiste, album, liste de lecture et chansons. -
Page 39: Changez L'information Sur L'affichage
GUIDE DE DÉPANNAGE PLUS D’INFORMATIONS Changez l’information sur l’affichage Symptôme Remède DISP Appuyez répétitivement sur Le son ne peut pas être entendu. • Ajustez le volume sur le niveau optimum. Nom de la station (PS)* Fréquence Type de programme (PTY)* Titre* •... - Page 40 GUIDE DE DÉPANNAGE Symptôme Remède Symptôme Remède Aucun périphérique Bluetooth • Faites de nouveau une recherche à partir du périphérique L’appareil ne répond pas quand Vous avez peut-être essayé de copier les mêmes entrées (déjà DISP n’est détecté. Bluetooth. vous essayez de copier le répertoire mémorisées) sur l’appareil.
-
Page 41: Spécifications
SPÉCIFICATIONS FM Plage de fréquences 87,5 MHz à 108,0 MHz (pas de 50 kHz) Réponse en fréquence (±3 dB) 20 Hz — 20 kHz Sensibilité utilisable (S/B = 26 dB) 0,71 μV/75 Ω Tension maximum d’entrée 1 200 mV Seuil de sensibilité (DIN S/N = 46 dB) 2,0 μV/75 Ω... - Page 42 Avertissement Installation de l’appareil (montage encastré) • L’appareil peut uniquement être utilisé avec une alimentation de 12 V CC, à masse négative. • Déconnectez la borne négative de la batterie avant le câblage et le montage. • Ne connectez pas le fil de batterie (jaune) et le fil d’allumage (rouge) au châssis de la voiture ou au fil de masse (noir) pour éviter les courts-circuits.
-
Page 43: Connexions
Liste des pièces pour l’installation Fil de télécommande (non fournie) Cordon de signal (non fournie) Le fil bleu/blanc du faisceau de fils (D) Façade Sortie avant JVC Amplificateur Sortie arrière/caisson de grave Fusible (10 A) Plaque d’assemblage Prise d’entrée du ( 9) microphone Borne de l’antenne...