ITATOOLS ITA11 Notice D'instructions
Appareil de cerclage feuillard plastique
MANUALE D'USO – DISTINTA RICAMBI
OPERATION MANUAL – SPARE PARTS LIST
NOTICE D'INSTRUCTIONS – PIÈCES DE RECHANGE
BETRIEBSANLEITUNG – ERSATZTEILLISTE
MANUAL DE USO – LISTA DE RECAMBIOS
ITA11-12
REGGIATRICE PNEUMATICA PER REGGIA IN PLASTICA
PNEUMATIC PLASTIC STRAPPING TOOL
APPAREIL DE CERCLAGE FEUILLARD PLASTIQUE
PNEUMATISCHES KUNSTSTOFFBAND-UMREIFUNGSGERÄT
FLEJADORA NEUMÁTICA PARA FLEJE DE PLÁSTICO
ITATOOLS s.r.l.
Via per Caronno 23 - 21040 Origgio (VA) - ITALY
Tel. +39.02.96450619 Fax +39.02.9659747
info@itatools.it
-
www.itatools.com
LEGGERE LE ISTRUZIONI PRIMA DI UTILIZZARE L'APPARECCHIO
READ ALL INSTRUCTIONS BEFORE OPERATING THE TOOL
AVANT D'UTILISER L'APPAREIL LIRE LA NOTICE D'INSTRUCTIONS
VOR DER INBETRIEBNAHME DES GERÄTS DIE BEDIENUNGSANLEITUNG LESEN
LEA LAS INSTRUCCIONES ANTES DE UTILIZAR EL APARATO
Ed. 05/13

Manuels Connexes pour ITATOOLS ITA11


Sommaire des Matières pour ITATOOLS ITA11
- Page 1 OPERATION MANUAL – SPARE PARTS LIST NOTICE D’INSTRUCTIONS – PIÈCES DE RECHANGE BETRIEBSANLEITUNG – ERSATZTEILLISTE MANUAL DE USO – LISTA DE RECAMBIOS ITA11-12 REGGIATRICE PNEUMATICA PER REGGIA IN PLASTICA PNEUMATIC PLASTIC STRAPPING TOOL APPAREIL DE CERCLAGE FEUILLARD PLASTIQUE PNEUMATISCHES KUNSTSTOFFBAND-UMREIFUNGSGERÄT FLEJADORA NEUMÁTICA PARA FLEJE DE PLÁSTICO...
- Page 3 INDICE TABLE OF CONTENTS TABLE DES MATIERES 1) Istruzioni di sicurezza 1) Safety instructions 1) Normes de sécurité 2) Dati tecnici 2) Technical data 2) Données techniques 3) Garanzia e responsabilità 3) Warranty and liability 3) Garantie et responsab. 4) Installazione 4) Installation 4) Installation 5) Descrizione e regolazioni...
- Page 4 To cut the straps use always proper safety strap cutter and keep other people and yourself at safe distance from strap, always stand to side of strap, away from direction of strap trajectory once loosen. Hold the upper strap portion and pay attention that the lower strap will snap forward away from you.
- Page 5 14 L/s – 29cuft/min Consumo d’aria: Air consumption: Consommation: Luftverbrauch: Consumo de aire: PRESTAZIONI PERFORMANCES PERFORMANCES LEISTUNG PRESTACIONES 3500N ITA11 6.5 bar–92 psi Tensione max. Tension max. Max. Tensión máx. del Max.Tension force: 5000N ITA12 6.5 bar–92 psi reggia: feuillard: Bandspannung: fleje: 6000N ITA12 6.5 bar–92 psi...
- Page 6 El período de la garantía de cada aparato Itatools es de 12 meses a partir de la fecha de envío indicada en el documento de acompañamiento. La empresa Itatools srl se compromete, durante el período de garantía, a sustituir sin costo alguno todas las partes que a su entero juicio presenten defectos que afecten su correcto funcionamiento.
- Page 7 It is recommended to use always a dryer unit near the compressor and a filter-regulator-lubricator unit with pressure gauge (Itatools code S100001) close to tool air connection to avoid the entrance of water and dirt in the valves or in the pneumatic motors.
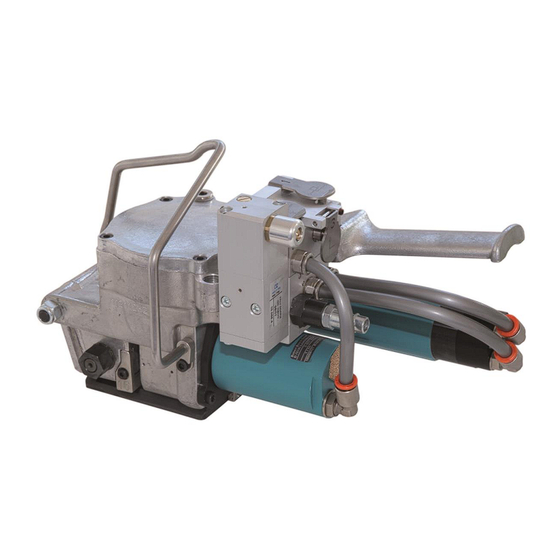
- Page 8 ELEMENTI PRINCIPALI E REGOLAZIONI / OPERATING ELEMENTS AND ADJUSTMENTS / MODULES PRINCIPAUX ET RÉGLAGES / ELEMENTOS PRINCIPALES Y AJUSTES NON AZIONARE MAI L’APPARECCHIO SENZA REGGIA, SI PUO’ DANNEGGIARE IL RULLO ED IL DISPOSITIVO DI SALDATURA / TAGLIO UK - DO NOT OPERATE THE TOOL WITHOUT STRAP, YOU COULD DAMAGE THE FEEDWHEEL AND THE WELDING / CUTTIG GROUP NE JAMAIS ACTIONNER L’APPAREIL SANS LE FEUILLARD, CELA RISQUE D’ENDOMMAGER LE DISPOSITIF DE SOUDURE/COUPE NIE DAS GERÄT OHNE BAND BETREIBEN, DAS SONST DIE ROLLE UND DIE SCHWEISS-/SCHNEIDEVORRICHTUNG BESCHÄDIGT WIRD NUNCA ACCIONAR EL APARATO SIN FLEJE YA QUE PODRÍA DAÑARSE EL RODILLO Y EL DISPOSITIVO DE SOLDADURA / CORTE...
- Page 9 gedreht, um die Luftmenge zu reduzieren bzw. zu erhöhen (Abb.B). Beim Drehen im Uhrzeigersinn wird die Spannkraft reduziert, gegen den Uhrzeigersinn hingegen erhöht. – Nicht zu sehr lockern. – El tensado máximo del fleje puede ajustarse, de acuerdo a la calidad y a las dimensiones; al girar el tornillo en el motor neumático con un destornillador se disminuye o se aumenta la cantidad de aire (fig.B).
- Page 10 ( D3 ) ( D4 ) 0.2mm 0.008” E’ possibile regolare la distanza tra il rullo di trascinamento e le piastrine bloccareggia per variare la pressione dei denti sulla reggia; svitare la vite di fermo (fig.D1), agire sulla vite di regolazione (fig.D2), avvitare per aumentare la distanza, svitare per diminuire la distanza, la regolazione normale prevede un gioco di circa 0.2mmm (fig.D4).
- Page 11 Ruotare le guide 1e 3 in posizione 16mm (fig.E1-E3)- Sostituire la guida 2 con il modello 16mm (fig.E2) Turn the guidestrap 1 and 3 in 16mm5/8” position (pic.E1-E3)- Replace the guidestrap 2 with model 16mm 5/8”(pic.E2) 19 > 16 Tourner les dispositifs de guidage 1 et 3 en position 16mm (fig.E1-E2) –Remplacer le dispositif 2 par le modèle 3/4”>5/8”...
- Page 12 UK - The tool model ITA11-12 is designed to strap packages with plastic strap. The strap is fed around the package manually and inserted in the tool, as showed in the instructions, tension, cut and friction welded by the tool. Wrap the parcel to be bound with the strap, as showed in pic.F1, holding the tip of the strap with left hand and winding over the strap by right hand ( beware that the strap...
- Page 13 Den kleinen Hebel Spannen 1 drücken (Abb. F4) bis die gewünschte bzw. eingestellte Höchstspannung (Würgen des Motors) erreicht wurde. Nach dem Einstellen der Zeit den kleinen Hebel 2 bestätigen, um das Band zu schweißen und zu schneiden (Abb. F5). Schweißen und die Kühlung der Zeit signalisiert werden durch den kleinen Kolben wie in Fig.. F6, die einst zurückgegeben wird, um die Spirale der Schweißen (pic.F7).
- Page 14 ( F8 ) ( F9 ) Controllo della saldatura / Seal check / Contrôle de la soudure / Schweißkontrolle / Control de la soldadura Un controllo regolare della qualità della saldatura è fondamentale e può essere eseguito visivamente: UK - A regular seal quality control is very important and it could be examinated visually as follow: Un contrôle régulier de la qualité...
- Page 15 MANUTENZIONE E PULIZIA / SERVICING - CLEANING / ENTRETIEN ET NETTOYAGE INSTANDHALTUNG UND REINIGUNG / MANTENIMIENTO Y LIMPIEZA PRIMA DI QUALUNQUE INTERVENTO SULL’APPARECCHIO SCOLLEGARE L’ALIMENTAZIONE DI ARIA COMPRESSA Pulire periodicamente l’apparecchio dai residui di reggia, in particolare il rullo di tensionamento, le piastrine dentate del gruppo saldatura e trazione, la cesoia utilizzando esclusivamente aria compressa (fig.
- Page 16 ( L1 ) ( L2 ) ( L3 ) ( L4 ) ( L5 ) Sostituzione rullo di trascinamento / Feedwhell replacement / Changer des la molette de tension / Ersetzen der Spannrolle / Sustitución del rodillo de arrastre ( M1 ) ( M2 ) ( M3 ) ( M4 )
- Page 17 ( M7 ) ( M8 ) ( M9 ) Togliere la molla di spinta (fig.M1), staccare i tubi aria del motore (fig.M2),togliere le 6 viti di fissaggio della piastra base (fig.M3), allentare il grano sul telaio (fig.M4) e dopo aver tolto il dado sul perno di collegamento estrarre lo stesso dal telaio facendo attenzione allo spessore (fig.
- Page 18 Togliere le 6 viti di fissaggio della piastra base (fig.N1), quindi svitare le viti delle piastrine da sostituire (fig. N2), eseguire la manutenzione (fig.N3), e compiere l’operazione inversa per riassemblare le parti. UK - Remove the 6 bottom plate screws (pic.N1), unscrew the grippers screws (pic.N2), replace the parts (pic.N3), and reassembly in opposite order.
- Page 19 RISOLUZIONE PROBLEMI / TROUBLESHOOTING / SOLUTION DES PROBLEMS PROBLEMLÖSUNG / LOCALIZACIÓN DE AVERÍAS PROBLEMA / TROUBLE / PROBLEM / PROBLEM / PROBLEMA SOLUZIONE / REMEDY / SOLUTION / LÖSUNG / SOLUCIÓN La tensione della reggia è insufficiente / The tension of strap isn’t enough / La tension du feuillard n’est pas suffisante / Ungenügende Bandspannung / El tensado del fleje es insuficiente I - Controllare: la pressione dell’aria (min.4,5 bar), che il gruppo filtro lubrificatore e/o il motore pneumatico non sia sporco o guasto (contattare centro assistenza), la regolazione della potenza del motore, il circuito pneumatico,il pulsante di azionamento,gli innesti,...
- Page 20 cliquets de guidage de l’appareil – Contrôler l’alignement des cliquets de guidage et voir s’ils ne sont pas cassés ou usés. D - Den Spannungswert des Motors einstellen – ev. zu hoch. Kontrollieren, ob sich das Band für das Gerät und die Anbringungsweise eignet.
- Page 21 for the strap kind or is damaged, try to replace it: - D000620 medium -- D001720 strong F - Contrôler et régler le temps de scellage sur la base du type de feuillard utilisé. Contrôler l’usure des cisailles et du pied de soudure –...
- Page 22 Die Betriebstüchtigkeit des Ventils und des Luftkreises überprüfen (den Kundendienst kontaktieren) Prüfen, ob der Druckluftmotor gestört ist (den Kundendienst kontaktieren) Nie Werkzeuge verwenden, um das Band aus der Maschine zu entfernen. Es muss hingegen der Fuß von der Maschine abmontiert werden, nachdem das Band von der Verpackung abgeschnitten wurde. E - Puede haber un problema en el dispositivo antiretorno (póngase en contacto con el centro de asistencia) Compruebe el correcto funcionamiento de la válvula y del circuito del aire (póngase en contacto con el centro de asistencia) Puede haber un problema en el motor neumático (póngase en contacto con el centro de asistencia)
- Page 23 Q.TA' DESCRIZIONE DESCRIPTION CODICE/ITEM Q.TY ASSIEME CORPO RIDUTTORE A000014 ASSEMBLED GEARBOX BODY GR. MOTORE TENSIONE ITA11 A000034 ITA11 TENSION MOTOR ASSEMBLED GR. MOTORE TENSIONE ITA12 5000N A000035 ITA12 5000N - TENSION MOTOR ASSEMBLED GR. CARTER ANTER. A000086 ASSEMBED FRONT COVER GR.
- Page 24 PIN 6X18DIN6325 SPINA ELAST.5X16 UNI6874 B700427 ELASTIC PIN 5X16 UNI6874 MOTORE PNEUM. BOSCH 0607951449 B900348 PNEUMATIC MOTOR 0607951449 MOLLA CESOIA PER ITA11 DA 13mm D000280 CUTTER SPRING ITA11 – 13mm MOLLA CESOIA FILO 0.9 D000620 MEDIUM CUTTER SPRING PIASTRINA BLOCCAREGGIA...
- Page 25 Q.TA' DESCRIZIONE DESCRIPTION CODICE/ITEM Q.TY PIATTELLO FRIZIONE POSTERIORE D001960 REAR FRICTION PLATE DISCO X FRIZIONE D001970 FRICTION PLATE (ONLY CLUTCH) § RULLO TRASCINAMENTO X FRIZIONE D001980 FEEDWHEEL FOR CLUTCH SYSTEM § PIATTELLO FRIZIONE ANTERIORE D001990 FRONT FRICTION PLATE GUIDAREGGIA ANT (10-13) D003970 FRONT GUIDESTRAP 10-13 GUIDAREGGIA ANT (16-19)
- Page 27 B900348 MOTORE SALDATURA / WELDING MOTOR / MOTEUR DE SOLDADURA SOUDURE / SCHWEISSMOTOR / MOTOR DE Nr. Q.TY CODE DESCRIPTION 3 605 125 063 MOTOR HOUSING 3 604 090 009 STATOR / 550W 3 604 220 005 ROTOR 3 605 700 167 BEARING FLANGE 1 900 905 127 DEEP-GROOVE BALL BEARING / 6000-2Z/C3 DIN 625 3 605 700 010 BEARING FLANGE 1 900 905 029 DEEP-GROOVE BALL BEARING / DIN 625-608-2Z-C3...
- Page 28 3 607 030 260 ASSEMBLY OF SERVICE PARTS / 5 PIECE ITA 11 A000034 MOTORE TENSIONE / TENSION MOTOR / MOTEUR DE TENSION SPANNMOTOR / MOTOR DE TENSIÓN...
- Page 29 A000034 PNEUMATIC TENSION MOTOR SPARE PARTS LIST CODE Q.TY DESCRIPTION 1 3 600 760 114 MOTOR HOUSING / BLUE 2 3 604 090 002 STATOR / 370W 3 3 604 220 025 ROTOR 5 3 605 700 005 BEARING FLANGE 6 3 600 905 039 DEEP-GROOVE BALL BEARING / 9x24x7mm 7 3 605 700 006...
- Page 30 ITA12 ITA A000035 MOTORE TENSIONE / TENSION MOTOR / MOTEUR DE TENSION SPANNMOTOR / MOTOR DE TENSIÓN...
- Page 31 A000035 PNEUMATIC TENSION MOTOR SPARE PARTS LIST CODE Q.TY DESCRIPTION 1 3 600 760 114 MOTOR HOUSING / BLUE 2 3 604 090 002 STATOR / 370W 3 3 604 220 025 ROTOR 5 3 605 700 005 BEARING FLANGE 6 3 600 905 039 DEEP-GROOVE BALL BEARING / 9x24x7mm 7 3 605 700 006...
- Page 32 ITA12 A000131 MOTORE TENSIONE / TENSION MOTOR / MOTEUR DE TENSION SPANNMOTOR / MOTOR DE TENSIÓN...
- Page 33 A000131 PNEUMATIC TENSION MOTOR SPARE PARTS LIST CODE Q.TY DESCRIPTION 3 600 760 114 MOTOR HOUSING / BLUE 3 604 090 002 STATOR / 370W 3 604 220 025 ROTOR 3 605 700 005 BEARING FLANGE 3 600 905 039 DEEP-GROOVE BALL BEARING / 9x24x7 mm 3 605 700 006 BEARING FLANGE...
- Page 34 B200347 VALVOLA PNEUMATICA – PNEUMATIC VALVE – VALVE PNEUMATIQUE DRUCKLUFTVENTIL-VÁLVULA NEUMÁTICA...
- Page 36 SPARE PARTS LIST B200347 CODICE Q.TA' DESCRIZIONE DESCRIPTION CODE Q.TY AZOR103 OR 103 OR 103 AZAM0.52.0 GUIDA OTTURATORE VNR 18 SHUTTER GUIDE VNR 18 AZ10.165.1 FONDELLO TEMPORIZZATORE TIMER BOTTOM PLATE AZ10.150.0 COPERCHIO TEMPORIZZATORE TIMER CONROL TOP PLATE AZ10.040.1 CORPO TEMPORIZZATORE BODY TIMER M4X35 VITE M4x35 UNI5931 (COPERCHIO TEMPORIZZ.)
- Page 37 è conforme ai sensi della Direttiva 2006/42/CE ed alle successive modificazioni, nonché ai requisiti delle seguenti norme EN12100-1 / EN12100-2 ITATOOLS Srl declares under own responsibility that the under mentioned machinery, to which this declarations refers, is in conformity with 2006/42/CE Directive and successive modifications, as well as with standards EN12100-1 / EN12100-2 ITATOOLS Srl déclare sous sa propre responsabilité...