Publicité

Les langues disponibles
  • FR

Les langues disponibles

  • FRANÇAIS, page 18

Liens rapides

CCTV-FARBKAMERA
CCTV COLOUR CAMERA
TVCCD-462COL
Best.-Nr. 19.9330
BEDIENUNGSANLEITUNG
INSTRUCTION MANUAL
MODE D'EMPLOI
ISTRUZIONI PER L'USO
MANUAL DE INSTRUCCIONES
INSTRUKCJA OBSŁUGI
®

Publicité

Table des Matières
loading

Sommaire des Matières pour Monacor Security TVCCD-462COL

  • Page 1 CCTV-FARBKAMERA CCTV COLOUR CAMERA ® TVCCD-462COL Best.-Nr. 19.9330 BEDIENUNGSANLEITUNG INSTRUCTION MANUAL MODE D’EMPLOI ISTRUZIONI PER L’USO MANUAL DE INSTRUCCIONES INSTRUKCJA OBSŁUGI...
  • Page 2 Prima di accendere ... Nous vous remercions d'avoir choisi un appa- Vi auguriamo buon divertimento con il Vostro reil MONACOR et vous prions de lire cette nuovo apparecchio MONACOR. Vi preghiamo notice avant l’utilisation. di leggere le presenti istruzioni prima dell'uso.
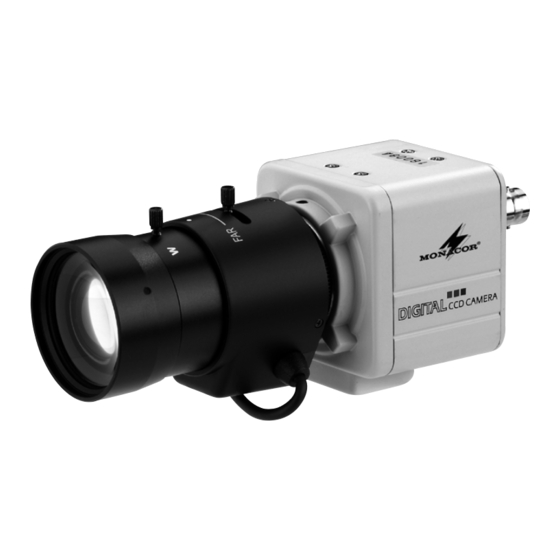
  • Page 3 VIDEO LENS DC LEVEL POWER VIDEO DIGITAL CCD CAMERA + 12V GND AUTO IRIS ➀ ➁...
  • Page 4: Übersicht Der Bedienelemente Und Anschlüsse

    Bitte klappen Sie die Seite 3 heraus. Sie se- 7 Betriebsanzeige hen dann immer die beschriebenen Bedien- 8 Klemmen +12V und GND zum Anschluss der elemente und Anschlüsse. Stromversorgung 9 Adapter mit Gewindebuchse [Fotogewinde 6,3 mm ( ")] für die Kameramontage; 1 Übersicht der Bedienelemente kann an die Ober- oder Unterseite der Ka- und Anschlüsse...
  • Page 5: Wichtige Hinweise Für Den Gebrauch

    Schützen Sie den CCD-Bildaufnehmer vor Schalter LENS Schalter LENS in Staub und Verschmutzung und berühren Sie in Position „DC“ Position „VIDEO“ ihn auf keinen Fall mit den Fingern. Dämpfungsspule - Stromversorgung +12 V Wenn kein Objektiv aufgeschraubt ist, setzen Sie zum Schutz des CCD-Bildaufnehmers Dämpfungsspule + nicht belegt immer die Schutzkappe (1) auf die Objektiv-...
  • Page 6 3 Einsatzmöglichkeiten 4 Objektiv Die Farbkamera TVCCD-462COL ist für den Ein- satz in Video-Überwachungsanlagen konzipiert. 4.1 Kamera auf das Objektiv einstellen Sie ist mit einer Gegenlichtkompensation und einem automatischen elektronischen Shutter Je nach verwendetem Objektivtyp die jeweiligen ausgestattet (ein-/ausschaltbar über DIP-Schal- Schaltereinstellungen durchführen: ter).
  • Page 7: Montage

    Die BNC-Buchse VIDEO (6) über ein 75-Ω-Kabel DC-Objektiv geregelten Objektiv (z. B. BNC-1000 von MONACOR) mit dem Vi- deoeingang des nachfolgenden Geräts (z. B. Mo- Dämpfungsspule - Stromversorgung +12 V nitor, Kamera-Umschalter, Video-Splitter) verbin- Dämpfungsspule + nicht belegt den.
  • Page 8 Zur Stromversorgung ein stabilisiertes Netz- lösen. Durch leichtes Verdrehen des Gewin- gerät (z. B. PS-12CCD von MONACOR) mit einer derings (3) ein scharfes Bild einstellen. An- Ausgangsspannung von 12 V und einer Belast- schließend die Schrauben wieder festziehen. barkeit von 150 mA an die Klemmen (8) anschlie- 4) Bei einem Objektiv mit automatischer Blen- ßen: Den Pluspol des Netzgeräts an die Klemme...
  • Page 9 Belichtungszeit wird automatisch auf die mo- lampe) angepasst. Auf diese Weise ist auch mentane Helligkeit eingestellt. Die Kamera ar- bei wechselnden Lichtverhältnissen eine farb- beitet mit Shutterzeiten von s bis echte Wiedergabe gewährleistet. 100 000 Bei Verwendung eines AI-Objektivs den Farbtemperaturen von verschiedenen Lichtquellen Schalter auf „OFF“...
  • Page 10: Technische Daten

    Shutter (ESC): ..100 000 Einstellbare Funktionen: ESC ein/aus, BLC ein/aus, 2 Weißabgleichmodi ATW/AWB Änderungen vorbehalten. Diese Bedienungsanleitung ist urheberrechtlich für MONACOR ® INTERNATIONAL GmbH & Co. KG ge- schützt. Eine Reproduktion für eigene kommerzielle Zwecke – auch auszugsweise – ist untersagt.
  • Page 11: Operating Elements And Connections

    Please unfold page 3. Then you can always 6 BNC jack for the video output see the operating elements and connections 7 Power LED described. 8 Terminals +12 V and GND for connecting the power supply 9 Adapter with thread jack [thread 6.3 mm ( ")] 1 Operating Elements and Connec- for mounting the camera;...
  • Page 12 If no lens is mounted, always place the lens Switch LENS in Switch LENS in cover (1) on the lens mount of the camera to position “DC” position “VIDEO” protect the CCD image sensor. damp - power supply +12 V For cleaning only use a dry, soft cloth;...
  • Page 13: Mounting The Lens

    3 Applications 4 Lens The colour camera TVCCD-462COL is designed for application in video surveillance systems. It is 4.1 Adjusting the camera to the lens equipped with a backlight compensation and an Set the switches according to the lens type used: automatic electronic shutter (to be switched on/off via DIP switches).
  • Page 14: Connecting The Camera

    The camera can be installed on a camera sup- tion cable of the lens – according to the pin port (e. g. support of the MONACOR TVH-... configuration for the lens type used listed in series), on a camera stand, or on a pan/tilt head the table –...
  • Page 15 an output voltage of 12 V and a current rating 4) In case of a lens with automatic iris control (AI of 150 mA to the terminals (8): Connect the posi- lens), the video signal level for the iris control tive pole of the power supply unit to the terminal can be readjusted if the picture is too dark or +12V and the negative pole of the power supply...
  • Page 16 Backlight compensation (BLC) Colour temperatures of various light sources In case of backlight, i. e. light which hits the Incandescent lamp 2800 – 3200 K lens directly or at an angle from the front, the Fluorescent lamp 4000 – 5000 K object to be monitored will be underexposed.
  • Page 17 2 white balance modes ATW/AWB Subject to technical modification. All rights reserved by MONACOR ® INTERNATIONAL GmbH & Co. KG. No part of this instruction manual may be reproduced in any form or by any means for any commercial use.
  • Page 18: Eléments Et Branchements

    Ouvrez le présent livret page 3 de manière à 7 Témoin de fonctionnement visualiser les éléments et branchements. 8 Bornes +12 V et GND pour brancher l’alimen- tation 9 Adaptateur avec prise filetée [filetage 6,3 mm 1 Eléments et branchements ")] pour le montage de la caméra : peut (schémas 1 et 2) être vissé...
  • Page 19: Conseils Importants D'utilisation

    Si aucun objectif n’est vissé, placez toujours le Sélecteur LENS Sélecteur LENS bouchon d’objectif (1) sur la monture d’objectif sur position “DC” sur position “VIDEO” de la camera pour protéger la puce CCD . bobine atténuation - alimentation +12 V Pour la nettoyer, utilisez un chiffon sec et doux, bobine atténuation + non configuré...
  • Page 20: Réglage De La Caméra Sur L'objectif Utilisé

    équipée d’une compensation du contre-jour et 4 Objectif d’une obturation électronique automatique (mar- che/arrêt par interrupteurs DIP). En outre, elle 4.1 Réglage de la caméra sur l’objectif uti- dispose d’une compensation automatique du lisé blanc avec deux modes de fonctionnement com- mutables.
  • Page 21: Branchements De La Caméra

    3) Si vous utilisez un objectif AI, reliez-le à la caméra (par exemple support de la série TVH-… de MONACOR), un pied de caméra ou sur un prise AUTO IRIS (12). Soudez le cordon de rotor (par exemple VPT-50 de MONACOR). Pour l’objectif à...
  • Page 22: Fonctionnement

    (3), réglez tation stabilisée (par exemple PS-12CCD de une image nette. Revissez ensuite les vis. MONACOR) avec une tension de sortie de 4) Pour un objectif à commande automatique de 12 V et une consommation de 150 mA doit être diaphragme (objectif AI), le niveau du signal reliée aux bornes (8) : Reliez le pôle plus de l’ali-...
  • Page 23 tionne avec des durées d’obturation de s – neuse utilisée (par exemple lampe fluores- cente). De cette façon, on garantit une restitu- 100 000 tion fidèle des couleurs même en cas de con- Si vous utilisez un objectif AI, mettez l’in- ditions d’éclairage changeantes.
  • Page 24: Caractéristiques Techniques

    Fonctions réglables : . . . ESC marche/arrêt BLC marche/arrêt 2 modes de compen- sation du blanc ATW/AWB Tout droit de modification réservé. Notice d'utilisation protégée par le copyright de MONACOR ® INTERNATIONAL GmbH & Co. KG. Toute reproduction même partielle à des fins commerciales est interdite.
  • Page 25: Elementi Di Comando E Collegamenti

    Vi preghiamo di aprire completamente la 6 Presa BNC per l’uscita video pagina 3. Così vedrete sempre gli elementi di 7 Spia di funzionamento comando e i collegamenti descritti. 8 Morsetti +12 V e GND per il collegamento dell’alimentazione 9 Adattatore con presa filettata [tipo macchina 1 Elementi di comando e collega- fotografica 6,3 mm ( ")] per il montaggio...
  • Page 26: Avvertenze Importanti Per L'uso

    Proteggere il sensore ottico CCD dalla polvere e dallo sporco; non toccarlo in nessun caso ➂ Presa AUTO IRIS con le dita. Se non è montato nessun obiettivo inserire Selettore LENS Selettore LENS in sempre il cappuccio protettivo (1) sul porta- in posizione “DC”...
  • Page 27: Possibilità D'impiego

    3 Possibilità d’impiego 4 Obiettivo La telecamera a colori TVCCD-462COL è stata realizzata per l’impiego in impianti di sorveglian- 4.1 Regolare la telecamera a seconda za video. È equipaggiata con una compensazio- dell’obiettivo ne della controluce e con un otturatore elettroni- Eseguire le diverse impostazioni dei selettori a co automatico (dis/attivabile tramite dip-switch).
  • Page 28: Collegamento Della Telecamera

    +12 V dosi di un cavo 75 Ω (p. es. BNC-1000 della bobina di attenuazione + libero MONACOR). Se il cavo supera i 100 metri di lunghezza, è opportuno inserire un amplificatore bobina di azionamento + uscita segnale video...
  • Page 29: Messa In Funzione

    (p. es. PS-12CCD filettato (3). Quindi stringere di nuovo le viti. della MONACOR) con tensione d’uscita di 12 V 4) Nel caso di un obiettivo con regolazione auto- e con potenza di 150 mA: il positivo dell’alimenta- matica del diaframma (obiettivo AI), è...
  • Page 30 esposizione viene regolato automaticamente anche con condizioni di luce variabili sono secondo la luminosità presente. I tempi di garantiti colori naturali dell’immagine. esposizione vanno da s bis 100 000 Temperature cromatiche di differenti sorgenti di luce Se si usa un obiettivo AI, mettere lo switch Lampada ad incandescenza 2800 –...
  • Page 31: Dati Tecnici

    ATW/AWB Con riserva di modifiche tecniche. La MONACOR ® INTERNATIONAL GmbH & Co. KG si riserva ogni diritto di elaborazione in qualsiasi forma delle presenti istruzioni per l’uso. La riproduzione – anche parziale – per propri scopi commerciali è vietata.
  • Page 32: Elementos Y Conexiones

    Abrir el presente libro página 3 de manera a 7 Testigo de funcionamiento visualizar los elementos y las conexiones. 8 Bornes +12V y GND para conectar la alimen- tación 9 Adaptador con toma enroscada [rosca 1 Elementos y conexiones 6,3 mm ( ")] para el montaje de la cámara;...
  • Page 33 Si ningún objetivo está atornillado, coloque Selector LENS Selector LENS siempre la tapa de protección (1) sobre el en posición “DC” en posición “VIDEO” zócalo del objetivo de la cámara para proteger bobina atenuación - alimentación +12 V el sensor CCD. Para limpiar la cámara, utilice un trapo seco y bobina atenuación + no configurada suave, en ningún caso productos químicos o...
  • Page 34: Montaje Del Objetivo

    3 Posibilidades de utilización 4 Objetivo La cámara color TVCCD-462COL está especial- mente fabricada para una utilización en instala- 4.1 Reglaje de la cámara según el objetivo ciones de vigilancia video. Dispone de la com- Según el tipo de objetivo utilizado, efectué los pensación de la contraluz, de una obturación reglajes siguientes: electrónica automática (ON/OFF por interrup-...
  • Page 35: Conexiones De La Cámara

    (p. ej. los soportes de la serie TVH-… de 3) Si utiliza un objetivo AI, conéctelo con la toma MONACOR), sobre un pie de cámara o sobre un AUTO IRIS (12). Soldar el cable del objetivo rotor (p. ej. VPT-50 de MONACOR). Para la fija- con la toma 4 polos entregada, según la con-...
  • Page 36 (p. ej. PS-12CCD de (4). Girando ligeramente la anilla enroscada MONACOR) con una tensión de salida de 12 V (3), regule una imagen nítida. Atornille de y una capacidad de corriente de 150 mA debe nuevo los tornillos.
  • Page 37 exposición está regulada automáticamente peratura del color de la fuente de luz utilizada en la luminosidad del momento. La cámara (por ejemplo lámpara fluorescente). De esta funciona con duraciones de obturación de manera, se garantiza una restitución sólida s – de los colores mismo en caso de cambios de 100 000 relaciones luminosas.
  • Page 38 Funciones regulables: . . ESC ON/OFF BLC ON/OFF 2 modos de compen- sación del blanco ATW/AWB Todo derecho de modificación reservado. Manual de instrucciones protegido por el copyright de MONACOR ® INTERNATIONAL GmbH & Co. KG. Toda reproducción mismo parcial con fines comerciales está prohibida.
  • Page 39 Proszę otworzyć niniejszą instrukcję na 6 Gniazdo wyjścia video BNC stronie 3. Dzięki temu będą Państwo mogli 7 Dioda wskaźnika zasilania obserwować opisywane elementy steru- 8 Terminale +12V i uziemienia GND do podłą- jące i połączenia. czenia zasilania 9 Mocowanie kamery [śruba 6,3 mm ( ")];...
  • Page 40: Bezpieczeństwo Użytkowania

    Należy chronić sensor CCD przed kurzem Przełącznik LENS Przełącznik LENS oraz zanieczyszczeniami; nie wolno dotykać w pozycji “DC” w pozycji “VIDEO” go palcami. zasilanie +12 V damp - Jeżeli do kamery nie jest zamocowany obiek- tyw należy zasłonić otwór pokrywą ochronną damp + brak funkcji (1) w celu ochrony sensora CCD.
  • Page 41 3 Zastosowania 4 Obiektyw Kamera kolorowa TVCCD-462COL nadaje się do stosowania w systemach monitorowania. 4.1 Dostosowywanie kamery do obiek- Wyposażona jest w funkcje kompensaty jas- tywu nego tła oraz automatyczną migawkę (włączane Ustawić przełączniki zgodnie ze stosowanym za pomocą przełączników on/off). Poza tym typem obiektywu: kamera wyposażona jest w funkcją...
  • Page 42: Podłączanie Kamery

    (3). Kamera może być montowana na uchwycie ka- 3) W przypadku stosowania obiektywów AI, na- mery (np.: z serii MONACOR TV-…), statywie, leży podłączyć go do gniazda AUTO IRIS lub obrotowej głowicy (np.: z serii MONACOR (12). Przylutować przewód połączeniowy VPT-50).
  • Page 43 (3). Następnie do- niej zasilacz o napięciu wyjściowym 12 V i na- kręcić śruby. tężeniu 150 mA (np.: MONACOR PS-12CCD): 4) W przypadku obiektywów z automatyczną biegun dodatni zasilacza podłączyć z termina- regulacją przesłony (obiektywy AI), poziom lem +12V, a biegun ujemny z terminalem GND.
  • Page 44 matycznie odpowiednio do jasności obsza- nie odwzorowywał monitorowany obiekt ru. Migawka działa w zakresie od s do nawet w przypadku zmiennego oświetlenia. 100 000 Temperatura kolorów przy różnym oświetleniu W przypadku obiektywów AI, ustawić Lampa jarzeniowa 2800 – 3200 K przełącznik w pozycji “OFF”.
  • Page 45: Dane Techniczne

    Regulowane funkcje: . . ESC on/off, BLC on/off, 2 tryby regulacji poziomu bieli ATW/AWB Może ulec zmianie. Instrukcje obsługi są chronione prawem Copyright for MONACOR ® INTERNATIONAL GmbH & Co. KG. Przetwarzanie całości lub części dla osobistych finansowych korzyści jest zabronione.
  • Page 46 ® Copyright by MONACOR INTERNATIONAL GmbH & Co. KG, Bremen, Germany. All rights reserved. A-0174.99.01.01.2004 ©...

Ce manuel est également adapté pour:

19.9330

Table des Matières